1
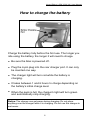
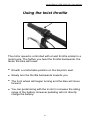
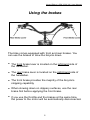
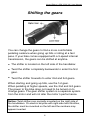
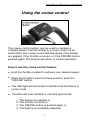
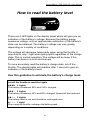
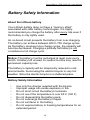
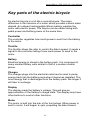
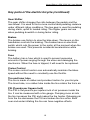
ODK U500 (V2) Electric Bicycle Ownerʼs Manual (English) _______________________________________________ Juiced Riders Inc. R130101 8724 Approach Road, San Diego, CA 92154, U.S.A. [email protected] Tel: +1 (619) 746-8877 www.Juicedriders.com Juiced Riders | ODK U500 V2 | User Manual How to charge the battery Charge the battery fully before the first use. The longer you ride using the battery, the longer it will need to charge. • • Be sure the bike is powered off. • The charger light will turn red while the battery is charging. • It takes between 1 and 6 hours to charge depending on the battery's initial charge level. • When the pack is full, the charger's light will turn green and automatically stop charging. Plug the 4-pin plug into the rear charger port. It can only be inserted one way. Notice: The charger can get warm during charging. Do not place anything over the charger while it is charging. Do not use the charger in wet areas. 2 Juiced Riders | ODK U500 V2 | User Manual Turning the bicycle ON and OFF The electric bicycle can be ridden like a normal bicycle with the power turned ON or OFF. However the throttle will be active only if the power is turned on. • • • Locate the power switch on the front face of the battery. • • The bike can now move with the battery power alone. Flip the power switch to the "ON" position. The lights on the display panel will illuminate to give an indication of the battery’s charge level. The power should be turned off after every ride to avoid draining the battery. 3 Juiced Riders | ODK U500 V2 | User Manual Using the twist throttle The motor speed is controlled with a twist throttle similar to a motorcycle. The farther you twist the throttle backwards, the faster the bike will travel. • • • Sit with a comfortable position on the bicycle's seat. • You can pedal along with the motor to increase the riding range of the battery. However pedaling will not directly charge the battery. Slowly turn the throttle backwards towards you. The front wheel will began turning and the bike will move forward. 4 Juiced Riders | ODK U500 V2 | User Manual Using the brakes The bike comes equipped with front and rear brakes. You can use the brakes to slow the bicycle down. • The front brake lever is located on the left-hand side of the handlebar. • The rear brake lever is located on the right-hand side of the handlebar. • The front brake provides the majority of the bicycle's stopping capability. • When slowing down on slippery surfaces, use the rear brake first before applying the front brake. • If you use the throttle and the brakes at the same time, the power to the motor will be automatically disconnected. 5 Juiced Riders | ODK U500 V2 | User Manual Shifting the gears You can change the gears to find a more comfortable pedaling cadence when going up hills or riding at a fast pace. If your bike comes equipped with a 3-speed internal transmission, the gears can be shifted at anytime. • • The shifter is located on the left side of the handlebar. • Twist the shifter forwards to enter 2nd and 3rd gears. Twist the shifter completely backwards to enter the first gear. When starting and going up hills, use the 1st gear. When pedaling at higher speeds, use the 2nd and 3rd gears. The power to the bike does not need to be turned on to change gears. The gear shifter system is a separate system from the motor and will not alter the motor’s performance. Notice: Twist shifters are normally mounted on the right side of the handlebars. On electric bicycles with right-side twist throttles, the shifter must be mounted on the left and the numbers may appear inverted. 6 Juiced Riders | ODK U500 V2 | User Manual Using the cruise control The cruise control system can be used to maintain a constant speed. It works similar to a cruise control in an automobile. The cruise control will deactivate if the brakes are applied, if the throttle is moved, or if the CRUISE button pushed again. The bicycle will return to normal operation. How to use the cruise control feature: • • Hold the throttle constant to achieve your desired speed. • The LED light will illuminate to indicate that the bike is in cruise mode. • The bike will now maintain a constant speed until: ! ! ! ! 1. The brakes are applied or 2. The throttle is moved or 3. The CRUISE button is pushed again or 4. The battery is completely depleted While the throttle is held at a fixed position, push the "CRUISE" button. 7 Juiced Riders | ODK U500 V2 | User Manual How to read the battery level There are 4 LED lights on the display panel which will give you an indication of the batteryʼs voltage. Because the battery gauge measures voltage, only an approximate estimation of the battery's state can be obtained. The battery’s voltage can vary greatly depending on a variety of conditions. The voltage will decrease temporarily when using the throttle. It may drop to only 1 light when going uphill regardless of the charge state. This is normal operation. The voltage will be lower if the battery has been in a cold environment. To more accurately read the batteryʼs charge state, let off the throttle. The display lights will stabilize after 1 second to give an indication of the battery’s level. Use this guideline to estimate the battery's charge level: Let off the throttle to read the Lights 4 Lights The battery is between 80% and 100% charged. 3 Lights The battery is between 40% and 80% charged. Speed will feel reduced. 2 Lights The battery level is low and should be recharged soon. 1 Light Stop using the throttle, recharge the battery pack. 8 Juiced Riders | ODK U500 V2 | User Manual Understanding the battery's range All electric bicycles have a riding range that can vary greatly depending on how it is ridden, terrain, tire pressure, temperature, payload and wind. After a few rides, you will get a sense of the electric bicycle’s range capability. Factors that will decrease your range: • Rapid accelerations using the motor • Uphill riding • Heavy payloads • Headwinds • Under-inflated tires • Extreme hot or cold weather How to increase your range: • Start by pedaling instead of only using the motor • Avoid rapidly accelerating using the throttle • Pedaling to help the motor up steep hills • Reduce your average speed and pedal along with the motor • Reduce payload weight • Properly inflating your tires between 40-50 psi • Coast to a stop and avoid rapid decelerations. Notice: Riding downhill or pedaling when not using the throttle will not recharge the battery pack. Do not over-inflate the tires. 9 Juiced Riders | ODK U500 V2 | User Manual Battery Safety Information About the Lithium battery Your Lithium battery does not have a “memory effect” associated with older battery technologies. It is highly recommended you charge the battery after every ride even if the battery is only lightly used. An on-board circuit prevents the battery from over-charging. The battery can achieve between 500 to 700 charge cycles. As the battery receives more charge cycles, the capacity will become decreased. Charging a partially flat battery is not considered a full charge cycle. Notice: The battery must be recharged at least once every month. A battery left unused for several months may result in permanent capacity loss. The battery’s capacity will be temporarily reduced in cold environments. Avoid using the electric bicycle in very hot weather. Store the electric bicycle in a sheltered place. Battery Safety Information • • • • • • • • Use only the charger supplied with the bicycle. Improper usage can cause explosion or fire. Do not short-circuit the battery’s terminals. Do not use if the temperature is over 60 C (140 F) Do not disassemble the battery pack. Do not submerge the battery in liquid. Do not set flame to the battery. Do not expose battery to freezing temperatures for an extended period. 10 Juiced Riders | ODK U500 V2 | User Manual Key parts of the electric bicycle An electric bicycle is a lot like a normal bicycle. The major difference is the inclusion of a motor which provides a boost when desired. An onboard rechargeable lithium battery supplies the motor with electric power. The bicycle can be ridden using both pedal power and battery power at the same time. Controller The controller regulates how much power is sent from the battery to the motor. Throttle The throttle allows the rider to control the bike’s speed. It sends a signal to the controller telling it how much power to send to the motor. Battery Electrical energy is stored in the battery pack. It is composed of many smaller battery cells similar to that of a modern mobile phone. Charger The charger plugs into the electrical outlet and is used to pump energy back into the battery pack when it becomes depleted. The more energy that is discharged from the battery pack, the longer it will take to recharge. Display The display reads the battery’s voltage. This will give an approximation of the battery’s charge state. The display may have other buttons to control other functions. Motor The motor is built into the hub of the front wheel. When power is sent to motor, it will began to spin, propelling the bike forward. 11 Juiced Riders | ODK U500 V2 | User Manual Key parts of the electric bicycle (continued) Gear Shifter The gear shifter changes the ratio between the pedals and the rear wheel. It is used to find a more comfortable pedaling cadence under different riding conditions. The low gear is used for pedaling during starts, uphill or loaded riding. The higher gears are use when pedaling downhill or during faster riding. Brakes The brakes use friction to slow the bike down. The levers on the handlebars controls the braking. The brakes have an electrical switch which cuts the power to the motor at the moment when the brakes are used. This prevents accidental accelerations while braking. Fuse The battery has a fuse which is used to prevent excessive amounts of power surging through the wires and damaging the electronics. When the fuse is tripped, it will need to be replaced. Cruise Control The cruise control function can automatically maintain the bikes speed without the need to constantly use the throttle. Tire and Inner tube The tire is made of rubber and provides traction for your bicycle. The Inner-tube, is a rubber tube inside the tire retains the tire’s air. PSI (Pounds per Square Inch) The PSI is the pound’s per square inch of air pressure inside the tire. It can be measured with a tire gauge. Pumping more air into the tire increases the PSI and makes the tire harder. Releasing air from the tire decreases the PSI and makes the tire softer. Both over and under inflating the tire can have negative effects. 12 Juiced Riders | ODK U500 V2 | User Manual Adjusting the bicycle for riding comfort 1. Adjusting the seat height Pull the seat clamp lever outward to loosen the seat post. Adjust the seat the desired height. The maximum height should not extend beyond minimum extension mark marked on the seat post. Tighten the seat clamp and close the lever to lock in the seat’s height. 2. Adjusting the seat tilt and distance Using a 6 mm Hex wrench, loosen the bolt under the seat. Adjust the seat tilt and seat distance forward or backward. Tighten the bolt securely to lock in your desired position. 3. Adjusting the stem height Use a 6mm Hex wrench to loosen the stem. Move the stem up or down to the desired height. The maximum height should not extend beyond minimum extension mark marked on the stem. Check to be sure the handlebars are pointing in the same direction as the wheels. Re-tighten the bolt to lock in the stem’s position. 4. Adjusting the handlebar tilt angle Use a a 5 mm Hex wrench to loosen the two screws near the center of the handlebars. Tilt the handlebars to the desired position. Re-tighten the screws securely to lock in the handlebars. Be sure both screws are tightened equally. 13 Juiced Riders | ODK U500 V2 | User Manual Important Safety Information Basic Bicycle Safety • • • • • Always wear a helmet. • • Do not follow other vehicles too closely. Use a light and wear reflective clothing when riding at night. Reduce speed when riding on a wet surface. Properly inflate tires. Apply the rear brake before using front brake in low traction conditions. Brake disk rotors can get extremely hot for brief periods after braking. Electric Bicycle Safety • • • • For maximum stability, avoid accelerating or braking while turning. • • • • • • • • Do not disassemble the battery pack. • Do not race or taunt other cyclist. Avoid riding in extremely wet conditions. Do not leave the electric bicycle in the rain. Discontinue the use of the electric bicycle if the battery pack is damaged due to crash or a drop. Do not use the charger outdoors in wet conditions. Do not ride up or down extremely steep inclines. Do not ride off-roads or jump the electric bicycle. Always use the kickstand or center stand when not on the bicycle. Do not exceed the carrying capacity. Do not ride on the sand. The motor can get hot, do not touch the body of the motor for at least 2 hours after riding. 14 Juiced Riders | ODK U500 V2 | User Manual Bicycle Specifications 15 Juiced Riders | ODK U500 V2 | User Manual Warrantee Information Juiced Riders Inc. provides a Limited Warrantee for one year covering the frame, components, and electronics including the battery. A battery pack that has been damaged, disassembled, submerged in liquid, used to power another device, or shortcircuited will void the battery warrantee. A bicycle modified to increase speed, over-volted, used off road, submerged in liquid, neglected, heavily crashed or jumped will void the bicycle warrantee. The manufacturer reserves the right to refuse any warranty claim in an event of damage or misuse. The manufacturer is not responsible for property and bodily damage associated with using this product. Contact information for warrantee claims: Juiced Riders Inc. 8724 Approach Road San Diego, CA 92154 U.S.A. [email protected] Tel: +1 (619) 746-8877 http://www.juicedriders.com/ 16 Juiced Riders | ODK U500 V2 | User Manual NOTES 17