1
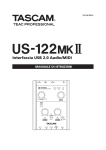
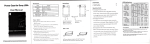
PPAS10-MP3
8-Channel, 2 x 150W Portable PA System
OWNER' S MANUL
www.tygglobal.com
Important Safety Instructions
Thank you for purchasing this complete, portable PA system.
It is compact enough to fit in the overhead storage compartment of an airplane, yet is
Unplug the product before electrical storms
occur and when unused for long periods of
time to reduce the risk of electric shock or
fire.
SAFETY RELATED SYMBOLS
functional and powerful enough to be used as a professional sound system for small venues.
CAUTION
It features a 120 watt, two-channel amplifier, a six-channel mixer and two removable,
RISK OF ELECTRIC SHOCK
DO NOT OPEN
two-way high output speakers incorporating dual 4" woofers and a 1" tweeter each. Molded
from a high-impact polypropylene polymer, It offers the only complete PA system in a
protective briefcase with a spare compartment for microphone and cable storage.
It has several innovative, specialized features that make it very useful for many types of
events. Among these is Split Track Mix, a feature specifically designed to control a split audio
External Connection
This symbol, wherever used, alerts
you to the presence of un-insulated
and dangerous voltages within the
product enclosure. These are voltages
that may be sufficient to constitute the
risk of electric shock or death.
Always use proper ready-made insulated
mains cabling (power cord). Failure to do
so could result in shock/death or fire. If
in doubt, seek advice, from a registered
electrician.
track voice and music volumes independently so you can adjust the vocals-to-music ratio
differently for rehearsals and live performances. This combo channel (ch 5/6) is versatile
enough to accommodate normal stereo inputs, as well, or can be used in mono for six total
mixer inputs.
These features help make the ideal sound system for:
Weddings
Business Presentations
Choir and Music Rehearsal
Pageant
Dance
School functions
and so many more...
It includes all the accessories needed to get started:
Mixer
Speakers
Microphone
Cables
Lectern
Caution:
For the sake of safety in the use of this machine, please read this manual carefully
Do not Remove any Covers
This symbol, wherever used, alerts
you to important operating and maintenance instructions. Please read.
Protective Ground Terminal
AC mains (Alternating Current)
Hazardous Live Terminal
Within the product are areas where high
voltages may present. To reduce the risk
of electric shock do not remove any
covers unless the AC mains power cord
is removed.
Covers should be removed by qualified
service personnel only.
No user serviceable parts inside.
ON: Denotes the product is turned on.
OFF: Denotes the product is turned off.
WARNING
Describes precautions that should be
observed to prevent the possibility of
death or injury to the user.
Fuse
To prevent fire and damage to the
product, use only the recommended
fuse type as indicated in this manual.
Do not short-circuit the fuse holder.
Before replacing the fuse, make sure
that the product is OFF and disconnected
from the AC outlet.
CAUTION
Describes precautions that should be
observed to prevent damage to the
product.
Protective Ground
Disposing of this product should
not be placed in municipal waste
and should be separate collection.
Before turning the product ON, make sure
that it is connected to Ground. This is to
prevent the risk of electric shock.
Never cut internal or external Ground wires.
Likewise, never remove Ground wiring
from the Protective Ground Terminal.
Read these instructions
Follow all instructions
Keep these instructions. Do not discard.
WARNING
Power Supply
Heed all warnings.
Ensure that the mains source voltage (AC
outlet) matches the voltage rating of the
product. Failure to do so could result in
damage to the product and possibly the user.
Only use attachments/accessories
specified by the manufacturer.
1
2
Features
Operating Conditions
Cleaning
Always install in accordance with the
manufacturer's instructions.
To avoid the risk of electric shock and
damage, do not subject this product to
any liquid/rain or moisture. Do not use this
product when in close proximity to water.
When required, either blow off dust from
the product or use a dry cloth.
Do not use any solvents such as Benzol
or Alcohol.
For safety, keep product clean and free
from dust.
Do not install this product near any direct
heat source.
Do not block areas of ventilation. Failure
to do so could result in fire.
Keep product away from naked flames.
Servicing
Refer all servicing to qualified service
personnel only.
Do not perform any servicing other than
those instructions contained within the
User's Manual.
Power Cord and Plug
Do not tamper with the power cord or plug.
These are designed for your safety.
Do not remove Ground connections!
If the plug does not fit your AC outlet seek
advice from a qualified electrician.
Protect the power cord and plug from any
physical stress to avoid risk of electric shock.
Do not place heavy objects on the power
cord. This could cause electric shock or fire.
!
To avold damage to speakers , be sure to
turn off ampliffiers (or powered speakers),
We also recommend that you turn the
"master level "control to the minimum
setting before operating the switch,to
avold excessively loud noises that could
cause hearing loss or device damage.
Specifications
Output Power:
300 watts (peak) per channel into 4 ohm load
Frequency Response:
40 Hz to 25 kHz +0/-3 dB measured at 1 W
Distortion:
Less than 0.8% THD at rated output
Signal/Noise Ratio:
85 dB mic input typical
AC Power:
115 VAC 60 Hz or
230 VAC 50/60 Hz
Weight:
lbs. (33 kg)
Dimensions:
700mm (L) x 310mm (W) x 610mm (H)
Speakers:
Woofer 10" (100 mm)
Dynamic Horn Tweeter
Microphone:
Dynamic, Cardioid (Unidirectional)
3
Molded, high-impact polypropylene carrying case
Convenient briefcase design
Modern ergonomics
Light weight
Interlock speakers
Internal space for cable and microphone storage
Powered Mixer
300 watts peak power
Two master speaker channels with independent volume control
eight channels of input with independent volume, low-and high EQ controls,
master EQ with low ,mid ,high
Four XLR microphone input with phantom power
Six line-level inputs
Four RCA/ inputs
Two RCA/ REC out
MP3 player (only MP8150U)
Two high-efficiency, two-way speakers
Molded polypropylene enclosures
Metal grille
Two 10" high output woofers per speaker
1 x 1" horn speaker for tweeter
Molded speaker stand receptacle
handheld microphone
Dynamic cardioid
Metal grille
On/Off switch
XLR balanced output
Cables
Two 15' speaker cables
One 15' XLR balanced microphone cable
One line cord
4
Quick setup guide
Function description
THINK SAFETY FIRST!
Much of the setup of the MP series is similar to the setup of other sound systems, and many
aspects require plain common sense. Safety should always be your first concern. Always use
grounded outlets and three-wire extension cords. Run sound system cables in a way to prevent
the danger of tripping, and tape them down where necessary. Place the speaker stands and
mixer stand on a solid, level surface. Following these guidelines will help prevent personal
injury and equipment damage
Setting Up Mixer and Speakers
Place the unit on a horizontal surface. Release the latches by lifting up until they disengage.
Remove the speakers from the package.
BT8150U
(Front pane)
Place speakers on their stands and position them so that they will face toward the audience and away
from the microphones. All of the necessary interconnect cables can be found in the convenient zipper
pouch. Connect the speaker cables from the jack on the rear of each speaker to the powered mixer,
connecting the left speaker to the "MAIN SP-L" and the right speaker to the "MAIN SP-R" jacks
on the front panel of the unit.
1. Channel input jacks (ch1,2,3,4)
For connecting a gutar microphone,keyboard or other instrument/device,Set the
channel level to correct position,XLR-type connectors are wired as follows
:pin 1:ground, pin 2:hot(+),and pin 3:cold (-)
1
Line input
It is to connect the high sensitivity music source for 6.3 jack .
!
Warning! Do not connect additional speakers to the powered mixer. The included speakers
provide the optimal load for the amplifier.
Connecting Microphone(s)
The Mp8150 powered mixer is designed to work with any good-quality,
balanced, dynamic or condenser microphone .Connect the microphone(s)
to the XLR (three-pin) input connectors as shown.
When using more than one mic, try to connect them to channels in the same
order as they appear on stage to make them easier to identify and control.
5
Be sure to leave this switch OFF if the device or instrument that you are using does not require
phantom power.
When using phantom power, do not connect any devices other than condenser microphones to the XLR
input jacks. Other devices may be damaged if connected to phantom power , this precaution does not
apply to balanced dynamic microphones, however, as these will not be affected by phantom power.
To avoid damage to speakers, be sure to turn off amplifiers (or powered speakers) before turning this
switch on off,we also recommend that you turn the MASTER LEVEL. Control to the minimum setting
before operating the switch, to avoid excessively loud noises that could cause hearing loss or device
damage.
NOTE: On any given channel , you may use either XLR or phone jack , but not both , please
connect to only one of these jacks on each channel
6
2. Stereo channel input jacks (ch5/6,7/8)
10. HIGH
Input the and right channels of a stereo signal into the respective odd
and even channels of the mixer,These inputs are intended mainly for use
with instruments and equipment having stereo outputs,such as a
synthesizer or CD player.
2
The switch is selectable for input that you need
Determines the level of the high frequency band for each channel,Rotating the
knob clockwise boosts the high frequencies and produces a clearer,crisper
sound,If you start getting feedback (a high-pitched squealing sound) or you
want to make the sound softer and less harsh,tum the knob counterclockwise
slightly.
11. LOW
3.Audio outputs"Rec. out"
Rec output (with RCA Connectors) for connecting a recording device (or other device)
(note: the signal level is not regulated by the master level controls)
3
L
R
4.Phantom switch
Determines the level of the low frequency band for each channel,Rotating the
knob clockwise boosts the low frequencies and produces a deeper,warmer
sound,If you start getting feedback or you want to make the sound less boomy,
tum the knob counterclockwise slightly.
10
11
12
13
4
If you set the swith on, the mixer supplies phantom power on to the XLR mic
input jacks on the channels 1.2.3.4.
12. Level vol.
5.Powered SP output
5
This is connect to powered speaker or monitor speaker.
This knob controls volume for CH5/6. Turn the knob clockwise, and the volume
increases. Turn the knob counter clockwise, and the volume decreases.
13. Reverb switch.
When it is down ,It means the "Echo" is ON in this channel ,When it is up, the "Echo" is OFF
6. MAIN SP output
This outputs is adjusted with the MASTER LEVEL control,connect only the included speaker.
14. Monitor level control.
6
This knob controls volume for powered SP output . Turn the knob clockwise, and the
volume increases. Turn the knob counter clockwise, and the volume decreases.
14
15. Master level .
7. AC Input
This inlet connects the unit with the main power.
This knob controls volume for main SP output . Turn the knob clockwise, and the
volume increases. Turn the knob counter clockwise, and the volume decreases.
15
8. AC fuse
The fuse protects the alternating current circuit of the unit, And the fuse can only
be replaced in the event of fuse damage.
7
8
16. Master EQ.
This is the master "EQ" for all inputs, it included "Low" "Mid" " High",
It can be adjusted freely according to your requirement.
9. Power switch
16
When the switch is set in the position ON, the unit is powered on. When the switch is
set in the position OFF, the unit is powered off.
ON
9
OFF
POWER
7
8
Troubleshooting Guide
17. Reverb level control.
Problem
This knob controls volume for Echo . Turn the knob clockwise, and the volume increases. Turn the
knob counter clockwise, and the volume decreases.
This function is very useful for you. When you play music , put this switch at "
"
While you talk, please put the switch at "
Turn power switch on.
Connect power cord to live outlet.
No sound (power light on)
Are MASTER and CHANNEL
LEVEL controls up?
Adjust both MASTER and
CHANNEL LEVEL controls
upward to desired level. Check
speaker connections. Turn mic
switch on. Check mic or sound
source connection.
System hum
Are all line cord ground connections
made properly on Messenger and
any auxiliary equipment connected to
Messenger?
Are all connections secure?
Are all interconnect cables shielded,
except the speaker cables?
Does the system hum when touching
microphone?
Turn the volume down on each channel
starting with channel 1, working through
the mixer channels to determine if the
problem is coming from an external audio
source, such as a malfunction in that
source or a bad recording.
We recommend that all units connected to
the Messenger be plugged into the same
AC power strip.Change the microphone
cable and/or microphone.
Only one speaker works
Are speaker cable connectors secure?
Are both MASTER LEVEL controls up?
Fully insert connector and/or swap
speaker cables between left and right
speakers and outputs to check for
damaged cables.
Loud howling or squeal from
speakers (known as "feedback"
by audio professionals)
If it goes away when the CHANNEL or
MASTER volume controls are lowered,
it is acoustic feedback.
Refer to Avoiding Acoustic Feedback
and Using Graphic EQ sections of this
manual.
Reduce microphone volume.
Reposition microphone behind or
farther from speakers.
Observe FLS light above EQ and
reduce level of that band.
Sound is distorted
Is the CHANNEL LEVEL at a very high
setting?
Reduce CHANNEL LEVEL and
increase MASTER LEVEL.
18
in order to make the song sounds perfect.
",so that your speech sounds very clear.
19. Level VU meter.
It indicates the output level for master output.
19
20. Mp3 function
Display the current mode
Correction
Is power switch on?
Is line cord connected to live
power outlet?
17
18.Music /speech select switch
Check
No sound
(no power light)
Select the forward program
Select the next program
Select the EQ mode
Select the SD card
or usb player
Volume"+"
Repeat the program
Power on or stop
Play or pause
Volume"-"
SD card insert
USB insert
9
10