1
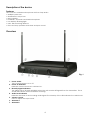
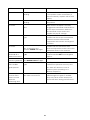
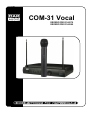
COM-31 Vocal
ORDERCODE D140579
ORDERCODE D140580
Congratulations!
You have bought a great, innovative product from DAP Audio.
The DAP Audio COM-31 brings excitement to any venue.
You can rely on DAP Audio, for more excellent audio products.
We design and manufacture professional audio equipment for the entertainment industry.
New products are being launched regularly. We work hard to keep you, our customer, satisfied.
For more information: [email protected]
You can get some of the best quality, best priced products on the market from DAP Audio.
So next time, turn to DAP Audio for more great audio equipment.
Always get the best -- with DAP Audio !
Thank you!
DAP Audio
DAP Audio COM-31™ Product Guide
Warning...................................................................................................................................................................
Safety-instructions.............................................................................................................................................
Operating Determinations...............................................................................................................................
2
2
3
Description..............................................................................................................................................................
Features..............................................................................................................................................................
Overview............................................................................................................................................................
Frontside.............................................................................................................................................................
Backside.............................................................................................................................................................
Transmitter..........................................................................................................................................................
4
4
4
4
5
5
Installation...............................................................................................................................................................
6
Set Up and Operation............................................................................................................................................
Set Up.................................................................................................................................................................
Inserting/replacing the battery.......................................................................................................................
Adjusting the squelch threshold......................................................................................................................
Tips for achieving maximum performance....................................................................................................
6
6
7
7
7
Frequency ranges..................................................................................................................................................
9
Declaration of conformity.....................................................................................................................................
10
Connection Cables..............................….......................................………..………….…….………….…...............
12
Maintenance………..............................….......................................………..………….…….………….…...............
13
Troubleshooting………..............................…................................………..………….…….………….…..................
13
Product Specifications.................................................................……………….…….…………………..................
14
1
WARNING
CAUTION!
Keep this device away from rain and moisture!
FOR YOUR OWN SAFETY, PLEASE READ THIS USER MANUAL CAREFULLY
BEFORE YOUR INITIAL START-UP!
SAFETY INSTRUCTIONS
Every person involved with the installation, operation and maintenance of this device has to:
be qualified
follow the instructions of this manual
CAUTION! Be careful with your operations.
With a dangerous voltage you can suffer
a dangerous electric shock when touching the wires!
Before your initial start-up, please make sure that there is no damage caused by transportation. Should
there be any, consult your dealer and do not use the device.
To maintain perfect condition and to ensure a safe operation, it is absolutely necessary for the user to
follow the safety instructions and warning notes written in this manual.
Please consider that damages caused by manual modifications to the device are not subject to
warranty.
This device contains no user-serviceable parts. Refer servicing to qualified technicians only.
IMPORTANT:
The manufacturer will not accept liability for any resulting damages caused by the nonobservance of this manual or any unauthorized modification to the device.
•
•
•
•
•
•
•
•
•
•
•
•
•
•
•
•
•
Never let the power-cord come into contact with other cables! Handle the power-cord and all
connections with the mains with particular caution!
Never remove warning or informative labels from the unit.
Never use anything to cover the ground contact.
Never leave any cables lying around.
Do not open the device and do not modify the device.
Do not insert objects into air vents.
Do not connect this device to a dimmerpack.
Do not switch the system on and off in short intervals, as this would reduce the system’s life.
Do not drive the inputs with a signal level bigger, than required to drive the equipment to full
output.
Do not plug Mics into the console (or stagebox) while Phantom Power is on. Also mute the monitor
/ Pa system when turning Phantom Power on or off. Allow the system to adjust for a couple of
seconds, before setting the input gains.
Only use device indoor, avoid contact with water or other liquids.
Avoid flames and do not put close to flammable liquids or gases.
Always disconnect power from the mains, when device is not used or before cleaning! Only
handle the power-cord by the plug. Never pull out the plug by tugging the power-cord.
Always operate the unit with the AC ground wire connected to the electrical system ground.
Make sure you don’t use the wrong kind of cables or defective cables.
Make sure that the signals into the mixer are balanced, otherwise hum could be created.
Make sure you use DI boxes to balance unbalanced signals; All incoming signals should be clear.
2
•
•
•
•
•
•
•
•
•
•
•
•
•
Make sure that the available voltage is not higher than stated on the rear panel.
Make sure that the power-cord is never crimped or damaged. Check the system and the powercord from time to time.
In system setup, the amplifier's output power must be 50%-100% more than the loaded
loudspeakers rated power.
Please turn off the power switch, when changing the power cord or signal cable, or select the
input mode switch.
Extreme frequency boosts in connection with a high input signal level may lead to overdriving
your equipment. Should this occur, it is necessary to reduce the input signal level by using the
INPUT control.
To emphasize a frequency range, you don’t necessarily have to move its respective sliding control
upward; try lowering surrounding frequency ranges instead. This way, you avoid causing the next
piece of equipment in your sound path to overdrive. You also preserve valuable dynamic reserve
(“headroom”)
Avoid ground loops! Always be sure to connect the power amps and the mixing console to the
same electrical circuit to ensure the same phase!
If system is dropped or struck, disconnect mains power supply immediately. Have a qualified
engineer inspect for safety before operating.
If the system has been exposed to drastic temperature fluctuation (e.g. after transportation), do
not switch it on immediately. The arising condensation water might damage your system. Leave
the system switched off until it has reached room temperature.
If your Dap Audio device fails to work properly, discontinue use immediately. Pack the unit
securely (preferably in the original packing material), and return it to your Dap Audio dealer for
service.
Repairs, servicing and electric connection must be carried out by a qualified technician.
For replacement use fuses of same type and rating only.
WARRANTY: Till one year after date of purchase.
OPERATING DETERMINATIONS
This device is not designed for permanent operation. Consistent operation breaks will ensure that the
device will serve you for a long time without defects.
If this device is operated in any other way, than the one described in this manual, the product may suffer
damages and the warranty becomes void.
Any other operation may lead to dangers like short-circuit, burns, electric shock, lamp explosion, crash
etc.
You endanger your own safety and the safety of others!
Improper installation can cause serious damage to people and property !
3
Description of the device
Features
The Com-31 is a Wireless Microphone Set from Dap Audio.
• Multiple system use.
• Simultaneous output use.
• Noise squelch.
• Included 1 dynamic hand-held microphone
• Low battery Warning light.
• max. 50m receiving distance
• Free and easy operation with clear and pure sound.
Overview
Fig. 1
1. Power switch.
Turns receiver power on or off.
2. Power on indicator.
Indicates that the receiver is switched on.
3. Diversity Signal Indicators.
The yellow LED of diversity A/B lights when the unit receives RF-signals from the transmitter. The A
and B LED indicate which channel is receiving.
4. Audio level indicator
Indicates the level of the incoming audio signal. The intensity of the LED indicates the audio level.
5. Volume control.
Used to adjust the output level.
6. Antenna A
7. Antenna B
4
Fig. 2
8. Balanced audio output connector (Low Z).
9. Squelch Control.
Adjust squelch control setting to emphasize either signal quality or system range. This control is
factory preset and normally needs no adjustement. For more info see the section on Adjusting the
squelch threshold on page 7.
10. ¼” Phone jack audio output connector (Unbalanced High Z).
11. Power input connector.
Please use the supplied AC adapter only.
Fig. 3
12. Grille.
13. Low battery LED.
The LED will light red when the battery only has one hour or less of useful operating time.
14. Power and Audio mute switch.
Set the switch in “on” position, the indicator lights for a moment. Put the switch in “mute”position.
Muting prevents the plop noise that sometimes occurs when turning the microphone off.
The LED will light red when the battery only has one hour or less of useful operating time.
15. Battery compartment.
Acces the battery compartment by removing the cover.
16. Frequency Mark.
Shows the carrier frequency of the transmitter.
5
Installation
Remove all packing materials from the Com-31. Check that all foam and plastic padding is removed.
Always disconnect from electric mains power supply before cleaning or servicing.
Damages caused by non-observance are not subject to warranty.
Set Up and Operation
Before plugging the unit in, always make sure that the power supply matches the product specification
voltage. Do not attempt to operate a 120V specification product on 230V power, or vice versa.
1. Refer to Figure 4. Connect the supplied power AC adapter into the DC input Connector (16) at
the back of the receiver. Plug the afdapter in a wall socket or other AC power source. Push the
POWER switch (1) on the front of the receiver, the red power LED will light.
2. Insert the supplied antennas in the antenna sockets (6,7) and rotate fully clockwise. Position the
antennas at an angle of 45 degrees.
3. Connect the receiver’s XLR AUDIO OUTPUT (8) to the mixer input using a XLR to XLR audio cable or
connect the receiver’s ¼” JACK OUTPUT CONNECTOR (10) to your amplifiers input using a
¼”phone plug cable.
4. Slide the transmitter POWER/OFF switch (12) to the power position. The indicator will light for a
moment and the receivers A/B LED’s (3) will light.
5. Talk or sing into the microphone. The AF (4) LED’s intensity will light in relation tothe volume of the
transmitter.
6. Adjust the receiver VOLUME control (5) and the volume adjustement of the connected mixer or
amplifier to a suitable level.
7. If the performance is over, turn off the sound system and slide the transmitter’s POWER/OFF switch
(12) to the off position to conserve battery power.
Front
Back
Fig. 4
6
Inserting/replacing the battery
We recommend powering the microphone by a 9 V PP3 alkali battery.
Fig. 5
•
•
•
Turn the battery compartment cover in the direction of the arrow and remove the cover.
Insert the battery as shown. Please observe correct polarity when inserting the battery.
Close and lock the battery cover.
Adjusting the squelch threshold.
Interference due to other transmission links can be eliminated as follows:
• Switch off the transmitter. The receiver should no longer receive a signal.
• If the receiver still receives a signal, use the squelch control (9) to increase the squelch threshold
so that the signal will no longer be received. If the signal cannot be eliminated in this wasy, set the
transmitter and the receiver to a different channel.
• Switch on the transmitter again and check if the receiver receives the transmitter signal.
Note:
If the squelch threshold is adjusted to high, the transmission range will be reduced. Therefore
always adjust the squelch control to the lowest possible setting.
Tips for achieving maximum performance.
•
•
•
•
•
•
•
Make sure you can always see a receiver antenna from the transmitter position.
Keep the distance from transmitter to receiver antenna as short as possible.
Point the receiver antennas away from each other at 45 degrees angle from vertical position.
Avoid placing the receiver antennas near metal surfaces and obstructions.
Replace battery as soon as low battery LED lights.
If stacking or rack mounting receivers in a multiple system setup. Do not allow antennas to cross.
Perform a walk-through before performance or presentation. If dead spots are found, adjust the
location of the receiver. If dead spots remain, mark the dead spots and avoid them.
7
Problem
Indicator status
Solution
No sound.
Red transmitter LED is not
blinking.
Slide transmitter POWER ON/OFF switch
No sound.
No sound.
in ON position. Make sure battery is
placed correctly, replace with a fresh
battery
Slide transmitter MUTE/ON switch in
Red transmitter LED is
blinking.
Red receiver POWER LED
ON position
Make sure AC adapter is securely
plugged into electrical outlet and into
the DC input connector. Make sure
the electrical output works and
supplies the proper voltage
dims.
No sound.
Receiver DIVERSITY A/B LED's
Turn up receiver volume control.
Confirm that the output connections
between receiver and external
equipement are correct and in good
condition.
light.
No sound.
Receiver DIVERSITY A/B LED's
Confirm that the transmitter and
receiver frequencies match. Move the
transmitter closer to the receiver.
dim. Transmitter and
receiver POWER LED's light.
Sound levels differ
f
from
llevell off a
cabled instrument.
Receiver DIVERSITY A/B LED's
Readjust transmitter gain level to
compensate ffor diff
differences iin guitar
i
outputs.
lilight.
h
Receiver DIVERSITY A/B LED's
Distortion level
increases gradually. and BATTERY LOW LED light.
Receiver DIVERSITY A/B LED's
Bursts of noise or
other audible
signals present.
light.
Momentary loss of
sound as transmitter is moved
within the
performing area.
Receiver DIVERSITY A/B LED's
Replace transmitter battery.
Identify potential sources of
interference (other RF-sources) and
turn them off. Remove or use a
wireless system operating on a
different frequency.
Reposition receiver and perform a
walk through test again. If audible
drop-outs persist, mark "dead spots"
and avoid them during performance.
dim when sound is lost.
8
COM-31 frequencies
Vocal UHF handheld.
D140579: Set - 795,996Mhz for use in: Australia, Brasil, Canada, Czech Republic, China/ Hong Kong,
Egypt, France, Germany, Greece, Hungary, Iran, Israel, Italy,
Luxemburg, Poland, Portugal, Romania, Slovakia, Switzerland,
Turkey, United Kingdom, USA.
D140580: Set - 807,396Mhz for use in: Australia, Brasil, Canada, Czech Republic, China/ Hong Kong.
Denmark, France, Germany, Greece, Hungary, Iran, Italy, Japan,
Luxemburg, Netherlands, Norway, Poland, Portugal, Romania,
Slovakia, Sweden, Switzerland, Turkey, United Kingdom, USA.
Presenter UHF headset.
D140579: Set - 795,996Mhz for use in: Australia, Brasil, Canada, Czech Republic, China/ Hong Kong,
Egypt, France, Germany, Greece, Hungary, Iran, Israel, Italy,
Luxemburg, Poland, Portugal, Romania, Slovakia, Switzerland,
Turkey, United Kingdom, USA.
D140580: Set - 807,396Mhz for use in: Australia, Brasil, Canada, Czech Republic, China/ Hong Kong.
Denmark, France, Germany, Greece, Hungary, Iran, Italy, Japan,
Luxemburg, Netherlands, Norway, Poland, Portugal, Romania,
Slovakia, Sweden, Switzerland, Turkey, United Kingdom, USA.
Guitarist UHF bodypack.
D140579: Set - 795,996Mhz for use in: Australia, Brasil, Canada, Czech Republic, China/ Hong Kong,
Egypt, France, Germany, Greece, Hungary, Iran, Israel, Italy,
Luxemburg, Poland, Portugal, Romania, Slovakia, Switzerland,
Turkey, United Kingdom, USA.
D140580: Set - 807,396Mhz for use in: Australia, Brasil, Canada, Czech Republic, China/ Hong Kong.
Denmark, France, Germany, Greece, Hungary, Iran, Italy, Japan,
Luxemburg, Netherlands, Norway, Poland, Portugal, Romania,
Slovakia, Sweden, Switzerland, Turkey, United Kingdom, USA.
Please check: DAP Audio Wireless Systems Frequency Table for more details.
9
Connection Cables
Take care of the connector cables, always holding them by the connectors and avoiding knots and
twists when coiling them: This gives the advantage of increasing their life and reliability, which is always to
your advantage.
Periodically check that your cables are in good condition, that they are correctly wired and that all their
contacts are perfectly efficient: a great number of problems (faulty contacts, ground hum, discharges,
etc.) are caused entirely by using unsuitable or faulty cables.
Headphones
plug
Unbalanced mono 1/4” jack plug
Balanced mono 1/4” jack
Compensation of interference with balanced connections
12
Maintenance
The DAP Audio COM-31 requires almost no maintenance. However, you should keep the unit clean.
Disconnect the mains power supply, and then wipe the cover with a damp cloth. Do not immerse in
liquid. Do not use alcohol or solvents.
Keep connections clean. Disconnect electric power, and then wipe the DMX and audio connections
with a damp cloth. Make sure connections are thoroughly dry before linking equipment or supplying
electric power.
Troubleshooting
DAP Audio COM-31
This troubleshooting guide is meant to help solve simple problems. If a problem occurs, carry out the steps
below in sequence until a solution is found. Once the unit operates properly, do not carry out following
steps.
1. If the device does not operate properly, unplug the device.
2. Check power from the wall, all cables, the fuse, etc.
3. If all of the above appears to be O.K., plug the unit in again.
4. If nothing happens after 30 seconds, unplug the device.
5. Return the device to your DAP Audio dealer.
13
Product Specification
Model: DAP Audio COM-31
Power: AC 230V-AC adapter with 2.1mm plug
Dimensions: 206" x 149 x 44 mm (LxWxH)
Weight: 1,08 Kg
Receiver
Border upon channel rejection: >70dB
Image Interfere rate: >70dB
S/N Ratio: >85dB
Sensitivity: -105dBM
T.H.D.: <1%
Output connectors: 1x3p. XLR balanced
1x 6,3mm jack unbalanced
Audio output impedance: 600Ohm
Audio output level: -12dB
Frequency response: 50-15.000Hz
Frequency range: 460 – 970 MHz
Power supply: 12-18V DC 300mA
Hand-held transmitter
Dynamic range: >100dB
Freq. Range: +/-30KHz
Spurious emission: >55dB
RF-output: 13dBm
Power consumption: 40mA
Battery's: 1 x 9V alkaline battery
Dimensions: 235 x 50 x 50mm (LxWxH)
Design and product specifications are subject to change without prior notice.
Website: www.Highlite.nl
Email: [email protected]
14
2007 Dap Audio.