1
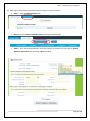
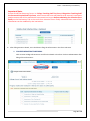
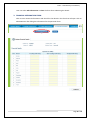
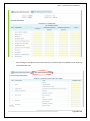
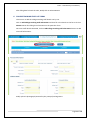
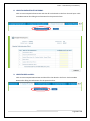
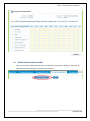
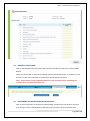
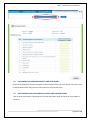
CCIM – User Manual (for Institutions) User Manual (for Institutions) PROCEDURE TO FILL PART-I: VISITATION FORM Version 1.0 Date: 09-Jan-2015 For any technical queries please contact CCIM Helpdesk: Contact No.:– (+91) 9654401726 / (+91) 9654401763 E-Mail:– [email protected] Page 1 of 19 CCIM – User Manual (for Institutions) VISITATION INITIATION PROCESS A. Prerequisite for initiating visitation: an institution must have filled and submitted its basic details form already. B. The steps to Login are as follows: Go to www.ccimindia.org website Click on Institution Login link. Login with institution’s Login Id (AYUxxxx for Ayurveda, SIDxxxx for Siddha and UNIxxxx for Unani) and Password and then click on Login Button. Note: - A new visitation can only be initiated once the previous visitation is complete (Last visitation should not be in Progress) C. Please take note of the following instructions before filling the form: Please fill all the forms by selecting the tab name in the header. If any of the value is not available or not applicable then please put it as 0. Please download the Annexure templates (applicable to your college (i.e. Ayurveda or Siddha or Unani) to be uploaded in various sections of the Visitation form. Page 2 of 19 CCIM – User Manual (for Institutions) D. Documents upload/download procedure: Wherever applicable and asked for, documents are to be uploaded in the required format and should be within the specified size limit. Kindly follow the following steps to upload a document: Click on click here to upload a document Browse the file to be uploaded from where it is saved in your local computer Click on Upload to upload the browsed file A file is uploaded, once you get the File uploaded successfully message as shown below Uploaded file can be downloaded and verified by clicking on Click here to Download as shown below Page 3 of 19 CCIM – User Manual (for Institutions) E. After Login, please follow the below mentioned steps to Initiate Visitation: STEP-1 : Click on Initiate Visitation Tab STEP-2 : Click on Initiate Visitation Process for filling the Audit Details STEP-3 : Fill in the mentioned details, select the purpose of visitation and then click on Submit Visitation Information after checking I Agree checkbox Page 4 of 19 CCIM – User Manual (for Institutions) Once visitation is initiated, user is navigated to visitation details form. Institution must fill the data required for all the forms to complete the initiation of Visitation. Status for data completion for the individual forms can be traced from the Visitation Data Collection Status dashboard on the visitation details tab as shown below. As institution will start filling and submitting the individual forms, the color in the status grid will change from Red to Green once the required data is filled for the corresponding form. Page 5 of 19 CCIM – User Manual (for Institutions) Important Note: In case of staff list data entry forms i.e. College Teaching Staff List Form, College Non-Teaching Staff List Form and Hospital Staff List Form, where more than one staff details to be entered, institutions need to ensure that all the staff details are entered one by one before submitting the visitation form finally on the Declaration Tab at the end. Once visitation forms finally submitted then none of the information can be modified by the institutions. F. After filling visitation details, user should start filing the information in the forms Tab wise. 1. COLLEGE INFRASTRUCTURE FORM: Click on Enter College Infrastructure and fill in the details in the form. Click on Submit Button after filling all the information: Page 6 of 19 CCIM – User Manual (for Institutions) After submitting the form, a view page will be displayed for verifying the information entered. If user wants to update any information, it can be done by clicking on Edit Information Button on the view page. By clicking on this button, User will be navigated to the editable mode of the form. Also, User can close the form and move to the visitation details page, to select another Tab by clicking on Close button 2. COLLEGE DEPARTMENT FORM: Click on Enter College Department and then fill in the details in the form. Click on Submit Button after filling the information for the particular form: Page 7 of 19 CCIM – User Manual (for Institutions) User can either Edit information or Close the form after submitting the details. 3. FINANCIAL INFROMATION FORM: Click on Enter Financial Information and then fill in the details in the form that will open. Click on Submit Button after filling the information for the particular form: Page 8 of 19 CCIM – User Manual (for Institutions) 4. STUDENT DETAILS FORM: Click on Enter Student Details and then fill in the details in the form. Click on Submit Button after filling the information for the particular form. 5. COLLEGE STAFF INFROMATION FORM: Click on Enter College Staff Information and then fill in the details in the form. Fill the information for Teaching Staff Information Tab first and click on Next Button: Page 9 of 19 CCIM – User Manual (for Institutions) After clicking on Next Button at the end of the form, Institution will be navigated to Non-Teaching staff Information Tab. Page 10 of 19 CCIM – User Manual (for Institutions) After filling data for both the Tabs, Kindly Click on Submit Button 6. COLLEGE TEACHING STAFF LIST FORM: This Form is to add the college teaching staff details one by one. Click on Add College Teaching staff Information and then fill in the details on the form. Click on Submit Button after filling the information on the particular form. Once one staff details submitted, click on Add College Teaching staff Information button to add next staff information. Kindly upload a photograph (attested by the principal) and Signature Page 11 of 19 CCIM – User Manual (for Institutions) After submitting the information for one staff member, click on Add College Teaching staff Information to add another staff details. This process has to be repeated for making entry for a staff member each time. Note: Please submit all the College Teaching Staff Details one by one before final submitting the visitation form using the Declaration tab. 7. COLLEGE NON-TEACHING STAFF FORM: Click on Add College Non-Teaching staff Information and then fill in the details in the form that will open. Click on Submit Button after filling the information for the particular staff member. Kindly follow the same steps as followed for College Teaching staff form (above mentioned point no. 6) to view the entry in grid and to enter data for another non-teaching staff. Note: Please submit all the College Non-Teaching Staff Details one by one before final submitting the visitation form using the Declaration tab. Page 12 of 19 CCIM – User Manual (for Institutions) 8. HOSPITAL INFRASTRUCTURE FORM: Click on Enter Hospital Infrastructure and then fill in the details in the form that will open. Click on Submit Button after filling the information for the particular form. 9. HOSPITAL OPD and IPD: Click on Enter Hospital OPD and IPD and then fill in the details in the form. Click on Submit Button after filling the information for the particular form. Page 13 of 19 CCIM – User Manual (for Institutions) 10. OTHER HOSPITAL DETAILS FORM: Click on Enter Other Hospital Details form and then fill in the details in the form. Then Click on Submit Button after filling the information for the form. Page 14 of 19 CCIM – User Manual (for Institutions) 11. HOSPITAL STAFF DETAILS: Click on Enter Hospital staff details and then fill in the details in the form that will open. Click on Submit Button after filling the information for the particular form. Page 15 of 19 CCIM – User Manual (for Institutions) 12. HOSPITAL STAFF FORM: Click on Add Hospital staff Information and then fill in the details in the form. Click on Submit Button. Follow the same steps as followed for College Teaching staff details (point no. 6 above) to view the entry in grid and to add data for all the hospital staff details one by one. Note: Please submit all the hospital Staff Details one by one before final submitting the visitation form using the Declaration tab. 13. EQUIPMENT FOR DISSECTION AND PHYSIOLOGY: Click on Enter Equipment for Dissection and Physiology and then fill in the details in the form that will open. Click on Submit Button after filling the information for the particular form. Page 16 of 19 CCIM – User Manual (for Institutions) 14. EQUIPMENT FOR PHARMACOGNOSY AND PATHOLOGY: Click on Enter Equipment for Pharmacognosy and Pathology and then fill in the details in the form. Click on Submit Button after filling with the information for the particular form. 15. INSTRUMENTS AND EQUIPMENTS FOR OPD AND LABOUR ROOM: Click on Enter Instruments and Equipments for OPD and Labour Room and then fill in the details in the form. Page 17 of 19 CCIM – User Manual (for Institutions) Fill the information for OPD Details Tab first and click on Next Button: After clicking on Next Button at the end of the form Institution will be navigated to Labour Room Details Tab. Click on Submit Button after filling the information for the particular form. 16. INSTRUMENTS AND EQUIPMENTS FOR OPERATION THEATER: Click on Enter Equipment for Dissection and Physiology and then fill in the details in the form that will open. Check I Agree and click on Submit Button after filling the information for the particular form. Page 18 of 19 CCIM – User Manual (for Institutions) 17. DECLARATION FORM : Click on Declaration tab and agree the details in the form. Check I Agree and click on Final Submit Button to submit the visitation information. Once the information final submitted, it cannot be modified by the institutions. G. Once Institution submits all the forms, the color of the status column will change to green corresponding to that form in the status grid table. H. After filling all the forms, click on Submit the data to Visitor button below the dashboard on the Visitation Details Form. Please make sure all the correct information before Final Submission, as no information can be edited afterwards. I. After completion of the above mentioned step, Institution Visitation Initiation Process is complete. J. User can take individual printouts of any of the forms by clicking on Print Submitted Data Button, provided at the view page of all the Forms. Page 19 of 19