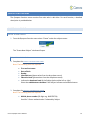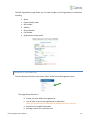
1
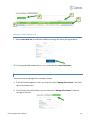
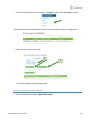
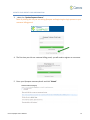
User’s Manual
Version 0.9, December 2014
Cerora, Inc
116 Research Drive
Suite 2207
Bethlehem, PA 18015-4731
Qumpass™
User Manual
Document Number:
Document Status:
Software Version and Release: 1.12
Date: November, 2014
Copyright © 2013-2014 Cerora Inc. All rights reserved.
Cerora Inc. Proprietary Information
The information contained within this document is the sole property of Cerora Inc. and restricted in its
use to assist customers of Cerora Inc. The document and its contents may not be copied, disclosed, or
used in in part or in whole for any purpose without the prior permission of Cerora Inc.
Information in this document and the use of Qumpass may change without notice. Cerora Inc.
reserves the right to make changes in software design and implementation as may warrant with
developing this technology.
Cerora, Cerora Qumpass, and the C-dot Logo are registered trademarks of Cerora, Inc., Bethlehem, PA
18015.
Cerora Qumpass User’s Manual
2
CONTENTS
Hardware and Software Requirements ....................................................................................................................................... 4
Hardware ................................................................................................................................................................................. 4
Software................................................................................................................................................................................... 4
Operating System ................................................................................................................................................................ 4
Minimum web Browser Requirements: ............................................................................................................................... 4
Other requirements ................................................................................................................................................................. 5
Account Setup .............................................................................................................................................................................. 5
The Signup Process in Detail .................................................................................................................................................... 5
Step 1: User information...................................................................................................................................................... 6
Verify your Email Account ................................................................................................................................................... 7
Step 2: Organization information ........................................................................................................................................ 8
Step 3: Licensing and Billing information ............................................................................................................................. 9
Step 4: Software Terms of service and business associate Agreements ........................................................................... 10
Qumpass Dashboard .................................................................................................................................................................. 11
Dashboard Overview ............................................................................................................................................................. 12
Personal Menu ....................................................................................................................................................................... 12
Dashboard.......................................................................................................................................................................... 12
“Your Name” ...................................................................................................................................................................... 12
Support .............................................................................................................................................................................. 12
Logout ................................................................................................................................................................................ 12
Qumpass Function Menu ........................................................................................................................................................... 13
Subject Management ............................................................................................................................................................. 13
Create a New Subject......................................................................................................................................................... 13
Manage Subjects ................................................................................................................................................................ 16
Cerora Survey management .................................................................................................................................................. 17
Start new survey ................................................................................................................................................................ 17
Design Survey..................................................................................................................................................................... 19
Retrieve Report .................................................................................................................................................................. 19
Edit Report ......................................................................................................................................................................... 20
Research ................................................................................................................................................................................ 20
Subject Collaboration............................................................................................................................................................. 20
Message notification ......................................................................................................................................................... 21
Composing a message ....................................................................................................................................................... 22
Viewing Messages .............................................................................................................................................................. 22
message Management....................................................................................................................................................... 23
System Management ............................................................................................................................................................. 23
Cerora Qumpass User’s Manual
3
HARDWARE AND SOFTWARE REQUIREMENTS
Cerora Qumpass is a medical grade, HIPAA compliant cloud-based web server application to assist in
assessment and monitoring of neurological function. Qumpass can run on most modern computers
that have a web browser and internet connection. However, certain functionality of Qumpass requires
a minimal hardware and software configuration.
HARDWARE
Dual core Intel® or AMD® processor
Mouse
Keyboard
Microphone
Speaker(s)
Monitor with a minimum screen resolution of 1240 x 768 pixels.
SOFTWARE
OPERATING SYSTEM
The following operating systems are supported:
Microsoft Windows 7, 8, or 10, server 2008 R2, 2011, 2012
Apple OSX 10.5+
iOS 7+
Android 4+
MINIMUM WEB BROWSER REQUIREMENTS:
The following browser versions are presently supported:
†
Internet Explorer (v11+) Trident Engine
Firefox (v30+) Gecko Engine
†
Chrome (v30+) Blink (Win) Webkit (iOS) Engine
†
Safari (v7+) Webkit Engine
†
Qumpass Survey functionality is limited to Firefox and Chrome on desktop/laptop computers. Only
these browsers contain the functionality to record audio.
Cerora Qumpass User’s Manual
4
OTHER REQUIREMENTS
Cerora Qumpass allows the user to increase the level of security by implementing an opt-in 2factor authentication. Usage of this functionality requires a smartphone/tablet with a camera.
The third party software, google authenticator, is also required for this functionality.
ACCOUNT SETUP
Creating an account on Qumpass involves four essential steps:
1.
2.
3.
4.
Entering your user information and verifying you and as an authentic Health Care Provider.
Adding details about your organization and verifying it as also an authentic Health Care Provider
Collecting billing information and selection of a software license type
Agreeing to the Qumpass terms of service
Your progress through this process is tracked by the time line at the top of the page.
THE SIGNUP PROCESS IN DETAIL
1. Open your supported browser and navigate to http://my.qumpass.com
2. Click on the “Create New Account” button on the lower left side of the screen. Alternatively you
may directly navigate to http://my.qumpass.com/SignUp
NOTE: It is highly recommended that you view the Account Setup video: Try our video guide
The link is also available at the bottom left of the page:
Cerora Qumpass User’s Manual
5
STEP 1: USER INFORMATION
All fields marked with a red asterisk are required
3
4
3. Please enter your full name and individual NPI number.
Note: The name and NPI number must exactly match those in the National Provider Database.
4. Provide your mobile phone number and please indicate whether you will permit Qumpass to
send text messages.
Note: We value your privacy. We will never sell or rent your name or personal information to
any third party without your expressed permission and we will never sell or rent your telephone
number or email.
5
6
7
5. Please enter a valid email address. Your email address will become your user name.
Additionally, an email will be sent to this address to verify that this is your email.
6. Create a password that contains:
a. at least 8 characters
b. one or more lowercase letters
c. one or more uppercase letters
d. one or more numbers
e. one or more special characters (e.g. $,%,&)
7. Create a personalized security question and answer. This will be used if you need to reset your
password or to verify your identity if you need support.
Cerora Qumpass User’s Manual
6
8. Once you have completed the User Information page please click “Create User and Send Email”.
9. You will be notified that an email from [email protected] was sent to your email address.
Note: The first professional user created in the Account Set-Up process will have full
administrator rights within Qumpass.
Cerora also recommends that in addition to creating a Username and strong Password,
users opt-in to use the 2-factor Authentication capabilities of Qumpass.
VERIFY YOUR EMAIL ACCOUNT
10. An email will be sent to the entered address with a verification link. Click the link provided in
the email or paste the URL into your browser address bar.
- - Remainder of the page intentionally left blank - -
Cerora Qumpass User’s Manual
7
STEP 2: ORGANIZATION INFORMATION
11. Please enter the name of your Organization name. Additionally, indicate whether the
organization is a HIPAA cover entity or a Research Organization.
11
12
13
HIPAA COVERED ENTITY
12. For a HIPAA covered entity, enter the Organization’s NPI number and select the appropriate
Point of Service Code from the dropdown menu.
Note: The name and NPI number must exactly match those in the National Provider Database.
For information on Point of Service Codes, please see:
http://www.cms.gov/Regulations-and-Guidance/Guidance/Manuals/Downloads/clm104c26.pdf
13. Once the Organization Information section please click “Create Organization”.
NON-HIPAA COVERED ENTITY
14
15
14. For a non-HIPAA covered entity, enter the Organization’s complete address. phone number and
Organization’s email.
Cerora Qumpass User’s Manual
8
15. Once the Organization Information section please click “Create Organization”.
STEP 3: LICENSING AND BILLING INFORMATION
16
17
18
16. Please select the appropriate license type from the pull-down menu. The current four options
are:
• Qumpass for Covered Entity – Full license for Cerora Qumpass testing suite and mobile
app to be used in a HIPAA covered entity.
• Qumpass for non-Covered Entity – Full license for Cerora Qumpass testing suite and
mobile app to be used in a non-HIPAA covered entity.
• Qumpass (App Only) for Covered Entity
• Qumpass (App Only) for non-Covered Entity
Note: Most users will select the “Qumpass for Covered Entity”
17. Please update the default “Payment Source Nickname”.
Note: A nickname for the payment source is required. Cerora recommends you change it to a
more friendly and memorable license identifier (e.g. David’s License for Downtown Clinic”.
- - Remainder of the page intentionally left blank - -
Cerora Qumpass User’s Manual
9
18. Once the License Details are entered please click “Enter Payment information”.
The window will expand to include the Secure Payment Form.
19
20
19. Please enter any Discount Code you received from Cerora in the box and click Apply.
20. Enter your credit card information and select “Subscribe”.
Note: Visa, American Express, MasterCard and Discover are accepted.
If you would like to be billed by other means (e.g. Purchase Order), please call our sales
group and we can assist you.
STEP 4: SOFTWARE TERMS OF SERVICE AND BUSINESS ASSOCIATE AGREEMENTS
21
22
Cerora Qumpass User’s Manual
23
10
21. The final step in the account setup process is to review our Terms of Service Agreement and
Business Associate Agreement (available only if you are a HIPAA covered entity). Accept each
of the agreements by checking the “I Agree to …” box.
22. Please digitally sign the document by typing your full name in the box provided.
23. Once the Agreements section is completed, please click “Sign and Create Account”.
Note: The signup process is finished and you will be automatically logged into Cerora Qumpass.
Note: If your session is idle too long, Qumpass will log you out of the signup process for
security reasons. To restart where you left off, login with your username/email and password
and Qumpass will continue from the last completed section.
QUMPASS DASHBOARD
1
2
3
Cerora Qumpass User’s Manual
11
DASHBOARD OVERVIEW
1. The Qumpass Dashboard contains a number of “widgets” including a system status widget, a
use statement, and a welcome/first steps widget. Over time these will be continually updated
and include important system-wide notices.
PERSONAL MENU
2. The personal menu contains four main tabs:
DASHBOARD
The Dashboard tab provides a link back to the dashboard from anywhere within the
program.
“YOUR NAME”
The bubble above your name indicates whether you currently have any messages (see
Messaging below below). A submenu is revealed as you hover the mouse pointer over your
name. The submenu contains the following functionality:
Messages – a link to the Qumpass messaging system
My Profile – a link to update your Qumpass profile.
Training – a link to your required training.
SUPPORT
The submenu under support contains all available help and support for Qumpass.
An online video manual contains the Qumpass Instructional Video Library of “How To”
videos for different Qumpass functionalities.
The User’s Manual. An on-line .pdf version of the documentation for Qumpass (This
Document).
A link to our eTicket Support system. This system allow you to report problems and bugs
directly to the Qumpass support/development team.
A link to Cerora’s Contact information for phone support.
+1 844 CeroraInc (844-237-6724)
A link to provide feedback to help up improve Qumpass for you.
LOGOUT
This link securely logs you out of the Qumpass system.
Cerora Qumpass User’s Manual
12
QUMPASS FUNCTION MENU
The Qumpass function menu contains five main tabs in dark blue. For each function, a detailed
description is provided below.
SUBJECT MANAGEMENT
CREATE A NEW SUBJECT
1. From the Qumpass function menu select “Create” under the subjects menu.
The “Create New Subject” window will open.
REQUIRED INFORMATION
2. Complete the SUBJECT INFORMATION FORM .
Note: The following fields are required.
•
•
•
•
•
•
First and Last name
Date of birth
Gender
Identified race (please select from the drop down menu)
Education level (please select from the drop down menu)
Indicate the dominant hand of the Subject (select either left or right)
Select the ambidextrous checkbox if the Subject indicates no hand dominance.
3. Complete the CONTACT INFORMATION FORM .
Note: The following fields are required.
•
Mobile phone number (10 digits e.g. 8442376724)
Used for 2-factor authentication if selected by Subject
Cerora Qumpass User’s Manual
13
OPTIONAL INFORMATION
CONTACT INFORMATION FORM .
•
Opt-in permission to contact via SMS text.
Used for 2-factor and emergency notifications.
•
•
Alternate phone number and extension (e.g. work number)
Email address
If present, a user account will be created for the Subject to logon to Qumapss
and allow the user to send messages to the aHCP.
QUMPASS PORTAL PASSWORD
Password for the Subject User Account for the Subject to logon to Qumapss and allow the
user to send messages to the aHCP.
HCP NOTES
Date of Study Consent – If performing a research study, a Study Consent date should be
entered here.
Subject/Experiment Notes – This is a free field to include any relevant information about
the subject that is not covered in any of the forms, including the Medical History (below).
- - Remainder of the page intentionally left blank - -
Cerora Qumpass User’s Manual
14
aMEDICAL HISTORY
b
The Medical History Form allows the aHCP to document any condition that could have the
potential to alter neurological function. Cerora recomends that all previous and current
conditions be entered into this form.
This form contains the 14 most commonly entered conditions. To enter an existing
medical condition:
a. Select the check box to the left of the medical condition
b. Enter the diagnosis date.
c. A comment box is provided to optionally add additional information if necessary.
d. Additional medical conditions can be added by selecting Add Medical Condition button
and choosing from the drop down menu
e. When finished, select the Create Subject.
4. You will be returned to the “Manage Subjects” page showing the newly created subject in the
list.
Cerora Qumpass User’s Manual
15
MANAGE SUBJECTS
1. From the Qumpass function menu select “Manage” under the subjects menu.
The subject management page will show a table of all subjects in the organization.
2
4
3
ADDING SUBJECTS WITHIN THE MANAGE SUBJECTS PAGE
2. The “Create New Subject” button at the top left will navigate to creating a new subject.
DISPLAYING AN EXISTING SUBJECTS INFORMATION
3. Selecting a Subject’s Name will display the Subject’s Information in the same format as before
when the subject was created.
SEARCHING FOR SUBJECTS IN AN ORGANIZATION
4. You can search for any information in the table from the search box. You may clear the search
box by clicking the [x] in the box on the right.
Cerora Qumpass User’s Manual
16
CERORA SURVEY MANAGEMENT
START NEW SURVEY
1. To begin a new Survey, select “Start New” under the Survey Reports menu.
Note: By entering the Cerora Survey area of Qumpass, you are transitioning to our cloud-based
application server. This functionality is kept separate to permit frequent enhancements and
additions to the task battery.
The Survey application will allow you to identify the subject being tested, the site where it is
being performed, license to which it will be billed, and the requesting physician.
Additionally, the Survey application will allow you to create/design Survey batteries.
6
2
3
4
5
SURVEY INFORMATION
2. Select a Requesting Clinician from the drop down menu. This list is populated by Cerora
Qumpass users.
3. Select the current Site where the Survey is being performed and the applicable Site License
(for billing purposes).
4. Select the Subject to be tested from the dropdown list
Note: The Subject must be created before initiating a survey.
Cerora Qumpass User’s Manual
17
5. If a new clinical condition has developed that is not in the subjects medical history please
enter the ICD 9 code.
Note: This field is context sensitive. You may enter the ICD 9 numeric code or the first
several letters of the condition. This will populate a drop down list in order to select the
appropriate condition.
SURVEY BATTERY
Note: The Survey battery is context dependent. The appropriate sets of tasks are
automatically chosen based on the age of the subject.
6. Select the tasks to be administered to the Subject by clicking the checkbox to the left of the
task.
7. Begin the Survey by selecting Calibrate Subject Experience at the lower left of the screen.
SUBJECT EXPERIENCE CALIBRATION
This screen allows the aHCP to vary the volume and text size for the subject so that they can
adequately see and hear the instructions played throughout the Survey.
There are four steps that should be completed before the Survey can begin.
a. Allow use of the computers microphone by choosing “Allow” at the top of the screen. This
should only be needed once, the first time Qumpass is used.
b. Enter Full Screen/Presentation mode.
Press the [Shift] key + [Command] key +[F] key………………………… (Mac OSX)
Or the [Shift] key + [F11] …………………………………………………………. (Windows)
Note: These keys must be pressed simultaneously.
Full screen mode must be enabled to prevent the subject from being distracted
by other web browser elements.
c. Allow the Subject to see the screen. Seat them comfortably in front of the monitor.
Cerora Qumpass User’s Manual
18
d. Have the subject adjust the test size and volume so that it is comfortable for them to see
and hear.
8. When the Subject is ready to begin, they may click on the “Begin Assessment” button at the
bottom of the screen.
This will start the Survey and the aHCP may leave the subject to complete the survey.
Note: The assessment is narrated so please be sure the subject listens to the complete question
before responding. Answer options do not become active until the question has been
completely read.
DESIGN SURVEY
Currently this Qumpasss functionality is under development. Soon you will be able to design
and save customized Survey batteries accessible from within the Survey application.
RETRIEVE REPORT
1. From the Qumpass function menu select “Retrieve Report” under the subjects menu.
2. The report retrieval view will show a searchable table of all Surveys performed in an
organization.
Cerora Qumpass User’s Manual
19
3. The table contains:
• The Subject name
• Start time of the Qumpass Survey
• The aHCP that requested the Survey
• The global identifier of the Survey
• A link to the HTML version of the report
• A link to the PDF version of the report
• A link to download the recorded audio collected during the Survey
To view .pdf’s Cerora suggests the following pdf readers
http://get.adobe.com/reader/
http://www.foxitsoftware.com/downloads/
4. Click on a Survey’s link to download the report
EDIT REPORT
Currently this Qumpasss functionality is under development. Soon you will be able to edit and
save Survey reports. This functionality will allow the HCP to manually adjust the scoring for a individual
Survey.
RESEARCH
Currently this Qumpasss functionality is under development. Soon this menu will contain the
ability to perform longitudinal studies and perform bulk downloads of subjects data tables.
SUBJECT COLLABORATION
Collaboration is an important aspect of effective treatment of Neurological disorder or challenge.
The “Health Circle” includes medical professionals including athletic trainers, therapists, doctors
and parents, loved ones, caregivers and patient is growing more important and effective. Effective
Cerora Qumpass User’s Manual
20
communication within the group can be facilitated by using the Qumpass HIPAA compliant
Messaging function.
MESSAGE NOTIFICATION
The bubble above your name indicates the number of unread messages. If you have unread messages,
the bubble will change from grey to green.
ACCESS TO YOUR MESSAGES
•
Select “Messages” under your name in the personalized menu.
•
From the Qumpass function menu select “Messaging” under the Subject Collaboration
menu.
This view presents a searchable table of received and sent messages within an organization.
Cerora Qumpass User’s Manual
21
COMPOSING A MESSAGE
1. Select the “Compose New Message” button.
3
4
2. The New Message window will open.
3. Select recipient from the “To” drop down menu. You can send a message to anyone in the
organization (professional users and subjects).
4. Enter your message.
Note: The message box is resizable if you need more room to compose your message. To
resize, click and drag the bottom right corner of the text box.
5. Click the “Send Message” button
VIEWING MESSAGES
The list of sent or received messages can be displayed by selecting either “My Sent Messages” or “My
Received Messages”.
1.
Click on the message to read text and details
Cerora Qumpass User’s Manual
22
2. The message text will be displayed below the table.
3. From within the message box, you may reply to the sender or delete the message.
MESSAGE MANAGEMENT
2
1
3
1. Messages can be individually marked as read or deleted using the buttons to the right of each
message.
2. Messages can also be selected using the checkboxes on the left.
3. Once selected, messages can be bulk deleted or marked read.
SYSTEM MANAGEMENT
This section allows you to edit your organization information, edit and create new sites, manage, edit
and create new licenses and create, manage and edit professional user information.
UPDATING AND EDITING ORGANIZATION INFORMATION
From the Qumpass function menu select “Organization” under the Sys Management menu.
Cerora Qumpass User’s Manual
23
The Edit Organization page allows you to make changes to the Organization’s information
including:
•
•
•
•
•
•
•
Name
Covered entity status
NPI number
Address
Phone Number
Fax Number
Organization contact email.
MANAGEING SITE INFORMATION
From the Qumpass function menu select “Sites” under the Sys Management menu.
This page allows the user to
b. Create new sites within the organization.
c. Lists all sites in the current organization in table form.
Note: you can edit a sites information by clicking the name of the site.
d. Search for site related information
e. Manage Licenses for a particular site.
Cerora Qumpass User’s Manual
24
a
c
d
b
CREATING A NEW TESTING SITE
1. Select Create New Site to establish an additional testing Site within your organization.
Fill in all required fields marked with a red star and select the Create Site Button.
MANAGEING SITE LICENSES
Site licenses can be managed from a number of views.
a. From the Site Management screen, you may click on the “Manage Site Licenses” link at the
right of each table entry.
b. From the Site Information editor, you can click on the “Manage Site Licenses” button at
the right of the form.
Cerora Qumpass User’s Manual
25
c. From the Qumpass function menu select “Licenses” under the Sys Management menu.
This view presents a searchable table of every site and site license within an organization.
1. Select the Site License link to edit.
2
3
A site license detail view will be presented.
UPDATE A PAYMENT SOURCE NICKNAME
2. Edit the nickname and select “Update Site License”.
Cerora Qumpass User’s Manual
26
UPDATE YOUR CREDIT CARD INFORMATION
3. , select the “Update Payment Source”.
Note: By clicking this link you are exiting Qumpass and beginning the login process to your
customer billing portal.
4. The first time you visit our customer billing portal, you will need to register as a new user.
5. Enter your Qumpass username/email and click “Submit”
Cerora Qumpass User’s Manual
27
6. An email will be sent to the entered address with a verification link. Click the link provided
in the email or paste the URL into your browser address bar.
7. Create a password for our customer billing portal. Cerora recommends a unique password,
but you may use the same one as that for Cerora Qumpass.
8. Once logged in to the customer billing portal, you may update and edit your credit card
information.
Cerora Qumpass User’s Manual
28
CREATE A NEW SITE LICENSE
9. Select the “Create New Site License” button.
3
Note: This is the same procedure as adding your Licensing and Billing information from
Step 3 of the signup process
10. Please select the appropriate license type from the pull-down menu. The current four
options are:
• Qumpass for Covered Entity – Full license for Cerora Qumpass testing suite and mobile
app to be used in a HIPAA covered entity.
• Qumpass for non-Covered Entity – Full license for Cerora Qumpass testing suite and
mobile app to be used in a non-HIPAA covered entity.
• Qumpass (App Only) for Covered Entity
• Qumpass (App Only) for non-Covered Entity
Note: Most users will select the “Qumpass for Covered Entity”
11. Please update the default “Payment Source Nickname”.
Note: A nickname for the payment source is required. Cerora recommends you change it to a
more friendly and memorable license identifier (e.g. David’s License for Downtown
Clinic”.
- - Remainder of the page intentionally left blank - -
Cerora Qumpass User’s Manual
29
12. Once the License Details are entered please click “Enter Payment information”.
The window will expand to include the Secure Payment Form.
19
20
13. Please enter any Discount Code you received from Cerora in the box and click Apply.
14. Enter your credit card information and select “Subscribe”.
Note: Visa, American Express, MasterCard and Discover are accepted.
If you would like to be billed by other means (e.g. Purchase Order), please call our sales
group and we can assist you.
MANAGEING USERS WITHIN AN ORGANIZATION
From the Qumpass function menu select “Users” under the Sys Management menu.
This view presents a searchable table of every professional user within an organization.
Note: Professional users are members of an organization that are not Subjects.
This page allows the user to
Cerora Qumpass User’s Manual
30
a. Create new users within the organization.
b. Edit Qumpass permissions for individual users.
CREATE NEW QUMPASS PROFESSIONAL USERS
1
1. Select Create New User to create a new professional user within your organization.
2
3
2. Please enter the new users full name and email address
All fields marked with a red asterisk are required
3. Once you have completed the User Identification and Account Setup Information forms,
please click “Create User and Send Email”.
Note: This will send an email to the new user to allow them to create a professional user
account within the organization.
Cerora Qumpass User’s Manual
31
EDIT QUMPASS PROFESSIONAL USER PERMISSIONS
4
4. To edit a user’s permissions, select “Edit Permissions” next to their name.
5. Add or remove permissions by marking or clearing the checkbox next to each permission.
6. Once you have completed editing the User’s permissions please click “Save”, or “Cancel” to revert
to permissions currently saved on Qumpass servers.
7. A professional user may be removed from an organization by selecting the “Remove User from
Organization”.
Note: This is permanent and the user will no longer have access to Qumpass. If you need a
professional user restored to your organization please contact support at Cerora.
EDIT QUMPASS PROFESSIONAL USER INFORMATION
8
Cerora Qumpass User’s Manual
32
8. To edit a user’s profile, select “Edit Profile” next to their name.
9. Edit the users information and select “Update Profile” to save changes.
Cerora Qumpass User’s Manual
33