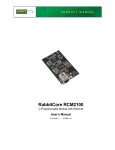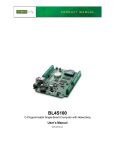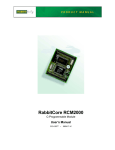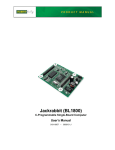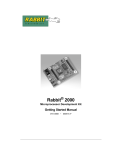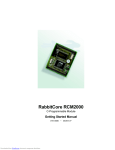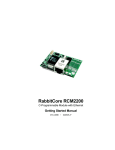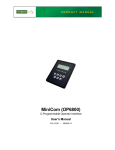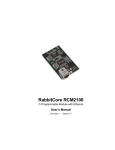
1
A Roadmap to Z-World’s
Rabbit-Based Sample Programs
Sample programs are provided in the Dynamic C SAMPLES folder. The various directories in the
SAMPLES folder contain specific sample programs that illustrate the use of the corresponding
Dynamic C libraries with particular boards.
Single-Board Computers
BL1800
General Board Operation
…Board ID
…LEDs
BL2000
BL2100
X
X
X
BL2500
BL2600
LP3500
X
X
X
Digital I/O
X
X
X
X
X
X
A/D Converter
X
X
X
X
X
X
X
X
X
X
X
X
X
X
X
X
X
X
X
X
X
D/A Converter
Storing/Retrieving
Calibration Constants
Serial Communication
X
TCP/IP
Serial Flash
X
X
Power Modes
X
Relay Outputs
X
LCD/Keypad
X
X
X
X
RabbitNet
X
X
Operator Interfaces
OP6600/OP6700
General Board Operation
…Board ID
…LEDs
…User Block Info
X
Digital I/O
X
OP6800
X
X
OP7200
X
X
X
X
A/D Converter
X
X
D/A Converter
Storing/Retrieving
Calibration Constants
X
Serial Communication
X
X
X
TCP/IP
X
X
X
LCD/Keypad
X
X
X
RabbitNet
Dynamic C Sample Programs
X
1
RabbitNet Peripheral Cards
RN1100
RN1200
RN1300
RN1400
RN1600
General Board Operation
X
X
X
X
X
Digital I/O
X
A/D Converter
X
X
D/A Converter
X
Relay Outputs
X
Keypad/Display Interface
X
Most of the sample programs for RabbitCore modules are based on peripherals available on the
Prototyping Board associated with the specific RabbitCore module, and so the Prototyping Board
is required to run the sample programs. Sample programs illustrating the LCD/keypad require the
optional LCD/keypad module.
Rabbit 2000 Based RabbitCore Modules
RCM2000 RCM2100 RCM2200 RCM2300
General Board Operation
X
X
X
X
Digital I/O
X
X
X
X
Serial Communication
X
X
X
X
X
X
X
X
TCP/IP
LCD/Keypad
X
X
Rabbit 3000 Based RabbitCore Modules
RCM3000 RCM3100 RCM3200 RCM3300 RCM3400 RCM3600 RCM3700
Digital I/O
…IrDA transceivers
X
X
X
X
X
X
X
A/D Converter
X
X
X
Serial Communication
X
TCP/IP
X
X
X
X
X
X
X
X
Serial Flash
LCD/Keypad
X
X
X
X
X
X
X
RabbitNet
X
RabbitWeb Module
X
X
X
X
X
X
X
X
X
SSL Module
X
X
X
X
Remote Application Update
X
Integrating Dynamic C Modules
X
X
Click here for a roadmap to TCP/IP sample programs that are not board-specific.
2
Roadmap to
1.1 BL1800
1.1.1 Digital I/O
FOLDER: SAMPLES\JACKRAB
• DEMOJR1.C—This program flashes LED DS3 on the Jackrabbit Prototyping Board.
• DEMOJR2.C—This program flashes LED DS3 on the Jackrabbit Prototyping Board and illustrates the use of the Dynamic C runwatch() function call.
• DEMOJR3.C—This program flashes LED DS4 on the Jackrabbit Prototyping Board and will
toggle DS1 on/off when pushbutton switch S1 is pressed. This program also illustrates the use
of Dynamic C costatements.
• JRIOTEST.C—This program exercises the JackRabbit's 4 digital output channels, the 2 analog
output channels, and the one analog input channel.
• RABDB01.C—This sample program flashes LEDs DS5–DS8 lights on the Jackrabbit Prototyping Board, and flashes LEDs DS1–DS4 when pushbutton switches S1–S4 are pressed. The
buzzer will sound whenever pushbutton switch S1 is pressed.
• RABDB02.C—This sample program flashes LEDs DS5–DS8 lights on the Jackrabbit Prototyping Board, and flashes LEDs DS1–DS4 when pushbutton switches S1–S4 are pressed. The
buzzer will sound whenever pushbutton switch S1 is pressed.
1.1.2 A/D Converter
FOLDER: SAMPLES\JACKRAB
• JRIO_COF.C—This program demonstrates the use of the Jackrabbit analog input driver as a
cofunction.
1.1.3 Serial Communication
FOLDER: SAMPLES\JACKRAB
• JR_FLOWCONTROL.C—This sample program requires two boards and demonstrates RS-232
flow control.
• JR_PARITY.C—This program sends byte values 0–127 from Serial Port B to Serial Port C,
and will switch between generating parity and not generating parity, which Serial Port C will
be checking for.
1.1.4 LCD/Keypad
FOLDER: SAMPLES\JACKRAB
• LCD_DEMO.C—This sample program illustrates using the Rabbit 2000 external I/O to drive an
LCD that uses the HD44780 controller or an equivalent.
Dynamic C Sample Programs
3
1.2 BL2000
1.2.1 General Board Operation
FOLDER: SAMPLES\BL2000
• BOARD_ID.C—This program is used to identify the model of BL2000 being used, and display
that information in the STDIO window.
• COUNTLEDS.C—This program will count from 0 to 31 in binary, using the four general- purpose LEDs, DS4–DS7, and the Processor Bad LED, DS8. The LEDs are used in reverse logical
order to minimize the cycling of the relay, which is slaved to the same output as DS4.
• LEDS_4.C—This program creates four “devices” (lights), and four buttons to toggle them.
Users can view the devices with their Web browser, and change the status of the lights. If the
Demonstration Board is connected to the BL2000, the lights on the Demonstration Board will
match the ones on the Web page. See Appendix D of the BL2000 User’s Manual for hookup
instructions for the Demonstration Board.
1.2.2 Digital I/O
FOLDER: SAMPLES\BL2000\IO
• ANADIGIN.C—Demonstrates using the A/D converter channels as digital inputs. You will be
able to see an input channel toggle HIGH and LOW when pressing the pushbuttons on the
Demonstration Board.
• DIGIN.C—Demonstrates the use of the digital inputs. Using the Demonstration Board, you
can see an input channel toggle from HIGH to LOW when pressing a pushbutton on the Demonstration Board.
• DIGOUT.C—Demonstrates the use of the high-current outputs. Using the Demonstration
Board, you can see an LED toggle on/off via a high-current output.
• LED.C—Demonstrates how to toggle the output LEDs on the BL2000 on/off.
• PWM.C—Demonstrates the use of Timer B to generate a PWM signal on digital output OUT8.
The program generates a 42 Hz PWM signal with the duty cycle adjustable from 1 to 99%.
1.2.3 A/D Converter
FOLDER: SAMPLES\BL2000\ADC
• AD_CALIB.C—Demonstrates how to recalibrate an A/D converter channel using two known
voltages to generate two coefficients, gain and offset, which are rewritten into the user block
data area. The voltage that is being monitored is displayed continuously. Note that this sample
program will overwrite the calibration constants set at the factory.
• AD1.C—Demonstrates how to access the A/D internal test voltages in the TLC2543 A/D converter chip. The program reads the A/D internal voltages and then uses the STDIO window to
display the RAW data.
• AD2.C—Demonstrates how to access the A/D channels using the anaInVolt() function. The
program uses the STDIO window to display the voltage that is being monitored.
4
Roadmap to
• AD3.C—Demonstrates how to access the A/D converter channels with the low-level A/D
driver. The program uses the STDIO window to display the voltage that is being monitored on
all the A/D channels using the low-level A/D driver.
• AD4.C—Demonstrates how to use the A/D converter channels with the low-level A/D driver.
The program uses the STDIO window to display the voltage (average of 10 samples) that is
being monitored on all the A/D converter channels using the low-level A/D driver.
1.2.4 D/A Converter
FOLDER: SAMPLES\BL2000\DAC
• DACAL.C—This program demonstrates how to recalibrate an D/A converter channel using two
known voltages, and defines the two coefficients, gain and offset, that will be rewritten into the
D/A converter's EEPROM simulated in flash memory. Note that this sample program will
overwrite the calibration constants set at the factory.
• DAOUT1.C—This program outputs a voltage that can be read with a voltmeter. The output voltage is computed using the calibration constants that are read from the EEPROM simulated in
flash memory.
• DAOUT2.C—This program demonstrates the use of both the D/A and the A/D converters. The
user selects both the D/A converter and A/D channel to be used, then sets the D/A converter
output voltage to be read by the A/D channel. All activity will be displayed in the STDIO
window.
1.2.5 Serial Communication
FOLDER: SAMPLES\BL2000\RS232
• PUTS.C—Transmits and then receives an ASCII string on Serial Ports B and C. It also displays
the serial data received from both ports in the STDIO window.
• RELAYCHR.C—This program echoes characters over Serial Port B to Serial Port C. It must be
run with a serial utility such as HyperTerminal.
FOLDER: SAMPLES\BL2000\RS485
• MASTER.C—This program demonstrates a simple RS-485 transmission of lower case letters to
a slave BL2000. The slave will send back converted upper case letters back to the master
BL2000 and display them in the STDIO window. Use SLAVE.C to program the slave BL2000.
• SLAVE.C—This program demonstrates a simple RS-485 transmission of lower case letters to a
slave BL2000. The slave will send back converted upper case letters back to the master
BL2000 and display them in the STDIO window. Use MASTER.C to program the master
BL2000.
1.2.6 Relay Outputs
FOLDER: SAMPLES\BL2000\IO
• RELAY.C—Demonstrates how to control the relay on the BL2000.
Dynamic C Sample Programs
5
1.2.7 TCP/IP
FOLDER: SAMPLES\BL2000\TCPIP
• SSI.C—This program demonstrates how to make the BL2000 a Web server. This program
allows you to turn the LEDs on an attached Demonstration Board from the Tool Kit on and off
from a remote Web browser. LEDs DS4–DS8 on the BL2000 will match those on the Web
page. As long as you have not modified the TCPCONFIG 1 macro in the sample program, enter
the following server address in your Web browser to bring up the Web page served by the sample program.
http://10.10.6.100.
Otherwise use the TCP/IP settings you entered in the TCP_CONFIG.LIB library.
• SMTP.C—This program allows you to send an E-mail when a switch on the Demonstration
Board is pressed. Follow the instructions included with the sample program.
• TELNET.C—This program allows you to communicate with the BL2000 using the Telnet protocol. This program takes anything that comes in on a port and sends it out Serial Port B. It
uses digital input IN0 to indicate that the TCP/IP connection should be closed, and it uses highcurrent output OUT0 to indicate that there is an open connection. You may change the digital
input and output to suit your application needs.
6
Roadmap to
1.3 BL2100
1.3.1 General Board Operation
FOLDER: SAMPLES\BL2100
• BOARD_ID.C—This program is used to identify the model of BL2100 being used, and display
that information in the STDIO window.
1.3.2 Digital I/O
FOLDER: SAMPLES\BL2100\IO
• DIGIN.C—Demonstrates the use of the digital inputs. Using the Demonstration Board, you
can see an input channel toggle from HIGH to LOW when pressing a pushbutton on the
Demonstration Board.
• DIGOUT.C—Demonstrates the use of the high-current outputs configured as either sinking or
sourcing outputs. Using the Demonstration Board, you can see an LED toggle on/off via a
high-current output.
• PWM.C—Demonstrates the use of Timer B to generate a PWM signal on PE5-INT located on
screw terminal header J11. The program generates a 42 Hz PWM signal with the duty cycle
adjustable from 1 to 99%.
1.3.3 A/D Converter
FOLDER: SAMPLES\BL2100\ADC
• AD_CALIB.C—Demonstrates how to recalibrate an A/D converter channel using two known
voltages to generate two coefficients, gain and offset, which are rewritten into the user block
data area. The voltage that is being monitored is displayed continuously. Make sure that you
don't exceed the voltage range of the A/D converter input channel.
NOTE: This sample program will overwrite the calibration constants set at the factory.
• AD1.C—Demonstrates how to access the A/D internal test voltages in both the TLC2543 and
TLC1543 A/D converter chips. The program reads the A/D internal voltages and then uses the
STDIO window to display the RAW data.
• AD2.C—Demonstrates how to access the A/D channels using the anaInVolt() function. The
program uses the STDIO window to display the voltage that is being monitored.
• AD3.C—Demonstrates how to access the A/D converter channels with the low-level A/D
driver. The program uses the STDIO window to display the voltage that is being monitored on
all the A/D channels using the low-level A/D driver.
• AD4.C—Demonstrates how to use the A/D converter channels with the low-level A/D driver.
The program uses the STDIO window to display the voltage (average of 10 samples) that is
being monitored on all the A/D converter channels using the low-level A/D driver.
Dynamic C Sample Programs
7
1.3.4 D/A Converter
FOLDER: SAMPLES\BL2100\DAC
• DACAL.C—This program demonstrates how to recalibrate an D/A converter channel using two
known voltages, and defines the two coefficients, gain and offset, that will be rewritten into the
D/A converter's EEPROM simulated in flash memory.
NOTE: This sample program will overwrite the calibration constants set at the factory.
• DAOUT1.C—This program outputs a voltage that can be read with a voltmeter. The output voltage is computed using the calibration constants that are read from the EEPROM simulated in
flash memory.
• DAOUT2.C—This program demonstrates the use of both the D/A and the A/D converters. The
user selects both the D/A converter and A/D channel to be used, then sets the D/A converter
output voltage to be read by the A/D channel. All activity will be displayed in the STDIO
window.
1.3.5 Using Calibration Constants
FOLDER: SAMPLES\BL2100\Calib_Save_Retrieve
The following sample programs prompt you to use a serial number for the BL2100. This serial
number can be any 5-digit number of your choice, and will be unique to a particular BL2100. Do
not use the MAC address on the bar code label of the RabbitCore module attached to the BL2100
since you may at some later time use that particular RabbitCore module on another BL2100, and
the previously saved calibration data would no longer apply.
• GETCALIB.C—This program demonstrates how to retrieve your analog calibration data to
rewrite it back to the simulated EEPROM in flash with using a serial utility such as Tera Term.
NOTE: Calibration data must be saved previously in a file by the sample program
SAVECALIB.C.
• SAVECALIB.C—This program demonstrates how to save your analog calibration coefficients
using a serial port and a PC serial utility such as Tera Term.
NOTE: Use the sample program GETCALIB.C to retrieve the data and rewrite it to the singleboard computer.
1.3.6 Serial Communication
FOLDER: SAMPLES\BL2100\RS232
• PUTS.C—Transmits and then receives an ASCII string on Serial Ports B and C. It also displays
the serial data received from both ports in the STDIO window.
• RELAYCHR.C—This program echoes characters over Serial Port B to Serial Port C. It must be
run with a serial utility such as HyperTerminal.
8
Roadmap to
FOLDER: SAMPLES\BL2100\RS-485
• MASTER.C—This program demonstrates a simple RS-485 transmission of lower case letters to
a slave BL2100. The slave will send back converted upper case letters back to the master
BL2100 and display them in the STDIO window. Use SLAVE.C to program the slave BL2100.
• SLAVE.C—This program demonstrates a simple RS-485 transmission of lower case letters to a
slave BL2100. The slave will send back converted upper case letters back to the master
BL2100 and display them in the STDIO window. Use MASTER.C to program the master
BL2100.
1.3.7 TCP/IP
FOLDER: SAMPLES\BL2100\TCPIP
• SSI.C—This program demonstrates how to make the BL2100 a Web server. This program
allows you to turn the LEDs on an attached Demonstration Board from the Tool Kit on and off
from a remote Web browser. LED0 and LED1 on the LCD/keypad module (LED1 and LED2
on the Demonstration Board) will match those on the Web page.
• SMTP.C—This program allows you to send an e-mail when a switch on the Demonstration
Board is pressed. Follow the instructions included with the sample program.
• TELNET.C—This program allows you to communicate with the BL2100 using the Telnet protocol. This program takes anything that comes in on a port and sends it out Serial Port B. It
uses digital input IN00 to indicate that the TCP/IP connection should be closed, and it uses
high-current output OUT00 to indicate that there is an open connection. You may change the
digital input and output to suit your application needs.
Dynamic C Sample Programs
9
1.4 BL2500
1.4.1 General Board Operation
FOLDER: SAMPLES\BL2500
• CONTROLLED.C—Uses the D/A converters to vary the brightness of the LEDs on the Demonstration Board.
• FLASHLEDS.C—Uses cofunctions and costatements to flash LEDs on the BL2500 at different
intervals.
• TOGGLESWITCH.C—Uses costatements to detect switches presses on the Demonstration
Board with press and release debouncing. Corresponding LEDs will turn on or off.
1.4.2 Digital I/O
FOLDER: SAMPLES\BL2500\IO
• DIGIN.C—This program demonstrates the use of the digital inputs and the function call
digIn() using the Demonstration Board to see an input channel toggle from HIGH to LOW
when pressing a pushbutton on the Demonstration Board.
• DIGOUT.C—This program demonstrates the use of the digital outputs and the function call
digOut() using the Demonstration Board to see the logic levels of output channels in the
STDIO window and the state of the corresponding LEDs on the Demonstration Board.
1.4.3 A/D Converter
FOLDER: SAMPLES\BL2500\ADC
• AD0.C—This program reads and displays the voltage on channel AD0 and its equivalent value
to the STDIO window.
• ADCCALIB.C—This program demonstrates how to recalibrate one single-ended A/D converter
channel using two known voltages to generate constants that are then rewritten into the user
block data area.
• COF_ANAIN.C—This program demonstrates the use of the analog input driver as a cofunction.
Connect DA1 to AD0 to provide an input voltage. When the program runs, it will read the
input voltage ten times while another costatement is executed concurrently. The values will be
printed out at the end of the program.
• DA2AD.C—This program allows the user to input a voltage in the Dynamic C STDIO window
for DA1 to output. The user needs to connect DA1 to AD0. The program will display the voltage read in the STDIO window.
10
Roadmap to
1.4.4 D/A Converter
FOLDER: SAMPLES\BL2500\DAC
• DAC.C—Demonstrates pulse-width modulation as an analog output voltage by displaying the
voltage entered and measuring the voltage output.
• DACCALIB.C—Demonstrates how to recalibrate one single-ended analog output channel using
two known voltages to generate constants for that channel that are then rewritten into the user
block data area.
• PWM.C—Demonstrates pulse-width modulation as an analog output.
1.4.5 Using Calibration Constants
FOLDER: SAMPLES\BL2500\ADC
• UPLOADCALIB.C—This program demonstrates reading calibration constants from a controller's user block in flash memory and transmitting the file using a serial port with a PC serial
utility such as Tera Term.
NOTE: Use the sample program DNLOADCALIB.C to retrieve the data and rewrite it to the
single-board computer.
• DNLOADCALIB.C—This program demonstrates how to retrieve your analog calibration data to
rewrite them back to simulated EEPROM in flash using a serial utility such as Tera Term.
NOTE: Calibration data must be saved previously in a file by the sample program
UPLOADCALIB.C.
NOTE: In addition to loading the calibration constants on the replacement RabbitCore module,
you will also have to add the product information for the BL2500 to the ID block associated
with the RabbitCore module. The sample program WRITE_IDBLOCK.C, available on the
Z-World Web site at http://www.zworld.com/support/feature_downloads.shtml, provides
specific instructions and an example.
1.4.6 Serial Communication
FOLDER: SAMPLES\BL2500\SERIAL
• FLOWCONTROL.C—Demonstrates hardware flow control by sending a pattern of * characters
out of Serial Port E (PG6) at115,200 bps. One character at a time is received from PG6 and is
displayed. In this example, PG3 is configured as the CTS input, detecting a clear to send condition, and PG2 is configured as the RTS output, signaling a ready condition. This demonstration
can be performed with either one or two boards.
• SIMPLE3WIRE.C—Demonstrates basic initialization for a simple RS-232 3-wire loopback
displayed in the STDIO window.
• SWITCHCHAR.C—This program transmits and then receives an ASCII string on Serial Ports E
and F when a switch is pressed. It also displays the serial data received from both ports in the
STDIO window.
Dynamic C Sample Programs
11
• SIMPLE485MASTER.C—This program demonstrates a simple RS-485 transmission of lower
case letters to a slave. The slave will send back converted upper case letters back to the master
BL2500 and display them in the STDIO window. Use SIMPLESLAVE.C to program the slave.
• SIMPLE485SLAVE.C—This program demonstrates a simple RS-485 transmission of lower
case letters to a master BL2500. The slave will send back converted upper case letters back to
the master BL2500 and display them in the STDIO window. Use SIMPLEMASTER.C to program
the master BL2500.
1.4.7 TCP/IP
FOLDER: SAMPLES\BL2500\TCPIP
• BROWSELED.C—This program demonstrates a basic controller running a Web page. Two
“LEDs” are created on the Web page, and two buttons on the Demonstration Board then toggle
them. Users can change the status of the lights from the Web browser. The LEDs on the Demonstration Board match the ones on the Web page.
• SMTP.C—This program allows you to send an E-mail when a switch on the Demonstration
Board is pressed. Follow the instructions included with the sample program.
• PINGLED.C—This program demonstrates ICMP by pinging a remote host. It will flash LEDs
DS1 and DS2 on the Demonstration Board when a ping is sent and received.
12
Roadmap to
1.5 BL2600
1.5.1 General Board Operation
FOLDER: SAMPLES\BL2600
• BOARD_ID.C—This program is used to identify the model of BL2600 being used, and displays
that information in the STDIO window.
1.5.2 Digital I/O
FOLDER: SAMPLES\BL2600\IO
• DIGIN.C—Demonstrates the use of the digital inputs. Using the Demonstration Board, you
can see an input channel toggle from HIGH to LOW when pressing a pushbutton on the
Demonstration Board. See Appendix C in the BL2600 User’s Manual for hookup instructions
for the Demonstration Board. This sample program does not explicitly configure any of the
configurable I/O, so all the configurable I/O are available by default as digital inputs.
• DIGINBANK.C—Demonstrates the use of digInBank() to read digital inputs. Using the Demonstration Board, you can see an input channel toggle from HIGH to LOW when pressing a
pushbutton on the Demonstration Board. See Appendix C in the BL2600 User’s Manual for
hookup instructions for the Demonstration Board. This sample program does not explicitly
configure any of the configurable I/O, so all the configurable I/O are available by default as
digital inputs.
• DIGOUT.C—Demonstrates the use of the configurable I/O sinking outputs. Using the Demonstration Board, you can see an LED toggle on/off via a sinking output. See Appendix C in the
BL2600 User’s Manual for hookup instructions for the Demonstration Board.
• DIGOUTBANK.C—Demonstrates the use of digInBank() to control the configurable I/O sinking outputs. Using the Demonstration Board, you can see an LED toggle on/off via a sinking
output. See Appendix C in the BL2600 User’s Manual for hookup instructions for the Demonstration Board.
• HIGH_CURRENT_IO.C—Demonstrates the use of the high-current outputs configured as either
sinking or sourcing outputs. High-current output HOUT0 is configured for sourcing to provide
power to the Demonstration Board. Outputs HOUT1 and HOUT2 are configured to demonstrate tristate operation to toggle the LEDs on the Demonstration Board. Output HOUT3 is
configured as a sinking output to toggle an LED on the Demonstration Board. See Appendix D
for hookup instructions for the Demonstration Board.
• PWM.C—Demonstrates the use of the four PWM channels on Parallel Port F (PF4–PF7) on
pins DIN20–DIN23. The PWM signals are set for a frequency of 10 kHz with the duty cycle
adjustable from 1 to 99% by the user. Since the output voltage swing is 0 V to 2.5 V DC, the
PWM outputs should interface only with TTL-compatible components.
Dynamic C Sample Programs
13
1.5.3 A/D Converter
FOLDER: SAMPLES\BL2600\ADC
NOTE: The calibration sample programs will overwrite the calibration constants set at the
factory.
• ADC_CAL_DIFF.C—Demonstrates how to recalibrate a differential A/D converter channel
using two known voltages to generate two coefficients, gain and offset, which are rewritten
into the reserved EEPROM. The voltage that is being monitored is displayed continuously.
• ADC_CAL_MA.C—Demonstrates how to recalibrate a milli-amp A/D converter channel using
two known currents to generate two coefficients, gain and offset, which are rewritten into the
reserved EEPROM. The current that is being monitored is displayed continuously.
• ADC_CAL_SE_BIPOLAR.C—Demonstrates how to recalibrate a single-ended bipolar A/D
converter channel using two known voltages to generate two coefficients, gain and offset,
which are rewritten into the reserved EEPROM. The voltage that is being monitored is displayed continuously.
• ADC_CAL_SE_UNIPOLAR.C—Demonstrates how to recalibrate a single-ended unipolar A/D
converter channel using two known voltages to generate two coefficients, gain and offset,
which are rewritten into the reserved EEPROM. The voltage that is being monitored is displayed continuously.
• AD_RD_DIFF.C—Demonstrates how to read and display voltage and equivalent values for a
differential A/D converter channel using calibration coefficients previously stored in the
EEPROM. The user selects to display either the raw data or the voltage equivalent.
• AD_RD_MA.C—Demonstrates how to read and display voltage and equivalent values for a
milli-amp A/D converter channel using calibration coefficients previously stored in the
EEPROM. The user selects to display either the raw data or the current equivalent.
• AD_RD_SE_BIPOLAR.C—Demonstrates how to read and display the voltage of all singleended A/D converter channels using calibration coefficients previously stored in the
EEPROM.
• AD_RD_SE_UNIPOLAR.C—Demonstrates how to read and display the voltage of all singleended A/D converter channels using calibration coefficients previously stored in the
EEPROM.
14
Roadmap to
1.5.4 D/A Converter
FOLDER: SAMPLES\BL2600\DAC
NOTE: The calibration sample programs will overwrite the calibration constants set at the
factory.
• DAC_CAL_MA.C—Demonstrates how to recalibrate a D/A converter channel using a known
current to generate calibration constants, which are written into the reserved EEPROM.
• DAC_CAL_VOLTS.C—Demonstrates how to recalibrate a D/A converter channel using a
known voltage to generate calibration constants, which are written into the reserved EEPROM.
• DAC_MA_ASYNC.C—Demonstrates how to output a current that can be read with an ammeter.
The output current is computed with using the calibration constants that are stored in the
reserved EEPROM.
The D/A converter circuit is set up for asynchronous operation, which updates the D/A converter output at the time it's being written via the anaOut() or anaOutmAmps() function calls.
• DAC_MA_SYNC.C—Demonstrates how to output a current that can be read with an ammeter.
The output current is computed with using the calibration constants that are stored in the
reserved EEPROM.
The D/A converter circuit is set up for synchronous operation, which updates the D/A converter output when the anaOutStrobe() function call executes. The outputs will be updated
with values previously written via the anaOut() or anaOutmAmps() function calls.
• DAC_VOLT_ASYNC.C—Demonstrates how to output a voltage that can be read with a voltmeter. The output voltage is computed with using the calibration constants that are stored in the
reserved EEPROM.
The D/A converter circuit is set up for asynchronous operation, which updates the D/A converter output at the time it's being written via the anaOut() or anaOutVolts() function calls.
• DAC_VOLT_SYNC.C—Demonstrates how to output a voltage that can be read with a voltmeter.
The output voltage is computed with using the calibration constants that are stored in the
reserved EEPROM.
The D/A converter circuit is set up for synchronous operation, which updates the D/A converter output when the anaOutStrobe() function call executes. The outputs will be updated
with values previously written via the anaOut() or anaOutVolts() function calls.
Dynamic C Sample Programs
15
1.5.5 Using Calibration Constants
FOLDER: SAMPLES\BL2600\ADC
• ADC_RD_CALDATA.C—Demonstrates how to display the two calibration coefficients, gain and
offset, in the Dynamic C STDIO window for each channel and mode of operation.
FOLDER: SAMPLES\BL2600\ADC
• DAC_RD_CALDATA.C—Demonstrates how to display the calibration coefficients, gain and offset, in the Dynamic C STDIO window for each channel and mode of operation.
1.5.6 Serial Communication
FOLDER: SAMPLES\BL2600\RS232
• PARITY.C—This sample program repeatedly sends byte values 0–127 from Serial Port F to
Serial Port C. The program switches between generating parity and not generating parity on
Serial Port F. Serial Port C will always be checking parity, so parity errors should occur during
every other sequence. The results are displayed in the Dynamic C STDIO window.
Connect TxF to RxC before compiling and running this sample program.
NOTE: For the sequence that does yield parity errors, the errors won't occur for each byte
received. This is because certain byte patterns along with the stop bit will appear to generate the
correct parity for the UART.
• SIMPLE3WIRE.C—This program demonstrates basic RS-232 serial communication. Connect
TxC to RxF on header J17 and connect TxF to RxC on header J17 before compiling and running this sample program.
• SIMPLE5WIRE.C—This program demonstrates 5-wire RS-232 serial communication. Connect
TxC to RxC on header J17 and connect TxF to RxF on header J17 before compiling and running this sample program.
TxF and RxF become the flow control RTS and CTS. To test flow control, disconnect RTS
from CTS while running this program. Characters should stop printing in the Dynamic C
STDIO window and should resume when RTS and CTS are connected again
FOLDER: SAMPLES\BL2600\RS485
• MASTER.C—This program demonstrates a simple RS-485 transmission of lower case letters to
a slave. The slave will send back converted upper case letters back to the master BL2600 and
display them in the STDIO window. Use SLAVE.C to program the slave. Make the following
connections between the master and slave:
485+ to 485+
485- to 485GND to GND
• SLAVE.C—This program demonstrates a simple RS-485 transmission of lower case letters to a
slave. The slave will send back converted upper case letters back to the master BL2600 and
display them in the STDIO window. Use MASTER.C to program the master BL2600.
16
Roadmap to
1.5.7 Serial Flash
FOLDER: SAMPLES\BL2600\SF1000
The following sample programs demonstrate the use of the optional SF1000 serial flash card on the
BL2600. The SF1000 User’s Manual contains additional information and API functions for the
SF1000.
• FLASH_PATTERN_INSPECT.C—Writes a pattern to the first 100 sectors of the SF1000, which
can then be inspected or cleared by the user. The user then has the option to either inspect or
clear a page of serial flash memory.
• SFLASH_TEST.C—Demonstrates how to read and write data from/to the SF1000. Once the
sample program is compiled and run, it displays a message in the Dynamic C STDIO window
to report whether the test was successful.
1.5.8 TCP/IP
FOLDER: SAMPLES\BL2600\TCPIP
• SSI.C—This program demonstrates how to make the BL2600 a Web server. This program
allows you to turn the LEDs on an attached Demonstration Board from the Tool Kit on and off
from a remote Web browser. The LEDs on the Demonstration Board match the ones on the
Web page. Follow the instructions included with the sample program.
• SMTP.C—This program allows you to send an e-mail when a switch on the Demonstration
Board is pressed. Follow the instructions included with the sample program.
• TELNET.C—This program allows you to communicate with the BL2600 using the Telnet protocol. This program takes anything that comes in on a port and sends it out Serial Port C. It
uses a digital input to indicate that the TCP/IP connection should be closed and a digital output
to toggle a LED to indicate that there is an active connection.
Dynamic C Sample Programs
17
1.6 LP3500
1.6.1 Power Modes
FOLDER: SAMPLES\LP3500\POWER
• POWER.C—This program demonstrates switching from the normal raw DC power source to an
external battery using the Prototyping Board. Pressing a switch will change from the power
source and will be displayed by flashing LEDs.
• LOWPWRDEMO.C—This program demonstrates a low-power mode with the normal power
source connected to the LP3500.
• VCCMONITOR.C—This program demonstrates the Vcc monitoring function on AIN7. All
activity will be displayed in the STDIO window
1.6.2 Digital I/O
FOLDER: SAMPLES\LP3500\IO
• DIGIN.C—Demonstrates the use of the digital inputs. Using the Prototyping Board, you can
see an input channel toggle from HIGH to LOW when pressing a pushbutton on the Prototyping Board.
• DIGOUT.C—Demonstrates the use of the high-current outputs configured as either sinking or
sourcing outputs. Using the Prototyping Board, you can see an LED toggle on/off via a highcurrent output.
• DIGBANKIN.C—Demonstrates the use of the digital inputs. Using the Prototyping Board, you
can see a bank of input channels toggle from HIGH to LOW when pressing a pushbutton on the
Prototyping Board.
• DIGBANKOUT.C—Demonstrates the use of the high-current outputs configured as either sinking or sourcing outputs. Using the Prototyping Board, you can see a bank of channels toggle
the corresponding LEDs on/off via high-current outputs.
• PWMOUT.C—This program demonstrates the PWM functions. It will set the PWM channels,
PWM0–PWM2, to the following duty cycles:
PWM Channel 0 to 10%
PWM Channel 1 to 25%
PWM Channel 2 to 50%
All activity will be displayed in the STDIO window.
1.6.3 A/D Converter
FOLDER: SAMPLES\LP3500\ADC
• AD_RDVOLT_ALL.C—This program reads and displays the voltage and equivalent values of
each single-ended A/D converter channel. Coefficients are read from the A/D converter's
simulated EEPROM in flash memory to compute the equivalent voltages. Computed raw data
and equivalent voltages are displayed in the STDIO window.
18
Roadmap to
• AD_RDVOLT_CH.C—This program reads and displays the voltage and equivalent values of one
single-ended A/D converter channel. Coefficients are read from the A/D converter's simulated
EEPROM in flash memory to compute the equivalent voltages. Computed raw data and equivalent voltages are displayed in the STDIO window.
• AD_RDDIFF_CH.C—This program demonstrates reading one differential A/D converter channel. Coefficients are read from the A/D converter's simulated EEPROM in flash memory to
compute the equivalent voltages. Computed raw data and equivalent voltages are displayed in
the STDIO window.
• AD_RDMA_CH.C—This program demonstrates reading one milliampere A/D converter channel. Coefficients are read from the A/D converter's simulated EEPROM in flash memory to
compute the equivalent currents. Computed raw data and equivalent currents are displayed in
the STDIO window.
• AD_SAMPLE.C—This program demonstrates how to use the A/D low-level driver. The program will display the average voltage that is present on an A/D converter channel. The particular channel and the number of samples may be changed by the user.
• ADCAL_ALL.C—This program demonstrates how to recalibrate all single-ended A/D converter
channels using two known voltages to generate constants for each channel, and will be written
into the user block data area. The program uses the STDIO window to display the voltage that
is being monitored.
NOTE: This sample program will overwrite the calibration constants set at the factory.
• ADCAL_CHAN.C—This program demonstrates how to recalibrate one single-ended A/D converter channel using two known voltages to generate constants for each channel, and will be
written into the user block data area. The program uses the STDIO window to display the voltage that is being monitored.
NOTE: This sample program will overwrite the calibration constants set at the factory.
• AD_CALDIFF.C—This sample program demonstrates how to recalibrate one differential A/D
converter channel using two known voltages to generate constants for that channel and rewrite
the constants into the user block data area. The program uses the STDIO window to display the
voltage that is being monitored.
NOTE: This sample program will overwrite the calibration constants set at the factory.
• AD_CALMA_CH.C—This sample program demonstrates how to recalibrate one A/D converter
channel operating in the 4–20 mA current mode using two known currents to generate two
coefficients, gain and offset, which are rewritten into the user block data area. The program
uses the STDIO window to display the current that is being monitored.
NOTE: This sample program will overwrite the calibration constants set at the factory.
Dynamic C Sample Programs
19
1.6.4 Serial Communication
FOLDER: SAMPLES\LP3500\RS232
• SIMPLE3WIRE.C—This program demonstrates basic initialization for a simple RS-232 3-wire
loopback displayed in the STDIO window.
FOLDER: SAMPLES\LP3500\RS485
• SIMPLE485MASTER.C—This program demonstrates a simple RS-485 transmission of lower
case letters to a slave LP3500. The slave will send back converted upper case letters back to the
master LP3500 and display them in the STDIO window. Use SIMPLE485SLAVE.C to program
the slave LP3500.
• SIMPLE485SLAVE.C—This program demonstrates a simple RS-485 transmission of lower
case letters to a slave LP3500. The slave will send back converted upper case letters back to the
master LP3500 and display them in the STDIO window. Use SIMPLE485MASTER.C to program the master LP3500.
1.6.5 Relay Outputs
FOLDER: SAMPLES\LP3500\RELAY
• SWRELAY.C—This program demonstrates the relay-switching function call operating on normal power source. Use the pushbutton switches on the Prototyping Board to switch the relay
between the SET (NO) and RESET (NC) positions. All activity will be displayed with the
LEDs.
1.6.6 LCD/Keypad
FOLDER: SAMPLES\LP3500\DISPLAY_KEYPAD
• DISPLED.C—This sample program demonstrates how to toggle the LEDs on the LCD/keypad
module.
• KEYMENU.C—This sample program demonstrates how to implement a menu system using a
highlight bar on the LCD/keypad module.
These two sample programs are board-specific to the LP3500. Click here for additional sample
programs that illustrate the use of the LCD/keypad module.
20
Roadmap to
1.7 Intellicom
1.7.1 General Board Operation
FOLDER: SAMPLES\ICOM
• COFTERMA.C—Demonstrates cofunctions, the cofunction serial library, and using a serial
ANSI terminal such as HyperTerminal from an available PC COM port connection.
• ICOMDEMO.C—Demonstration program to illustrate Intellicom features. This demonstration
program comes up when the Intellicom is first powered up before new programs are compiled
and run.
• MUSIC.C—Speaker demonstration: plays one line of “Bicycle Built For Two” (with lyrics).
• MUSIC2.C—Speaker demonstration: plays one line of “Für Elise” as background music while
other processing is going on.
• SPEAKER.C—Demonstrates how to adjust the speaker frequency and volume.
1.7.2 Digital I/O
FOLDER: SAMPLES\ICOM
• DEMOBRD1.C—Flashes LEDs on Demonstration Board included in Development Kit.
• DEMOBRD2.C—Flashes LEDs on Demonstration Board included in Development Kit and
illustrates the Dynamic C runwatch function.
• DEMOBRD3.C—Flashes LEDs on Demonstration Board included in Development Kit and
demonstrates the use of costatements.
• ICOMIO.C—Demonstrates how to turn the digital I/O on and off.
1.7.3 Serial Communication
FOLDER: SAMPLES\ICOM
• ICOM232.C—Demonstrates a simple RS-232 loopback.
• ICOM485.C—Demonstrates a simple RS-485 transmission from master to slave.
• ICOM5WIRE.C—Demonstrates a 5-wire RS-232 loopback in an Intellicom set up for 5-wire
RS-232.
• REMOTE1.C—Demonstrates simple serial data communication using a remote ANSI terminal
such as HyperTerminal from an available PC COM port connection.
Dynamic C Sample Programs
21
1.7.4 TCP/IP
FOLDER: SAMPLES\ICOM
• HTTPDEMO.C—Allows a Web browser to view and change the state of the Intellicom board.
• MBOXDEMO.C—Implements a Web server that allows e-mail messages to be entered and then
shown on the LCD display.
• SMTPDEMO.C—Uses the TCPIP\SMTP.LIB library to send an e-mail when a key on the keypad or a switch on the Demonstration Board is pressed. See Appendix D in the Intellicom
User’s Manual for hookup instructions for the Demonstration Board.
• TCP_RESPOND.C—Shows how to receive messages and respond.
• TCP_SEND.C—Shows how to send message to specific addresses and ports.
The programs TCP_SEND.C and TCP_RESPOND.C are meant to be executed on two different
Intellicom boards so that the two boards communicate with each other. In the absence of a second
board, PCSEND.EXE (used with TCP_SEND.C) and PCRESPOND.EXE (used with TCP_RESPOND.C)
in the SAMPLES\ICOM\WINDOWS directory can be used on the PC console side at the command
prompt. Both the executables and the C source code are located in the WINDOWS directory.
Using PCSEND
PCSEND.C is the source code for PCSEND.EXE used on the PC console side to communicate with
an Intellicom board. The executable PCSEND.EXE is similar to TCP_SEND.C, but is run at the
command prompt to communicate with an Intellicom board running TCP_RESPOND.C.
Using PCRESPOND
PCRESPOND.C is the source code for PCRESPOND.EXE used on the PC console side to communicate with an Intellicom board. The executable PCRESPOND.EXE is similar to TCP_RESPOND.C,
but is run at the command prompt to communicate with an Intellicom board running TCP_SEND.C.
1.7.5 LCD/Keypad
FOLDER: SAMPLES\ICOM
• KEYLCD.C—Demonstrates the use of an LCD and keypad.
22
Roadmap to
1.8 OP6800
1.8.1 General Board Operation
FOLDER: SAMPLES\OP6800
• BOARD_ID.C—Detects the type of single-board computer and displays the information in the
STDIO window. For the OP6800, the STDIO window should show OP6800.
FOLDER: SAMPLES\OP6800\DEMO_BD
• BUZZER.C—Demonstrates the use of the buzzer on the Demonstration Board. Remember to
set the jumper across pins 1–2 of header JP1 on the Demonstration Board to enable the buzzer
on. When you finish with BUZZER.C, it is recommended that you reconnect the jumper across
pins 2–3 of header JP1 on the Demonstration Board to disable the buzzer.
• KEYPAD.C—Flashes the LED above a keypad button when the corresponding keypad button is
pressed. The corresponding LED on the Demonstration Board will also flash if a keypad button
in the top row of the keypad is pressed. A message is also displayed on the LCD.
• SWITCHES.C—Flashes the LED on the Demonstration Board and the OP6800 when the corresponding pushbutton switch on the Demonstration Board is pressed. A message is also displayed on the LCD.
1.8.2 Digital I/O
FOLDER: SAMPLES\OP6800\IO
• DIGIN.C—Demonstrates the use of the digital inputs. By pressing a pushbutton switch on the
Demonstration Board, you can view an input channel toggle from HIGH to LOW on your PC
monitor. The four pushbutton switches correspond to IN00–IN03 on the OP6800. IN04–IN12
can also be toggled by momentarily grounding the inputs.
• DIGOUT.C—Demonstrates the use of the sinking high-current outputs. By pressing a pushbutton switch on the Demonstration Board, you can view an output channel toggle the corresponding LEDs on/off. The four pushbutton switches correspond to OUT07– OUT10.
1.8.3 Serial Communication
FOLDER: SAMPLES\OP6800\RS232
• PUTS.C—Transmits and then receives an ASCII string on Serial Ports B and C. It also displays
the serial data received from both ports in the STDIO window.
• RELAYCHR.C—This program echoes characters over Serial Port B to Serial Port C. It must be
run with a serial utility such as HyperTerminal.
FOLDER: SAMPLES\OP6800\RS485
• MASTER.C—This program demonstrates a simple RS-485 transmission of lower case letters to
a slave OP6800. The slave will send back converted upper case letters back to the master
OP6800 and display them in the STDIO window. Use SLAVE.C to program the slave OP6800.
• SLAVE.C—This program demonstrates a simple RS-485 transmission of lower case letters to a
slave OP6800. The slave will send back converted upper case letters back to the master OP6800
and display them in the STDIO window. Use MASTER.C to program the master OP6800.
Dynamic C Sample Programs
23
1.8.4 TCP/IP
FOLDER: SAMPLES\OP6800\TCPIP
• SSI.C—This program demonstrates how to make the OP6800 a Web server. This program
allows you to turn the LEDs on an attached Demonstration Board from the Tool Kit on and off
from a remote Web browser. LED0 and LED1 on the OP6800 (LED1 and LED2 on the
Demonstration Board) will match those on the Web page.
• SMTP.C—This program allows you to send an e-mail when a switch on the Demonstration
Board is pressed. Follow the instructions included with the sample program.
• TELNET.C—This program allows you to communicate with the OP6800 using the Telnet
protocol. This program takes anything that comes in on a port and sends it out Serial Port B. It
uses digital input IN00 (which is connected to Demonstration Board switch SW1) to indicate
that the TCP/IP connection should be closed and high-current output OUT01 to indicate that
there is an active connection.You may change the digital input and output to suit your application needs.
24
Roadmap to
1.9 OP7200
1.9.1 General Board Operation
FOLDER: SAMPLES\OP7200
• BOARD_ID.C—Detects the model of the board you are using and displays the information in
the STDIO window.
• FUN.C—Demonstrates the features of the OP7200. A variable customer-supplied 0–10 V DC
power supply is recommended to demonstrate the analog input section.
• USERBLOCKINFOR.C—Displays the addresses reserved for the analog calibration data constants and the addresses available for use by your application program.
1.9.2 Digital I/O
FOLDER: SAMPLES\OP7200\IO
• BUZZER.C—Demonstrates the use of the OP7200 buzzer.
• DIGIN.C—Demonstrates the use of the digital inputs. Using the Demonstration Board, you
can see an input channel toggle from HIGH to LOW when pressing a pushbutton on the
Demonstration Board.
• DIGOUT.C—Demonstrates the use of the high-current outputs configured as either sinking or
sourcing outputs. Using the Demonstration Board, you can see an LED toggle on/off via a
high-current output.
• LED.C—Toggles the LEDs on the OP7200.
• PWM.C—Demonstrates the use of Timer B to generate a 42 Hz PWM signal on digital output
OUT0. The PWM duty cycle may be adjusted from 1 to 99%. Connect +K to +PWR (pins 1
and 3 on screw-terminal header J3) to run this sample program.
• TRISTATE.C—Demonstrates the use of the high-current outputs configured as sinking, sourcing, or tristate outputs. Using the Demonstration Board, you can see a bank of channels toggle
the corresponding LEDs on/off via the high-current outputs.
1.9.3 A/D Converter
FOLDER: SAMPLES\OP7200\ADC
• AD_CAL_DIFF_2V.C—Demonstrates how to recalibrate an A/D input channel being used for
a differential input with the input attenuator tied to the 2 V reference voltage.
• AD_CAL_DIFF_GND.C—Demonstrates how to recalibrate an A/D input channel being used for
a differential input with the input attenuator tied to analog ground.
• ADCAL_MA_CH.C—Demonstrates how to recalibrate an A/D input channel being used to convert analog current measurements to generate the calibration constants for that channel.
• ADCAL_SE_ALL.C—Demonstrates how to recalibrate all single-ended A/D input channels for
a given gain.
Dynamic C Sample Programs
25
• ADCAL_SE_CH.C—Demonstrates how to recalibrate one single-ended A/D input channels to
generate the calibration constants for that channel.
NOTE: The above sample programs will overwrite the calibration constants set at the factory.
• ADRD_DIFF_2V.C—Demonstrates how to read an A/D input channel being used for a differential input with the input attenuator tied to the 2 V reference voltage.
• ADRD_DIFF_GND.C—Demonstrates how to read an A/D input channel being used for a differential input with the input attenuator tied to analog ground.
• ADRD_MA_CH.C—Demonstrates how to read an A/D input channel being used to convert analog current measurements using previously defined calibration constants for that channel.
• ADRD_SE_ALL.C—Demonstrates how to read all single-ended A/D input channels using previously defined calibration constants.
• ADRD_SE_CH.C—Demonstrates how to read one single-ended A/D input channels using previously defined calibration constants.
1.9.4 Using Calibration Constants
FOLDER: SAMPLES\OP7200\Calib_Save_Retrieve
The following sample programs illustrate how to save or retrieve the calibration constants. Note
that both sample programs prompt you to use a serial number for the OP7200. This serial number
can be any 5-digit number of your choice, and will be unique to a particular OP7200. Do not use
the MAC address on the bar code label of the RabbitCore module attached to the OP7200 since
you may at some later time use that particular RabbitCore module on another OP7200, and the
previously saved calibration data would no longer apply.
• SAVECALIB.C—This program demonstrates how to save your analog calibration coefficients
using a serial port and a PC serial utility such as Tera Term.
NOTE: Use the sample program GETCALIB.C to retrieve the data and rewrite it to the singleboard computer.
• GETCALIB.C—This program demonstrates how to retrieve your analog calibration data to
rewrite it back to the simulated EEPROM in flash with using a serial utility such as Tera Term.
NOTE: Calibration data must be saved previously in a file by the sample program
SAVECALIB.C.
NOTE: In addition to loading the calibration constants on the replacement RabbitCore module,
you will also have to add the product information for the OP7200 to the ID block associated
with the RabbitCore module. The sample program WRITE_IDBLOCK.C, available on the
Z-World Web site at http://www.zworld.com/support/feature_downloads.shtml, provides
specific instructions and an example.
26
Roadmap to
1.9.5 Serial Communication
FOLDER: SAMPLES\OP7200\RS232
• PUTS.C—This program transmits and then receives an ASCII string on Serial Ports C and D.
The serial data received are displayed in the STDIO window.
• RELAYCHR.C—This program echoes characters to or from a serial utility such as HyperTerminal.
FOLDER: SAMPLES\OP7200\RS485
• MASTER.C—This program demonstrates a simple RS-485 transmission of lower case letters to
a slave OP7200. The slave will send back converted upper case letters back to the master
OP7200 and display them in the STDIO window. Use SLAVE.C to program the slave OP7200.
• SLAVE.C—This program demonstrates a simple RS-485 transmission of lower case letters to a
master OP7200. The slave will send back converted upper case letters back to the master
OP7200 and display them in the STDIO window. Use MASTER.C to program the master
OP7200.
1.9.6 TCP/IP
FOLDER: SAMPLES\OP7200\TCPIP
• FLASH_XML.C—The basic idea for this program is to allow an HTML Web page to create a
separate active socket on a server that runs on the OP7200.
• SSI.C—This program demonstrates how to make theOP7200 a Web server. This program
allows you to turn the LEDs on an attached Demonstration Board from the Tool Kit on and off
from a remote Web browser. LED1 and LED2 on the Demonstration Board will match those on
the Web page.
• SMTP.C—This program allows you to send an E-mail when a switch on the Demonstration
Board is pressed. Follow the instructions included with the sample program.
• TELNET.C—This program allows you to communicate with the OP7200 using the Telnet protocol. This program takes anything that comes in on a port and sends it out Serial Port B. It
uses digital input IN0 to indicate that the TCP/IP connection should be closed and high-current
output OUT0 to indicate that there is an active connection.You may change the digital input
and output to suit your application needs.
Dynamic C Sample Programs
27
1.9.7 LCD/Keypad
FOLDER: SAMPLES\OP7200\LCD_BASIC
• BUFFLOCK.C—Demonstrates how to improve LCD performance by using the glBuffLock()
and glBuffUnlock() functions.
• CONTRAST.C—Demonstrates how to adjust the contrast on the LCD.
• PRIMITIVES.C—Demonstrates the primitive graphic functions to draw lines, circles, polygons, and bitmaps.
• SCROLLING.C—Demonstrates the scrolling features of the GRAPHIC.LIB library.
• TEXT.C—Demonstrates the text features of the GRAPHIC.LIB library.
FOLDER: SAMPLES\OP7200\LCD_KEYPAD
• KP_16KEY.C—Demonstrates using 9-key keypad instead of touchscreen to control virtual
keypad.
• KP_ANALOG.C—Demonstrates using 9-key keypad instead of touchscreen to control virtual
keypad.
• KP_BASIC.C—Demonstrates the keypad functions.
• KP_MENU.C—Demonstrates how to implement a menu system using the GLMENU.LIB library.
FOLDER: SAMPLES\OP6800\LCD_TOUCHSCREEN
• BTN_16KEY.C—Demonstrates the use of a virtual keypad for data entry.
• BTN_BASICS.C—Demonstrates the basic functionality of the touchscreen buttons.
• BTN_KEYBOARD.C—Demonstrates the use of a virtual keypad for data entry.
• CAL_TOUCHSCREEN.C—Demonstrates how to recalibrate the touchscreen coordinates.
• RD_TOUCHSCREEN.C—Demonstrates how to read the touchscreen in debounced or real-time
modes.
• TSCUST16KEY.LIB—Sample library demonstrating how to make custom keysets using
GLTOUCHSCREEN.LIB.
• TSCUSTKEYBOARD.LIB—Sample library demonstrating how to make custom keysets using
GLTOUCHSCREEN.LIB functions.
28
Roadmap to
1.10 RabbitNet Peripheral Cards
1.10.1 General Board Operation
FOLDER: SAMPLES\RABBITNET
• ECHOCHAR.C—Demonstrates a simple character echo to any RabbitNet peripheral card. This
program will first look for a peripheral card that is connected directly to each master port using
rn_device(). The last peripheral card found will echo characters sent by the master. Otherwise, the status byte will indicate there is no connection.
• ECHOTERM.C—Demonstrates a simple character echo to any RabbitNet peripheral card
through a serial terminal on the master. This program will first look for a peripheral card connected directly to each master port using rn_device(). The last peripheral card found will
echo characters sent by the master. Otherwise, the status byte will indicate there is no
connection.
• HWATCHDOG.C—Demonstrates setting the hardware watchdog on a RabbitNet peripheral card.
This program will first look for a peripheral card that is connected directly to each master port
using rn_device(). The last peripheral card found will be used. The hardware watchdog will
be set and a hardware reset should occur in approximately 1.5 seconds. The hardware watchdog will be disabled after the reset is done and the hardware reset bit will be set.
• SWATCHDOG.C—Demonstrates setting and hitting the software watchdog on a RabbitNet
peripheral card using costatements. This program will first look for a peripheral card that is
connected directly to each master port using rn_device(). The last peripheral card found
will be used. The software watchdog will be set for 2.5 seconds. The watchdog will be hit at an
ever-increasing timeout until the timeout is longer than 2.5 seconds. A software reset will
occur and the software watchdog will be disabled.
1.10.2 Digital I/O Card
1.10.2.1 Digital I/O
FOLDER: SAMPLES\RABBITNET\RN1100\DIO
• DIGBANKIN.C—Demonstrates the use of the digital inputs by using the Demonstration Board
to toggle a bank of input channels from HIGH to LOW when pressing a pushbutton on the
Demonstration Board.
• DIGIN.C—Demonstrates the use of the digital inputs by using the Demonstration Board to
toggle an input channel from HIGH to LOW when pressing a pushbutton on the Demonstration
Board.
• DIGBANKOUT.C—Demonstrates writing values to a bank of outputs by using the Demonstration Board whose LEDs are toggled ON/OFF via the outputs.
• DIGOUT.C—Demonstrates the use of the outputs configured as sinking and sourcing type
outputs by using the Demonstration Board whose LEDs are toggled ON/OFF via the outputs.
Dynamic C Sample Programs
29
1.10.2.2 A/D Converter
FOLDER: SAMPLES\RABBITNET\RN1100\AIN
• AIN_CALDIFF_CH.C—Demonstrates how to recalibrate the differential A/D converter channel using two known voltages to generate constants for that channel that are rewritten into the
Digital I/O Card flash. The voltages being monitored will be displayed continuously.
• AIN_CALSE_CH.C—Demonstrates how to recalibrate one single-ended A/D converter channel using two known voltages to generate constants for that channel that are rewritten into the
Digital I/O Card flash. The voltages being monitored will be displayed continuously.
• AIN_RDDIFF_CH.C—Demonstrates reading the differential A/D converter channel using two
known voltages and constants for that channel. The voltage being monitored will be displayed
continuously.
• AIN_RDSE_CH.C—Reads and displays the voltage and equivalent values of one single-ended
analog input channel. Coefficients are read from the Digital I/O Card. The computed raw data
and equivalent voltages will be displayed.
• AIN_SAMPLE.C—Demonstrates how to use the A/D driver on the single-ended inputs. The voltage (average of 10 samples) that is present on the A/D channels will be displayed continuously.
1.10.3 A/D Converter Card
FOLDER: SAMPLES\RABBITNET\RN1200
• AIN_CALDIFF_CH.C—Demonstrates how to recalibrate a differential A/D converter channel
using two known voltages to generate constants for that channel that are rewritten into the A/D
Converter Card flash. The voltages being monitored will be displayed continuously.
• AIN_CALMA_CH.C—Demonstrates how to recalibrate a 4–20 mA A/D converter channel
using two known currents to generate constants for that channel that are rewritten into the A/D
Converter Card flash. The currents being monitored will be displayed continuously.
• AIN_CALSE_ALL.C—Demonstrates how to recalibrate all the single-ended A/D converter
channels for one gain using two known voltages to generate constants for each channel that are
rewritten into the A/D Converter Card flash. A hardware reset will be issued to complete writes
to flash once the constants are written, and the hardware watchdog will be set.
• AIN_CALSE_CH.C—Demonstrates how to recalibrate one single-ended A/D converter channel using two known voltages to generate constants for that channel that are rewritten into the
A/D Converter Card flash. A hardware reset will be issued to complete writes to flash once the
constants are written, and the hardware watchdog will be set.
• AIN_RDDIFF_CH.C—Demonstrates reading a differential A/D converter channel using two
known voltages and constants for that channel. The voltage being monitored will be displayed
continuously in the STDIO window.
• AIN_RDMA_CH.C—Demonstrates reading a 4–20 mA A/D converter channel. The current
being monitored will be displayed continuously in the STDIO window.
• AIN_RDSE_CH.C—Reads and displays the voltage and equivalent values of one single-ended
analog input channel. Coefficients are read from the A/D Converter Card. The computed raw
data and equivalent voltages will be displayed.
30
Roadmap to
1.10.4 D/A Converter Card
FOLDER: SAMPLES\RABBITNET\RN1300
• DAC_ASYNC.C—This sample program outputs a voltage that can be read with a voltmeter. The
output voltage is calculated using the calibration constants located on the D/A Converter Card
EEPROM (simulated in flash memory).
The D/A Converter Card is set up for the asynchronous mode of operation, which updates a D/A
converter output at the time it is being accessed via the anaOutVolts() or anaOut() functions (i.e., the anaOutStrobe() function is not used to update the D/A converter outputs).
The sample program DAC_SYNC.C illustrates the synchronous mode of operation.
NOTE: This sample program must be compiled to flash.
• DAC_SYNC.C—This sample program outputs a voltage that can be read with a voltmeter. The
output voltage is calculated using the calibration constants located on the D/A Converter Card
EEPROM (simulated in flash memory).
The D/A Converter Card is set up for the synchronous mode of operation, which updates all D/
A converter outputs at the same time when the anaOutStrobe() function executes. The outputs are all updated with values previously written using the anaOutVolts() and/or
anaOut() functions.
NOTE: This sample program must be compiled to flash.
• DAC_CAL.C—This program demonstrates how to recalibrate a D/A converter channel using
two known voltages, and defines the two coefficients, gain, and offset, that will be rewritten
into the D/A converter card's EEPROM (simulated in flash memory).
This program will first look for a device using rn_find() and the product RN1300 as the
search criteria, and will use the first D/A Converter Card found.
NOTE: The calibration constants set at the factory will be overwritten when you run this sample
program.
Dynamic C Sample Programs
31
1.10.5 Relay Card
FOLDER: SAMPLES\RABBITNET\RN1400
• RELAY_ALL.C—Demonstrates how to activate all the relays in parallel using the
rn_RelayAll() function call.
• RELAY_LOW_PWR.C—Demonstrates how to configure the relays to operate in the power-save
mode. A relay is first activated normally for 50 ms, and is then pulsed every millisecond with a
50% duty-cycle square wave, which essentially cuts the power required to keep the relay energized in half. Since the operation of a relay in the power-save mode will reduce the relay-holding force, this mode is not recommended when the relay may be subject to shock and vibration.
• RELAY_SEQUENCE.C—Demonstrates writing values to a bank of outputs by using the Demonstration Board whose LEDs are toggled ON/OFF via the outputs.
1.10.6 Keypad/Display Interface
FOLDER: SAMPLES\RABBITNET\RN1600
• ALPHANUM.C—Demonstrates the use of the 2 × 6 keypad and the 4 × 20 display provided in
the RabbitNet Keypad/Display Interface Development Kit. The sample program demonstrates
how you can create messages with the keypad and then display them on the LCD.
• BUZZER.C—Demonstrates control of the buzzer on the RabbitNet Keypad/Display interface
by using the function calls rn_keyBuzzer() and rn_keyBuzzerAct(). Although the
buzzer is monotone, some pitch and motorboat effects can be demonstrated with this sample
program.
• KEYBASIC.C—Demonstrates the keypad function using the 4 × 10 keypad provided in the
RabbitNet Keypad/Display Interface Development Kit. The sample program demonstrates the
following features.
• Custom ASCII keypad return values.
• Use of the buzzer on the RabbitNet Keypad/Display interface.
• Keypad character assignment for a specific example provided.
Once you compile and run this program, press each key on the keypad. The results are displayed in the Dynamic C STDIO window.
• LCDBASIC.C—Demonstrates the use of the 2 × 20 display provided in the RabbitNet Keypad/
Display Interface Development Kit. The sample program demonstrates various display functions. Note that the backlight function will work only on displays that are equipped with a
backlight.
• PONG.C—Demonstrates the use of the 3 × 4 keypad and the 2 × 20 display provided in the
RabbitNet Keypad/Display Interface Development Kit.
32
Roadmap to
1.11 LCD/Keypad Module
FOLDER: SAMPLES\LCD_Keypad\122x32_1x7
• ALPHANUM.C—Demonstrates how to create messages using the keypad and then displaying
them on the LCD display.
• COFTERMA.C—Demonstrates cofunctions, the cofunction serial library, and using a serial
ANSI terminal such as HyperTerminal from an available COM port connection.
• DISPPONG.C—Demonstrates output to LCD display.
• DKADEMO1.C—Demonstrates some of the LCD/keypad module font and bitmap manipulation
features with horizontal and vertical scrolling, and using the GRAPHIC.LIB library.
• FUN.C—Demonstrates drawing primitive features (lines, circles, polygons) using the
GRAPHIC.LIB library
• KEYBASIC.C—Demonstrates the following keypad functions in the STDIO display window:
- default ASCII keypad return values.
- custom ASCII keypad return values.
- keypad repeat functionality.
• KEYMENU.C—Demonstrates how to implement a menu system using a highlight bar on a
graphic LCD display. The menu options for this sample are as follows.
1. Set Date/Time
2. Display Date/Time
3. Turn Backlight OFF
4. Turn Backlight ON
5. Toggle LEDs
6. Increment LEDs
7. Disable LEDs
• LED.C—Demonstrates how to toggle the LEDs on the LCD/keypad module.
• SCROLLING.C—Demonstrates scrolling features of the GRAPHIC.LIB library.
• TEXT.C—Demonstrates the text functions in the GRAPHIC.LIB library. Here is a list of what
is demonstrated.
1. Font initialization.
2. Text window initialization.
3. Text window, end-of-line wraparound, end-of-text window clipping, line feed, and carriage return.
4. Creating 2 different TEXT windows for display.
5. Displaying different FONT sizes.
Dynamic C Sample Programs
33
1.12 RCM2000
1.12.1 General Board Operation
FOLDER: SAMPLES\RCM2000
• EXTSRAM.C—This sample program demonstrates the setup and simple addressing to an
external SRAM.
1.12.2 Digital I/O
FOLDER: SAMPLES\RCM2000
• FLASHLED.C—Demonstrates assembly-language program by repeatedly flashing LED DS3
on the Prototyping Board
• FLASHLED2.C—This program will repeatedly flash LED DS3 on the RCM2000 Prototyping
Board. This program also shows the use of the runwatch() function to allow Dynamic C to
update watch expressions while running.
• FLASHLEDS.C—Demonstrates cofunctions and costatements to flash LEDs DS2 and DS3 on
the Prototyping Board at different rates.
• FLASHLEDS2.C—Demonstrates cofunctions and costatements to flash LEDs DS2 and DS3 on
the Prototyping Board at different rates.
• SWTEST.C—Uses switches S2 and S3 to control LEDs DS2 and DS3 on the RCM2000 Prototyping Board.
• TOGGLELED.C—Flashes DS3 on the Prototyping Board once per second (bit 2 on port A).
This program will also watch button S1 (port B bit 2) and toggle LED DS2 (port A bit 1) on/off
when pressed.
1.12.3 Serial Communication
FOLDER: SAMPLES\RCM2000
• CORE_FLOWCONTROL.C—This program demonstrates how to configure Serial Port C for CTS/
RTS with serial data coming from Serial Port B. The serial data received are displayed in the
STDIO window.
• CORE_PARITY.C—This program demonstrates the use of parity modes by repeatedly sending
byte values 0–127 from Serial Port B to Serial Port C. The program will switch between generating parity or not on Serial Port B. Serial Port C will always be checking parity, so parity
errors should occur during every other sequence.
1.12.4 LCD/Keypad
FOLDER: SAMPLES\RCM2000
• KEYLCD.C—Demonstrates a simple setup for a 2 × 6 keypad and a 2 × 20 LCD.
• LCD_DEMO.C—This sample program illustrates using the Rabbit 2000 external I/O to drive an
LCD that uses the HD44780 controller or an equivalent.
34
Roadmap to
1.13 RCM2100
1.13.1 General Board Operation
FOLDER: SAMPLES\RCM2100
• EXTSRAM2.C—This sample program demonstrates the setup and simple addressing to an
external SRAM.
1.13.2 Digital I/O
FOLDER: SAMPLES\RCM2100
• FLASHLED.C—Demonstrates assembly-language program by repeatedly flashing LED DS3
on the Prototyping Board
• FLASHLED2.C—This program will repeatedly flash LED DS3 on the Prototyping Board. This
program also shows the use of the runwatch() function to allow Dynamic C to update watch
expressions while running.
• FLASHLEDS.C—Demonstrates cofunctions and costatements to flash LEDs DS2 and DS3 on
the Prototyping Board at different rates.
• FLASHLEDS2.C—Demonstrates cofunctions and costatements to flash LEDs DS2 and DS3 on
the Prototyping Board at different rates.
• SWTEST.C—Uses switches S2 and S3 to control LEDs DS2 and DS3 on the Prototyping
Board.
• TOGGLELED.C—Flashes DS3 on the Prototyping Board once per second (bit 2 on port A).
This program will also watch button S1 (port B bit 2) and toggle LED DS2 (port A bit 1) on/off
when pressed.
1.13.3 Serial Communication
FOLDER: SAMPLES\RCM2100
• CORE_FLOWCONTROL.C—This program demonstrates how to configure Serial Port C for CTS/
RTS with serial data coming from Serial Port B. The serial data received are displayed in the
STDIO window.
• CORE_PARITY.C—This program demonstrates the use of parity modes by repeatedly sending
byte values 0–127 from Serial Port B to Serial Port C. The program will switch between generating parity or not on Serial Port B. Serial Port C will always be checking parity, so parity
errors should occur during every other sequence.
• MASTER2.C—Demonstrates a simple RS-485 transmission of lower case letters to a slave. The
slave will send converted upper case letters back to the master to display in the STDIO window.
Use SLAVE2.C to program the slave.
• SLAVE2.C—Demonstrates a simple RS-485 transmission of lower case letters to a slave. The
slave will send converted upper case letters back to the master to display in the STDIO window.
Use MASTER2.C to program the slave.
Dynamic C Sample Programs
35
1.13.4 TCP/IP
FOLDER: SAMPLES\RCM2100
• ETHCORE1.C—Creates four “devices” (lights) and four “buttons” in the Web browser to toggle
them. Users can change the status of the lights. If the RCM2100 is plugged into the MASTER
slot on the Prototyping Board, the lights on the Prototyping Board will track the ones in the
Web browser.
• ETHCORE2.C—This program takes anything that comes in on a port and sends it out Serial
Port C. It uses SW2 as a signal that the connection should be closed, and PA0 as an indication
that there is an open connection. You may change SW2 and PA0 to suit your application needs.
• LEDCONSOLE.C—Demonstrates the features of ZCONSOLE.LIB command-oriented console
library to control two LEDs on the Prototyping Board.
• PINGLED.C—Flashes LED DS2 on the Prototyping Board when it sends a ping and flashes
LED DS3 on the Prototyping Board when it receives a ping response.
1.13.5 LCD/Keypad
FOLDER: SAMPLES\RCM2100
• KEYLCD2.C—Demonstrates a simple setup for a 2 × 6 keypad and a 2 × 20 LCD.
• LCD_DEMO.C—This sample program illustrates using the Rabbit 2000 external I/O to drive an
LCD that uses the HD44780 controller or an equivalent.
36
Roadmap to
1.14 RCM2200
1.14.1 General Board Operation
FOLDER: SAMPLES\RCM2200
• EXTSRAM.C—This sample program demonstrates the setup and simple addressing to an
external SRAM.
1.14.2 Digital I/O
FOLDER: SAMPLES\RCM2200
• FLASHLED.C—Demonstrates assembly-language program by flashing LED DS3 on the Prototyping Board at different rates. LED DS2 will always be on
• FLASHLEDS.C—Demonstrates cofunctions and costatements to flash LEDs DS2 and DS3 on
the Prototyping Board at different rates.
• TOGGLELED.C—Flashes DS2 on the RCM2200 Prototyping Board once per second (bit 1 on
port E). This program will also watch button S3 (port B bit 3) and toggle LED DS3 (port E bit
7) on/off when pressed.
1.14.3 Serial Communication
FOLDER: SAMPLES\RCM2200
• PUTS.C—Transmits and then receives an ASCII string on Serial Port D. It also displays the
serial data received in the STDIO window.
• MASTER.C—Demonstrates a simple RS-485 transmission of lower case letters to a slave. The
slave will send converted upper case letters back to the master to display in the STDIO window.
Use SLAVE.C to program the slave.
• SLAVE.C—Demonstrates a simple RS-485 transmission of lower case letters to a slave. The
slave will send converted upper case letters back to the master to display in the STDIO window.
Use MASTER.C to program the slave.
1.14.4 TCP/IP
FOLDER: SAMPLES\RCM2200
• CONSOLE.C—Demonstrates the features of ZCONSOLE.LIB command-oriented console
library. This program is also run in conjunction with SERDCLIENT.C or SPCLIENT.C.
• ETHCORE1.C—Creates two “devices” (lights) and two “buttons” in the Web browser to toggle
them. Users can change the status of the lights. If the RCM2200 is plugged into the MASTER
slot on the Prototyping Board, the lights on the Prototyping Board will track the ones in the
Web browser.
• MYECHO.C—Operates RCM2200 as a basic server. When a client connects, echoes back any
data sent by the client.
Dynamic C Sample Programs
37
• SERDCLIENT.C—Demonstrates the ability of a Rabbit-based target board to update files on
the Web server of the RCM2200 board it is connected to via Serial Port D. This program is run
in conjunction with CONSOLE.C.
• SPCLIENT.C—Demonstrates the ability of a Rabbit-based target board to update files on the
Web server of the RCM2200 board it is connected to via the slave port. This program is run in
conjunction with CONSOLE.C.
1.14.5 LCD/Keypad
FOLDER: SAMPLES\RCM2200
• KEYLCD.C—Demonstrates a simple setup for a 2 × 6 keypad and a 2 × 20 LCD.
38
Roadmap to
1.15 RCM2300
1.15.1 General Board Operation
FOLDER: SAMPLES\RCM2300
• EXTSRAM.C—This sample program demonstrates the setup and simple addressing to an
external SRAM.
1.15.2 Digital I/O
FOLDER: SAMPLES\RCM2300
• FLASHLED.C—Demonstrates assembly-language program by flashing LED DS3 on the Prototyping Board at different rates. LED DS2 will always be on
• FLASHLEDS.C—Demonstrates cofunctions and costatements to flash LEDs DS2 and DS3 on
the Prototyping Board at different rates.
• TOGGLELED.C—Flashes DS2 on the RCM2300 Prototyping Board once per second (bit 1 on
port E). This program will also watch button S3 (port B bit 3) and toggle LED DS3 (port E bit
7) on/off when pressed.
1.15.3 Serial Communication
FOLDER: SAMPLES\RCM2300
• PUTS.C—Transmits and then receives an ASCII string on Serial Port D. It also displays the
serial data received in the STDIO window.
• MASTER.C—Demonstrates a simple RS-485 transmission of lower case letters to a slave. The
slave will send converted upper case letters back to the master to display in the STDIO window.
Use SLAVE.C to program the slave.
• SLAVE.C—Demonstrates a simple RS-485 transmission of lower case letters to a slave. The
slave will send converted upper case letters back to the master to display in the STDIO window.
Use MASTER.C to program the slave.
1.15.4 LCD/Keypad
FOLDER: SAMPLES\RCM2300
• KEYLCD.C—Demonstrates a simple setup for a 2 × 6 keypad and a 2 × 20 LCD.
Dynamic C Sample Programs
39
1.16 RCM3000
1.16.1 Digital I/O
FOLDER: SAMPLES\RCM3000
• CONTROLLED.C—Demonstrates use of the digital inputs by having you turn the LEDs on the
Prototyping Board on or off from the STDIO window on your PC.
• FLASHLED1.C—Demonstrates assembly-language program by flashing LEDs DS1 and DS2
on the Prototyping Board at different rates.
• FLASHLED2.C—Demonstrates cofunctions and costatements to flash LEDs DS1 and DS2 on
the Prototyping Board at different rates.
• IR_DEMO.C—Demonstrates sending Modbus ASCII packets between two RCM3000/Prototyping Board assemblies via the IrDA transceivers.
To use this sample program, you will need a second system with IrDA capability such as
another RCM3000 with an RCM3000 Prototyping Board, or an RCM3400 with an RCM3400
Prototyping Board. First, compile and run the IR_DEMO.C sample program from the SAMPLES
folder specific to the other system on the second system, then move the programming cable to
the RCM3000, and compile and run the IR_DEMO.C sample program from the SAMPLES\
RCM3000 folder on the RCM3000 system. With the IrDA transceivers on the two Prototyping
Boards facing each other, press switch S2 on the Prototyping Board to transmit a packet. The
other system will return a response packet that will then appear in the Dynamic C STDIO
window.
• TOGGLESWITCH.C—Uses costatements to detect switches using the press and release method
for debouncing. The corresponding LEDs (DS1 and DS2) will turn on or off.
1.16.2 Serial Communication
FOLDER: SAMPLES\RCM3000\SERIAL
• FLOWCONTROL.C—This program demonstrates how to configure Serial Port C for CTS/RTS
with serial data coming from Serial Port B. The serial data received are displayed in the STDIO
window.
• PARITY.C—This program demonstrates the use of parity modes by repeatedly sending byte
values 0–127 from Serial Port B to Serial Port C. The program will switch between generating
parity or not on Serial Port B. Serial Port C will always be checking parity, so parity errors
should occur during every other sequence.
• SIMPLE3WIRE.C—This program demonstrates basic RS-232 serial communication.
• SIMPLE5WIRE.C—This program demonstrates 5-wire RS-232 serial communication.
• SWITCHCHAR.C—This program demonstrates transmits and then receives an ASCII string on
Serial Ports B and C. It also displays the serial data received from both ports in the STDIO
window.
40
Roadmap to
• SIMPLE485MASTER.C—This program demonstrates a simple RS-485 transmission of lower
case letters to a slave RCM3000. The slave will send back converted upper case letters back to
the master RCM3000 and display them in the STDIO window. Use SIMPLE485SLAVE.C to
program the slave RCM3000.
• SIMPLE485LAVE.C—This program demonstrates a simple RS-485 transmission of lower case
letters to a master RCM3000. The slave will send back converted upper case letters back to the
master RCM3000 and display them in the STDIO window. Use SIMPLE485MASTER.C to program the masterRCM3000.
1.16.3 TCP/IP
FOLDER: SAMPLES\RCM3000\TCPIP
• BROWSELED.C—This program demonstrates a basic controller running a Web page. Two
“LEDs” are created on the Web page, with two buttons to toggle them. Users can change the
status of the lights from the Web browser. The LEDs on the Prototyping Board match the ones
on the Web page.
• ECHOCLIENT.C—This program demonstrates a basic client that will send a packet and wait
for the connected server to echo it back. After every number of sends and receives, transfer
times are shown in the STDIO window.
Use ECHO_SERVER.C to program a server controller.
• ECHOSERVER.C—This program demonstrates This program demonstrates a basic server that
will echo back any data sent from a connected client.
Use ECHO_CLIENT.C to program a client controller.
• ENET_AD.C—This program demonstrates Ethernet communication between two single-board
computers. The program sends an A/D voltage value to the second controller via Ethernet for
display.
Use ENET_MENU.C to program the other single-board computer.
• ENET_MENU.C—This program demonstrates how to implement a menu system using a highlight
bar on a graphic LCD display and to communicate it to another single-board computer via Ethernet.
Use ENET_AD.C to program the other single-board computer with analog inputs and outputs.
• MBOXDEMO.C—Implements a Web server that allows e-mail messages to be entered and then
shown on the LCD/keypad module.
• SMTP.C—This program allows you to send an E-mail when a switch on the Prototyping Board
is pressed. Follow the instructions included with the sample program.
• PINGLED.C—This program demonstrates ICMP by pinging a remote host. It will flash LEDs
DS1 and DS2 on the Prototyping Board when a ping is sent and received.
Dynamic C Sample Programs
41
1.16.4 LCD/Keypad
FOLDER: SAMPLES\RCM3000\LCD_KEYPAD
• KEYPADTOLED.C—This program demonstrates the use of the external I/O bus. The program
will light up an LED on the LCD/keypad module and will display a message on the LCD when
a key press is detected. The DS1 and DS2 LEDs on the Prototyping Board will also light up.
• LCDKEYFUN.C—This program demonstrates how to draw primitive features from the graphic
library (lines, circles, polygons), and also demonstrates the keypad with the key release option.
• SWITCHTOLED.C—This program demonstrates the use of the external I/O bus. The program
will light up an LED on the LCD/keypad module and will display a message on the LCD when
a switch press is detected. The DS1 and DS2 LEDs on the Prototyping Board will also light up.
These three sample programs are board-specific to the RCM3000. Click here for additional
sample programs that illustrate the use of the LCD/keypad module.
42
Roadmap to
1.17 RCM3100
1.17.1 Digital I/O
FOLDER: SAMPLES\RCM3100
• CONTROLLED.C—Demonstrates use of the digital inputs by having you turn the LEDs on the
Prototyping Board on or off from the STDIO window on your PC.
• FLASHLED1.C—Demonstrates assembly-language program by flashing LEDs DS1 and DS2
on the Prototyping Board at different rates.
• FLASHLED2.C—Demonstrates cofunctions and costatements to flash LEDs DS1 and DS2 on
the Prototyping Board at different rates.
• IR_DEMO.C—Demonstrates sending Modbus ASCII packets between two RCM3100/
Prototyping Board assemblies via the IrDA transceivers.
To use this sample program, you will need a second system with IrDA capability such as
another RCM3100 with an RCM3000 series Prototyping Board, or an RCM3400 with an
RCM3400 Prototyping Board. First, compile and run the IR_DEMO.C sample program from
the SAMPLES folder specific to the other system on the second system, then move the programming cable to the RCM3100, and compile and run the IR_DEMO.C sample program from the
SAMPLES\RCM3100 folder on the RCM3100 system. With the IrDA transceivers on the two
Prototyping Boards facing each other, press switch S2 on the Prototyping Board to transmit a
packet. The other system will return a response packet that will then appear in the Dynamic C
STDIO window.
• TOGGLESWITCH.C—Uses costatements to detect switches using the press and release method
for debouncing. The corresponding LEDs (DS1 and DS2) will turn on or off.
1.17.2 Serial Communication
FOLDER: SAMPLES\RCM3100\SERIAL
• FLOWCONTROL.C—This program demonstrates how to configure Serial Port C for CTS/RTS
with serial data coming from Serial Port B. The serial data received are displayed in the STDIO
window.
• PARITY.C—This program demonstrates the use of parity modes by repeatedly sending byte
values 0–127 from Serial Port B to Serial Port C. The program will switch between generating
parity or not on Serial Port B. Serial Port C will always be checking parity, so parity errors
should occur during every other sequence.
• SIMPLE3WIRE.C—This program demonstrates basic RS-232 serial communication.
• SIMPLE5WIRE.C—This program demonstrates 5-wire RS-232 serial communication.
• SWITCHCHAR.C—This program demonstrates transmits and then receives an ASCII string on
Serial Ports B and C. It also displays the serial data received from both ports in the STDIO
window.
Dynamic C Sample Programs
43
• SIMPLE485MASTER.C—This program demonstrates a simple RS-485 transmission of lower
case letters to a slave RCM3100. The slave will send back converted upper case letters back to
the master RCM3100 and display them in the STDIO window. Use SIMPLE485SLAVE.C to
program the slave RCM3100.
• SIMPLE485LAVE.C—This program demonstrates a simple RS-485 transmission of lower case
letters to a master RCM3100. The slave will send back converted upper case letters back to the
master RCM3100 and display them in the STDIO window. Use SIMPLE485MASTER.C to
program the masterRCM3100.
1.17.3 LCD/Keypad
FOLDER: SAMPLES\RCM3100\LCD_KEYPAD
• KEYPADTOLED.C—This program demonstrates the use of the external I/O bus. The program
will light up an LED on the LCD/keypad module and will display a message on the LCD when
a key press is detected. The DS1 and DS2 LEDs on the Prototyping Board will also light up.
• LCDKEYFUN.C—This program demonstrates how to draw primitive features from the graphic
library (lines, circles, polygons), and also demonstrates the keypad with the key release option.
• SWITCHTOLED.C—This program demonstrates the use of the external I/O bus. The program
will light up an LED on the LCD/keypad module and will display a message on the LCD when
a switch press is detected. The DS1 and DS2 LEDs on the Prototyping Board will also light up.
These three sample programs are board-specific to the RCM3100. Click here for additional
sample programs that illustrate the use of the LCD/keypad module.
44
Roadmap to
1.18 RCM3200
1.18.1 Digital I/O
FOLDER: SAMPLES\RCM3200
• CONTROLLED.C—Demonstrates use of the digital inputs by having you turn the LEDs on the
Prototyping Board on or off from the STDIO window on your PC.
• FLASHLED1.C—Demonstrates assembly-language program by flashing LEDs DS1 and DS2
on the Prototyping Board at different rates.
• FLASHLED2.C—Demonstrates cofunctions and costatements to flash LEDs DS1 and DS2 on
the Prototyping Board at different rates.
• IR_DEMO.C—Demonstrates sending Modbus ASCII packets between two RCM3200/
Prototyping Board assemblies via the IrDA transceivers.
To use this sample program, you will need a second system with IrDA capability such as
another RCM3200 with an RCM3200 Prototyping Board, or an RCM3400 with an RCM3400
Prototyping Board. First, compile and run the IR_DEMO.C sample program from the SAMPLES
folder specific to the other system on the second system, then move the programming cable to
the RCM3200, and compile and run the IR_DEMO.C sample program from the SAMPLES\
RCM3200 folder on the RCM3200 system. With the IrDA transceivers on the two Prototyping
Boards facing each other, press switch S2 on the Prototyping Board to transmit a packet. The
other system will return a response packet that will then appear in the Dynamic C STDIO
window.
• TOGGLESWITCH.C—Uses costatements to detect switches using the press and release method
for debouncing. The corresponding LEDs (DS1 and DS2) will turn on or off.
1.18.2 Serial Communication
FOLDER: SAMPLES\RCM3200\SERIAL
• FLOWCONTROL.C—This program demonstrates how to configure Serial Port C for CTS/RTS
with serial data coming from Serial Port B. The serial data received are displayed in the STDIO
window.
• PARITY.C—This program demonstrates the use of parity modes by repeatedly sending byte
values 0–127 from Serial Port B to Serial Port C. The program will switch between generating
parity or not on Serial Port B. Serial Port C will always be checking parity, so parity errors
should occur during every other sequence.
• SIMPLE3WIRE.C—This program demonstrates basic RS-232 serial communication.
• SIMPLE5WIRE.C—This program demonstrates 5-wire RS-232 serial communication.
• SWITCHCHAR.C—This program demonstrates transmits and then receives an ASCII string on
Serial Ports B and C. It also displays the serial data received from both ports in the STDIO
window.
Dynamic C Sample Programs
45
• SIMPLE485MASTER.C—This program demonstrates a simple RS-485 transmission of lower
case letters to a slave RCM3200. The slave will send back converted upper case letters back to
the master RCM3200 and display them in the STDIO window. Use SIMPLE485SLAVE.C to
program the slave RCM3200.
• SIMPLE485LAVE.C—This program demonstrates a simple RS-485 transmission of lower case
letters to a master RCM3200. The slave will send back converted upper case letters back to the
master RCM3200 and display them in the STDIO window. Use SIMPLE485MASTER.C to
program the masterRCM3200.
1.18.3 TCP/IP
FOLDER: SAMPLES\RCM3200\TCPIP
• BROWSELED.C—This program demonstrates a basic controller running a Web page. Two
“LEDs” are created on the Web page, and two buttons on the Prototyping Board then toggle
them. Users can change the status of the lights from the Web browser. The LEDs on the
Prototyping Board match the ones on the Web page.
• ECHOCLIENT.C—This program demonstrates a basic client that will send a packet and wait
for the connected server to echo it back. After every number of sends and receives, transfer
times are shown in the STDIO window.
Use ECHO_SERVER.C to program a server controller.
• ECHOSERVER.C—This program demonstrates This program demonstrates a basic server that
will echo back any data sent from a connected client.
Use ECHO_CLIENT.C to program a client controller.
• ENET_AD.C—This program demonstrates Ethernet communication between two single- board
computers. The program sends an A/D voltage value to the second controller via Ethernet for
display.
Use ENET_MENU.C to program the other single-board computer.
• ENET_MENU.C—This program demonstrates how to implement a menu system using a highlight
bar on a graphic LCD display and to communicate it to another single-board computer via Ethernet.
Use ENET_AD.C to program the other single-board computer with analog inputs and outputs.
• MBOXDEMO.C—Implements a Web server that allows e-mail messages to be entered and then
shown on the LCD/keypad module.
• SMTP.C—This program allows you to send an E-mail when a switch on the Prototyping Board
is pressed. Follow the instructions included with the sample program.
• PINGLED.C—This program demonstrates ICMP by pinging a remote host. It will flash LEDs
DS1 and DS2 on the Prototyping Board when a ping is sent and received.
46
Roadmap to
1.18.4 LCD/Keypad
FOLDER: SAMPLES\RCM3200\LCD_KEYPAD
• KEYPADTOLED.C—This program demonstrates the use of the external I/O bus. The program
will light up an LED on the LCD/keypad module and will display a message on the LCD when
a key press is detected. The DS1 and DS2 LEDs on the Prototyping Board will also light up.
• LCDKEYFUN.C—This program demonstrates how to draw primitive features from the graphic
library (lines, circles, polygons), and also demonstrates the keypad with the key release option.
• SWITCHTOLED.C—This program demonstrates the use of the external I/O bus. The program
will light up an LED on the LCD/keypad module and will display a message on the LCD when
a switch press is detected. The DS1 and DS2 LEDs on the Prototyping Board will also light up.
These three sample programs are board-specific to the RCM3200. Click here for additional
sample programs that illustrate the use of the LCD/keypad module.
Dynamic C Sample Programs
47
1.19 RCM3300
1.19.1 Digital I/O
FOLDER: SAMPLES\RCM3200
• CONTROLLED.c—Demonstrates use of the digital inputs by having you turn the LEDs on the
Prototyping Board on or off from the STDIO window on your PC.
• FLASHLED.c—Demonstrates assembly-language program by flashing the USR LED on the
RCM3300 and LEDs DS3, DS4, DS5, and DS6 on the Prototyping Board.
• SWRELAY.c—Demonstrates the relay-switching function call using the relay installed on the
Prototyping Board through screw-terminal header J17.
• TOGGLESWITCH.c—Uses costatements to detect switches S2 and S3 using debouncing. The
corresponding LEDs (DS3 and DS4) will turn on or off.
1.19.2 Serial Communication
FOLDER: SAMPLES\RCM3300\SERIAL
• FLOWCONTROL.C—This program demonstrates hardware flow control by configuring Serial
Port F for CTS/RTS with serial data coming from Serial Port E. The serial data received are
displayed in the STDIO window.
• PARITY.C—This program demonstrates the use of parity modes by repeatedly sending byte
values 0–127 from Serial Port E to Serial Port F. The program will switch between generating
parity or not on Serial Port E. Serial Port F will always be checking parity, so parity errors
should occur during every other sequence.
• SIMPLE3WIRE.C—This program demonstrates basic RS-232 serial communication.
• SIMPLE5WIRE.C—This program demonstrates 5-wire RS-232 serial communication.
• SWITCHCHAR.C—This program demonstrates transmits and then receives an ASCII string on
Serial Ports E and F. It also displays the serial data received from both ports in the STDIO window.
Before running this sample program, connect TxE to RxF and connect RxE to TxE. These connections can be made using wire jumpers on screw-terminal header J14.
• SIMPLE485MASTER.C—This program demonstrates a simple RS-485 transmission of lower
case letters to a slave RCM3300. The slave will send back converted upper case letters back to
the master RCM3300 and display them in the STDIO window. Use SIMPLE485SLAVE.C to
program the slave RCM3300.
• SIMPLE485LAVE.C—This program demonstrates a simple RS-485 transmission of lower case
letters to a master RCM3300. The slave will send back converted upper case letters back to the
master RCM3300 and display them in the STDIO window. Use SIMPLE485MASTER.C to program the master RCM3300.
48
Roadmap to
1.19.3 TCP/IP
FOLDER: SAMPLES\RCM3300\TCPIP
• BROWSELED.C—This program demonstrates a basic controller running a Web page. Two
“LEDs” are created on the Web page, along with two buttons to toggle them. Users can change
the status of the lights from the Web browser. The LEDs on the Prototyping Board match the
ones on the Web page.
• MBOXDEMO.C—Implements a Web server that allows e-mail messages to be entered and then
shown on the LCD/keypad module. The keypad allows the user to scroll within messages, flip
to other e-mails, mark messages as read, and delete e-mails. When a new e-mail arrives, an
LED (on the Prototyping Board and LCD/keypad module) turns on, then turns back off once
the message has been marked as read. A log of all e-mail actions is kept, and can be displayed
in the Web browser. All current e-mails can also be read with the Web browser.
• PINGLED.C—This program demonstrates ICMP by pinging a remote host. It will flash LEDs
DS3 and DS4 on the Prototyping Board when a ping is sent and received.
• SMTP.C—This program allows you to send an e-mail when switches S2 and S3 on the Prototyping Board are pressed. Follow the instructions included with the sample program. LEDs
DS3 and DS4 on the Prototyping Board will light up when sending e-mail.
1.19.3.1 RabbitWeb
FOLDER: SAMPLES\RCM3300\TCPIP\RABBITWEB
• BLINKLEDS.C—This program demonstrates a basic example to change the rate at which the
DS3 and DS4 LEDs on the RCM3300 Prototyping Board blink.
• DOORMONITOR.C—The optional LCD/keypad module must be plugged in to the RCM3300 Prototyping Board when using this sample program. This program demonstrates adding and monitoring passwords entered via the LCD/keypad module.
• SPRINKLER.C—This program demonstrates how to schedule times for the relay and digital
outputs in a 24-hour period.
1.19.4 LCD/Keypad
FOLDER: SAMPLES\RCM3300\LCD_KEYPAD
• KEYPADTOLED.C—This program demonstrates the use of the external I/O bus. The program
will light up an LED on the LCD/keypad module and will display a message on the LCD when
a key press is detected. The DS3, DS4, DS5, and DS6 LEDs on the Prototyping Board will also
light up.
• LCDKEYFUN.C—This program demonstrates how to draw primitive features from the graphic
library (lines, circles, polygons), and also demonstrates the keypad with the key release option.
• SWITCHTOLCD.C—This program demonstrates the use of the external I/O bus. The program
will light up an LED on the LCD/keypad module and will display a message on the LCD when
a switch press is detected. The DS3 and DS4 LEDs on the Prototyping Board will also light up.
These three sample programs are board-specific to the RCM3400. Click here for additional
sample programs that illustrate the use of the LCD/keypad module.
Dynamic C Sample Programs
49
1.19.5 Serial Flash
1.19.5.1 Onboard Serial Flash
FOLDER: SAMPLES\RCM3300\SerialFlash
• SFLASH_INSPECT.c—This program is a handy utility for inspecting the contents of a serial
flash chip. When the sample program starts running, it attempts to initialize a serial flash chip
on Serial Port B. Once a serial flash chip is found, the user can perform two different commands to either print out the contents of a specified page or clear (set to zero) all the bytes in a
specified page.
• SFLASH_LOG.c—This program runs a simple Web server and stores a log of hits in the serial
flash. This log can be viewed and cleared from a browser.
1.19.5.2 SF1000 Serial Flash Card
FOLDER: SAMPLES\RCM3300\SF1000
• SERFLASHTEST.c—An optional SF1000 Serial Flash card is required to run this demonstration. Install the Serial Flash card into socket J11 on the Prototyping Board. This sample program demonstrates how to read and write from/to the Serial Flash card.
1.19.6 Remote Application Update
FOLDER: SAMPLES\RCM3300\RemoteApplicationUpdate
• DLP_STATIC.C—This program uses the TCP/IP HTTP.LIB library, and outputs a basic static
Web page.
• DLP_WEB.C—This program outlines a basic download program with a Web interface.
Complete information on the use of these programs is provided in the Remote Application
Update instructions, which are available with the online documentation.
1.19.7 Dynamic C FAT File System, RabbitWeb, and SSL Modules
The Dynamic C FAT File System, RabbitWeb, and Secure Sockets Layer (SSL) modules have
been integrated into a sample program for the RCM3300. The sample program will only run on
the RCM3300 and RCM3700, and requires that you have installed the Dynamic C FAT File
System, RabbitWeb, and SSL modules.
TIP: Before running any of the sample programs described in this section, you should look at and
run sample programs for the TCP/IP ZSERVER.LIB library, the FAT file system, RabbitWeb,
SSL, the download manager, and HTTP upload to become more familiar with their operation.
The INTEGRATION.C sample program in the SAMPLES\RCM3300\Module_Integration
folder demonstrates the use of the TCP/IP ZSERVER.LIB library and FAT file system functionality with RabbitWeb dynamic HTML content, all secured using SSL. The sample program also
supports dynamic updates of both the application and its resources using the Rabbit Download
Manager (DLM) and HTTP upload capability, respectively—note that neither of these currently
supports SSL security.
50
Roadmap to
Before you run the INTEGRATION.C sample program, you will first need to format and partition
the serial flash. Find the FMT_DEVICE.C sample program in the Dynamic C SAMPLES\
FileSystem folder. Open this sample program with the File > Open menu, then compile and
run it by pressing F9. FMT_DEVICE.C formats the serial flash for use with the FAT file system. If
the serial flash is already formatted, FMT_DEVICE.C gives you the option of erasing the serial
flash and reformatting it with a single large partition. This erasure does not check for non-FAT
partitions and will destroy all existing partitions.
Next, run the INTEGRATION_FAT_SETUP.C sample program in the Dynamic C SAMPLES\
RCM3300\Module_Integration folder. Open this sample program with the File > Open
menu, then compile and run it by pressing F9. INTEGRATION_FAT_SETUP.C will copy some
files into the FAT file system via #ximport.
The last step to complete before you can run the INTEGRATION.C sample program is to create an
SSL certificate. The SSL walkthrough in the online documentation for the Dynamic C SSL module explains how to do this.
Now you are ready to run the INTEGRATION.C sample program in the Dynamic C SAMPLES\
RCM3300\Module_Integration folder. Open this sample program with the File > Open
menu, then compile and run it by pressing F9.
NOTE: Since HTTP upload and the Dynamic C SSL module currently do not work together,
compiling the INTEGRATION.C sample program will generate a serious warning. Ignore the
warning because we are not using HTTP upload over SSL. A macro
(HTTP_UPLOAD_SSL_SUPRESS_WARNING) is available to suppress the warning message.
Open a Web browser, and browse to the device using the IP address from the TCP_CONFIG.LIB
library or the URL you assigned to the device. The humidity monitor will be displayed in your
Web browser. This page is accessible via plain HTTP or over SSL-secured HTTPS. Click on the
administrator link to bring up the admin page, which is secured automatically using SSL with a
user name and a password. Use myadmin for user name and use myadmin for the password.
The admin page demonstrates some RabbitWeb capabilities and provides access to the HTTP
upload page. Click the upload link to bring up the HTTP upload page, which allows you to choose
new files for both the humidity monitor and the admin page. If your browser prompts you again
for your user name and password, they are the same as before.
Note that the upload page is a static page included in the program flash, and can only be updated
by recompiling and downloading the application. This way, the page is protected so that you cannot accidentally change it, possibly restricting yourself from performing future updates. If you
wish, you may place the upload page into the FAT file system to allow the upload page to be
updated.
To try out the update capability, click the upload link on the admin page and choose a simple text
file to replace monitor.ztm. Open another browser window and load the main Web page. You
will see that your text file has replaced the humidity monitor. To restore the monitor, go back to
the other window, click back to go to the upload page again, and choose
HUMIDITY_MONITOR.ZHTML to replace monitor.ztm and click Upload.
Dynamic C Sample Programs
51
When you refresh the page in your browser, you will see that the page has been restored. You have
successfully updated and restored your application's files remotely!
When you are finished with the INTEGRATION.C sample program, you need to follow a special
shutdown procedure before powering off to prevent any possible corruption of the FAT file system. Press and hold switch S2 on the Prototyping Board until LED DS3 blinks rapidly to indicate
that it is now safe to turn the RCM3300 off. This procedure can be modified by the user to provide
other application-specific shutdown tasks.
52
Roadmap to
1.20 RCM3400
1.20.1 Digital I/O
FOLDER: SAMPLES\RCM3400
• CONTROLLED.C—Demonstrates use of the digital inputs by having you turn the LEDs on the
Prototyping Board on or off from the STDIO window on your PC.
• FLASHLED1.C—Demonstrates assembly-language program by flashing LEDs DS1 and DS2
on the Prototyping Board at different rates.
• FLASHLED2.C—Demonstrates cofunctions and costatements to flash LEDs DS1 and DS2 on
the Prototyping Board at different rates.
• IR_DEMO.C—Demonstrates sending Modbus ASCII packets between two RCM3400/
Prototyping Board assemblies via the IrDA transceivers.
To use this sample program, you will need a second system with IrDA capability such as
another RCM3400 with an RCM3400 Prototyping Board, or an RCM3000 with anRCM3000
Prototyping Board. First, compile and run the IR_DEMO.C sample program from the SAMPLES
folder specific to the other system on the second system, then move the programming cable to
the RCM3400 Prototyping Board, and compile and run the IR_DEMO.C sample program from
the SAMPLES\RCM3400 folder on the RCM3400 system. With the IrDA transceivers on the
two Prototyping Boards facing each other, press switch S2 on the RCM3400 Prototyping
Board to transmit a packet. The other system will return a response packet that will then appear
in the Dynamic C STDIO window.
• TOGGLESWITCH.C—Uses costatements to detect switches using the press and release method
for debouncing. The corresponding LEDs (DS1 and DS2) will turn on or off.
1.20.2 A/D Converter
FOLDER: SAMPLES\RCM3400\ADC
• AD_CAL_ALL.C—Demonstrates how to recalibrate all single-ended analog input channels for
one gain, using two known voltages to generate the calibration constants for each channel.
Constants will be rewritten into the user block data area.
• AD_CAL_CHAN.C—Demonstrates how to recalibrate one single-ended analog input channel
with one gain using two known voltages to generate the calibration constants for that channel.
Constants will be rewritten into user block data area.
• AD_CAL_DIFF.C—Demonstrates how to recalibrate one differential analog input channel
using two known voltages to generate the calibration constants for that channel. Constants will
be rewritten into user block data area.
• AD_CALMA_CH.C—Demonstrates how to recalibrate an A/D input channel being used to convert analog current measurements to generate the calibration constants for that channel.
NOTE: The above sample programs will overwrite any existing calibration constants.
• AD_RDDIFF_CH.C—Demonstrates how to read an A/D input channel being used for a differential input using previously defined calibration constants.
Dynamic C Sample Programs
53
• AD_RDMA_CH.C—Demonstrates how to read an A/D input channel being used to convert analog current measurements using previously defined calibration constants for that channel.
• AD_RDVOLT_ALL.C—Demonstrates how to read all single-ended A/D input channels using
previously defined calibration constants.
• AD_SAMPLE.C—Demonstrates how to use a low-level driver on single-ended inputs. The program will continuously display the voltage (average of 10 samples) that is present on the A/D
channels.
• ANAINCONFIG.C—Demonstrates how to use the Register Mode method to read single-ended
analog input values for display as voltages. The sample program uses the function call
anaInConfig() and the ADS7870 CONVERT line to accomplish this task.
• THERMISTOR.C—Demonstrates how to use analog input THERM_IN7 to calculate temperature for display to the STDIO window. This sample program assumes that the thermistor is the
one included in the Development Kit whose values for beta, series resistance, and resistance at
standard temperature are given in the part specification.
• DNLOADCALIB.C—Demonstrates how to retrieve analog calibration data to rewrite it back to
simulated EEPROM in flash with using a serial utility such as Tera Term.
• UPLOADCALIB.C—Demonstrates how to read calibrations constants from the user block in
flash memory and then transmitting the file using a serial port and a PC serial utility such as
Tera Term. Use DNLOADCALIB.C to download the calibration constants created by this
program.
1.20.3 Serial Communication
FOLDER: SAMPLES\RCM3400\SERIAL
• FLOWCONTROL.C—This program demonstrates how to configure Serial Port C for CTS/RTS
with serial data coming from Serial Port D. The serial data received are displayed in the STDIO
window.
• PARITY.C—This program demonstrates the use of parity modes by repeatedly sending byte
values 0–127 from Serial Port D to Serial Port C. The program will switch between generating
parity or not on Serial Port D. Serial Port C will always be checking parity, so parity errors
should occur during every other sequence.
• SIMPLE3WIRE.C—This program demonstrates basic RS-232 serial communication.
• SIMPLE5WIRE.C—This program demonstrates 5-wire RS-232 serial communication.
• SWITCHCHAR.C—This program demonstrates transmits and then receives an ASCII string on
Serial Ports D and C. It also displays the serial data received from both ports in the STDIO
window.
• SIMPLE485MASTER.C—This program demonstrates a simple RS-485 transmission of lower
case letters to a slave RCM3400. The slave will send back converted upper case letters back to
the master RCM3400 and display them in the STDIO window. Use SIMPLE485SLAVE.C to
program the slave RCM3400.
54
Roadmap to
• SIMPLE485LAVE.C—This program demonstrates a simple RS-485 transmission of lower case
letters to a master RCM3400. The slave will send back converted upper case letters back to the
master RCM3400 and display them in the STDIO window. Use SIMPLE485MASTER.C to
program the masterRCM3400.
1.20.4 TCP/IP
FOLDER: SAMPLES\RCM3400\TCPIP
• BROWSELED.C—This program demonstrates a basic controller running a Web page. Two
“LEDs” are created on the Web page, and two buttons on the Prototyping Board then toggle
them. Users can change the status of the lights from the Web browser. The LEDs on the
Prototyping Board match the ones on the Web page.
• MBOXDEMO.C—Implements a Web server that allows e-mail messages to be entered and then
shown on the LCD/keypad module.
• PINGLED.C—This program demonstrates ICMP by pinging a remote host. It will flash LEDs
DS1 and DS2 on the Prototyping Board when a ping is sent and received.
• SMTP.C—This program allows you to send an E-mail when a switch on the Prototyping Board
is pressed. Follow the instructions included with the sample program.
1.20.5 LCD/Keypad
FOLDER: SAMPLES\RCM3400\LCD_KEYPAD
• KEYPADTOLED.C—This program demonstrates the use of the external I/O bus. The program
will light up an LED on the LCD/keypad module and will display a message on the LCD when
a key press is detected. The DS1 and DS2 LEDs on the Prototyping Board will also light up.
• LCDKEYFUN.C—This program demonstrates how to draw primitive features from the graphic
library (lines, circles, polygons), and also demonstrates the keypad with the key release option.
• SWITCHTOLED.C—This program demonstrates the use of the external I/O bus. The program
will light up an LED on the LCD/keypad module and will display a message on the LCD when
a switch press is detected. The DS1 and DS2 LEDs on the Prototyping Board will also light up.
These three sample programs are board-specific to the RCM3400. Click here for additional
sample programs that illustrate the use of the LCD/keypad module.
Dynamic C Sample Programs
55
1.21 RCM3600
1.21.1 Digital I/O
FOLDER: SAMPLES\RCM3600
• CONTROLLED.C—Demonstrates use of the digital inputs by having you turn the LEDs on the
Prototyping Board on or off from the STDIO window on your PC.
• FLASHLED.C—Demonstrates assembly-language program by flashing LEDs DS1 and DS2 on
the Prototyping Board at different rates.
• IR_DEMO.C—Demonstrates sending Modbus ASCII packets between two RCM3600/Prototyping Board assemblies via the IrDA transceivers.
• DIO.C—Demonstrates the digital I/O capabilities of the A/D converter on the Prototyping Board
by configuring two lines to outputs and two lines as inputs on Prototyping Board header JP4.
Install a 2 x 2 header at JP4 and connect pins 1–2 and pins 3–4 on header JP4 before running
this sample program.
• TOGGLESWITCH.C—Uses costatements to detect switches using debouncing. The corresponding LEDs (DS1 and DS2) will turn on or off.
1.21.2 A/D Converter Inputs
FOLDER: SAMPLES\RCM3600\ADC
• AD_CALDIFF_CH.C—Demonstrates how to recalibrate one differential analog input channel
using two known voltages to generate the calibration constants for that channel. Constants will
be rewritten into user block data area.
• AD_CALMA_CH.C—Demonstrates how to recalibrate an A/D input channel being used to convert
analog current measurements to generate the calibration constants for that channel.
Before running this program, make sure that pins 3–5 are connected on headers JP5, JP6, and
JP7. Connect pins 1–2, 3–4, 5–6, 7–8 on header JP8.
• AD_CALSE_ALL.C—Demonstrates how to recalibrate all single-ended analog input channels
for one gain, using two known voltages to generate the calibration constants for each channel.
Constants will be rewritten into the user block data area.
• AD_CALSE_CHAN.C—Demonstrates how to recalibrate one single-ended analog input channel
with one gain using two known voltages to generate the calibration constants for that channel.
Constants will be rewritten into user block data area.
NOTE: The above sample programs will overwrite any existing calibration constants.
• AD_RDDIFF_CH.C—Demonstrates how to read an A/D input channel being used for a differential input using previously defined calibration constants.
• AD_RDMA_CH.C—Demonstrates how to read an A/D input channel being used to convert analog current measurements using previously defined calibration constants for that channel.
Before running this program, make sure that pins 3–5 are connected on headers JP5, JP6, and
JP7. Connect pins 1–2, 3–4, 5–6, 7–8 on header JP8.
56
Roadmap to
• AD_RDSE_ALL.C—Demonstrates how to read all single-ended A/D input channels using previously defined calibration constants.
• AD_SAMPLE.C—Demonstrates how to use a low-level driver on single-ended inputs. The program will continuously display the voltage (average of 10 samples) that is present on the A/D
converter channels.
• ANAINCONFIG.C—Demonstrates how to use the Register Mode method to read single-ended
analog input values for display as voltages. The sample program uses the function call anaInConfig() and the ADS7870 CONVERT line to accomplish this task.
• THERMISTOR.C—Demonstrates how to use analog input THERM_IN7 to calculate temperature for display to the STDIO window. This sample program assumes that the thermistor is the
one included in the Development Kit whose values for beta, series resistance, and resistance at
standard temperature are given in the part specification.
• DNLOADCALIB.C—Demonstrates how to retrieve analog calibration data to rewrite it back to
simulated EEPROM in flash with using a serial utility such as Tera Term.
• UPLOADCALIB.C—Demonstrates how to read calibrations constants from the user block in
flash memory and then transmitting the file using a serial port and a PC serial utility such as
Tera Term. Use DNLOADCALIB.C to download the calibration constants created by this
program.
1.21.3 Serial Communication
FOLDER: SAMPLES\RCM3600\SERIAL
• FLOWCONTROL.C—This program demonstrates hardware flow control by configuring Serial
Port C for CTS/RTS with serial data coming from Serial Port D. The serial data received are
displayed in the STDIO window.
• PARITY.C—This program demonstrates the use of parity modes by repeatedly sending byte
values 0–127 from Serial Port D to Serial Port C. The program will switch between generating
parity or not on Serial Port D. Serial Port C will always be checking parity, so parity errors
should occur during every other sequence.
• SIMPLE3WIRE.C—This program demonstrates basic RS-232 serial communication.
• SIMPLE5WIRE.C—This program demonstrates 5-wire RS-232 serial communication.
• SWITCHCHAR.C—This program demonstrates transmits and then receives an ASCII string on
Serial Ports C and E. It also displays the serial data received from both ports in the STDIO window.
Before running this sample program, check to make sure that Serial Port E is set up as an
RS-232 serial port—pins 1–3 and pins 2–4 on header JP2 must be jumpered together. Then
connect TxC to RxE and connect RxC to TxE. These connections can be made using the pins
on header J2.
Dynamic C Sample Programs
57
• SIMPLE485MASTER.C—This program demonstrates a simple RS-485 transmission of lower
case letters to a slave RCM3600. The slave will send back converted upper case letters back to
the master RCM3600 and display them in the STDIO window. Use SIMPLE485SLAVE.C to
program the slave RCM3600, and check to make sure that Serial Port E is set up as an RS-485
serial port—pins 3–5 and pins 4–6 on header JP2 must be jumpered together.
• SIMPLE485LAVE.C—This program demonstrates a simple RS-485 transmission of lower case
letters to a master RCM3600. The slave will send back converted upper case letters back to the
master RCM3600 and display them in the STDIO window. Use SIMPLE485MASTER.C to program the masterRCM3600, and check to make sure that Serial Port E is set up as an RS-485
serial port—pins 3–5 and pins 4–6 on header JP2 must be jumpered together.
1.21.4 LCD/Keypad
FOLDER: SAMPLES\RCM3600\LCD_KEYPAD
• KEYPADTOLED.C—This program demonstrates the use of the external I/O bus. The program
will light up an LED on the LCD/keypad module and will display a message on the LCD when
a key press is detected. The DS1 and DS2 LEDs on the Prototyping Board will also light up.
• LCDKEYFUN.C—This program demonstrates how to draw primitive features from the graphic
library (lines, circles, polygons), and also demonstrates the keypad with the key release option.
• SWITCHTOLED.C—This program demonstrates the use of the external I/O bus. The program
will light up an LED on the LCD/keypad module and will display a message on the LCD when
a switch press is detected. The DS1 LED on the Prototyping Board will also light up.
These three sample programs are board-specific to the RCM3600. Click here for additional
sample programs that illustrate the use of the LCD/keypad module.
58
Roadmap to
1.22 RCM3700
1.22.1 Digital I/O
FOLDER: SAMPLES\RCM3700
• CONTROLLED.C—Demonstrates use of the digital inputs by having you turn the LEDs on the
Prototyping Board on or off from the STDIO window on your PC.
• FLASHLED.C—Demonstrates assembly-language program by flashing LEDs DS1 and DS2 on
the Prototyping Board at different rates.
• IR_DEMO.C—Demonstrates sending Modbus ASCII packets between two RCM3700/Prototyping Board assemblies via the IrDA transceivers.
• DIO.C—Demonstrates the digital I/O capabilities of the A/D converter on the Prototyping
Board by configuring two lines to outputs and two lines as inputs on Prototyping Board header
JP4.
Install a 2 x 2 header at JP4 and connect pins 1–2 and pins 3–4 on header JP4 before running
this sample program.
• TOGGLESWITCH.c—Uses costatements to detect switches using debouncing. The corresponding LEDs (DS1 and DS2) will turn on or off.
1.22.2 A/D Converter
FOLDER: SAMPLES\RCM3700\ADC
• AD_CALDIFF_CH.C—Demonstrates how to recalibrate one differential analog input channel
using two known voltages to generate the calibration constants for that channel. Constants will
be rewritten into user block data area.
• AD_CALMA_CH.C—Demonstrates how to recalibrate an A/D input channel being used to convert
analog current measurements to generate the calibration constants for that channel.
Before running this program, make sure that pins 3–5 are connected on headers JP5, JP6, and
JP7. Connect pins 1–2, 3–4, 5–6, 7–8 on header JP8.
• AD_CALSE_ALL.C—Demonstrates how to recalibrate all single-ended analog input channels
for one gain, using two known voltages to generate the calibration constants for each channel.
Constants will be rewritten into the user block data area.
• AD_CALSE_CHAN.C—Demonstrates how to recalibrate one single-ended analog input channel
with one gain using two known voltages to generate the calibration constants for that channel.
Constants will be rewritten into user block data area.
NOTE: The above sample programs will overwrite any existing calibration constants.
• AD_RDDIFF_CH.C—Demonstrates how to read an A/D input channel being used for a differential input using previously defined calibration constants.
• AD_RDMA_CH.C—Demonstrates how to read an A/D input channel being used to convert analog current measurements using previously defined calibration constants for that channel.
Before running this program, make sure that pins 3–5 are connected on headers JP5, JP6, and
JP7. Connect pins 1–2, 3–4, 5–6, 7–8 on header JP8.
Dynamic C Sample Programs
59
• AD_RDSE_ALL.C—Demonstrates how to read all single-ended A/D input channels using previously defined calibration constants.
• AD_SAMPLE.C—Demonstrates how to use a low-level driver on single-ended inputs. The program will continuously display the voltage (average of 10 samples) that is present on the A/D
channels.
• ANAINCONFIG.C—Demonstrates how to use the Register Mode method to read single-ended
analog input values for display as voltages. The sample program uses the function call anaInConfig() and the ADS7870 CONVERT line to accomplish this task.
• THERMISTOR.C—Demonstrates how to use analog input THERM_IN7 to calculate temperature for display to the STDIO window. This sample program assumes that the thermistor is the
one included in the Development Kit whose values for beta, series resistance, and resistance at
standard temperature are given in the part specification.
• DNLOADCALIB.C—Demonstrates how to retrieve analog calibration data to rewrite it back to
simulated EEPROM in flash with using a serial utility such as Tera Term.
• UPLOADCALIB.C—Demonstrates how to read calibrations constants from the user block in flash
memory and then transmitting the file using a serial port and a PC serial utility such as Tera
Term. Use DNLOADCALIB.C to download the calibration constants created by this program.
1.22.3 Serial Communication
FOLDER: SAMPLES\RCM3700\SERIAL
• FLOWCONTROL.C—This program demonstrates hardware flow control by configuring Serial
Port C for CTS/RTS with serial data coming from Serial Port D. The serial data received are
displayed in the STDIO window.
• PARITY.C—This program demonstrates the use of parity modes by repeatedly sending byte
values 0–127 from Serial Port D to Serial Port C. The program will switch between generating
parity or not on Serial Port D. Serial Port C will always be checking parity, so parity errors
should occur during every other sequence.
• SIMPLE3WIRE.C—This program demonstrates basic RS-232 serial communication.
• SIMPLE5WIRE.C—This program demonstrates 5-wire RS-232 serial communication.
• SWITCHCHAR.C—This program demonstrates transmits and then receives an ASCII string on
Serial Ports C and E. It also displays the serial data received from both ports in the STDIO window.
Before running this sample program, check to make sure that Serial Port E is set up as an
RS-232 serial port—pins 1–3 and pins 2–4 on header JP2 must be jumpered together. Then
connect TxC to RxE and connect RxC to TxE. These connections can be made using the pins
on header J2.
60
Roadmap to
• SIMPLE485MASTER.C—This program demonstrates a simple RS-485 transmission of lower
case letters to a slave RCM3700. The slave will send back converted upper case letters back to
the master RCM3700 and display them in the STDIO window. Use SIMPLE485SLAVE.C to
program the slave RCM3700, and check to make sure that Serial Port E is set up as an RS-485
serial port—pins 3–5 and pins 4–6 on header JP2 must be jumpered together.
• SIMPLE485LAVE.C—This program demonstrates a simple RS-485 transmission of lower case
letters to a master RCM3700. The slave will send back converted upper case letters back to the
master RCM3700 and display them in the STDIO window. Use SIMPLE485MASTER.C to program the masterRCM3700, and check to make sure that Serial Port E is set up as an RS-485
serial port—pins 3–5 and pins 4–6 on header JP2 must be jumpered together.
1.22.4 TCP/IP
FOLDER: SAMPLES\RCM3700\TCPIP
• BROWSELED.C—This program demonstrates a basic controller running a Web page. Two
“LEDs” are created on the Web page, along with two buttons to toggle them. Users can change
the status of the lights from the Web browser. The LEDs on the Prototyping Board match the
ones on the Web page.
• MBOXDEMO.C—Implements a Web server that allows e-mail messages to be entered and then
shown on the LCD/keypad module. The keypad allows the user to scroll within messages, flip
to other e-mails, mark messages as read, and delete e-mails. When a new e-mail arrives, an
LED (on the Prototyping Board and LCD/keypad module) turns on, then turns back off once
the message has been marked as read. A log of all e-mail actions is kept, and can be displayed
in the Web browser. All current e-mails can also be read with the Web browser.
• PINGLED.C—This program demonstrates ICMP by pinging a remote host. It will flash LEDs
DS1 and DS2 on the Prototyping Board when a ping is sent and received.
• SMTP.C—This program allows you to send an e-mail when a switch on the Prototyping Board
is pressed. Follow the instructions included with the sample program. LED DS1 on the Prototyping Board will light up when sending e-mail. Note that pin PB7 is connected to both switch
S2 and to the external I/O bus on the Prototyping Board, and so switch S2 should not be used
with Ethernet operations.
1.22.4.1 RabbitWeb
FOLDER: SAMPLES\RCM3700\TCPIP\RABBITWEB
You will need to have the Dynamic C RabbitWeb module installed before you run the sample
programs described in this section. The sample programs can be found in the SAMPLES\RCM3700\
TCPIP\RABBITWEB folder.
• BLINKLEDS.C—This program demonstrates a basic example to change the rate at which the
DS1 and DS2 LEDs on the RCM3700 Prototyping Board blink.
• DOORMONITOR.C—The optional LCD/keypad module must be plugged in to the RCM3700 Prototyping Board when using this sample program. This program demonstrates adding and monitoring passwords entered via the LCD/keypad module.
Dynamic C Sample Programs
61
• SPRINKLER.C—This program demonstrates how to schedule times for the digital outputs in a
24-hour period.
• TEMPERATURE.C—This program demonstrates the use of a thermistor to measure
temperature, and it also demonstrates some simple #web variable registration along with the
authentication features. An e-mail message will be sent if the current temperature exceeds the
minimum or maximum limits set by the user.
Before running this sample program, you will have to install the thermistor included in the
Development Kit at location J7 on the Prototyping Board, which is connected to analog input
THERM_IN7.
1.22.4.2 Secure Sockets Layer (SSL)
FOLDER: SAMPLES\RCM3700\TCPIP\SSL
You will need to have the Dynamic C SSL module installed before you run the sample programs
described in this section. The sample programs can be found in the SAMPLES\RCM3700\TCPIP\
SSL folder.
Before running these sample programs, you will have to create an SSL certificate. The SSL walkthrough in the online documentation for the Dynamic C SSL module explains how to do this.
• SSL_BROWSELED.C—This program demonstrates a basic controller running a Web page. Two
“LEDs” are created on the Web page, along with two buttons to toggle them. Users can change
the status of the lights from the Web browser. The LEDs on the Prototyping Board match the
ones on the Web page. As long as you have not modified the TCPCONFIG 1 macro in the sample program, enter the following server address in your Web browser to bring up the Web page
served by the sample program.
http://10.10.6.100.
Otherwise use the TCP/IP settings you entered in the TCP_CONFIG.LIB library.
• SSL_MBOXDEMO.C—Implements a Web server that allows e-mail messages to be entered and
then shown on the LCD/keypad module. The keypad allows the user to scroll within messages,
flip to other e-mails, mark messages as read, and delete e-mails. When a new e-mail arrives, an
LED (on the Prototyping Board and LCD/keypad module) turns on, then turns back off once
the message has been marked as read. A log of all e-mail actions is kept, and can be displayed
in the Web browser. All current e-mails can also be read with the Web browser.
62
Roadmap to
1.22.5 Serial Flash
FOLDER: SAMPLES\RCM3700\Serial_Flash
• SERIAL_FLASHLOG.C—This program runs a simple Web server and stores a log of hits in the
serial flash. This log can be viewed and cleared from a browser.
• SFLASH_INSPECT.C—This program is a handy utility for inspecting the contents of a serial flash
chip. When the sample program starts running, it attempts to initialize a serial flash chip on Serial
Port B. Once a serial flash chip is found, the user can perform two different commands to either
print out the contents of a specified page or clear (set to zero) all the bytes in a specified page.
1.22.6 LCD/Keypad
FOLDER: SAMPLES\RCM3700\LCD_KEYPAD
• KEYPADTOLED.C—This program demonstrates the use of the external I/O bus. The program
will light up an LED on the LCD/keypad module and will display a message on the LCD when
a key press is detected. The DS1 and DS2 LEDs on the Prototyping Board will also light up.
• LCDKEYFUN.C—This program demonstrates how to draw primitive features from the graphic
library (lines, circles, polygons), and also demonstrates the keypad with the key release option.
• SWITCHTOLED.C—This program demonstrates the use of the external I/O bus. The program
will light up an LED on the LCD/keypad module and will display a message on the LCD when
a switch press is detected. The DS1 LED on the Prototyping Board will also light up.
These three sample programs are board-specific to the RCM3700. Click here for additional
sample programs that illustrate the use of the LCD/keypad module.
1.22.7 Dynamic C FAT File System, RabbitWeb, and SSL Modules
The Dynamic C FAT File System, RabbitWeb, and Secure Sockets Layer (SSL) modules have
been integrated into a sample program for the RCM3700. The sample program will only run on
the RCM3300 and RCM3700, and requires that you have installed the Dynamic C FAT File
System, RabbitWeb, and SSL modules.
NOTE: These sample programs will work only on the RCM3700, and not the RCM3710. The
download manager portion of the sample program will only work on an RCM3300.
TIP: Before running any of the sample programs described in this section, you should look at and
run sample programs for the TCP/IP ZSERVER.LIB library, the FAT file system, RabbitWeb,
SSL, the download manager, and HTTP upload to become more familiar with their operation.
The INTEGRATION.C sample program in the SAMPLES\RCM3700\Module_Integration
folder demonstrates the use of the TCP/IP ZSERVER.LIB library and FAT file system functionality with RabbitWeb dynamic HTML content, all secured using SSL. The sample program also
supports dynamic updates of both the application and its resources using the Rabbit Download
Manager (DLM) and HTTP upload capability, respectively—note that neither of these currently
supports SSL security.
Dynamic C Sample Programs
63
Before you run the INTEGRATION.C sample program, you will first need to format and partition
the serial flash. Find the FMT_DEVICE.C sample program in the Dynamic C SAMPLES\
FileSystem folder. Open this sample program with the File > Open menu, then compile and
run it by pressing F9. FMT_DEVICE.C formats the serial flash for use with the FAT file system. If
the serial flash is already formatted, FMT_DEVICE.C gives you the option of erasing the serial
flash and reformatting it with a single large partition. This erasure does not check for non-FAT
partitions and will destroy all existing partitions.
Next, run the INTEGRATION_FAT_SETUP.C sample program in the Dynamic C SAMPLES\
RCM3700\Module_Integration folder. Open this sample program with the File > Open
menu, then compile and run it by pressing F9. INTEGRATION_FAT_SETUP.C will copy some
files into the FAT file system via #ximport.
The last step to complete before you can run the INTEGRATION.C sample program is to create an
SSL certificate. The SSL walkthrough in the online documentation for the Dynamic C SSL module explains how to do this.
Now you are ready to run the INTEGRATION.C sample program in the Dynamic C SAMPLES\
RCM3700\Module_Integration folder. Open this sample program with the File > Open
menu, then compile and run it by pressing F9.
NOTE: Since HTTP upload and the Dynamic C SSL module currently do not work together,
compiling the INTEGRATION.C sample program will generate a serious warning. Ignore the
warning because we are not using HTTP upload over SSL. A macro
(HTTP_UPLOAD_SSL_SUPRESS_WARNING) is available to suppress the warning message.
Open a Web browser, and browse to the device using the IP address from the TCP_CONFIG.LIB
library or the URL you assigned to the device. The humidity monitor will be displayed in your
Web browser. This page is accessible via plain HTTP or over SSL-secured HTTPS. Click on the
administrator link to bring up the admin page, which is secured automatically using SSL with a
user name and a password. Use myadmin for user name and use myadmin for the password.
The admin page demonstrates some RabbitWeb capabilities and provides access to the HTTP
upload page. Click the upload link to bring up the HTTP upload page, which allows you to choose
new files for both the humidity monitor and the admin page. If your browser prompts you again
for your user name and password, they are the same as before.
Note that the upload page is a static page included in the program flash, and can only be updated
by recompiling and downloading the application. This way, the page is protected so that you cannot accidentally change it, possibly restricting yourself from performing future updates. If you
wish, you may place the upload page into the FAT file system to allow the upload page to be
updated.
To try out the update capability, click the upload link on the admin page and choose a simple text
file to replace monitor.ztm. Open another browser window and load the main Web page. You
will see that your text file has replaced the humidity monitor. To restore the monitor, go back to
the other window, click back to go to the upload page again, and choose
HUMIDITY_MONITOR.ZHTML to replace monitor.ztm, and click Upload.
64
Roadmap to
When you refresh the page in your browser, you will see that the page has been restored. You have
successfully updated and restored your application's files remotely!
When you are finished with the INTEGRATION.C sample program, you need to follow a special
shutdown procedure before powering off to prevent any possible corruption of the FAT file system. Press and hold switch S1 on the Prototyping Board until LED DS1 blinks rapidly to indicate
that it is now safe to turn the RCM3700 off. This procedure can be modified by the user to provide
other application-specific shutdown tasks.
Dynamic C Sample Programs
65
66
Roadmap to
INDEX
B
BL1800
digital I/O
DEMOJR1.C ........................ 3
DEMOJR2.C ........................ 3
DEMOJR3.C ........................ 3
JRIO_COF.C ........................ 3
JRIOTEST.C ........................ 3
RABDB01.C ......................... 3
RABDB02.C ......................... 3
LCD/keypad
LCD_DEMO.C ..................... 3
serial communication
JR_FLOWCONTROL.C ...... 3
JR_PARITY.C ...................... 3
BL2000
A/D converter
AD_CALIB.C ....................... 4
AD1.C ................................... 4
AD2.C ................................... 4
AD3.C ................................... 5
AD4.C ................................... 5
D/A converter
DACAL.C ............................. 5
DAOUT1.C ..........................5
DAOUT2.C ..........................5
digital I/O
ANADIGIN.C ...................... 4
DIGIN.C ...............................4
DIGOUT.C ........................... 4
LED.C ................................... 4
general board operation
BOARD_ID.C ...................... 4
COUNTLEDS.C ................... 4
LEDS_4.C ............................ 4
relay
RELAY.C ............................. 5
serial communication
MASTER.C ..........................5
PUTS.C ................................. 5
RELAYCHR.C ..................... 5
SLAVE.C ............................. 5
Dynamic C Sample Programs
TCP/IP
SMTP.C ................................6
SSI.C .....................................6
TELNET.C ...........................6
BL2100
A/D converter
AD_CALIB.C .......................7
AD1.C ...................................7
AD2.C ...................................7
AD3.C ...................................7
AD4.C ...................................7
calibration constants
GETCALIB.C .......................8
SAVECALIB.C ....................8
D/A converter
DACAL.C .............................8
DAOUT1.C ...........................8
DAOUT2.C ...........................8
digital I/O
DIGIN.C ...............................7
DIGOUT.C ...........................7
PWM.C .................................7
general board operation
BOARD_ID.C ......................7
serial communication
MASTER.C ..........................9
PUTS.C .................................8
RELAYCHR.C .....................8
SLAVE.C ..............................9
TCP/IP
SMTP.C ................................9
SSI.C .....................................9
TELNET.C ...........................9
BL2500
A/D converter
AD0.C .................................10
ADCCALIB.C ....................10
COF_ANAIN.C ..................10
DA2AD.C ...........................10
calibration constants
DNLOADCALIB.C ............11
UPLOADCALIB.C ............11
D/A converter
DAC.C ................................11
DACCALIB.C ....................11
PWM.C ...............................11
digital I/O
DIGIN.C .............................10
DIGOUT.C .........................10
general board operation
CONTROLLED.C ..............10
FLASHLEDS.C ..................10
TOGGLESWITCH.C .........10
serial communication
SIMPLE3WIRE.C ..............11
SIMPLE485MASTER.C ....12
SIMPLE485SLAVE.C ........12
SWITCHCHAR.C ..............11
TCP/IP
BROWSELED.C ................12
PINGLED.C ........................12
SMTP.C ..............................12
BL2600
A/D converter
AD_RD_DIFF.C .................14
AD_RD_MA.C ...................14
AD_RD_SE_BIPOLAR.C ..14
AD_RD_SE_UNIPOLAR.C 14
ADC_CAL_DIFF.C ............14
ADC_CAL_MA.C ..............14
ADC_CAL_SE_BIPOLAR.C 14
ADC_CAL_SE_UNIPOLAR.C 14
calibration constants
ADC_RD_CALDATA.C ....16
DAC_RD_CALDATA.C ....16
D/A converter
DAC_CAL_MA.C ..............15
DAC_CAL_VOLTS.C .......15
DAC_MA_ASYNC.C ........15
DAC_MA_SYNC.C ...........15
DAC_VOLT_ASYNC.C ....15
DAC_VOLT_SYNC.C .......15
67
digital I/O
DIGIN.C ............................. 13
DIGINBANK.C .................. 13
DIGOUT.C ......................... 13
DIGOUTBANK.C .............. 13
HIGH_CURRENT_IO.C ... 13
PWM.C ............................... 13
general board operation
BOARD_ID.C .................... 13
serial communication
MASTER.C ........................ 16
PUTS.C ............................... 16
SIMPLE3WIRE.C .............. 16
SIMPLE5WIRE.C .............. 16
SLAVE.C ........................... 16
serial flash
FLASH_PATTERN_
INSPECT.C ..................... 17
SFLASH_TEST.C .............. 17
TCP/IP
SMTP.C .............................. 17
SSI.C ................................... 17
TELNET.C ......................... 17
I
Intellicom
digital I/O
DEMOBRD1.C .................. 21
DEMOBRD2.C .................. 21
DEMOBRD3.C .................. 21
ICOMIO.C .......................... 21
general board operation
COFTERMA.C ................... 21
ICOMDEMO.C .................. 21
MUSIC.C ............................ 21
MUSIC2.C .......................... 21
SPEAKER.C ....................... 21
LCD/keypad
KEYLCD.C ........................ 22
serial communication
ICOM232.C ........................ 21
ICOM485.C ........................ 21
ICOM5WIRE.C .................. 21
REMOTE1.C ...................... 21
TCP/IP
HTTPDEMO.C ................... 22
MBOXDEMO.C ................. 22
PCRESPOND.C ................. 22
PCSEND.C ......................... 22
SMTPDEMO.C .................. 22
TCP_RESPOND.C ............. 22
TCP_SEND.C ..................... 22
68
L
LCD/keypad module
ALPHANUM.C ......................33
COFTERMA.C .......................33
DISPPONG.C .........................33
DKADEMO1.C ......................33
FUN.C ....................................33
KEYBASIC.C ........................33
KEYMENU.C ........................33
LED.C .....................................33
SCROLLING.C ......................33
TEXT.C ..................................33
LP3500
A/D converter
AD_CALDIFF.C ................19
AD_CALMA_CH.C ...........19
AD_RDDIFF_CH.C ...........19
AD_RDMA_CH.C .............19
AD_RDVOLT_ALL.C .......18
AD_RDVOLT_CH.C .........19
AD_SAMPLE.C .................19
ADCAL_ALL.C .................19
ADCAL_CHAN.C .............19
digital I/O
DIGBANKIN.C ..................18
DIGBANKOUT.C ..............18
DIGIN.C .............................18
DIGOUT.C .........................18
PWMOUT.C .......................18
LCD/keypad
DISPLED.C ........................20
KEYMENU.C .....................20
power modes
LOWPWRDEMO.C ...........18
POWER.C ...........................18
VCCMONITOR.C ..............18
relay
SWRELAY.C .....................20
serial communication
SIMPLE3WIRE.C ..............20
SIMPLE485MASTER.C ....20
SIMPLE485SLAVE.C .......20
O
OP6800
digital I/O
DIGIN.C .............................23
DIGOUT.C .........................23
general board operation
BOARD_ID.C ....................23
BUZZER.C .........................23
KEYPAD.C ........................23
SWITCHES.C .....................23
serial communication
MASTER.C ........................23
PUTS.C ...............................23
RELAYCHR.C ...................23
SLAVE.C ............................23
TCP/IP
SMTP.C ..............................24
SSI.C ...................................24
TELNET.C ..........................24
OP7200
A/D converter
AD_CAL_DIFF_2V.C .......25
AD_CAL_DIFF_GND.C ....25
ADCAL_MA_CH.C ...........25
ADCAL_SE_ALL.C ..........25
ADCAL_SE_CH.C .............26
ADRD_DIFF_2V.C ............26
ADRD_DIFF_GND.C ........26
ADRD_MA_CH.C .............26
ADRD_SE_ALL.C .............26
ADRD_SE_CH.C ...............26
calibration constants
GETCALIB.C .....................26
SAVECALIB.C ..................26
digital I/O
BUZZER.C .........................25
DIGIN.C .............................25
DIGOUT.C .........................25
LED.C .................................25
PWM.C ...............................25
TRISTATE.C ......................25
general board operation
BOARD_ID.C ....................25
FUN.C .................................25
USERBLOCKINFOR.C .....25
LCD/keypad
BTN_16KEY.C ..................28
BTN_BASICS.C .................28
BTN_KEYBOARD.C ........28
BUFFLOCK.C ....................28
CAL_TOUCHSCREEN.C ..28
CONTRAST.C ....................28
KP_16KEY.C .....................28
KP_ANALOG.C .................28
KP_BASIC.C ......................28
KP_MENU.C ......................28
PRIMITIVES.C ..................28
RD_TOUCHSCREEN.C ....28
SCROLLING.C ..................28
TEXT.C ..............................28
TSCUST16KEY.LIB ..........28
TSCUSTKEYBOARD.LIB 28
Roadmap to
serial communication
MASTER.C ........................ 27
PUTS.C ............................... 27
RELAYCHR.C ................... 27
SLAVE.C ........................... 27
TCP/IP
FLASH_XML.C ................. 27
SMTP.C .............................. 27
SSI.C ................................... 27
TELNET.C ......................... 27
R
RabbitNet
general board operation
ECHOCHAR.C .................. 29
ECHOTERM.C .................. 29
HWATCHDOG.C .............. 29
SWATCHDOG.C ............... 29
RN1100
A/D converter
AIN_CALDIFF_CH.C ... 30
AIN_CALSE_CH.C ....... 30
AIN_RDDIFF_CH.C ...... 30
AIN_RDSE_CH.C .......... 30
AIN_SAMPLE.C ............ 30
digital I/O
DIGBANKIN.C .............. 29
DIGBANKOUT.C .......... 29
DIGIN.C ......................... 29
DIGOUT.C ..................... 29
RN1200
A/D converter
AIN_CALDIFF_CH.C ... 30
AIN_CALMA_CH.C ..... 30
AIN_CALSE_ALL.C ..... 30
AIN_CALSE_CH.C ....... 30
AIN_RDDIFF_CH.C ...... 30
AIN_RDMA_CH.C ........ 30
AIN_RDSE_CH.C .......... 30
RN1300
D/A converter
DAC_ASYNC.C ............. 31
DAC_CAL.C .................. 31
DAC_SYNC.C ............... 31
RN1400
relay
RELAY_ALL.C ............. 32
RELAY_LOW_PWR.C . 32
RELAY_SEQUENCE.C 32
Dynamic C Sample Programs
RN1600
keypad/display interface
ALPHANUM.C ..............32
BUZZER.C .....................32
KEYBASIC.C .................32
LCDBASIC.C .................32
PONG.C ..........................32
RCM2000
digital I/O
FLASHLED.C ....................34
FLASHLED2.C ..................34
FLASHLEDS.C ..................34
FLASHLEDS2.C ................34
SWTEST.C .........................34
TOGGLELED.C .................34
general board operation
EXTSRAM.C .....................34
LCD/keypad
KEYLCD.C ........................34
LCD_DEMO.C ...................34
serial communication
CORE_FLOWCONTROL.C 34
CORE_PARITY.C .............34
RCM2100
digital I/O
FLASHLED.C ....................35
FLASHLED2.C ..................35
FLASHLEDS.C ..................35
FLASHLEDS2.C ................35
SWTEST.C .........................35
TOGGLELED.C .................35
general board operation
EXTSRAM2.C ...................35
LCD/keypad
KEYLCD2.C ......................36
LCD_DEMO.C ...................36
serial communication
CORE_FLOWCONTROL.C 35
CORE_PARITY.C .............35
MASTER2.C ......................35
SLAVE2.C ..........................35
TCP/IP
ETHCORE1.C ....................36
ETHCORE2.C ....................36
LEDCONSOLE.C ..............36
PINGLED.C .......................36
RCM2200
digital I/O
FLASHLED.C ....................37
FLASHLEDS.C ..................37
TOGGLELED.C .................37
general board operation
EXTSRAM.C .....................37
LCD/keypad
KEYLCD.C ........................38
serial communication
MASTER.C ........................37
PUTS.C ...............................37
SLAVE.C ............................37
TCP/IP
CONSOLE.C ......................37
ETHCORE1.C ....................37
MYECHO.C .......................37
SERDCLIENT.C ................38
SPCLIENT.C ......................38
RCM2300
digital I/O
FLASHLED.C ....................39
FLASHLEDS.C ..................39
TOGGLELED.C .................39
general board operation
EXTSRAM.C ......................39
LCD/keypad
KEYLCD.C ........................39
serial communication
MASTER.C ........................39
PUTS.C ...............................39
SLAVE.C ............................39
RCM3000
digital I/O
CONTROLLED.C ..............40
FLASHLED1.C ..................40
FLASHLED2.C ..................40
IR_DEMO.C .......................40
TOGGLESWITCH.C .........40
LCD/keypad
KEYPADTOLED.C ...........42
LCDKEYFUN.C ................42
SWITCHTOLED.C ............42
serial communication
FLOWCONTROL.C ..........40
PARITY.C ..........................40
SIMPLE3WIRE.C ..............40
SIMPLE485LAVE.C ..........41
SIMPLE485MASTER.C ....41
SIMPLE5WIRE.C ..............40
SWITCHCHAR.C ..............40
TCP/IP
BROWSELED.C ................41
ECHOCLIENT.C ................41
ECHOSERVER.C ..............41
ENET_AD.C .......................41
ENET_MENU.C .................41
MBOXDEMO.C .................41
PINGLED.C ........................41
SMTP.C ..............................41
69
RCM3100
digital I/O
CONTROLLED.C .............. 43
FLASHLED1.C .................. 43
FLASHLED2.C .................. 43
IR_DEMO.C ....................... 43
TOGGLESWITCH.C ......... 43
LCD/keypad
KEYPADTOLED.C ........... 44
LCDKEYFUN.C ................ 44
SWITCHTOLED.C ............ 44
serial communication
FLOWCONTROL.C .......... 43
PARITY.C .......................... 43
SIMPLE3WIRE.C .............. 43
SIMPLE485LAVE.C ......... 44
SIMPLE485MASTER.C .... 44
SIMPLE5WIRE.C .............. 43
SWITCHCHAR.C .............. 43
RCM3200
digital I/O
CONTROLLED.C .............. 45
FLASHLED1.C .................. 45
FLASHLED2.C .................. 45
IR_DEMO.C ....................... 45
TOGGLESWITCH.C ......... 45
LCD/keypad
KEYPADTOLED.C ........... 47
LCDKEYFUN.C ................ 47
SWITCHTOLED.C ............ 47
serial communication
FLOWCONTROL.C .......... 45
PARITY.C .......................... 45
SIMPLE3WIRE.C .............. 45
SIMPLE485LAVE.C ......... 46
SIMPLE485MASTER.C .... 46
SIMPLE5WIRE.C .............. 45
SWITCHCHAR.C .............. 45
TCP/IP
BROWSELED.C ................ 46
ECHOCLIENT.C ............... 46
ECHOSERVER.C .............. 46
ENET_AD.C ...................... 46
ENET_MENU.C ................ 46
MBOXDEMO.C ................. 46
PINGLED.C ....................... 46
SMTP.C .............................. 46
RCM3300
digital I/O
CONTROLLED.C .............. 48
FLASHLED1.C .................. 48
SWRELAY.C ..................... 48
TOGGLESWITCH.C ......... 48
70
Dynamic C module integration
INTEGRATION.C .............50
INTEGRATION_FAT_
SETUP.C .........................51
LCD/keypad
KEYPADTOLED.C ...........49
LCDKEYFUN.C ................49
SWITCHTOLCD.C ............49
remote application update
DLP_STATIC.C .................50
DLP_WEB.C ......................50
serial communication
FLOWCONTROL.C ..........48
PARITY.C ..........................48
SIMPLE3WIRE.C ..............48
SIMPLE485MASTER.C ....48
SIMPLE485SLAVE.C .......48
SIMPLE5WIRE.C ..............48
SWITCHCHAR.C ..............48
serial flash
SERFLASHTEST.C ...........50
SFLASH_INSPECT.C .......50
SFLASH_LOG.C ...............50
TCP/IP
BROWSELED.C ................49
MBOXDEMO.C .................49
PINGLED.C .......................49
RabbitWeb
BLINKLEDS.C ..............49
DOORMONITOR.C .......49
SPRINKLER.C ...............49
SMTP.C ..............................49
RCM3400
A/D converter
AD_CAL_ALL.C ...............53
AD_CAL_CHAN.C ...........53
AD_CAL_DIFF.C ..............53
AD_CALMA_CH.C ...........53
AD_RDDIFF_CH.C ...........53
AD_RDMA_CH.C .............54
AD_RDVOLT_ALL.C .......54
AD_SAMPLE.C .................54
ANAINCONFIG.C .............54
DNLOADCALIB.C ............54
THERMISTOR.C ...............54
UPLOADCALIB.C ............54
digital I/O
CONTROLLED.C ..............53
FLASHLED1.C ..................53
FLASHLED2.C ..................53
IR_DEMO.C .......................53
TOGGLESWITCH.C .........53
LCD/keypad
KEYPADTOLED.C ...........55
LCDKEYFUN.C ................55
SWITCHTOLED.C ............55
serial communication
FLOWCONTROL.C ..........54
PARITY.C ..........................54
SIMPLE3WIRE.C ..............54
SIMPLE485LAVE.C ..........55
SIMPLE485MASTER.C ....54
SIMPLE5WIRE.C ..............54
SWITCHCHAR.C ..............54
TCP/IP
BROWSELED.C ................55
MBOXDEMO.C .................55
PINGLED.C ........................55
SMTP.C ..............................55
RCM3600
A/D converter
AD_CALDIFF_CH.C .........56
AD_CALMA_CH.C ...........56
AD_CALSE_ALL.C ..........56
AD_CALSE_CHAN.C .......56
AD_RDDIFF_CH.C ...........56
AD_RDMA_CH.C .............56
AD_RDSE_ALL.C .............57
AD_SAMPLE.C .................57
ANAINCONFIG.C .............57
DNLOADCALIB.C ............57
THERMISTOR.C ...............57
UPLOADCALIB.C ............57
digital I/O
CONTROLLED.C ..............56
DIO.C ..................................56
FLASHLED1.C ..................56
IR_DEMO.C .......................56
TOGGLESWITCH.C .........56
LCD/keypad
KEYPADTOLED.C ...........58
LCDKEYFUN.C ................58
SWITCHTOLED.C ............58
serial communication
FLOWCONTROL.C ..........57
PARITY.C ..........................57
SIMPLE3WIRE.C ..............57
SIMPLE485MASTER.C ....58
SIMPLE485SLAVE.C ........58
SIMPLE5WIRE.C ..............57
SWITCHCHAR.C ..............57
Roadmap to
RCM3700
A/D converter
AD_CALDIFF_CH.C ........ 59
AD_CALMA_CH.C ........... 59
AD_CALSE_ALL.C .......... 59
AD_CALSE_CHAN.C ....... 59
AD_RDDIFF_CH.C ........... 59
AD_RDMA_CH.C ............. 59
AD_RDSE_ALL.C ............. 60
AD_SAMPLE.C ................. 60
ANAINCONFIG.C ............. 60
DNLOADCALIB.C ........... 60
THERMISTOR.C ............... 60
UPLOADCALIB.C ............ 60
digital I/O
CONTROLLED.C .............. 59
DIO.C ................................. 59
FLASHLED1.C .................. 59
IR_DEMO.C ....................... 59
TOGGLESWITCH.C ......... 59
Dynamic C module integration
INTEGRATION.C ............. 63
INTEGRATION_FAT_
SETUP.C ......................... 64
LCD/keypad
KEYPADTOLED.C ........... 63
LCDKEYFUN.C ................ 63
SWITCHTOLED.C ............ 63
Dynamic C Sample Programs
serial communication
FLOWCONTROL.C ..........60
PARITY.C ..........................60
SIMPLE3WIRE.C ..............60
SIMPLE485MASTER.C ....61
SIMPLE485SLAVE.C .......61
SIMPLE5WIRE.C ..............60
SWITCHCHAR.C ..............60
serial flash
SERIAL_FLASHLOG.C ....63
SFLASH_INSPECT.C .......63
TCP/IP
BROWSELED.C ................61
MBOXDEMO.C .................61
PINGLED.C .......................61
RabbitWeb
BLINKLEDS.C ..............61
DOORMONITOR.C .......61
SPRINKLER.C ...............62
TEMPERATURE.C ........62
SMTP.C ..............................61
SSL
SSL_BROWSELED.C ...62
SSL_MBOXDEMO.C ....62
71