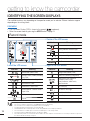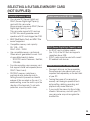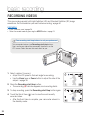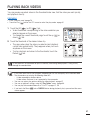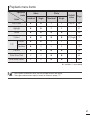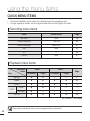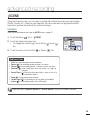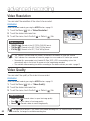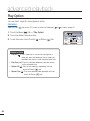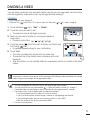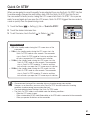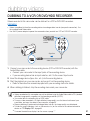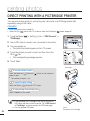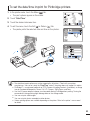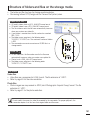
1
User Manual High Definition Digital Camcorder www.samsung.com/register For video recording, use a memory card that supports faster write speeds. - Memory Card: A Class 6 SDHC card or above. HMX-T10WP HMX-T10BP HMX-T10OP HMX-T11WP HMX-T11BP HMX-T11OP before reading this user manual SAFETY WARNINGS What the icons and signs in this user manual mean; Safety Icon Meaning There is a potential risk of death or serious injury. WARNING There is a potential risk of personal injury or damage to the product. CAUTION CAUTION To reduce the risk of fire, explosion, electric shock, or personal injury when using your camcorder, follow these basic safety precautions. Here are hints or page number references you will find helpful when you operate the camcorder. PRECHECK! Settings required before using a function. These warning signs are here to prevent injury to you and others. Please follow them explicitly. After reading this section, keep it in a safe place for future reference. PRECAUTIONS Warning! • When using the AC power adapter with your camcorder, connect the adapter to an outlet with protective grounding. • Do not expose the camcorder battery to direct sunlight, heaters, radiators, fire, or any other source of excessive heat. Caution If you replace the battery with the wrong battery, you can cause an explosion. Replace only with the same battery or an equivalent type. ii To disconnect the apparatus from the mains, the plug must be pulled out from the mains socket, therefore the mains plug shall be readily operable. IMPORTANT INFORMATION ON USE About this user manual Thank you for purchasing this Samsung Camcorder. Please read this user manual carefully before you use the camcorder and keep it handy for future reference. Should your camcorder fail to operate correctly, refer to Troubleshooting. This User Manual covers HMX-T10WP, HMX-T10BP, HMX-T10OP, HMX-T11WP, HMX-T11BP, HMX-T11OP models. • Illustrations of model HMX-T10BP are used in this user manual. • The displays in this user manual may not be exactly the same as those you see on the LCD screen. • Designs and specifications of the camcorder and other accessories are subject to change without any notice. • In this user manual, the icon or symbol in the parenthesis appearing in a description of a submenu item indicates it will appear on the screen when setting the corresponding item. Ex) Submenu item of “Video Quality” page 50 - “Super Fine” ( ): Records in the Super Fine quality. (If set, the corresponding icon ( ) will appear on the screen.) The following terms are used in this manual: • ‘Scene’ refers to the point where you press the Record Start/Stop button to start recording until you press again to pause the recording. • The terms ‘photo’ and ‘still image’ are used interchangeably and have the same meaning. Before using this camcorder • • • • • • • • This camcorder records video in H.264 (MPEG4 part10/AVC) format and in High Definition Video (HD-VIDEO) or Standard Definition Video (SD-VIDEO). You can play back and edit the video recorded by the camcorder on a personal computer using the internal software of this camcorder. Please note that this camcorder is not compatible with other digital video formats. Before recording important video, make a trial recording. Play back your trial recording to make sure the video and audio have been recorded properly. Recorded contents may be lost due to a mistake when handling this camcorder or memory card, etc. Samsung will not provide compensation for damages due to the loss of recorded contents. Make a backup of important recorded data. Protect your important recorded data by copying the files to a PC. We also recommend you copy it from your PC to other recording media for storage. Refer to the software installation and USB connection guide. Copyrights: Please note that this camcorder is intended for individual use only. Data recorded on the storage media in this camcorder using other digital/analogue media or devices is protected by the Copyright Act and cannot be used without permission of the owner of the copyright, except for personal enjoyment. Even if you record an event such as a show, performance, or exhibition for personal enjoyment, we strongly recommend that you obtain permission beforehand. We recommend you use the camcorder at least once a month to maintain its performance and operating life. iii before reading this user manual • • • Check the image resolution before developing photos. Make sure to check all functions of the camcorder before recording to prevent recording failure. For Open Source licences information, refer to the “Opensource-T10.pdf” in the provided CD-ROM Correct disposal of batteries in this product (Applicable in the European Union and other European countries with separate battery return systems) This marking on the battery, manual or packaging indicates that the batteries in this product should not be disposed of with other household waste at the end of their working life. Where marked, the chemical symbols Hg, Cd or Pb indicate that the battery contains mercury, cadmium or lead above the reference levels in EC Directive 2006/66. If batteries are not properly disposed of, these substances can cause harm to human health or the environment. To protect natural resources and to promote material reuse, please separate batteries from other types of waste and recycle them through your local, free battery return system. Correct Disposal of This Product (Waste Electrical & Electronic Equipment) iv (Applicable in the European Union and other European countries with separate collection systems) This marking shown on the product or its literature, indicates that it should not be disposed with other household wastes at the end of its working life. To prevent possible harm to the environment or human health from uncontrolled waste disposal, please separate this from other types of wastes and recycle it responsibly to promote the sustainable reuse of material resources. Household users should contact either the retailer where they purchased this product, or their local government office, for details of where and how they can take this item for environmentally safe recycling. Business users should contact their supplier and check the terms and conditions of the purchase contract. This product should not be mixed with other commercial wastes for disposal. Notes regarding trademarks • All the trade names and registered trademarks mentioned in this manual or other documentation provided with your Samsung product are trademarks or registered trademarks of their respective holders. Furthermore, “™” and “®” are not mentioned in each case in this manual. • The SD logo is a trademark. The SDHC logo is a trademark. • Microsoft®, Windows®, Windows Vista®, Windows® 7, and DirectX® are either registered trademarks or trademarks of the Microsoft Corporation in the United States and/or other countries. • Intel®, Core™, Core 2 Duo®, and Pentium® are the registered trademarks or trademarks of the Intel Corporation in the United States and other countries. • AMD and Athlon™ are either registered trademarks or trademarks of AMD in the United States and other countries. • Macintosh, Mac OS are either registered trademarks or trademarks of Apple Inc. in the United States and/or other countries. • YouTube is a trademark of Google Inc. • Flickr is a trademark of Yahoo. • Facebook is a trademark of Facebook Inc. • HDMI, the HDMI logo and High-Definition Multimedia Interface are trademarks or registered trademarks of HDMI Licensing LLC. • Adobe, the Adobe logo, and Adobe Acrobat are either registered trademarks or trademarks of Adobe Systems Incorporated in the United States and/or other countries. safety information The safety precautions illustrated below are to prevent personal injury or material damages. Heed all instructions carefully. WARNING Prohibited action. Do not touch the product. CAUTION Do not disassemble the product. This precaution must be followed. Means that there is a potential risk of serious personal injury. Means that there is a potential risk of personal injury or damage to the product. Unplug from the power supply. W W 4 4 WARNING W 4 W 4 Do not allow water or metal and inflammable matter to enter the camcorder or AC power adaptor. Doing so may pose a fire hazard. W 4 OI L Do not overload outlets or extension cords as this may result in abnormal heat or fire. Using the camcorder at temperatures over 60℃(140℉) may result in fire. Keeping the battery at a high temperature may cause an explosion. W 4 No sand or dust! Fine sand or dust entering the camcorder or AC power adaptor could cause malfunctions or defects. No oil! Oil entering the camcorder or AC power adaptor could cause electric shock, malfunctions or defects. Do not aim the camcorder directly into the sun. Doing so could cause eye injuries, as well as lead to malfunctioning of internal parts of the product. Do not bend the power cord or damage the AC power adaptor by pressing on it with a heavy object. There may be a risk of fire or electric shock. Do not disconnect the AC adaptor by pulling on its power-cord, as this could damage the power-cord. Do not use adaptor if it has Do notthe use the AC AC adapter if it has damaged, split or broken cords or damaged, split broken cords or wires. Doing soor may cause fire or electric shock. wires. Doing so may cause fire or electric shock. No sand or dust! safety information ng ani cle Do not dispose of the battery in a fire as it may explode. Never use cleaning fluid or similar chemicals to clean the camcorder. Do not spray cleaners directly on the camcorder. Keep the used lithium battery or memory card out of the reach of children. If the lithium battery or memory card is swallowed by a child, consult physician immediately. Do not plug or unplug the power cord with wet hands. There is a risk of electric shock. Do not connect the AC adapter unless W 4 the plug can be fully inserted with no part of the blades Do not connect theexposed. AC adaptor unless the plug can be fully inserted with no part of the blades exposed. d flui W 4 W 4 Keep the camcorder away from water when using it near the beach or pool or when it rains. There is a risk of malfunction or electric shock. W 4 When cleaning the AC adaptor, unplug the power-cord. There is a risk of malfunction or electric shock. W 4 Keep the power-cord unplugged when not in use or during lightning storms. There is a risk of fire. W 4 vi If the camcorder malfunctions, immediately detach the AC adaptor or battery from the camcorder. There is a risk of fire or injury. Do not attempt to disassemble, repair, or modify the camcorder or the AC adaptor to avoid a risk of fire or electric shock. If the camcorder emits an abnormal sound, or smell or smokes, unplug the power-cord immediately and request service from a Samsung service centre. There is a risk of fire or personal injury. W 4 CAUTION W 4 Do not drop or expose the camcorder, battery, AC adaptor, or other accessories to severe vibrations or impact. This may cause a malfunction or injury. Do not use the camcorder on a tripod (not supplied) in a place where it is subject to severe vibrations or impact. Do not leave the camcorder in a closed vehicle for a long time, where the temperature is very high. Do not expose the camcorder to soot or steam. Thick soot or steam could damage the camcorder case or cause a malfunction. W 4 Do not press the surface of the LCD with force, or hit it with a sharp object. If you push the LCD surface, display unevenness may occur. W 4 Do not expose the camcorder to soot or steam.Thick soot or steam could damage the camcorder case or cause a malfunction. W 4 Do not use the camcorder in direct sunlight or near heating equipment. This may cause a malfunction or injury. W INSECT ICIDE 4 Do not expose the camcorder to insecticide. Insecticide entering the camcorder could cause the product to operate abnormally. Turn the camcorder off and cover it with vinyl sheet, etc. before using insecticide. Do not expose the camcorder to sudden changes in temperature or high humidity. There is also a risk of defect or electric shock when using outdoors during lightning storms. W 4 Do not use the camcorder near dense exhaust gas generated by gasoline or diesel engines, or near a corrosive gas such as hydrogen sulphide. Doing so may corrode the external or internal terminals, disabling normal operation. W 4 Do not place the camcorder with the open LCD screen down. Do not wipe the camcorder body with benzene or thinner. The exterior coating could peel off or the surface could deteriorate. Do not leave the LCD screen open when not using the camcorder. vii W 4 W 4 safety information W 4 W 4 Do not use the camcorder near a TV or radio: This could cause distortion on the TV screen or interference in the radio broadcasts. Do not use the camcorder near sources of strong radio waves or magnetism such as speakers or large motors. Noise from these sources could distort the video or audio you are recording. W 4 w T Do not hold the camcorder by the LCD monitor when lifting it. The LCD screen could detach and the camcorder may fall. w T W W 4 Use Samsung-approved accessories only. Using products from other manufacturers may cause overheating, fire, explosion, electric shock or personal injuries caused by abnormal operation. W 4 Only plug the adaptor plug into a socket that is easily accessible. If any problem occurs with the product, you must pull the plug out of the socket to disconnect the power completely. Turning off the power button on the product does not completely disconnect the power. viii 4 Place the camcorder on a stable surface that is well ventilated. Keep important data separately. Samsung is not responsible for data loss. contents QUICK START GUIDE 07 You can record videos in H.264 format! GETTING TO KNOW THE CAMCORDER 11 12 14 What’s included with your camcorder Location of controls Identifying the screen displays GETTING STARTED 17 18 19 Inserting/ejecting the battery Charging the battery Checking the battery state BASIC OPERATION OF THE CAMCORDER 22 23 24 24 25 Turning your camcorder on/off Switching to the power saving mode Setting the operation modes ) button Using the Display( Using the touch panel FIRST TIME SETTINGS 26 Setting the time zone and date/time for the first time Selecting the languages 07 11 17 22 26 GETTING READY TO START RECORDING 28 27 28 29 31 32 32 33 Inserting / ejecting a memory card (not supplied) Selecting a suitable memory card (not supplied) Recordable time and capacity Using the hand strap Adjusting the LCD screen Basic camcorder positioning contents BASIC RECORDING 39 Recording videos Capturing photos during video recording Recording photos Recording with ease for beginners (smart auto) Zooming BASIC PLAYBACK 40 41 43 Changing the playback mode Playing back videos Viewing photos USING THE MENU ITEMS 45 46 48 Handling menus and quick menus Menu items Quick menu items ADVANCED RECORDING 49 50 50 51 51 52 53 54 55 55 56 57 58 59 60 61 62 62 63 63 64 65 SCENE Video Resolution Video Quality Photo Resolution Photo Sharpness White Balance Aperture Shutter EV Super C.Nite Back Light Focus Anti-Shake (OIS: Optical Image Stabiliser) Digital Effect Fader Tele Macro Cont. Shot Wind Cut Digital Zoom Self Timer Quick View Guideline 34 40 45 49 34 36 37 38 ADVANCED PLAYBACK 66 67 68 68 Play Option Highlight Slide Show Option File Info EDITING FILES 69 70 71 72 Deleting files Protection from accidental erasure Dividing a video Combining videos SYSTEM SETTING 73 74 74 75 75 76 76 76 77 77 78 79 79 80 81 82 82 83 83 84 84 85 85 86 Setting menu items Card Info Format File No. Time Zone Date/Time Set Date Type Time Type Date/Time Display LCD Brightness Auto LCD Off Beep Sound Shutter Sound Auto Power Off Quick On STBY PC Software USB Connect HDMI TV Out TV Connect Guide TV Display Default Set Language Demo Anynet+ (HDMI-CEC) 66 69 73 contents CONNECTING TO A TV 89 90 Connecting to a high definition TV with HDMI Connecting to a regular TV Viewing on a TV screen DUBBING VIDEOS 91 Dubbing to a VCR or DVD/HDD recorder PRINTING PHOTOS 92 Direct printing with a PictBridge printer 87 91 92 USING WITH A WINDOWS COMPUTER 94 TROUBLESHOOTING MAINTENANCE & ADDITIONAL INFORMATION SPECIFICATIONS 87 What you can do with a windows computer 94 95 Using the Intelli-studio programme 100 Using as a removable storage device 102 Warning indicators and messages 107 Symptoms and solutions 113 Maintenance 114 Using your camcorder abroad 115 Specifications quick start guide This quick start guide introduces the basic operation and features of your camcorder. See the reference pages for more information. You can record videos in H.264 format! You can record videos in H.264 format that is convenient to email and share with your friends and family. You can also take photos with your camcorder. STEP 1: Get ready 1. Insert the battery to the camcorder. page 17 • Make sure that the SAMSUNG logo is facing up and the battery is placed as shown in the figure. 2. Charge the battery fully. page 18 • The battery is fully charged when the CHG (charging) indicator light turns green. 3. Insert a memory card. page 28 • You can use commercially available SDHC (SD High Capacity) or SD memory cards with this camcorder. STEP 2: Record with your camcorder Zoom(W/T) lever Zoom (W/T) button PHOTO button Recording start/stop button Recording start/ stop button LCD screen Your camcorder turns on when you open the LCD screen. MODE button/ Mode indicator 7 quick start guide Recording videos Recording photos Your camcorder uses advanced H.264 compression technology to give you the clearest video quality. 1. Open the LCD screen. 1. Open the LCD screen. 2. Press the Recording start/stop button. • To stop recording, press the Recording start/stop button. 00:00:00 2. Press the PHOTO button lightly to adjust the focus. 3. Fully press the PHOTO button when the subject is in focus. [307Min] 9999 OFF SUPER Using ‘Quick On STBY’ by opening/closing the LCD screen. When you close the LCD screen during standby, your camcorder goes to Quick On STBY mode (power saving mode). You can start recording quickly when you open the LCD screen. page 81 • The default video resolution setting is “1080/50i”. You can also record in SD (standard definition) video quality. • You can also take photos while recording videos. page 36 8 STEP : Play back videos or photos Viewing videos or photos on the LCD screen You can find recordings quickly by using the thumbnail index view. 1. Touch the Play ( ) tab on the screen in STBY mode. 2. Touch the thumbnail ( STBY 00:00:00 HD / SD / ) tab, then touch the desired image. [307Min] HD 9999 SD OFF 3/3 SUPER Viewing on a high definition TV You can enjoy HD (high definition) videos on an HDTV. page 87 You can also play back videos on an SD (standard definition) image quality TV. page 89 STEP 4: Save recorded videos or photos Simple and fun! Enjoy the various features of the internal Intelli-studio programme on your Windows computer. Using the Intelli-studio programme built into your camcorder, you can import videos/photos into your computer and edit or share the videos/photos with your friends and family. For details, see pages 94-101 9 quick start guide Importing and viewing videos/photos from the camcorder to your PC 1. Launch the Intelli-studio programme by connecting the camcorder to your PC with a USB cable. • A new file saving screen appears with the Intelli-studio main window. Click “Yes”, and the uploading procedure starts. 2. The new files are saved to your PC and registered to “Contents Manager” on the Intelli-studio programme. • You can arrange the files by different criteria such as Face, Date, etc. Contents Manager Saved files into your PC Folders directory on your PC 3. Double-click on the file you would like to playback. Sharing videos/photos on YouTube/Flickr/ FaceBook Share your contents with the world by uploading videos and photos directly to a web site with one click. Click “Share” “Upload” tab on the browser. page 99 Intelli-studio runs automatically after you connect your camcorder to a Windows computer if you have set “PC Software: On” in the Settings menu. page 82 STEP 5: Delete videos or photos If the storage media is full, you cannot record new videos or photos. Delete videos or photos that you have saved to a computer from the camcorder’s storage media. Then you can record new videos or photos on newly freed up space. 10 Touch the Play ( ) tab Menu ( ) tab “Delete” on the LCD screen. page 69 getting to know the camcorder WHAT'S INCLUDED WITH YOUR CAMCORDER Your new camcorder comes with the following accessories. If any of these items is missing from your box, call Samsung’s Customer Care Centre. Model name Colour HMX-T10WP HMX-T11WP White HMX-T10BP HMX-T11BP Black HMX-T10OP HMX-T11OP Orange Memory card slot LCD screen Lens Yes Colour /Touch panel 10x (Optical) 100x (Digital) • Although some features of the models are different, they operate in the same way. Checking your accessories Battery (BP125A) AC power adaptor (AA-MA9 type) Audio/Video cable USB cable Optional accessories Hand strap User manual CD Quick start guide Mini HDMI cable • The exact appearance of each item may vary by model. • The contents may vary depending on the sales region. • Parts and accessories can be purchased after consulting with your local Samsung dealer. SAMSUNG is not responsible for reduced battery life time or malfunctions caused by any unauthorised use of accessories such as the AC power adaptor or the batteries. • A memory card is not included. See page 29 for memory cards compatible with your camcorder. • Your camcorder includes the user manual CD and the printed quick start guide. 11 getting to know the camcorder LOCATION OF CONTROLS Front/Left Lens Internal microphone Display button Power button SMART button TFT LCD screen (Touch screen) Q.MENU button Zoom (W/T) button Recording start/stop button 12 Internal speaker During a recording, be careful not to block the internal microphone and lens. AUTO Rear/Right/Top/Bottom Zoom (W/T) lever PHOTO button Recording start/stop button Charging (CHG) indicator DC IN jack MODE button / Mode indicator : Record mode • (Video/Photo) • : Play mode Jack cover (DC IN) USB, HDMI, AV(Audio/Video) jack Hand strap hook Jack cover (USB, HDMI, AV) Tripod receptacle Battery/Memory card cover OPEN/CLOSE switch Memory card slot Battery slot Battery release switch 1 getting to know the camcorder IDENTIFYING THE SCREEN DISPLAYS The available functions vary depending on the operation mode you’ve selected. Different indicators appear depending on the setting values. PRECHECK! • This On Screen Display (OSD) is shown in the record ( ) mode only. • Select the record mode by pressing the MODE button. page 24 Record mode Centre of the LCD screen STBY 00:00:00 [307Min] 9999 Indicator Warning indicators and messages Card Full F2 Remaining recordable time [307Min] Card Full - 0.3 Optical zoom / Digital zoom bar Time Zone (visit) 01/JAN/2010 00:00 01/JAN/2010 00:00 Left of the LCD screen Indicator / STBY // / / OFF - 0.3SUPER Operating status (standby/recording) / Self Timer* Battery info. (remaining charge level) Manual aperture* / Manual shutter* / Super C.Nite EV (Exposure Value)* Play tab 14 Meaning Storage media (Memory card) 9999 , , , Image counter (total number of recordable photo images), Photo Resolution, Video Quality, Video Resolution Anti-shake(OIS) Manual focus*, Touch Point* / S.1/50 / F2 • • • • • • • • Indicator Record mode (Video/Photo) White Balance, Fader* , Date/Time Right of the LCD screen Meaning SCENE / Smart Auto / Digital Effect , Meaning Time counter (video recording time) 00:00:00 , Tele Macro*, Back Light , Cont. Shot, Wind Cut Photo Sharpness Menu tab Settings of functions marked with * are not retained when the camcorder is turned off. The on-screen indicators are based on an 32GB SDHC memory card capacity. The screen above is an example and may differ from the actual display. For warning indicators and messages, see pages 102~106 The illustrated items above and their positions can be changed without notice to improve performance. The total number of recordable photos is based on available space on the storage media. The largest number the OSD Image Counter can display is “9,999”. This camcorder provides one record mode which combines the video and photo record modes. You can easily record videos or photos in the same mode without having to change it. PRECHECK! • This On Screen Display (OSD) is shown in video play ( HD / SD ) mode only. • Select the Play ( ) tab on the LCD screen to select the video play ( HD / SD ) mode. page 40 Video play mode Top of the LCD screen Indicator 00:00:05/00:00:50 100_0001 Meaning Video play mode 01/JAN/2010 00:00 , Operating status (play/pause) 00:00:05/00:00:50 Playback time/recorded time Storage media (Memory card) Battery info. (remaining charge level) Play Option 100_0001 , Bottom of the LCD screen Indicator 10 / Meaning File name (file number) Video Quality, Video Resolution Protect 01/JAN/2010 00:00 Date/Time Volume control Volume tab / Play related function tab (frame advance) Return tab Play related function tab (skip/ search/pause/playback/slow playback) Menu tab • The play related tab, the volume control, and the return tab appear briefly on the screen. They reappear when you touch the screen anywhere. • For warning indicators and messages, see pages 102~106 15 getting to know the camcorder PRECHECK! • This On Screen Display (OSD) is shown in photo play ( ) mode only. • Select the Play ( ) tab on the LCD screen to select the photo play ( ) mode. page 40 Photo play mode Top of the LCD screen 100_0001 Indicator 1/10 Meaning Photo play mode 01/JAN/2010 00:00 X1.1 / 100_0001 1/10 Slide show / Playback zoom (X1.1~X8.0) File name (file number) Photo image counter (current image / total number of recorded images) Storage media (memory card) Battery info. Erase protection Bottom of the LCD screen Indicator Meaning Volume tab (when activating slide show) Return tab Previous image/Next image tab Slide show start tab Menu tab 16 Photo resolution 01/JAN/2010 00:00 Date/Time getting started INSERTING/EJECTING THE BATTERY Purchase extra batteries to allow continuous use of your camcorder. Battery release switch To insert the battery To eject the battery 1. Open the battery cover by sliding the OPEN/CLOSE switch toward OPEN. 1. Open the battery cover by sliding the OPEN/CLOSE switch toward OPEN. 2. Insert the battery into the battery slot until it locks. • Make sure that the SAMSUNG logo is facing up and the battery is placed as shown in the figure. 2. Slide the Battery release switch in the direction as shown in the figure. 3. Close the battery cover by sliding the OPEN/CLOSE switch toward CLOSE. 3. Close the battery cover by sliding the OPEN/CLOSE switch toward CLOSE. Samsung is not responsible for problems that are caused by using unapproved batteries. If you use batteries from other manufacturers, there is a danger of overheating, fire, or explosion. 17 getting started CHARGING THE BATTERY You can charge the battery using the AC power adaptor or the USB cable. PRECHECK! • Insert the battery into the camcorder. page 17 • To charge, use the supplied AC power adaptor or the USB cable. To charge the battery Charge the battery using the AC power adaptor or the USB cable. • The charging (CHG) indicator lights up and charging starts. After the battery is fully charged, the charging (CHG) indicator turns green. Using the AC power adaptor Connect the AC power adaptor to the camcorder properly, and then plug the AC Power adaptor in the wall outlet. Using the USB cable Connect the USB cable to the camcorder properly, and then connect the other end to a USB port of a PC. Please make sure that there are no foreign substances in the plug and socket when you connect the AC power supply to the camcorder. 18 • When charging, if both the USB cable and AC power adaptor are connected, the AC power adaptor will override the USB. • You cannot operate the camcorder using USB power only. Use the power adaptor or battery to power the camcorder. • USB charging time may depend on the type of USB host on your PC. • If you use the camcorder while you are charging the battery, charging may take longer. CHECKING THE BATTERY STATE You can check the charging state and remaining battery capacity. To check the charging state The colour of the LED indicates the power or charging state. Charging (Orange) Fully charged (Green) Error (Off) Battery level display The battery level display shows the amount of battery power remaining in the battery. Battery level indicator - State Message Fully charged - 25~50% used - 50~75% used - 75~95% used - 95~98% used - Exhausted (flickers): The device will soon turn off. Change the battery as soon as possible. - The device will be forced to turn off after 3 seconds. “Low Battery” STBY 00:00:00 [307Min] 9999 OFF SUPER The figures above are based on a fully charged battery at a normal temperature. Low ambient temperature may affect the use time. 19 getting started Available running time for the battery Battery type BP125A Charging time Using the AC power adaptor: approx. 120 min. Using the USB cable: approx. 270 min. Video resolution HD SD Continuous recording time Approx. 110 min. Approx. 120 min. Playback time Approx. 140 min. Approx. 160 min. • Charging time: Approximate time in minutes required to fully charge a completely exhausted battery. • Recording/Playback time: Approximate time available when you have fully charged the battery. ‘HD’ stands for high definition image quality and ‘SD’ stands for standard image quality. • The time is only for reference. Times shown above are measured under Samsung’s test conditions. Your times may differ, depending on your usage and conditions. • The recording and playback times will be shorter when you use your camcorder in low temperatures. Continuous Recording (without zoom) The continuous recording time above shows the available recording time when you record without using any other function after recording starts. The battery may discharge 2-3 times faster than this reference if you use the record start/stop, the zoom, and the play functions. Prepare additional batteries with the expectation that the actual recording time is about 1/3 to 1/2 of the times listed above. Using an AC power source We recommend that you use the AC power adaptor to power the camcorder from a household AC outlet when recording and playing the camcorder indoors. The connection is the same as that for battery charging. page 18 20 About the battery • Battery Properties A lithium-ion battery is small-sized and has a high capacity. Low ambient temperature (below 10Cº (50ºF)) may shorten its usage time and affect its function. Before recording in low temperatures, put the battery into your pocket to warm it, then install it in the camcorder. • Make sure to store the battery separately after use. - A small amount of battery power is consumed when the battery is stored in the camcorder even if the camcorder power is off. - The battery may be completely discharged, if it has been installed and left in the camcorder for a long period of time. If this occurs, the battery may not fully operate even if you charge it. - If the battery is not used for a long time, fully charge the battery and then, using your camcorder, drain the charge completely once every 3 months to keep the battery functioning properly. To store the battery, remove it from your camcorder and put it in a cool, dry place. • Charge an extra battery before using the camcorder outdoors in cold temperatures. - The cold temperature may shorten the length of time you can use the battery before needing to recharge it. - Carry the supplied AC power adaptor to charge the battery while travelling. • Check whether the battery terminal is damaged if the battery falls or is dropped. - If you install a battery with the damaged terminal into the camcorder, you can damage the camcorder. • Remove the battery and the memory card from the camcorder and disconnect the AC power adaptor after use. - Store the battery in a stable, cool and dry place. (Recommended temperature : 15Cº~ 25Cº (59ºF ~ 77ºF), recommended humidity: 40%~ 60%) - Temperatures that are too high or too low shorten the battery lifetime. - The battery terminals can become rusty or malfunction if the battery is stored in a smoky or dusty location. • Recyle or dispose of your dead batteries properly. • The battery lifetime is limited. - Battery capacity decreases over time and through repeated use. If decreased usage time between charges becomes significant, it is probably time to replace the battery with a new one. - Each battery’s life is affected by storage, operating, and environmental conditions. • Make sure to turn off the camcorder before disconnecting the AC power adaptor. Otherwise, you can damage the storage media or data. • Use a nearby wall outlet when using the AC power adaptor. Disconnect the AC power adaptor from the wall outlet immediately if any malfunction occurs while using your camcorder. • Do not place the AC Adaptor in a confined space when you use it, such as between a wall and a piece of furniture. • Be sure to use the included AC power adaptor to power the camcorder. Using other AC power adaptors could cause electric shock or result in fire. • You can use the AC power adaptor around the world. An AC plug adaptor is required in some foreign countries. If you need one, purchase it from your distributor. • The charging time will vary depending on the charge remaining in the battery. • The battery is charged over 95% after about 2 hours, and the indicator colour changes to green. It takes about 2 hours and 40 minutes for the battery to charge 100%. 21 basic operation of the camcorder TURNING YOUR CAMCORDER ON/OFF LCD screen 1. Open the LCD screen to turn on the camcorder. • Your camcorder turns on automatically when you open the LCD screen. 2. To turn off the camcorder, press the Power ( ) button for about one second. Power button • The camcorder operates the self-diagnosis function when powered on. If a warning message appears, refer to ‘warning indicators and messages’ (pages 102~106) and take corrective actions. • If you close the LCD screen when the power is on, the power saving mode activates. page 23 • The camcorder turns on automatically if connecting the AC power adaptor or inserting the battery to the camcorder with the LCD screen open. When using this camcorder for the first time When you use your camcorder for the first time or reset it, the time zone screen appears at start-up. Select your geographical location, and then set the date and time. page 26 If you do not set the date and time, the time zone screen appears every time you turn on the camcorder. 22 SWITCHING TO THE POWER SAVING MODE If you need to use the camcorder for an extended time, the following functions enable you to prevent unnecessary energy consumption. Quick On STBY Mode in the STBY mode The camcorder switches to "Quick On STBY" mode when you close the LCD screen. page 81 Sleep mode in the Play mode (includes the thumbnail index view) • The camcorder switches to the sleep mode when you close the LCD screen and then, if idle for more than 20 minutes, the camcorder turns off. However, if “Auto Power Off: 5 Min” is set, the camcorder turns off in 5 minutes. • If you open the LCD screen or connect a cable to the camcorder when the camcorder is in sleep mode, the camcorder returns to the last active operation mode. LCD screen is closed <Sleep mode> After 20 minutes <Power off> • The power saving mode does not work in the following situations: - When the camcorder has a cable connection. (Audio/Video cable, Mini HDMI, or USB, etc.) - While recording, playing back, or while running a slideshow. - When the LCD screen is opened. • The camcorder consumes less battery power in the power saving mode. However, if you plan to use the camcorder for an extended time, we recommend you turn off the camcorder by pressing the Power ( ) button when not using it. 2 basic operation of the camcorder SETTING THE OPERATION MODES You switch the operating mode in the following order each time you press the MODE button. Record mode ( ) Play mode ( ). • Each time the operation mode changes, the respective mode indicator lights turn on. • Touching the Play ( ) tab in the record mode switches the operation mode to the play mode. MODE button / Mode indicators • (Record mode): To record videos or photos. • (Play mode): To play videos or photos, or edit them. in] 00 STBY 00:00: [307M 9999 Play tab This camcorder provides one record mode which combines the video and photo record modes. You can easily record videos or photos in the same mode without having to change modes. USING THE DISPLAY( When the power is on, press the Display ( information or not. ) BUTTON ) button to display or hide the on-screen Switching the information display mode Press the Display( ) button. The full and minimum display modes alternate. Full display mode STBY 00:00:00 [307Min] Minimum display mode STBY 9999 OFF SUPER 24 • Warning indicators and messages may appear depending on the recording conditions. ) button does not work when the menu or quick menu screen is being displayed. • The Display ( USING THE TOUCH PANEL The touch panel lets you playback and record with a simple touch of your finger. Place your hand on the rear side of the LCD screen, then touch the items displayed on the screen. Touch Slightly touch items with your finger to select them or to execute functions. STBY 00:00:00 [307Min] 9999 OFF SUPER • Do not place a protective film on the LCD screen. • If you leave a film attached to the LCD screen for a long time, strong adhesion between the film and the surface of the screen may cause a malfunction of the touch panel. • Be careful not to accidentally press the buttons near the LCD panel while using the touch panel. • The tabs and indicators that appear on the LCD screen depend on the current recording/playback status of your camcorder. • The camcorder does not recognise touches if you touch more than two points on the screen at the same time. Touch one point at a time. 25 first time settings SETTING THE TIME ZONE AND DATE/TIME FOR THE FIRST TIME Set the date and time of your local area when you turn on the camcorder for the first time. Home London, Lisbon 1. Open the LCD screen to turn on the camcorder. • The time zone (“Home”) screen appears displaying settings for Lisbon and London (Greenwich Mean Time). 2. Select your local area on the map by touching the left ( right ( ) tab on the LCD screen, and then press the ( • The “Date/Time Set” screen appears. ) or ) tab. Date/Time Set Day 01 3. Touch the date and time information, and then change the setting values by using the up ( ) or down ( ) tabs. 4. Make sure the clock is correctly set, and then touch the ( tab. • The message “Date/Time Set” appears. [GMT 00:00] 01/JAN/2010 00:00 Month 00 Year / JAN / 2010 Hr Min : 00 ) Date/Time Set Year Month Day Date/Time / 01 Set01 2010 Hr Min 01/JAN/2010 00:00 12 : 00 AM • You can set the year up to 2037, based on the “Home” item. • Set “Date/Time Display” to On. page 77 • Activating the ( ) icon moves the time forward by 1 hour. Internal rechargeable battery • Your camcorder includes a internal rechargeable battery that retains the date and time settings even after the power is turned off. • If the battery is depleted, the current date/time values are reset to the default values. If this occurs, you need to recharge the internal rechargeable battery (see below), and then re-set the current date and time. Charging the internal rechargeable battery 26 • The internal battery is always recharged while your camcorder is connected to the AC power or while the battery is attached. • If you have not used the camcorder for about 2 weeks and you have not connected the AC power or the battery to it, the internal battery fully discharges. If this occurs, charge the internal battery by connecting the camcorder to the supplied AC adaptor for 24 hours. SELECTING THE LANGUAGES You can select the language of the menu or messages displayed on the LCD screen. The camcorder retains the language setting even when you turn it off. 1. Touch the Menu ( 2. Touch the up ( ) Setting ( ) tab. )/down ( ) tab until “Language” appears. 3. Touch “Language”, and then touch the desired OSD language. Language Demo 6/6 ) tab to complete the setting. 4. Touch the Exit ( ) or Return ( • The camcorder displays the menus and messages in the language you selected. Anynet+(HDMI-CEC) Language English 한국어 1/8 Français Deutsch Supported languages 日本語 English Português Polski Ελληνικά 한국어 Nederlands Čeština Srpski ไทย Français Svenska Slovensky Hrvatski Türkçe Deutsch Suomi Magyar Українська Italiano Norsk Română Русский Español Dansk Български 中文 • “Language” options may be changed without a prior notice. • The camcorder retains the language you select even when not connected to the battery or AC power. • The date and time format may change depending on the language you selected. 27 getting ready to start recording INSERTING / EJECTING A MEMORY CARD (NOT SUPPLIED) Terminal portion To insert a memory card To eject a memory card 1. Open the memory card cover by sliding the OPEN/CLOSE switch toward OPEN. 1. Open the memory card cover by sliding the OPEN/CLOSE switch toward OPEN. 2. Insert the memory card into the card slot until it softly clicks. • Make sure that the camcorder is placed as shown above and the terminal portion of the card is facing up. 2. Gently push the memory card to eject it. 3. Close the memory card cover by sliding the OPEN/CLOSE switch toward CLOSE. 3. Close the memory card cover by sliding the OPEN/CLOSE switch toward CLOSE. • To avoid data loss, turn off the camcorder by pressing the Power ( ) button for one second before inserting or ejecting the memory card. • Be careful not to push the memory card too hard. The memory card may suddenly pop out. 28 Your camcorder supports only SD (Secure Digital) and SDHC (Secure Digital High Capacity) cards. Card compatibility may vary depending on the manufacturer and the type of memory card. SELECTING A SUITABLE MEMORY CARD (NOT SUPPLIED) Compatible memory cards • You can use SD (Secure Digital) and SDHC (Secure Digital High Capacity) cards with this camcorder. We recommend you use an SDHC (Secure Digital High Capacity) card. This camcorder supports SD cards up to 2GB. We cannot guarantee normal operation with SD cards bigger than 2GB. • MMC (Multi Media Card) and MMC Plus are not supported. • Compatible memory card capacity: SD: 1GB ~ 2GB SDHC: 4GB ~ 32GB • Use compatible memory card brands. Others are not guaranteed to work. A list of compatible brands is below: - SDHC/SD cards: Panasonic, SanDisk, TOSHIBA • For video recording, use a memory card that supports faster write speeds (above SDHC Class 6 card). • SD/SDHC memory cards have a mechanical write-protection switch. Setting the switch prevents accidental erasure of files recorded on the card. To enable writing, move the switch up in the direction of the terminals. To set write protection, move the switch down. Usable memory card (1GB~32GB) Terminals Terminals Protection tab Protection tab <SD> <SDHC> SDHC (Secure Digital High Capacity) cards • An SDHC card is a higher version (Ver. 2.00) of the SD card and supports capacities above 2GB. • SDHC cards cannot be used with current SD enabled host devices. Common cautions for memory cards • Damaged data may not be recoverable. We recommend you make a back-up of important data separately on the hard disk of your PC. • Turning the power off or removing a memory card during an operation such as formatting, deleting, recording, and playback may cause data loss. • If you modify the name of a file or folder stored in the memory card with your PC, your camcorder may not recognise the modified file. 29 getting ready to start recording Handling a memory card • We recommend that you power off before inserting or removing the memory card to avoid data loss. • We can not guarante that you can use memory cards formatted by other devices. When you format a card, be sure to format the memory card using this camcorder. • You must format newly-purchased memory cards, memory cards with data that your camcorder cannot recognise, and cards with data saved by other devices. Note that formatting erases all data on the memory card. • If you cannot use a memory card that has been used with another device, format it with your camcorder. Note that formatting erases all information on the memory card. • A memory card has a certain life span. If you cannot record new data, you have to purchase a new memory card. • Do not bend, drop, or subject the card to strong impacts. • Do not place foreign substances on the memory card terminals. Use a soft dry cloth to clean the terminals if required. • Do not paste anything other than the label provided with the card on the label pasting area of the card. • Do not use a damaged memory card. • Be careful to keep the memory card out of the reach of children, who might swallow it. 30 The camcorder supports SD and SDHC memory cards, giving you a wider choice of cards to choose from! The data storage speed may differ, depending on the manufacturer and production system. • SLC (single level cell) system: faster write speed enabled. • MLC (multi level cell) system: only lower write speed is supported. For best results, we recommend using a memory card that supports a faster write speed. Using a lower write speed memory card for recording video may cause difficulties when storing. You may even lose your video data during the recording. In an attempt to preserve every bit of the recorded video, the camcorder forcibly stores the video on the memory card and displays a warning: “Low speed card. Please record at a lower resolution”. If you are unavoidably using a low speed memory card, the resolution and quality of the recording may be lower than the value you set. page 50 The higher the video resolution and quality, the more memory the camcorder uses. • Samsung is not responsible for data loss due to misuse, including loss caused by any PC virus. • We recommend using a memory card case to avoid data loss that can be caused by moving the card or by static electricity. • After a period of use, the memory card may get warm. This is normal and is not a malfunction. RECORDABLE TIME AND CAPACITY Listed below are the available video recording times and the number of photos the camcorder can take, by card memory size and resolution. Refer to the recordable video time and the number of photos when recording videos or taking photos. Recording time available for video in minutes Resolution Quality Storage media (Capacity) 1GB 2GB 4GB 8GB 16GB 32GB Super Fine 8 15 30 61 125 253 Fine 9 18 36 74 152 307 Normal 12 23 46 94 193 390 Super Fine 11 21 42 86 177 357 Fine 14 28 57 115 235 475 Normal 21 42 84 171 351 708 Super Fine 32 63 126 254 521 1051 1080/50i 720/50p Fine 42 83 166 336 688 1387 Normal 62 123 244 494 1011 2039 576/50p (Unit: Approximate minutes of recording) Recordable number of photos Resolution Storage media (Capacity) 1GB 2GB 4GB 8GB 16GB 32GB 2880x1620 656 1251 2482 5014 9999 9999 1920x1080 1173 2346 4654 9402 9999 9999 (Unit: Approximate number of images) 1GB ≒ 1,000,000,000 bytes : Actual formatted capacity may be less as the internal firmware uses a portion of the memory. • • • • • • • Actual recording times may differ depending on the recording conditions and the subject. The higher the quality and resolution, the more memory is used. Lower resolution and quality increases the recording time, but the image quality may suffer. The bit rate automatically adjusts to the recording image. Accordingly, the recording time may vary. Memory cards bigger than 32GB may not operate normally. When a video file exceeds 1.8GB, a new video file is created automatically. The maximum number of recordable photo and video files is 9999 respectively. 31 getting ready to start recording USING THE HAND STRAP Attach the strap and place your hand through the loop to prevent the camcorder from being dropped. Insert the end of the hand strap into the hook of the camcorder as shown in the illustration. ADJUSTING THE LCD SCREEN The wide LCD screen on your camcorder offers high quality image viewing. 1. Open the LCD screen with your finger. • The screen opens up to 90°. 2. With the LCD screen open 90°, rotate it forwards (towards the lens) or backwards. • You can rotate it up to 180° towards the lens and up to 90° backward. To view recordings more conveniently, rotate the screen by 180° towards the lens, and then fold it back to the body. Excessive rotation may damage the connective hinge between the screen and the camcorder. 2 Clean fingerprints or dust on the screen with a soft cloth. BASIC CAMCORDER POSITIONING Use both hands while taking a video or photo to prevent the camcorder from shaking. Try to avoid any slight movement while shooting. Aim the camcorder as shown in the illustration. 1. Loop the hand strap around your wrist. 2. Hold the camcorder with both your hands. 3. Make sure your footing is stable and there is no danger of colliding with another person or object. 4. Aim and focus as shown in the illustration. Adjusting the shooting angle <Low angle> <High angle> <Self-recording> • This camcorder’s lens angle is approx. 20˚ higher than the rest of the camcorder body. When you record, this prevents strain on the wrist and allows you to record videos in a comfortable position with a clear view of your subjects while you record. • Make sure the camcorder lens is angled for proper shooting. • We recommend you keep the sun behind you while shooting. 33 basic recording RECORDING VIDEOS This camcorder supports both High Definition (HD) and Standard Definition (SD) image resolutions. Set the resolution you want before recording. page 50 PRECHECK! • Insert a memory card. page 28 • Select the record mode by pressing the MODE button. page 24 Two recording start/stop buttons to suit your preference! This camcorder features two Recording start/stop buttons. One is on the rear side of the camcorder, the other is on the LCD screen. Select the one that works best for you. 1. Select a subject to record. • Adjust the LCD panel to the best angle for recording. • Use the Zoom lever or Zoom button to adjust the size of the subject. page 39 2. Press the Recording start/stop button. • The recording () indicator appears, and recording starts. 4 00:00:00 STBY 00:00:00 [307Min] OFF SUPER 3. To stop recording, press the Recording start/stop button again. 4. Touch the Quick View ( ) icon to view the most recently recorded video. • After the Quick View is complete, your camcorder returns to the standby mode. [307Min] 9999 OFF SUPER • If power is interrupted or an error occurs during recording, the video may not be recorded/edited. • Samsung is not responsible for any damage caused by a failure of normal recording or playback operations because of a memory card error. • Note that damaged data cannot be recovered. • Do not turn off the camcorder or remove the memory card while the camcorder is accessing the memory card. Doing so may damage the memory card or the data in the memory card. • Videos are compressed in the H.264 (MPEG-4.AVC) format. • Eject the battery when you have finished recording to prevent unnecessary battery power consumption. • For the on-screen information display, see page 14 • For approximate recording time, see page 31. • Sound is recorded by the internal stereo microphone located on the front of the camcorder. Make sure that the microphone is not blocked. • Before recording an important video, make sure to test the recording function to see if there are any problems with the audio or video recording. • For various functions available during recording, see pages 49~65 • If the power cable/battery is disconnected or recording is interrupted, the camcorder switches to the data recovery mode. While data is being recovered, no other function is enabled. • You can adjust the brightness of the LCD screen in the menu options. Adjusting the LCD screen does not affect the image being recorded. page 77 • In the record mode, you can set the Quick View menu option. The Quick View icon appears when you have set the Quick View menu option to On. • The menu setting tabs shown on the LCD screen do not affect the image the camcorder is recording. 35 basic recording CAPTURING PHOTOS DURING VIDEO RECORDING Your camcorder can capture photos without interrupting video recording. PRECHECK! • Insert a memory card. page 28 • Select the record mode by pressing the MODE button. page 24 1. Press the Recording start/stop button. • The recording () indicator appears, and recording starts. 2. While recording the video, frame the scene you want to photograph, and then press the PHOTO button. • When the () indicator disappears, the camcorder has recorded the photo image without a shutter sound. • Video keeps recording, even while you take photos. 3. To stop recording, press the Recording start/stop button again. 00:00:00 [307Min] 00:00:32 [307Min] OFF SUPER • Photos are captured in 1920x1080 resolution regardless of the resolution of the video recording. • When the HDMI cable is connected to the camcorder, you cannot capture a photo while recording a video. 6 RECORDING PHOTOS You can take photos and store them in the storage media. Set the desired resolution before recording. page 51 PRECHECK! • Insert a memory card. page 28 • Select the record mode by pressing the MODE button. page 24 1. Select a subject to record. • Adjust the LCD panel to the best angle for recording. • Use the Zoom lever or Zoom button to adjust the size of the subject. page 39 2. Frame the subject in the LCD screen, and then half-press the PHOTO button. • When the subject is in focus, () indicator appears green. If it appears red, readjust the focus. 9999 3. Fully press the PHOTO button. 4. Touch the Quick View ( ) icon to view the most recently recorded photo. ) tab. • To return to the standby mode, touch the Return ( STBY 00:00:00 [307Min] 9999 OFF SUPER Do not turn off the camcorder or remove the memory card when taking photos as it may damage the storage media or data. • The recordable number of photos varies depending on the recording conditions and the photo resolution. page 31 • The camcorder does not record audio when you take photos. • If focusing is difficult, use the manual focus function. page 57 • For the on-screen display information, see page 14. • Adjust the brightness of the LCD screen using menu items. Adjusting the brightness does not affect the recorded image. page 77 • For various functions available during recording, see pages 49~65 • Photo files conform to the DCF (Design rule for Camera File system) standard, established by JEITA (Japan Electronics and Information Technology Industries Association). 7 basic recording RECORDING WITH EASE FOR BEGINNERS (SMART AUTO) In Smart Auto mode, your camcorder automatically chooses the appropriate settings based on the type of scene it detects (Indoor, Night, etc.). Smart Auto mode is helpful if you are not familiar with the best camcorder settings for various scenes. 1. Press the SMART AUTO button. • The Smart Auto ( ) and Anti-shake(OIS) ( icon appear on the LCD screen. ) 2. Align your subject in the frame. • The camcorder automatically detects the scene when you align the subject. • The appropriate scene icon appears on the LCD screen. Appears when recording a very bright scene. (White) STBY [307Min] 9999 Appears when recording an outdoor scene. (Landscape) OFF Appears when recording indoors. (Indoor) Appears when recording at night. (Night) 00:00:00 SUPER <When recording a close-up> Appears when recording a close-up. (Macro) Appears when recording images of landscapes with backlighting. (Backlight) 3. Press the Recording start/stop button or PHOTO button. pages 34, 37 4. To cancel Smart Auto mode, press the SMART AUTO button again. 8 ) tab / Q.MENU button/ etc. • Buttons unavailable during Smart Auto operation: Menu ( Most settings are automatically adjusted in Smart Auto mode. To set or adjust functions on your own, release the Smart Auto mode first. • You can not access Smart Auto mode while recording. You must set this function before recording. ). • When the camcorder fails to recognise the recording situation, it records in the basic settings ( • The camcorder may not select the correct scene depending on shooting conditions, such as camcorder shake, lighting, and distance to the subject. • If the camcorder detects more than one scene at the same time, Smart Auto prioritizes as follows: Backlight Macro White Landscape Night Indoor For example, a) If White and Indoor can be applied at the same time, then White is selected and the corresponding icon appears. b) If White and Landscape can be applied at the same time, then White is selected and the corresponding icon appears. ZOOMING This camcorder allows you to record using optical 10x power zoom and digital zoom by sliding the Zoom lever or pressing the Zoom button on the LCD panel. To zoom in Press the T (zoom) button on the LCD panel or slide the zoom lever towards T (telephoto). • The distant subject is gradually magnified. • The highest zoom magnification ratio is 10x in the normal zoom-in. W : Wide angle To zoom out Press the W (zoom) button on the LCD panel or slide the zoom lever towards W (wide angle). • The subject gets smaller and further away. • The smallest optical zoom ratio is the subject’s original size when zoomed-out. T : Telephoto Zoom speed When using the zoom function, you can decrease zoom speed by slowly moving the Zoom (W/T) lever. Moving it faster increases the zoom speed. However, you cannot adjust the zoom speed when using the Zoom (W/T) button on the LCD panel. • Using the optical zoom does not degrade the image quality and clarity. • Use the digital zoom when you want to zoom more than the optical zoom range. page 63 • Focusing may become unstable when you record with a fast zoom or zoom into a subject standing too far away. If this occurs, use the manual focus function. page 57 • The minimum distance you can have between the camcorder and subject while maintaining sharp focus is about 1cm (about 0.4 inches) for wide angle and about 50cm (about 19.7 inches) for telephoto. If you want to shoot the subject close to the lens at a wide angle, use the Tele Macro function. page 61 • When using the zoom function and holding the camcorder with your hand, use Anti-shake(OIS) for stable recording. page 58 • Frequent use of the zoom function consumes more power. • The camcorder can record the sound of the zoom mechanism. 9 basic playback CHANGING THE PLAYBACK MODE • You can set the record mode and the play mode in turn with the MODE button. You can also switch the operation mode directly into the playback thumbnail display by touching the Play ( ) tab on the LCD screen. • The most recently created file is highlighted in the thumbnail view. • The camcorder selects the thumbnail display options based on the standby mode that was last used. However, you can choose the video (HD or SD) or photo thumbnail view display options by touching the ) tab on the LCD screen. HD ( HD ), SD ( SD ), or photo ( Understanding how to change the operation modes You can easily change the operation modes by touching the LCD screen or using the buttons as shown in the following figures: STBY 00:00:00 [307Min] 9999 OFF SUPER HD HD SD SD 3/3 3/3 HD SD To change thumbnail display type You can choose from these thumbnail display options: 3x2 ( HD SD HD SD ), 4x3 ( ), and Date ( HD ). SD 01/JAN/2010 (17) 3/3 40 2/2 2/2 <3X2 type> <4X3 type> <Sorted by date> PLAYING BACK VIDEOS You can preview recorded videos in the thumbnail index view, find the video you want quickly, and playback directly. PRECHECK! • Insert a memory card. page 28 ) tab on the LCD screen to select the play mode. page 40 • Touch the Play ( 1. Touch the HD ( HD ) or SD ( SD ) tab. • Video thumbnails corresponding to the video resolution you selected appear on the screen. • To change the current thumbnail page, touch the up ( ) or down ( ) tab. 2. Touch the thumbnail of the desired video clip. • The camcorder plays the video you selected and playback control tabs appear briefly. They reappear when you touch anywhere on the screen. • To stop playback and return to the thumbnails, touch the Return ( ) tab. HD SD 3/3 00:00:05/00:00:50 100_0013 Do not power off the camcorder or eject the memory card during video playback. Doing so may damage the recorded data. • It may take some time to start playback, depending on the size and quality of the selected video. • The camcorder may not play the following video files: - A video recorded on another device. - A video whose file format is not supported by the camcorder. • You can use various play options during the video playback. page 42 • You can set playback settings using the “Play Option” menu. page 66 • You can play the recorded videos on a TV or PC. pages 87, 98 ) tab or Q.MENU button during playback, play is paused and the menu • If you touch the Menu ( screen appears. 41 basic playback Various playback operations Playback / Pause / Stop • Playback and pause alternate when you touch the Pause ( ) tab to stop playback. • Touch the Return ( ) / Play ( ) tab during playback. Search playback During playback, each touch of the Reverse search ( )/ ) tab increases the play speed: Forward search ( • RPS (Reverse Playback Search)/FPS (Forward Playback Search) rate: x2 x4 x8 x2 00:00:05/00:00:50 100_0013 Skip playback Touch the Reverse skip ( ) / Forward skip ( ) tab during playback. • Touching the Forward skip ( ) tab plays the next video. ) plays the beginning of the scene. If you touch the Reverse skip ( ) for • Touching the Reverse skip ( three seconds or less after a video starts, the camcorder plays the previous video. ) / Forward skip ( ) tab to search for a video number • Place and hold your finger on the Reverse skip ( quickly. When you lift off your finger, the camcorder plays the video you selected. Slow playback When playback is paused, touching the Reverse slow ( )/ ) tab reduces the playback speed: Forward slow ( • Reverse/forward playback slow rate: x1/2 x1/4 x1/8 x1/2 00:00:05/00:00:50 100_0013 Frame by frame playback When playback is paused, touch the Reverse frame advance ( ) / Forward frame ) to make the video go in reverse or forward one frame at a time. advance ( To adjust the volume 00:00:05/00:00:50 100_0013 You can hear the recorded sound from the internal speaker. 1. Touch the Volume ( ) tab on the LCD screen. )/( ) tab to increase or decrease audio volume. 2. Touch the ( • You can adjust the sound level between “0~19”. When the level is at “0”, you cannot hear sound. 42 • Touch the Play ( ) tab to play back in normal speed. • You can hear the recorded sound only when you playback at normal speed. 00:00:05/00:00:50 100_0013 10 VIEWING PHOTOS You can view recorded photos using various playback functions. PRECHECK! • Insert a memory card. page 28 ) tab on the LCD screen to select the play mode. page 40 • Touch the Play ( 1. Touch the Photo ( ) tab. • The thumbnail view appears. • To change the current thumbnail page, touch the up ( down ( ) tab. HD 2. Touch the photo you want to display. • The camcorder displays the photo you selected in full screen and playback control tabs appear briefly. They reappear when you touch anywhere on the screen. 3. To return to the thumbnails, touch the Return ( ) tab. SD ) or 3/3 HD SD 3/3 14/17 100_0014 Do not power off the camcorder or eject the memory card during photo playback. Doing so may damage the recorded data. • Loading time may vary depending on the size and quality of the photo you selected. • Your camcorder may not play back the following photo files normally: - A photo recorded on another device. - A photo with a file format not supported by this camcorder. (One that does not conform to DCF standards.) • Touch previous image ( ) / next image ( ) tab to view the previous and next photo. 4 basic playback Viewing a slide show You can view a photo slide show with background music. ) tab during photo playback. Touch the Slide Show ( • The ( ) indicator appears. The slide show starts from the current selected photo. • To stop the slide show, touch the Return ( ) tab. 100_0014 14/17 To start a slide show in the menu screen Touch the Menu ( ) tab “Slide Show Start”. 100_0014 14/17 Slide Show Start Slide Show Option 1/2 Delete Protect • All photos are played back depending on the slide show options. page 68 ), the camcorder plays back only photos taken on the • If you select the thumbnail display by date ( corresponding date in the slide show. • You can adjust the background music’s volume level using the Volume ( ) tab while playing back the slide show with music. Zooming during photo playback You can magnify a playback image. Touch up/down/left/right to select the area to magnify. 1. Touch the photo you want to magnify. • The camcorder displays the selected photo on the full screen. 2. Adjust the magnification with the Zoom (W/T) button or Zoom (W/T) lever. • Magnification starts from the centre of the photo. • You can zoom in from x1.1 to x8.0. 3. Touch the up ( )/down ( )/left ( )/right ( ) tab to view the area you want on the magnified photo. 4. To cancel, touch the Return ( ) tab. 44 100_0014 X 3.0 • Photos recorded on other devices or those edited on a PC cannot be magnified. • While the playback zoom is in use, other images cannot be selected. 14/17 using the menu items HANDLING MENUS AND QUICK MENUS The instructions below are examples of how to access and use menu items using the Menu Tab and the Q.MENU Button. When you access and use other menu items, use these examples as guides. STBY ) tab [307Min] 9999 PRECHECK! • Insert a memory card. page 28 • Select the record mode by pressing the MODE button. page 24 Using the Menu ( 00:00:00 OFF SUPER Q.MENU button 1. Touch the Menu ( ) tab on the touch panel. • The menu screen appears. • To change the current page, touch the up ( )/down ( ) tab. 2. Touch “ SCENE”. (The SCENE function is used here as an example.) 3. Touch the desired option. • Adjust the setting values accordingly. • To exit the menu, touch the Exit ( ) or Return ( ) tab. SCENE Video Resolution 1/6 Video Quality Photo Resolution SCENE Auto Sports 1/2 Portrait Using the Q.MENU button Quick menu enables you to access your favourite functions quickly. You can easily select the desired menu with one-touch. 1. Press the Q.MENU button on your camcorder to see the available menu options. • The quick menu screen appears. 2. Touch “Focus”. (The Focus function is used here as an example.) 3. Touch the desired option. • Adjust the setting values accordingly. • To exit the menu, touch the Exit ( ) or Return ( ) tab. Menu tab Spotlight SCENE Video Resolution Photo Resolution WB EV Focus Manual Touch Point Focus Auto • When using Menu or Quick menu items, some menu items can not be used at the same time, or may be greyed out. For more information, see Troubleshooting on page 112. • For easy understanding, the menu setting procedures on this page are explained using the simplest methods. Menu setting methods can differ depending on the menu options you choose. 45 using the menu items MENU ITEMS • The items available in each menu vary depending on the operating mode. • For item operation details, see the page number listed under Page in the table. Recording menu items 46 Items Default value Page SCENE Auto 49 Video Resolution 1080/50i 50 Video Quality Fine 50 Photo Resolution 2880x1620 51 Photo Sharpness Normal 51 White Balance Auto 52 Aperture Auto 53 Shutter Auto 54 EV 0 55 Super C.Nite Normal 55 Back Light Off 56 Focus Auto 57 Anti-Shake(OIS) On 58 Digital Effect Off 59 Fader Off 60 Tele Macro Off 61 Cont. Shot Off 62 Wind Cut Off 62 Digital Zoom Off 63 Self Timer Off 63 Quick View On 64 Guideline Off 65 Playback menu items Operation mode Video Photo Default value Page X Play All 66 X X - 67 - 69 Off (Single) 70 Divide X X - 71 Combine X X X - 72 File Info - 68 Slide Show Start X X - 44 Slide Show Option X X - 68 Thumbnail Single Thumbnail Single Play Option X Highlight Delete Protect Items Edit : available, X : not available • Menu options and default values may be changed without prior notice. • Some grey coloured menu options cannot be selected. page 112 47 using the menu items QUICK MENU ITEMS • The items available in each menu vary depending on the operating mode. • For item operation details, see the page number listed under Page in the table. Recording menu items Items Default value Page SCENE Auto 49 Video Resolution 1080/50i 50 Photo Resolution 2880x1620 51 WB Auto 52 EV 0 55 Focus Auto 57 Playback menu items Operation mode Item Video Thumbnail Photo Single Thumbnail Single Page Highlight X X 67 Delete 69 Protect 70 Divide X X 71 Combine X X X 72 68 Edit File Info : available, x : not available Menu options and default values may be changed without a prior notice. 48 advanced recording SCENE Using the iScene function, you can select a setting that matches the scene you are shooting (Sports, Portrait, etc.). Based on your selection, the camcorder sets the appropriate shutter speed and aperture automatically for optimal recording. PRECHECK! Select the record mode by pressing the MODE button. page 24 1. Touch the Menu ( ) tab “ SCENE”. 2. Touch the desired submenu item. • To change the current page, touch the up ( tab. 3. To exit the menu, touch the Exit ( ) or Return ( SCENE Auto )/down ( ) Sports 1/2 ) tab. Portrait Spotlight Submenu items • • • • • • • • Auto: For recording under normal conditions. Sports ( ): For recording people or objects in motion. Portrait ( ): For recording portraits. Captures natural skin tones. Spotlight ( ): When strong light strikes the subject. On stage, for example. Beach/Snow ( ): Where the reflection of light is intense such as a snowfield or beach. Food ( ): To make food more colourful. Candle Light ( ): For recording in the soft glow of candlelight. Indoor ( ): For recording indoors with artificial light. When you specify “Aperture: Manual” or “Shutter: Manual”, the SCENE mode is cancelled. 49 advanced recording Video Resolution You can select the resolution of the video to be recorded. PRECHECK! Select the record mode by pressing the MODE button. page 24 1. Touch the Menu ( ) tab “Video Resolution”. 2. Touch the desired submenu item. 3. To exit the menu, touch the Exit ( ) or Return ( ) tab. Video Resolution 1080/50i 720/50p 1/1 576/50p Submenu items • 1080/50i ( • 720/50p ( • 576/50p ( ): Records in the HD (1920x1080/50i) format. ): Records in the HD (1280x720/50p) format. ): Records in the SD (720x576/50p) format. • “50i” indicates the camcorder will record in interlaced scan mode at 50 fields per second. • “50p” indicates the camcorder will record in progressive scan mode at 50 frames per second. • Recorded files are encoded using Variable Bit Rate (VBR). VBR is an encoding system that automatically adjusts the bit rate in response to the image being recorded. • The available video recording time differs according to the video resolution you select. page 31 Video Quality You can select the quality of the video to be recorded. PRECHECK! Select the record mode by pressing the MODE button. page 24 1. Touch the Menu ( ) tab “Video Quality”. 2. Touch the desired submenu item. 3. To exit the menu, touch the Exit ( ) or Return ( Video Quality Super Fine ) tab. Fine 1/1 Normal Submenu items • Super Fine ( ): Records videos in super fine image quality. • Fine ( ): Records videos in fine image quality. • Normal ( ): Records videos in normal image quality. 50 The higher the resolution is, the shorter the available recording time. On the other hand, the lower the resolution, the longer the available recording time. Photo Resolution You can select the resolution of the photo to be recorded. PRECHECK! Select the record mode by pressing the MODE button. page 24 1. Touch the Menu ( ) tab “Photo Resolution”. Photo Resolution 2. Touch the desired submenu item. 3. To exit the menu, touch the Exit ( 2880x1620 ) or Return ( ) tab. 1920x1080 1/1 Submenu items • 2880x1620 ( • 1920x1080 ( ): Records in the 2880x1620 resolution. ): Records in the 1920x1080 resolution. • The number of recordable images differs according to the photo resolution you select. page 31 • Photos that are recorded on your camcorder may not playback properly on other digital devices that do not support these photo sizes. Photo Sharpness This function lets you create more sharper or softer image by processing the captured image when you take a photo. PRECHECK! Select the record mode by pressing the MODE button. page 24 1. Touch the Menu ( ) tab “Photo Sharpness”. Photo Sharpness 2. Touch the desired submenu item. 3. To exit the menu, touch the Exit ( Soft ) or Return ( ) tab. Normal 1/1 Sharp Submenu items • Soft ( ): Smooths the edges of photo images. Makes image softer. • Normal ( ): The photo images appear with sharp edges and are suitable for printing. • Sharp ( ): Sharpens the edges in photo images further. 51 advanced recording White Balance Using the White Balance function, you can select a setting that matches the light illuminating the subject you are shooting (Daylight, Fluorescent, etc.). Based on your selection, the camcorder automatically adjusts the colour of the subject so the whites and colours in your recording or photo look natural. PRECHECK! Select the record mode by pressing the MODE button. page 24 1. Touch the Menu ( ) tab “White Balance”. 2. Touch the desired submenu item. 3. To exit the menu, touch the Exit ( ) or Return ( White Balance Auto Daylight 1/2 Cloudy Fluorescent ) tab. Submenu items • • • • • • Auto: Controls the white balance automatically in response to lighting conditions. Daylight ( ): For recording outdoors in clear, natural light. ): For recording in the shade or cloudy weather. Cloudy ( ): For recording under white fluorescent lights. Fluorescent ( Tungsten ( ): For recording under halogen lamps and incandescent lights. Custom WB ( ): Lets you adjust the white balance manually to match the light source or situation. Understanding White Balance The White Balance (WB) process removes unrealistic colour casts, so that white objects are rendered white in your image and all other colours look natural. Proper white balance has to take into account the “colour temperature” of a light source, which refers to the relative warmth or coolness of white light. To set the white balance manually ) tab “White Balance” “Custom WB”. 1. Touch the Menu ( • The “( ) Set White Balance” indicator appears. 2. Fill the screen with a white subject, and then touch the ( • The camcorder stores the white balance setting. Tungsten ) tab. ) tab. 3. To exit the menu, touch the Exit ( ) or Return ( • The camcorder applies the stored white balance the next time you record. 52 White Balance Custom WB 2/2 • When setting the white balance manually, the subject must be white, otherwise, your camcorder may not detect an appropriate setting value. • The adjusted setting remains until you set the white balance again. • During normal outdoor recording, setting White Balance to “Auto” may provide better results. • Cancel the digital zoom function for clear and precise white balance setting. page 63 • Reset the white balance if light conditions change. Aperture The camcorder adjusts the aperture (lens opening) automatically depending on the subject and recording conditions. You can also manually adjust the aperture. PRECHECK! Select the record mode by pressing the MODE button. page 24 1. Touch the Menu ( ) tab “Aperture”. Aperture 2. Touch the desired submenu item. 3. To exit the menu, touch the Exit ( Auto ) or Return ( ) tab. Manual 1/1 Submenu items • Auto: Sets the aperture value automatically. ) or increase ( ) tab • Manual ( ): Touch the decrease ( to adjust the aperture. You can choose from the following settings: F1.8, F2, F2.8, F4, F5.6, F8, F11, F16 Understanding Aperture You can adjust the aperture value to control the amount of light reaching the image sensor. The smaller the aperture value, the greater the amount of light. For example, F1.8 lets in more light than F2.8. You need to adjust the aperture value in the following cases: • When you are shooting against the light or when the background is too bright. • When you are shooting on a reflective natural background such as at the beach or when skiing. • When the background is overly dark (for example, scenery at night). • When you specify “Aperture: Manual”, the SCENE mode is cancelled, “Super C.Nite” is set to “Off”, and “Shutter” is set to “Auto” automatically. • If the aperture is set to manual, the aperture value changes depending on the zoom level you change. 5 advanced recording Shutter The camcorder automatically sets the shutter speed depending on the scene’s brightness. User high shutter speeds to record fast moving objects and low shutter speeds to record slow or stationary objects or objects in dimmer light. PRECHECK! Select the record mode by pressing the MODE button. page 24 1. Touch the Menu ( ) tab “Shutter”. Shutter 2. Touch the desired submenu item. 3. To exit the menu, touch the Exit ( Auto ) or Return ( ) tab. Manual 1/1 Submenu items • Auto: The camcorder automatically sets the appropriate shutter speed value. • Manual ( ): Touch the decrease ( ) or increase ( ) tab to adjust the setting values. You can choose from the following settings: 1/50,1/120, 1/250, 1/500, 1/1000, 1/2000, 1/4000, or 1/10000. • The image may not seem smooth when you set a high shutter speed. • When recording at a shutter speed of 1/1000 or lower, make sure the sun is not shining directly into the lens. As the shutter speed gets slower, the camcorder can be harmed by too much light. • When you specify “Shutter: Manual”, the SCENE mode is cancelled, “Super C.Nite” is set to “Off”, and “Aperture” is set to “Auto” automatically. • Even if the shutter speed is set to 1/10000, the camcorder supports only up to 1/2000 while recording photos. 54 EV Depending on the intensity of the ambient light, your videos and photos may be too bright or dark. Using the EV function, you can manually adjust video and photo image brightness. PRECHECK! Select the record mode by pressing the MODE button. page 24 1. Touch the Menu ( ) tab “EV”. EV ) tab to adjust the 2. Touch the decrease ( ) or increase ( setting values. You can choose from the following settings: • EV values ( ): -2.0, -1.6, -1.3, -1.0, -0.6, -0.3, 0, +0.3, +0.6, +1.0, +1.3, +1.6, +2.0 3. To exit the menu, touch the Exit ( ) or Return ( 0 ) tab. Understanding EV (Exposure Value) Exposure value is the total amount of light allowed to fall on the photographic medium (Image sensor) during the process of taking photos or videos. The higher the number, the greater the exposure. For example, + 0.3 lets in more light than -0.3. Darker (-) Brighter (+) 0 Super C.Nite Use to get better images of slowly moving subjects or subjects in dark places. When you turn the Super C.Nite function on, the camcorder adjusts the shutter speed so that the images are brighter without compromising colour. PRECHECK! Select the record mode by pressing the MODE button. page 24 1. Touch the Menu ( ) tab “Super C.Nite”. 2. Touch the desired submenu item. 3. To exit the menu, touch the Exit ( ) or Return ( Super C.Nite OFF OFF OFF ) tab. Off Normal 1/1 SUPER SUPER SUPER Super Submenu items • Off: Disables the function. • Normal ( ): The shutter opens for 1/50 of a second in the normal mode and automatically switches to open for 1/25 of a second in a dark place. Use this function to get bright images in a dark place. • Super ( ): The shutter opens for 1/13 of a second regardless of surrounding conditions. Use this function to get bright images in a darker place. OFF OFF SUPER SUPER 55 advanced recording Back Light When a subject is lit from behind, this function compensates for back lighting so that the subject does not appear too dark. PRECHECK! Select the record mode by pressing the MODE button. page 24 1. Touch the Menu ( ) tab “Back Light”. Back Light 2. Touch the desired submenu item. 3. To exit the menu, touch the Exit ( OFF ) or Return ( ) tab. Submenu items • Off: Disables the function. • On ( ): Backlight compensation brightens the subject. Back lighting causes the subject to be darker than the background It typically occurs when: • The subject is in front of a window. • The person you want to record is wearing white or shiny clothes and is placed against a bright background. The person’s face is too dark to distinguish his/her features. • The subject is outdoors and the background is overcast. • The light sources are too bright. • The subject is in front of a snowy background. 56 Off On 1/1 Focus The camcorder usually focuses on a subject automatically (auto focus). When you turn the camcorder on, focus is always set to automatic. You can also set the focus manually. PRECHECK! Select the record mode by pressing the MODE button. page 24 1. Touch the Menu ( Focus ) tab “Focus". Auto Manual 2. Touch the desired submenu item. 3. To exit the menu, touch the Exit ( 1/1 ) or Return ( Touch Point ) tab. Submenu items • Auto: In most situations, it is better to use the automatic focus feature, as it lets you concentrate on the creative side of your recording. • Manual ( ): You may need to focus manually under conditions in which automatic focusing is difficult or ) or ( ) tab to adjust the focus. unreliable. Touch ( • Touch Point ( ): To focus on a subject shown on the LCD screen, simply touch the subject on the screen. Focusing manually during recording Your camcorder automatically focuses a subject from close-up to infinity. However, the camcorder may not focus correctly, depending on the recording conditions. If it does not focus correctly, use the manual focus ) for a nearer subject, and on the ( ) mode. To adjust the focus, place and hold your finger on the ( tab for a farther subject. • The nearer or farther icon ( / ) appears in the centre when focus adjustment reaches the end. • The camcorder applies the adjusted value right after you touch the ( ) or ( ) tab. Manual Manual 10CM <Nearer subject> 10CM <Farther subject> Scenes to set focus manually for • • • • Scenes containing several objects, some close to the camcorder, others farther away. Scenes with a person enveloped in fog or surrounded by snow. Scenes which contain very shiny or glossy surfaces such as that of a car. Scenes with people or objects moving constantly or quickly such as athletic events or crowd scenes. 57 advanced recording Using the touch point function Using the Touch Point function, you can have the camcorder focus on a small section of the picture. You get the camcorder to focus on a particular point by touching the desired point on the LCD screen. STBY 00:00:00 [307Min] 9999 OFF To activate the touch point with a long touch You can activate touch point by lightly pressing a particular point on the LCD screen for about 2 seconds. SUPER • The Auto Focus (AF) setting is useful when you operate the zoom function because you might not be able to keep accurate focus after the zoom ratio has been changed. • In the manual focus setting menu screen, you can access auto focus by touching the AF ( ) tab on the screen. You can return to manual focus by touching the manual focusing tabs. • If you have enabled the Touch Point function, you can reset the focus to Auto by touching the AF ) tab on the LCD screen. ( Anti-Shake (OIS: Optical Image Stabiliser) Smart OIS improves on existing Optical Image Stabilisation by allowing the camcorder lens to shift over wider range of motion in wide/tele zoom position. This allows the camcorder to compensate for greater degrees of camcorder shake and delivers a stunning level of image smoothness. PRECHECK! Select the record mode by pressing the MODE button. page 24 1. Touch the Menu ( ) tab “Anti-Shake(OIS)”. 2. Touch the desired submenu item. 3. To exit the menu, touch the Exit ( ) or Return ( Off On ) tab. Submenu items • Off: Disables the function. • On ( ): The Anti-Shake(OIS) function is enabled to compensate for shaking. Use the Anti-Shake(OIS) function in the following cases • When recording while walking or riding in a moving car. • When recording with the zoom function. • When recording subjects of a small size. 58 Anti-Shake(OIS) 1/1 • When you turn on Smart Auto mode, it automatically sets Anti-shake (OIS) to On. • The Anti-Shake (OIS) function may not correct gross camcorder shake entirely. To decrease shake, hold the camcorder firmly with both hands. • When this function is On, the actual movement of the subject and the movement displayed on the screen may be slightly different. • When you record in dark or dim light at high magnification while this function is On, afterimages may stand out. If this occurs, we recommend using a tripod (not supplied) and turning Anti-shake to (OIS) Off. Digital Effect Using the Digital Effect function gives your recording a creative look. PRECHECK! Select the record mode by pressing the MODE button. page 24 1. Touch the Menu ( ) tab “Digital Effect”. Digital Effect 2. Touch the desired submenu item. 3. To exit the menu, touch the Exit ( Off ) or Return ( ) tab. Black & White 1/2 Sepia Negative Examples of 5 Digital Effect options Off Without any Digital Effect, the image retains a normal, natural look. Black & White ( ) This mode changes the image to black and white. Negative ( ) This mode reverses the colours, creating a negative image. Art ( ) This mode helps adjust for facial imperfections. Sepia ( ) This mode gives the image an old-time, reddish brown look. 59 advanced recording Fader You can give your recording a professional look by using special effects such as fade in at the beginning of a sequence or fade out at the end of a sequence. PRECHECK! Select the record mode by pressing the MODE button. page 24 1. Touch the Menu ( ) tab “Fader”. Fader 2. Touch the desired submenu item. 3. To exit the menu, touch the Exit ( Off ) or Return ( In ) tab. 1/1 Out In-Out Submenu items • • • • Off: Disables the function In ( ): As soon as you start recording, the recording fades in. Out ( ): When the recording is done, it fades out. In-Out ( ): When you start or stop recording, the recording fades in or fades out accordingly. Recording a video with Fade effect Fade in With “Fader” set to “In”, press the Recording start/ stop button. The recording starts with a dark screen, and then the image and sound fade in. Fade In (Approx.3 seconds) Fade out With “Fader” set to “Out”, press the Recording start/stop button to stop recording. The image and sound fade out, the screen goes black, and then the recording stops. Fade Out (Approx. 3 seconds) Fade in-out With “Fader” set to “In-Out”, press the Recording start/stop button. The recording starts with a dark screen, and then the image and sound fade in. To stop recording, press the Recording start/stop button. The image and sound fade out, the screen goes black, and then the recording stops. 60 The camcorder automatically turns the Fader function off after it has been used once. You must reset it each time you want to use it. Tele Macro Using the Tele Macro function, you can get close up images which are created by focusing on a small portion of a large object at a wide angle. It is useful to get close up images of flowers or insects etc. PRECHECK! Select the record mode by pressing the MODE button. page 24 1. Touch the Menu ( ) tab “Tele Macro”. Tele Macro 2. Touch the desired submenu item. 3. To exit the menu, touch the Exit ( Off ) or Return ( ) tab. On 1/1 Submenu items • Off: Disables the function. • On ( ): You can focus on a small portion of a large object at a wide angle. • • • • • • When recording in Tele Macro mode, the focus speed may be lowered. Use a tripod (not supplied) to prevent camcorder shake in the Tele Macro mode. Avoid shadows when recording in the Tele Macro mode. As the distance to the subject decreases, focusing area narrows. If you can not get proper focus, move the Zoom button or Zoom lever to adjust the focus. The effective focal distance in the Tele Macro mode is between 1 to 50 cm. (0.4 to 19.7 inches). 61 advanced recording Cont. Shot The Continuous Shot function lets you capture up to eight photos in rapid succession to give you more photo-taking opportunities when recording moving subjects. PRECHECK! Select the record mode by pressing the MODE button. page 24 1. Touch the Menu ( ) tab “Cont. Shot”. 2. Touch the desired submenu item. 3. To exit the menu, touch the Exit ( ) or Return ( Cont. Shot Off On ) tab. 1/1 Submenu items • Off: The camcorder records only one photo image. • On ( ): When you press the PHOTO button, the camcorder can take up to 8 photos in one second. • If an error occurs (Card full, etc.) during continuous shot, the recording stops and an error message appears. • When “Cont. Shot” is “On”, the camcorder fixes the photo resolution at 1920x1080. Wind Cut Using the Wind Cut function, you can reduce wind noise when recording sound using the internal microphone. PRECHECK! Select the record mode by pressing the MODE button. page 24 1. Touch the Menu ( ) tab “Wind Cut”. 2. Touch the desired submenu item. 3. To exit the menu, touch the Exit ( ) or Return ( Wind Cut Off On ) tab. 1/1 Submenu items • Off: Disables the function. • On ( ): Reduces wind noise when recording sound using the internal microphone. 62 Using the Wind Cut function also removes some low frequency sound with the wind noise. Digital Zoom The digital zoom enables higher zoom magnification than the optical zoom. Digital zoom can electronically magnify an image created by the optical lens up to 1000 times. PRECHECK! Select the record mode by pressing the MODE button. page 24 1. Touch the Menu ( Digital Zoom ) tab “Digital Zoom”. Off On 2. Touch the desired submenu item. 3. To exit the menu, touch the Exit ( 1/1 ) or Return ( ) tab. STBY 00:00:00 [307Min] 9999 Submenu items OFF • Off : Disables Digital Zoom. • On : Enables higher digital zoom magnification. SUPER When you use the digital zoom, the camcorder processes the image digitally more than in the optical zoom mode. As a result, the image resolution may deteriorate. The right side of the bar shows the digital zooming zone. The zooming zone appears when you move the zoom lever. Self Timer When you enable the self-timer, there is a time delay of 10 seconds before recording starts. You can record videos or take photos of yourself. PRECHECK! Select the record mode by pressing the MODE button. page 24 1. Touch the Menu ( ) tab “Self Timer”. 2. Touch the desired submenu item. 3. To exit the menu, touch the Exit ( ) or Return ( Self Timer OFF ) tab. Off 10 Sec 1/1 Submenu items • Off: Disables the Self Timer. • 10 Sec ( ): There is a time delay of 10 seconds after you press the Record Start/Stop or PHOTO button. The camcorder automatically turns the Self Timer function off after it has been used once. You must turn it on each time you want to use it. 6 advanced recording Quick View Using the Quick View function, you can view the most recently recorded video or photo images immediately after you have recorded them. PRECHECK! Select the record mode by pressing the MODE button. page 24 1. Touch the Menu ( ) tab “Quick View”. Quick View 2. Touch the desired submenu item. 3. To exit the menu, touch the Exit ( Off ) or Return ( ) tab. On 1/1 Submenu items • Off: Quick View ( ) icon does not appear on the screen after you finish the recording. • On: Quick View ( ) icon appears on the screen as soon as you finish the recording. Touch the Quick View icon to view the most recent video or photo you have recorded. After the Quick View is completed, your camcorder switches back to the standby mode. Deleting files after Quick View If you touch the delete ( ) tab during Quick View, the file you are viewing is deleted. 00:00:05/00:00:50 100_0013 Quick View • The Quick View function is not available under the following conditions: - If the mode has been changed after the recording - If the USB cable is connected to the camcorder. - If the camcorder has been restarted after the recording - After playing Quick View • For photos recorded with “Cont. Shot”, only the last file in the sequence is displayed. 64 Guideline Guideline displays straight line patterns on the LCD screen that can help you set the image composition when recording images. The camcorder provides 3 types of guidelines. PRECHECK! Select the record mode by pressing the MODE button. page 24 1. Touch the Menu ( ) tab “Guideline”. Guideline 2. Touch the desired guideline according to the subject. • The selected guideline appears on the screen. 3. To exit the menu, touch the Exit ( ) or Return ( Off ) tab. STBY 00:00:00 Submenu items [307Min] 9999 • Off: Disables the function. : Placing the subject at the centre cross point puts the subject in • the middle of the frame. : Positioning subjects within the Safety Zone rectangle ensures • they will be recorded. : For recording multiple subjects. Putting subjects at or near the • grid cross points creates a balanced composition. • Positioning a subject at the cross point of a guideline provides a balanced composition. • Guidelines are not recorded. 65 advanced playback Play Option You can select a specific video playback option. PRECHECK! Select the Play ( ) tab on the LCD screen to select the Video play ( 1. Touch the Menu ( HD / SD ) mode. page 40 ) tab “Play Option”. Play Option 2. Touch the desired submenu item. 3. To exit the menu, touch the Exit ( Play All ) or Return ( ) tab. Play One 1/1 Repeat All Repeat One Submenu items • Play All ( • Play One ( ): Plays video clips in succession starting from a video you select and ending at the last video you recorded, then returns to the thumbnail index view. ): Plays the selected video once, and then returns to the thumbnail view. • Repeat All ( • Repeat One ( 66 ): Plays all the video clips repeatedly until you ) tab. touch the Return ( ): Plays one selected video repeatedly until you ) tab. touch the Return ( Highlight The Highlight function plays a portion of each recorded video at random. PRECHECK! Select the Play ( ) tab on the LCD screen to select the Video play ( 1. Touch the Menu ( HD / SD ) mode. page 40 ) tab. “Highlight”. Highlight 2. Touch the desired submenu item. 3. To exit the menu, touch the Exit ( Recent ) or Return ( ) tab. All 1/1 Submenu items • Recent ( ): Plays a portion of all videos created within the last 24 hours. • All ( ): Plays a portion of all video files. Highlight playback time to the duration of a video Video Duration Highlight playback time Less than 5 sec. Full playback 5 to 30 sec. Plays 5 seconds at random. 30 sec. to 5 min. Plays 5 seconds of each 30 second section at random. 5 min. to 10 min. Plays 11 seconds of each 2 minute section at random. Over 10 min. Plays 15 seconds of each 3 minute section at random. • lf you run the Highlight function in the date thumbnail display, Highlight plays random portions of all the files in the selected date set. • In the Highlight play mode, you can adjust the volume by touching the screen. You can also cancel the playback. 67 advanced playback Slide Show Option You can set the play options for the slide show with the slide show setting menus. PRECHECK! Select the Play ( ) tab on the LCD screen to select the photo ( 1. Touch the Menu ( ) mode. page 40 ) tab. “Slide Show Option”. 2. Touch the desired submenu item and touch the ( set the value you want. 3. To exit the menu, touch the Exit ( ) or Return ( )/( Slide Show Option ) tab to ) tab. Interval : 1 Sec Music : On Effect : On Submenu items • Interval: Continuously plays back photos at the interval you select. You can choose 1 sec. or 3 sec. • Music: You can turn the internal background music on or off. This camcorder has 7 default background melodies stored in the boot-up flash memory. When music is On, starting a slide show starts the play back of the 7 melodies in shuffle mode. • Effect: Continuously plays back photos using the fade in / out effect to transition between images. File Info You can see the image information for all images. PRECHECK! Select the Play ( page 40 ) tab on the LCD screen to select the Video play ( 1. Touch the Menu ( ) tab “File Info”. 2. Select the file you want to view the file information for. • The information of the selected file appears. 3. To exit the menu, touch the Return ( 68 ) tab. HD / SD ) or Photo play ( ) mode. File Info 100VIDEO HDV_0017.MP4 Date Duration Size : 01/JAN/2010 : 00:00:05 : 9.56MB Resolution : HD 1080 50i F editing files DELETING FILES You can erase your recordings one by one or all at once. PRECHECK! • Insert a memory card. page 28 ) tab on the LCD screen to select the play mode. page 40 • Touch the Play ( 1. Touch the HD ( HD ), SD ( SD ), or Photo ( ) tab. Delete • Videos or photos appear as thumbnails. Select Files ) tab “Delete” touch the desired 2. Touch the Menu ( All Files submenu item. 1/1 • If you touch “Select Files”, you will see image thumbnails. Go to Step 3. • If you touch “All Files”, you will see the message that Delete corresponds to that option. Go to Step 4. 3. Touch the files you want to delete. After you have selected all the files you want to delete, touch the ( ) tab. Go to Step 4. 3/3 • See Submenu items below for additional details. Remain:.62GB 4. Touch “Yes”. • If you selected “All Files”, the camcorder deletes all the files in the storage media, except for those that are protected. • If you selected “Select Files”, the camcorder deletes the files you selected. Submenu items • Select Files: Deletes individual images. Touch the images you want to delete. The indicator ( ) is displayed on the selected images. Touching the thumbnail image toggles the image between being selected for deletion ( ) or not selected. ) tab. Touch the ( • All Files: Deletes all images. • Deleted images cannot be recovered. • Do not eject a memory card or power off the camcorder while deleting videos or photos recorded on the storage media. Doing so may damage the storage media or data. • You can also operate this function in the full and single image display modes. • To protect important images from accidental erasure, activate the image protection function in advance. page 70 • You can not delete protected files. Cancel the protect function first. page 70 • If the write protection tab on the memory card is set to lock, you cannot delete images. • The delete function does not work if the battery charge is insufficient. We recommend you use the AC adapter to ensure the camera has continuous power when deleting. 69 editing files PROTECTION FROM ACCIDENTAL ERASURE You can protect important recordings from accidental erasure. The protected videos and photos can not be deleted unless you format the memory card or cancel the protection. PRECHECK! • Insert a memory card. page 28 ) tab on the LCD screen to select the play mode. page 40 • Touch the Play ( 1. Touch the HD ( HD ), SD ( SD ), or Photo ( • Videos or photos appear as thumbnails. ) tab. 2. Touch the Menu ( ) tab “Protect” touch the desired submenu item. • If you touch “Select Files”, you will see image thumbnails. Go to Step 3. • If you touch “All Files”, you will see the message that corresponds to that option. Go to Step 4. 3. Touch the files you want to protect. After you have selected all ) tab. Go to Step 4. the files you want to protect, touch the ( • See Submenu items below for additional details. Protect Select Files All On 1/1 All Off Protect 3/3 4. Touch “Yes”. • If you selected “All On”, the ( ) indicator appears on all files. • If you selected “All Off”, the ( ) indicator disappears from all protected files. • If you selected “Select Files”, the indicator appears on the files you selected for protection and disappears from the files you removed protection from. Submenu items • Select Files: Protects individual images. Touch the images to protect from erasure. The ( ) indicator appears on the selected images. Touching the thumbnail image toggles the image between being selected ( ) or not selected. ) tab. Touch the ( • All On: Protects all images. • All Off: Turns off protection on all protected images all at once. 70 • You can also operate this function in the full and single image display modes. • If the write protection tab on the memory card is set to lock, you cannot set this function. page 29 DIVIDING A VIDEO You can divide a video into two, and easily delete a section you no longer need. As this function edits the original file, make sure to back up the original before dividing it. PRECHECK! • Insert a memory card. page 28 ) tab on the LCD screen to select the Video play ( • Select the Play ( HD / SD ) mode. page 40 1. Touch the Menu ( ) tab “Edit” “Divide”. Edit 2. Touch the video you want to edit. Divide • The selected video is displayed as paused. Combine 1/1 3. Search for the point of division by touching the playback control tabs. • Playback control tabs: / / / / / 4. Touch the pause ( ) tab at the point of division, and then touch the Cutting ( ) tab. Divide • A message appears asking for your confirmation. 5. Touch “Yes”. • The video you selected is divided into two video clips. • The second clip of the divided video is displayed as the last thumbnail. • After the division, you can partially delete an unnecessary section or combine it with other videos. 00:00:25/00:00:50 100_0013 Do not eject a memory card or power off the camcorder while editing a video recorded on the storage media. Doing so may damage the storage media or data. You can also operate this function in the full and single image display modes. You can not divide files that are protected ( ) . Cancel the protect function first. page 70 The divided video may drift before or after the division point by approximately 2 seconds. The Divide function is not available under the following conditions: - If the total recorded time of the video is less than 6 seconds. - If you try to divide sections without leaving 3 seconds at the beginning and the end. - If the remaining memory space on your memory card is less than 15MB. - When the number of files on the card reaches 9999. • You can not divide photos. • • • • 71 editing files COMBINING VIDEOS You can combine two different videos. As this function edits the original files, make sure to back up the original files before combining them. PRECHECK! • Insert a memory card. page 28 ) tab on the LCD screen to select the Video play ( • Select the Play ( 1. Touch the Menu ( HD / SD ) mode. page 40 ) tab “Edit” “Combine”. 2. Touch the video thumbnails of the videos you want to combine in the order you want them combined. • The ( ) indicator and the order number appear on the selected videos. Touching the video thumbnail toggles a video between being selected ( ) or not selected. • The ( ) indicator does not appear if the video files have different resolutions. ) tab. 3. Touch the ( • A message appears asking for your confirmation. Edit Divide Combine 1/1 Combine 1 3/3 4. Touch “Yes”. • The camcorder combines the video files you selected in the order you designated, and then stores the combined videos as a single video file. Do not eject a memory card or power off the camcorder while editing a video recorded on the memory card. Doing so may damage the storage media or data. 72 • You can not combine files that are protected ( ). Cancel the protect function first. page 70 • The original videos are not preserved. • The Combine function is not available under the following conditions: - If the Videos are in different resolution formats. For example, videos recorded at “Video Resolution: 1080/50i” and “Video Resolution: 720/50p” cannot be combined. - If the file size of the combined videos exceeds 1.8 GB. - If the remaining memory space on your memory card is less than 15MB. - If a video’s file format is not supported by the camcorder. - When the camcorder is playing a video file. system setting SETTING MENU ITEMS • Refer to page 45 for setting menus. • For item operation details, go to the page number listed in the table under Page. Items Default value Page Card Info - 74 File No. Series 75 Time Zone Home 75 Date/Time Set 01/JAN/2010 00:00 (Summer Time : Off) 76 Date Type 01/JAN/2010 76 Time Type 24 Hr 76 Date/Time Display Off 77 LCD Brightness 18 77 Auto LCD Off On 78 Beep Sound On 79 Shutter Sound On 79 Auto Power Off 5 Min 80 Quick On STBY 5 Min 81 PC Software On 82 USB Connect Mass Storage 82 HDMI TV Out Auto 83 TV Connect Guide - 83 TV Display On 84 Format - 74 Default Set - 84 Language English 85 Demo On 85 Anynet+(HDMI-CEC) On 86 • Menu options and default values may be changed without prior notice. • The time type may change depending on the language you selected. 73 system setting Card Info This function shows you the storage information of the memory card, such as used memory space, available memory space, etc. PRECHECK! Insert a memory card. page 28 1. Touch the Menu ( ) Setting ( ) tab “Card Info”. • Used memory space, available memory space, and recordable time appear. Available space and recordable time depend on the video resolution you’ve selected. 2. To exit the menu, touch the Return ( ) tab. Card Info • Used: 40.5MB • Free: 30.8GB [HD]1080/50i Super Fine : 253Min Fine : 307Min Normal : 390Min Format Use this function if you want to delete all files completely or to correct problems on the storage media. PRECHECK! Insert a memory card. page 28 1. Touch the Menu ( ) Setting ( ) tab “Format”. 2. Touch “Yes” “Yes”. • The format is executed and the formatting message appears. TV Connect Guide TV Display 5/6 Format Default Set • Do not remove the storage media or perform any other operation (such as turning off the power) during formatting. Also, be sure to use the provided AC power adapter to power the camcorder when formatting. The memory card may be corrupted if the battery becomes exhausted during formatting and the formatting process stops before the card is completely formatted. • If the storage media becomes corrupted, format it again. 74 • Do not format the storage media on a PC or other device. Make sure to format the storage media on this camcorder. • You can not format a memory card with the protection tab set to lock. page 29 • If there is no storage media inserted, you can not select the Format function, and its name will be dimmed on the menu. • Formatting completely deletes all files and options on a memory card, including protected files. By deleting all files and options, formatting typically corrects problems, enabling stable read/write speeds and operation. File No. File names (numbers) are assigned to recorded images according to the numbering option you select. 1. Touch the Menu ( ) Setting ( ) tab “File No.”. File No. 2. Touch the desired submenu item. 3. To exit the menu, touch the Exit ( Series ) or Return ( ) tab. Reset 1/1 Submenu items • Series: Assigns file numbers in a continuous sequence even after you replace or format the storage media or delete all files. Each file is given a unique file number that allows convenient image management on a PC. • Reset: Resets the file number to 0001 after you format the memory card, delete all files, or insert a new memory card. When you set “File No.” to “Series”, the camcorder assigns each file a different number to avoid duplicating file names. This is useful when you want to manage your files on a computer. Time Zone You can set the clock to the local time when using your camcorder in a different time zone. Setting the local time 1. Touch the Menu ( “Visit”. 2 Touch the left ( ) tab Setting ( ) tab “Time Zone” Time Zone Home ) or the right ( ) tab to select the visited area. ) tab when the time zone setting is complete. 3. Touch the ( • The camcorder does not apply the time zone you set if you finish the setting by touching the ( ) tab without touching the ( ) tab. Visit 1/1 Visit London, Lisbon Submenu items • Home: The camcorder displays the time according to your settings on the Date/Time Set menu. Select Home when using the camcorder for the first time or when returning the clock to your hometown date/time setting. • Visit ( ): When you visit a locale in a different time zone, the Visit function allows you to use the local time without changing your hometown time setting. The camcorder adjusts the clock in accordance with the time difference between the two locations. [HOME 00:00] 01/JAN/2010 00:00 75 system setting Date/Time Set Date/Time Set Day By setting the date and time, you can display the date and time of the recording during playback. page 26 01 Month 00 Year / JAN / 2010 Hr Min : 00 Date Type You can set the display format for the date. ) Setting ( ) tab “Date Type”. 1. Touch the Menu ( 2. Touch the desired submenu item. 3. To exit the menu, touch the Exit ( ) or Return ( ) tab. Date Type 2010/01/01 JAN/01/2010 1/1 01/JAN/2010 01/01/2010 Submenu items • • • • 2010/01/01: Displays the date in the year/month (two-digit)/day format. JAN/01/2010: Displays the date in the month/day/year format. 01/JAN/2010: Displays the date in the day/month/year format. 01/01/2010: Displays the date in the day/month (two-digit)/year format. This function depends on the “Date/Time Display” setting. page 77 Time Type You can set the display format for the time. ) Setting ( ) tab “Time Type”. 1. Touch the Menu ( 2. Touch the desired display option. 3. To exit the menu, touch the Exit ( ) or Return ( ) tab. Time Type 12 Hr 24 Hr 1/1 Submenu items • 12Hr: Displays the time information in 12 hour units. • 24Hr: Displays the time information in 24 hour units. 76 This function depends on the “Date/Time Display” setting. page 77 Date/Time Display You can set whether or not the date and/or time are displayed on the LCD screen. PRECHECK! Before you use the “Date/Time Display” function, you must set the date and time. page 76 1. Touch the Menu ( ) Setting ( ) tab “Date/Time Display”. Date/Time Display 2. Touch the desired submenu item. Off ) tab. 3. To exit the menu, touch the Exit ( ) or Return ( • The date/time is displayed on the LCD screen according to the selected option. Date 1/1 Time Date & Time Submenu items • • • • Off: Current date/time information is not displayed. Date: Displays the current date. Time: Displays the current time. Date & Time: Displays the current date and time. • The date/time will read “01/JAN/2010 00:00” in the following case: - When the internal rechargeable battery is depleted. • This function depends on the “Date Type” and “Time Type” setting. page 76 LCD Brightness You can adjust the brightness of the LCD screen to compensate for ambient lighting conditions. 1. Touch the Menu ( ) Setting ( ) tab “LCD Brightness”. ) or increase ( ) tab to adjust the 2. Touch the decrease ( setting values as you want. • You can set value for LCD brightness between 0 and 35. 3. To exit the menu, touch the Exit ( ) or Return ( LCD Brightness 18 ) tab. • If the surroundings are too bright, adjust the brightness of the LCD screen. • Adjusting the LCD screen does not affect the image you are recording. • A brighter LCD screen consumes more power. 77 system setting Auto LCD Off To reduce power consumption, the camcorder automatically dims the brightness of the LCD screen if the camcorder is idle for a period of time. 1. Touch the Menu ( ) Setting ( ) tab “Auto LCD Off”. Auto LCD Off 2. Touch the desired submenu item. 3. To exit the menu, touch the Exit ( Off ) or Return ( ) tab. On 1/1 Submenu items • Off: Disables the function. • On: When the camcorder is idle for more than 2 minutes in the STBY mode, or for more than 5 minutes when recording a video, the power saving mode starts by dimming the LCD screen. STBY 00:00:00 [307Min] 9999 STBY 00:02:00 After 2 minutes OFF OFF SUPER SUPER <In the STBY mode> 00:00:00 [307Min] 9999 <LCD screen is darkened> [307Min] 00:05:00 [307Min] After 5 minutes OFF OFF SUPER SUPER <During recording> 78 <LCD screen is darkened> • When the “Auto LCD Off” function is enabled, you can press any button on the camcorder to return LCD brightness to normal. • Auto LCD Off is disabled in the following cases: - If the AC power adaptor is connected. - While the Demo function is in operation. Beep Sound The Beep Sound function lets you control whether a beep sounds when you touch certain buttons on the screen. 1. Touch the Menu ( ) Setting ( ) tab “Beep Sound”. Beep Sound 2. Touch the desired submenu item. 3. To exit, touch the Exit ( disappears. Off ) or Return ( ) tab until the menu On 1/1 Submenu items • Off: Disables the function. • On: You will hear a beep when pressing buttons or tabs such as the Power ( ) button or Recording start/stop button. The Beep Sound is cancelled in the following cases: - During recording and playback. - When the camcorder has a cable connection (Audio/Video cable, HDMI cable, etc.). Shutter Sound The Shutter Sound function lets you turn the shutter sound that plays when you press the PHOTO button on or off. 1. Touch the Menu ( ) Setting ( ) tab “Shutter Sound”. Shutter Sound 2. Touch the desired submenu item. 3. To exit the menu, touch the Exit ( Off ) or Return ( ) tab. On 1/1 Submenu items • Off: Disables the function. • On: You will hear the shutter sound when you press the PHOTO button. The camcorder does not make the shutter sound: - If you press the PHOTO button during video recording. - When the camcorder has a cable connection (Audio/Video cable, HDMI cable, etc.). 79 system setting Auto Power Off You can set your camcorder to turn off automatically if it is idle for 5 minutes without an operation. This function prevents unnecessary power consumption. 1. Touch the Menu ( ) Setting ( ) tab “Auto Power Off”. Auto Power Off 2. Touch the desired submenu item. 3. To exit the menu, touch the Exit ( Off ) or Return ( ) tab. 5 Min 1/1 Submenu items • Off: Disables the function. • 5 Min: The camcorder turns off if idle for 5 minutes without an operation. • Auto Power Off does not work in the following situations: - When the camcorder has a cable connection. (USB cable, AC power adaptor, etc.) - While the Quick On STBY function is in operation. - While the Demo function is in operation. - While you are recording, playing (except pause), or running a photo slide show. • To turn the camcorder on again, press the Power ( ) button. 80 Quick On STBY When you are going to record frequently for an extended time, use the Quick On STBY function to reduce energy consumption and battery drain. With the Quick On STBY function On and the camcorder in standby mode, closing the LCD screen starts Quick On STBY. Once you are ready to record again and you open the LCD screen, Quick On STBY triggers the camcorder to come on quickly from the power saving mode. 1. Touch the Menu ( ) Setting ( ) tab “Quick On STBY”. Quick On STBY 2. Touch the desired submenu item. 3. To exit the menu, touch the Exit ( Off ) or Return ( ) tab. 5 Min 1/1 10 Min 20 Min Submenu items • Off: In the standby mode, closing the LCD screen turns off the camcorder. • 5 Min: In the standby mode, closing the LCD screen starts the Quick On STBY mode in a few seconds. The camcorder stays in Quick On STBY mode for 5 minutes and then turns off unless you open the LCD screen or push a button. • 10 Min: In the standby mode, closing the LCD screen starts the Quick On STBY mode in a few seconds. The camcorder stays in Quick On STBY mode for 10 minutes and then turns off unless you open the LCD screen or push a button. • 20 Min: In the standby mode, closing the LCD screen starts the Quick On STBY mode in a few seconds. The camcorder stays in Quick On STBY mode for 20 minutes and then turns off unless you open the LCD screen or push a button. • We recommend turning off the camcorder after use to reduce energy consumption. However, as an alternative, you can use the Quick On STBY function under most shooting conditions to reduce energy consumption effectively. • The mode indicator keeps blinking in the Quick On STBY mode. • The Quick On STBY mode is not available under the following conditions: - When the LCD screen is open. - When a video cable (HDMI, Audio/Video cable) or the USB cable is connected to the camcorder. - When you operate the buttons on the camcorder. 81 system setting PC Software If you set PC Software to On, you can use the PC software built into the camcorder (Intellistudio) by connecting your camcorder to your PC using the camcorder’s USB cable. You can download the video and photo images stored on the camcorder to your PC’s hard disk and edit the videos and photos using the internal PC software. ) Setting ( ) tab “PC Software”. 1. Touch the Menu ( 2. Touch the desired submenu item. 3. To exit the menu, touch the Exit ( ) or Return ( ) tab. PC Software Off On 1/1 Submenu items • Off: Disables the PC Software function. • On: The internal editing software starts when you connect the camcorder to a PC. • The PC Software function is not available under the following conditions: - If “USB Connect” is set to “PictBridge” • To enable the PC Software function, set “USB Connect” to “Mass Storage”, in the system setting menu option. page 82 • The PC Software is compatible with the Windows operating systems only. USB Connect You can transfer data to a PC or print photos directly by establishing the correct USB connection. 1. Touch the Menu ( ) Setting ( ) tab “USB Connect”. 2. Touch the desired submenu item. 3. To exit the menu, touch the Exit ( ) or Return ( ) tab. USB Connect Mass Storage PictBridge 1/1 Submenu items • Mass Storage: Connect to a PC to transfer videos or photos. page 100 • PictBridge: Connect to a PictBridge printer to print photos directly (when using the PictBridge function). page 92 82 Before connecting a USB cable, check whether the current USB mode is appropriate for the function you want to use. HDMI TV Out You can set the HDMI video output to match the TV you have connected the camcorder to. PRECHECK! Using the HDMI cable (not supplied), connect the camcorder to your TV. page 87 1. Touch the Menu ( ) Setting ( ) tab “HDMI TV Out”. HDMI TV Out 2. Touch the desired submenu item. 3. To exit the menu, touch the Exit ( Auto ) or Return ( ) tab. 576p 1/1 Submenu items • Auto: The video signals are output in the same format as the recorded file. Use this setting only when connecting to an HDTV. • 576p: The recorded file is output in the 720x576p format. Use this setting only when connecting to a standard, analogue TV which supports Standard Definition (SD) progressive scan through its the HDMI jacks. TV Connect Guide You can view the TV Connect Guide before you connect the camcorder to your TV set. 1. Touch the Menu ( Guide”. ) tab Setting ( ) tab “TV Connect HDMI 2. Touch the desired submenu item. • The TV Connect Guide appears depending on the selected submenu items. • Refer to the TV Connect Guide when you connect your camcorder to a TV. 3. To exit the menu, touch the Exit ( TV Connect Guide ) or Return ( ) tab. Composite 1/1 TV Connect Guide Composite Camcorder TV Video L R Submenu items • HDMI: Select HDMI when connecting the camcorder to a TV with an HDMI cable. • Composite: Select Composite when connecting the camcorder to a TV with a Video/Audio (composite) cable. Audio <To connect the Audio/Video cable> 8 system setting TV Display You can enable or disable the On Screen Display (OSD) that appears on the TV screen when you have connected your camcorder to a TV. 1. Touch the Menu ( ) Setting ( ) tab “TV Display”. TV Display 2. Touch the desired submenu item. 3. To exit the menu, touch the Exit ( Off ) or Return ( ) tab. On 1/1 Submenu items • Off: The OSD (On Screen Display) menus are only shown on the LCD screen. • On: The OSD menus are shown on the LCD screen and the TV screen as well. The thumbnail display and Demo screens are shown on the TV even if you set “TV Display” to “Off”. Default Set You can restore all menu settings to their factory default settings. ) Setting ( ) tab “Default Set”. 1. Touch the Menu ( • A message appears asking for your confirmation. 2. Touch "Yes" if you want all the settings returned to the default. • The Time Zone screen appears after all settings return to their defaults. TV Connect Guide TV Display 5/6 Format Default Set 3. Set the date and time again. page 26 • Do not turn off the power while using this function. • Initializing the camcorder settings to factory defaults does not affect recorded images. 84 Language You can select a language in which to display the menu and messages. page 27 Language English 한국어 1/8 Français Deutsch Demo Demo mode automatically shows you the major functions that are included with your camcorder so that you may use them more easily. 1. Touch the Menu ( ) Setting ( ) tab “Demo”. Demo 2. Touch the desired submenu item. 3. To exit the menu, touch the Exit ( Off ) or Return ( ) tab. On 1/1 Submenu items • Off: Disable the Demo function. • On: Enables the Demo function. Using the Demo function The Demo mode is cancelled in the following cases: - If the LCD screen is touched. - If you press any button (Recording start/stop, Q.MENU, Display ( ), SMART AUTO, MODE, PHOTO, etc.). However, the camcorder enters the Demo mode automatically after 5 minutes in STBY mode if it is idle for 5 minutes without an operation. If you don’t want the Demo function to start, set “Demo” to “Off”. The Demo function does not operate in the following case: - If you set “Auto Power Off” to “5 Min” and you are using the battery to power the camcorder, the Auto Power Off function turns the camcorder off before Demo can run. 85 system setting Anynet+ (HDMI-CEC) This camcorder supports Anynet+. Anynet+ is an AV network system that lets you control all connected Samsung AV devices with an Anynet+ supported Samsung TV remote control. 1. Touch the Menu ( CEC)”. ) Setting ( ) tab “Anynet+ (HDMI- Anynet+ (HDMI-CEC) Off 2. Touch the desired submenu item. 3. To exit the menu, touch the Exit ( On ) or Return ( ) tab. 1/1 Submenu items • Off: Disables the function. • On: The Anynet+ function is enabled. When the camcorder is connected to an Anynet+ supported TV, you can operate some functions of the camcorder using the TV’ s remote control. • When you turn on the camcorder and it is connected by an HDMI cable to a TV that supports Anynet+, the TV automatically turns on. If you do not want to use the Anynet+ function, set the “Anynet+ (HDMI-CEC)” to “Off”. • For details on the Anynet+ (HDMI-CEC) function, refer to the user manual of Samsung’s Anynet+ supported TV. 86 connecting to a TV CONNECTING TO A HIGH DEFINITION TV WITH HDMI You can view High Definition (HD) quality videos recorded in HD resolution on an HDTV using an HDMI connection. This camcorder supports HDMI output to deliver high-definition video transfer. PRECHECK! • Check if there is an HDMI input jack on your TV. • Use the AC power adaptor to power the camcorder when you attach it to a TV. • Select “HDMI TV Out”. page 83 HDTV Camcorder Signal flow Mini HDMI Cable Using a mini HDMI cable 1. Turn on the camcorder. • If you do not turn on the camcorder first, the camcorder may fail to recognise the connected TV. 2. Connect the camcorder to the TV with a Mini HDMI cable. 3. Set the TV’s input or source selector to the HDMI input you’ve attached the camcorder to. • Refer to the TV’s instruction manual to see how to select the TV’s input or source. 4. Select the playback mode on your camcorder, and then start to play back videos or photos. pages 41~43 87 connecting to a TV Understanding the HDMI cable HDMI (High Definition Multimedia Interface) is a compact audio/video interface for transmitting uncompressed digital data. What is Anynet+ function? The Anynet+ function lets you control all devices that support the Anynet + function with the same remote. You can use the Anynet + function on the camcorder if the camcorder is connected by an HDMI cable to a TV that supports Anynet+. For more information, refer to the Anynet+ supported TV’s user manual. When “HDMI TV Out” is set to “Auto”, you can play an SD video file in HD format. This camcorder comes with the “TV Connect Guide” menu function. If you try to connect the camcorder to a TV and don’t have your user’s manual, you can use the “TV Connect Guide” menu function to view connection instructions on the camcorder’s screen. page 83 You can use only a C to A type Mini HDMI cable with this camcorder. The HDMI jack on the camcorder is for output only. If you connect an Anynet+ supported TV to the camcorder with an HDMI cable, turning on the camcorder may turn the TV’s power on. (an Anynet+ function) If you don’t want this to occur, set “Anynet+ (HDMI-CEC)” to “Off”. page 86 Use only HDMI 1.3 cable when connecting to the HDMI jack of this camcorder. If you use another type of HDMI cable, the screen display may not work. 88 CONNECTING TO A REGULAR TV You can view images recorded with your camcorder on a regular TV that supports standard definition. This camcorder supports the composite output for standard definition video transfer. PRECHECK! Use the AC power adaptor to power the camcorder when you connect it to a TV. Regular TV Camcorder Signal flow Audio/Video cable Connecting an Audio/Video cable for the composite output 1. Connect the camcorder to a TV with an Audio/Video cable. • Turn on the camcorder, and then connect an Audio/Video cable. If you do not turn on the camcorder first, the camcorder may fail to recognise the connected TV. 2. Set the TV’s input or source selector to the input you’ve attached the camcorder to. • Refer to the TV’s instruction manual to see how to select the TV input. 3. Select the playback mode on your camcorder, and then start to play back videos or photos. pages 41~43 Make sure you’ve connected the camcorder to the correct input jacks. The TV screen may not display the right video information if the camcorder is connected incorrectly. When connecting to a TV using the Audio/Video cable, match the colour of the cables to the colour of the corresponding jacks. Video input may appear green depending on the TV. If this occurs, connect the yellow plug of the Audio/Video cable to the green jack of the TV. When the camcorder is connected to a TV with more than one type of cable, the camcorder outputs video signals in the following order of priority: - HDMI Audio/Video (composite) output This camcorder comes with the “TV Connect Guide” menu function. If you try to connect the camcorder to a TV and don’t have your user’s manual, you can use the “TV Connect Guide” menu function to view connection instructions on the camcorder’s screen. page 83 If your TV has one audio jack (mono input), connect the yellow plug of the Audio/Video cable to the video jack, the white plug to the audio jack, and leave the red plug unconnected. When you connect the camcorder to a TV using the Audio/Video cable, images recorded in high-definition image quality (1080/50i or 720/50p) are played back in standard definition image quality. 89 connecting to a TV VIEWING ON A TV SCREEN Image appearance depends on the TV screen aspect ratio Recording ratio Appearance on Wide (16:9) TV Appearance on 4:3 TV Images recorded in a 16:9 ratio: • Video images • Photo images • Photo capture images Adjust the volume to a moderate level. If the volume is too high, the video may include noise. If “TV Display” is set to “Off”, the TV screen does not display the camcorder’s OSD (On Screen Display) menus. page 84 90 dubbing videos DUBBING TO A VCR OR DVD/HDD RECORDER Videos recorded in this camcorder can be dubbed to a VCR or DVD/HDD recorders. PRECHECK! • Videos are dubbed to the other recording device via analogue data transfer (composite connection). Use the supplied Audio/Video cable. • Use the AC power adaptor to power the camcorder when you dub to a VCR or DVD/HDD recorder. VCR or DVD/HDD recorder Camcorder Signal flow Audio/Video cable 1. Connect your camcorder to the recording device (VCR or DVD/HDD recorder) with the Audio/Video cable. • Connect your camcorder to the input jacks of the recording device. • If your recording device has an input selector, set it to the correct input mode. 2. Insert the storage device (tape, disc, etc.) into the recording device. 3. Start the playback on your camcorder, and record it on the recording device. • Refer to the instruction manuals supplied with your recording device for details. 4. When dubbing is finished, stop the recording device and your camcorder. Videos recorded on this camcorder can only be dubbed using the Audio/Video cable in SD (standard definition) image quality, regardless of the recording resolution (HD/SD). You cannot dub to a recorder with an HDMI cable. To copy a video recorded in HD (high definition) image quality, use the internal software of your camcorder, and copy the video to your computer. page 95 Because dubbing is performed via analogue data transfer, the image quality may deteriorate. To hide the screen indicators (such as the counter, etc.) on the screen of the connected monitor device set “TV Display: Off”. page 84 To record the date/time, display it on the screen. page 77 91 printing photos DIRECT PRINTING WITH A PICTBRIDGE PRINTER You can print photos directly by connecting your camcorder to a PictBridge printer (sold separately) using a USB cable. PRECHECK! • Insert the memory card. page 28 ) tab on the LCD screen to select the Photo play ( • Select the Play ( 1. Touch the Menu ( “PictBridge”. ) mode. page 40 ) Setting ( ) tab “USB Connect” USB Connect Mass Storage 2. Use a USB cable to connect your camcorder to the printer. 3. Turn your printer on. • The photo thumbnails appear on the LCD screen. 4. Touch the photos you want to print, and then touch the ) tab. Print ( • The corresponding message appears. PictBridge 1/1 100-0014 14/17 01 5. Touch “Yes”. Camcorder To set the number of prints Touch the decrease ( )/increase ( copies to print. The number of copies is set. ) tab to set the number of To cancel the print setting Touch the Return ( ) tab on the LCD screen. To stop printing after printing starts Touch “Cancel” on the screen. If the camcorder fails to recognise the printer, remove the USB cable, and then turn off the printer. Set “USB Connect” to “PictBridge”, and then connect the USB cable again. Use the supplied USB cable. 92 Printer (Compatible with PictBridge) To set the date/time imprint for Pictbridge printers 1. In the printer mode, touch the Menu ( ) tab. • The print options appear on the screen. 100-0014 14/17 01 2. Touch “Date/Time”. 3. Touch the desired submenu item. ) tab. 4. To exit the menu, touch the Exit ( ) or Return ( • The printer prints the selected date and time on the photos. Date/Time 1/1 01/JAN/ 2010 00 :00 Date/Time 00 Off 01 N/2 JA 01/ 0: 00 Date 1/1 Time Date & Time The date/time imprint option may not be supported by all printers. Check with your printer manufacturer. You can not setup the “Date/Time” menu if the printer does not support this option. PictBridge™ is a registered trademark of CIPA (Camera & Imaging Products Association), an image transfer standard developed by Canon, Fuji, HP, Olympus, Seiko Epson, and Sony. Use the AC power adaptor to power your camcorder during PictBridge direct printing. Turning the camcorder off during printing might damage data on the storage media. You can not print video images. You can not print photos recorded on other devices. Various printing options are available depending on the printer. Refer to the printer's user manual for details. 93 using with a Windows computer WHAT YOU CAN DO WITH A WINDOWS COMPUTER You can perform the following functions by connecting your camcorder to your Windows computer with a USB cable and using the Intelli-studio editing software built into your camcorder. Main functions Intelli-studio editing software’s main functions. - Playing back recorded videos or photos. - Editing recorded videos or photos. - Uploading the recorded videos and photos to YouTube, Flickr, Facebook, etc. You can transfer or copy the files (videos and photos) saved on the storage media into your computer (the mass storage function). System requirements The following requirements must be satisfied to use the internal editing software (Intelli-studio): 94 Items Requirement OS Microsoft Windows XP SP2, Vista, or Windows 7 CPU Intel® Core 2 Duo® 1.66 GHz or higher is recommended AMD Athlon ™ X2 Dual-Core 2.2 GHz or higher is recommended (Notebook: Intel Core2 Duo 2.2GHz or AMD Athlon X2 Dual-Core 2.6GHz or higher is recommended) RAM 1GB or higher is recommended Video Card NVIDIA GeForce 8500 or higher, ATI Radeon HD 2600 series or higher Display 1024 x 768, 16-bit colour or higher (1280 x 1024, 32-bit colour recommended) USB USB 2.0 Direct X DirectX 9.0c or higher * Memory Card A Class 6 SDHC card or above. System requirements mentioned above are recommendations. Even on a system that satisfies the requirements, Intelli-studio may not operate optimally. On a slower computer than recommended, video playback may skip frames or operate erratically. If the version of DirectX on your computer is lower than 9.0c, install DirectX 9.0c or higher. We recommend transferring the recorded videos to a PC before playing back or editing the video data. To run Intelli-studio, a laptop computer requires better and faster components than a desktop PC. Intelli-studio is not Macintosh compatible. USING THE Intelli-studio PROGRAMME Using the Intelli-studio programme built into your camcorder, you can transfer video and photo files to your PC using a USB cable and edit them on your PC screen. Intelli-studio offers the most convenient way for you to manage your video and photo files. Step 1. Connecting the USB cable 1. Set “USB Connect: Mass Storage” and “PC Software: On”. • These are the default settings. 2. Connect the camcorder to a PC with the USB cable. • A new file saving window appears along with the Intelli-studio main window. • Depending on your version of Windows, the Windows removable disk window may also appear. PC Software Off On 1/1 3. Click “Yes” in the new file saving window. The uploading procedure starts. Click “Yes” to confirm. • If you do not want to save any new files, select “No”. 95 using with a Windows computer To disconnect the USB cable To disconnect the USB cable after completing the file transfer, you must follow these steps: 1. Click the “Safely Remove Hardware” icon on the taskbar. 2. Select “USB Mass Storage Device”, and then click “Stop”. 3. If the “Stop a Hardware device” window appears, click “OK”. 4. Disconnect the USB cable from the camcorder and PC. Use the provided USB cable. (Supplied by Samsung) Make sure you insert the USB plug into the USB jack with the plug facing in the correct direction. Use the AC power adaptor to power the camcorder when transferring files to your computer. When the USB cable is connected, turning the camcorder on or off may cause the PC to malfunction. If you disconnect the USB cable from the PC or the camcorder while transferring files, the data transmission will stop and the data may be damaged. If you connect the camcorder to a PC via a USB HUB or simultaneously connect the camcorder along with other USB devices, the camcorder may not work properly. If this occurs, remove all USB devices from the PC, and then reconnect the camcorder. Intelli-studio may not automatically run. If this occurs, access My Computer or Windows Explorer, open the drive that corresponds to your camcorder, find Intelli-studio, and then run iStudio.exe. 96 Step 2. About the Intelli-studio main window When the Intelli-studio starts up, video and photo thumbnails are displayed in the main window. 1 2 3 4 5 6 ! 0 9 7 8 1. Menu items 2. Switches to Library of the computer and connected camcorder. 3. Switches to Photo Edit mode. 4. Switches to Movie Edit mode. 5. Switches to Share mode. 6. : Changes the size of thumbnails. : Displays all files (videos and photos). : Displays video files only. : Displays photo files only. : Displays voice files only. 7. Minimizes the connected device screen. 8. Displays videos and photos in various ways. Thumbnails: Displays video and photo thumbnails. Smart Album: Arranges multiple videos and photos by various classifications. Global Map: Displays the locations where photos and videos were shot on a map. 9. Selects the connected device. 10.Shows Contents Manager and My Computer directories. Contents Manager: You can classify and manage videos and photos on your computer. My Computer: You can view videos and photos saved in selected directories of your computer. 11. Shortcut icons : Navigates files (previous and next). : Prints selected photo(s). : Displays locations where you shot selected photo(s) with GPS information. : Registers to Contents Manager. : Manages the registry of faces in the selected photo folder. Intelli-studio is a programme commonly used in Samsung camcorders or digital cameras. Some functions listed above may not work on the product you purchased. 97 using with a Windows computer Step 3. Playing back videos or photos You can play back the recordings conveniently using the Intelli-studio application. 1. Run the Intelli-studio programme. page 95 2. Click the desired folder to display your recordings. • Video or photo thumbnails appear on the screen, depending on the folder you selected. 3. Choose the video or photo that you want to play. • You can view the file information by moving the mouse over the file. • If you click a video thumbnail once, the video plays back inside the thumbnail frame, allowing you to search for a desired scene with ease. 4. After you select the video or photo you want, double-click to play back. • Playback starts and the controls appear. Intelli-studio supports the following file formats: - Video formats: MP4 (Video: H.264, Audio: AAC), WMV (WMV 7/8/9) - Photo formats: JPG, GIF, BMP, PNG, TIFF Step 4. Editing videos or photos With Intelli-studio, you can edit the videos or photos in various ways with various functions. (Change Size, FineTuning, Image Effect, Insert Frame, etc.) • Before editing a video or photo in Intelli-studio, make a backup copy of the video or photo file and store it on your computer for safe-keeping using My Computer or Windows Explorer. 98 Step 5. Sharing the videos/photos online Share your contents with the world by uploading photos and videos directly to a web site with one click. 1. Select the videos or photos you want to share. 2. Click “Share” on the Intelli-studio browser. • The selected file appears in the sharing window. 3. Click the web site you would like to upload files to. • You can choose “YouTube”, “Fickr”, “Facebook”, or another web site you want to use for your uploading management. 4. Click “Upload” to start uploading. • A pop up window appears asking for your ID and password. 5. Enter your ID and the password to access. • Access to the web site contents can be limited depending on your web access environment. For more information about using Intelli-studio, open the Help Guide by clicking “Help”. The Intelli-studio application will run faster if you install it on your Windows computer. To install, click “Tool” “Install Intelli-studio on PC” on the Intelli-studio screen. Flickr is an image hosting website, web services suite, and online community platform. In addition to being a popular website for users to share personal photographs, theservice is widely used by bloggers as a photo repository. http://www.flickr.com/ Facebook is a global social networking website that is operated and privately owned by Facebook, Inc. Users can add friends and send messages, and update their personal profiles to notify friends about themselves. Additionally, users can join networks organized by city, workplace, school, and region. http://www.facebook.com/ YouTube is a video sharing website. Users can upload, view, and share personalized video clips. The San Bruno-based service uses Adobe Flash technology to display a wide variety of users-generated contents including video clips, TV clips and music videos, as well as amateur contents such as video blogging and short original videos. http://www.youtube.com/ 99 using with a Windows computer USING AS A REMOVABLE STORAGE DEVICE You can copy video or photo files recorded by the camcorder to a Windows computer by connecting the camcorder to the computer using a USB cable. Viewing the contents of storage media 1. Set “USB Connect” to “Mass Storage”. page 82 2. Set “PC Software” to “Off”. page 82 3. Insert a memory card. page 28 4. Connect the camcorder to the PC with the USB cable. page 95 • The “Removable Disk” or “Samsung” window appears on the PC’s screen after a moment. • Select “Open folders to view files using Windows Explorer”, and then click “OK”. 5. The folders in the storage media appear. • Different file types are stored in different folders. 6. Select the desired folder or files to copy, then drag and drop them into the destination folder. • The folder or files are copied from the storage media to the PC. If the “Removable Disk” window does not appear, confirm the connection (page 95) or perform steps 1 and 4 again. If the removable disk does not appear automatically, open the removable disk folder in My Computer. If the connected camcorder’s disk drive does not open or the context menu that appears when right clicking your mouse (open or browse) appears broken, your computer may be infected by Autorun virus. Please update your anti-virus software to its latest version and scan your disk drives. 100 Photos Videos Setting data Structure of folders and files on the storage media • The folder and file structure for storage media are below. • File naming follows DCF (Design rule for Camera File System) rules. Video file (H.264) ➀ HD-quality videos have an HDV_####.MP4 name format. SD-quality videos have a SDV_####.MP4 name format. The file number used in the file name automatically increases when you create a new video file. A new folder is created when the file number has reached 999~1,000. The folder names are given in the following order: 100VIDEO, 101VIDEO, etc. The maximum number of folders is 999. The camcorder can create a maximum of 9,999 files in a storage media. Photo file ➁ As with video files, the file number used in the file name automatically increases when you create a new photo file. Photos have a SAM_####.JPG name format. The folder names are given in the following order: 100PHOTO, 101PHOTO, etc. File format Video files • Video files are compressed in H.264 format. The file extension is “.MP4”. • Refer to page 50 for the video resolution. Photo files • Photo images are compressed in JPEG (Joint Photographic Experts Group) format. The file extension is “.JPG”. • Refer to page 51 for the photo resolution. Do not modify the name of a video file recorded by the camcorder. For proper playback, the camcorder requires that files have their original folder and file names. 101 troubleshooting Before contacting a Samsung authorised service centre, perform the following simple checks. They may save you the time and expense of an unnecessary call. WARNING INDICATORS AND MESSAGES Problems may occur because of the following reasons. Check the information and take corrective action. Battery Message Low Battery Check authenticity of the battery. Icon - - Informs that... Action The battery is almost discharged. Replace with a charged battery or connect the AC power adaptor. The battery can not pass authenticity check. Check whether the battery is authentic. If not, change to an authentic Samsung battery. We recommend you use only genuine Samsung batteries in this camcorder. Informs that ... Action Storage media Message Insert card 102 Icon There is no memory card inserted Insert a memory card. in the memory card slot. Delete unnecessary files from the memory card. Back-up files to a PC or another storage media, and then delete unneeded files. Replace the memory card with another card that has enough free space. Card Full There is not enough space to record on the memory card. Card Locked The write protection tab on an SD Release the write protection tab. or SDHC card has been set to lock. Card Error The memory card has a problem and the camcorder can not recognise it. Replace the memory card with another card. Message Informs that ... Action Not Formatted The memory card is not formatted in this camcorder. Format the memory card using this camcorder. Not Supported Format The memory card may have been formatted by another device and may still have existing images on it. Files cannot be played as the memory card format is not supported by the camcorder. Format the card using the camcorder or replace the card with a card formatted correctly. Not Supported Card The memory card is not supported in this camcorder. Replace the memory card with a recommended card. The memory card is not fast enough to record at this resolution. Record video at a lower resolution and quality. Replace memory card with a faster card. Informs that ... Action Low Speed Card. Please record at a lower resolution. Icon - Recording Message Icon Write Error - A problem has occurred while the camcorder was writing data to storage media. Turn the camcorder's power off and on for data recovery. If a file is not recovered, use the camcorder to format the storage media after backing up important files to a PC or another storage media. Release the Smart Auto - You can not operate some functions manually when Smart Auto is activated. Release the Smart Auto function. Recovering Data… Don’t power off and keep card inside. - The file was not created normally. Wait until data recovery is finished. Never turn off the power or eject the memory card during recording. 103 troubleshooting Recording Message The number of video files is full. Cannot record video. Icon - Informs that ... Action Delete unnecessary files from the storage media. Back up files to your PC or another storage media and delete unneeded The number of video files that can files. be stored is 9,999. Change to another card which has enough free space. Set “File No.” to “Reset”. Format the storage media. The number of photo files is full. Cannot take a photo. - The number of photo files that can be stored is 9,999. Delete unnecessary files on the storage media. Back up files to your PC or another storage media and delete unneeded files. Change to another card which has enough free space. Set “File No.” to “Reset”. Format the storage media. File number is full. Cannot record video. - Folder and file number have reached the maximum number and you can not record. Set “File No.” to “Reset” and format the storage media. Remember to back up important files before formatting. - Folder and file number have reached the maximum number and you can not record. Set “File No.” to “Reset” and format the storage media. Remember to back up important files before formatting. Informs that ... Action A problem has occurred while the camcorder was reading data from the storage media. Use the camcorder to format the storage media after backing up important files to a PC or another storage device. This file can not be read. Use the camcorder to format the storage media after backing up important files to a PC or another storage device. File number is full. Cannot take a photo. Playback Message Icon Read Error - Corrupted file 104 - Editing videos Message Icon Informs that ... Action Cannot select different resolution. - The files you want to combine have different resolutions. You can not combine files that have different resolutions. Not enough free space in Card. - You cannot edit due to insufficient space on memory card. Edit after deleting unnecessary files. - Only two files can be combined. Combine two files first, and then combine the resulting file with an additional file. Note that you can not combine files if the total size of the combined files exceeds 1.8GB. - The files whose total size is likely to exceed 1.8GB cannot be combined. Perform a divide or partial delete function first to delete unnecessary parts of the files, and then perform the combine function. Select 2 files for combine. Total file size is over than 1.8GB. 105 troubleshooting USB Message Informs that... Action - A problem occurred when connecting the camcorder via USB to a printer. Check the USB cable. Try the connection procedure again. Switch “USB connect” function to “PictBridge”. Fail USB Connecting Change 'USB Connect' - A problem occurred when connecting the camcorder via USB to a PC. Check the USB cable. Try the connection procedure again. Switch “USB connect” function to “Mass Storage”. Ink Error - There is a problem with an ink cartridge. Check the ink cartridge. Put a new ink cartridge into the printer. Paper Error - There is a problem with the paper. Check the paper in the printer. If there is no paper, insert paper. File Error - There is a problem with the file. Your camcorder does not support this file format. Try another file recorded on your camcorder. Printer Error - There is a problem with the printer. Turn the printer’s power off and on. Contact the printer manufacturer’s service centre. Print Error - A problem occurred during printing. Do not remove the camcorder’s power source or eject the memory card during printing. Fail Printer Connecting Change 'USB Connect' 106 Icon SYMPTOMS AND SOLUTIONS If these instructions do not solve your problem, contact your nearest Samsung authorised service centre. Power Symptom Explanation/Solution The camcorder does not turn on. The battery may not be installed in your camcorder. Insert the battery into the camcorder. The inserted battery may be discharged. Charge the battery or replace it with a charged one. If you use the AC power adaptor, make sure it is properly connected to a wall outlet. The power turns off automatically. Is “Auto Power Off” set to “5 Min”? If no button is pressed for about 5 minutes, the camcorder is automatically turned off (“Auto Power Off”). To disable this option, change the setting of “Auto Power Off” to “Off”. page 80 The battery is almost exhausted. Charge the battery or replace it with a charged one. Power cannot be turned off. Remove the battery or unplug the AC power adaptor, and connect the power supply to the camcorder again before turning it on. The battery discharges quickly. The temperature is too low. The battery is not fully charged. Charge the battery again. The battery has reached the end of its lifespan and cannot be recharged. Use another battery. Display Symptom Explanation/Solution The TV screen or LCD display has distorted images or has stripes at the top/bottom or on the left/right. This can occur when recording or viewing a 16:9 ratio image on a 4:3 ratio TV, or vice versa. For more details, see the display specification. page 90 Unknown image appears on the LCD screen. The camcorder is in Demo mode. If you do not want to see Demo images, change “Demo” to “Off”. page 85 Unknown indicator appears on the screen. A warning indicator or message appears on the screen. pages 102~106 An afterimage remains on the LCD screen. This occurs if you disconnect the AC power adaptor or remove the battery before turning the power off. The image on the LCD screen looks Ambient light is too bright. Adjust the brightness and angle of the dark. LCD. 107 troubleshooting Recording 108 Symptom Explanation/Solution Pressing the Recording start/stop button does not start recording. Press the MODE button to set the record mode. page 24 There is not enough free space to record on the storage media. Check if memory card is not inserted or write-protect tab is set to lock. The actual recording time is less than the estimated recording time. The estimated recording time may vary depending on content and features used. When you record an object that moves quickly, the actual recording time may be shortened. The recording stops automatically. There is no more free space for recording on the storage media. Back up important files on your PC and format the storage media or delete unnecessary files. If you make recordings or delete files frequently, the performance of the storage media deteriorates. If this occurs, format the storage media again. If you use a memory card with a low write speed, the camcorder automatically stops recording videos and displays a message on the LCD screen. When recording a subject illuminated by bright light, a vertical line appears. This is not a malfunction. When the screen is exposed to direct sunlight during recording, the screen becomes red or black for an instant. This is not a malfunction. During recording, the date/time does not display. “Date/Time Display” is set to “Off”. Set the “Date/Time Display” to On. page 77 You cannot record a photo image. Set your camcorder to the record mode. page 24 Release the lock on the write-protection tab of the memory card if any. The storage media is full. Use a new memory card or format the storage media. page 74 Or remove unnecessary images. page 69 You don’t hear the shutter sound when you record a photo image. Set “Shutter Sound” to “On”. During dual recording (video and photo), the Shutter Sound is off. When the Mini HDMI cable or Audio/Video cable is connected to the camcorder, the Shutter Sound is not available. You don’t hear the beep sound. Set “Beep Sound” to “On”. Beep sound is temporally off while recording videos. When the Mini HDMI cable or Audio/Video cable is connected to the camcorder, the Beep Sound is not available. There is a time difference between the point where you press the Recording start/stop button and the point where the recorded video starts/stops. On your camcorder, there may be a slight time delay between the point where you press the Recording start/stop button and the actual point where the recorded video starts/stops. This is not an error. Horizontal stripes appear on the images. This occurs when recording images under a fluorescent lamp, sodium lamp, or mercury lamp. This is not a malfunction. Storage Media Symptom Explanation/Solution Memory card functions do not operate. Insert a memory card into your camcorder properly. page 28 If you use a memory card formatted on a computer, format it again directly on your camcorder. page 74 Image cannot be deleted. Release the lock on the write-protect tab of the memory card (SDHC/SD memory card), if any. page 29 You cannot delete a protected image. Release protection of the image using the Protect function. page 70 You cannot format the memory card. Release the lock on the write-protect tab of the memory card (SDHC/SD memory card), if any. page 29 The memory card is not supported on your camcorder or the card has some problems. The data file name is not indicated correctly. The file may be corrupted. The file format is not supported by your camcorder. The file name is displayed correctly only if the directory structure complies with the international standard. Adjusting the image during recording Symptom Explanation/Solution Focus does not adjust automatically. Set “Focus” to “Auto”. page 57 The recording conditions are not suitable for auto focus. Adjust the focus manually. page 57 The lens is dusty on the surface. Clean the lens and check the focus. Recording is being made in a dark location. Use a light to brighten the area. The image appears too bright, flickers, or changes colour. This may occur when you make a recording under a fluorescent sodium, or mercury lamp. Cancel “ SCENE” to avoid or minimise this phenomenon. page 49 Image’s colour balance is not natural. The white balance is incorrect. Set the proper “White Balance”. page 52 A subject passing quickly through the frame appears distorted This is called the focal plane phenomenon. This is not a malfunction. Because of the way the image device (CMOS sensor) reads out video signals, a subject passing through a frame rapidly may appear to bend, depending on the recording conditions. 109 troubleshooting Playback on your camcorder Symptom Explanation/Solution Playback (play/pause) function does not work. Image files recorded using another device may not play on your camcorder. Check memory card compatibility. page 29 Photo images stored on a storage media are not displayed in the actual size. Photo images recorded on other devices may not appear in their actual size. This is not an error. Playback is interrupted unexpectedly. Check if the AC power adaptor or battery back is properly connected and secure. Playback on other devices (TV, etc.) Symptom Explanation/Solution You cannot view the image on or Make sure that the connection cable is connected to the proper hear the sound from the connected jack. device. The image appears distorted on a TV. This phenomenon is caused by connecting to a TV with 4:3 aspect ratio. You cannot view the image on or hear the sound from a TV connected using the HDMI cable. The camcorder can not output Images from the HDMI jack if the material is copyright protected. Connecting/Dubbing with other devices (Recorder, PC, Printer, etc.) 110 Symptom Explanation/Solution You cannot dub correctly using the HDMI cable. You cannot dub images using the HDMI cable. You cannot dub correctly using the Audio/Video cable. The Audio/Video cable is not connected properly. Make sure that the Audio/Video cable is connected to the proper jack, i.e. to the input jack of the device used for dubbing images from your camcorder. page 91 Your PictBridge printer cannot print photos from your camcorder. Your printer may not print images edited on a computer or recorded using other devices. This is not an error. Connecting to a computer Symptom Explanation/Solution Your computer does not recognise your camcorder. Disconnect the USB cable from the computer and camcorder, restart the computer, and then connect the USB cable again correctly. Cannot play a video file properly on a PC. You need a video codec to play the file recorded on your camcorder. Install the software provided with your camcorder. page 99 Make sure you insert the connector in the correct direction, and connect the USB cable to the USB jack on your camcorder firmly. Disconnect the cable from the computer and camcorder, restart the computer, and then connect the cable again properly. To play back an HD video file, you need a computer with better specifications. Use a computer with the recommended specifications. page 94 Intelli-studio does not function properly. Exit the Intelli-studio application, and restart the Windows computer. Intelli-studio does not start. Set “PC Software” to “On” in the Settings menu or install Intellistudio on the computer. pages 82, 99 Your computer is not playing videos, images, or sound located on your camcorder properly. Video playback or sound may stop temporarily depending on your computer. The video or sound copied to your computer is not affected. If your camcorder is connected to a computer that does not support Hi-speed USB (USB2.0), the image or sound may not play correctly. Images, video, and sound copied from the camcorder to your computer are not affected. The playback screen is paused or distorted. Check the system requirements to play a video. Shut down all other applications currently running on the computer. If you play a video on your camcorder when it is connected to a computer, the video may not play smoothly on the computer, depending on the transfer speed. Please copy the file to your PC, and then play it back. 111 troubleshooting Overall operations Symptom Explanation/Solution The date and time are incorrect. Has the camcorder been left unused for a long period of time? The backup internal rechargeable battery may be discharged. page 26 Menu items that cannot be used at the same time Symptom Cannot use Because of the following settings Menu items are greyed out “Photo Resolution” “Cont. Shot” You cannot select greyed menu items in the current recording/playback mode. There are some functions you cannot activate simultaneously. The list shown above shows examples of unworkable combinations of functions and menu items. Menu and quick menu cannot be used in Smart Auto mode. The following functions cannot be used during video recording: “Video Resolution”, “Video Quality”, “Photo Resolution”, “Photo Sharpness”, “Fader”, “Cont.Shot”, “Digital Zoom”, “Self Timer”. The following functions are automatically set to Off or Auto mode in the Smart Auto mode: “ SCENE”, “Shutter”, “Digital Effect”, “Tele Macro”, etc. In the Smart Auto mode, your camcorder automatically chooses the appropriate camcorder settings based on a detected type of scene. Most settings are automatically adjusted in Smart Auto mode. To set or adjust functions on your own, release the Smart Auto mode first. 112 maintenance & additional information MAINTENANCE The suggestions below will help you fulfill any warranty obligations and allow you to enjoy this product for many years. Cautions when storing For safekeeping of the camcorder, turn off the camcorder. - Remove the battery and AC power adaptor. - Remove the memory card. Cleaning the camcorder Before cleaning, turn off the camcorder and remove the battery and AC power adaptor. To clean the exterior - Wipe gently with a soft dry cloth. Do not apply excessive force when cleaning. Gently rub the surface. - Do not use benzene or thinner to clean the camcorder. The exterior coating could peel off or the case could deteriorate. To clean the LCD screen Wipe very gently with a soft dry cloth. Be careful not to damage the screen. To clean the lens Use a blower brush to remove dust, and then wipe the lens gently with a soft cloth. If necessary, wipe gently with lens paper or tissue. - Mould may form if the lens is left dirty. - If the lens looks dim, turn off the camcorder and leave it off for about 1 hour. LCD screen To prolong its service life, do not rub the LCD screen with a coarse cloth. Be aware of the following LCD screen phenomena. They are not malfunctions. - When you use the camcorder, the surface around the LCD screen may heat up. - If you leave the power on for a long time, the surface around the LCD screen becomes hot. - When using the camcorder in cold conditions, an afterimage may appear on the LCD screen. An LCD screen is manufactured using advanced technology which creates screens with pixel failure rates of less than 0.01%. However, a black or bright spot (red, blue, white) may appear in the centre of the LCD screen and up to two spots may appear outside the centre. These spots, which are normally incurred during the manufacturing process, do not affect the recorded images. When there is dew condensation, put the camcorder aside for a while before using What is dew condensation? Dew condensation happens when a camcorder is moved to a location where there is a significant temperature difference from the previous location. The dew condenses on the external or internal parts of the camcorder, and on the reflection lens. If there is dew on or in your camcorder, it may cause the camcorder to malfunction or damage the camcorder when you turn the power on. Exactly when does dew condensation occur? When you move the camera to a location with a higher temperature than the previous location, or when you move it to a hot area suddenly. Examples: - You record outside in cold weather during the winter and then move the camera in indoors. - You record outside in hot weather after being indoors or inside a car where the A/C was running. What can I do? - Turn the power off, detach the battery, and leave the camcorder in a dry area for 1~2 hours before using it. Use the camcorder only after dew condensation has completely disappeared. Be sure to use the recommended accessories supplied with the camcorder. For service, contact your nearest Samsung authorised service centre. 113 maintenance & additional information USING YOUR CAMCORDER ABROAD • Each country or region has its own electric and colour systems. • Before using your camcorder abroad, check the following items. Power sources The AC adaptor provided lets you power, recharge, and use your camcorder in any country/ region that has AC power in the 100 V to 240 V, 50/60 Hz range. You may need a commercially available AC plug adaptor depending on the design of local wall outlets. On TV colour systems Your camcorder is an PAL-system-based camcorder. If you want to view your recordings on a TV or to copy them to an external device, it must be an PAL-system-based TV or external device and have the appropriate Audio/Video jacks. Otherwise, you may need to use a separate video format transcoder (For example, an PAL-NTSC format converter). The format transcoder is not provided by Samsung. PAL-compatible countries/regions Australia, Austria, Belgium, Bulgaria, China, CIS, Czech Republic, Denmark, Egypt, Finland, France, Germany, Greece, Great Britain, Holland, Hong Kong, Hungary, India, Iran, Iraq, Kuwait, Libya, Malaysia, Mauritius, Norway, Romania, Saudi Arabia, Singapore, Slovak Republic, Spain, Sweden, Switzerland, Syria, Thailand, Tunisia, etc. NTSC-compatible countries/regions Bahamas, Canada, Central America, Japan, Korea, Mexico, Philippines, Taiwan, United States of America, etc. You can make recordings with your camcorder and view pictures on the LCD screen anywhere in the world. 114 specifications Model name HMX-T10WP / HMX-T10BP / HMX-T10OP HMX-T11WP / HMX-T11BP / HMX-T11OP Focal length Filter diameter PAL H.264 (MPEG-4.AVC) AAC (Advanced Audio Coding) 1/4”, 5.1M Pixel CMOS F1.8 ~ F2.5, 10x optical zoom, 100x digital zoom 2.75mm ~ 27.5mm Ø 34 LCD screen Size/dot number LCD screen method 2.7” Wide Touch LCD / 230k TFT LCD Connectors Composite output HDMI output Audio output USB output 1Vp-p (75 Ω terminated) C type connector -7.5 dBs (600 Ω terminated) mini USB-B type (USB2.0 High Speed) Power source Power source type DC 5 V, Lithium Ion battery pack 3.7 V Lithium Ion battery pack, Power supply (100 V ~ 240 V) 50/60 Hz 2.5W (LCD on) System General Video signal Picture compression format Audio compression format Image device Lens Power consumption (Recording) Operating temperature Storage temperature Storage media External dimensions (WxHxD) Weight Internal MIC 0 ˚C ~ 40 ˚C (32 ˚F~104 ˚F) -20 ˚C ~ 60 ˚C (-4 ˚F ~ 140 ˚F) Memory card (SD/SDHC) (Not supplied) Approx. 38.6mm (1.52 inches) x 54.4mm (2.14 inches) x 118mm (4.65 inches) Approx. 195.3g (0.43 lb, 6.89 oz) (Except for Lithium Ion battery) Omni-directional stereo microphone The technical specifications and design may be changed without notice. 115 Contact SAMSUNG WORLD WIDE If you have any questions or comments relating to Samsung products, please contact the SAMSUNG customer care centre. Region North America Latin America Europe CIS Asia Pacific 1-800-SAMSUNG(726-7864) 01-800-SAMSUNG(726-7864) 1-800-SAMSUNG(726-7864) 0800-333-3733 0800-124-421, 4004-0000 800-SAMSUNG(726-7864) 00-1800-5077267 800-7919267 0-800-507-7267 1-800-10-7267 800-6225 1-800-299-0013 1-800-234-7267 800-7267 1-800-682-3180 1-800-751-2676 1-800-SAMSUNG(726-7864) 0-800-100-5303 01-8000112112 0810 - SAMSUNG (7267864, € 0.07/min) BELGIUM 02-201-24-18 CZECH DENMARK FINLAND FRANCE GERMANY HUNGARY ITALIA LUXEMBURG NETHERLANDS NORWAY POLAND PORTUGAL SLOVAKIA SPAIN SWEDEN U.K IRELAND 800 - SAMSUNG(800-726786) 70 70 19 70 030 - 6227 515 01 48 63 00 00 01805 - SAMSUNG(726-7864 € 0,14/Min) 06-80-SAMSUNG(726-7864) 800-SAMSUNG(726-7864) 261 03 710 0900-SAMSUNG (0900-7267864) (€ 0,10/Min) 815-56 480 0 801 1SAMSUNG(172678), 022-607-93-33 80820-SAMSUNG(726-7864) 0800-SAMSUNG(726-7864) 902-1-SAMSUNG (902 172 678) 0771 726 7864 (SAMSUNG) 0845 SAMSUNG (7267864) 0818 717100 Switzerland 0848 - SAMSUNG(7267864, CHF 0.08/min) LITHUANIA LATVIA ESTONIA RUSSIA Georgia Armenia Azerbaijan KAZAKHSTAN UZBEKISTAN KYRGYZSTAN TADJIKISTAN 8-800-77777 8000-7267 800-7267 8-800-555-55-55 8-800-555-555 0-800-05-555 088-55-55-555 8-10-800-500-55-500 8-10-800-500-55-500 00-800-500-55-500 8-10-800-500-55-500 UKRAINE 0-800-502-000 Belarus Mouldova AUSTRALIA New zealand CHINA 810-800-500-55-500 00-800-500-55-500 1300 362 603 0800 SAMSUNG (0800 726 786) 400-810-5858, 010-6475 1880 HONG KONG (852) 3698-4698 INDIA INDONESIA JAPAN MALAYSIA 3030 8282, 1800 110011, 1800 3000 8282, 1800 266 8282 0800-112-8888, 021-5699-7777 0120-327-527 1800-88-9999 1-800-10-SAMSUNG(726-7864), 1-800-3-SAMSUNG(726-7864), 1-800-8-SAMSUNG(726-7864), 02-5805777 1800-SAMSUNG(726-7864) 1800-29-3232, 02-689-3232 0800-329-999 1 800 588 889 444 77 11 0860-SAMSUNG(726-7864 ) 800-SAMSUNG (726-7864) 8000-4726 800-22273 0800-726786 9200-21230 800-2255 1825-22-73 PHILIPPINES Middle East & Africa Contact Centre Country CANADA MEXICO U.S.A ARGENTINE BRAZIL CHILE Nicaragua Honduras COSTA RICA ECUADOR EL SALVADOR GUATEMALA JAMAICA PANAMA PUERTO RICO REP. DOMINICA TRINIDAD & TOBAGO VENEZUELA COLOMBIA AUSTRIA SINGAPORE THAILAND TAIWAN VIETNAM Turkey SOUTH AFRICA U.A.E Bahrain Jordan Egypt KSA Qatar Syria Web Site www.samsung.com www.samsung.com www.samsung.com www.samsung.com www.samsung.com www.samsung.com www.samsung.com www.samsung.com www.samsung.com www.samsung.com www.samsung.com www.samsung.com www.samsung.com www.samsung.com www.samsung.com www.samsung.com www.samsung.com www.samsung.com www.samsung.com www.samsung.com www.samsung.com/be (Dutch) www.samsung.com/be_fr (French) www.samsung.com www.samsung.com www.samsung.com www.samsung.com www.samsung.com www.samsung.com www.samsung.com www.samsung.com www.samsung.com www.samsung.com www.samsung.com www.samsung.com www.samsung.com www.samsung.com www.samsung.com www.samsung.com www.samsung.com www.samsung.com/ch www.samsung.com/ch_fr/(French) www.samsung.com www.samsung.com www.samsung.com www.samsung.com www.samsung.com www.samsung.com www.samsung.com www.samsung.ua www.samsung.com/ua_ru www.samsung.com www.samsung.com www.samsung.com www.samsung.com/hk www.samsung.com/hk_en/ www.samsung.com www.samsung.com www.samsung.com www.samsung.com www.samsung.com www.samsung.com www.samsung.com www.samsung.com www.samsung.com www.samsung.com www.samsung.com www.samsung.com www.samsung.com RoHS compliant Our product complies with “The Restriction Of the use of certain Hazardous Substances in electrical and electronic equipment”, and we do not use the 6 hazardous materialsCadmium(Cd), Lead (Pb), Mercury (Hg), Hexavalent Chromium (Cr +6), Poly Brominated Biphenyls (PBBs), Poly Brominated Diphenyl Ethers(PBDEs)- in our products.