1
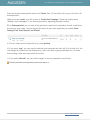
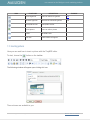
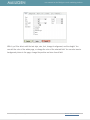
USER MANUAL FOR
THE EMAIL MARKETING PLATFORM
MAILIGEN
New Generation of
Email Marketing
MAILIGEN
user manual for the Mailigen e-mail marketing platform
Table of Contents
1. STARTING YOUR WORK ���������������������������������������������������������������������������������������������������4
1.1. Registration ��������������������������������������������������������������������������������������������������������4
1.2. User account overview ������������������������������������������������������������������������������������������5
1.3. Configuring your user account ��������������������������������������������������������������������������������5
Choose add-ons ����������������������������������������������������������������������������������������������������������7
2. WORKING WITH YOUR LISTS �����������������������������������������������������������������������������������������11
2.1. Making a new list ����������������������������������������������������������������������������������������������12
2.1.1. Editing your lists ������������������������������������������������������������������������14
2.1.2. Importing lists ��������������������������������������������������������������������������15
2.1.3. Exporting your list ����������������������������������������������������������������������18
2.1.4. Editing your contacts �����������������������������������������������������������������18
2.1.5. Searching for list members ��������������������������������������������������������19
2.2. Segmentation ����������������������������������������������������������������������������������������������������19
2.3. Managing Sign-Up Forms ������������������������������������������������������������������������������������21
3. MAKING E-MAIL CAMPAIGNS �����������������������������������������������������������������������������������������24
3.1. Step 1 - Preferences ������������������������������������������������������������������������������������������24
3.2. Step 2 - Select Recipients ����������������������������������������������������������������������������������25
3.3. Step 3 – Choose Design ��������������������������������������������������������������������������������������26
3.4. Step 4 - Create Newsletter ����������������������������������������������������������������������������������28
3.5. Step 5 - Confirm Details & Send It ������������������������������������������������������������������������31
© 2011
Mailigen. www.mailigen.com
Back to Table of Contents
2
MAILIGEN
user manual for the Mailigen e-mail marketing platform
4. REPORTS & STATISTICS ������������������������������������������������������������������������������������������������� 32
5. AUTORESPONDERS ������������������������������������������������������������������������������������������������������ 35
6. SURVEYS ��������������������������������������������������������������������������������������������������������������������� 37
6.1. Step 1 – Survey Templates ���������������������������������������������������������������������������������� 38
6.2. Step 2 – Survey questions ���������������������������������������������������������������������������������� 38
6.2.1. Survey questions and parameters: ���������������������������������������������� 38
6.2.2. Save as New Survey Template: ���������������������������������������������������� 38
6.2.3. Your logo here: �������������������������������������������������������������������������� 38
6.2.4. Welcome page: ������������������������������������������������������������������������ 38
6.2.5. New block: ������������������������������������������������������������������������������ 38
6.2.6. Thank You Landing: ������������������������������������������������������������������ 40
6.2.7. Survey Options: ������������������������������������������������������������������������ 40
6.3. Step 3 - Survey Colors �������������������������������������������������������������������������������������� 40
6.3.1. Colors: ������������������������������������������������������������������������������������ 40
6.3.2. Survey Fonts: �������������������������������������������������������������������������� 41
6.3.3. Width and paddings: ���������������������������������������������������������������� 41
6.4. Step 4 - Distribute ���������������������������������������������������������������������������������������������� 41
7. TINYMCE Editor ������������������������������������������������������������������������������������������������������������� 44
7.1. Introduction ������������������������������������������������������������������������������������������������������ 44
7.2. The basics �������������������������������������������������������������������������������������������������������� 44
7.3. Inserting pictures ������������������������������������������������������������������������������������������������ 46
7.4. Inserting and editing hyperlinks ���������������������������������������������������������������������������� 47
7.5. Adding and editing styles ������������������������������������������������������������������������������������ 48
© 2011
Mailigen. www.mailigen.com
Back to Table of Contents
3
MAILIGEN
user manual for the Mailigen e-mail marketing platform
The Mailigen.com e-mail marketing software will help you to: plan your marketing campaigns and
actions; analyze user activity; and the returns of your marketing activities. We hope that with the
help of this manual you will be able to successfully start exploring the myriad possibilities that the
Mailigen e-mail marketing platform offers. 1. STARTING YOUR WORK
1.1. Registration
For your days at Mailigen to be happy, fruitful, and long lasting, you have to register first.
Click ‘Sign up free’ at the homepage.
1) Enter your desired username, password, and e-mail, which will be used as your ID from now on.
(We do not share your information with 3rd parties and we will never use it for anything else but our
service.) After the form has been filled, press ‘Create Account’.
2) Check your e-mail. An activation link will appear in your inbox shortly. To activate your user
account, click the activation link.
3) When you click the activation link, you will be redirected to our welcome page, where you will be
asked to answer some additional questions about you and your company.
After you have activated your user account, click ‘LOGIN’ or, alternatively, use the direct URL –
http://login.mailigen.com – where you will be required to enter your username and password.
© 2011
Mailigen. www.mailigen.com
Back to Table of Contents
4
MAILIGEN
user manual for the Mailigen e-mail marketing platform
1.2. User account overview
The OVERVIEW tab is what you see when you log in. Here you will see your account information,
reports of your recent campaigns, and the latest subscribers that have subscribed to your mailing
lists.
1.3. Configuring your user account
You can see three categories at top right: Settings / Help / Log Out
1) SETTINGS
This tab shows the information related to your account; you can also change your password and
© 2011
Mailigen. www.mailigen.com
Back to Table of Contents
5
MAILIGEN
user manual for the Mailigen e-mail marketing platform
view payment options here.
a) Contact Information – your contact and company info can be changed here.
b) Username & password - your username and password can be changed here.
c) Price plans / Upgrade. This tab allows you to easily upgrade your account by changing your
price plan, the length of your subscription; you can also see the discounts applied. After choosing
the plan, enter the required information and choose a payment option. Your account is upgraded
immediately after payment, according your plans.
© 2011
Mailigen. www.mailigen.com
Back to Table of Contents
6
MAILIGEN
user manual for the Mailigen e-mail marketing platform
Choose add-ons
1.When you purchase the ‘Pro User’ addon, you’ll have access to the following features:
• ability to edit the entire email, including the ability to customize the footer, and removing the
Mailigen logo.
• up to 4 ‘sender’ email addresses. The Pro User plan allows you to use up to 4 sender names
from a single account.
• The ability to export the full report data. Includes individual clicks and open statistics..
2.The ‘Additional Library Space’ add-on unlocks the following features:
• The ability to store up to 100MB in images to use for email marketing campaigns.
This add-on runs for a month; if the add-on isn’t renewed by the end of the period, the excess
image files are deleted.
© 2011
Mailigen. www.mailigen.com
Back to Table of Contents
7
MAILIGEN
user manual for the Mailigen e-mail marketing platform
For additional safety, please check your personal information and/or props before you make a
purchase.
You can choose from these payment options:
• Credit card (VISA, MasterCard);
• PayPal;
• Bank transfer.
Note that making payments via credit card or PayPal is completely safe. We use SSL
certificates and have an exceptionally safe platform for making payments.
If you want to make a bank transfer, please keep in mind that the payment must be made within
14 days.
If you want to print your invoice, you can do so by clicking on ‘Order ID’ in the ‘Billing Statements’
tab.
If you pay by credit card or PayPal, please re-enter the Mailigen system (log out, then log in
again) to renew your account information.
d) View Login History – you can view your Mailigen login history here.
.
e) Billing Statements – you can see the past invoices in this tab; you can also print them if needed.
© 2011
Mailigen. www.mailigen.com
Back to Table of Contents
8
MAILIGEN
user manual for the Mailigen e-mail marketing platform
f) API keys – use them for identifying the client.
API functions:
1. List management;
2. Campaign creation and sending;
3. Campaign statistics;
We suggest API keys are handled by your system administrator or programmer.
g) Close Account - if you no longer want to use Mailigen, your account can be closed here.
2) Log Out
When you press this menu, you will log out of the Mailigen system.
3) Help
Here search terms (phrases or keywords) can be entered, and our search system will automatically
© 2011
Mailigen. www.mailigen.com
Back to Table of Contents
9
MAILIGEN
user manual for the Mailigen e-mail marketing platform
answer most of your queries. If, however, the information you seek can’t be found here, please
contact our support system. The Mailigen support team will gladly help you resolve any questions;
the support team is available at any given time.
© 2011
Mailigen. www.mailigen.com
Back to Table of Contents
10
MAILIGEN
user manual for the Mailigen e-mail marketing platform
2. WORKING WITH YOUR LISTS
Your clients and list subscribers are kept in the ‘Lists’ tab. This tab offers a convenient way of
keeping in touch with your clients and organizing the e-mail addresses of your clients. When a new
list is created, these database fields are added automatically: Name, Surname, and E-Mail. You can
then adjust, change, update, and add to these fields according to your needs.
You can create and expand your e-mail lists in three different ways:
1) By manually entering information about the client in a pre-created list;
2) By importing contacts from database files;
Please note that only: *.xls, *.xlsx, *.ods, *.csv files are allowed. You can also import *.txt files
that have database entries divided with TAB!
3) By copying them into the required field;
4) By using double opt-in newsletters or subscription forms. (See ‘Managing sign-up forms’).
Contact lists can be segmented or divided into separate groups that follow certain criteria and
parameters.
The tab ‘My Contacts’ allows you to see your lists and additional information about them. This tab
also allows you to easily choose the list necessary and to grasp ‘the big picture’ of your lists.
© 2011
Mailigen. www.mailigen.com
Back to Table of Contents
11
MAILIGEN
user manual for the Mailigen e-mail marketing platform
2.1. Making a new list
Click ‘Create New List’ in the tab ‘My Contacts’.
.
A window will open where you will have to fill the following fields:
1) List name – choose an easily recognizable list name to make it easier to find. The name of the
list will be visible to subscribers when they want to unsubscribe from your newsletters.
2) Remind people how they got on your list – (remind the subscriber how he got on your list, but
be short.) You can also copy the reminder from an existing list, provided you have one.
3) Choose the additional options at ‘Email Notifications’. You can opt to receive e-mails when
people either subscribe or unsubscribe to your list, when:
a) A client has subscribed. Checking this option will send a message to your email if a client has
subscribed.
b) A client has unsubscribed. Checking this option will send a message to your email if a client has
unsubscribed.
4) People can pick email format (HTML or plain-text). If this is checked, the list’s subscription form
© 2011
Mailigen. www.mailigen.com
Back to Table of Contents
12
MAILIGEN
user manual for the Mailigen e-mail marketing platform
will have an additional field where the user can choose what kind of e-mails he/she will receive.
5) The Default contact fields are Email, First Name, and Last Name. These will be the database
fields that every list has at start.
When you are sure about your selections, click ‘Save’.
The new list can now be found in the ‘My Contacts’ tab. You can work with and edit the list by choosing
from the additional options found below its name.
a) Click ‘add contact’ if you want to manually add individual contacts.
b) Click ‘import list’ if you want to add your e-mail database from a file. You can copy the list
from Excel or upload a file that has the required information in it. The currently allowed formats are:
*.xls, *.xlsx, *.ods, *.csv, and *.txt files with entries divided with TAB.
c) Click ‘remove contact’ if you want to delete one or more entries. A window will open with
additional instructions and options
.
d) By clicking ‘sign-up form’ you can create a subscription form, which will automatically
add new subscribers to your list and newsletter.
e) Click ‘send to list’ if you want to prepare and send a new e-mail campaign to the
respective list.
f) Click on ‘edit contact fields’ if you want to add or change database fields of the respective
list.
© 2011
Mailigen. www.mailigen.com
Back to Table of Contents
13
MAILIGEN
user manual for the Mailigen e-mail marketing platform
2.1.1. Editing your lists
You can edit your client lists any time you want!
To start, click on the name of the needed list in ‘My Contacts’. You can view individual client data
here; you’ll see that the clients are grouped into four categories: active; inactive; unsubscribed; and
bounced.
You can also choose from additional options to edit your lists:
a) View all will let you see the list of all clients, no matter in which editing tab you currently work
in.
b) By pressing ‘Add contacts’, you’ll be taken to a tab where you can add contacts.
c) Remove all contacts, as the name implies, will remove all contacts from the current list. So, in
the ‘email addresses’ field you have to enter emails you want to remove from your list, each in a
separate line. Then press unsubscribe.
d) Change columns allows you to edit the column order.
e) In the additional fields tab you can add additional database fields that will help you during client
segmentation.
1) Click on the name of the list; then choose additional fields.
2) Click on add a field and then choose the type of the field you want to add. For example,
if you want to know the client’s age or place of residence, choose a ‘text’ field and change its
value to age or location.
© 2011
Mailigen. www.mailigen.com
Back to Table of Contents
14
MAILIGEN
user manual for the Mailigen e-mail marketing platform
3) Specify whether or not the field will become a default (required) field. This is important as
this field will be used when you create sign-up forms. For example, the user will be unable to
register, if he doesn’t fill in the field you marked as required.
4) The button add a field will always allow you to create new fields that have to have names;
the names will be important during client segmentation.
5) When all the necessary fields are added, press Save.
2.1.2. Importing lists
You can import lists by selecting import list in the ‘My Contacts’ tab. A new window will open once
you click the link:
.
© 2011
Mailigen. www.mailigen.com
Back to Table of Contents
15
MAILIGEN
user manual for the Mailigen e-mail marketing platform
a) Choose ‘One-by-one’ if you want to add contacts individually.
A tab will appear. In it, you’ll be able to choose the required list once again. Fill in the fields,
‘E-mail’, ‘Name’, ‘Surname’, and choose the email type – Plain Text or HTML.
Choose whether or not you want to send a confirmation letter to the client. This way the client will
only appear in your database once the willingness to participate in your list is confirmed. You can
edit the content of the letter by clicking ‘Confirmation Request Message’.
You can use this option no matter which way of adding contacts you choose.
b) Choose Copy & Paste if you need only a few select columns from an Excel file. Please note the
sorting of the rows and columns.
c) Choose Upload if you want to if you want to upload the data-base from a pre-made contact list
file. A file-uploading dialogue will open
d) Upload a file with the required entries pre-loaded
You can import the following file types: *.xls, *.xlsx, *.ods, *.csv and *.txt files with entries
divided with TAB.
The import function will allow you to fill in the remaining subscriber slots of your subscription
plan. Please keep in mind that you can only add as many subscribers as your plan currently
allows, except if you’re a user of the ‘Pay as You Go’ plan. You can view your current plan and the
remaining amount of contacts you can add in ‘Overview’.
If our system finds a duplicate e-mail that is already on your list, the e-mail can be updated
automatically if you check ‘Auto-update my existing list’.
This makes external database synchronizing a lot more convenient. However, please use this only for
lists you are sure have new information about current contacts, otherwise the update will commence
significantly slower. If you upload a database with more addresses than your plan currently allows, the emails
imported will be from the top, filling the available space.
1) When you have chosen a file, press ‘Continue’.
© 2011
Mailigen. www.mailigen.com
Back to Table of Contents
16
MAILIGEN
user manual for the Mailigen e-mail marketing platform
2) When the importing is completed, a window like this will pop up:
3) If any of these fields have no name, click ‘edit’ and enter the desired name(s) of the field. If the
data file has new fields, click ‘edit’ > New Column Name and enter a desired name for your new
column.
5) Check your list again thoroughly. If you notice any inconsistencies and/or errors, use ‘cancel and
re-upload list’.
6) If the list looks OK, press ‘all done’.
© 2011
Mailigen. www.mailigen.com
Back to Table of Contents
17
MAILIGEN
user manual for the Mailigen e-mail marketing platform
If you haven’t filled all the necessary fields, an error window will pop up:
If the clients have opted to receive email from you, check ‘I certify that these email addresses
have opted-in and gave me permission to send them emails.’
2.1.3. Exporting your list
1) In the ‘My Contacts’ tab, select the list you want to export.
2) When you open the list, choose which users to export (active, inactive, unsubscribed, bounced).
When you’ve chosen the users, press ‘export list’ in the right side of the page. If you want to export
all contacts, press ‘view all’, and then press ‘export list’ under the name of the list.
You can currently export your list to the *.XLS format.
2.1.4. Editing your contacts
1) Find the list you want to edit in ‘My Contacts’ and press on it.
2) Click ‘Edit’
respectively right from the contact you want to edit.
.
3) Select the information you want to change about the particular client.
© 2011
Mailigen. www.mailigen.com
Back to Table of Contents
18
MAILIGEN
user manual for the Mailigen e-mail marketing platform
4) Press ‘Save’. You will be sent to the ‘profile’ of the respective user. You will be able to view the
current status of the user; his join date; and his IP address.
5) To view the complete list once again, select ‘view all’.
.
2.1.5. Searching for list members
When you open the ‘My Contacts’ tab, you can search for users in the text box on the right. For
example, you can search for information in the list fields of the users: name, surname, address,
phone number, etc. Discover more about list database fields in 2.1.1.
2.2. Segmentation
Our fully-automated system was carefully planned so that you can thoroughly plan your marketing
activities and have a huge database while at the same time having the opportunity to segment your
clients via different criteria.
Client Segmentation
© 2011
Mailigen. www.mailigen.com
Back to Table of Contents
19
MAILIGEN
user manual for the Mailigen e-mail marketing platform
Open the necessary list and select ‘Segments’ from the top menu.
a
Use the options you need; ‘match any rule (OR)’ or ‘match all rules (AND)’.
Select the contacts you want to segment: by name; surname; or date added, which is; is not;
contains; does not contain; starts with; ends with; is greater than; or is less than, and write the
filter rule in the textbox.
Example. If your contact list sorts clients by name, surname, age, e-mail, age, sex, etc, an example client
could look like this: client John Doe is 34 years old, his e-mail address is: [email protected], he lives in
Kansas City, Missouri, and was added to your contacts in 02.02.2002.
John Doe looks something like this in your contact list:
John Doe ‘ M ‘ [email protected] ‘ 34 ‘ Kansas City, Missouri ‘ 02.02.2002.
© 2011
Mailigen. www.mailigen.com
Back to Table of Contents
20
MAILIGEN
user manual for the Mailigen e-mail marketing platform
You can filter your clients extensively: e.g. name starts with J, or ends with N; e-mail ends with
gmail.com; contains ‘Missouri’; et cetera.
If you filter clients by age, you can put these clients in segments by adding the rule: ‘is greater
than’, for example, 29 years, but ‘is less than’, for example, 35 years. You can add such rules
ad infinitum. You can edit the segment later on by pressing ‘add members’ when you view the
segment. You can also add or remove rules to automatically expand the segment.
You can add the created segment to your recipients in the Email campaign creation steps 2 and 5;
you can also export the segment. Discover more about sending email campaign sending in 3.5.
2.3. Managing Sign-Up Forms
You can effectively attract new subscribers and expand your mailing list with the help of sign-up
forms. Sign up forms are fully automated if you use the service provided by MAILIGEN.
To make a new sign-up form, which will be linked to a list you specify, click ‘sign up forms’ in the
‘My Contacts’ tab, or select ‘sign-up form’ near the list you want to control.
© 2011
Mailigen. www.mailigen.com
Back to Table of Contents
21
MAILIGEN
user manual for the Mailigen e-mail marketing platform
A window like this will appear when you select ‘Sign-up forms’:
.
1) Choose the list you want to use your new sign-up form with, and press ‘sign-up form’.
2) Enter the desired text (it will be visible in your homepage) in ‘Form Title’. Preferably use
something informative, for example, ‘weekly newsletter’.
3) Add an informative text in the ‘Form Description’ category. This text will remind your users where
they subscribed to your list, so it should mention your homepage or products. For example, ‘News of
homepage.com’ would be a good start.
4) Name the confirmation button (e.g. ‘Subscribe now!’), and mark the checkbox below if you want
other users to see the amount of subscribers.
5) Apply the width of the form. The width can be changed according to its placement in the
homepage. You can also change the color of every component of the form.
You can change the color of the following elements: border; form title; header; text; inner
background; and outer background.
© 2011
Mailigen. www.mailigen.com
Back to Table of Contents
22
MAILIGEN
user manual for the Mailigen e-mail marketing platform
6) You can add ‘required’ fields to a sign-up form when creating it. You can add every existing field,
or choose the fields you want to be filled when a user registers. To do that, press ‘edit required
fields’.
7) There are two ways which you can go from here:
• Create a link to the form – you can place the link in your homepage; e-mails; etc.
• Create an embed code which, not unlike those of YouTube, can be embedded within
your homepage through HTML code.
If you choose to link the form, the client needs to click the link; it makes it more flexible as the link
can even be posted in forums. If you choose to embed the code, however, you can easily import
it into your homepage and external pages you have access to. Or, alternatively, you can opt to use
both ways.
Once a user has filled in the sign-up form, he’ll receive a confirmation letter with a confirmation link
in it. If the user clicks this link, he’ll be added to the list of active subscribers.
If the confirmation letter has been sent, but the client hasn’t clicked the confirmation link, he’ll be
added to the list of inactive subscribers.
An example sign-up form:
.
IMPORTANT * Remember to save changes before logging out!
© 2011
Mailigen. www.mailigen.com
Back to Table of Contents
23
MAILIGEN
user manual for the Mailigen e-mail marketing platform
3. MAKING E-MAIL CAMPAIGNS
You only need to go through five simple steps to create a brand new e-mail campaign with Mailigen.
You can view your past campaigns and information about them in ‘Email Campaigns’. Once you’re
there, select ‘Create New Campaign’ to create a new e-mail campaign.
3.1. Step 1 - Preferences
.
1) Enter the name desired. The name should probably be easily recognizable.
2) Enter the title of the e-mails.
3) ‘Message From’ – this will show up at the ‘From’ field in the recipient’s e-mails. Use easily
recognizable names here, for example, the name of your company.
4) ‘Reply Address’ – if the subscribers answer your e-mails, they will be sent to this e-mail address.
You will be able to change this field later on.
© 2011
Mailigen. www.mailigen.com
Back to Table of Contents
24
MAILIGEN
user manual for the Mailigen e-mail marketing platform
5) Check the options you think you’ll need:
• Personalize the “To:” field – the recipient’s e-mail address will show up as his name. This
significantly improves the click-through rate of the sent e-mails.
• Track opens – reports are made from the data gathered here; we suggest you leave this field
intact.
• Track HTML clicks – If this is checked, you can see who exactly, and when exactly, has
opened links in the e-mail.
• Track plain-text clicks. – If this is checked, clicks from plain-text e-mails are tracked, too.
Keep in mind, though, that a tracking link looks somewhat like this - http://list.mailigen.
com/track/click?u=757b50590ee5293&id
6) Choose between sending HTML & Plain Text or Plain Text e-mails.
• HTML & Plain Text e-mails can be enhanced with images, stylized text, hyperlinks, and
actually is proved to give more results than plain text e-mails.
• If you opt to use plain text e-mails, you won’t be able to insert pictures and text styles.
You can read about more about the pros & cons of each e-mail sending method in our blog, where a
detailed post about it is up.
7) When all the necessary fields are filled, press ‘Next’.
3.2. Step 2 - Select Recipients
In this category you can select the recipients. You can choose to send e-mails to users that are in
© 2011
Mailigen. www.mailigen.com
Back to Table of Contents
25
MAILIGEN
user manual for the Mailigen e-mail marketing platform
any list or segment you’ve created earlier.
See ‘Working with your lists’ if you want to know how to create lists, segments, etc.
Mark the segments or lists you want to direct your campaign to and press ‘NEXT’ when you’re done.
3.3. Step 3 – Choose Design
If you opted to send HTML and plain text e-mails in step 1, these options will be visible: Blank
layouts; Browse Templates; Import from URL; My Templates.
Each of these options is pretty needed.
a) In ‘Blank Layouts’ you can choose from the four most commonly used HTML e-mail templates.
You can choose from the following: Blank text page; Basic; Left Column; and Right Column. You can
edit the layouts yourself if you have the necessary HTML knowledge.
b) Mailigen offer pre-ready templates, too. You can view the available templates in ‘Browse
Templates’. New templates are added on a regular basis, and, more often than not, here you’ll find
a template that works for you. You can, of course, edit the pre-ready templates according to your
needs – you will be able to add the logo of your company, edit text and add hyperlinks, etc. The
templates we offer are ‘classical’ in e-mail marketing and have passed the test of time.
© 2011
Mailigen. www.mailigen.com
Back to Table of Contents
26
MAILIGEN
user manual for the Mailigen e-mail marketing platform
.
c) You can import templates from other URLs by entering the link to them in ‘Import from URL’.
d) You can view your previous e-mails in ‘My Templates’ if you have saved them during campaign
creation. This way you can use the same design all over again in your campaigns.
© 2011
Mailigen. www.mailigen.com
Back to Table of Contents
27
MAILIGEN
user manual for the Mailigen e-mail marketing platform
3.4. Step 4 - Create Newsletter
When you have selected a template, you will see the toolbar at the top – quite resembling those of
Word and other office applications. You can edit styles and work with hyperlinks and text via the
toolbar.
.
a) Check everything thoroughly – texts, hyperlinks, pictures – so you can move on.
It is important that you take notice of text styles. If you copy a text from Word, it would be wise to
select the text and remove formatting by pressing the icon below. After that you can add the desired
styles to the text. Different e-mail software echoes standard text differently, so the text needs not to
be left without a style.
If you have added pictures from your Mailigen gallery, don’t erase them until the campaign is
© 2011
Mailigen. www.mailigen.com
Back to Table of Contents
28
MAILIGEN
user manual for the Mailigen e-mail marketing platform
over. If they are erased from your gallery, they won’t appear in the e-mails the users receive. Each
user has default 10Mb of allocated space for pictures on our servers.
b) You can see the ‘Plain Text’ category above the toolbar. You have to make an alternative version
of the e-mail to be sent to clients that don’t support HTML e-mails (e.g. webmail users).
.
You should do good to make the e-mail interesting to read – not only will you have more fun writing
it; the readers will love it and you will profit if you make it interesting while staying true to your
business!
If you want to make the plain text e-mail identical to the HTML version, press ‘Import from HTML’,
if not, write a different text.
Please note the red separator line. It marks our recommended e-mail width – how it will be viewed
on the other side depends on the monitor, though.
c) ‘Attach File’ allows you to create e-mail attachments – you can attach documents, pictures, or
additional information such as file archives or price catalogues.
© 2011
Mailigen. www.mailigen.com
Back to Table of Contents
29
MAILIGEN
user manual for the Mailigen e-mail marketing platform
Supported file types: *.jpg; *.gif; *.png; *.doc; *.docx; *.pdf; *.xls; *.xlsx; *.pps; *.ppt;
Note that the maximum file size is 5Mb, and you can attach a maximum of 10 Mb in data.
d) When the letter is ready, you can check it by sending it to yourself as a ‘Test Message’.
e) We suggest you check the SpamScore of this letter. The SpamScore determines how likely your
letter is to be considered spam. You can read more about SpamScore in our blog.
When you click ‘SpamScore check’, a window like this will open:
.
If your message won’t be tagged as spam, it will appear green.
Please note that SpamScore is provided by SpamAssassin. SpamAssassin is served by Apache
Software Foundation, and Mailigen don’t offer user support.
If you have any questions regarding the results and test methods of SpamAssassin, you can seek
support in the official homepage of SpamAssassin: http://spamassassin.apache.org/
© 2011
Mailigen. www.mailigen.com
Back to Table of Contents
30
MAILIGEN
user manual for the Mailigen e-mail marketing platform
f) To save the template, press “save to ‘my templates’”.
3.5. Step 5 - Confirm Details & Send It
Please double check everything. Check the basic e-mail campaign info, the contact list and the
number of recipients. You can send the e-mail right away or, alternatively, send it at a later date
&time you set.
IMPORTANT! You can close the campaign at every time; you don’t have to do all of the steps at
once. The campaign will be automatically saved as a rough copy. You will be able to find them in
the ‘All Campaigns’ tab later on.
© 2011
Mailigen. www.mailigen.com
Back to Table of Contents
31
MAILIGEN
user manual for the Mailigen e-mail marketing platform
4. REPORTS & STATISTICS
The key to modern marketing is getting precise statistics on what your clients do, and why they do
what they do. Our Reports & Statistics system will let you monitor how many of your sent e-mails
are received, opened, or bounced; how many clicks your e-mails generate, how many people
subscribe and unsubscribe, et cetera.
You can view the statistics in ‘Reports & Statistics’ where you can choose a campaign and view its
statistics. You have two ways to go from here: you can either view statistic graphs resembling those
of PowerPoint, or you can export the statistics to an Excel spreadsheet. You can export *.pdf reports
by opening the campaign.
If you selected ‘view’, you’ll see some categories of statistics. In each of these, you’ll be able to
choose the email campaign statistics of the campaign you want to inspect.
1) In the ‘overview’ panel the following information on campaigns is available:
•
•
•
•
•
•
•
Contact List;
Sending Time (how long it took to send the e-mails);
Sent To (address count);
Sent By (the sender address you selected);
Opened (how many times/unique open times);
Open Rate (in percent);
Bounced e-mails.
In the simple diagram on the right you can see the same information, (the count of opened,
unopened, and bounced e-mails), albeit in a diagram.
2) You can view additional information about opened e-mails in ‘Open Statistics’. This includes
information such as the IP addresses of openers, also when the e-mails were opened, etc. This
© 2011
Mailigen. www.mailigen.com
Back to Table of Contents
32
MAILIGEN
user manual for the Mailigen e-mail marketing platform
helps you understand your clients’ habits, and can help you to determine the hours and days when
your e-mails are more likely to be opened.
3) You can see the following in the ‘Link Statistics’ tab:
•
•
•
•
•
•
Total Click count;
Individual links that have been clicked;
Individual links that have been clicked;
Most Popular (you can view the most popular links here);
The Average Click (Per Email Open) count;
Click-through Rate in percent.
You can see which links were clicked and when in the chart below.
© 2011
Mailigen. www.mailigen.com
Back to Table of Contents
33
MAILIGEN
user manual for the Mailigen e-mail marketing platform
.
4) In ‘Bounce Statistics’ you can see detailed statistics on how many e-mails weren’t delivered or
had bounced during the campaign:
• Total Emails (The number of total sent e-mails);
• Total Bounces (The number of bounced e-mails);
• Total Blocked Bounces (The number of e-mails that were blocked in server filters as they
were considered spam);
• Total Soft Bounces (The number of bounced e-mails that will be sent again);
• Total Hard Bounces (These e-mail addresses no longer exist or are incorrect);
• Total Temporary Bounces (These e-mails were bounced temporarily and will be re-sent);
• Total Generic Bounces (These e-mails were not delivered);
• Bounce Rate (Total bounce rate (in percent)).
5) In ‘Unsubscribe Statistics’ you can see how many people have cancelled their subscriptions.
6) In ‘Forwarding Statistics’ you can see how many people have forwarded your emails.
© 2011
Mailigen. www.mailigen.com
Back to Table of Contents
34
MAILIGEN
user manual for the Mailigen e-mail marketing platform
5. AUTORESPONDERS
You can create auto responders for your e-mails. The e-mails will be automatically sent to your
clients, coworkers, potential clients, etc, at the time you specify in this category.
1) Open ‘Autoresponders’ and choose from the options: ‘Create New Autoresponder’ or ‘All
Autoresponders’.
2) You can choose distinct times, regularity or rules, which, when triggered, will send your
messages.
Select the sending interval: hour (s); day (s); week (s); month (s); year (s).
Choose the list you want to create auto responders for in ‘list’.
In ‘name’, please select the name of the campaign. It will only be visible to you, in the auto
responder list.
.
© 2011
Mailigen. www.mailigen.com
Back to Table of Contents
35
MAILIGEN
user manual for the Mailigen e-mail marketing platform
Enter the desired autoresponder name in the ‘Name’ field, it’ll be visible only to you in the list of all
autoresponders.
When you press ‘create’, you will be sent to ‘Create New Campaign’. Please see chapter three,
‘Making e-mail campaigns’, if you have any questions regarding campaign creation.
3) In ‘Autoresponders’ you can view all the previously created auto responders, as well as edit them
according to your needs. You can also see the status of each auto responder you created: Send
Settings, Lists, Sent, Opened, and Clicked.
a) You can view your auto responder if you press preview.
b) If you press ‘copy’, you can copy the selected auto responder and then edit it to fit other lists. You
can change the content and the sending time, which can make copying reasonable, as it is easier
than creating a new auto responder from scratch.
c) If you press ‘edit mail’, you can make changes in the auto responder’s email letter.
To edit a particular autoresponder, you have to pause it.
© 2011
Mailigen. www.mailigen.com
Back to Table of Contents
36
MAILIGEN
user manual for the Mailigen e-mail marketing platform
6. SURVEYS
Phone and direct interviews cannot make for a thorough and fast assessment of what people are
saying. Internet surveys, on the other hand, are committed in a more timely manner, cost less, have
their data processed more efficiently; the answers to internet surveys are generally truer, because
the answer is thought through.
Before creating a survey, brainstorm the topics of the survey, and throughly analyze the problems
present in your company; also determine the questions that, answered, will help your company
prosper.
Each survey should have at least one „open” question, which has no given answers, thus the
respondent can enter a free answer from which you can generate ideas.
Choose the desired respondents – men, women, or an age group.
Make the survey questions concrete, basic, and avoid extra words or lengthy sentences.
Avoid using ambiguous words in the surveys, for example, ‘often’, ‘rarely’, ‘sometimes’, ‘regularly’,
etc.
To open the survey tab, choose ‘Surveys’ in the main menu. The following window will appear:
You can choose ready-made templates which you can edit, copy, send, view, view survey results,
and create a new survey. To create a new survey, press ‘New Survey’.
© 2011
Mailigen. www.mailigen.com
Back to Table of Contents
37
MAILIGEN
user manual for the Mailigen e-mail marketing platform
6.1. Step 1 – Survey Templates
In this step you can make a survey from a survey template or create new ones.
6.2. Step 2 – Survey questions
6.2.1. Survey questions and parameters:
If you click ‘survey templates’, or go back, you’ll be redirected to the 1st step.
6.2.2. Save as New Survey Template:
This option will save the current survey in the first survey page, under ‘My Survey Templates’.
6.2.3. Your logo here:
This option allows you to upload your own image for the survey, and edit it.
6.2.4. Welcome page:
The welcome page houses the desired text with which you will address your respondents.
6.2.5. New block:
This option is for creating new questions.
When you press ‘New block’, the following window will appear when you click ‘Click here to add
question, text or collect additional data’:
a) Question text
Here you can write the desired question, and as well add a logo.
b) Answers
Here you can add as many answers you wish, and add images to the questions.
c) Options
© 2011
Mailigen. www.mailigen.com
Back to Table of Contents
38
MAILIGEN
user manual for the Mailigen e-mail marketing platform
• Question is required: Here you can specify whether answering the question is
mandatory.
• Add answer to contact info in database: Here you can choose whether the answer will
show up at the database next to the contact. This option requires additional actions –
choose the corresponding list and the field you want to save the answer in.
• ‘Other’ option. Respondents can add their own answers. If this option is selected, an
‘Other’ field will appear when filling in the survey. Here the respondents can supply their
own answers.
• Comment field. The respondent can leave a comment. This allows users to leave
comments on the survey, and leave a longer answer.
d) Change question type, add text or collect contact list data
The following window will appear when you select this option:
Here you can choose the desired type of your question.
•
•
•
•
•
•
Single answer: This option allows only one answer for the question.
Multiple answers: This option allows multiple answers for the question.
Rate items: This option allows users to answer the question with a rating.
Free response: This option allows users to answer the question freely in text.
Rank items: This option allows users to prioritize the answers.
Contact form: This option adds sign-up fields to your survey. This option is required for
adding new subscribers through surveys.
• Comment block: This option enables the user to leave a comment.
© 2011
Mailigen. www.mailigen.com
Back to Table of Contents
39
MAILIGEN
user manual for the Mailigen e-mail marketing platform
6.2.6. Thank You Landing:
Here you can add a message for those who finished the survey, for example, ‘Thank you for your
time. Your feedback is greatly appreciated.’
6.2.7. Survey Options:
• Survey Title: This field houses the topic of the survey.
• Description: Here you can, for example, add the purpose of the survey. This field will not
be visible to the users.
• Survey Welcome Page: Here you can enable or disable the welcome page for this
survey.
• Redirect link: Here you can enter the landing page to which the user will be redirected
after completing the survey.
• Redirect after: Here you can enter the desired amount of time, in seconds, after which
the user will be redirected once the survey is complete.
• Survey available to: Here you can pick whether or not the survey will be available to
non-list participants.
When you’ve finished the survey, press ‘Next’ and you’ll be at the third step.
6.3. Step 3 - Survey Colors
6.3.1. Colors:
In the ‘Survey colors’ panel, you can change the color of the Title, Text, Question text, Answer Text,
Full background, Lines & Borders, Question background, Answers background.
To change a field’s color color, you simply have to click the corresponding color. A color selector will
appear. You can pick the desired color with the mouse button, and you have to click select once
you’ve chosen a color.
© 2011
Mailigen. www.mailigen.com
Back to Table of Contents
40
MAILIGEN
user manual for the Mailigen e-mail marketing platform
To leave the color picker, simply click on the page outside the picker.
6.3.2. Survey Fonts:
In this tab you can change the text style and size.
6.3.3. Width and paddings:
In this tab you can change the survey width, question and answer paddings, and the logo spacing
from bottom. Once you’re finished with the design, click ‘Next’ and you’ll land at STEP 4.
6.4. Step 4 - Distribute
Before you send a survey, you have to activate it.
Once a survey has become active, you have a number of options.
Send postcard invitation
When you click this field, you’ll be redirected to a page where you can pick the desired contacts/
segments to which you’ll send the survey.
Select a number of contacts, and press Next to be redirected to a page where you can edit your
survey template.
The respondent will have to click the link to fill your survey.
By default, the link will be labeled, ‘Take the survey’, but you can change it, or create a new link.
To do it, click the text, ‘Take the survey’, and click the hyperlink editor in the text editor (an infinity
symbol). The following window will open:
The link address, in this case, is #[SURVEY:ID]#. To create a new link on text or images, select the
text or image in the text editor, click the hyperlink editor once again, and the same window will
appear. Simply paste #[SURVEY:ID]# in the Link URL, and press ‘Update’.
When you’ve finished editing the survey template, you have to enter the ‘Campaign Title’, which
can simply be the topic of your survey.
© 2011
Mailigen. www.mailigen.com
Back to Table of Contents
41
MAILIGEN
user manual for the Mailigen e-mail marketing platform
In the Message subject field, you should enter the topic your respondents will see when they haven’t
opened the email yet.
In the Message From field, enter your name and surname, which the client will see when he
receives the campaign.
In the reply address field you should enter your email, to which the respondents will be able to
reply.
Check the desired options
Track HTML Clicks – this will allow you to see exactly which respondent has clicked through the
links, and when.
Track opens – this field is quite important for the statistics, and should be left checked.
Track plain-text clicks – if this field is checked, all of the links in your email will be tracked.
When you’ve finished your work with the survey template, press ‘Send’.
Email campaign invitation
If you choose this option, you will be redirected to the campaign creation tab. See page 24 for more
information on Email campaign creation.
To add the survey to the Email campaign, you have to choose the survey you created in the Choose
Design tab.
• Close survey: This option will lock your survey for the time being, but if you want to
activate and distribute it later, you’ll have to copy it. It can be done in the survey front
page.
• Send test invitation: Pressing this will send a test survey to the email address of your
profile.
• Survey questions and properties: This option will land you back to the second step of
the survey creation process, so you can edit your questions and answers once more.
• Survey colors: This option will land you at the third step of the survey creation process.
• My new survey: Here you can see the link of the survey. If you follow the link, you’ll be
© 2011
Mailigen. www.mailigen.com
Back to Table of Contents
42
MAILIGEN
user manual for the Mailigen e-mail marketing platform
able to see your new survey. You can also answer the questions, to which the results will
be added anonymously. However, if you choose ‘Mailing list only’ at the second step’s
Survey Options / Survey available to, an anonymous user won’t be able to take the
survey.
• Embed survey into your website. Below the text you can see the HTML code, which you
can paste to insert the survey into your homepage.
After sending a survey, you can view the report data by pressing ‘Survey Results’ in the ‘All
Surveys’ tab:
Choose the survey you want to view, and a report window will appear:
Here you can see the individual statistics of the campaign: the creation date of the survey; when
was it sent; how many respondents have answered; and so forth.
• When you choose to view the individual statistics, the Respondent list and results
window will pop up. Here you’ll be able to choose which respondent answers you want
to see (All, Registered, and Anonymous). To see the answers of a particular respondent,
press ‘view results’ at the particular respondent.
• When you click on the letter itself, you can see how many users have received the
survey, how many of them have completed it, how many answers there have been to
each question, and the relevancy of answers in per cents.
© 2011
Mailigen. www.mailigen.com
Back to Table of Contents
43
MAILIGEN
user manual for the Mailigen e-mail marketing platform
7. TINYMCE Editor
7.1. Introduction
TinyMCE is a browser-based editor control, which houses Javascript, HTML, and WYSIWYG editors.
TinyMCE will aid in creating HTML-based content for your homepages. It is supported by numerous
operating systems and web browsers, for example, Mozilla Firefox, Internet Explorer, Opera, Safari,
and Chrome.
7.2. The basics
The default TinyMCE editor looks like this:
Taskbar
The following table explains the features and functions of each item found in the taskbar.
ICON
FUNCTIONS
DESCRIPTION
EXAMPLE
Save
Saves current changes
Text style
management
Allows you to use different text
styles
text
Bold
Style the selected text bold
text
© 2011
Mailigen. www.mailigen.com
Back to Table of Contents
44
MAILIGEN
ICON
user manual for the Mailigen e-mail marketing platform
FUNCTIONS
DESCRIPTION
EXAMPLE
Italic
Style the selected text italic
text
Align left
Aligns the selected text to the left
text
Center
Centers the selected txt
Align right
Aligns the selected text to the right
Justify
Justifies the selected text
Unordered list
text
text
text
Creates an unordered list
•
item 1
•
item 2
•
item 3
1. item 1
Numbered list
Creates a numbered list
2. item 2
3. item 3
© 2011
Decrease indent
Decreases indent from the left
Increase indent
Increases indent from the left
Create table
Creates a new table
Table row properties
Changes table row properties
Table cell properties
Changes table cell properties
Insert row before
Inserts a new row at the top of the
selected row
Insert row after
Inserts a new row at the bottom of
the selected row
Delete row
Deletes the selected row
Insert column before
Inserts a column before the selected
column
Insert column after
Inserts a column after the selected
column
Delete column
Deletes the selected column
Split merged table
cells
Splits merged table cells
Merge cells
Merges the selected cells
Mailigen. www.mailigen.com
Back to Table of Contents
45
MAILIGEN
ICON
user manual for the Mailigen e-mail marketing platform
FUNCTIONS
DESCRIPTION
EXAMPLE
Insert hyperlink
Inserts or edits the hyperlink
text
Remove hyperlink
Removes the selected hyperlink
text
Insert/edit anchor
Inserts/edits anchor
Insert picture
Inserts or edits a picture
HTML
Edit HTML code
Full view
A fuller editor will appear
7.3. Inserting pictures
Here you can read how to insert a picture with the TinyMCE editor.
To start, choose the
button on the taskbar:
The following window will appear upon clicking this icon:
Three columns are available to you:
© 2011
Mailigen. www.mailigen.com
Back to Table of Contents
46
MAILIGEN
user manual for the Mailigen e-mail marketing platform
• The first column – General; here you’ll be able to upload the picture, enter its description
and name it.
• The second column - Appearance. Here you can change the properties of the picture, its
alignment, size, and style.
• The third column – Advanced. Here you can insert advanced functions on events.
The maximum size of a picture is 1 Mb.
After uploading, the picture will be saved in your Mailigen account. Afterwards, you can edit, erase,
and re-name the picture. If you opt to edit the picture, a window where you can edit the picture will
appear. In the editor, you can crop the details of the picture, change its size, re-name it, mark and
save it.
7.4. Inserting and editing hyperlinks
When you press the Insert Hyperlink button, a window with 4 tabs will appear:
• In the GENERAL tab you can add the desired address, name, and specify the class,
anchor, or target of the hyperlink.
• In the POPUP tab you can add pop-ups and change their properties for the hyperlink.
• In the EVENTS tab you can add events to the hyperlink.
• In the ADVANCED tab you can add advanced properties to the hyperlink.
ANCHORS
Anchors are like headings in Word documents – you can link to them. An anchor is a piece of
marked hypertext. If a hyperlink points to an anchor, the user is redirected to the respective part of
the page. This function is particularly useful for bigger documents.
First of all, create a document with headings and cross-headings:
© 2011
Mailigen. www.mailigen.com
Back to Table of Contents
47
MAILIGEN
user manual for the Mailigen e-mail marketing platform
To create an anchor to each cross-heading, move the mouse cursor to the start of each line you
want to link, and press Insert/edit anchor. Then, enter the desired name of the anchor link.
Afterwards, select the text you want to turn into a link, and press Insert/edit hyperlink.
And simply choose the anchor you want to link to, in the General tab.
7.5. Adding and editing styles
To edit or add a CSS style, press the following button:
The following window will appear:
© 2011
Mailigen. www.mailigen.com
Back to Table of Contents
48
MAILIGEN
user manual for the Mailigen e-mail marketing platform
With it you’ll be able to edit the text style, size, font, change its alignment, and line height. You
can edit the color of the whole page, or change the color of the selected field. You can also insert a
background picture in the page, change the position and size of each field.
© 2011
Mailigen. www.mailigen.com
Back to Table of Contents
49
MAILIGEN
user manual for the Mailigen e-mail marketing platform
About Mailigen
Mailigen is an e-mail marketing management system that provides high-end services for all sorts of
companies and individuals. Mailigen is an easy-to-use and powerful tool to enhance communication
with your existing and potential clients. Mailigen allows using contemporary tools such as
e-mail personalizing, list management and segmentation, e-mail auto responders; Mailigen offer
contemporary e-mail designs and sign-up forms.
Mailigen offer one of the best price/quality services in mailing list management. Mailigen also
provide numerous tutorials, tips and simply interesting materials on the topic – visit blog.mailigen.
com to read more.
E-mails sent by Mailigen automatically include everything necessary in order to comply with spam
laws, for example, the option to unsubscribe, and the sender’s contact information.
More information about Mailigen - www.mailigen.com
Mailigen support phone: +371 6749 1059 or e-mail: [email protected]
MAILIGEN
New Generation of
Email Marketing
If you need help with email templates or you wish to have your own unique email
design created, our createive team will be happy to help you. For more information
about email marketing best practices you can also contact us via details below.
Aspazijas blv. 30, Riga, LV-1050, Latvia
(+371) 67491059
[email protected]
© 2011
Mailigen. www.mailigen.com
Back to Table of Contents
50