1
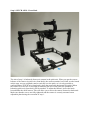
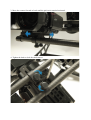
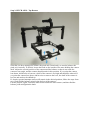
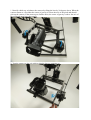
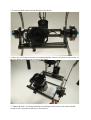
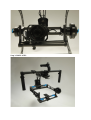
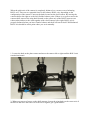
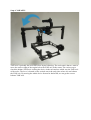
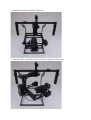
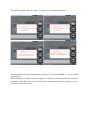
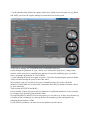
HOW TO USE THE SKY GLIDE - A GUIDE
1 Remove the stand from the box. Set on a flat surface. (In the version STR rack, turn the 5
elements).
2 Pull the unit SKY GLIDE and set it on a stand.
3 Turn the camera on a shelf at 90 degrees.
4 Attach the camera to the shelf and tighten the screw attached 1/4 "(photo no 4)
5 Balance the device.
BALANCING UNIT SKY GLIDE
The most important factor in achieving optimum device performance SKY GLIDE is when
balancing the device. For correct operation of the gimbal, it must be balanced neutral, ie the
camera placed on the base must remain in the position in which you set it "manually" without
power. The correct balance is necessary in the performance shots of the SKY GLIDE device,
which is subjected to extreme movements and accelerations (running, cycling, driving a
helicopter flight, etc.).
The device operates in three axes, which we have carefully weighed before turning and
possible changes in the software configuration of the Sky Glide.
We remind you that the camera must be fully configured with all accessories before fitting
and balancing the camera on the platform. Adding accessories (follow focus, receivers, etc.)
can cause the center of gravity, so they must be installed before the start of the balancing
process. Perfect balancing process is required, and any derogations are not permitted!
Omission of this process will result in unstable operation!
Step 1: PITCH AXIS - Front-Back
The aim of step 1 is balanced (front-rear) camera in the pitch axis. When you get the correct
balance of the camera in pitch axis (front-back), the camera remains level when we take hands
at this stage, not yet weighted camera vertically over the pitch, so it is only possible to
confirm balance PITCH axis (front-back), when the camera the horizontal axis pitch. When
the camera is set too low or too high in relation to the axis of the pitch, the problem of
balancing pitch axis (front-back) will be masked. To adjust the balance, loosen the knob
located under the shelf camera. This will allow you to move the camera forward or backward.
Make sure that the screws are fully tightened and the camera is securely mounted on an
adjustable plate during the execution of step 1.
1. Attach the camera to the adjustable plate.
2. Loosen the knob at the plate camera.
3. Move the camera forward or back until the pitch axis remains horizontal.
4. Tighten the knob to lock the shelf camera.
Step 2: PITCH AXIS - Top-Bottom
Now that you have managed to balance the pitch axis (front-back), we need to balance the
pitch axis vertically. To do this, loosen the knob on the outside of the arms holding the camera
shelf. Adjust the vertical position of the camera until the balance so that it can rotate the
camera to any angle, and the camera should remain in this position. If you point the camera
lens down, and he tries to lean on, a shelf of the camera is too high and should be reduced. If
you point the camera lens down, and he tries to return to the level, the shelf of the camera is
too low and needs to be shifted up.
If, despite repeated attempts camera will remain in the desired position, follow the steps from
step 1 and find the balance point for the shelves of the camera.
For this purpose, again, loosen the knob located under the shelf camera, and then find the
balance point and tighten the knob.
1. Identify which way to balance the camera by tilting the lens by 20 degrees down. When the
camera returns to a level that the center of gravity is below the axis of the pitch and should
pick up the camera. If the camera goes further down, the center of gravity is above the axis of
the pitch and must leave the camera.
2. Turn the camera on the axis pitch so that the lens are pointing up.
3. Loosen the knob on the outside shoulder of the device.
4. Move the shelf camera forward or backward until the camera is left alone in the position of
the lens facing upwards when we remove his hands.
5. Tighten the knob. Confirm good balance by tilting the shelf camera, the camera should
remain in the set position without user intervention.
Step 3: ROLL AXIS
When the pitch axis of the camera is completely balanced, we can move on to balancing
ROLL axis. There are two potential sites for the balance ROLL axis, depending on the
configuration of the camera. Unscrew the knob located on the shelf camera. By moving the
camera shelf to the right or to the left, find the balance point. If there is no space to move the
camera shelf, unscrew the wing knob located on the center axis of the ROLL between two
carbon tubes and move the arms together with a shelf camera left or right. ROLL axis is
properly balanced when you have found a balance and shelf will not tilt itself. Well balanced
ROLL axis should be at this point where you set it manually.
1. Loosen the knob at the plate camera and move the camera left or right until the ROLL axis
remains horizontal.
2. When you run out of space on the shelf cameras, loosen the wing knob on the center axis of
the ROLL and move the entire set to the left or right to get a good balance.
3. Confirm good balance by tilting arms ROLL axis machine and make sure the axis will
maintain a certain angle without user intervention.
Step 4: YAW AXIS
YAW axis is probably the most difficult to depict balancing. The end result is that we want to
move the entire weight of the engine below the YAW axis to the center. The easiest way to
check the balance YAW axis is tilting the device in the rack and see which way the YAW axis
of the rocks. The lever is located on the vertical arm is the only place where we can balance
the YAW axis. By moving the whole device forward or backward, we can get the correct
balance YAW axis.
1. Install the unit and turn off Sky Glide rack.
2. Align Sky Glide so that the lens are in the left or right side of the rack.
3. Using the handle, tilt the device Sky Glide a few steps down and watch which way the
YAW axis rotates.
4. If the lens are pointing down, it means that Sky Glide front is too heavy and you have to
move it back.
5. If the back of the unit points down, it means that Sky Glide rear is too heavy and you need
to move it forward.
6. Release the eccentric clamp placed on the tubes.
7. Slide the gimbal in the direction indicated in steps 4 and 5.
8. Tighten the clamp eccentric.
9. Confirm that the camera does not sway to the left or right while tilting the device Sky
Glide. That is the right balance of YAW axis
Attach the battery
Attach a charged battery in the battery holder or the device, depending on the version of the
device:
- With the tie / Velcro battery holder - connect the battery with power cord
- Open the cap tubes labeled "battery cap" and insert the batteries into the power cord so that
it protrudes on the inside
- Insert the power plug to plug "BATT." on the back of the housing pin voltage meter.
Properly hooked, the meter beeps and displays the status of the battery voltage. Gauge poses
in sequence voltage of the individual cells and the whole package. If the battery during
operation will discharge, the meter will beep, the voltage does not fall below 3V purposes.
Discharging the battery voltage below that leads to the irreversible destruction, you can not let
this happen! Discharged battery should be connected to the charger immediately! The
manufacturer is not responsible for damaged batteries from the user's fault.
Turn the unit on when Sky Glide is on a tripod. On / Off button located on the rear of the unit.
Sky Glide is ready for action.
Charging the battery
Depending on the version held and battery charger for charging proceed
a)
1 Connect the charger with the power cord into a 230V socket
2 Attach the battery via a suitable adapter and connector 5 pin. Insert cables into the
corresponding slot in the charger (4 cells).
3 Select the program LiPo Balance charge. Charging current: 1.5 A and a type of battery: 14.8
V (4S).
4 Confirm the settings by holding down the START button.
Charging the battery takes about 3 hours. Charger confirms when the charging beeps and there
is a message on the display.
b)
1 Connect the charger to the socket 230
2 Connect 2 batteries by 3 socket outlets in the charger
3 Charging process is automatic red LED means charging - green LED means that the
charging is completed.
Modes of operation
SKY GLIDE device can operate in the following modes:
1 shelf stabilization mode (the camera keeps the 2-axis pitch and roll and yaw axis follows)
2 follow mode (the camera follows the movements of the operator)
3 RC remote mode
Sky Glide STR version does not have a joystick control.
SKY GLIDE PRO version and CINEMA works by default in the stabilization of the shelf.
Button to change the machine's "PROFILE" is located next to the inclusive "POWER".
To change the mode, press the button as many times as indicated by the mode number above
example, when you press the three (3) times the unit enters remote control. The unit will beep
to confirm the mode change.
Programmed profiles:
Usage of button
1 click
2 clicks
3 clicks
4 clicks
5 clicks
Hold for 5 seconds
Effect
Shelf stabilize mode
Follow mode
Remote Control
Set tilt angles by hand
Calibration of gyroscope
Reset the device
Notes:
During calibration device SKY GLIDE should stand still on the stand.
When reset SKY GLIDE starts again after about 5 seconds (the time holding down the
button).
GUI:
Sky Glide device is pre-configured to work properly - if necessary after proper balancing
equipment, we can proceed to the configuration using the GUI supplied with the device on
USB Memory or you can download it from:
http://www.basecamelectronics.com/downloads/
For proper operation of the GUI the following are required JAVA and drivers that are on the
USB drive.
After connecting the USB cable to the device, run the software.
In the upper left corner, select the COM port assigned to the device and click CONNECT.
The main parameters of the configuration of the device are POWER of engines and PID
parameters.
The parameter gain (torque) and power which is supplied to the engine at all times, must be
sufficient to maintain a static or rotating. It should also be set so that the engine temperature
was below 65 ° Celsius, and so as not to "oscillation". You should note that too high values of
"the Force" will cause the engine not to have much torque and will simply overheat. You need
to find the correct value for the weight of the camera. Weighing equipment is very essential
for the proper operation of the controller.
The parameter "P"
It is the power, or rather the moment at which the motor is turning and the engine should be
sufficient to maintain the defined position (using the joystick or external control) or to return
to the reference (output) stabilized position. Larger gain value "P" means the stronger the
moment at which the motor will move (change position).
Parameter "I"
It is the engine speed. The higher the faster the motor reacts - rotates. But quick response is
the neutral point the need for immediate detention. Because of the large mass of the camera
and the device is a high inertia during rotation of the camera, too large a value of "I" may
suffer from the problem of stabilization. "I" must be so set reasonable and no more than is
necessary.
A perfect example for understanding the principle of selecting the set 'I' is the axis ROLL. The
return movement to the neutral position after a disturbance outside (eg executions of a finger)
should perform much slower than the pitch for small lightweight cameras. You should set the
"I" so that the camera weights out not too fast, but very uniformly and linearly and then
stopped after a microscopically soft bounce. (Low speed with low value "I" should reduce the
final reflection, but as a consequence of the engines will be very slow correct position before
reaching the set point stability, so you're losing time after the precipitation reaction of
stabilizing the external device. It should be noted that the rate of reaction of "I" for cameras
with a large mass is much lower than for adjustable light cameras, it is the difference in
inertia).
The parameter "D"
Reduces oscillation - bounce when the engine reaches the neutral point and exceeds it a bit
further than necessary. This parameter helps to reduce low-frequency oscillations. Too high a
value of "D" may cause high frequency oscillation - vibration device.
On MONITORING tab, we can observe the work of the gyroscope.
The following graphs show the work of a single axis for different parameters.
We already know the rules regulating the parameters P, I, D, and POWER - so we can start the
configuration.
When the battery is connected and the engines are turned on, this demonstrates the abnormal
parameters of the PID, however, not caring if have weighted out the device properly, we can
proceed to correct the settings.
1. In the Advanced tab, disable the engine control axes which are not currently set (eg, ROLL
and YAW), just leave the engine running for controlled axes such as pitch.
2. We correct settings P, I, D, POWER only for adjustable pitch axis.
Gently change the parameter P, I (up / down), save and test the finger force, change in the
position of the camera in a controlled axis and observe how the stabilizing goes (see charts
above) and make adjustments, P, I, D, POWER
3. After adjusting the pitch axis, again we point 1-2 this time by adjusting the turn axis ROLL,
YAW, each time turning the power of the other axles.
We configure each axis separately, the time for parallel testing. We need to check the
influence of individual axes at each other. Sometimes there may be mutual excitation caused
by poor balancing.
Turn on both axes PITCH and ROLL,
test set and the camera response to the precipitation of equilibrium and there occurs areaction
to a change of the position of the machine frame.
If cooperation ROLL and PITCH axis run properly, we can move on, if there are problems (eg
excitation of the oscillations) we must go back to the beginning of the configuration by
changing the parameters of PID
If you still have problems, zou then incorrectly balanced out the device.
BATTERY
Concerned about the safe use and care of the proper use of the potential of the package, please
kindly refer to the instruction manual.
If you have additional questions, please feel free to contact the retailer, who will answer any
question regarding the purchased package.
User manual
Before you begin, be sure to read this instruction manual. Improper use of lithium-polymer
pack can affect adverse effect on the capacity and characteristics of the battery current, in
extreme situations such as damage, overheat, ignite or exploxion!
Manufacturer and distributor are not liable for accidents caused by a different reason than
those mentioned in this document.
NOTE!
1) Do not attempt to modify or disarm the battery. This leads to irreversible damage to the
battery or can cause dangerous health effects (ignition, explosion)
2) Do not short between the two poles of the battery (+) and (-).
3) Do not transport or store the package in the vicinity of sharp, especially metal objects such
as knives, hair clips or pens. This may cause a short-circuit the two poles of the package,
which leads to irreversible damage to the package
4) Do not dispose of batteries in a fire, not warm, not exposed to very high or very low
temperatures (environmental conditions for the use and storage of packages later in this
document).
5) Do not dispose of batteries in water or other liquids.
6) Do not use or store the battery when it is exposed to high temperatures, such as the window
of the car, in the air in sunlight or close to heating appliances.
7) lithium-polymer battery is very sensitive to mechanical damage. It must therefore keep a
special effort to properly secure the package both during storage and during use. Do not drop,
puncture, throw, do not subject it to strong shocks. Damage to the battery in virtually every
case will result in irreversible damage to the package.
8) Do not pierce or not pierce, hit hard objects and stand on the package rate. Damage may
result in unforeseen dangerous side effects.
9) Always be sure to properly connect the terminals (+) and (-), in accordance with their
intended purpose - cable with positive polarity (red "+") should be connected to the positive
port on the controller and charger (also marked with "+")
10) Charged battery should be placed on a non-flammable, heat resistant and non-conductive
electrical material. It should also be removed from the vicinity of the package all flammable
materials such as paper or leaves. Rechargeable battery should ALWAYS be under the
supervision of the charge. Do not leave rechargeable batteries unattended, in the company of
children or people who do not know the rules of procedure of the lithium-polymer batteries.
11) Do not overcharge lithium polymer batteries above the value of 4.2 V per cell. Setting the
parameters of the charger that was loading above this value may result in irreversible damage
to the package.
12) Always use a proven, high-quality charger adapted to charge lithium polymer batteries.
Defective, or derived from a source chargers can cause a change in the electrical properties of
the package, or even, in extreme cases, irreversibly damage them. For help in choosing the
charger ask
the seller.
13) Do not discharge the battery below 2.9V per cell. Below this value, the battery will be
permanently damaged. To avoid this situation, always use a good quality, efficient regulators
and never leave the battery connected (in a closed circuit) to the controller or charger for a
long period of time (eg overnight). The best way to avoid this situation is to disconnect every
time the package whenever it is not used.
14) Do not connect the battery directly to 230V or 12V cigarette lighter output - it can cause
severe short-circuit and as a result in irreparable damage to the package.
15) Do not use the package to other uses than those described in this manual. Improper use
will result in immediate loss of warranty and likely damage or adverse change in the
parameters of the package.
16) If there was contact contained in the battery with the eyes, immediately rinse with clean
water and consult a physician. After contact with skin or clothing, the place should also be
flushed with clean water - otherwise it may cause local discoloration.
17) During charging, the package can not be located on the surface conductive.
Information on the use of the device:
1) Do not mix lithium batteries to operate on a single chip with cell Li-Pol different capacity,
another producer, another voltage or other type of batteries such as NiCd and NiMH batteries.
2) As soon as the charger will signal the end of the charging process, immediately disconnect
it from the charger. Do not leave it connected to a charger, even when the charging process is
completed.
3) Do not expose the battery to high temperatures, do not hold the battery near microwave
ovens, heating furnaces, heaters, gas stoves and other sources of heat or radiation.
4) If you see or feel a burning odor, change in color / shape of the battery, deformation or
excessive heat or any other signs which might give rise to doubts, immediately stop using the
battery and consult the service model shop where you purchased the given battery.
5) If the battery comes out liquid electrolyte or strong burning smell, immediately protect the
battery and remove it from any flammable materials.
6) Battery Operating Environment:
- When loading 0 <> 45 ° C
- During the discharge: -20 <> +60 ° C
- During storage over 30 days: -20 <> +50 degrees Celsius (in the state capacity of 50%)
7) Do not use or charge the battery when it is exposed to strong solar radiation or is in the
immediate vicinity of the highly heated objects.
8) Keep the battery and use it out of reach of children. Also, when working / loading /
unloading, make sure that no unauthorized is able to contact with the battery.
9) Battery pre-charged to 50% capacity. It is recommended to carry out a full cycle of
discharge and fully charge the battery before first use.
10) Do not touch the battery to water or other liquids in any form. The moist surface of cables
may result in inaccurate charging / discharging, and cells with prolonged contact with water
may be damaged or changed properties.
11) You should always carefully read and follow the instructions manual for the battery
charger.