1
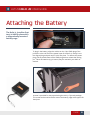
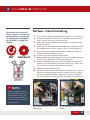
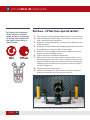
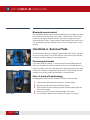
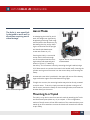
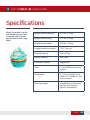
LETUS HELIX JR USER GUIDE
CONFIGURATION / GETTING STARTED
/ USING THE GUI / SHOOTING MODES /
SPECIFICATIONS
Table of Contents
Elements of the Helix Jr.�������������������������������������������������������������������3
Menu Button & Profiles��������������������������������������������������������������������5
Power Output Ports��������������������������������������������������������������������������6
Mounting the Camera����������������������������������������������������������������������7
Attaching the Battery�����������������������������������������������������������������������8
Balancing the Camera����������������������������������������������������������������������9
Roll Axis - Optical Centering������������������������������������������������������� 10
Roll Axis - Offset (non-optical center)���������������������������������������� 11
Pan Axis����������������������������������������������������������������������������������������� 12
Tilt Axis������������������������������������������������������������������������������������������ 13
Profile Selection and PID����������������������������������������������������������������14
Installing the GUI����������������������������������������������������������������������������15
GUI Installation����������������������������������������������������������������������������� 15
Installing the Virtual COM Port Driver (PC & Mac) ������������������ 16
Connecting the GUI�������������������������������������������������������������������������17
Connecting to a Mac�������������������������������������������������������������������� 17
Connecting to a PC����������������������������������������������������������������������� 18
Connecting to an Android device����������������������������������������������� 19
Adjusting PID Settings��������������������������������������������������������������������20
Shooting Modes�������������������������������������������������������������������������������21
Joystick Mode�������������������������������������������������������������������������������� 21
Second Operator Mode��������������������������������������������������������������� 22
Handheld vs. Suitcase Mode������������������������������������������������������ 23
Aerial Mode����������������������������������������������������������������������������������� 24
Mounting to a tripod ���������������������������������������������������������������� 24
Updating Firmware�������������������������������������������������������������������������25
Firmware Upgrade Procedure���������������������������������������������������� 25
Additional Resources����������������������������������������������������������������������27
Specifications����������������������������������������������������������������������������������28
LETUS HELIX JR USER GUIDE
Elements of the Helix Jr.
15
14
1
2
3
4
5
1.
2.
3.
4.
5.
6.
7.
8.
9.
10.
11.
12.
13.
14.
15.
Tilt motor
13
12
Right (tilt) handle
11
Tilt handle adjustment screw
Battery
Battery life indicator
Input power port
Expansion port
Joystick port
Pan motor
Serial number
USB port
Menu button
Left handle detachment screws (for flight mode)
Battery cage
Battery cage screw (for flight mode)
PAGE
3
10
9
8
7
6
LETUS HELIX JR USER GUIDE
16
17
18
19
9
23
22
16.
17.
18.
19.
20.
21.
22.
23.
21
20
Roll Motor
Additional power ports
¼” – 20 screw for attaching camera
Helix Jr. baseplate
Fore / Aft adjustment screw
Touch-and-Go dovetail plate
On-off switch
Helix Jr. on-board battery indicator
PAGE
4
LETUS HELIX JR USER GUIDE
Menu Button & Profiles
There are 5 profiles preloaded onto your Helix Jr.
when it is manufactured.
You can switch profiles by
clicking the Menu button a
specific number of times.
Here are the default profiles and corresponding clicks at the time of this
writing. Note that these Menu button assignments do change from time
to time as modifications in manufacturing warrant. The commands assigned to various clicks of the Menu button can be viewed and changed by
going to the “Service” tab in the SimpleBGC GUI.
Default Menu Button Functions
•
•
•
•
•
One click - Toggle motors ON and OFF
Two clicks - Profile 1 - Small camera (with/without joystick)
Three clicks - Profile 2 - Large camera (with/without joystick)
Four clicks - Profile 3 - Small camera RC with follow mode
Five clicks - Set tilt angles by hand (turns motor off for a few seconds
and allows the user to set the home position for the roll angle)
• Long press (5 seconds or until the second beep is heard) - Reset the
controller*
Accessing profiles 4 and 5 is done via the RC transmitter (Flaps/Gyro
switch on Spektrum DX8), since those are both profiles designed for RC
(second operator) use.
*Resetting the Helix is a good idea anytime the Helix goes into a confused
state. Resetting your controller will NOT erase your pre-loaded profiles.
The only way to erase a profile is to write a new profile over the old one
via the GUI.
PAGE
5
LETUS HELIX JR USER GUIDE
Power Output Ports
Two power ports are available on the Helix Jr. for
connection to provide
power for your camera or
accessories.
The ports are oriented in agreement with the U.S. standard, so that the
red dot is aligned with the positive pole on the port. It is critical that accessories with a different orientation for these poles (e.g. Teradek and
Paralinx accessories) not be plugged into these power ports without an
appropriate conversion to the U.S. standard. Failure to do this will cause
serious harm to your Helix Jr. and void your warranty.
Power Port Wiring Diagram
CAUTION
Helix Jr. uses U.S. Standard,
straight polarity in all power
connections. Do not mix reversed polarity accessories!
PAGE
6
LETUS HELIX JR USER GUIDE
Mounting the Camera
A baseplate is provided
with your Helix Jr. for
mounting your camera.
Default baseplate shown in
Figure 2 and Figure 3.
Alternate baseplates
The Helix Jr. baseplate is optimized
for use with most DSLR cameras.
If you are using a larger DSLR
or other camera, you may find
that you require a baseplate with
longer vertical rods or a baseplate
that extends further out from the
Helix. The Helix Jr. is designed to
accept other baseplates from the
normal Helix, and you may find
this necessary for these larger
cameras.
Track 1
Track 2
Track 3
Figure 2. Top view of Helix Jr. baseplate
Figure 3. Bottom of Helix Jr. baseplate
Use the included ¼” screw to attach your camera to the camera plate of
the Helix Jr. Insert the screw into the threaded end of one of the three
mounting holes and thread it all the way into the hole. Once fully inserted, the screw will turn freely and can be slid to the most appropriate
location on the mounting track.
Selecting screw location for mounting your camera
Installing the camera with the screw located in mounting track 1 or 3 will
allow your camera to be mounted such that the lens is optically centered.
This option is important if you plan to use the Helix with a joystick to do
continuous roll motion. Since most cameras have more weight either
to the left or to the right of the lens, additional balancing weights will be
needed to achieve proper balance.
Installing the camera with the screw located in the mounting track 2 will
allow your camera to be installed so that no balancing weights are needed. This does not have the advantage of optical centering, but in many
applications optical centering is not important, and the elimination of
balancing weights will be a real advantage.
PAGE
7
LETUS HELIX JR USER GUIDE
Attaching the Battery
The Helix Jr. JuiceBox (battery) is held in place with
a magnetically mounted
battery cage.
To plug in the battery, align the red dot on the 2 pin LEMO plug of the
Juice Box to the red dot on the power input of the Helix Jr. Gently insert
the aligned plug and push until it locks into place. To remove the power
plug, pull the metal sleeve of the LEMO plug back to release the locking
pin. Other 4S batteries (e.g. V-mount) may be used with your Helix as
desired.
A screw is provided for those purchasing the Helix Jr. fly mode package.
This screw can be used to further secure the battery cage at the upper left
hand post.
PAGE
8
LETUS HELIX JR USER GUIDE
Balancing the Camera
Balancing your camera well
is a critical part of setting
up the Helix Jr. Once practiced, the balancing process is quick and straightforward.
Pan
Roll
Tilt
Spend a good amount of time on this when you are first starting out so
that you understand the effects of a properly balanced setup. The better
your camera is balanced, the better the Helix Jr. will perform for you.
Decide whether optical centering is important
As discussed previsouly, the Helix Jr. is designed to allow optically centered use (when the center of the lens corresponds with the axis of rotation) or non-optically centered use.
QUICK TIP: Balancing is
much easier to understand
when you see someone
do it. We recommend you
visit LetusHelix.com and
watch the training videos on
balancing the Helix Jr.
PAGE
9
• Optically centered - This is desirable when you plan to do continuous
roll motion via joystick or RC unit, or if you want the option
to change lenses quickly, since optical centering allows a
lens change without rebalancing the roll axis. Optically
centering the camera generally requires using weights
as counterbalances. Use mounting tracks 1 or 3 for this
Centered
mode.
• Offset (No Optical Centering) – The Helix Jr. can also be used in a
non-optically centered manner. This method avoids using
counterweights, and should be considered the normal
mode of operation, due to its speed of balancing and lower
total weight. To use this mode, attach the camera using
mounting track #2.
Offset
LETUS HELIX JR USER GUIDE
Roll controls the horizon
of the camera. In centered
mode, balance is adjusted
by adding counterweights
to the Helix Jr. weight antennas.
Roll Axis - Optical Centering
1.
2.
3.
4.
5.
Roll
Centered
6.
7.
8.
9.
10.
Turn the motor off by pressing the Menu button if it is currently on.
Take the baseplate off of the Helix Jr. and mount the camera using
track 1 or track 3 per the instructions above.
Rotate the roll axis upside down, so that the 2-pin LEMO ports are
facing downward.
Rotate the mounted camera and baseplate upside down, and insert
the baseplate posts into the clamps on the roll axis (see Figure 4).
Rotate the roll axis upright so that the 2-pin LEMO ports and the
camera are both facing right side up.
Tighten at least one of the blue clamp screws.
While holding the pan axis steady with one hand, rotate the camera
on the roll axis, watching the end of the camera lens.
Adjust the baseplate posts up or down through the clamp until the
camera lens rotates smoothly along the optical center. When rotating, the end of the lens should not move up or down.
Retighten both blue clamp screws.
Attach the antennae (posts with weights and clamps) to one rod and
adjust the number of weights and their position on the rod. When
finished, you should be able to rotate the camera to any angle on
the roll axis and have it stay there after letting go of it (see Figure 5).
Use Track 1 or 3
NOTE
Optical centering on the roll
axis is optional. If you do not
need optical centering, we
recommend offset balancing
of the roll axis as outlined in
the next section.
Figure 4. Inserting baseplate rods into the
Figure 5. Adjusting weights on the antenna
clamps (step 4)
(step 10)
PAGE
10
LETUS HELIX JR USER GUIDE
Roll controls the horizon
of the camera. In offset
mode, balance is adjusted
by sliding the camera left
and right on the Helix Jr.
camera plate.
Roll Axis - Offset (non-optical center)
1.
2.
3.
4.
5.
Roll
Offset
6.
7.
8.
9.
Turn the motor off by pressing the Menu button if it is currently on.
Take the baseplate off of the Helix Jr. and mount the camera using
track 2 per the previous instructions.
Rotate the roll axis upside down, so that the 2-pin LEMO ports are
facing downward.
Rotate the mounted camera and baseplate upside down, and insert
the baseplate posts into the clamps on the roll axis.
Rotate the roll axis upright so that the 2-pin LEMO ports and the
camera are both facing right side up.
Tighten at least one of the blue clamp screws.
Allow the roll axis to spin freely to find its natural position. Then
adjust the baseplate posts up or down through the clamp until the
camera will naturally stay oriented with the camera facing directly
sideways (top of the camera pointing directly to either the right or
the left). See Figure 6.
Retighten both blue clamp screws.
Adjust the mounting screw within track 2 so that the camera will
rotate to any position on the roll axis and stay there
Use Track 2
Figure 6. Camera adjusted so that it stays oriented with camera sideways (step 7)
PAGE
11
LETUS HELIX JR USER GUIDE
Pan controls how the camera points left and right.
Balance is adjusted by sliding the camera fore and aft
on the Helix Jr. dovetail.
Pan Axis
1.
2.
Pan
3.
4.
Loosen the left tilt handle adjustment screw and remove the left
handle.
Balance the Helix Jr. on the left upright, with the right tilt handle on
top (see Figure 7).
a. If the camera lens tends to rise so that it ends up pointing upward, your Helix Jr. is back heavy, and you will need to slide it
forward. Set the camera right side up on the table, loosen the
two blue pan axis adjustment screws, and slide the camera
forward (numbers should get smaller on the pan axis slider).
Retighten the blue adjustment screws.
b. If the camera lens tends to fall, so that it ends up pointing
downward, your Helix Jr. is front heavy, and you will need to
slide it backward. Set the camera right side up on the table,
loosen the two blue pan axis adjustment screws, and slide the
camera backward (numbers should get larger on the pan axis
slider). Retighten the blue adjustment screws.
Continue doing this until the camera lens no longer has a tendency
to move upward or downward when the Helix Jr. is resting on the
left upright.
Replace the left handle and tighten the left tilt handle adjustment
screw.
Figure 7. Resting the Helix Jr. on the left upright to balance the pan axis (step 2)
PAGE
12
LETUS HELIX JR USER GUIDE
Tilt controls how the camera points up and down.
Balance is adjusted by
changing handle positions
up and down.
Tilt Axis
1.
2.
Tilt
3.
4.
Check the height of both tilt handles by looking at the numbered
markings on the side of the upright. Loosen one of the blue tilt
handle adjustment screws and adjust the height of the handle so
the height on both handles is the same.
Retighten the blue adjustment screws and pick up the Helix Jr. by
the handles. Using your right thumb along the inside of the tilt
motor, rotate the camera forward 30 degrees and then release the
motor with your thumb (see Figure 8).
a. If the Helix Jr. swings back and forth, tending to come to rest
with the base of the Helix Jr. facing downward, then your
Helix Jr. is bottom heavy. Loosen the tilt handle adjustment
screws and lower the handles slightly. Retighten the tilt
handle adjustment screws.
b. If the Helix Jr. has a tendency to fall forward or backward,
coming to rest upside down, then your Helix Jr. is top heavy.
Loosen the tilt handle adjustment screws and raise the
handles slightly. Retighten the tilt handle adjustment screws.
Check your work in step 2 by rocking the Helix Jr. backwards in the
same manner.
Sometimes in the process of balancing the tilt axis, it becomes apparent the pan axis needs further fine tuning. This will be evident
if the camera comes to a natural resting point with the camera lens
facing downward (front heavy), or upward (back heavy). Make any
adjustments in the pan axis balance as necessary.
Figure 8. Rotating the camera forward using a thumb on the inside of the tilt motor (step 2)
PAGE
13
LETUS HELIX JR USER GUIDE
Profile Selection & PID
PID adjustments are not
always necessary. The
default profiles on Helix Jr.
will work for most setups.
Once your camera is properly balanced, you will want to try it out to see
whether it will work well with one of the profiles pre-loaded onto the Helix
Jr., or whether it will need some slight adjustment to the PID settings. Ensure the battery is plugged into the input power port before starting.
If you are using a DSLR camera, press the Menu button twice to switch to
profile 1 on the Helix. If you are using a heavier camera, press the Menu
button three times to switch to profile 2 on the Helix. Then hit the menu
button once to turn the motors on (if they aren’t already on).
If your Helix Jr. is working perfectly, then you are ready to go. If there
is a bit of vibration or a wobbly feel, you may need to make some small
adjustments to the PID settings via the GUI software.
GUI installation is covered in the sections that follow. You can then
adjust your PID settings through the GUI. Instructions on how to
make PID adjustments can be found on page 20.
WHAT IS PID?
PID stands for proportional-integral-derivative controller. PID controllers are a control loop feedback mechanism used in industrial control
systems. A PID controller calculates an error value as the difference
between a measured variable and a desired setpoint. The controller
then attempts to minimize that error.
Don’t worry, you do not need to understand complex algorithm calculations to use the Helix Jr. The default profiles will work for most. Do
not become overwhelmed by all of the settings. Very few of them need
to be changed (if any). We have done all of the hard work for you.
PAGE
14
LETUS HELIX JR USER GUIDE
Installing the GUI
The SimpleBGC GUI, designed by BaseCam Electronics, is the graphical
user interface that allows
you to interact with the
Helix Jr.
The SimpleBGC GUI (BGC stands for Brushless Gimbal Controller), allows
you to customize settings used in operation of the Helix Jr. / Helix. These
settings enable the user to eliminate any residual vibration, change the
function of the menu button, switch between joystick and RC control,
change the follow speed, and adjust many other settings. A GUI application for Android devices (described below) is also available.
GUI Installation
The latest software and manual are located on the Letus Helix download
page at http://letushelix.com/helix-downloads/. Always download the latest version available on this site. Do NOT use GUI versions provided at
the BaseCam Electronics website, as they are likely to have mislabeled
axes in the GUI, because of the discrepancies between normal firmware
and the Helix (Jr.) firmware.
To install the GUI on PC (Windows) systems
1.
2.
3.
4.
Download the latest GUI application from LetusHelix.com.
Save the .zip file to a folder of your choice.
Extract the downloaded .zip file to a location of your choice.
Double click the “SimpleBGC_GUI.exe” file.
If you do not have Java installed, you may be prompted to install it. Clicking OK in response to this message should automatically lead to a web
page for downloading the Java Runtime Environment. If this does not
happen automatically, you can download Java Runtime Environment (JRE)
for free at www.java.com. Note that most computers will already have JRE
installed.
PAGE
15
LETUS HELIX JR USER GUIDE
To install the GUI on Mac (OS X) systems
1.
2.
3.
4.
Before connecting the Helix
Jr. via USB, be sure to first
install the Virtual COM Port
Driver from Silicon Labs.
Download the latest GUI application from the LetusHelix.com.
Unzip the file.
Double click the “SimpleBGC_GUI.jar” file. Due to the security protocols of OS X, one of two methods is required to run this unsigned
application. Either you must
a. Allow the computer to run all non-signed applications. This
will mean you can run the program normally, but your computer will have reduced security. To allow all unsigned applications to run, go to System Preferences > Security & Privacy >
General > allow application downloaded from : Anywhere, or
b. Use a special procedure to run the application each time.
This can be done by right clicking on the application, selecting
Open, and then selecting Open again at the prompt.
If the Mac alerts you to the need to install Java, download Java for
Mac and install it per the instructions given on the screen.
Installing the Virtual COM Port Driver
(PC & Mac)
In order for the GUI to work via USB cable on either PC or Mac, a virtual
COM port must be established. This requires a USB to UART bridge virtual
COM port driver, which can be downloaded from Silicon Labs at http://
www.silabs.com/products/mcu/pages/usbtouartbridgevcpdrivers.aspx.
Install the appropriate driver for your operating system before attempting to connect the computer to the Helix Jr. When connecting to
the Helix Jr. (covered in the next section), you will use the COM port that is
created by this driver.
PAGE
16
LETUS HELIX JR USER GUIDE
Connecting the GUI
Connecting via a Mac
Via USB
1.
2.
3.
4.
5.
6.
Connect the Helix Jr. to a USB port on your computer using a mini
USB cable.
Make sure you have installed the virtual COM port adapter (covered
in previous section).
Open the SimpleBGC GUI.
Choose the connection port in the dropdown menu in the top left
corner. The USB port will have the letters “SLAB” in the name.
Click Connect.
Move the Helix Jr. on any axis. If the graphics show movement, then
it is connected.
Via Bluetooth
In order to connect to and control your Helix Jr. from a Mac, it must have the
optional Bluetooth module installed.
1.
2.
3.
4.
5.
6.
7.
8.
9.
PAGE
17
Power on the Helix Jr.
Open your computer’s Bluetooth Assistant and turn on Bluetooth if
it is not already on.
Click on the Letus-Helix and hit the Continue or Pair button. If it
gives a “pairing failed” message, then click on the Options button
Enter Bluetooth Code: 7777
Wait for the connection to complete.
Open the BaseCam GUI software (*.jar file)
Choose the correct connection port in the drop down menu in the
top left corner. The Bluetooth port will have “tty” and “Letus-Helix”
in the name given in the connection box.
Click Connect.
Move the Helix Jr. on any axis. If the GUI interface dials show movement, then you are connected.
LETUS HELIX JR USER GUIDE
Connecting via a PC
Via USB
1.
2.
3.
4.
5.
6.
Connect the Helix Jr. to a USB port on your computer using a mini
USB cable.
The USB drivers should install automatically. If they do not, refer to
“Installing the Virtual COM Port Driver”.
Open the BaseCam software.
Choose the correct connection port in the drop down menu in the
top left corner (this can either be done by trial and error, or by looking at the Devices and Printers screen from the control panel to find
the COM port number).
Click Connect.
Move the Helix Jr. on any axis. If the dials show movement then you
are connected.
Via Bluetooth
In order to connect to and control your Helix from Windows, your Helix must
have the optional Bluetooth module installed. Your Windows computer must
also have Bluetooth capability.
*
Windows 8 users:
1.
2.
3.
4.
5.
6.
1) Use the search window to
find “Devices and Printers”
2) Click “Add a device”, select
the Letus Helix and hit “Next”
7.
8.
Open your computer’s Bluetooth Devices.
Click on Letus-Helix.
Enter Bluetooth Code: 7777
Wait for the connection to complete.
Open the SimpleBGC GUI software.
Choose the connection port in the drop down menu in the top left
corner (this can either be done by trial and error, or by looking at
the Devices and Printers screen from the control panel to find the
COM port number). “Letus-Helix” should show up under “Devices
and Printers”. Right click on this and select “Properties” and look for
the COM port.*
Click Connect.
Move the Helix Jr. on any axis. If the dials show movement you are
connected.
PAGE
18
LETUS HELIX JR USER GUIDE
Connecting via an Android device
Installing the BaseCam App
A GUI (Graphical User Interface) is also available for Android devices.
The free app, entitled “SimpleBGC Mobile,” can be downloaded from the
Google Play store.
An .apk file is also available at www.basecamelectronics.com. It provides
similar functionality to the SimpleBGC GUI provided for Windows and
OSX, but is missing a few features and has the ability to remotely control
the Helix Jr.
After installing the app, you can connect to and control your Helix Jr. from
an Android device by following the steps below.
Connecting Via Bluetooth
In order to connect to and control your Helix Jr. from an Android device, it
must have the optional Bluetooth module installed.
1.
2.
3.
4.
5.
6.
7.
8.
9.
10.
11.
12.
PAGE
19
Disconnecting and reconnecting the power on the Helix Jr. just before attempting to connect often helps in the connection process.
Make sure Bluetooth is enabled on your Android device
Open SimpleBGC Mobile on your Android device
Tap the three lines in the upper left
Tap on the white button next to “Connect”
The Helix Jr. should connect and request a passcode.
Enter Bluetooth code: 7777
Wait for the connection to complete
Tap the three lines icon again to collapse the menu
Tap on the dashed circle icon in the upper right
Move the Helix Jr. The dials should reflect this motion.
You are now connected and can use the App for control and setup
LETUS HELIX JR USER GUIDE
Adjusting PID Settings
PID tuning is the process of
determining the best P, I,
and D values for your camera (and accessories), so
that the Helix Jr. reacts to
motion smoothly.
If you change the overall weight or configuration of your setup significantly, you may need to retune your PID settings. The steps to adjusting your
PID settings are:
1.
2.
3.
4.
Guidelines
Experience at Letus has shown
that many cameras have minimal vibration when power is
set between 80 – 200, (with
smaller cameras using less
power), when D is between
60% and 150% of the P value,
and I is no greater than 0.1
(~.05 is often good). P values
may vary widely, but usually
tend to end up in the range
from 12 to 50. You may need
to play with your individual
system to see what works best
for your camera configuration.
5.
6.
7.
Connect to the GUI using Bluetooth or USB cable (Bluetooth is more
convenient if you have that option).
Turn the motors on by pressing the Menu button once (if motors
are not already on).
Pick up the Helix Jr. and try it out. If you get vibration, determine
which axis (pan, roll, or tilt) is vibrating. If it is not immediately obvious, you can touch each motor very gently to determine this.
Determine what
type of vibration
you have. Usually
this will fall into
one of two categories, either rapid
regular vibration
(i.e. buzzing), or a
slower, jittery vibration. The latter
is more common.
Change your P
and/or D setting in
Figure 10. Section of GUI used in PID tuning
the appropriate row (see Figure
10) to eliminate the vibration.
For buzzing (faster vibration), you must lower the D value by 3 or
4 units at a time and then hit the WRITE button on the GUI to communicate this change to the Helix Jr. Note: P and D often work well
in a certain ratio, so if lowering the D value causes jittery behavior, you
may need to lower the P value as well.
For jittery (slower) vibration, raise the D value 4 units at a time
until it goes away. Be sure to hit the WRITE button in the GUI after
each change in order to communicate these changes to the Helix Jr.
Note that P and D often work well in a certain ratio, so if raising the
D value causes buzzing, you may need to lower the P value, rather
than raising the D value.
PAGE
20
LETUS HELIX JR USER GUIDE
Shooting Modes
An optional analog joystick
is available for the Helix Jr.
Joystick Mode
The joystick can be used to control
any two axes of the Helix. By default, profile 1 and profile 2 are set
up to be able to use joystick input.
These profiles are set up so that up
and down motion on the joystick
(down = side on which cable is
attached) controls the roll axis and side to side motion on the joystick
controls the pan axis.
Using the joystick
1.
2.
3.
Plug the joystick into the joystick port on the back of the Helix Jr.
Choose a profile supporting joystick control (Profile 1 or 2 by default).
Move the joystick to control the Helix Jr. If it does not respond, try
toggling the motors on/off (depressing the Menu button once, pausing, then depressing it again).
Depressing the joystick knob has the same effect as pressing
the menu button. Be careful not to press it by accident.
Mounting the joystick
The joystick can be mounted to the top of either the right or left handle.
Attach to the handle with the included bracket and ¼” – 20 screw.
Adjusting joystick trim
On occasion, the joystick may require trimming. This will be evident by
very slow motion in the pan or roll axes when the joystick is connected
and the joystick is in the neutral position. Joystick trimming can be accomplished via the GUI. See the Helix GUI manual (RC tab section) for details.
PAGE
21
LETUS HELIX JR USER GUIDE
The Helix can be used as a
remote pan/tilt head and
controlled via an optional
plug-in joystick or via the
optional 2.4 GHz receiver.
Second Operator Mode
Setting up RC Mode
Supported transmitters
The Helix Jr. has an optional Spektrum 2.4 GHz RC receiver.
This receiver (model #AR6100e) is compatible with any of
the Spektrum brand air radios using DSM2 technology.
Binding the RC transmitter
1.
2.
3.
4.
5.
Bind plug inserted into joystick port (step 2)
6.
7.
NOTE: Occasionally the
Spektrum radio transmitter
will not give an indication of
being bound to the receiver
8.
9.
10.
11.
in the Helix Jr., so if you
have completed all steps
correctly, you should try out
the operation to see if it is
12.
13.
Disconnect all power from the Helix Jr. (including the USB cable).
Place the two wires of the supplied bind plug into the top and bottom pins of the joystick port (12 o’clock and 6 o’clock locations).
Plug in the battery power (you can turn off the motor if you wish)
Turn off the RC remote controller if it is on.
Get the antenna of the RC remote controller touching the right side
of the controller box (when binding, the signal working distance is
significantly shorter than during operation).
Press and hold the bind/train button BEFORE AND DURING AND
AFTER switching on the power on the RC remote controller
If you have the DX 6, 7, or 8, it should say “DSM2 1024”. This is your
indication that the Helix Jr. is bound. Let go of your bind/train button.
Disconnect power to the Helix Jr.
Remove the binding pin.
Connect power back to the Helix Jr.
Change to the RC profile of your choice. You can tell which profiles
use RC control in the GUI by going to the RC tab of the Helix GUI
(see Helix GUI manual for details).
You should be able to use the controller.
If the camera drifts left or right or if it rolls, use the trim buttons on
the remote controller to trim the drifting until it stops.
actually bound.
PAGE
22
LETUS HELIX JR USER GUIDE
Bluetooth remote control
The SimpleBGC Mobile app for Android (available in the Google Play store)
can be used to remotely control the Helix Jr. via Bluetooth. Control may
be done by tilting the Android device or by moving a finger across the
Android device’s screen. This provides a creative option for control, but is
not anticipated to provide sufficient control for most applications in filmmaking.
Handheld vs. Suitcase Mode
Suitcase mode is when you swing the right handle of the Helix Jr. upward
for use as a top handle. This can be done on the fly and is by far the easiest way to transition between low and high shots.
Positioning the handle
Handheld Mode
If you plan to use the Helix Jr. in suitcase mode for extended periods of
time, you may want to rotate the handle so that it is horizontal (when sitting on the table), so that it is parallel to the camera (oriented in the same
direction the camera is facing) when positioned as a top handle. This will
enable you to tilt the camera up and down in suitcase mode.
Helix Jr. hand-off methodology
Handing off the Helix to another operator is easiest in suitcase mode.
1.
2.
3.
Suitcase Mode
PAGE 23
4.
5.
Position the handle above the camera in suitcase mode.
Move your hand toward the back of the handle.
Pass the Helix to the secondary operator and have them grab the
front of the handle.
Remove your hand as they take the weight of the Helix.
The secondary operator can re-adjust their grip as necessary.
LETUS HELIX JR USER GUIDE
The Helix Jr. was specifically designed to work well in
situations requiring aerial
video footage.
Aerial Mode
In redesigning the Helix for aerial
work, the weight was significantly
dropped by producing it with magnesium (rather than aluminum), by
decreasing the size, and by allowing the removal of the left upright
and handle (the detachment
screws are shown on p. 3).
Securing the Helix Jr. to an aerial
carrier vehicle is done through
use of the optional aerial mountFigure 11. Helix Jr. with aerial mounting
ing bracket (sold separately and
bracket installed
shown in Figure 11). Attaching
the Helix Jr. to this bracket is done by removing the right handle (using a
3/16” Allen wrench to remove the screws in the handle itself), inserting the
cylinder coming out of the motor into the center clamp, and securing the
clamp.
A screw and screw hole is provided in the upper left corner of the battery
cage to allow the cage to be locked down during flight.
Helix Jr. aerial mounting bracket
If height is a concern, the mounting bracket may also be directly screwed
to the tilt motor. To do this, simply unscrew the cylinder coming out of
the tilt motor, remove the clamp on the mounting bracket, and screw the
bracket directly to the motor.
Mounting to a Tripod
The Helix Jr. may also be used in a two-axis mode by attaching the Touchand-Go dovetail plate (show on p. 4) to a tripod. In this configuration,
motion of the tilt motor will not effect motion of the camera and any commands by an RC transmitter to move the tilt axis will cause the tilt handle
to spin freely.
PAGE
24
LETUS HELIX JR USER GUIDE
Updating Firmware
The Helix Jr. is shipped with
the recommended firmware version. You should
not need to update your
firmware when you first
receive it.
The firmware (software residing on the Helix Jr. itself) should match the
version of the GUI software. The GUI version is printed on the top border
of the GUI window, while the firmware version is printed slightly below
that, and only shows up after connecting the Helix Jr.
You should be using the latest version of the GUI available via the Downloads tab at letushelix.com, and match your firmware version to that. Do
not download newer firmware unless a matching GUI is available, as it has
not been properly tested by Letus.
Firmware Upgrade Procedure
1.
2.
3.
4.
5.
6.
Attention Mac Users
Testing of this firmware upgrade
process has yielded success with
newer versions of Mac OS X (e.g. OS
10.8 and newer), but unsuccessful
attempts with older versions (e.g.
OS 10.7 and older). Note that a
USB cable should always be used
when upgrading firmware from a
Mac (and preferably when using a
PC compatible computer). Once the
firmware is upgraded, there is no
problem using the GUI on a Mac.
PAGE 25
7.
8.
9.
Open the GUI and connect to the Helix Jr. via USB cable. Make sure
the connection is working properly (dials move when you physically
rotate an axis by hand).
Go to the Upgrade tab
Make sure your GUI is displaying the Automatic tab within the Upgrade tab
Click the CHECK button.
You should get a message telling you that a new firmware version is
available for download. Click the “Go to upgrade…” button.
Using the “Upgrade to version” dropdown menu, select a version
labeled with the phrase ***Special version for Letus gimbals***
at the top of the informational window. If the version does not say
“***Special version for Letus gimbals***” in the informational box,
then upgrading to that version will cause your Helix Jr. to malfunction.
Click the UPGRADE! button.
Check the box agreeing to the license terms and click “OKAY”.
After about 15 – 45 seconds you should receive a message saying
that the firmware has updated successfully. Click OK to acknowledge the message.
LETUS HELIX JR USER GUIDE
Figure 9. GUI with Upgrade Options Shown
If you receive an error that includes the words, “CreateProcess error = 14001,”
it usually means that required libraries are missing on your computer. You
will need to install the Microsoft Visual C++ 2008 x86 redistributable. You can
find it at http://www.microsoft.com/en-us/download/details.aspx?id=5582 and
install it if your computer does not already have it installed.
PAGE
26
LETUS HELIX JR USER GUIDE
Additional Resources
We want to make sure you
are fully equipped to use
and understand your Helix
Jr. We are always here to
help!
If you are unable to find the answers to your questions here, or your
questions are oriented to other aspects of Helix Jr. use (e.g. calibration,
hardware issues, etc.), there are additional resources available online.
These can all be found by going to http://letushelix.com/.
Training Events
A calendar describing when online webinars are being given. Most of
these are for beginners, but occasionally other webinars are presented.
Training Videos
LetusDirect produces training videos and posts them to LetusHelix.com.
If there is a specific subject you would like covered, please feel free to
contact them at [email protected] with your request.
Downloads
Users can download the GUI, the Helix GUI manual (applies to the Helix Jr.
as well), and default (shipping) profiles for each new version that comes
out. Starting with version 2.43, versions of the GUI found at this site have
corrected directional labels (roll/tilt/pan). Versions of the GUI found at
BaseCam Electronics’ website do not have these corrected labels.
Forums
This is an area where users can ask questions or share their discoveries
with the Letus community of users. Letus staff watch these forums and
provide assistance where needed.
Support Site
LetusDirect has created a number of support articles on various aspects
of Helix and Helix Jr. use, such as balancing, eliminating vibration, fixing
any home position problems, etc. Some of these support articles are accompanied by videos or pictures, and most will apply equally to either the
Helix or the Helix Jr.
PAGE
27
LETUS HELIX JR USER GUIDE
Specifications
Wow! You made it to the
end of the manual. Now
treat yourself to these
specifications and a cupcake!
Weight (without battery)
4.25 lbs. (1.9 kg)
Weight (with battery)
4.75 lbs. (2.2 kg)
Weight (aerial mode)
3.65 lbs. (1.6 kg)
Length (handle to handle)
17.25” (44 cm)
Payload capacity
7 lbs (3.2 kg)
Battery capacity
2600 mAh
Structural material
Magnesium
Ports
2 2-pin LEMO power (out),
Joystick
Input power
8 – 18 V in through 2 pin
LEMO (U.S. Standard – Red
dot = positive)
Shooting modes
Handheld (normal), aerial,
joystick, 2nd operator
(with RC transmitter)
PAGE
28
THEME DOCUMENTATION
letushelix.com