1
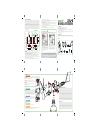
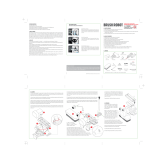
above the ground, where strong winds nearly always blow.
• Wind generators are a clean and renewable way of producing energy. But they are useless when the wind
stops blowing! So we need other forms of renewable energy, too.
• Ocean turbines are like wind generators under the sea. They capture the energy in the currents caused
by rising and falling tides.
• Plastic drinks bottles like the one you recycled for the wind generator are normally made from a type of
plastic called PET (short for polyethylene terephthalate).
• PET bottles are recycled to make hundreds of different objects, such as new bottles, packaging film and
fibres for making carpets and clothes.
• The recycled plastic from just 25 drinks bottles can be made into a warm fleece jacket!
G. HOW DOES THE GENERATOR WORK?
Your wind generator turns the energy in the wind into light that comes from the LED (light-emitting diode).
The wind pushes on the rotor blades, making the rotor turn, always in the same direction. The stronger the
wind, the faster the rotor turns. The gear wheels make the shaft of the motor turn many times for each turn
of the rotor. The motor actually works as a generator. Inside the motor is an armature attached to the shaft.
The armature has hundreds of turns of wire around it. Around the armature are permanent magnets. When
electricity is fed into a motor, it flows through the armature, turning it into an electromagnet. The armature
is repelled and attracted by the permanent magnets, making it spin. In your wind generator, the motor
works in reverse. When the armature is spun round by the shaft, the magnetic field made by the permanent
magnets causes electricity to flow in the wire in the armature. When the shaft is turned fast enough, the
electricity generated is strong enough to make the LED light up. The wind generator's tail keeps the rotor
facing into the wind.
MOTOR
WINDMILL GENERATOR
motor spinning
rotor spinning
1.
2.
3.
4.
Before you start, please read through all the instructions.
This kit is intended for children over 8.
Adult assistance and supervision is recommended at all times.
Both the kit and the completed wind generator contain small parts that may cause choking if misused.
Keep away from children under 3 years old.
5. You are advised to wear eye protection and gloves when the wind generator is working, as strong winds
may cause parts to fly off.
Build a better tomorrow through education & awareness. You will like the other great Green Science kits:
Rotor
Spinning
Centre
axle spins
B. BEFORE YOU START
To complete the wind generator you will need a clean plastic drinks bottle and a small cross-head screwdriver
- these are NOT included. Carefully identify all the following parts before you begin to assemble your wind
generator:
MAGNET
MAGNET
armature
MAGNET
MAGNET
armature
Motion
force
generated
A. SAFETY WARNINGS
Electromagnetic
Induction
C. CONTENTS
Current
generated
Electromagnetic
Induction
current generated
Current
from
battery
battery
current
from
battery
LED lamp
lights up
00-03261 Enviro Battery
Learn the Science behind the Power! ENVIRO-BATTERY
uses natural materials like mud, lemons, and water to
power a light bulb, a watch, and activate a music chip.
An amazing, environmentally friendly science kit that
includes detailed instructions so you can create many
unusual batteries with fruit juices, vegetables, coins,
utensils, and more!
LED lamp
lights up
00-03263 Dynamo Torch
Turn a simple toy motor into a generator that converts
hand motion into electrical energy and powers a light
bulb. No battery, no pollution, just amazement. The
generator could be used as an awesome emergency
torch. Caution: High Voltage Inspiration & Fun!
1 rotor
1 front-housing
1 back-housing
2 half screw caps
1 tail
H. FUN FACTS
• The most powerful wind generator in the world is the REpower 5M. Each of its three blades is 61.6 metres
long. It produces enough electricity for 5,000 houses.
• A small wind generator can supply enough electricity for a home, school or small factory.
• The world's largest wind farm is the Horse Hollow Wind Energy Center in Texas, USA. It has a total of 421
generators. It will produce 735 megawatts of power, enough to boil half a million kettles at once.
• Offshore wind farms are wind farms built at sea, where the wind is more consistent in strength and
direction. The wind generators sit on pylons resting on the sea bed.
• Engineers are designing and testing airborne wind generators. These will float thousands of metres
1 rotor shaft
41-03267/1
Questions & Comments
1 toy motor with gear
(generator)
1 motor cover
8 small screws
1 LED lamp unit
with wires
1 gear with
metal shaft
We value you as a customer and your satisfaction with this product is important to us. If you have comments or questions,
or you find any part of this kit missing or defective, please do not hesitate to contact our distributor in your country. You
will find the address printed on the package. You are also welcome to contact our Marketing Support Team: Email:
[email protected], Fax (852) 25911566, Tel: (852) 28936241, Web site: WWW.4M-IND.COM
©2007 4M Industrial Development Limited. All rights reserved.
D. ASSEMBLY
ASSEMBLING THE HOUSING
1
Slide the long end of the metal shaft of the gear through the front housing. A little cooking oil on
the shaft will reduce friction. Push the rotor shaft onto the metal shaft, making sure that the gear can
still spin freely. Adult assistance may be requried.
3
2
Fix the LED unit to the lower part of the front housing.
3
Thread the wires through the bottom hole in the back housing.
4
Push the two halves of the housing together and secure
them with four screws.
9
4
7
2
6
5
Assemble the two half screw caps around the lower part of the housing, and secure them with two
screws. Put a little cooking on the top of the caps to help the housing turn freely.
CONNECTING THE WIRES
Connect the red wire and black wire to the metal tags on the
motor as shown opposite. The LED will not work if they are connected
the other way round. With the plastic base of the motor facing you and
the metal tags facing down, the red wire should be at your left and
the black wire at your right. Thread the bare end of each wire through
the hole in its tag, bend it over and gently twist it to secure it.
RED
8
3
E. HOW TO USE YOUR WIND GENERATOR
BLACK
6
INSTALLING THE MOTOR
2
5
6
7
7
Insert the gear end of the motor into the housing as shown.
Gently press it into place so that the teeth on the gear wheels
interlock. Add the motor cover and secure with two screws.
ADDING THE ROTOR
8
Push the rotor onto the rotor shaft.
ADDING THE TAIL
9
Push the tail into the hole in the back of the motor cover.
ADDING THE STAND
10 The screw cap will fit most drinks bottles. Recycle a bottle by emptying and cleaning it, and
screw the screw cap onto it. Your wind generator is now complete.
10
Hold the plastic bottle vertically in one hand and point the rotor into the wind. Alternatively,
half fill the bottle with water to make it stable, and stand the generator on the ground or any
level surfaces (be careful not to let water touch the LED). The wind generator needs a strong
wind (about 15 to 20 kilometers per hour) before the rotor will turn the generator fast enough
to produce sufficient electricity to operate the LED. If you are working outdoors, it will be more
windy in an open space, on a hill, or at the beach. If you are working indoors (for example, in
a classroom), you will need to use a mains-powered electric fan on a medium or high setting
to produce enough wind. Adult supervision is need when using the electric fan. Note: The wind
generator is designed for occasional demonstration purposes only. If you would like to install
it permanently outdoors, you should be aware that strong winds and rain could damage its
parts. More fun: Try putting your wind generator outside at night, and watch the LED light up
when the wind blows. Add water to the bottle to see a water light show. Remember to bring
the generator back indoors afterwards, and be careful that water does not touch the LED.
Customise your wind generator by adding coloured stickers to the plastic bottle and the tail.
F. TROUBLE SHOOTING
Follow these steps if the LED does not light up. • The rotor may not be spinning fast enough.
Wait for a stronger wind, or move to a windier place, or if indoors, use a higher fan speed. You
can also add a little grease to the gear teeth to make them turn more easily. Check also if the
base of the rotor shaft is touching the front housing. This will create friction and stop the rotor
from spinning smoothly. Slightly lift the rotor shaft so that it no longer touches the housing
(see step 1). • Check that the wires are connected properly to the motor, and that the red and
black wires are connected the correct way round (see step 6). • Check that the housing can
turn freely on the screw cap. The rotor will not turn at full speed unless it faces directly into
the wind.