1
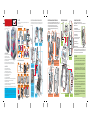
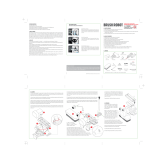
T
B - HEAD
S
Align triangles
and match
sequence numbers
2
A3
F. INSTRUCTIONS: FINAL ASSEMBLY
Double
adhesive
foam
E
A1
C - ARM
Insert F to
form the
nose.
AA
V
1.5
AA
V
1.5
Moving on smooth floorings...
Your robot is designed for movement on most floor surfaces including rugged surfaces like cement
or carpeted floorings. If you are playing your robot on a smooth surface like ceramic or wood tiled
floorings, you may tie rubber bands to the wheels. This will increase the friction between the wheel
and the floor. The friction is required for driving most wheels-driven machines.
6
B
B1
If your robot is going slow...
Change the batteries. (See Diagram)
17
W1
6
6
A2
6
A3
9
W2
A1
C
2233
A1
10
X - COVER 3
10
W - MOVING ARMS
A4
8
V - COVER 2
Double
adhesive tape
7
U - COVER 1
D.4. Install structure made in
D.3 to Platform Y.
Double
adhesive tape
7
(with worm gear
and wires installed)
(with gear installed)
A4
How does your robot work? When the power is on, the motor turns the set of gears installed.
One of the gears turns the arms, making the robot arms and the antenna moving up and
down.
Why do the robot move? Another gear is installed to the front wheel axle which controls a
pair of front wheels. The wheels are driven by the gear actions when the power is on.
A2A4
22
A
D
A3
D.5. Connect BLACK wires
Y - BASE PLATFORM
Z - WHEELS X 4 PCS
DOUBLE ADHESIVE FOAM, DOUBLE ADHESIVE TAPES
Connecting
tabs
tapes
For fixing the
mechanical base
to the cardboard
casing
For fixing the cardboard casing
22
12
(with switch installed)
from the battery and the
motor. Place both wires to
the centre hole of the rivet.
Press the plastic tab into the
hole to fix the wires in place.
The circuit will be connected
through the metal rivet.
Connect the RED wires from
motor and from the switch
the same way as above.
STRUCTURE
MADE IN E.4
D.6. Inner Mechanical
Engine completed.
E.3. Stick A4 to cover to complete the main body
casing.
E.4. The Main Body Casing is completed.
23
F.4. Assemble the different parts to the main
body made in E.4 to complete the Robot.
F.3. Stick and build the
Arms C & D.
Did you know who was the first one to introduce the word "Robot" ? In 1920,
Czechoslovakian playwright Karel Capek introduced "Robot" to the world in the play R.U.R Rossum's Universal Robots. The word came from the Czech "Robota", which means tedious
labour.
Did you know any robot which has orbit the Earth for 6500 times? Named Canadarm, the
Remote Manipulator System is the robot arm which is built on the Space Shuttle. It was
originally built by a Canadian company. It helps accomplishing various tasks in the Space
Shuttle missions. It has travelled 175 million miles in space and has completed over 6,500
orbits around the Earth.
Did you know over 90% of the robots nowadays are industrial robots which work in factories,
laboratories, plants etc? Decades ago, most of the robots were employed by the car
industries. They do a variety of tasks in car assembly lines. These days, the use of robots
are more spread out among the industries as stated above.
Did you know an alarm clock is a robot too? By definition a robot is an obedient but
impersonal machines which automate tasks after it is programmed. A robot is made of 3
elements in its definition: a body, a programmed control and a programmed behaviour. In the
alarm clock, the body is the clock, setting the alarm is the control and the alarm signal is the
automatic programmed behaviour. Fun!?
© 2005 4M INDUSTRIAL DEVELOPMENT LIMITED
41-03254/1
7
Y
Slide in the cardboard
extension (printed green)
to the corresponding slot to
further secure the
casing structure.
the head.
D
D.3. Put Arm W to the
extension point of Gear S, and
install Cover X as shown.
H. FUN FACTS
F.2. Stick and build B1 to make
12
T - MOTOR
E.2. Use the double adhesive foam to stick Inner
Mechanical Engine made in step D1-6 to Main
Body Part A1. Fold and stick A2 & A3 to build the
preliminary body case.
10
S - GEAR
8
R - AXLE
E.1. Stick Body Part A2 and
A3 to the corresponding
sides of A1.
X
Insert
eye masks
A3
8
PARTS OF INNER MECHANICAL ENGINE
9
41-03254/1
A3
9
QUESTION AND COMMENTS
We treasure you as a customer and your satisfaction with this product is important to us. In case you have
any comments or questions, or you find any parts of this kit missing or defective, please do not hesitate to
contact our distributor in your country, whose address is printed on the package. You are also welcome to
contact our marketing support team at Email: [email protected], Fax (852) 25911566, Tel (852)
28936241, Web site: WWW.4M-IND.COM
A3
the slot.
A2
B. USE OF BATTERY
1. Requires two 1.5V batteries (Not included).
2. For optimum operation, always use fresh batteries.
3. Insert batteries according to the correct polarities.
4. Make sure that the supply terminals are not short circuited.
5. Do not leave batteries in the toy if it is not in use.
6. Remove empty batteries from the toy.
7. Do not recharge non-rechargeable batteries.
8. Rechargeable batteries should be removed from the toy before being charged (if removable).
9. Rechargeable batteries should only be charged under adult's supervision.
10. Do not mix old and new batteries.
11. Do not mix alkaline, standard (Carbon-Zinc) or rechargeable (Nickel-Cadmium) batteries.
12. Only use batteries of the same or equivalent type.
13. The toy should not be connected to more than the recommended number of power supplies.
A
3
1. Please read through this instruction before you start.
2. This kit is intended for age 8 and ups.
3. Adults assistance and supervision required.
4. This kit and its finished product contain small parts which may cause choking if misused. Keep
away from children under 3 years old.
5. Wires may contain sharp points, adult assistance required during connection.
6. Never touch the contacts inside the battery case to prevent possible short circuit.
2
STRUCTURE
MADE IN D.3
F - NOSE
A2
A1
F.1. Inset the
Antenna E into
15
A. SAFETY MESSAGES
E - ANTENNA
made in D.1 with Cover U.
D - ARM
W1
3
ON
D.2. Cover the structure
If your robot is not moving...
1. Check if batteries are empty.
2. Check if batteries are placed in correct polarities.
3. Check if all connection points are secured.
13
and Motor T into Cover V.
OFF
A1
A1
If your robot goes backwards...
1. Check if batteries are placed in correct polarity.
2. Check if wire connections to the motor are in correct order.
F
7
D.1. Install Axle R, Gear S,
STRUCTURE
MADE IN D.1
1
U
Always turn your robot off when you are performing any checking.
Replacing the batteries... open the cover at the back of your robot and install the batteries as
illustrated inside of the cover.
B
1
W2
G. REMARKS / TROUBLE SHOOTING:
12
V
R
B
The Outer Body Casing consists of 4 major parts as Main Body Structure A, Head B, Arm C and Arm
D, plus the Nose, Antenna and Eye Masks. Just fold and stick the corresponding edges with double
adhesive tapes provided. The step sequence is printed on the connection edges.
Corresponding sides are matched with the same sequence number printed in a triangle.
Just match the sequence number and align the direction of the triangle and the casing
should be built easily.
Apply double
adhesive tape
on areas printed blue
A4
A2
E. INSTRUCTIONS: MAKING THE OUTER BODY CASING
14
A - MAIN BODY (A1, A2, A3, A4)
Remarks: to increase motion performance and easiness of assembly, you may apply some sort grease
to reduce friction between the gears and connecting points. Cooking oil will serve the purpose. Ask an
adult's assistance.
11
PARTS OF OUTER BODY CASING
D. INSTRUCTIONS: MAKING THE INNER MECHANICAL ENGINE
16
• • •• •••• • • • •• •• • •• • • •• •• • • • •• • ••• • • •• • •
• • • • •••• • • ••• •• • ••• •••• • • ••• •• • • •• • ••••
•••• •• • • •
The robot is composed of an Outer Body Casing and an Inner Mechanical Engine. The parts are
listed and illustrated below:
2
Not for Children under 3
C. CONTENTS
8
WARNING
CHOKING HAZARD Small parts.