1
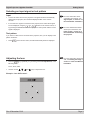
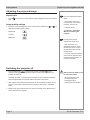
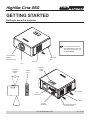
Highlite Cine 260
GETTING STARTED
Getting to know the projector
Notes
For complete and detailed
information about how to use
and control the projector, see
the User Manual.
Front Infra-red
window
Adjustable
feet
(remote control)
Air inlet
Lens
Remote
reception
angle
Remote
control
Projector
control
panel
40°
Air inlet
Input
connections
Air outlet
40°
Power
connection
Rev A December 2010
Rear Infra-red window
(remote control)
111-370A
Getting Started
Digital Projection Highlite
Positioning the screen and projector
•
•
Cine 260
Notes
Install the screen, ensuring that it is in the best position for viewing by your
audience.
For more information about
positioning the screen and
projector, see Positioning
the screen and projector, in
section 2. of the User Manual:
Installation.
Mount the projector, ensuring that it is at a suitable distance from the screen for
the image to fill the screen, and that it is perpendicular to the sceen.
Switching the projector on
•
Connect the power cable between the mains supply and the projector. Switch on
at the switch next to the power connector.
Wait until the self-test has completed and the standby indicator on the projector
control panel shows amber. The lamp will be off and the projector will be in
STANDBY mode.
Projector
control
panel
For more detailed information
about:
- using the control keys on the
remote control or the projector
control panel,
- using the menus,
see section 4. of the User
Manual: Controlling the
projector.
Power
connection
•
Press POWER ON
on the remote control or POWER
on the projector
control panel to switch the projector ON. The power indicator on the control
panel will flash blue for approximately 30 seconds, whilst the lamp comes up to
full brightness. When the projector is ready for use, the power indicator will show
a steady blue.
If the red ISSUE indicator is
illuminated continuously or
flashing, see Error Codes in
section 6 of the User Manual:
Appendix, for more information
Inserting batteries into the remote control
•
Open the battery compartment and insert two AA size batteries, making sure
they are inserted the correct way round, as shown below.
Do not mix an old battery with
a new one or different types of
batteries.
If you will not use the remote
control for a long time, remove
the batteries to avoid damage
from battery leakage.
Page Rev A December 2010
Digital Projection Highlite
Cine 260
Selecting an input signal or test pattern
Input
•
Connect an video source to the projector. The signal should be automatically
detected by the projector, and should be displayed within a two or three
seconds.
•
If more than one signal is connected to the projector, then select which signal
is to be displayed, using the
to
buttons on the remote control, or
by pressing the SOURCE button on the projector control panel until the correct
signal is displayed.
Test pattern
If you have no video source connected to the projector, then you can display a test
pattern as follows:
•
Press
Notes
For more information about
connecting input signals, see
Signal Inputs, in section 2. of
the User Manual: Installation.
For more detailed information
about input connections, see
Input signals in section 6. of
the User Manual: Controlling
the projector.
on the remote control, until the desired test pattern is displayed.
Adjusting the lens
•
Getting Started
Press the
key repeatedly to cycle through the Lens adjustments, in the
following order:
For more information about lens
shift, see Shifting the image in
section 2. of the User Manual:
Installation.
Focus, Zoom, Shift...
•
Use the use the
,
,
and
keys to adjust the lens.
Example - Lens Shift control:
Rev A December 2010
Page Getting Started
Digital Projection Highlite
Adjusting the projected image
Notes
Aspect ratio
•
Press
ratio.
For more detailed information
about:
on the remote control until the image is displayed in the corect aspect
- using all the control keys
on the remote control or the
projector control panel,
- using the menus,
see section 4. of the User
Manual: Controlling the
projector.
Image quality settings
•
Press any of the following keys on the remote control, followed by
adjust these image quality settings:
Cine 260
and
, to
Brightness
Contrast
Sharpness
For the picture setting
adjustments shown here:
- after 5 seconds, if no
adjustment has been made,
the indicator will go out and
the adjustment key must be
pressed again.
- to end the adjustment before
5 seconds has elapsed, press
a different adjustment key, or
press the key again.
Switching the projector off
•
Press POWER OFF
on the remote control or POWER
on the
projector control panel, then press the button a second time to confirm your
intention to switch off.
The lamp will switch off, and the power indicator on the control panel will flash
blue for approximately 30 seconds until the lamp has cooled down.
•
Wait until the power indicator has switched off and the standby indicator on the
projector control panel shows amber. The projector will now be in STANDBY
mode.
•
Switch off the power switch next to the power connection, then disconnect the
power cable from the projector.
Page Always allow the lamp to cool
for 5 minutes before:
- disconnecting the power
- moving the projector
- changing the lamp
- cleaning the fans and filter
Rev A December 2010