1
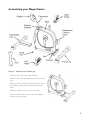
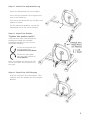
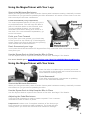
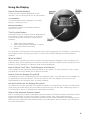
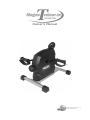
Owner’s Manual © 2002 3D Innovations, LLC All Rights Reserved CONTENTS Cautions and Safety ___________________________________________________ 1 Assembling your MagneTrainer _________________________________________ 2 Using the MagneTrainer with Your Legs __________________________________ 4 Using the MagneTrainer with Your Arms __________________________________ 4 Keeping the Bike in Place ______________________________________________ 5 Using the Display _____________________________________________________ 6 Free Online Calorie Calculator __________________________________________ 7 Optional Accessories __________________________________________________ 7 Care and Maintenance ________________________________________________ 8 Spare Parts __________________________________________________________ 8 Support _____________________________________________________________ 8 Contact _____________________________________________________________ 8 Warranty ___________________________________________________________ 9 Cautions and Safety Cautions Failure to observe these warnings could result in physical injury or damage to the MagneTrainer. Use the MagneTrainer indoors on a level surface. Keep the MagneTrainer away from moisture and dust. Make sure that the pedals are on tight. Loose pedals will slowly come undone. Using the bike with loose pedals can damage the threads on the crank arms. Stripped crank-arm threads are not covered by the warranty. Wear suitable clothing when using the MagneTrainer. Do not wear loose clothing that could become caught on the bike. Always wear athletic shoes. Do not subject the bike to heavy shock or treat it excessively. Do not disassemble or modify it. Doing so will void the warranty. The Magnetrainer has sealed bearings and is maintenance free. Lubricants are not necessary and can actually damage the bike. Do not place the bike in a location where it will be in contact with direct sunlight or where it will be exposed to high temperatures or excessive humidity. Safety Warning! To reduce the risk of serious injury, please read the following precautions before using the MagneTrainer. Read all instructions in this manual before using the MagneTrainer. Use the MagneTrainer only as described. It is the responsibility of the owner to ensure that all users of the MagneTrainer are adequately informed of all precautions. Never use this device after drinking alcohol; doing so is dangerous and could result in serious injury or accident. Do not place this device in a location where it may cause an obstruction. Do not leave the device unattended after use. Be sure to move and store it in a safe place to avoid injury. If using the Velcro® tether, remove it between uses to avoid a tripping hazard. Consult Your Physician It is always important to consult your physician before starting an exercise program. This is particularly true if any of the following apply to your current medical condition: Chest pain or pain in the neck and/or arm Shortness of breath A diagnosed heart condition Joint and/or bone problems Currently taking cardiac and/or blood pressure medications Have not previously been physically active Dizziness or blurred vision Those with physical handicaps should use this device only under supervision. If none of these apply to you then start gradually and sensibly. However, if you feel any of the physical symptoms listed above when you start your exercise program, contact your physician right away. If one or more of the statements listed above applies for you, see your physician before beginning an exercise program. An exercise-stress test may be used to help plan your exercise program. 1 Assembling your MagneTrainer Step 1: Install the Fixed Leg Place the bike on a hard flat surface! Remove the nuts and washers from the Fixed Leg. Align the bolts of the Fixed Leg with the holes in the Bike, and push the bolts through the holes. Attach a washer and a nut to each bolt. Do not tighten the nuts yet! You will tighten them in the next step. 2 Step 2: Install the Adjustable Leg Insert the Adjustable Leg into the Bike. Then use the provided Tool to tighten the nuts on the fixed leg. Then screw the Wing Nut into the Bike and tighten by hand. For the maximum stability, extend the Adjustable Leg as far out as possible. Step 3: Install the Pedals Tighten the pedals well!!! Using the bike with loose pedals will damage the pedal arm threads! Damaged threads are not covered under the warranty. Screw the left pedal into the left pedal arm COUNTER-CLOCKWISE. Screw the right pedal into the right pedal arm CLOCKWISE. Note, the pedals are marked on the end of the shaft. See the picture to the right. Step 4: Install the LCD Display Plug the Connector into the Display. Then carefully slide the Display onto the Display Bracket. 3 Using the MagneTrainer with Your Legs Start at the Minimum Resistance When you first get the bike, start off at the lowest pedal resistance setting. Gradually increase the tension as you get used to pedaling the bike downward. It’s easier to learn how to use the bike correctly at the lower resistances. Pedal Downward (Very Important!) The most important advice we can give you is to pedal downward. This will keep the bike in place. If the bike slides or tilts forward, then you are pedaling forward. You can pedal downward even when sitting on a couch or a low chair. For a more detailed explanation, go to the link below. Point your Toes Forward If you point your toes upward, your heels may hit the ground or the Fixed Leg. If this happens, simply rotate your feet so that they are pointing more toward the forward direction. Don’t Overextend your Legs Your knees should be bent about 25 degrees from fully-extended when the pedal is farthest away from you. Use the Dycem Pads to Help Keep the Bike in Place Use the Dycem Pads to improve the traction of the bike. See Page 5 for Details. For more details go to www.MagneTrainer.com/HowToPedalAMiniExerciseBike.php Using the MagneTrainer with Your Arms Place the bike on a table top to exercise your arms. You can pedal in the forward and reverse directions to work different muscle groups. Pedal Downward! If the bike rocks forward, concentrate on pedaling more in the downward direction. Start at the Minimum Resistance When you first get the bike, start off at the lowest pedal resistance setting. Gradually increase the tension as you get used to pedaling the bike. Use the Dycem Pads to Help Keep the Bike in Place Use the Dycem Pads to improve the traction of the bike. See Page 5 for Details. Adjusting the Pedal Resistance Turn the knob clockwise to make it harder to pedal. Turn it counterclockwise to make it easier to pedal. Important! It takes over 5 complete rotations of the knob to go from minimum to maximum pedal resistance. The knob will stop rotating when you reach the minimum and maximum settings. 4 Keeping the Bike in Place Pedal the Bike Downward The most important advice we can give you is to pedal downward. This will keep the bike in place. See previous page for details. For even more details, go to the following link. www.MagneTrainer.com/HowToPedalAMiniExerciseBike.php Extend the Adjustable Leg For maximum stability the Adjustable Leg should be extended as far out as possible. A longer base provides the best stability. Use the Dycem® Pads Two Dycem® pads are included with each MagneTrainer. You can place the pads under the front feet as shown in the picture. This helps keep the bike in place on wood floors, tables and even carpet. Keep the Dycem pads clean. See details in the Care and Maintenance section. Note; if you pedal the bike forward you will likely damage the Dycem® pads. Remember to pedal downward. Using the Velcro® Tether (Optional) The MagneTrainer™ comes with a Velcro strap that can be used to tether the bike to the chair as shown in the picture below. The strap is made from Velcro Loop material. On the back side of one end is Velcro Hook material. Do I need the Tether? Most people don’t need the tether. Pedaling the bike downward will keep it in place, even on slick surfaces. The tether may be needed if you use a rolling chair on a smooth surface. In this case, the tether keeps the chair from rolling away from the bike. Installation: 1. Place the bike in front of the chair. 2. Sit in your chair and pedal the bike. Your knees should be bent about 25 degrees from fullyextended when the pedal is farthest away from you. 3. Route the Velcro strap as shown in the picture. Keep the strap as low as possible. Stretch the loop tight and attach the end with the Hook material to the Loop material to make a tight loop. 4. Pedal the bike to make sure the distance is correct. Adjust if necessary. 5. With a pair of scissors, cut away the excess Velcro strap. Important! Remove the tether when not using the bike to prevent a tripping hazard! 5 Using the Display How to Read the Display There are two numbers displayed on the monitor, one on the top and one on the bottom. Top Number: The top number always displays your pedal speed, in miles per hour. Bottom Number: The bottom number can display Distance, Calories or Time. The Function Button Press this button to change what is displayed by the bottom number. Each time you press the Function Button the Indicator Arrow moves between, TIME (total Time pedaled), DIST (total Distance pedaled, in miles), CAL (total Calories burned), SCAN. The Indicator Arrow points to the function that is being displayed. For example, in the picture the Indicator Arrow is pointing to DIST, so the lower number displays the total distance pedaled. What is SCAN? When SCAN is selected, the lower number will cycle between displaying Time, Distance and Calories. Each will be displayed for about 6 seconds. Another Indicator Arrow will point to the function (Time, Distance or Calories) that is being displayed. How to Reset Total Time, Total Distance and Calories Time, Distance and Calories are accumulated as you pedal. To reset these all to zero, press and hold the Function Button for at least 3 seconds. How to Turn the Display On and Off The display turns on automatically when you pedal the bike. You can also turn the display on by pressing the Function Button. You do not need to turn the display off. It will turn off automatically a few minutes after you stop pedaling. Are the Calories on the Display Accurate? The Calories are most accurate if the pedal resistance is at maximum. All mini exercise bikes (and many full-sized bikes) do not measure the power put into the bike. Measuring power is very expensive, but it is needed for a reasonable calculation. How to Get Accurate Calorie Counts We’ve created a free Calorie Calculator (see the section Free Online Calorie Calculator) which solves this problem. It uses your gender, height, weight, age, pedal speed and the MagneTrainer knob setting to calculate Calories burned. It also calculates the wattage of the bike from the resistance knob position and your pedal speed. See the section Free Software for more information. 6 Free Online Calorie Calculator Calorie Calculator – Provides accurate calculation of Calories burned when using the bike. The Calorie Calculator uses your height, weight, gender, and age for improved accuracy. It also calculates the wattage of the bike from the knob setting and the pedal speed. The Calorie calculator is located at the following link. http://www.magnetrainer.com/OnlineCalorieCalculator.php Feel free to email us at [email protected] with any suggestions or comments about our software. Optional Accessories There are several optional accessories available to customize the MagneTrainer to your situation. Some of these are listed below, Ergonomic Hand Pedals – Place your hands in a more natural position Large Foot Pedals – Larger area and longer straps Quick-Connects - Enables you to quickly switch between 2 sets of pedals Wider and Taller Adjustable Leg – Makes the bike more stable; It raises the far side of the bike and widens the base; This option was originally designed for those who have difficulty using the bike because of medical conditions Custom Leg Set for Hospital Chairs - Raises the bike and widens the base; designed for the taller hospital chairs Display with Large Text – The display window is twice as large Medical-Level Foot Pedals – Holds your feet securely in place. Typically used for those who, for medical reasons, cannot keep their feet on the pedals Visit the MagneTrainer website www.MagneTrainer.com for a complete list of accessories. 7 Care and Maintenance Do Not Lubricate The MagneTrainer contains sealed bearings for years of maintenance-free use. No lubrication is needed. In fact, some lubricants contain chemicals that can actually harm the bearings. Clean the Dycem® Pads Two Dycem® pads are included with each MagneTrainer. You can place the pads under the bike as shown in the picture. This helps keep the bike in place on wood floors, tables and even carpet. Over time, dirt will collect on the pads, reducing their grip. You can clean these pads with soap and warm water. Always pedal the bike downward. If you pedal the bike forward, the pads can be damaged. You can purchase replacement Dycem® pads at www.MagneTrainer.com. Spare Parts Spare parts are available at www.MagneTrainer.com in the spare parts section. Support The best place to look for answers is the MagneTrainer website www.MagneTrainer.com. If you don’t find what you’re looking for, feel free to call or email us with your questions or suggestions. Contact Phone: 1-877-426-3292 Email: [email protected] 8 Warranty We stand behind our products. The MagneTrainer and its accessories are covered by a one year warranty on all parts and labor. This warranty is for US customers only; outside of the US, the warranty depends on your local retailer. What is covered? 3D Innovations warrants the MagneTrainer and accessories against defects in material or workmanship for a full year from the date of purchase. 3D Innovations will, at its option, repair or replace the object. Parts: All parts are covered under this warranty. Labor: All labor is covered under this warranty. In most cases a local bike shop can perform the repairs and the labor charge is reimbursed to the customer. Shipping: For the first 30 days, 3D Innovations pays for all shipping. After the first 30 days, 3D Innovations pays for the shipping to the customer and the customer pays for the shipping to 3D Innovations. In most cases there will be no shipping cost since a local bike shop can perform most repairs. The labor charge of the bike shop is reimbursed to the customer by 3D Innovations. What is not covered? This warranty does not cover damage caused by neglect, abuse or misuse. This includes using the bike with loose pedal arms. Using the bike with loose pedal arms will damage the threads. Use Blue threadlocker if the pedals come loose. How do I get Service? Contact us by phone or by email to request a warranty repair. Be prepared to provide your invoice number and a description of the problem. Phone: 1-877-426-3292 Email: [email protected] 9 www.3DInnovations.com © 2002 3D Innovations, LLC. All Rights Reserved