1
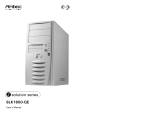
User’s Manual
ATX Solution Series
Computer Enclosures
KS 382 Mini Tower Case
This manual is intended only as a guide for
Antec’s Computer Enclosures. For more
comprehensive instructions, please refer to
the user’s manuals which come with your
components and drives.
Disclaimer
This manual is intended only as a guide for Antec's Computer Enclosures. For
more comprehensive instructions, please refer to the user's manuals which come
with your components and drives.
Basics
1. Take the case out of the box.
2. Remove the Styrofoam.
3. Remove the plastic bag.
4. Place the case upright with the power supply fan at the back facing you on a
stable flat surface.
5. Remove the two thumb screws which fasten the top cover onto the case. These are
the only screws you need to remove to open the case. Keep these screws separate
from the other screws.
6. Grip both sides of the top panel with your hands. Slide and lift it up.
7. From the top of the case, right in front of the power supply, there is a tab on top
of each side panels. Lift and pull the side panels out.
Note: Do not use the tab as a handle to lift the case.
8. Inside the case you should see the power supply, some wiring (LED's, etc.),
an installed I/O panel, a power cord and a plastic bag containing more
hardware (screws, brass standoff, plastic stands, etc.).
Motherboard Installation
This manual is not designed to cover CPU or RAM or expansion card installation. Please consult your motherboard manual for specific mounting instructions
and trouble-shooting.
1. Lay the case down so that the open side is up. You should be able to see the
drive cage, and power supply.
2. Make sure you have the appropriate I/O panel for your mother board. If the
panel provided is not suitable for your motherboard you may order different
styles from Antec directly. Please visit www.antec-inc.com under "Service and
Support" and then I/O panels, which will show you the available I/O
configurations.
3. Line up motherboard with standoff holes, and determine which ones line up
and remember where they are. (Note: Not all motherboards will match with
all of the provided screw holes, and this is not necessary for proper
functionality. In other words there will likely be extra holes.)
4. Lift up and remove your motherboard.
5. Screw in the brass standoffs to the threaded holes that line up with your
motherboard.
6. Place your motherboard on the brass standoffs.
7. Screw in your motherboard to the standoffs with the provided metallic Phillips
head screws.
8. Your motherboard is now installed into the case.
Power Connections
ATX power supplies have a single 20-pin (single large) power connector to the
motherboard. This is set up as a double row of 10 pins.
1. Connect the 20-pin ATX power connector to your motherboard.
LED's and Front Panel Leads
1. Reset (labeled RESET SW) connects to your motherboard at the RST
connector. The label should be facing the front of the case, and for all of the
following connectors as well.
2. Power LED (labeled POWER LED) connector is located behind the
Reset connector.
3. Power Switch (labeled POWER SW) connects to the PWR connector on
the motherboard.
4. Speaker (labeled SPEAKER) connector is behind the PWR connector.
5. Hard Drive LED (labeled HDD.LED) connects to the IDE or HDD connector.
3.5" Device Installation
1. Slide your 3.5" floppy drive into the top drive bay from the back to the front
until it stops. Make sure the disk eject button of the drive is firmly seated
against the eject button of the case.
2. With one of your hands holding the drive, fasten the floppy drive with the
screws provided onto the case.
3. Find a small 4-pin white connector on the power supply and connect it into
the male 4-pin connector on the floppy drive.
4. Install your other 3.5" devices to the drive bays accordingly.
5. Connect a 4-pin large white connector from the power supply to the
male 4-pin connector on each of the devices.
5.25" Device Installation
1. Looking from the rear of the case you can see some metal grills. Carefully
use a screw driver through the metal grill and gently push the plastic drive
bay outwards until it comes off.
2. Use your hands to twist the metal plate back and forth until it breaks off.
3. Fasten your 5.25" device into the drive bay with screws provided.
4. Repeat the same procedure for other devices.
5. Connect a 4-pin large white connector from the power supply to the male
4-pin connector on each of the devices.
IDE Cable Connection
This is for IDE devices only.
1. After you have connected the devices to the power supply, you need to
connect the IDE cables between the devices and the motherboard.
2. For hard drives and CD ROMs use the 40-pin IDE ribbon cables. For
floppy drives use the 34-pin ribbon cables. These should come with
your devices and have a red strip on side. When you connect a ribbon
cable to a device, make sure that the red strip is toward the power
connector.
3. The side that attaches to devices should be the side that has 2
connectors. This will enable you to connect another device if you wish.
4. Connect the far end of the cable to your motherboard on the IDE port,
either IDE 1 or IDE 2.
Fan Installation
The KS-382 case has two optional fans that can be installed: 80mm fan in front
and 60mm fan at the rear.
Note: Antec Cooling Fans blow in the direction of the side the Antec logo.
1
2
Front Fan
1. Squeeze the sides of the fan cage near the speaker to release pressure on the
tabs. Once loose, you should then be able to pull the cage back and out of
the case.
2. Drop the fan into the cage and push it in until it clips in. No screws are needed.
3. Reattach the cage/fan assembly to the case paying attention to the wires of
the fan. There are slots near each corner to put the wires through (any
corner will work, find the one that's best for you).
4. Connect the 4-pin male connector to a 4-pin female connector coming out from
the power supply.
Rear Fan
1. Line up the screw holes of the fan to the screw holes on the back of the case that
surround the fan grill.
2. Holding the fan in one hand, insert the screw from the outside into the case/fan
screw holes.
3. Connect the 4-pin male connector to a 4-pin female connector coming out from
the power supply.
3
4
ty
A
Antec Quality 3 year Warranty
Quality
ec
nt
3 Ye a r W
a
a rr
n
Antec, Inc., warrants this product to be free from defects resulting from faulty
manufacture of faulty components under the following terms:
I. Warranty Length
Parts and labor are warranted for three (3) years from the date of purchase.
Replacement products will be warranted for the remainder of the warranty period or
thirty days, whichever is longer.
II. Who Is Protected
This warranty is enforceable only by the original consumer purchaser.
III. What Is And Is Not Covered
It is important to note that our warranty is not an unconditional guarantee for the 3year length of the warranty. Antec Products are made from the finest materials available under our exacting manufacturing standards. But, like any other product, it is not
indestructible. Therefore, our warranty does not cover product damage that may
result from abuse or mishandling of the products, nor does it cover incidental or
consequential damage.
Also, as with any product, it should be expected that component parts, moving parts,
wheels, etc. will show wear with use over time, and eventually may need to be
refurbished or replaced. This type of normal wear and tear is naturally not covered by
our warranty, but we will always be happy to provide you with prompt, high-quality
repair service at a nominal cost.
All Antec products are covered by this 3 year warranty except keyboards, monitors
and any product purchased before the inception of this warranty program which is
November 1, 2000.
The following are not covered by the warranty:
1. Any product on which the serial number has been defaced, modified, or removed.
2. Damage, deterioration or malfunction resulting from:
a. Accident, abuse, misuse, neglect, fire, water, lightning, or other acts of nature,
commercial or industrial use unauthorized product modification or failure to
follow instructions included with the product.
b. Repair or attempted repair by anyone not authorized by Antec, Inc.
c. Any shipment damages (claims must be made with the carrier)
d. Any other causes which does not relate to a product defect.
3. Cartons, cases, batteries, cabinets, tapes or accessories used with this product.
4. Antec, Inc. does not warrant that this product will meet your requirements. It is
your responsibility to determine the suitability of this product for your purpose.
5. Removal or installation charges.
6. Shipping charges.
7. Any incidental charges.
7
IV. Exclusion Of Damages
Antec's sole obligation and liability under this warranty is limited to the repair or
replacement of a defective product at our option. Antec shall not, in any event, be
liable to the purchaser or any third party for any incidental or consequential damage,
(including, but not limited to, damages resulting from interruption of service and loss
of business), or liability in tort relating to this product or resulting from its use or
possession.
V. Limitations Of Implied Warranties
There are no other oral or written warranties, expressed or implied, including but not
limited to those of merchantability or fitness for a particular purpose. The duration of
implied warranties is limited to the warranty length specified in Paragraph I.
VI. State Law And Your Warranty
This warranty gives you specific legal rights. You may also have other rights granted
under state law. These rights vary from state to state.
VII. Warranty Registration
It is not necessary to send anything to Antec, Inc. to register your products. In the
event that warranty service is required, Antec, Inc. will request proof of purchase
(store receipt or invoice).
VIII. For Warranty Service
If the products need repair, return them to the dealer from whom you purchased the
product. All products returned to Antec for warranty service must have prior
approval, which your dealer can obtain by calling Antec, Inc. at (510) 770-1200.
If the repair is required within the warranty period, enclose the proof of purchase with
the defective product and return it to the dealer. During the warranty period, your
product will be repaired or replaced without charge, excluding shipping and handling.
To return your product for service, package the product securely in its original
packaging and ship it postpaid. Your dealer or Antec will not be responsible for the
damage due to shipping. Remember to enclose your proof of purchase and a clear
description of the problem.
IX. For Out-of-Warranty Service
If the repair is required after the warranty period there will be a charge for service
and parts. Contact Antec, Inc. at (510) 770-1200 ext. 330 for a repair estimate on
your out-of-warranty product.
X. How To Call For Technical Support At Antec
If you need help installing or troubleshooting a product call our Technical Support
Voice Message System at 1-800-22-Antec (1-800-222-6832). Because Antec, Inc.
wants to provide the convenient and comprehensive technical support our customers
deserve, our policy is to return your call within one hour if you call during our office
hours, Monday through Friday, 8:30 a.m. to 5:00 p.m. Pacific Time. The customer
service line is open 24 hours a day, every day. Messages left after office hours will be
returned as soon as possible.
8
Antec, Inc.
47900 Fremont Blvd.
Fremont, CA 94538
tel: 510-770-1200
fax: 510-770-1288
Antec Europe B.V.
Sydneystraat 108 - 112
3047 BP Rotterdam
The Netherlands
tel: +31(10)462-2060
fax: +31(10)437-1752
[email protected]
Technical Support:
1-800-222-6832
or
1-800-22ANTEC
www.antec-inc.com
© 2000 Antec, Inc. Reproduction in whole or in part without written
permission is prohibited. All rights reserved.
Printed in China