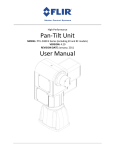
1
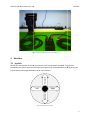
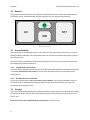
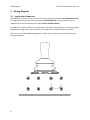
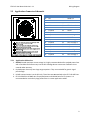
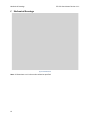
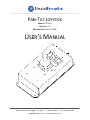
PAN-TILT JOYSTICK
MODEL: PTU-DCJ
VERSION: 1.1.1
REVISION DATE: MAY 21, 2009
USER’S MANUAL
890C Cowan Road, Burlingame, CA 94010 • (650) 692-3900 • FAX: (650) 692-3930
[email protected] • www.DPerception.com
Pan-Tilt Joystick (Model PTU-DCJ) User’s Manual, May 21, 2009
©1991, 2009 by Directed Perception, Inc., 890C Cowan Road, Burlingame,
California
94010,
(650)692-3900,
FAX:
(650)692-3930,
www.DPerception.com.
All rights reserved. Protected under numerous U.S. Patents including
5463432 and 5802412, and patents pending. No part of this book may be
reproduced, stored in a retrieval system, or transcribed, in any form or by
any means, electronic, mechanical, photocopying, recording, or otherwise,
without the prior written permission of Directed Perception, Inc.
The information in this manual is subject to change without notice and,
except for the warranty, does not represent a commitment on the part of
Directed Perception. Directed Perception cannot be held liable for any
mistakes in this manual and reserves the right to make changes.
2
Table of Contents
1
Introduction .......................................................................................................................................... 4
2
Quick Start............................................................................................................................................. 4
3
2.1
System Overview........................................................................................................................... 4
2.2
Components .................................................................................................................................. 4
2.3
Installation and Setup ................................................................................................................... 4
Interface ................................................................................................................................................ 5
3.1
Joystick .......................................................................................................................................... 5
3.2
Buttons .......................................................................................................................................... 6
3.3
Preset Position .............................................................................................................................. 6
3.3.1
Setting the Preset Position.................................................................................................... 6
3.3.2
Recalling the Preset Position................................................................................................. 6
3.4
Zeroing .......................................................................................................................................... 6
3.5
Reset ............................................................................................................................................. 7
3.6
Table of Button Commands .......................................................................................................... 7
4
LED Codes.............................................................................................................................................. 7
5
Wiring Diagram ..................................................................................................................................... 8
5.1
Application Connector .................................................................................................................. 8
5.2
Application Connector Schematic ................................................................................................. 9
5.2.1
A
Application Advisories........................................................................................................... 9
Regulatory Information....................................................................................................................... 10
A.1
FCC Notice ................................................................................................................................... 10
B
Limited Warranty ................................................................................................................................ 11
C
Mechanical Drawings .......................................................................................................................... 12
3
Introduction
PTU-DCJ User Manual Version 1.1.1
1 Introduction
PTU-DCJ is a rugged, reliable joystick that is easy to deploy and integrate with PTU D47, D48, D100, and
D300 models. The DCJ’s most notable features are:
•
•
•
Power-curved contactless joystick for precise and intuitive velocity control.
Simple and responsive positional control with high-duty buttons.
Standard circular MIL connectors with pass-through for easy and robust wiring.
2 Quick Start
This section will get your joystick talking to a pan-tilt unit as quickly as possible.
2.1 System Overview
The DCJ normally operates as the sole interface to a PTU. Power is supplied to and passes through the
DCJ to the attached PTU. The DCJ will automatically connect when power is supplied.
2.2 Components
•
•
•
•
•
PTU-DCJ
Pan-Tilt model D47, D48, D100, or D300
PTU to DCJ cable (PT-DCJ-CABLE)
Breakout cable (PTU-AC-CAB-25BO)
AC/DC Power Supply (PTU-AC-APS-30V)
2.3 Installation and Setup
1)
2)
3)
4)
5)
Setup the PTU such that it is clear from all possible obstructions.
Attach the breakout cable to the DCJ Application Connector (red marking in Figure 1).
Attach the PTU to the DCJ (green marking in Figure 1).
Attach power supply to the breakout cable (DIN connector).
Attach power supply to a switched power strip.
Your workbench should look like Figure 1. Switch on the power strip and observe the DCJ. The LED will
be blinking green while connecting to the PTU. The PTU will reset and zero with the DCJ LED showing
solid green shortly afterwards (see LED Codes for more information about the DCJ’s LED).
A solid green LED means the system is live. Deflection of the joystick will move the PTU accordingly.
Speed, acceleration, step mode, and other parameters that affect the joystick’s response and feel are
governed by the PTU. Refer to your PTU manual and the Command Reference Manual for details on how
to change these settings.
Note: Do not power off the DCJ or PTU by disconnecting the cable directly. Use a switched power strip
or other switched power source to turn the devices off before disconnecting cables. Live cable
disconnection may result in electrical damage to all connected devices.
4
PTU-DCJ User Manual Version 1.1.1
Interface
Figure 1 Setup Overview (arrows mark power flow)
3 Interface
3.1 Joystick
Forward
The DCJ will automatically search for and connect to a PTU when power is applied. The joystick is
LED).. Small deflections in the joystick result
immediately live after a successful connection (solid green LED)
in slow motions while large deflections result in fast motions.
Right
Backward
Left
Figure 2 Joystick Axis Orientation
5
Interface
PTU-DCJ User Manual Version 1.1.1
3.2 Buttons
Three membrane overlay buttons are the primary interface for positional control and modal features.
The buttons are Go, Command (CMD), and Set. See Figure 3 for the layout of these buttons.
Figure 3 Button Layout
3.3 Preset Position
A preset position is an application-specific center position. This may be forward and level or it may be
pointing towards a landmark. This feature allows the user to freely move around and quickly return to a
position of interest.
The preset position is kept within the PTU itself. Moving a PTU from one DCJ to another DCJ will move
the saved preset position with the PTU.
3.3.1 Setting the Preset Position
A new PTU has no default preset position set. Recalling a preset with Go will fail until the preset position
is set. Press and hold the Set button for two or more seconds to set the current position as the
preset position.
3.3.2 Recalling the Preset Position
To go to the preset position, press and release the Go button. The PTU will immediately return to
the preset position. Deflection of the joystick while moving to the preset will abort the move and
immediately enter joystick control.
3.4 Zeroing
A PTU that has been freshly powered on and reset will be pointing at position zero on both axes. Moving
the joystick will deflect the PTU off the zero position. Going to the preset position may also move the
PTU off zero.
Press and release the Command button three times to return to zero.
6
PTU-DCJ User Manual Version 1.1.1
LED Codes
3.5 Reset
There may be cases where a PTU reset is required. The reset command can be sent by pressing and
holding the Command button. The DCJ will reset the PTU and itself on this command.
3.6 Table of Button Commands
Command
Go To Preset
Set Preset
Go to Zero
Reset
Button Sequence
Go
Press & Hold Set
Command, Command, Command
Press & Hold Command
4 LED Codes
The DCJ uses a multi-color LED indicator for user feedback and diagnostics.
LED
Blinking Green
Description
Connecting
User Action
Wait for DCJ to connect to PTU.
Solid Green
Connected
Joystick is live – start using the joystick.
Amber
Button Sequence
One or more buttons have been pressed.
Red
Error
General error. Error conditions are usually
short lived and the DCJ will automatically
attempt to recover.
7
Wiring Diagram
PTU-DCJ User Manual Version 1.1.1
5 Wiring Diagram
5.1
Application Connector
The application connector is a 19 pin circular connector complying with MIL standard MS31122E14-19S.
The appropriate mating connector shall comply with MS3126F14-19P. A mating connector can be
ordered from Directed Perception (part number PTU-AC-cable01-19PmilC).
The application connector allows for payload signals to be passed though the DCJ to a PTU that supports
payload pass-through. Refer to the schematic in 5.2 Application Connector Schematic for details.
Note: not all PTU models support payload pass-through. Check your PTU manual for details on passthrough capabilities.
8
PTU-DCJ User Manual Version 1.1.1
5.2
Wiring Diagram
Application Connector Schematic
Pin
A
B
C
D
E
F
G
H
M
N
P
R
S
T
U
V
Destination
DCJ
DCJ
DCJ
PTU
PTU
Payload
Payload
Payload
DCJ
Payload
Payload
Payload
Payload
Payload
Payload
Payload
Current
3A
3A
1A
1A
1A
1A
1A
3A
3A
1A
1A
1A
Description
RS485 TXRS485 RXRS485 RX+
PTU Ground
PTU 9-30 VDC
Shield
Video 1 Ground
Video 1 Signal
RS485 TX+
Pass-Through 3
Pass-Through 2
Payload Ground
Payload 0-30 VDC
Video 2 Signal
Video 2 Ground
Pass-Through 1
5.2.1 Application Advisories
1. DO NOT exceed maximum current ratings! It is highly recommended to fuse payload power lines
with a fast-blow fuse before entry into the DCJ. Damage due to overcurrent conditions is not
covered under warranty.
2. Payload power lines may have large surge capacitors. They are unsuitable for generic signal
pass-through.
3. RS-485 communication is to the DCJ only. These lines are not attached to the PTU’s RS-485 lines.
4. PT-DCJ-CABLE has 16 AWG wire for payload power and 18 AWG wire for PTU power. It is
recommended to use similarly large power wires in custom application cables.
9
Regulatory Information
PTU-DCJ User Manual Version 1.1.1
A Regulatory Information
Electromagnetic Interference (EMI) is any signal or emission, radiated in free space or conducted along
power or signal leads that endangers the function of a radio navigation or other safety service or
seriously degrades, obstructs, or repeatedly interrupts a licensed radio communications service.
Class A
Class A equipment has been tested and found to comply with the limits for a Class A digital device,
pursuant to Part 15 of the FCC Rules. These limits are designed to provide reasonable protection against
harmful interference in a commercial environment. This equipment generates, uses and can radiate
radio frequency energy and, if not installed and used in accordance with the instructions, may cause
harmful interference to radio communications. However, there is no guarantee that interference will
not occur in a particular installation. Operation of this equipment in a residential area is likely to cause
harmful interference, in which case the user will be required to correct the interference at his/her own
expense.
Class B
Class B equipment has been tested and found to comply with the limits for a Class B digital device,
pursuant to Part 15 of the FCC Rules. These limits are designed to provide reasonable protection against
harmful interference in a residential installation. This equipment generates, uses and can radiate radio
frequency energy and, if not installed and used in accordance with the instructions, may cause harmful
interference to radio communications. However, there is no guarantee that interference will not occur
in a particular installation. If this equipment does cause harmful interference to radio or television
reception, which can be determined by turning the equipment off and on, the user is encouraged to try
to correct the interference by one or more of the following measures:
•
•
•
•
•
Reorient or relocate the receiving antenna.
Increase the separation between the equipment and receiver.
Connect the equipment into an outlet on a circuit different from that to which the receiver is
connected.
Establish good grounding to the base connector.
Consult the dealer or an experienced radio/TV technician for help.
Caution: Changes or modifications of this equipment not expressly approved by manufacturer could
result in violation of Part 15 of the Federal Communication Commission’s rules. The FCC has prepared
the following booklet: “How to Identify and Resolve Radio-TV Interference Problems.” It is available
from the US Government Printing Office, Washington DC, 20402. Stock Number 004-00-00345-4.
A.1 FCC Notice
According to 47CFR, Parts 2 and 15, Subpart B Class A:
10
PTU-DCJ User Manual Version 1.1.1
Limited Warranty
This device complies with FCC Part 15, Subpart B Class A of the FCC Rules. Operation is subject to the
following two conditions: (1) This device may not cause harmful interference, (2) This device must
accept any interference received including interference that may cause undesired operations.
B Limited Warranty
Directed Perception, Inc. warrants this product against defects in material or workmanship, as follows:
For a period of one year from date of purchase, Directed Perception, Inc. will repair the defective
product and provide new or rebuilt replacements at no charge. Warranty repairs require the issuance of
a repair authorization number from Directed Perception prior to the return of merchandise, and the
buyer assumes responsibility for freight charges.
After the one year period, the purchaser must pay for all parts, labor and freight.
This warranty does not cover any damage due to accident, misuse, abuse or negligence. You should
retain your original bill of sale as evidence of the date of purchase.
REPAIR OR REPLACEMENT AS PROVIDED UNDER THIS WARRANTY IS THE EXCLUSIVE REMEDY OF THE
PURCHASER. DIRECTED PERCEPTION SHALL NOT BE LIABLE FOR ANY INCIDENTAL OR CONSEQUENTIAL
DAMAGES FOR BREACH OF ANY EXPRESS OR IMPLIED WARRANTY ON THIS PRODUCT, EXCEPT TO THE
EXTENT PROHIBITED BY APPLICABLE LAW, ANY IMPLIED WARRANTY OF MERCHANTABILITY OR FITNESS
FOR A PARTICULAR PURPOSE ON THIS PRODUCT IS LIMITED IN DURATION TO THE DURATION OF THIS
WARRANTY.
Some states do not allow the exclusion or limitation of incidental or consequential damages, or allow
limitations on how long an implied warranty lasts, so the above limitations or exclusion may not apply to
you. This warranty gives you specific legal rights, and you may also have other rights which vary from
state to state.
11
Mechanical Drawings
PTU-DCJ User Manual Version 1.1.1
C Mechanical Drawings
Figure 4 DCJ Mechanical
Note: all dimensions are in inches unless otherwise specified.
12