1
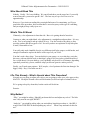
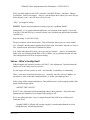
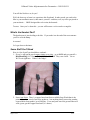
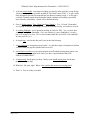
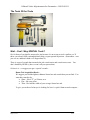
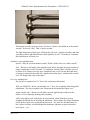
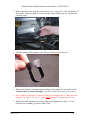
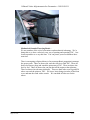
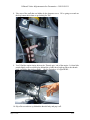
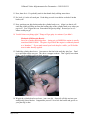
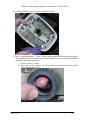
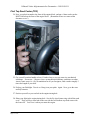
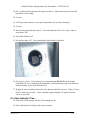
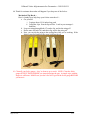
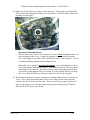
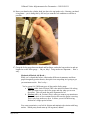
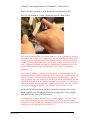
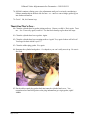
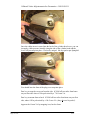
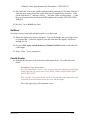
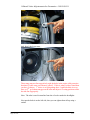
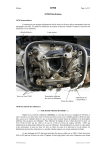
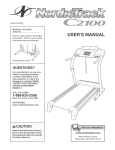
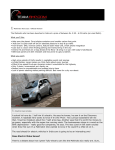
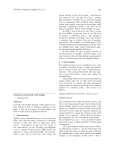
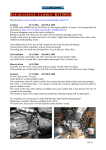
Oilhead Valve Adjustments for Dummies – 2003-09-23
CHAPTER ONE
Oilhead Valve Adjustment for Dummies
Where Our Ham fisted Hero Pursues Advanced Valve Adjustment Procedures in
99 Easy to Follow Steps (Some Of Which Are Repeated Over And Over And Over
Again)
- Or Smidges, Snerks, Torques, Tweaks, and a Peculiar Quantum Tunneling Problem
at the Mechanical Level…
Javarilla
JohnJen
Marc
The author(s) have done their best to provide accurate information. However, they/we assume no liability for any
damage or injury caused by any errors or omissions in this manual. Use at your own risk. Verify all values with
your BMW shop manual.
Page 1 of 37
V 2.2
Oilhead Valve Adjustments for Dummies – 2003-09-23
Who Should Read This
Nobody. Really. We’re not kidding. We can tell and show you the steps, but, if you really
want to learn this, you need to get the ‘feel’. The best way to cop a feel is to serve an
apprenticeship.
However, if you insist on reading this you might find some of it entertaining, you’ll get a
good idea of the procedure, discover that there is no real mystery to this type of wrenching,
and you might pick up a nifty tip or two.
What’s This All About
Ultimately, valve adjustment is about the ride. But we’re getting ahead of ourselves.
Contrary to what you might think, valve adjustment is a straightforward procedure. It’s easy
to do. You’re not going to end up with oil all over. You don’t need to buy thirty or forty
specialty gaskets and an Iraq-pack of oil. Nor will you have an explosion of tiny little parts
to track, reassemble or lose.
You really only need a handful of tools, two different sized feeler gauges, an old bucket, and
enough oil on hand to replace the half a coffee cup of oil you’ll lose.
You don’t need a fancy shop. You can do this in your garage, or, on a calm day, out in the
driveway, with any kind of stool or chair that’s going to let you work at cylinder head level
for a couple hours. (On your third try, you’ll probably only need 30 to 45 minutes, depending
upon how persnickety you are, and how adept you become (practice makes perfect!).
Finally, you’ll need some patience. Well, maybe, a lot of patience the first time through. No
biggie, really. Hey, if Javarilla can do it…
I Do This Already – What’s Special about This Procedure?
Not only are you going to adjust your valves, you are going to refine your valve gaps so they
MATCH. Each pair of intake valves will be matched, as will each pair of exhaust valves.
We’re going to be picky about this, but the results will be divine.
Promise.
Why Bother?
“Why,” you might be asking, “Should I put down this beer and adjust my valves? The bike
runs - they must be set right, RIGHT?”
“And why,” you might be asking after you noticed how long this procedure is, “the HELL
would I care THIS MUCH about adjusting my valves? Doesn’t my mechanic do this for
me?”
Page 2 of 37
V 2.2
Oilhead Valve Adjustments for Dummies – 2003-09-23
Well, your bike might run, but YOU can make it run MUCH better. Smoother. Sharper
acceleration. Little or no surging. And yes, your mechanic does adjust your valves for you,
but he doesn’t (won’t, can’t) do it as well as you can.
“Why,” you might be asking…
LISTEN! Display some mechanical curiosity or go buy a goddamn Honda!
Joking aside - we’re serious about the difference you can make in the quality of your ride.
You truly CAN and WILL give yourself a better valve job than your professional mechanic
can offer you.
Stop snickering. I said VALVE job.
The pro-wrenchers can do decent work. They will almost always get your valves within
spec. But that’s not the same as getting the job done right. Remember, they have a clock to
race, a profit to turn, and a line of customers to please.
You, on the other hand, have only your own sorry ass to please. And, we’re betting that
unless your ass is hanging off the back of JLo or Rabia, you’re probably the only one who
cares enough about it to focus on superior tuning.
Valves – What’s the Big Deal?
Oilhead engines are extremely sensitive to EXACT valve adjustment. Does this mean the
engine won’t run if they aren’t set exactly?
No, the engine will run, just not as well – not as briskly, or smoothly, or consistently.
There’s a lot more to this than meets the eye. (Actually, since the valves are hidden, we
insist there’s more to this than ‘numbs the buns’ or ‘makes your hands go buzz.’)
In fact, many of the common solutions to ‘Driveability Issues’ such as surging, and the like,
begin with this magic phrase,
“ADJUST THE VALVES.”
EXACT valve adjustment (when maintained) reduces these problems. And, when other
adjustments are maintained, your engine really springs to life.
We’re not talking shit here - here’s a snippet from the May 2003 issue of Motorcycle
Consumer News:
“Surging? BMW’s officials still say that ‘surging’ is an aberration blamed on ‘techs
taking shortcuts’ when doing tune-ups.”
Page 3 of 37
V 2.2
Oilhead Valve Adjustments for Dummies – 2003-09-23
You still don’t believe us, do you?
Well, the best way to learn is to experience this first hand. In other words, get used to the
bike as your mechanic tunes it, then tune it yourself – and then, well, try not to get pissed at
your mechanic… BMW designed the valve train, the bastards.
Trust us. Once you’ve done this – you too will become a valve tweeko evangelist.
What’s the Hardest Part?
The hardest part is just deciding to do this. If you make it to the end of the next sentence
you’ll be over the hump.
Awesome!
Let’s get down to business.
Some Stuff You’ll Need
Here is a list of stuff you should have on hand…
1. If you’ve still got the stock engine timing cover plug – go to BMW and get yourself a
RealMansPlug ©®™ from a R650-750-800-900-1000. They cost a buck. Go on.
We’ll wait right here. Where’s the fridge?
2. Some Anti-Seize. There’s a copper based anti-Seize available from Wurth that is the
primo Columbian weed of anti-seize products – but anything that’ll protect the weather
exposed bolts from gunkin’ up will do fine. Your auto parts store has got stuff that will
work, (pssst, get the copper based stuff, it’s better).
Page 4 of 37
V 2.2
Oilhead Valve Adjustments for Dummies – 2003-09-23
3. A decent metric toolkit –Just about everything you need is in the stock kit, except for the
16mm wrench you’ll use to fumble around for Top Dead Center (TDC). I’ve got a spiffy
little aftermarket kit from Proxxon that has just about everything I need. I’ve also got a
cool little T-handle ratchet from MotionPro which combines accessibility, speed and,
most critically, snerkability. (Snerk will be defined shortly).
4. Four (4) feeler gauges. Two .15mm’s and two .30mm’s. Yes, 2 of each. Remember,
we’re going to match valve settings, and you’ll soon find out why you need two of each.
5. A working flashlight - you’re gonna be looking in a hole for TDC. Yes, we know that
‘working flashlight’ is redundant - if it’s not working, it’s not a flashlight, it’s a stick –
but we’re trying to be clear. We’ve been around people like you before. (Uh, truthfully?
We ARE people like you.)
6. A couple rags – one for the dirty stuff, one for the final clean up.
7. An oil catch pan or cheap throwaway bucket – to catch the couple of teaspoons of oil that
you lose when you pop the cylinder head covers off.
8. An uncluttered surface so you can layout parts-n-stuff without loosing them, and so you
know what order to put them back, and so you have a quick indicator that YOU
FORGOT SOMETHING!
9. A magnet stick for the parts you drop. Maybe some needle nosed pliers for the nonmagnetic stuff you drop.
10. What else. Oh yeah, right! Where’s the card for that motorcycle towing place?
11. That’s it. You are ready to wrench!
Page 5 of 37
V 2.2
Oilhead Valve Adjustments for Dummies – 2003-09-23
The Tools Of the Trade
Wait – Can’t I Buy SPECIAL Tools?
Ok, for those of you that fix motorcycles just because it’s an excuse to stock a toolbox, we’ll
throw you a bone AND a rationalization to help you past spousal objections. (Remember – now
you owe us, and don’t think we’ll forget about it.)
There is a type of wrench that can make the job a touch easier and a touch more exact. You
don’t absolutely NEED it, (but we won’t tell your spouse that.)
So here it is – we suggest you get a ‘special’ wrench…
Bonus Tool Acquisition Break…
We suggest you find the lightest, thinnest 10mm box end wrench that you can find. You
want this wrench to be:
• Short – like 4.75” or 120mm, or so
• Flat – like zero offset
• Thin – like half the width of your average 10mm box end
To give you an idea of what you’re looking for, here’s a quick 10mm wrench comparo…
Page 6 of 37
V 2.2
Oilhead Valve Adjustments for Dummies – 2003-09-23
That bottom wrench is what you want. See how it’s about ½ the thickness of the normal
wrench? See how it’s flat? That’s a Heyco wrench.
The light, thin nature of the Heyco will make the job easier. Ignition wrenches, and some
wrenches by Hazet and Stahlwille have these qualities as well. Wrenches by Craftsman
Mac and Snap-on will work, too.
And here is your rationalization –
Spouse: “Why do you need another wrench? What’s all this fuss over a little wrench?”
You: “Because it will tend to limit applied torque and let me apply the proper amount of
torque consistently for all 4 lock nuts. It’s important. Besides, these wrenches can cost
as little as $10, cheap at twice the price compared to the cost of just one threaded insert,
or having to replace the threaded valve adjuster bolt and lock nut. And that little wrench
is a LOT cheaper than a trip to the shop!”
Let’s see, anything else?
Do you have a complete set of ¼” drive, bits, extensions, and ratchet?
Well, you SHOULD. In fact, you should use a ¼” drive for everything while doing these
adjustments. The only exception is the 16mm ratchet for turning the engine over.
Again with the why? Because it will limit your max applied torque and lessen the
chances of over torqueing anything and everything.
AND, using lighter tools yields better feel and control, which can help to prevent
stripping out threads due to muscling the bolt home. These engines are mostly aluminum
and as such are quite easy to strip the threads out of. Yes, there are threaded inserts in
lots of places but they are still imbedded in aluminum, and there are places that don’t
have inserts… yet…
Page 7 of 37
V 2.2
Oilhead Valve Adjustments for Dummies – 2003-09-23
The tools in the picture of the ‘recommended tools’ are ALL ¼”drive (except as noted)
for just that reason.
Ok. Got the tool monkey off your back? Good. Let’s get rolling. We did make it clear that
we’re done the moment you’re out of beer?
Getting Started.
1. Make sure the machine is cold (as defined by the manual as less than 95°F or 35°C). Ask
yourself – would you dare touch the exhaust with your tongue? By god, if you burn
yourself doing this on a hot engine you are a bigger idiot than me and you’d probably just
better stop, put your stuff away, go back upstairs, grab some Cheetos and a Bud, toss the
underwear off the couch and turn on the TV. Mr. McMann is probably up to something
nasty on the WWF!
2. Clean the machine. Especially where the cylinder head cover meets the cylinder head.
You don’t want any grit gitt’n in the engine.
3. If you skipped step 2, go back to step 2, you skank. One half-assed swipe of the bike
with a wet rag every 3000 miles isn’t going to hurt you or it one little bit, and you might
spot that loose bolt or melted hose that you heard or smelt but never bothered to check
out.
4. Put the dog outta the garage and seal the remains of the cat in a ziplock bag.
5. Put the kids in a closet.
6. Send the wife to the male strip joint.
7. Put your favorite wrenchin’ music on the boombox.
8. Pull up a stool.
Go…
1. If you have crash bars and they interfere with removing the stock head guards, they will
most likely also interfere with removing your cylinder head covers as well… so git-ta
wrenchin’. Hey, don’t look at us. We didn’t put those damn things on there.
2. Remove the stock cylinder head guards. Remember where the bolts went – there are 2
different lengths. It’s hard to mess ‘em up when you bolt things back together, but
you’ll find yourself wasting time on a stupid little game of musical bolts if you get them
mixed up.
Page 8 of 37
V 2.2
Oilhead Valve Adjustments for Dummies – 2003-09-23
3. Remove the plug cover from the cylinder head cover. It pops off. Grab it at the back of
the cylinder, (where the plug wire exits) and pull it back slightly and out. Should come
off pretty easily.
4.
Find that strange plastic gadget in your stocker toolkit that looks like this…
5.
Remove the plug wire using that strange looking plastic gadget in your stocker toolkit.
You don’t have to remove the plugs. Lucky bike! God knows how badly you’d foul that up…
6. Now would be a good time to clean everything, if you skipped step #2. Blow air in the
plughole if you got it. No, no, no – in the bike’s plug hole! No more beer for you!
7. Remove the black alternator cover at the front of the engine block. Why? It’s our
preferred way of finding Top Dead Center (TDC).
Page 9 of 37
V 2.2
Oilhead Valve Adjustments for Dummies – 2003-09-23
Mechanical Gauntlet Throwing Break…
We are members of the cult of convenience and mechanical advantage. We’re
doing this so we have a relatively easy way of spotting and repeating TDC. Just
loosen up and do as we say this time. You can pursue your own dumbass ideas
next time.
There is an ongoing religious debate (of near armegeddonic proportions) amongst
the grease gurus. There are those who work the rear tire to find TDC. There are
those who remove plugs and watch the piston run to TDC. There are those who
do it by feel. There are those who can just shut off the engine at the right time.
There are those who advocate telekinesis. There are those who swear a good $20
whore can suck the piston to TDC. We lesser, lazier beings just take off the front
cover and turn the crank with a wrench. We can think of better use for the
whore.
Page 10 of 37
V 2.2
Oilhead Valve Adjustments for Dummies – 2003-09-23
8. Take note of the stuff that was hidden by the alternator cover. We’re going to wrench on
that big bottom bolt when we go looking for TDC.
9. You’ll find the engine timing hole on the ‘Throttle grip’ side of the engine. It’s that little
round slightly concave rubber plug behind the cylinder head, right up above the throttle
body, just below the telelever hinge. Oh, for chrissakes, it’s right HERE…
10. Slip a flat screwdriver up behind the throttle body and pop it off.
Page 11 of 37
V 2.2
Oilhead Valve Adjustments for Dummies – 2003-09-23
11. Now, hunt for it. It’s probably stuck in the throttle body cabling somewhere.
12. No, look, it’s in the oil catch pan. Good thing we took it out before we had oil in that
bucket, eh?
13. Now, position your drip bucket under the cylinder head cover. Align it so that it will
catch the oil that will drip out from the leading edge of the cylinder head cover when you
pop it off. You’ll figure this out. Remember the gravity thing? Pretend you’re oil –
where would you go?
14. You did clean everything, right? Things will get gritty in a minute if you didn’t.
Mechanical Philosophy Break…
Just a bit of insider knowledge here – letting grit git INSIDE the engine is usually
considered BAD FORM. The gitter of grit inside the engine is commonly known
as a “dumbass.” If you stand around your local shop for a while, you’ll find the
term is rather broadly applied.
15. Unbolt the cylinder head cover. Just unscrew the four bolts until they play free. Don’t
try to pull them all the way out. They have a stopper on them. That’s good, leave them
alone - you’d probably just lose them, anyway.
16. Wiggle the cylinder head cover loose - just a wee bit. Some oil will drip out into your
strategically placed bucket. Congratulate yourself. Now kick the bucket and get oil on
your pant leg or shoe.
Page 12 of 37
V 2.2
Oilhead Valve Adjustments for Dummies – 2003-09-23
17. Let it drip. Don’t freak. There’s only a few ounces. There, it’s done. See?
18. Wiggle the gasket off. It’s a pretty beefy piece of gasketry. You don’t have to be a
wimp, but don’t Schwarzenegger it off, either. You will reuse this.
19. Set the cylinder head cover on the bucket so the oil can drain out. If you let it drain
you’ll find it much less messy when you remount it. We’ll make fun of you later because
you forgot this step.
Page 13 of 37
V 2.2
Oilhead Valve Adjustments for Dummies – 2003-09-23
20. Clean the gasket with the designated ‘dirty rag’.
21. Clean the cylinder head surface where it meets the gasket. Don’t try to clean the inside
bits. Pretend you’re having sex and just do as little as necessary. If you try too hard,
you’ll just break something, or get lint everywhere. Just clean the joining surfaces.
Page 14 of 37
V 2.2
Oilhead Valve Adjustments for Dummies – 2003-09-23
22. Clean the matching surfaces on the cylinder head cover.
23. Now – some odd business. There’s a rubber plug gasket that surrounds the spark plug.
It’s typically stuck to the inside of the cylinder head cover, but it might still be buried in
the head in the spark plug tunnel.
a. Find it, remove it, clean it.
b. Now, look at it for a minute. Do you see some curved impressions in the surface
that was facing the engine?
Page 15 of 37
V 2.2
Oilhead Valve Adjustments for Dummies – 2003-09-23
c. Look in the spark plug tunnel of the cylinder head. Do you see what made the
impressions?
d. Good. First clean the mating area on the cylinder head cover then put the gasket
back into place on the cover and rotate the rubber plug gasket about 90 degrees so
it will press virgin flesh against the plug tunnel wall. Ahhhh.
Page 16 of 37
V 2.2
Oilhead Valve Adjustments for Dummies – 2003-09-23
Find Top Dead Center (TDC)
24. Now, scoot back around to the front of the engine block, and put a 16mm socket on the
BOTTOM bolt at the front of the engine block. (Remember where we removed the
alternator cover?)
25. Get yourself a ratchet handle at least 12 inches long so you get some nice mechanical
advantage. Excuse me. I forget we have an international audience, and that was rather
Ameri-centric wasn’t it. Ok, in translation for all you foreigners, find a ratchet roughly 3
times the length of your dick.
26. Pick up your flashlight. Turn it on. Bang it on your palm. Again. Now, go to the store
and buy batteries.
27. Position yourself so you can look in the engine timing hole.
28. Shine your light in the engine timing hole. See the fly wheel/starter ring with all the teeth
on it? There will be a metal tab on the rear side that will indicate top dead center with
the letters OT. You’ll see it when you rotate the engine.
Page 17 of 37
V 2.2
Oilhead Valve Adjustments for Dummies – 2003-09-23
29. Ok – grab the ratchet and rotate the engine clockwise. (Pull toward yourself across the
bottom arc of the ratchet.)
30. Go slow.
31. You’ll get some resistance as you pull compression, but you’ll get through it.
32. Go slow.
33. Watch for the metal tab that reads S. Just a little bit past the S is OT – that’s what we
want, that’s TDC.
34. Just a little further is OT.
35. See the line under OT? You want that line in the middle of the hole.
36. If you got it - great! If you went past it, go around again. DO NOT turn the engine
backwards (As you’re looking in the timing hole, you should always pull your ratchet up
from the bottom, never down from the top.)
37. Wiggle the valve assembly (where the valve adjusters and lock nuts are). If they’re loose
then it’s time to get to work. If not, crank the engine around to OT again to free the
valves on your side.
It’s Valve Adjustin’ Time…
38. Grab your 4 feeler gauges, but don’t do anything just yet.
39. Notice the bucket of oil right under valve assembly.
Page 18 of 37
V 2.2
Oilhead Valve Adjustments for Dummies – 2003-09-23
40. Think for a minute about what will happen if you drop one of the feelers.
Mechanical Tip Break…
Here’s a handy tip to help keep your feelers outta the oil…
a. Get yourself:
i. 2 strings about 12-16 inches long, and
ii. 2 alligator clips. Roach clips will do. Look in your teenager’s
bedroom.
b. Loop one string through both 15’s and a clip, and tie the string off.
c. Do the same for both 30’s and their clip, and tie the string off.
d. Now, you can clip the string to the cooling fins while you’re working. If the
feelers come free and fall, they won’t fall into the oil.
41. Clean all your feeler gauges – they’re about to go to work. NOTE: Clean the feeler
gauges EVERY TIME, BEFORE you insert them into the gap. A simple wipe with the
fingers is sufficient. MAKE sure you don’t feel ANY grit on the feeler gauge BEFORE
you insert it.
Page 19 of 37
V 2.2
Oilhead Valve Adjustments for Dummies – 2003-09-23
42. Clip your intake feelers to a cooling fin. Then insert the intake feelers into the intake
valve assembly. We’re talking about the 15’s. They go in the valve assembly at the
‘rear’ of the cylinder head.
43. Clip your exhaust feelers to a cooling fin and insert the exhaust feelers (the 30’s) into the
exhaust valve assembly. Note: The exhaust valve assembly is at the ‘front’ the cylinder
head near the exhaust headers.
Page 20 of 37
V 2.2
Oilhead Valve Adjustments for Dummies – 2003-09-23
44. Make sure all four feelers are in place at the same time. In this picture, the front of the
bike is on the left, meaning the exhaust valve assembly is on the left and the intake valve
assembly is on the right.
Mechanical Philosophy Break…
Why all four at once? Well, You’re going to see some weird stuff happen when you
start wrenching on the valves – changes at an intake valve will affect an exhaust
valve, and changes at one intake valve will affect the other. Can’t explain it. Sort of
a quantum-tunneling problem at the mechanical level.
Remember, you’re going for matched adjustment – you want both intakes to be as
close to one another as humanly possible. Same with the exhausts. The closer they’re
matched the sweeter the ride. So you need two of each feeler gauge, and you know
weird stuff is gonna happen when you wrench, so go buy all four feelers, you cheap
shit. Geez, drop $15 thou on a motorcycle then try to save $5.00 on gauges.
45. With all the feeler gauges in place, assuming you could get them all in, let’s check your
valves. We’re going to test both intake valves to see if they feel the same, and both
exhaust valves to see if they feel the same. If one or more feeler gauge(s) just doesn’t
want to slip in the gap you will need to open the gap up a bit during steps 57 thru 62.
Then you’ll be able to proceed. Ready?
Page 21 of 37
V 2.2
Oilhead Valve Adjustments for Dummies – 2003-09-23
46. Brace your hand on the cylinder head just above the top intake valve. Bracing your hand
is important – you’re doing this by feel and you want the feel conditions as similar as
possible.
47. Grasp the feeler gauge between thumb and forefinger, and make long strokes in and out
lengthwise on the feeler gauge… Oh yea, baby! Long strokes are important… Here’s
why…
Mechanical/Marital Aid Break…
While you’ve heard this before, albeit under different circumstance and from
people marginally prettier than us, that quick in-n-out poking isn’t going to get
you maximum results. Here’s why…
You’re gonna feel 2 different types of drag on the feeler gauge.
a. Stiction (AKA Static Friction) This is the initial resistance felt as drag
when you start to move the feeler gauge and also when you reverse
directions. This will mask the more important feel of:
b. Friction (AKA, uh, Friction) This is what you want to pay attention to.
This is the more-or-less constant friction felt once the gauge is moving.
This is why long strokes are best. It allows you to feel the moving
friction for a longer period of time.
You want to maximize your feel for friction and minimize the stiction with long
strokes. Which pretty much sums up life in general, dudnit?
Page 22 of 37
V 2.2
Oilhead Valve Adjustments for Dummies – 2003-09-23
48. Make sure not to bind the gauge by twisting or bending it…
49. Feel that? Move your fingers back and forth so that you find the least drag when pushing
and pulling lengthwise on the gauge. That spot with the least drag is what you want to
feel, that’s just the friction.
50. Do it some more. Oh. Oh. Yea baby. Long strokes. Got the feel?
51. Good, now use the same hand and the same type of brace and feel the other intake valve.
52. I’m betting they’re different! AND THIS, my friend (for as long as the beer holds out)
is where you’ll make your adjustments and change your life!
53. Grab your 10mm box wrench and your 3mm hex wrench. It’s time to adjust.
54. Select the valve that needs the most adjustment.
55. Put the box wrench on the lock nut, but don’t do anything just yet.
56. Put the hex wrench into the valve adjuster, but don’t do anything just yet.
The Agony and the Ecstasy
57. Brace your HEX wrench hand on a sturdy engine bit – don’t try to move the wrench.
Just brace it so that it doesn’t move when you loosen the bolt with the box wrench. It’s
hard to see, but we’re pushing the hex wrench into the cylinder head. The hex wrench
actually bows under the pressure.
Page 23 of 37
V 2.2
Oilhead Valve Adjustments for Dummies – 2003-09-23
Here’s another view of a different type of bracing… Note how two fingers are used to
pull the thumb and hex wrench into the cylinder head, ‘locking’ the hex wrench in place.
58. Loosen the lock nut with the box wrench.
Mechanical Philosophy Break…
On your first session, or, on any session following a trip to your professional
mechanic, odds are that ALL of the lock nuts are waaay too tight.
But, even more important, they are not tightened equally. This small detail
figures prominently in how long your valve setting will last (at least it’s one of the
most important parameters you have direct control over).
What this means is (at least for your first adjustment), ALL of the lock nuts
should be loosened and then tightened so that they all match. Usually during the
first adjustment you’ll have to do this anyway, just because, as you’ll see later…
59. Loosen or tighten the hex wrench just a smidge as determined by your earlier feeler, uh,
feels.
Mechanical Vocabulary Break…
A smidge is not the woman you caught your dad with in the closet at the
Christmas party your parents threw back in ’72. That was Mrs. Olsen.
A smidge is the technical term for “about the width of the hex wrench as
measured at the outer most end of the wrench.” You’re going to find it doesn’t
take much movement of the hex wrench to make a substantial difference in the
feel of the valve adjustment. Work in smidges.
Page 24 of 37
V 2.2
Oilhead Valve Adjustments for Dummies – 2003-09-23
Pre-Smidge…
Post-Smidge…
Compare the two photos, looking closely at the pink (you pervert). See how very
slightly the hex wrench moved? That is a smidge!
60. Brace your HEX wrench hand on a sturdy engine bit so the next step doesn’t move
the setting (too much). We suggest you PUSH the outer end of the hex wrench into the
cylinder head, thus ‘locking’ it in place.
Page 25 of 37
V 2.2
Oilhead Valve Adjustments for Dummies – 2003-09-23
61. Tighten the lock nut with the box wrench just a little bit.
Mechanical tidbit of the week award …
You may have never heard this before, looser valve settings are better. Most
people think that in order to get the maximum lift and duration of the valve (for
the best breathing), set the valves on the tight side. This is a common mechanical
legend that doesn’t really hold up well to scrutiny.
In fact one advanced trick is to ‘mild’ the cams where you deliberately widen the
valve gaps and get better engine response. In our case, setting the valve gaps
looser aids in getting better feel from the feeler gauges and thus closer matching
from each pair of valves (which is the real goal here).
So go with easier pull on the feeler gauges but not so loose that the feeler gauges
want to fall by themselves, but do go for maximum feel as the gauge slides back
and forth in the gap.
62. Check the feeler gauge. Long strokes. Braced hand.
63. Better? Worse? Go back and repeat The Agony and the Ecstasy until you’re happy.
Mechanical Head Thump Break…
It’s tempting to try to feel the gap when things are loose. This doesn’t work.
When you tighten the lock nut, the gap will change.
It’s tempting to try and move the locknut and adjuster shaft at once. This doesn’t
work. You’ll just end up screwing up the threads, making your valve adjustment
suck forever after. When you buy that Honda because “it’s so much smoother”,
we’ll all know that you bunged up your threads, Dumbass.
It’s tempting to not brace your HEX hand securely. You’ll learn that the brace is
the key to speed during this procedure..
It’s tempting to give up. But keep going. It’s worth it. Really, it is!
64. Great! One valve is done. (Or is it?)
65. Now do the other intake valve.
66. Done? Great!
67. Now go back and forth between the intake valves until they’re matched to each other.
This is the trick. This is where you make the difference. Do NOT skimp here. Get
those valves to match.
Mechanical Technique Break…
Page 26 of 37
V 2.2
Oilhead Valve Adjustments for Dummies – 2003-09-23
Remember; use the same hand to test.
Brace that same hand in the same way.
Use long feeler strokes, lengthwise on the feeler.
Your First Valve Adjustment Sympathy Break…
Yes, the gap changed. Changing one changes the other. Keep at it.
Yes, isn’t that odd. Changing the other, changes the first. Keep at it.
Yes, it’s frustrating. Put down the hammer. Calm down. Keep at it.
**Keep THIS firmly in mind** – what you are doing right now is what
the pros can’t afford the time to do. Every refinement you make right
here pays off big time in rideability. Keep at it!
ALSO KEEP IN MIND IT WILL GET EASIER, MUCH EASIER, THE
MORE TIMES YOU DO THIS! ! !
68. Now adjust the exhaust valves. This is the exact same drill. Except you’re using the
thicker feeler gauges, and you’re working at the front of the cylinder head. Refreshing
change of view, ain’t it?
69. Match the exhaust valves.
70. Done? Excellent!
The Agony and the Ecstasy, the Sequel.
71. Now check your intake valve gaps. They changed didn’t they? HA-HA-HA-HA. Ow!
Ok. We won’t laugh again. We promise.
Your Last Valve Adjustment Sympathy Break – (get over it)…
Remember how you always hear about quantum mechanics and tunneling and
such. Well, as near as we can tell, you’ve just taken a crash course in the former,
because you’ve just experience the latter. YOU’VE JUST ENTERED THE
TWILIGHT ZONE.
BMW mechanics swear this ‘is not supposed to happen’.
Well, it does.
You now know what it takes to get the valves set, then matched in their pairs, then
refined across all settings. It’s going to take you the better part of an hour the
first time through. Don’t sweat; you will get faster each time. NOTE: it is NOT
necessary that the intakes and the exhaust valves be matched together. Just match
the 2 intakes together and match the 2 exhaust valves together.
72. Re-adjust your intake valves.
Page 27 of 37
V 2.2
Oilhead Valve Adjustments for Dummies – 2003-09-23
73. Re-check your exhaust valves.
74. HA-HA-HA-HA. Sorry. I know we promised not to laugh…
75. Got it? Here, let me check. Nope, this one’s a little tighter than that one. This feels
pretty loose. You might be happy, but if it was MY bike.... (We find guilt to be a
superior motivator.)
76. Repeat.
77. Good? Fantastic! OK, now we go for the final torque on the lock nuts… Spec calls for
8Nm (about 5.9ft-lbs). ALSO during this final set of adjustments, remove the 3mm allen
wrench AND the 10mm box wrench after EVERY adjustment. This means the only tools
touching your valve assembly are the feeler gauges. This removes ALL external
influences while you are going for that last bit of Tweek.
Kinesthetic Awareness Break…
How do you know when you have applied 5.9ft lbs of torque? Well, here’s
where an experienced hand (or experience, period) comes into play.
Your hand (without ANY extra mechanical leverage) can generate about 7ft-lbs
of torque. The grip shown below would generate more power than you need
right now.
Not only is that too much, you can’t use a ratchet because you need to keep the
hex wrench locked while torqueing the locknut.
So what do you do?
Page 28 of 37
V 2.2
Oilhead Valve Adjustments for Dummies – 2003-09-23
What is needed is a smooth ½ snerk shortly after real resistance is felt.
Here’s a way to think of ½ snerk with the box wrench – think ‘Pinky’.
Now, don’t be thinking this is a delicate maneuver. You’re putting real power to
the wrench, but, because you’ve choked up, and you’re holding the pinky off the
wrench, you’re preventing yourself from putting a heavy fistful of twist on that
locknut. If you put that pinky down, you’re going to apply more force than you
need. Experiment with the two grips by clamping an expendable bolt in a vice
and wrenching a nut with pinky up and pinky down. There’s a surprising
difference.
If you want to ‘calibrate’ your new ‘special wrench’ to your hand then use the
bolt and nut mentioned above and torque the nut down with a regular wrench and
then use your new wrench to get the same amount of applied torque. Another
way to calibrate your new wrench is to use the bolt and nut mentioned above and
add LOTS of torque to the nut and pay attention to the way the nut feels when it
goes kinda mushy. At that point you’ve gone beyond 1 snerk and even 2 snerks,
you’re into mangling the threads. This feeling is what we want to avoid.
Another bit of information here, the Heyco wrench (as shown) is the wrench
BMW supplied in the old airhead tool kits for doing this job. These wrenches
ARE still available from your BMW dealer.
As an added bit of insight into this illusive ½ snerk, imagine ½ of ½ of ¼ of a
turn. That is about the amount of travel (about a 1/16th of a turn) the wrench
needs to be moved AFTER real resistance is first felt on the lock nut. NOTE this
applies to the valve adjuster lock nuts ONLY ! ! !
Page 29 of 37
V 2.2
Oilhead Valve Adjustments for Dummies – 2003-09-23
Ok – so it is REALLY hard to communicate the feel of ½ snerk on paper. The
best we can do is show you the illustration above, and give you a couple of polar
extremes to avoid…
Do NOT just make the locknut finger-tight, or tighten the locknut just a little bit.
You’ll be paying the big bucks for someone to dig it out of your engine block 50
miles from now, and…
…you most definitely do NOT want to be doing this…
This tender little expression of leverage would rip the shit right outta threads.
IT IS NOT A GOOD THING to over torque the locknuts. Go for that smooth ½
snerk shortly after real resistance is felt. Use a slightly disabling grip, and the
thinnest, flattest 10mm box wrench you can find, and you’ll be fine.
But more importantly, develop the feel for consistently repeating this amount of
torque so that all 4 lock nuts are the same.
Also, be aware that other wrench’n techniques will work. It is important that you
find a means to apply the desired ½ snerk consistently, if this means using a
different grip at the end of the wrench instead of choking up on the wrench with
your whole hand that will work as well…It’s the ½ snerk every time that is
important.
Page 30 of 37
V 2.2
Oilhead Valve Adjustments for Dummies – 2003-09-23
78. SOOOO continue refining your valve adjustments until you’re seriously considering a
lifetime membership in the hair club for men – or – until we can no longer guilt trip you
into further refinement.
79. Got it? Ok, let’s button it up.
Thank God That’s Over…
80. Clean the cylinder head to gasket joining surfaces. I know you did it. Do it again. Trust
me. See. It was oily again, wasn’t it! Use the final clean up rag for these last steps.
81. Clean the cylinder head cover gasket. Again.
82. Clean the cylinder head cover mating surfaces. Again? Yes, again. Is there still oil in it?
You forgot to drain it didn’t you?!?!
83. Clean the rubber plug gasket. Yes, again.
84. Remount the cylinder head gasket – it’s shaped so you can’t really mess it up. Be sure it
fits flush.
85. Put the rubber spark plug gasket back into/onto the cylinder head cover. You
remembered to rotate this gasket so the plug indentations get virgin gasket, right?
Ahhhh.
Page 31 of 37
V 2.2
Oilhead Valve Adjustments for Dummies – 2003-09-23
86. Pop the cylinder head cover back on the bike. Remember there’s oil in it. Get all your
surfaces together with hand pressure, then start tightening bolts. Don’t dwaddle. Faster,
damnit!
87. Ah geez, my grandmother is faster than you and she’s dead! Pull it out, let’s clean it all
up and try it again. NOTE, if any oil is left on either of the gasket to metal surfaces and
then the valve cover is tightened down, THAT is where oil will weep from.
88. On? Ok! Tighten that sucker up by rotating bolts for even pressure in a cross pattern.
NOTE. DO NOT OVER TORQUE the 4 cylinder cover bolts. The spec calls for 8Nm
(just like the lock nuts on the valve adjuster). Once you feel the cylinder cover bolts seat,
just a tiny snerk is more than enough.
89. Push the spark plug wire into the plug tunnel and onto the plug until you hear it ‘Pop’. If
you don’t hear the pop, do it again. Maybe make sure there’s nothing else in there. You
did clean the bike didn’t you? (Dumbass, we told you to clean the bike.)
90. Replace the spark plug cover on the cylinder head cover.
Plastic Magic Break…
Here’s a nifty trick of mounting the spark plug cover. Seat it from the back (wire
exit side) to front using your thumb.
Near the back of the spark plug cover, on the inside surface, is a rubber insert.
Seat it into it’s mating holes at the rear of spark plug cover, then push the
sparkplug cover from the back of the cover toward the front of the bike.
Page 32 of 37
V 2.2
Oilhead Valve Adjustments for Dummies – 2003-09-23
Once the rubber insert is seated into the back of the cylinder head cover, you can
just apply a little pressure laterally along the side of the cylinder head and the
cover will just snap into place. Und voila, amigos! Ich neyt parlez pas Spanglais!
You should hear the front of the plug cover snap into place.
Don’t try to snap the covers on from the side. It’ll fall off two miles from home
on your first ride where it’ll be pulverized by a ’78 Crown Vic.
Don’t try to mount front to back. It’ll fall off two miles from home on your first
ride, where it’ll be pulverized by a ’80 Crown Vic. (they do travel in packs!).
Appease the Crown Vic by snapping it on, back to front.
Page 33 of 37
V 2.2
Oilhead Valve Adjustments for Dummies – 2003-09-23
91. Put a little anti-seize on the cylinder head guard bolts, and start all 3 by hand. (Hint, the 1
short bolt goes on the front of the engine, that leaves 2 long bolts for elsewhere. AND
put the front bolt in 1st, and leave it loose… The other 2 bolts will align easier…) After
they are all started and seated by hand THEN tighten with a ratchet. DO NOT OVER
TORQUE.
92. By God. You’re HALF way done!
Halftime!
Good time to score some lunch and take a break so you don’t rush.
93. Rotate the engine to top dead center again. Use your flashlight, and your 16mm socket
on a ratchet that’s 3 times the length of your dick, and rotate the engine CLOCKwise
through S to OT.
94. Go repeat The Agony and the Ecstasy and Thank God That’s Over on the other side
of the engine.
95. Done? Wow. You’re getting fast!
Fourth Quarter
96. Remount the alternator cover at the front of the engine block. Use a little anti-seize,
please.
Alternator Cover Alternatives…
Hey kid wanna know a secret? After you move the cover into place put the bolts
on the right side (as you face the cover) in first, USING YOUR HAND AND
NOT A RATCHET.
Why you ask? If you look closely you’ll see a metal tube with 2 tangs that reach
in and will be bolted down between the cover and the engine.
Here’s the upper tang, of the alternator cover…
Page 34 of 37
V 2.2
Oilhead Valve Adjustments for Dummies – 2003-09-23
And, here’s the lower tang…
These tangs may not line up perfectly with the holes in the engine (did you notice
that these 2 bolts came out with more effort?). If this is what you have found then
you have 2 choices. 1st choice is to fight putting these 2 right side bolts in every
time, or 2nd go Schwarzenegger on the tube and adjust it’s resting position so that
the tabs line up properly.
Note: The tube is an oil return line from the oil cooler under the headlights.
Next put the bolts in on the left side, then you can tighten them all up using a
ratchet.
Page 35 of 37
V 2.2
Oilhead Valve Adjustments for Dummies – 2003-09-23
97. REMEMBER TO REPLACE THAT NIFTY LITTLE NEW (OLD) TIMING COVER
PLUG (RealMansPlug ©®™ )…Believe it or not it does make a difference on how the
engine runs if you forget it (yes it’s a subtle difference)… And for those of you who
would REALLY like to be able to get that new RealMansPlug ©®™ to actually fit in the
hole and not continually fall on the floor, try this. 1st clean all of the wax coating off of
the new plug. Contact cleaner or WD-40 works quite well… Then completely dry the
plug. Next peer into the timing hole and notice that it is oval, not round. Now what you
want to do is to sneak one edge of the RealMansPlug ©®™ so it fit into the hole along
one of the long sides of the oval. Then with a flat blade screwdriver push the other side
of the RealMansPlug ©®™ into the block and towards the side that is already seated.
This deforms the RealMansPlug ©®™ into an oval and convinces it to seat fully… You
can check to make sure that the RealMansPlug ©®™ is fully seated by looking at the
outer edge of the RealMansPlug ©®™ and see if it is in contact with the block. You can
also push it with the screwdriver just to make sure…
Sudden Death
98. Place key in ignition, turn and start.
99. Suhweeet! You are done and we are out of beer.
Now, go tune your throttle bodies…They WILL need it…
Post Script
AND NOW FOR MORE AGONY (which ultimately leads to more ecstasy as the rest of the
engine gets used to and then wants to stay running properly).
This is just the first adjustment and it won’t last very long. Why? Because once you become
sensitized to how well the engine CAN run you’ll notice that after a while it will turn once again
to the dark side...
Which means, Luke, you will get more practice at doing this. After a few more sessions the
amount of time needed to complete this procedure will plummet to under an hour. At the same
time the number of valves that need to be adjusted and their amount of adjustment (how much
you have to turn the 3mm hex wrench) will also diminish. The engine will get used to staying in
the sweet spot and you will become more expert at the feel required and thus get better results.
And now that you’ve completed this exercise in engine tweaking you can rest on your laurels
knowing you’ve reached the pinnacle of tweakdom, RIGHT?
Well… Just think of this as PHASE I. Yes, Virginia there is more, there’s always more…
BUUHAHAHAHAHA
Page 36 of 37
V 2.2
Oilhead Valve Adjustments for Dummies – 2003-09-23
About the Authors
JohnJen
[email protected]
Uberseer of Wrenchery. No, not wenchery, WRENCHERY – Geez, I thought the Honda
guys left…
Marc
[email protected]
Wrencher. Horsepower fiend.
Javarilla
[email protected]
Wrencher. Comedic Technical Writer, Hand model.
God (As portrayed by Michelangelo) [email protected]
Hand model.
Page 37 of 37
V 2.2