1
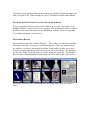
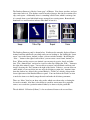
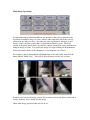
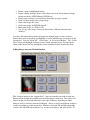
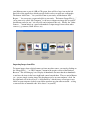
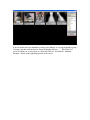
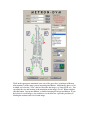
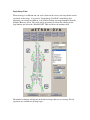
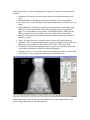
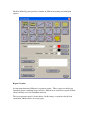
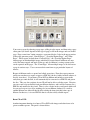
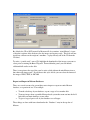
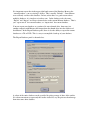
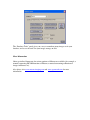
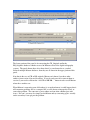
Metron-DVM Version 5 User Manual
Version 5.3
© EponaTech LLC 2010
Starting Metron
The installation program has placed an icon on your desktop that looks like this:
Double clicking the icon will start Metron. If the icon does not appear on your desktop,
you can start Metron by going to the “Start” button (extreme lower left on your computer
screen), then choosing “Programs”, and then choosing “EponaTech” and then “Metron”.
The installation program also places an icon on your desktop called “Metron Guide”
which is a shortcut to this document.
When Metron Starts Up
When you first start up Metron, you will see a panel informing you that you are in “Trial
Mode”. In Trial Mode you will find many features of Metron are blocked to you. But,
you may be able to explore Metron a little bit and get a feel for it.
If you have already purchased Metron, the company you purchased it from can supply you
with an “Unlock Code” which will take you out of Trial Mode and fully enable Metron.
First-Time Install of Version 5 over an Older Version of Metron
If you are upgrading from an earlier version of Metron to version 5, you will have to go
through a one-time “database conversion” operation. This operation will convert your old
database(s) into the modern format for use with Metron version 5. Please see Appendix
A for further instructions on this process.
The Database Browser
Metron always starts in the “Database Browser”. This is where you can browse and find
all images, video clips, and reports in your Metron database. The basic organization of
the database is by Owner, then Animal, then Date. Each Owner may have one or more
Animals, and each Animal may have been imaged on one or more Dates. We sometimes
use the term “Study” for all the images of a given animal on a given date. The Database
Browser always shows thumbnails (small images) for all the items in the selected study.
The Database Browser panel, and thumbnails representing all the items in a selected
study.
The Database Browser is like the “home page” of Metron. You always start here, and you
often come back to it. The database consists mostly of images, but can also contain video
clips, and reports. Additionally, there is something called a form, which is an image, but
it is created from several individual images arranged in a certain pattern. Beneath each
thumbnail is a small icon that indicates what kind of item it is.
The Database Browser panel is shown below. It indicates the currently displayed Owner,
Animal, and Date which tells you which study you are looking at. By clicking the “down
arrow” next to the Owner, Animal, or Date, you can switch to another. By clicking the
“New…” button to the right of each of these, you can create a new Owner, Animal, or
Date. When you first create a new Animal, you can enter its species, breed, and other
data. This “Animal Data” can later be viewed or edited by clicking the “Edit…” button to
the right of the animal’s name. You can delete an owner (and all animals and dates and
images) by using the “Del” button to the right of the Owner. Likewise, you can delete an
entire animal, or you can delete just one study by deleting a certain date. Anytime items
from the database are deleted, they go into Metron’s “Trash Can” which is shown in the
lower right corner of the Database Browser panel. You can click on the Trash Can icon
to un-delete items or to finally empty the trash and make the deletions permanent.
There are “filters” that let you show only studies which were taken today, or during the
last week or month. Also there is the ability to search by owner name for a particular
owner, or to search for a particular animal either by its name or by the patient ID.
The tab labeled “Collection (0 Items)” is for an advanced feature to be covered later.
The Database Browser panel lets you find any image in Metron, lets you jump into
various ways to acquire a new image, and lets you operate on sets of images in various
ways.
Multi-Image Operations
An important concept behind the Metron user interface is that you can perform some
operations on multiple images at a time, whereas other operations only make sense to
perform on one image at a time. Any time you want to perform an action on several
images at once, the place you do that is in the Database Browser panel. The lower
portion of the panel (shown above in isolation) contains actions that can be performed on
multiple images at a time. You specify the images by single-clicking on the thumbnails,
which will turn the border of the thumbnail red, showing that it is selected.
For example, click on 6 thumbnails to highlight them with a red border; then click the
button labeled “Multi View”. You will see those 6 images side by side as below:
In multi-view, below each image, you are able to zoom, and you can choose to turn off or
on any “mark up” that is drawn over the image.
Other multi-image operations that you can do are:
•
•
•
•
•
•
•
•
Delete a group of highlighted images
Export a group of images (that is, write them out to your disk in whatever image
format you choose (JPEG, Bitmap, DICOM, etc)
Print a group of images (you can choose how many per page to print)
Stich 2 or more images into a single image
Send some images by e-mail
Send some images by DICOM network
Burn some images to a DVD or CD
Cut or Copy some images (later to be Pasted into a different location in the
database).
Just above the buttons that perform operations on multiple images at once are three
buttons that can be used to help you highlight, or select, which images you want to do the
operation to. You can “Select All”, “Select None”, or “Select Next Region”. The “Select
Next” button will highlight all images from a certain anatomical zone, and subsequent
clicks to this button will step through the various anatomical zones found in the study.
Adding Images into your Metron Database
This section is known as the “Acquire Box”. Any new item that you wish to bring into
Metron will be brought in by clicking on one of the choices in this box. The exact set of
choices in this box may look different in your copy of Metron, depending on which
hardware devices you have interfaced to Metron. Above we show two different examples
of what you might see in the acquire box. Metron is used with CR and DR radiography
systems, and with USB video cameras (e.g. an inter-oral camera), and other devices. If
your Metron came as part of a DR or CR system, there will be a large icon on the left
hand side of the acquire box which you will click in order to acquire new radiographs.
The button “Add Form…” lets you add a Form to your study, and the button “Add
Report…” lets you create a report and add it to your study. The button “Image File(s)…”
(or in some cases called “My Computer”) is the way to import any image file on your PC
into Metron, and also any *.avi video file can be imported this way. Finally, the “Other
Sources…” button brings up a panel with methods to input images from various other
sources (e.g. scanners, twain devices, etc).
Importing Images from Files
To import images from a digital camera or from any other source, you start by clicking on
the “Image File(s)…” or “My Computer” button in the acquire section of the Database
Browser. This will bring up a new display of thumbnails, but note that these thumbnails
to not have the icons in the lower right hand corner beneath them. They are not in Metron
yet – you are simply viewing image files that happen to be on your computer’s disk. On
the right hand side of the screen is a “folder Browser” which you use to navigate to any
folder on your computer (indeed to any folder anywhere on your office network – as long
as remote disks are mounted with “drive letters” on your PC)
You can double-click one thumbnail to bring it into Metron, or you may highlight a group
of images and then click the button “Import highlighted Images…”. This brings to a
screen in which you see one image at a time in its full size, and with the “Anatomy
Diagram” shown on the right hand portion of the screen:
Click on the appropriate anatomical zone (one of the green dots) to indicate to Metron
what anatomy is in the image you are importing into Metron. Additionally, there is a list
in which you select the “View” that best describes the image (e.g. Lateral, DP, etc). You
can adjust the size and location of the annotation on the image as well. When complete,
click the button “Accept into Metron” to finalize bringing the image into Metron. If you
had selected several images, you would now see the next one; repeat the procedure of
labeling the anatomy and view of each image.
Single Image Tools
When an image is in Metron and you view it alone on the screen, you can perform various
operations on the image. You get into “Single Image View/Edit” immediately after
importing a new image into Metron, or by double-clicking any image thumbnail from the
Database Browser screen. The single image operations are entered by clicking on the
large buttons just below the “Metron-DVM” label and above the anatomy chart.
The number of buttons will depend on the kind of image that you are viewing. Not all
operations are available on all image types.
In the example above, a lateral radiograph of an equine foot, there are many operations
available:
• Annotation: All images have this feature which lets you pick the anatomy and
view
• Calibration: Prior to making measurements in images, you need to calibrate
• Free mark-Up: A set of tools that let you make measurements and add notes to an
image
• Guided Mark-Up: A protocol for making measurements for certain image types.
In Metron we have patent hoof analysis measurements that you are guided to
make. For small animals we support the Vertebral Heart Score (VHS) and the
TPLO procedure for dogs, and other such tools will be added in the future.
• Measures: this panel presents the measurements which resulted from a Guided
mark-Up session
• Scores: this panel presents a scoring system associated with guided mark-up.
• 3-D Bones: this is a specialty function just for later radiographs of the equine foot.
Metron creates approximate 3-D models of the 4 bones of the distal limb
• P3 Analysis: this is patent-pending method we propose for measuring the health
of the equine pedal bone (available for lateral radiographs)
• Luminance: this is a ‘beta’ feature related to measuring bone density, but not fully
developed yet. We are engaged in university research in this area.
In the single image view/edit screen, a row of buttons across the bottom of the screen
provide image filtering tools and other functions.
The Free Mark-Up panel provides a number of different measuring and annotation
options.
Report Creation
An important function of Metron is to generate reports. These reports are multi-page
formatted reports containing images and text. Metron users create these reports for their
clients and they are a vital communication tool.
The report generator panel is shown below. In this image, a report has already been
constructed which consists of several pages.
You create a report by choosing a page type, adding it to the report, and then using a page
editor panel (its details depends on the type of page) to fill in the images and text on that
page. Pages come from 3 main categories, represented by the 3 tabs in the upper portion
of the repot generator panel: “Generic Pages”, “Specialty Equine Pages”, and “Form
Pages”. Most reports are built from “Generic Pages”; the “Specialty Equine Pages”
format pages in which multiple images which have been measured in Metron are autoscaled and auto-cropped and made to line up, and also Metron’s scoring system results
can be reported on the pages. The “Form Pages” allow multiple images to be laid out on
a page in various ways. Users can create their own forms to get particular layouts of
interest.
Reports in Metron can be re-opened and edited at any time. From the report generator
panel you can choose to export a report as a PDF file (the free Adobe Acrobat software is
need to view these). If you burn a CD or DVD in Metron and include a report in the
study that goes onto the disk, it will automatically be converted to a PDF file and put on
the disc. This way, the recipient of your CD will not be able to edit the report. Likewise,
you can e-mail a report directly from your Metron database, and it will be converted to a
PDF file and attached to the e-mail. There is also a choice in the e-mail panel which will
let you send a report (as well as anything else in your Metron database) by e-mail to
another Metron user who will then be able to bring the items into their own copy of
Metron. In that case, it is not a PDF file that is sent, but a fully editable report.
Burn CD or DVD
Another important function is to burn a CD or DVD with images and other items to be
given to another person. The panel is shown below:
By default, the CD or DVD created by Metron will also contain a “mini-Metron” viewer
so that the recipient of the disk can view the images and reports easily. This disk will not
install any software on the recipient’s machine – it plays directly off of the CD from the
CD drive.
To write a “partial study” onto a CD, highlight the thumbnails of the images you want to
select prior to entering the Burn CD panel. From within the panel, you can include
additional full studies on the disk.
There is an option at the top of the panel to write a disk without the min-Metron viewer,
but rather with images only. If you choose this style of disk, you can select the format of
the images: JPEG, TIFF, or DICOM.
Export and Import of Metron Databases
There are several reasons why you might want to import or export an entire Metron
database, or a portion of one. For example:
•
•
•
To make a back-up of your database, export a copy of it to another disk
To merge images from a portable Metron-based system that went out into the field
back into your main database at your office
To give a copy of part or all of your database to a colleague.
These things are done with items found under the “Database” entry in the top-bar of
Metron.
It is important to note that in the upper right hand corner of the Database Browser the
“current database” you are viewing is shown. This is usually “Default”. Some Metron
users will only ever have this database. In fact, unless there is a good reason to have
multiple databases, it is simplest to just have one. In the database tools, the terms
“Export” and “Import” are always meant relative to the current Metron database. That is,
you “export out of” the current database, or “import into” the current database.
You can export your database or a portion of it onto a thumb-drive, then carry it to
another computer with Metron, then import from the thumb-drive into the database of
that Metron. In the Export Database panel, there is also the ability to export the current
database to a CD or DVD. This is a way to accomplish a back-up of your database.
The Export Database panel is shown below:
A subset of the entire database can be specified by giving a range of dates of the studies.
It is often convenient to export only the studies created in, say, the prior week and merge
them into some other database.
The “Database Tools” panel gives you a way to count how many images are in your
database, and to see the total size your images occupy on disk.
More Information
Other specialized documents for various portions of Metron are available (for example, a
manual concerning DICOM functions of Metron, a manual concerning calibration of
images in Metron, etc).
Also please visit www.metron-imaging.com and www.eponatech.com for more
information.
Appendix A: Updating an Old Database to Version 5 Format
Metron version 5 uses an updated format for storage of its database. In order to use
images (and video clips, and reports, etc) that you had entered into an earlier version of
Metron, you will have to convert the old database to version 5 format.
When you first install Metron version 5, if it detects that an older version had previously
run on the same PC, it will pop up the “Convert Old Databases” panel as shown below.
The panel above is what you would see if you are installing Metron-Hoof or MetronHoof-Pro, or “unbundled” Metron-DVM. In the display above, there is just one database
and the display shows that it has 50 “old items” and 17 “new items”. The 17 new items
are some sample images that came with version 5, so they are already in the new format.
The 50 “old items” are the number of images that were found in the old (pre version 5)
database format.
Before proceeding, it is highly recommended that you back-up your existing old database
just in case anything goes wrong with the conversion process, or if, for any reason you
wish to “go back” to the previous version of Metron. The database conversion that
occurs will be a conversion “in place” and will overwrite and update your database, and
the database will no longer be readable by a version of Metron prior to 5. If you need to
back-up your old databases before proceeding, then note the location of them from this
panel and then click “Exit Metron – Complete this later” to exit Metron. After backing
them up, restart Metron to come back to this panel.
At any time in the future, if this panel is not presented to you automatically when you
enter Metron, you can always find it under “Database” in the top-bar.
If you have purchased Metron in a bundle with a digital imaging system, then the
database conversion panel has a second portion at the bottom, as shown below:
The lower portion of the panel is for converting the CR_Originals and/or the
DR_Originals databases which were used in Metron version 4 for digital radiography
systems. The panel shown above also shows that if, as an advanced user, you had
declared multiple Metron databases, then they are all shown in the upper portion of this
panel.
Note that in the case of CR or DR originals, Metron can’t know if you have other
archives from version 4 located elsewhere. If you do, and you wish to convert them to
version 5, you need to click on the “Add CR or DR DB…” button in order to tell Metron
where these archives are.
When Metron is converting your old database(s) to modern format, it could happen that it
will encounter problems due to a corrupted file, or a file that was improperly closed, or
some other problem. The converter is pretty robust and can often continue past such
issues. If it can’t, you may also simply restart Metron and try converting again – usually
on the second try it can get past the problem.