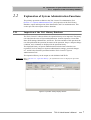
1
638-94259 Total Organ Carbon Analyzer TOC-V Administrator's Manual Read this manual carefully and keep it with the instrument for future reference. SHIMADZU CORPORATION ANALYTICAL & MEASURING INSTRUMENTS DIVISION KYOTO, JAPAN Copyright Shimadzu Corporation 2003. All rights reserved, including those to reproduce this publication or parts thereof in any form without permission in writing from Shimadzu Corporation. Read and understand this manual before operation. Save this manual. Information in this publication is subject to change without notice and does not represent a guarantee on the part of the vendor. Any errors or omissions which may have occurred in this publication despite the utmost care taken in its production will be corrected as soon as possible, but not necessarily immediately upon detection. We appreciate notification of any errors or omissions. Shimadzu does not have any responsibility for errors or injuries resulting from following the instructions in this manual. Windows is a registered trademark of Microsoft Corporation. ii TOC-V ADMINISTRATORS MANUAL Introduction Congratulations on your purchase of the Total Organic Analyzer (TOC-VCPH/ TOC-VCPN/TOC-VWP). This instruction manual has been prepared for the TOC-Control V Administrator, and describes the various operations associated with the TOC-Control V software system administration. Please read this manual carefully before using the software. The TOC-V User's Manual is provided separately. Carefully read the TOC-V User Manual before using the instrument. CAUTION • Do not operate the TOC-Control V software before understanding the contents of this manual. Product Warranty and Post Sale Service Product Warranty and Post Sale Service Product Warranty The warranty does not cover malfunctions that result from: • misuse; • repairs or modifications made by any company other than the manufacturer or an approved company; • external factors; • operation under severe conditions, such as environments with high temperature, high humidity, corrosive gas, vibration, etc.; • fire, earthquake or other forces of nature; • moving or transporting the unit after its initial installation; • normal wear of items or parts that can be regarded as consumable. The service life of consumable items depends on the actual operating conditions. Post Sale Service If any problems occur with this instrument, inspect it and take appropriate corrective action as described in Section 5.6 “Troubleshooting” of the TOC-V User Manual. If the problem persists, or symptoms not covered in the Troubleshooting section occur, contact your Shimadzu representative. Relevant Instruction Manuals iv Name Content TOC-V User Manual Describes the procedures necessary for performing routine operation and maintenance of the TOC-V. TOC-V Administrator's Manual Describes the procedures necessary for safe administration of the TOC-Control V software, including security, user registration, etc. TOC-V Administrator’s Manual Contents of This Manual Contents of This Manual Chapter 1 GLP/GMP Overview Provides an overview of GLP/GMP and describes FDA 21 CFR Part 11. Chapter 2 System Administration Overview Provides an overview of the system administration functions that ensure protection of the data generated using the TOC-Control V software. Chapter 3 System Administration Operations Describes the procedures for accessing the TOC-Control V System Administration functions, setting up the System Administration Tool, viewing the measurement data, and exporting and viewing data profiles, etc. Chapter 4 Software Installation Describes the TOC-Control V software installation procedure. Notation Conventions Precautionary Conventions Used in this Manual The following precautionary conventions are used in this manual. Convention Description CAUTION Indicates the possibility of slight to moderate injury or equipment damage. Note: Provides additional information to ensure the correct use of the instrument. Other Conventions Used in this Manual Supplementary Conventions In addition to the precautionary conventions, Tip and Reference are used to supply additional information. Convention Description TIP: Indicates a particular technique, alternative means of operation, or useful advice. Reference: Indicates a reference location for more detailed information. TOC-V Administrator’s Manual v Notation Conventions vi TOC-V Administrator’s Manual Table of Contents Introduction............................................................................................ iii Product Warranty and Post Sale Service .................................................... iv Product Warranty ............................................................................... iv Post Sale Service ................................................................................ iv Relevant Instruction Manuals..................................................................... iv Contents of This Manual ............................................................................. v Notation Conventions .................................................................................. v Precautionary Conventions Used in this Manual ................................ v Other Conventions Used in this Manual ............................................. v 1 Overview of GLP/GMP ........................................................................... 1 1.1 2 3 Basic Concepts of GLP/GMP...................................................................... 2 1.1.1 GLP/GMP............................................................................................ 2 1.1.2 FDA 21 CFR Part 11 ........................................................................... 2 System Administration Overview........................................................... 3 2.1 System Administration Concepts ................................................................ 4 2.1.1 System Administration Functions ....................................................... 4 2.1.2 Data Administration Flow ................................................................... 6 2.2 Explanation of System Administration Functions....................................... 2.2.1 Inspection of the TOC History Database ............................................ 2.2.2 Output and Viewing of the Data Profile.............................................. 2.2.3 User Authentication............................................................................. 7 7 8 9 System Administration Operations ...................................................... 11 3.1 3.2 TOC-Control V Main Menu ...................................................................... 12 System Administration Tool...................................................................... 3.2.1 User Accounts ................................................................................... 3.2.2 Database Manager ............................................................................. 3.2.3 Program Test (S/W Validation)......................................................... 3.2.4 Security.............................................................................................. 3.2.5 External Modules .............................................................................. 3.2.6 Change Password .............................................................................. 3.2.7 Add Event Log .................................................................................. 14 15 18 21 22 28 29 30 3.3 Operation History ...................................................................................... 31 3.4 Data Profile................................................................................................ 34 3.5 Sample Table Editor .................................................................................. 38 TOC-V vii Table of Contents 4 Software Installation ............................................................................. 41 4.1 Installation Precautions.............................................................................. 42 4.2 Installation Procedure ................................................................................ 4.2.1 Installation of MSDE Database ......................................................... 4.2.2 Installation of Shimadzu User Authentication Tool .......................... 4.2.3 Installation of TOC-Control V Software ........................................... 43 44 45 46 4.3 PDF Output Settings .................................................................................. 51 4.3.1 Adobe Acrobat Installation Information............................................ 51 4.3.2 PostScript Printer Installation ............................................................ 52 Index ........................................................................................................... Index-1 viii TOC-V 1 1Overview of GLP/GMP This chapter provides an overview of GLP/GMP and FDA 21 CFR Part 11. 1.1 Basic Concepts of GLP/GMP Provides overview descriptions of GLP and GMP, and of FDA 21 CFR Part 11. 1.1 Basic Concepts of GLP/GMP 1.1.1 GLP/GMP 1.1 Basic Concepts of GLP/GMP 1.1.1 GLP/GMP GLP (Good Laboratory Practice) is a quality system that ensures the reliability of analysis and inspection data, and GMP (Good Manufacturing Practice) defines the standards for ensuring quality control of manufactured pharmaceutical products as well as proper manufacturing standards. GLP and GMP are defined in United States Title 21 Code of Federal Regulations. Inspection reliability is ensured using a method that guarantees the transparency of the inspection process. All documentation associated with the job of inspection is standardized, and the inspection process is recorded and archived. A department or section, separate from the actual inspection system, is established to perform scheduled periodic checks on the equipment and system accuracy to ensure reliability. The key point of this method is to manage the entire process (validation, work flow, data) used to obtain the results, and to leave a record of that process so that it can be used as an audit trail for the purpose of verification. TIP: GLP/GMP are regulations for performing proper analysis and inspection. It incorporates effective ideas for conducting the work properly and is a useful tool even in analytical laboratories where GLP/GMP is not required. 1.1.2 FDA 21 CFR Part 11 The FDA (Food and Drug Administration of the United States) Title 21 of the Code of Federal Regulations Part 11 (abbreviated as FDA 21 CFR Part 11) stipulates the compliance requirements by which “electronic records and electronic signatures” are considered equivalent to “written records and hand written signatures”. This regulation is used to speed up the FDA approval for new pharmaceuticals marketed in the United States. Through this regulation, electronic signatures can be legally used with documents in electronic format, such as global and commercial transactions and documents output from a computer. This regulation recognizes electronic data that is generated from computerized analytical instruments that comply with the FDA 21 CFR Part 11 even if they are located outside the United States. This regulation is not limited to the fields of pharmaceuticals and food manufacturing. This regulation provides a means of substituting electronic data for paper-based data and details proper record retention procedures. The FDA 21 CFR Part 11 regulation deals mainly with data integrity (security), data completeness (data and metadata) and audit trail capability. The TOC-Control V software supports the FDA 21 CFR Part 11 data regulations. 2 TOC-V Administrator’s Manual 2 2System Administration Overview System administration functions are provided to protect the programs and data associated with the TOC-Control V software and to restrict user access to software functions. This chapter provides an overview of these functions. 2.1 System Administration Concepts This section describes the concepts of the system administration functions in the TOC-Control V software. 2.2 Explanation of System Administration Functions This describes the primary system administration functions for the TOC-Control V software. 2.1 System Administration Concepts 2.1.1 System Administration Functions 2.1 System Administration Concepts The TOC-Control V software incorporates System Administration Functions that protect the programs and data by restricting user access to the various software functions. By activating the System Administration Functions, it is possible to maintain reliability and properly administer the analysis environment, data, etc., so that the system is compliant with GLP/GMP regulations. 2.1.1 System Administration Functions The System Administration Function allows control of the following items. User When this software is installed, a user who will have all the authority (system administration authority) is registered as “Admin.” The individuals who will use this software are registered as “Users” using the System Administration Functions. Enter the following items when registering new users. Parameter Description User ID / User Name The User ID is entered for use in login, and the User Name is entered to associate the User ID with a proper name. The software does not permit multiple use of identical User ID’s or User Names. Password Registers the user login password. User Level Selects the User Level for the user being registered. Access is restricted to a predefined set of functions associated with the level selected. Access Rights Individually selects the functions to which the user will have access. When the user enters the registered User ID and Password in the Login screen, all of the functions registered in the Access Rights for that user become accessible. If the entered User ID and Password do not match any of those in the registration database, the program will not initiate. 4 TOC-V Administrator’s Manual 2.1 System Administration Concepts 2.1.1 System Administration Functions Access Rights The Access Rights settings restrict the functions available to the user. This software contains the following predefined Access Right functions for each of the User Levels. Select the User Level that contains the Access Rights required for that user. Administrator Main User User Guest Security settings Sample Table creation / editing Sample Table creation / editing File viewing Database management Sample measurement Sample measurement User account creation/editing Measurement File viewing results reprocessing Background processing settings Instrument maintenance Software validation History log viewing Other functions individually defined by the Administrator. Other functions individually defined by the Administrator. Sample Table creation / editing Sample measurement Note: All of the Access Rights are assigned to the Administrator. TOC-V Administrator’s Manual 5 2.1 System Administration Concepts 2.1.2 Data Administration Flow 2.1.2 Data Administration Flow The TOC-Control V software outputs the following types of data after each sample measurement. The output data can be imported into external software for secure database management. TOC-Control V Measurement-related Data Export1 directory • Data • Related information (measurement parameters, calibration curve, etc.) • Output ASCII file • Data • Path to below-mentioned binary file and PDF file Export2 directory Secure storage in a database using external software Operation history Data Profile (metadata) • Data • Related information (measurement parameters, calibration curve, etc.) • Above-mentioned history PDF file • Report file Figure 2.1 Data Administration Flow 6 • After completion of each sample measurement, an ASCII file, a Data Profile and a PDF file are output. • The ASCII file contains the paths to the Data Profile and PDF report file. By using an external tool, such as the Shimadzu Agent software, the Data Profile and PDF report file can be retrieved from this path for secure storage in a database. • The Data Profile (metadata) contains, in addition to the measurement data, information related to the measurement (calibration curve and method used, etc.). As a result, the integrity of the data is always maintained. • The PDF file is a report file of the measurement results. The PDF format is supported by a wide range of software applications, and can be viewed in most operating systems. TOC-V Administrator’s Manual 2.2 2.2 Explanation of System Administration Functions 2.2.1 Inspection of the TOC History Database Explanation of System Administration Functions The primary operations available in the TOC-Control V Administration Tool (Section 3.2 “System Administration Tool”) are inspection of the TOC History Database, output and inspection of the Data Profile, and User Authentication. This section provides a description of these functions. 2.2.1 Inspection of the TOC History Database The TOC-Control V software allows the operation history to be inspected. The history is divided into the areas of System Administration, General Operation, Create/Edit Data, H/W Settings, Maintenance, and Errors. The time and date of the operation, the user who performed the operation, the nature of the operation, the pre- and post-change condition, and a comment are displayed in the operation history. The displayed history of System Administration includes items related to user registration, such as changes in System Administration settings, password changes, etc., and the other functions performed with the TOC-Control V System Administration Tool. The Operation History can be output as a tab delimited ASCII file. Reference: Refer to Section 3.3 “Operation History” for information on how to display the Operation History, Figure 2.2 Operation History Display Window TOC-V Administrator’s Manual 7 2.2 Explanation of System Administration Functions 2.2.2 Output and Viewing of the Data Profile 2.2.2 Output and Viewing of the Data Profile The TOC-Control V software is used to perform sample measurement, and to output a Data Profile for each sample. The Data Profile includes the measurement data, the calibration curve and the analysis method used, so that data integrity is maintained at all times. Reference: Refer to Section 3.4 “Data Profile” for information on how to display the Data Profile. Figure 2.3 Data Profile Window 8 TOC-V Administrator’s Manual 2.2 2.2.3 Explanation of System Administration Functions 2.2.3 User Authentication User Authentication Descriptions of some of the User Authentication functions are displayed below. User ID / Password User ID and Password authentication functions are provided to prevent unauthorized users from using the TOC-Control V software. The User ID and Password authentication functions are complementary, and once validated, satisfy the conditions for the electronic signature and enable workflow administration for each user. They provide a means of setting individual user access rights to the various software functions. Mail Transmission upon Login Error As described above, TOC-Control V authenticates each user by the User ID and Password, however, if the login fails after a previously set number of login attempts, the PC will lock up for a specified period of time. If there is an attempt to log in while the PC is in the locked state, an e-mail message is sent to a previously specified destination. This function allows e-mail confirmation of a suspicious login attempt, and ensures the security of the software. Re-entering a Password If no operations are performed in the TOC-Control V software within a previously specified time period, the user ID and password input box can be displayed to oblige the user to properly log in again before allowing any further software operations. Screen Lock If the user must temporarily leave the PC during measurement, the screen can be locked to protect the data from another individual making improper or malicious operations. Once the screen is locked, it can only be unlocked by entering the user ID and password of the user who was logged in at the time the screen was locked. Note: These functions are implemented using settings in the Security section of the System Administration Tool. Refer to Section 3.2.4 “Security” for details regarding setting these items. TOC-V Administrator’s Manual 9 2.2 Explanation of System Administration Functions 2.2.3 User Authentication 10 TOC-V Administrator’s Manual 3 3System Administration Operations This chapter describes the procedure for accessing System Administration within the TOC-Control V software, and performing various operations of the System Administration Tool. 3.1 TOC-Control V Main Menu Describes the Main Menu used for starting the TOC-Control V system. 3.2 System Administration Tool Describes the screens used for administering the TOC-Control V system. 3.3 Operation History Describes the procedures for displaying the history of operations performed in TOC-Control V. 3.4 Data Profile Describes the Data Profile output from TOC-Control V software. 3.5 Sample Table Editor Describes the TOC-Control V Sample Table operations related to System Administration. 3.1 TOC-Control V Main Menu 3.1 TOC-Control V Main Menu To start the TOC-Control V software, select Start > Programs > TOC-Control V. The TOC-Control V Main Menu window is displayed. Figure 3.1 TOC-Control V Main Menu Window The TOC-Control V software is made up of several modules. These modules are accessed by double-clicking the corresponding icons in the Main Menu window. The User dialog box shown below is displayed to enable module access. Figure 3.2 User Dialog Box To gain access to the module the first time the program is executed, enter the following default user information, and click OK. User ID: Admin Password: Do not enter anything. Note: To maintain security, use the procedure in Section 3.2.6 “Change Password” to change the “Admin” password after the first use of the program. 12 TOC-V Administrator’s Manual 3.1 TOC-Control V Main Menu System Administration Tool Select the Administration icon to gain access to the System Administration Tool. The System Administration Tool contains the User Accounts, Database Manager, S/W Validation, Background Processing, Change Password and Event Log functions. Sample Table Editor Select the Sample Table Editor icon to create or edit a sample table. New System Select the New System icon to create a new instrument system. System Icon (“123”, etc. in above screen) After creating a new system, naming it “123”, etc., and saving it in TOC-Control V, an icon corresponding to that system name will thereafter be displayed in the Main Menu window, enabling access to that system. History Database Select this icon to view the operation history. Only users having access rights to the operation history can view the history database. Access to view the history is set in User Accounts. This icon is only displayed if the Operation History option is checked in the Security item of the System Administration Tool. Data Profile Select this icon to view a particular measurement Data Profile exported from the TOC-Control V system. This icon is only displayed if the Data Profile Export option is checked in the Security item of the System Administration Tool. TOC-V Administrator’s Manual 13 3.2 System Administration Tool 3.2 System Administration Tool Click the Administration icon in the TOC-Control V Main Menu window to start the System Administration Tool. The TOC-Control V Administrator window opens. Figure 3.3 TOC-Control V Main Menu Window The TOC-Control V administrative functions are accessed from the TOC-Control V Administrator window. These functions allow the system administrator to set all the administrative parameters related to User Accounts, database creation, software checks, security as it relates to FDA 21 CFR Part 11, output data from the TOC-Control V, and settings for launching external applications. Figure 3.4 TOC-Control V Administrator Window 14 TOC-V Administrator’s Manual 3.2 3.2.1 System Administration Tool 3.2.1 User Accounts User Accounts The User Accounts function allows the System Administrator and authorized users to create new user accounts, modify existing user information, and activate or deactivate user accounts. Figure 3.5 TOC-Control V User Window File Menu Close After completing user registration tasks, select the Close command to return to the TOC-Control V Administrator window. User Menu New To add a new user to the system, select New. The New / Edit User dialog box is displayed. Figure 3.6 New / Edit User Dialog Box TOC-V Administrator’s Manual 15 3.2 System Administration Tool 3.2.1 User Accounts 16 Command Description User ID (required) Enter a User ID in this text box. The User ID can contain a maximum of 30 characters. User Name (required) Enter a User Name in this text box. The User Name can contain a maximum of 60 characters. Password (required) Enter a password in this text box. The length and other conditions for the password are specified in the Shimadzu User Authentication Tool > Configuration > User Authentication Tool Configuration Settings. Refer to the Shimadzu User Authentication Tool instruction manual for instructions. The password is encrypted and is displayed with asterisks (*). Confirm New Password (required) To verify the password, carefully type into the Verify Password text box the same password entered in the password text box. The password is case sensitive. Company, Department, Position, Tel. Number, E-mail Address, etc. Enter these items, as necessary. User Level Select the appropriate radio button to set a User Level. • Administrator • Main User • User • Guest Default access rights for each user level are displayed. Create / Edit User Accounts and Security Setting access rights items cannot be deleted from the Administrator User Level or added to any other User Level. Access Rights The administrator can select the functions accessible to each user. Each of the 4 user levels is provided with certain default access rights. (Refer to Table 3.1 “Default Access Rights”) The administrator can assign or remove access rights from Main User, User or Guest levels. The administrator has complete access as the default. TOC-V Administrator’s Manual 3.2 System Administration Tool 3.2.1 User Accounts Table 3.1 • Default Access Rights Task Administrator Main User User O O Create / edit user accounts O Security settings O Database Management O S/W Validation O Background processing settings O Sample measurement O O O View Files O O O Recalculation O O Create / edit method O O Create / edit calibration curve O O Create/edit control template O O Instrument maintenance O O Create / edit sample table O O Create instrument settings (system) O O Change instrument settings O O Use control charts O O O Use method validation O O O View history O Add event log O Guest O O O Activate / Deactivate Use this command to deactivate a user that is registered on the system, or to activate a user that has been previously deactivated. Once a user is registered, that user cannot be deleted from the TOC-Control V User window. Remove a user from the system by selecting “Deactivate” in the Activate / Deactivate column. To change a user's Activate / Deactivate setting, select the appropriate User ID in the TOC-Control V User window. Next, click the Activate / Deactivate command in the User menu. When the Comment dialog box opens, enter a reason for making the change, and click OK. If a reason is not entered, an error message is displayed, and the change is not executed. When the change is executed, the new setting is displayed in the Activate / Deactivate column of the TOC-Control V User window. TOC-V Administrator’s Manual 17 3.2 System Administration Tool 3.2.2 Database Manager Edit To edit settings for a previously registered user, select the appropriate User ID in the TOC-Control V User window. Next, click the Edit command in the User menu. When the Create / Edit User Accounts dialog box opens, enter the appropriate information in the item to be edited. For detailed information about the Create / Edit User Accounts dialog box, refer to the Create New item. Settings for a user that is currently “Deactivated” cannot be edited. To edit this information, change the user status to “Activated.” Help Menu Version Information This displays the TOC-Control V version number and copyright information. 3.2.2 Database Manager Database Manager allows the administrator or authorized users to organize TOC-Control V data or to export it to MS-Access. Use Database Manager to create a new database by deciding which columns are to be included. An existing database can be opened or compressed. Database Manager can be used to repair a compressed data file that has become corrupted. Figure 3.7 Database Administration Dialog Box Database To open an existing database, either enter the entire directory path including the file name into the Database text box, or click to browse for and select the file. Note: Enter a new database file name with the extension .mdb to create a new database. Available Columns The Available Columns list box displays a list of all the data categories available for output. 18 TOC-V Administrator’s Manual 3.2 System Administration Tool 3.2.2 Database Manager Columns in database This box lists the columns selected for inclusion in the database. If an existing file is opened, the columns included in the database are displayed in this box. Create Click Create to construct a database using the columns listed in the Columns in database box. Open Click Open to access an existing database. Compress Click Compress to compress an existing database. Repair Click Repair to repair a database file that was damaged during the compression process. Creating a Database To create a database, select the appropriate columns from the Available Columns text box, and click to copy the selected column into the Columns in database box. To display all of the Available Columns, click . After the desired columns are displayed in the Columns in database list box, click Create to construct the database. Note: Double-clicking on a column in the Available Columns list box will also copy the column into the Columns in database list box. TOC-V Administrator’s Manual 19 3.2 System Administration Tool 3.2.2 Database Manager Opening a Database To open an existing database, either enter the entire directory path including the file name into the Database text box, or click to browse for the file. Once the file name is in the database field, click Open. The Database View window is displayed. Database information cannot be edited in the Database View window. Figure 3.8 Database View Window Importing Columns from a Database Open a database. Select the desired columns in the Columns in database list box, and click . To import all of the columns, click create a new database. . The imported items can be used to Note: Double-clicking on the columns in the Columns in database list box will also import those columns. Compressing and Restoring Database Files Open a database file, and then click Compress to shrink the file size. A message is displayed to indicate that the file compression has been executed normally. At times, a file may be damaged during the compression process. To repair a damaged file, first open that file, and then click Repair. A message is displayed to indicate that the file has been Repaired normally. 20 TOC-V Administrator’s Manual 3.2 System Administration Tool 3.2.3 Program Test (S/W Validation) 3.2.3 Program Test (S/W Validation) The S/W Validation function verifies that the TOC-Control V program files have not been modified since installation. The TOC-Control V program files consist of executables, DLL files and Help files. This function can be used only by users having access rights to S/W Validation. Select S/W Validation in the TOC-Control V Administration Tool window to open the TOC-V Program Test dialog box. Figure 3.9 TOC-V Program Test Dialog Box Click Start to initiate the program file check. When all the files of a particular type are checked, the results are displayed in the Name, Path, Size, Checksum, and Version columns to the right. Click Report to print the results. Click Close to close the Program Test dialog box. TOC-V Administrator’s Manual 21 3.2 System Administration Tool 3.2.4 Security 3.2.4 Security The Security function is used to make software security-related changes. This function ensures compliance with FDA 21 CFR Part 11 and can only be used by users having Security Settings access rights. Select Security in the TOC-Control V System Administration Tool window to open the Security dialog box. Figure 3.10 Security Dialog Box Audit Trail Select this item to save the operation history in a MSDE format database. If this item is selected at installation, it cannot be changed thereafter. Select “Comment Required for Modifications” box to require mandatory comment entry for the audit trail. This item is only displayed if Audit Trail is selected. Figure 3.11 Comment Dialog Box 22 TOC-V Administrator’s Manual 3.2 System Administration Tool 3.2.4 Security Data Profile Export Select this item to output the measurement results Data Profile after each measurement. If this item is selected at installation, it cannot be changed thereafter. The Data Profile is output in the following situations. • Upon completion of each sample measurement • When performing recalculation of measurement results • When excluding a value from the measurement results PDF Report Export Select this item to output a data profile report file in PDF format when the data profile is output. This item is only displayed when Data Profile Export is selected. Use PDF Writer/Distiller Select the output driver for the PDF output. This item is only displayed if PDF Report Export is selected. User ID/Password Select this item to enable the User ID and Password functions. If this item is selected at installation, it cannot be changed thereafter. Re-enter Password Select this item to require the user to re-enter the User ID and Password after the instrument remains idle for a specified period of time. If the specified time is set to 0, it is equivalent to having not selected this item. Figure 3.12 Re-enter Password Dialog Box TOC-V Administrator’s Manual 23 3.2 System Administration Tool 3.2.4 Security Prohibit Deletion of Measured Data Select this item to prohibit measurement data from being deleted from the sample table after measurement. If this item is selected at installation, it cannot be changed thereafter. Figure 3.13 Prohibit Deleting Measured Data Prohibit Editing Measured Data Select this item to prohibit editing of any measurement data information after measurement. Editing of property items, deletion of data, recalculation, and deletion of measurement data are all prohibited. Figure 3.14 Example of “Prohibit Editing of Measured Data” Status Delete Temporary Data on Local PC Select this item to delete all temporary files, including *.t32 files and *.pkt files in the “install folder\Data” folder, and all *.txt files in the “install folder\Export1” and “\Export2” folders when the Sample Table Editor is closed. 24 TOC-V Administrator’s Manual 3.2 System Administration Tool 3.2.4 Security Use TOC-V Gateway Select this item to convert the Data Profile and text files to the general purpose format required by Class-Agent. If this item is selected at installation, it cannot be changed thereafter. The TOC-Control V software exports a text file to the “install folder\Export1” folder. The text file reflects the content of the data profile when it is output. The TOC-V Gateway software opens and converts this file to Class-Agent format and outputs it to the “install folder\Export2” folder. Figure 3.15 TOC-Control V Export Text File Figure 3.16 Gateway Software-Generated Class-Agent Format File Converted from Text File TOC-V Administrator’s Manual 25 3.2 System Administration Tool 3.2.4 Security Delete Exported Files Select this item to register the Data Profile, text and PDF files that are exported from the TOC-Control V for deletion. Files that are registered for deletion are automatically deleted when data collection is performed by the general purpose Agent. This item is only displayed if the Use TOC-V Gateway item is selected. Figure 3.17 Files Registered for Deletion 26 TOC-V Administrator’s Manual 3.2 System Administration Tool 3.2.4 Security Send E-mail on Login Failure Select this item to send a notification message to a specified e-mail address if login is attempted following a software lockup. The software locks up after a preset number of failed login attempts. The number of failed login attempts is set in Shimadzu User Authentication Tool>Configuration>User Authentication Tool Configuration. Refer to the User Authentication Tool Instruction Manual at the back of this manual for information on the setting method. The Address: From, Address: To, Domain Address, Mail Server and Port No. items are only displayed when the Send E-mail on Login Failure item is selected. Figure 3.18 User Authentication Tool Configuration Window Figure 3.19 Login Failure E-mail Message TOC-V Administrator’s Manual 27 3.2 System Administration Tool 3.2.5 External Modules 3.2.5 External Modules External Modules can launch external software modules linked to TOC-Control V to run in the background before and after measurement. Use this function to import or export data using LIMS, etc. Select External Modules in the TOC-Control V Administrator window to display the Background Processing dialog box. This function can only be used by users having access rights to Background Processing Settings. Figure 3.20 Background Processing Dialog Box Enable online ASCII Export This function exports data in ASCII format. The data is exported after at least one sample (one row in the sample table) has been measured. Data from TOC-Control V is exported online in ASCII format. Launch External Application External applications can be initiated by the TOC-Control V software at 4 points in the measurement sequence; before starting a sample run, before starting a new sample, after finishing a sample and after the completing a sample run. The necessary external applications include either external database initialization before each sample measurement, or data output to a Laboratory Information Management System (LIMS). Select the times for the external application to be launched by placing a check mark in the corresponding check box. Enter the full path of the Executable File including file name for the application to be launched, or click Search for File and select the appropriate file. 28 TOC-V Administrator’s Manual 3.2 3.2.6 System Administration Tool 3.2.6 Change Password Change Password This function is used to change the password of a registered user. Select Change Password in the TOC-Control V System Administrator window to open the Change Password dialog box. This function can only be used if the User ID/ Password item is selected in the Security dialog box (see Section 3.2.4 “Security”). Figure 3.21 TOC-Control V Administrator Window Figure 3.22 Change Password Dialog Box TOC-V Administrator’s Manual 29 3.2 System Administration Tool 3.2.7 Add Event Log 3.2.7 Add Event Log This function adds a comment to the operation history. This function is useful for documenting items in the operation history, such as the replacement of catalyst, that cannot be recorded automatically through the software. Only users with access rights to Add Event Log can use this function. This function can only be used if Audit Trail is selected in the Security dialog box (see Section 3.2.4 “Security”). Select Add Event Log in the TOC-Control V Administrator window to display the Add Event Log dialog box. Figure 3.23 Add Event Dialog Box Select one of the items in the “Choose an item” box, and then enter a comment in the Comment text field. If the Comment text field is left blank, an error message is displayed, and the comment is not added to the Event Log. 30 TOC-V Administrator’s Manual 3.3 3.3 Operation History Operation History It is possible to save the operations performed in TOC-Control V. This function allows one to view the history of those operations. This function can only be used by users with access rights to View History. This function is only available if Operation History has been selected in the Security dialog box (see Section 3.2.4 “Security”). Click the History Database icon in the TOC-Control V Main Menu window to open the TOC History Database window. Figure 3.24 TOC-Control V Main Menu Window Figure 3.25 TOC History Database Window TOC-V Administrator’s Manual 31 3.3 Operation History Menus File > Open > General Operation, Create/Edit Data, Administration, H/W Settings, Maintenance, Errors Each of these items displays an operation history for their respective group. File > Open > Old Version History This function allows the user to access History Database files created on software prior to TOC-Control V Ver1.06.00. Select this function to display the files, and select the appropriate file. Figure 3.26 Select File Screen Export > ASCII The selected operation history is output as a tab delimited text file. Figure 3.27 Example of Tab Delimited ASCII File Export 32 TOC-V Administrator’s Manual 3.3 Radio Buttons Operation History (Administration, Create/Edit Data, General Operation, H/W Settings, Maintenance, Error) Select the desired item, and click the View History Log button. The appropriate operation history is displayed. Multiple items can be selected and displayed simultaneously. Check Boxes (Time Period, User Name) Date Select the date and time range of the operation history to display. User Select a specific user name of the operation history to display. Buttons (View History Log, ASCII Export) View History Log Click this button to display the operation history determined by the radio button and check box settings. ASCII Export Click this button to output the displayed item in a tab delimited text file. TOC-V Administrator’s Manual 33 3.4 Data Profile 3.4 Data Profile This function is used to output the data profile from TOC-Control V so that it can be displayed. Each row of the TOC-Control V sample table is output as an individual data profile. This function can only be used if Data Profile Export is selected in the Security dialog box. Three methods are available for displaying a data profile. The user ID and password are not required to access any of the display methods. 1. Double-click the Data Profile icon in the TOC-Control V window, or select the icon and press Enter. Figure 3.28 TOC-Control V Main Menu Window 34 2. Select the row in the sample table that you wish to display, and then select View > Data Profile. 3. Locate the file (.trd file) saved in the Data folder, a sub-folder of the TOC3201 folder, and double-click on the file name. TOC-V Administrator’s Manual 3.4 Data Profile Figure 3.29 Data Profile Dialog Box Menus File > Open Opens the selected file. View > Parameters Displays the measurement parameters. View > Reference Source Displays any source files that may have been used at the time of measurement, including the calibration curve file, method file and comment template. View > H/W Settings Displays the instrument settings used at the time of measurement. View > View PDF Displays a PDF report file, if one exists in this Data Profile folder, for that sample. Note: The information displayed for the above items cannot be edited. TOC-V Administrator’s Manual 35 3.4 Data Profile Commands Right-click in the Type column of the Data display area to open the Data right-click menu. View Peaks and View Cal. Curve commands are described below. Figure 3.30 Right-Click Menu View Peaks Displays the measurement peaks. Figure 3.31 Peak View Window 36 TOC-V Administrator’s Manual 3.4 Data Profile View Cal. Curve Displays the calibration curve if one was used during measurement. Figure 3.32 Calibration Curve Properties Window TOC-V Administrator’s Manual 37 3.5 Sample Table Editor 3.5 Sample Table Editor This section describes the system administration-related operations in the Sample Table menu. View Data Profile Displays the Data Profile for each row in the Sample Table. This function can only be used if Data Profile Export is selected in the Security dialog box (see Section 3.2.4 “Security”). Select the desired row in the Sample Table to view the data profile. Select View > Data Profile to open the Data Profile dialog box. Figure 3.33 Data Profile Command Figure 3.34 Data Profile Dialog Box 38 TOC-V Administrator’s Manual 3.5 Sample Table Editor Screen Lock Function If a user must temporarily leave the PC he/she is logged into, the screen can be locked to prevent another individual from performing operations in TOC-Control V by using the password function. This function can only be used if the User ID / Password item is selected in the Security dialog box. Select Screen Lock in the Tools menu to lock the screen. The screen is locked and the Re-enter Password dialog box is displayed. Enter the user ID and password to release the screen lock. If the user ID and password do not match those used by the logged in user, the screen lock is not released. Figure 3.35 Screen Lock Command Figure 3.36 Re-enter Password Dialog Box TOC-V Administrator’s Manual 39 3.5 40 Sample Table Editor TOC-V Administrator’s Manual 4 4Software Installation This chapter describes the procedure for installing the TOC-Control V software used with this instrument. 4.1 Installation Precautions Describes the precautions that should be taken when installing the TOC-Control V software. 4.2 Installation Procedure Describes the TOC-Control V software installation procedure. 4.3 PDF Output Settings Describes the procedures for generating a PDF report. 4.1 Installation Precautions 4.1 Installation Precautions The TOC-Control V software can be installed on PC’s running under Windows95, Windows98, WindowsNT 4.0 (SP3 or later), Windows2000 or WindowsXP. In order to maintain FDA 21 CFR Part 11 compliance, the software must be installed with Windows2000 at this time. Install the software while Windows is running. Close all other applications before beginning the installation procedure. lWindows User Accounts Error messages may be generated on computers using Windows2000 or WindowsNT if the Windows user ID and password differ from the one used at the time of TOC-Control V installation. The error message indicates that the database for the User account could not be found. To correct this situation, log into Windows using the same user ID and password used for the TOC-Control V installation. Windows ME The Windows ME operating system has low stability and is unsuitable for controlling analytical instruments like the TOC analyzer. Windows ME can cause abnormal operation, and in the worst case, occasionally cause the operation to stop altogether. Do not use the TOC-Control V software with Windows ME. PC Power Management Settings Disable the PC Power Management function to prevent shutdown of the PC and interruption of instrument operations. 42 TOC-V Administrator’s Manual 4.2 4.2 Installation Procedure Installation Procedure Since the installation procedure differs depending on whether the software is to comply with FDA 21 CFR Part 11, use the procedure described below that suits the usage requirement. The TOC-Control V CD-ROM contains the MSDE database, the Shimadzu User Authentication Tool and the TOC-Control V software. Usage not to comply with FDA 21 CFR Part 11 Usage to comply with FDA 21 CFR Part 11 Install MSDE Install Shimadzu User Authentication Tool Install TOC-Control V software Install Shimadzu User Authentication Tool Install TOC-Control V software Figure 4.1 Installation Flow TOC-V Administrator’s Manual 43 4.2 Installation Procedure 4.2.1 Installation of MSDE Database 4.2.1 Installation of MSDE Database If the software is to comply with FDA 21 CFR Part 11, install the MSDE database. If the software need not comply with FDA 21 CFR Part 11, proceed to Section 4.2.2 Installation of Shimadzu User Authentication Tool. 1. Insert the CD-ROM into the CD drive. 2. Using Explorer, etc., access the drive containing the CD-ROM. 3. Execute Setup.exe. The TOC-Control V Software dialog box opens. Figure 4.2 TOC-Control V Software Dialog Box 4. Click on MSDE Ver. 1.0 Eng. This procedure is described in the Shimadzu User Authentication Tool Instruction Manual, at the back of this manual. Continue the installation referring to the procedure described in Section 3.2 Installation of MSDE (page 3-2). 44 TOC-V Administrator’s Manual 4.2.2 4.2.2 4.2 Installation Procedure Installation of Shimadzu User Authentication Tool Installation of Shimadzu User Authentication Tool 1. Insert the CD-ROM into the CD drive. 2. Using Explorer, etc., access the drive containing the CD-ROM. 3. Execute Setup.exe. The TOC-Control V Software dialog box opens. Figure 4.3 TOC-Control V Software Dialog Box 4. Click on Step 1. Shimadzu User Authentication Tool Eng. This procedure is described in the Shimadzu User Authentication Tool Instruction Manual, at the back of this manual. Continue the installation referring to the procedure described in Section 1.2 Installation (page 1-2). TOC-V Administrator’s Manual 45 4.2 Installation Procedure 4.2.3 Installation of TOC-Control V Software 4.2.3 Installation of TOC-Control V Software 1. Insert the CD-ROM into the CD drive. 2. Using Explorer, etc., access the drive containing the CD-ROM. 3. Execute Setup.exe. The TOC-Control V Software dialog box opens. Figure 4.4 TOC-Control V Software Dialog Box 46 TOC-V Administrator’s Manual 4.2.3 4. 4.2 Installation Procedure Installation of TOC-Control V Software Click on Step 2. TOC-Control V Eng. The Welcome dialog box opens. Figure 4.5 Welcome Dialog Box 5. Read the Welcome dialog box message, and click Next. The License Agreement dialog box opens. Figure 4.6 License Agreement Dialog Box TOC-V Administrator’s Manual 47 4.2 Installation Procedure 4.2.3 Installation of TOC-Control V Software 6. Read the Agreement text, and click Yes. The User name and S/W serial no. dialog box opens. Figure 4.7 User name and S/W serial no. Dialog Box 7. Enter the name of the User and the serial number affixed to the case of the CD-ROM. Then click Next. Note: The serial number including the hyphens consists of 17 characters. Enter the characters carefully as the serial number is case sensitive. The Choose Destination Location dialog box opens. Figure 4.8 Choose Destination Location Dialog Box 48 TOC-V Administrator’s Manual 4.2.3 8. 4.2 Installation Procedure Installation of TOC-Control V Software Either accept the default folder, or select a different folder, and click Next. The Select the functions dialog box opens. Figure 4.9 Select the functions Dialog Box This dialog box is used to set the security-related settings to make this software compliant with FDA 21 CFR Part 11. If you do not want the software to comply with this regulation, do not select any of the items. Leave the default settings. To make the software compliant with FDA 21 CFR Part 11, select the appropriate items. Refer to Section 3.2.4 “Security” for more information. 9. After making the appropriate selections, click Next. The SQL Server Login Settings dialog box opens. Figure 4.10 SQL Server Login Settings dialog box TOC-V Administrator’s Manual 49 4.2 Installation Procedure 4.2.3 Installation of TOC-Control V Software 10. To use the Operation History function, enter an SQL Server login ID and password. Use of the Operation History is required for FDA 21 CFR Part 11 compliance, so entry of the login ID and password is required. If the Operation History function will not be used and FDA 21 CFR Part 11 compliance is not required, do not enter a user ID or password. Leave the default settings, and click Next. Reference: Refer to Section 2.2 “Explanation of System Administration Functions”, and Section 3.3 “Operation History” for additional information about the Operation History,. 11. Make the appropriate entries, and click Next. The Installation Complete dialog box opens. Figure 4.11 Finish Dialog Box 12. 50 Click Finish. The installation is complete. A new program group is displayed under Programs in the Start menu. TOC-V Administrator’s Manual 4.3.1 4.3 4.3 PDF Output Settings Adobe Acrobat Installation Information PDF Output Settings TOC-Control V software incorporates a report output function that creates documents in PDF format (Portable Document Format). These documents are administered and edited using Adobe Acrobat 5.0 or higher. 4.3.1 Adobe Acrobat Installation Information Adobe Acrobat 5.0 must be installed to utilize the report function. Note: Adobe Acrobat 5.0 Information. • Adobe Acrobat 5.0 is not included with this software package. The user is obliged to obtain this product separately. • Acrobat Distiller or Acrobat PDFWriter is required to use the PDF output function incorporated in the TOC-Control V software. Acrobat Distiller is installed with the Standard Setup installation of Adobe Acrobat 5.0. • This Acrobat PDFWriter program is not installed with Standard Setup of Adobe Acrobat 5.0. Use the Custom Setup option to install Acrobat PDFWriter. Acrobat Distiller should also be installed when using the Custom Setup option. For the installation, insert the Adobe Acrobat CD-ROM into the CD drive, and follow the directions indicated on the AutoPlay screen. TOC-V Administrator’s Manual 51 4.3 PDF Output Settings 4.3.2 PostScript Printer Installation 4.3.2 PostScript Printer Installation The procedure for utilizing the PDF Output function is as follows. 1. Insert the Adobe Acrobat 5.0 Installation CDROM to start Acrobat installation. The Adobe AutoPlay Welcome screen is displayed. Figure 4.12 Adobe AutoPlay Welcome Screen 2. Click the Next button. The Adobe Acrobat 5.0.5 Installation screen is displayed. Figure 4.13 Adobe Acrobat 5.0.5 Installation Screen 52 TOC-V Administrator’s Manual 4.3.2 3. 4.3 PDF Output Settings PostScript Printer Installation Select the Additional Materials button. A list of buttons corresponding to the various supplemental software options is displayed. Figure 4.14 Additional Materials Menu Screen 4. Select Install Adobe PostScript Printer Driver. The Adobe PostScript Printing System screen is displayed. Figure 4.15 Adobe PostScript Printing System Screen TOC-V Administrator’s Manual 53 4.3 PDF Output Settings 4.3.2 PostScript Printer Installation 5. Select the Install PostScript Printer button. Continue to accept the default values indicated on the screen until the Local Port Selection screen is displayed. Figure 4.16 Local Port Selection Screen 6. Select “File:” for the port, and then click the Next button. The Select Printer Model screen is displayed. Figure 4.17 Select Printer Model Screen 54 TOC-V Administrator’s Manual 4.3.2 7. 4.3 PDF Output Settings PostScript Printer Installation Select the Generic PostScript Printer option, and then click the Next button. Continue to accept the default values until the Printer Information screen is displayed. Figure 4.18 Printer Information Screen 8. Verify that the Printer Name is indicated as “Generic PostScript Printer.” For the setup questions, “Do you want to use this printer as your default printer?” and “Would you like to print a test page?”, select No to both. Click the Next button and proceed following the directions on the screens to complete installation of the printer driver. TOC-V Administrator’s Manual 55 4.3 PDF Output Settings 4.3.2 PostScript Printer Installation 56 TOC-V Administrator’s Manual Index 0.1Index A Access Rights ....................................... 4, 5, 16 Acrobat Distiller ...................................................51 Installation ....................................... 51, 52 PDFWriter ..............................................51 Activate User ..................................................17 Add Event Log ...............................................30 Additional Materials Menu.............................53 Administrator....................................................5 Adobe Acrobat Distiller..................................... 51 Acrobat Installation..........................51, 52 Acrobat PDFWriter ................................ 51 AutoPlay Welcome Screen .................... 52 PostScript Printer Driver........................ 53 ASCII Export........................................ 28, 32, 33 File ........................................................... 6 Tab Delimited ........................................ 32 Audit Trail........................................... 2, 22, 30 Comment Dialog Box ............................ 22 B Background Processing ..................................28 Launch External Application..................28 Binary File........................................................ 6 C Calibration Curve .................................... 36, 37 Class-Agent forma..........................................25 Compressing Database Files.................... 19, 20 Contents of This Manual ..................................v Create New System........................................ 13 Create New User ............................................ 15 Create/Edit Data............................................. 32 Creating a Database ....................................... 19 D Data Administration Flow ................................6 Data Folder .....................................................34 Data Profile..................... 6, 13, 25, 26, 34, 38 Commands....................................... 36, 38 Dialog Box..............................................38 Export ....................................... 23, 34, 38 H/W Settings ..........................................35 Measurement Parameters........................35 Open File ................................................35 Output and Viewing .................................8 Reference Source Files ...........................35 Type Column ..........................................36 View Cal. Curve .....................................36 View PDF ...............................................35 View Peaks .............................................36 Database Manager ..........................................18 Available Columns .................................18 Columns in database...............................19 Compress ......................................... 19, 20 Creating a Database................................19 Edit User.................................................18 Importing Columns from a Database .....20 Open Existing Database .................. 18, 19 Opening a Database................................20 Repair Database............................... 19, 20 Restoring Files........................................20 Database View window ................................. 20 Deactivate User .............................................. 17 Default User Information ............................... 12 Dialog Box Change Password ................................... 29 Choose Destination Location ................. 48 Comment................................................ 22 Data Profile ......................................35, 38 Finish...................................................... 50 License Agreement ................................ 47 New / Edit User...................................... 15 Re-enter Password............................23, 39 Security ..................................... 22, 29, 39 Select the functions ................................ 49 SQL Server Login Settings .................... 49 TOC-Control V Software.......... 44, 45, 46 TOC-V Program Test............................. 21 User ........................................................ 12 User name and S/W serial no................. 48 Welcome ................................................ 47 Index-1 Index E Electronic Signatures ....................................... 2 See Also ... FDA 21 CFR Part 11 E-mail Failed Login ........................................... 27 Login Error............................................... 9 Enable ASCII Export......................................28 Export Data Using LIMS................................28 F Folder, Data ....................................................34 Food and Drug Administration See FDA Failed Login E-mail Notification ................... 27 FDA.................................................................. 2 FDA 21 CFR Part 11 2, 14, 22, 43, 44, 49, 50 G Generic PostScript Printer.............................. 55 GLP/GMP ........................................................ 2 Basic Concepts ......................................... 2 Overview .................................................. 1 Regulations............................................... 4 Good Laboratory Practice See GLP/GMP Good Manufacturing Practice See GLP/GMP H History Database...................................... 13, 31 Help Menu Version Information.................... 18 I Importing Columns from a Database ............. 20 Inspection of Operation History....................... 7 Installation Finish Dialog Box...................................50 License Agreement .................................47 MSDE Database .....................................44 Postscript Printer Driver .........................54 Precautions..............................................42 Procedure ................................................43 TOC-Control V Software .......................46 User Authentication Tool .......................45 L Laboratory Information Management System See LIMS Launching an External Application ............... 28 LIMS...............................................................28 Login Error E-mail Notification .......................9 Login Failure E-mail ......................................27 M Manual Contents ................................................... v Notation Conventions .............................. v Other Conventions ................................... v Precautionary Conventions ...................... v Relevant .................................................. iv Index-2 MS-Access......................................................18 MSDE Database ...................................... 22, 43 Installation ..............................................44 Index O Operation History ......... 13, 30, 31, 32, 33, 50 Add Event Log .......................................30 Buttons....................................................33 Check Boxes...........................................33 Create/Edit Data .....................................32 Errors ......................................................32 General Operation ..................................32 H/W Settings ..........................................32 Inspection .................................................7 Maintenance ...........................................32 Old Version History ...............................32 Radio Buttons .........................................33 View History Log ...................................33 Output and Viewing of Data Profile ................ 8 Overview of GLP/GMP ................................... 1 P Password....... 4, 9, 16, 23, 29, 34, 39, 42, 50 Change....................................................29 PC Power Management Settings ....................42 PDF Files ................................................... 6, 26 Output Settings .......................................51 Postscript Printer Installation .................52 Report File ......................................... 6, 23 Writer/Distiller .......................................23 Peaks...............................................................36 Portable Document Format See PDF Post Sale Service............................................. iv PostScript Printer Driver Installation................................. 52, 54, 55 Local Port Selection Screen ................... 54 Precautionary Conventions .............................. v Precautions PC Power Management.......................... 42 Windows User Accounts........................ 42 Printer Driver PostScript ............................................... 53 Printer Information Screen............................. 55 R Relevant Instruction Manuals..........................iv Restoring Database Files................................ 20 S S/W Validation ...............................................21 Program Files..........................................21 Sample Table ..................................................34 Data Folder .............................................34 Editor ........................................ 13, 24, 38 View Data Profile ...................................38 Screen Adobe AutoPlay Welcome .....................52 Local Port Selection ...............................54 Select File ...............................................32 Select Printer Model ...............................54 Screen Lock ......................................................9 Command ...............................................39 Function..................................................39 Security ........................................ 9, 22, 34, 38 Delete Exported Files............................. 26 Delete Temporary Data on Local PC..... 24 Dialog Box ................................ 22, 29, 39 Files Registered for Deletion ................. 26 PDF Writer/Distiller............................... 23 Prohibit Deletion of Measured Data ...... 24 Prohibit Editing Measured Data............. 24 Re-enter Password.................................. 23 Sample Table Editor............................... 24 Send E-mail on Login Failure................ 27 TOC-V Gateway .................................... 25 Service............................................................. iv Shimadzu User Authentication Tool. 27, 43, 44 Software Installation ................................41, 43 SQL Server login ID ...................................... 50 System Administration...............................7, 32 Concepts................................................... 4 Functions..............................................4, 7 Operations .............................................. 11 Overview.................................................. 3 Index-3 Index System Administration Tool ....................13, 14 Add Event Log ....................................... 30 Change Password ................................... 29 External Modules ................................... 28 System Icon ....................................................13 T TOC-V Gateway...................................... 25, 26 Tab Delimited ASCII File.............................. 32 TOC-Control V Main Menu ............................................. 12 Main Menu System Icon ........................ 13 Main Menu, New System....................... 13 Program Files ......................................... 21 Sample Table.......................................... 34 Software ................................................. 43 Software Installation .............................. 46 System Administration Tool .......7, 22, 29 U User .................................................................. 4 Access Rights ................................4, 5, 16 Accounts................................................. 15 Activate / Deactivate .............................. 17 Authentication .......................................... 9 Close User Window ............................... 15 Create New............................................. 15 Default Information................................ 12 ID ..........4, 9, 16, 23, 29, 34, 39, 42, 50 Level..............................................4, 5, 16 Name ..................................................4, 16 Re-entering a Password............................ 9 User Authentication Tool Configuration Window ...........................27 Installation ..............................................45 V Validation, S/W.............................................. 21 View Cal. Curve............................................. 37 View Peaks .....................................................36 W Warranty.......................................................... iv Window Calibration Curve Properties.................. 37 Database View ....................................... 20 TOC History Database ........................... 31 TOC-Control V Administrator..14, 29, 30 TOC-Control V User.............................. 15 User Authentication Tool Configuration 27 Index-4 Windows ME ..................................................42 Windows User Accounts ................................42 223-10068B The Shimadzu User Authentication Tool Instruction Manual Before operating the software, please read this manual carefully and retain it for future reference. SHIMADZU CORPORATION ANALYTICAL INSTRUMENTS DIVISION KYOTO, JAPAN Before Using The Shimadzu User Authentication Tool Thank you for purchasing CLASS-Agent Software. Before using this software, please read this manual carefully to get the most out of your software. This instruction manual describes how to use and operate CLASS-Agent Manager. It assumes that you should be familiar with some features in Windows 98/NT/2000; you should have some hands -on experience with the mouse and keyboard. In this instruction manual, basic terminology used in Windows 98/NT/2000 are used to explain about how to do anything in CLASS-Agent Software. For definitions of unfamiliar words, please refer to the Windows 98/NT/2000 manual. If you are a first-time user of Windows 95/98/NT, please read the Windows 98/NT/2000 manual before reading this instruction manual. Handling Precautions 1. This Software is and remains the proprietary property of Shimadzu Corporation. 2. No part of this Software may be copied or reproduced in any form or by any means, except for installation and routine backup. No part of this Software may be leased, assigned, transferred, recompiled or altered in any form or by any means. 3. Shimadzu Corporation shall not be liable to the purchaser or any other person for any loss or damage arising out of the use or operation of this Software. Contents Preface About The Shimadzu User Authentication Tool About the Instruction Manual Warning Signs Chapter 1 1.1 1.2 Installation Procedures Outline ...........................................................................................................1-1 Installing Software ..........................................................................................1-2 1.2.1 Chapter 2 2.1 Shimadzu User Authentication Tool Shimadzu User Authentication Tool..................................................................2-1 2.1.1 2.1.2 2.1.3 2.1.4 2.1.5 2.1.6 2.1.7 2.1.8 2.1.9 Chapter 3 3.1 3.2 Startup of program.................................................................................................................. 2-1 Main screen............................................................................................................................. 2-2 Configuration........................................................................................................................... 2-3 Change Server......................................................................................................................... 2-5 Create New ............................................................................................................................... 2-6 View event log .......................................................................................................................2-11 View user list..........................................................................................................................2-17 Cancel Lockout......................................................................................................................2-19 Exit...........................................................................................................................................2-19 Network Shared Settings Outline ...........................................................................................................3-1 Installation of MSDE .......................................................................................3-2 3.2.1 3.3 Setting Up The Shimadzu User Authentication Tool ...................................................... 1-3 Setup of MSDE (only in server personal computer).......................................................... 3-3 Setup..............................................................................................................3-7 3.3.1 3.3.2 Creation of authentication database (only in server personal computer) ...................... 3-7 Connection to server personal computer (only in client personal computer) ............... 3-9 Preface About The Shimadzu User Authentication Tool This software (hereafter referred to as “Shimadzu User Authentication Tool”) controls unitarily the user information used in Shimadzu applications. When the user information of the CLASS-Agent, the LabSolutions, etc. is controlled by this User Authentication Tool, the common database (user authentication database) which does not depend on applications is used. The User Authentication Tool is equipped with the utility functions to display the access log, create new servers, set the configuration, etc. to this database. About the Instruction Manual The authors have used their best efforts in preparing this document by providing up-to-date information as much as possible, but the information and software discussed in this document are subject to change due to nonconformity. For the latest information, please read the contents written in the README2.TXT file, a file that is saved to the program directory of this software during an installation process. The names of data processing software and equipment are expressed in the form of generic names. Model names and type names are indicated as may be deemed necessary to identify any software or equipment. As used in this instruction manual, this software package is referred to as “CLASS-Agent Software” where appropriate. Warning Signs The following warning signs are used throughout this instruction manual. [CAUTION] indicates a potentially hazardous situation where, if not avoided, any damage to property may be caused. [NOTE] emphasizes additional information that is useful to increase efficiency of operations and to enlarge an understanding of topics. Chapter 1 1.1 1.2 Installation Procedures Outline .....................................................................................................1-1 Installing Software...................................................................................1-2 1.2.1 Setting Up The Shimadzu User Authentication Tool............................................. 1-3 1 1.1 Installation Procedures Outline The Shimadzu User Authentication Tool can easily control and attest users in analytical applications. • The User Authentication Tool offers the following functions. 1. The tool realizes the User Authentication security by the login/logout processing using the login ID and the password. In addition, the tool can set in details the password length, the validity, etc. for each personal computer and each user. 2. The tool controls the user information (such as the name, the section and the address) based on the database. Because the tool can be connected to the rigid database such as the SQL Server/MSDE, it can realize easily the security at high level. 3. Because the tool is equipped with the advanced audit trail function, the system administrator can trace the information on each user. 4. Network function Because the tool corresponds to the LAN consisting of client and server, the information related to the user login can be unitarily controlled in the server. 1-1 1 Installation Procedures 1.2 Installing Software The following installation procedures assume that you are installing from a CD-ROM. Procedure 1) Gather a CD-ROM disk for CLASS-Agent Software. Then insert the CD-ROM disk into your CD-ROM drive. 2) With the CD-ROM disk inserted, the installation wizard appears as shown below. [NOTE] If the installation wizard does not automatically start up, or if you reboot the Windows program, you can install programs by using the Run command in MS-Windows 95/98/NT. Choose [Start] ® [Run] to open the <Run> dialog box. Click the [Browse] button and then choose a SETUP.EXE program from the root folder on the CD-ROM. Then click on the OK button to run the setup program. - The <Run> dialog box - 1-2 1 1.2.1 Installation Procedures Setting up The Shimadzu User Authentication Tool 1) You will see a listing of CLASS-Agent components. Click on the [Shimadzu User Authentication Tool] package button. 2) After you have specified which component to install, the installation program for the selected component starts up. In the installation wizard, click on the [Next] button to proceed as instructed on-screen. 1-3 1 Installation Procedures 3) Clicking on the [Next] button will display the next screen. 4) If you click on the [Next] button, the next wizard screen appears to start the installation process. 1-4 1 Installation Procedures 5) And then, the next wizard screen appears. Click [OK] button at the first installation. When re-installation or ActiveX Data Objects (ADO) has been already installed by installation of the Microsoft Office, click [No] button. - About re-installation - 6) You will see a message indicating that the installation was completed successfully. Then click on the [Finish] button. Install the application software “Class-Agent” consecutively. For the installation method, refer to the “CLASS-Agent Software Installation Manual (223-10053)”. 1-5 Chapter 2 2.1 Shimadzu User Authentication Tool Shimadzu User Authentication Tool .......................................................2-1 2.1.1 Startup of program ................................................................................................. 2-1 2.1.2 Main screen ............................................................................................................ 2-2 2.1.3 Configuration ......................................................................................................... 2-3 2.1.4 Change Server ........................................................................................................ 2-5 2.1.5 Create New............................................................................................................. 2-6 2.1.6 View event log ..................................................................................................... 2-11 2.1.7 View user list ....................................................................................................... 2-17 2.1.8 Cancel Lockout .................................................................................................... 2-19 2.1.9 Exit ....................................................................................................................... 2-19 2 2.1 Shimadzu User Authentication Tool Shimadzu User Authentication Tool 2.1.1 Startup of program 1) From [Settings] offered by the [Start] button on the desktop, select “Control Panel”. 2) Double-click the “Shimadzu authentication tool” icon. [NOTE] No user accounts have been created during the installation. Define a password surely for the login ID “Admin”. 2-1 2 Shimadzu User Authentication Tool 2.1.2 Main screen The figure below shows the main screen of the Shimadzu User Authentication Tool. Execute each function through this screen. - The main screen. Configuration Sets the configuration of the user authentication tool. For this setting, the administrator privilege is required. View event log Displays the event log list. Change Server Changes the MSDE (SQL) server to be referred . In the change destination personal computer, the Shimadzu user authentication server should be created. View user list Displays the registered user list. Cancel Lockout Cancels the User and PC lockout state. Create New Creates a new user authentication server. For creation, the MSDE (SQL) server should be set up in this personal computer, or this personal computer should be connected through the LAN to a personal computer in which the MSDE server h b l d t Exit Exits the user authentication server. 2-2 2 2.1.3 Shimadzu User Authentication Tool Configuration Click the [Configuration] button to display the <Login check> screen. Enter “Login ID” and “Password” and click the [OK] button to display the <Configuration of user authentication tool> screen. Click the [Cancel] button to cancel login. Click the [Help] button to display the <Help> screen. 2.1.3.1 Configuration setting of user authentication tool Set the configuration of the User Authentication Tool. If the User Authentication Tool is shared by two or more Shimadzu applications, setting changes are effective to all Shimadzu applications. - <Configuration of user authentication tool> screen - 1) [NOTE] Minimum password length: (0 to 14 characters) Set the minimum number of characters required in the password. When the minimum length of password is changed, this setting become effective at the next time of changing password. 2-3 2 Shimadzu User Authentication Tool 2) Maximum password age: (0 to 3650 days) When the maximum age is expired since the latest password was set, the warning is displayed. If “0” is set here, the maximum age is indefinite, and the warning is not displayed. 3) Same password is permitted: The previously set password is permitted. If this item is set ineffective, the previous password is not available when the password is changed. If it is required to change the password periodically, set this item ineffective. 4) Passwords must meet complexity requirements: A password must be consisted of both alphabet and the numeral characters. 5) User lockout duration: (0 to 9999 minutes) If login has failed beyond the specified number of bad logon attempts by a user, the user cannot log in for the specified duration. This function is offered to prevent illegal login by the third party. If “0” is set here, the user lockout function is ineffective, and any user can continue the login operation endlessly without regard to the number of bad logon attempts. 6) User lockout after: bad logon attempts (0 to 999) Set the number of bad logon attempts (password input error) permitted in one user. If “0” is set here, the user lockout function is ineffective, and any user can continue the login operation endlessly without regard to the number of bad logon attempts. 7) PC lockout duration: (0 to 9999 minutes) If login has failed beyond the specified number of bad logon attempts by a personal computer, the login operation from the personal computer is not permitted for the specified duration. This function is offered to prevent illegal login attempted with different user IDs by the third party. If “0” is set here, the PC lockout function is ineffective, and the login operation can be continued endlessly without regard to the number of bad logon attempts. 8) PC lockout after: bad logon attempts (0 to 999) Set the number of bad logon attempts (password input error) permitted in one computer. If “0” is set here, the PC lockout function is ineffective, and the login operation can be continued endlessly without regard to the number of bad logon attempts. 9) Description: Enter a comment in up to 255 alphanumeric characters. 10) [Default] button Click the [Default] button to adjust the ER/ER default values. 11) [Update] button Click the [Update] button to update the changed set values. 12) [Exit] button Click the [Exit] button to exit the <Configuration of user authentication tool> screen. 2-4 2 2.1.4 Shimadzu User Authentication Tool Change Server Click the [Change Server] button to display the <Change server> screen. Two or more User Authentication Tool can exist in the network. In this case, select the personal computer in which the User Authentication Tool to be used exists. 2.1.4.1 Change Server - <Change server> screen - 1) SQL Server7, MSDE Select this item when sharing the same User Authentication Tool with other personal computers. Two or more sharing personal computers can refer to and control unitarily one user information. When this item is selected, the dropdown list of “Network library” is effective. 2) Access MDB Select this item when this personal computer is not connected to the network or only this personal computer controls independently users. When this item is selected, the changed configuration and usr information are effective only in this personal computer, and the dropdown list of “Network library” is not effective. 3) Server name: Enter the server (personal computer) name in which the User Authentication Tool is set up. When “Access MDB” is selected in 2), the User Authentication Tool becomes the MS-Access format (*.MDB). A file “ShimadzuAttestServer.MDB” is stored in the setup folder of each Shimadzu application. Specify this file. 2-5 2 Shimadzu User Authentication Tool 4) Network library: Select a network library from the dropdown list. “Named pipe” “TCP/IP” “Multi protocol” Select this library when the User Authentication Tool is set up in the MS-Windows NT, and “NetBEUI” is used as the network protocol. When selecting this library, the user account should be set in the Windows NT. Select this library when the User Authentication Tool is set up in the MS-Windows NT or the Windows98 (MSDE only), and use “TCP/IP” as the network protocol. Select this library when two or more servers are using different network protocols. When this library is selected, the network protocol available at first is automatically selected to establish connection. Click the [OK] button to change the server. Click the [Cancel] button to cancel change of the server. (For the detailed explanation related to the network library, refer to the manuals of the Microsoft SQLServer, the Acesss2000, etc.) 2.1.5 Create New Click the [Create New] button to display the <Create new user authentication tool> window. Create new user information database. Prior to creation, this personal computer should be connected through the LAN to a personal computer in which the MSDE or the SQL Server7 is set up. 2-6 2 Shimadzu User Authentication Tool 2.1.5.1 MSDE (SQL Server) login property - <Create new user authentication database (MSDE (SQL Server) login properties)> screen - 1) Server name: Enter the server (personal computer) name in which the MSDE (SQL Server7) exists. Enter “local” to set the server in this personal computer. 2) Login-ID: Enter “sa (System administrator)” of the server in which the MSDE (SQL Server7) exists or the login ID having the equivalent privilege. 3) Password: Enter the password of the sa (System administrator). 4) Network library: Select a network library from the dropdown list. For the setting method, refer to “2.1.4.1 Change server 4)”. 5) [Next] button Click the [Next] button to proceed to the next screen. 2-7 2 Shimadzu User Authentication Tool 6) [Cancel] button Click the [Cancel] button to cancel creation of the Shimadzu User Authentication Tool. 7) [Help] button Click the [Help] button to display the <Help> screen. 2.1.5.2 Create application’s administrator Click the [Next] button to display the <Create new user authentication tool (Create application’s administrator)> screen. The user created here is required to start up Shimadzu applications. - <Create new user authentication database (Create application’s administrator)> screen - 1) User-ID: Enter the system administrator referred to by Shimadzu applications when the User Authentication Tool is created. The ID is fixed to “Admin”. 2-8 2 Shimadzu User Authentication Tool 2) Password: Enter the password in 6 or more alphanumeric characters. Enter the password using less than 6 alphanumeric characters. In such a case, however, change the password before starting the operation from each Shimadzu application, or change “Minimum password length” on the <Configuration of User Authentication Tool> screen. 3) Password check: Enter the password again. Never forget the password because it is required to start up Shimadzu applications. 4) [Back] button Click the [Back] button to return to the <Create new user authentication tool (MSDE (SQL Server) login property)> screen. 5) [Next] button Click the [Next] button to proceed to the <Create new user authentication tool (Preparation was ready)> screen. 6) [Cancel] button Click the [Cancel] button to cancel creation of the Shimadzu User Authentication Tool. 7) [Help] button Click the [Help] button to display the <Help> screen. 2-9 2 Shimadzu User Authentication Tool 2.1.5.3 Preparation was ready Click the [Next] button on the <Create new user authentication tool (Create application’s administrator)> screen to display the <Create new user authentication tool (Preparation was ready)> screen. - <Create new user authentication database (Ready to create)> screen - 1) [Back] button Click the [Back] button to return to the <Create new user authentication tool (Create application’s administrator)> screen. 2) [Create] button Click the [Create] button to start creation of the User Authentication Tool. If something is wrong with the network connection or if the MSDE (SWL Server7) is not operating on the server computer, an error occurs. The creation status is displayed on the screen. 2-10 2 3) Shimadzu User Authentication Tool [Cancel] button Click the [Cancel] button to cancel creation of the Shimadzu User Authentication Tool. 4) [Help] button Click the [Help] button to display the <Help> screen. 2.1.6 View event log Click the [New event log] button to display the <Login check> screen. Enter “Login ID” and “Password” and click the [OK] button to display the <Event log> screen. Click the [Cancel] button to cancel login. Click the [Help] button to display the <Help> screen. 2-11 2 Shimadzu User Authentication Tool - <Event log> screen - 1) [Condition] button Click the [Condition] button to set the extraction condition. 2) [Copy] button Click the [Copy] button to copy the event log data to the clipboard. Because the event log data is copied in the CSV format, it can be copied as a text delimited with comma to texts of other editors. 3) [Print] button Click the [Print] button to print out the event log list. 4) [Font] button Click the [Font] button to specify the font for the event log list. 5) [Exit] button Click the [Exit] button to exit the <Event log> screen. 2-12 2 6) Display contents Login date: Computer name: Shimadzu User Authentication Tool Date and time when the operation was performed Personal computer name in which the operation was performed User ID: ID of the user who performed the operation User name: Full name of the user who performed the operation Operation: Contents of operation Configuration setting: The configuration of the User Authentication Tool was changed. (This operation is recorded only when the “Configuration” menu of this program is executed.) User Add: A new Shimadzu application user was registered. (The following operations related to users are executed and recorded by each Shimadzu application.) User Edit: The registered user information was changed. User Dell: The registered user information was deleted. User Restore: The deleted user information was restored. Result: Status indicating whether the setting was correctly executed OK: The setting was correctly executed. WN: There was no problem in the setting, but there was nonconformity. NG: An error occurred, and the setting was not executed. Information: Contents of operation performed to the User Authentication Tool Software: Shimadzu application program name which performed the operation to the User Authentication Tool Description: Comment entered by the user during change 2-13 2 Shimadzu User Authentication Tool 2.1.6.1 Extraction Condition Click the [Condition] button to display the <Extraction Condition> screen. On this screen, the event log extraction condition can be set. For example, if there are too many lines in the default status and the screen is difficult to look at, use this screen. Set each target check item to ON, and enter the extraction condition in the text box on the right side. If two or more check items are set to ON, event logs which satisfy all the conditions are extracted. - <Extraction Condition> screen - 1) Period Set the event log period of the data to be extracted. Check the check box to enable the combo box for operation. Drop down the combo box to display the calendar. 2) User Enter the user ID of the data to be extracted and displayed. 3) User full name Enter the user name of the event logs to be extracted. The entire full name does not have to be input. The logs of the user names including the input characters are extracted and displayed. 4) Result Among “OK”, “WN” and “NG”, select the result of the data to be extracted. 2-14 2 Shimadzu User Authentication Tool 5) Operation Among “User Add”, “User Edit” and “User Dell”, select the operation of the data to be extracted. 6) PC name Enter the personal computer name in which the data to be extracted is registered. 7) Software Enter the software name (Shimadzu application name) of the data to be extracted. 8) Information Enter the contents on the data to be extracted. 9) Description Enter the comment on the data to be extracted. 10) [OK] button Click the [OK] button to make the set extraction condition effective and reflect it on the list. 11) [Cancel] button Click the [Cancel] button to make the set extraction condition ineffective and return to the <Event log> screen. 2.1.6.2 Font Click the [Font] button to display the <Font> screen. The font specified on this screen is reflected on screens and printouts. - <Font> screen - 1) Font: Specify the font type. 2) Font style: Specify the font style. 2-15 2 Shimadzu User Authentication Tool 3) Size: Specify the font size. 4) Effects: “Strikeout” and “Underline” can be added. 5) Color: Specify the font color from the dropdown list. 6) Sample: The font specified on this screen is displayed as preview. 7) Script: “Japanese” is automatically displayed here when the font type selected in “Font” is a Japanese one. “Western” is automatically displayed here when the font type selected in “Font” is a Western one. 2-16 2 2.1.7 Shimadzu User Authentication Tool View user list Click the [View user list] button to display the <Login check> screen. Enter “Login ID” and “Password” and click the [OK] button to display the <User list> screen. Click the [Cancel] button to cancel login. Click the [Help] button to display the <Help> screen. - <User list> screen - 1) [Copy] button Click the [Copy] button to copy the user information data to the clipboard. Because the user information data is copied as a text delimited with commas, it can be copied to texts of other editors. 2-17 2 Shimadzu User Authentication Tool 2) [Print] button Click the [Print] button to print out the user information list. 3) [Font] button Click the [Font] button to display the <Font> screen. On this screen, specify the font for the user list. For the details, refer to “2.1.6.2 Font”. 4) [Exit] button Click the [Exit] button to close the <User list> screen. 2-18 2 2.1.8 Shimadzu User Authentication Tool Cancel Lockout Click the [Cancel Lockout] button to display the <Login check> screen. Enter “Login ID” and “Password” and click the [OK] button to display the <Confirm> screen. Click the [OK] button. Cancels the User and PC lockout state. 2.1.9 Exit Click the [Exit] button to terminate setting of the Shimadzu User Authentication Tool. 2-19 Chapter 3 3.1 3.2 Outline .....................................................................................................3-1 Installation of MSDE...............................................................................3-2 3.2.1 3.3 Network Shared Settings Setup of MSDE (only in server personal computer) .............................................. 3-3 Setup ........................................................................................................3-7 3.3.1 Creation of authentication database (only in server personal computer)................ 3-7 3.3.2 Connection to server personal computer (only in client personal computer) ......... 3-9 3 3.1 Network Shared Settings Outline This chapter explains The Shimadzu User Authentication Tool while picking up a setting example in which the tool is shared in the LAN. In order to share the tool in the LAN, one personal computer which acts as the database server is required. As the server database, the SQL Server or the MSDE is required. The MSDE is the database engine of the SQL Server offered by Microsoft free of charge. It is customized for small-scale database systems. Because each client personal computer refers to the database of the user authentication existing in the server, the information can be unitarily controlled. Server personal computer Database (SQL Server/MSDE) The user authentication is unitarily controlled here, and logged in through the server personal computer. Ethernet Client personal computer Client personal computer 3-1 Client personal computer 3 Network Shared Settings 3.2 Installation of MSDE This paragraph describes how to install the MSDE from the CD-ROM. Install the MSDE to server personal computers. You do not have to install it to client personal computers. If the SQL Server manufactured by Microsoft is already installed, installation of the MSDE is not required. Procedure 1) At first, insert the CD-ROM of the CLASS Agent software into the CD-ROM drive, and install the MSDE. 2) In several seconds after the CD-ROM is inserted into the CD-ROM drive, the following logo is automatically displayed. [NOTE] If the logo shown in 2) is not displayed in automatic startup or if the Windows is started up again, select <RUN(R)> from the [Start] button of the MS-Windows 95/98/NT. When the <RUN> dialog box is displayed, select and enter “setup.exe” from the route folder in the CD-ROM using the [Browse] button, then click the [OK] button. - Structure of the <RUN> dialog box - 3-2 3 3.2.1 Network Shared Settings Setup of MSDE (only in server personal computer) 1) Select the package type to be installed on the screen, and click the [MSDE Ver. 1.0] package button. 2) Confirm the folder in the temporary area used to install the MSDE. Specify the hard disk having free space of 150 MB or more, then click the [Continue] button. 3-3 3 Network Shared Settings 3) When the package is selected, preparation for setup starts. After a while, the following screen is displayed. Click the [Next] button on the screen in turn. Next Button 4) Click the [Next] button to display the following screen. Specify the MSDE installation destination. In the installation destination, the hard disk should have free space of 200 MB or more. 3-4 3 Network Shared Settings 5) Click the [Next] button to display the following screen and start installation. Installation will be finished in 15 to 60 minutes depending on the hardware configuration. Wait until the message for restart is displayed. 3-5 3 Network Shared Settings 6) When installation is completed, the following message is displayed. Restart the computer in accordance with the instruction. After restart, when the contents shown below are displayed on the task bar, the installation is completed. 3-6 3 3.3 Network Shared Settings Setup 3.3.1 Creation of authentication database (only in server personal computer) 1) Start up The Shimadzu User Authentication Tool by selecting “Settings”-“Control Panel” and double-clicking the tool icon in the server personal computer. Click the [Create New] button. Enter “Admin” for login after displaying the login menu. 2) Enter the name (or IP address) of the current computer to “Server name”, and click the [Next] button. The server personal computer name is displayed on the “Network and Dial-up Connections” identification tab of “Control Panel”. 3-7 3 Network Shared Settings 3) This is the system administrator’s password input phase. Because the password can be changed later using the Agent Manager, click the [Next] button. Though a warning is displayed because the system administrator’s password is not set, ignore the warning and continue the setting. 4) Click the [Create] button to create the database for authentication. Now, the database for user authentication is created in the server personal computer. Next, in the client personal computer, perform the setting to connect the server personal computer. 3-8 3 3.3.2 Network Shared Settings Connection to server personal computer (only in client personal computer) 1) In the client personal computer, start up The Shimadzu User Authentication Tool from “Control Panel”. Click the [Change Server] button. Enter “Admin” for login after displaying the login menu. 2) Enter the name (or IP address) of the server personal computer to “Server name”, then click the [OK] button. 3) When the message shown below is displayed, the setting of the client is completed. After that, the user information is unitarily controlled by the server personal computer. 3-9