1
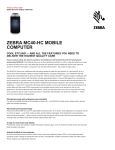
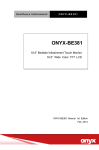
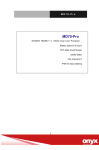
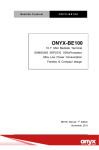
Bloodborne Pathogen
Compliance Tool
User Manual for Site Employee Safety Administrators
(SESAs)
New York City Department of Education
Table of Contents
1. ACCESSING THE SYSTEM ....................................................... 5 2. CONFIRMING A LIST OF AT-RISK EMPLOYEES ............... 6 3. CHECKING EMPLOYEES’ TRAINING STATUS ................... 9 4. CREATING AND MANAGING A VACCINE EVENT ........... 11 5. CHECKING THE VACCINATION STATUS OF AT-RISK
EMPLOYEES ...................................................................................... 13 6. DEVELOPING A SITE-SPECIFIC EXPOSURE CONTROL
PLAN SUMMARY............................................................................... 15 7. CREATING A CLEANING SCHEDULE FOR MEDICAL
AND CHANGE ROOMS ..................................................................... 17 2
Introduction and Where to Find Help
This training manual is designed to assist Site Employee Safety Administrators
(SESAs) in using the Bloodborne Pathogen Compliance Tool (BBPCT).
The following topics will be covered:
•
•
•
•
•
•
•
Accessing the System
Confirming a list of at-risk employees
Checking the training status of at-risk employees
Creating and managing a vaccine event
Checking the vaccination status of at-risk employees
Developing a Site-specific Exposure Control Plan Summary, and
Creating a cleaning schedule for medical and change rooms
If you need additional help not discussed in this guide, you can contact one
of the following units for help:
For policy issues:
Contact The Office of Occupational Safety and Health (OOSH) at:
718-935-2319
Inform the office that you are a designated SESA, and that you have a policy
question.
For technical support issues in using the Tool:
For technical issues:
If you cannot log in to the Tool or you receive an error message while using
the Tool, contact the HelpDesk and ask for support on the Bloodborne
Pathogen Compliance Tool at: 718-935-5100
Informational and compliance literature can be found once you are logged in to
the BBPCT by following these steps:
1. Log into the Tool.
2. Click the Resources button in the left-hand navigation pane.
3. Review the list of documents that are available to you, such as:
• New York City DOE Bloodborne Pathogens Exposure Control
Plan 2006-2007 - UNDER REVIEW
• OOSH Bulletin: The Bloodborne Pathogens Standard
• OOSH Bulletin: Hepatitis B and Hepatitis B Vaccination
• OOSH Bulletin: Hepatitis C
• OOSH Bulletin: HIV / AIDS
• OOSH Bulletin: Handling of Regulated Waste and Cleanup
Protocol
3
•
•
•
•
•
•
•
•
•
•
4
Brochure: Bloodborne Pathogens for Site Employee Safety
Administrators
Brochure: Bloodborne Pathogens for Principals
Brochure: A SESA’s Guide to Employee Exposure
Determination
Brochure: Post-Exposure Information for Employees
Brochure: Post-Exposure Information for Principals
Bloodborne Pathogens Standard PowerPoint Presentation for
SESAs
Bloodborne Pathogens Standard PowerPoint Presentation for
Pedagogues and School Staff
Brochure: At-Risk Employees with Occupational Exposure to
Blood and OPIM
NYCDOE Bloodborne Pathogens Poster
Universal Precautions Poster
1. Accessing the System
To access the system, perform the following:
1. You were sent an email when your principal designated you as the SESA
in Galaxy. Follow the instructions in the email, and then click the link to
go to the BBPCT system.
2. Add the site to your favorites, as you will be returning to it often:
a. On your Microsoft Internet Explorer menu bar, click the
Favorites option, and then trace to and click Add to Favorites.
b. Click the OK button in the Add Favorite dialog box.
Note: You can only access this system using a computer that is connected to the
Department of Education network. You must be logged into the network in order
to access the system.
Note: Your principal must designate you as the SESA in Galaxy before you can
access the system. When you receive an email that informs you that you have
been selected by your principal, you will have access to the system using the link
provided in the email.
Note: If you have problems accessing the system, please contact technical
support as detailed in this guide’s Introduction.
Help Desk Number: 718-935-5100
5
2. Confirming a list of at-risk employees
A list of employees who may be at risk for occupational exposure to blood and
other potentially infectious materials has been identified for you in Categories A
and B. SESAs are required to review and confirm these categories. These
employees will be invited to attend a web-based training session on bloodborne
pathogens. Upon completion of the training, they will be offered the hepatitis B
vaccine. To confirm the list of employees that may need to be trained and
offered a vaccine, perform the following:
1. Open the email you received informing you that you have been selected
as a SESA.
2. Click the link in the email to launch the Tool.
Note: You must be logged into the DOE network to access the Tool.
3. A list will appear with the employees from your location. If the list does
not appear, perform the following:
a. Click the Identify At-Risk Employees link in the left-hand
navigation pane.
b. Select search options on the form using the drop-down menus,
and then click the Search button.
Note: Most of the search options are already set for you and they
correspond to your work location.
c. A list will appear with the employees from your location.
4. Review the pre-set search options. You may need to make changes to
the assigned Categories based on the employees’ job tasks. Do the
following:
a. Compare the employee lists against the assigned Categories.
b. To change the Category field for any entry, click the down-arrow
in the Category column and then select one of the following
options:
• A = This category identifies job classifications in which
all employees may be expected to incur occupational
exposures to blood or OPIM, regardless of frequency.
These employees are highlighted in Red.
• B = Job titles in which SOME employees are at risk. To
be eligible for this category, an employee must perform
at least one assigned task with potential occupational
exposure. Category B employees are highlighted in
Orange.
• C = Employees whose job assignments do not expose
them to blood or OPIM. Category C employees are
highlighted in Beige.
Note: The Category field was pre-set based on job titles. As a result, some
employees in Category C may actually have occupational exposure to blood and
OPIM. Reassign these employees to Category A. If you need additional
6
information to determine the appropriate category, refer to “A SESA’s Guide to
Employee Exposure Determination” in the Resource section.
5. When you are done making any changes, scroll to the bottom of the page
and click the Confirm This Page button, and then click the OK button.
6. After you confirm your list, an email will be sent to the employees in
Categories A and B advising them that they are required to take a
mandated web-based training. Their email will contain a link for training
registration.
7. If the employee does not complete the training, you and the employee
will receive a reminder email every three business days until the training
is completed.
Note: As a SESA, you will be copied on any emails that a confirmed at-risk
employee receives. You may want to talk to your local IT support person to
create a rule in Outlook to help you manage your Inbox.
7
8
3. Checking employees’ training status
After you have identified the at-risk employees, you can check the status of their
training by performing the following steps:
1. Open the email you received informing you that you have been selected
as a SESA.
2. Click the link in the email to launch the Tool.
Note: You must be logged into the DOE network to access the Tool.
3. Click the Identify At-Risk Employees link in the left-hand navigation
pane.
4. Select search options on the form, and then click the Search button.
Note: Most of the search options are already set for you and they
correspond to your work location.
5. A list will appear with the employees from your location.
6. Review the Status column, which appears as the last column in the list of
your school’s location.
7. The following table is used as a guide to understanding Training Status:
Training Status Status Description Assigned for training When a staff/SESA is confirmed for the training Training Email Sent When a staff is notified about the training Registered For Training When an employee registers for training
(Learning Times) Training Reminder Sent When a staff fails to register for the training Training Not Attended When an employee (SESA or staff) fails to
attend registered training Training Completed When an employee completes the training 9
10
4. Creating and managing a vaccine event
To propose a vaccine event and then check the status of the vendor’s acceptance,
perform the following steps:
1. Open the email you received informing you that you have been selected
as a SESA.
2. Click the link in the email to launch the Tool.
Note: You must be logged into the DOE network to gain access to the
Tool.
3. Click the Manage Vaccination Schedules link in the left-hand
navigation pane.
4. Select search options on the form, and then click the Search button.
Note: Most of the options are already set for you and they correspond to
your work location.
5. You may select one of the following options if you want to filter the list
of results:
a. Vaccination Offer Notification Sent
b. Vaccination Offer Reminder Sent
c. Accepted Vaccination Offer
d. Declined Vaccination Offer
e. Vaccination Declination Email Sent
f. Vaccination Schedule Notification Sent
g. Assigned Dosage Completed
h. Vaccination Schedule Reminder Sent
i. VACCINATION COMPLETED
j. Failed to take Scheduled Vaccine
6. A list will appear with the employees from your location who meet the
criteria you selected.
7. Click the Create/Modify Vaccination Events button.
8. Click the Select Location down-arrow, and then trace to and click on a
location for the event.
Note: You can also use the Search Location Code box to search for a
DOE location.
Note: The Event Name is populated for you. For example, if you
selected AF14 from the Select Location options, the following event
name will appear: AF14--Senior Achievement Facilitator 14
9. Click in the Event Date text box.
10. Using the pop-up calendar, select a date for your vaccine event.
Note: When you select a date, the Event Name changes. The date is
added to the name of the event.
11. Click in the Start Time text box.
12. Enter a start time for the event in the following format: HH:MM
AM/PM.
Note: When you select a start time, the Event Name changes. The start
time is added to the name of the event.
13. Click in the End Time text box.
11
14. Enter an end time for the event in the following format: HH:MM
AM/PM.
Note: When you select an end time, the Event Name changes. The end
time is added to the name of the event.
15. Enter text in the Event Message field. This will be sent to the employees
who are invited to attend.
16. Click the Save button.
17. If you need to change a saved event that has already been set up, click
the Edit icon in the table that appears at the bottom of this screen.
12
5. Checking the vaccination status of at-risk
employees
To check the vaccination status of at-risk employees, perform the following
steps:
1. Open the email you received informing you that you have been selected
as a SESA.
2. Click the link in the email to launch the Tool.
Note: You must be logged into the DOE network to access the Tool.
3. Click the Identify At-Risk Employees link in the left-hand navigation
pane.
4. Select search options on the form, and then click the Search button.
Note: Most of the options are already set for you and they correspond to
your work location.
5. You may select one of the following options if you want to filter the list
of results:
a. Vaccination Offer Notification Sent
b. Vaccination Offer Reminder Sent
c. Accepted Vaccination Offer
d. Declined Vaccination Offer
e. Vaccination Declination Email Sent
f. Vaccination Schedule Notification Sent
g. Assigned Dosage Completed
h. Vaccination Schedule Reminder Sent
i. VACCINATION COMPLETED
j. Failed to take Scheduled Vaccine
6. A list will appear with the employees from your location who meet the
criteria you selected.
7. Review the Status column, which appears as the last column in the list of
employees.
8. Use the following table to understand employee Vaccination Status.
Vaccination Status Status 13
Description Vaccination Offer Notification When an employee completes the
training Vaccination Offer Reminder When an employee fails to act on the
vaccination offer Accepted Vaccination Offer When an employee accepts the
vaccination offer Declined Vaccination Offer When an employee declines the
vaccination offer Event Attached Vaccination Event is Attached Event Confirmed Vaccination Event is Confirmed Initial email notification to the
employee that an event has been
scheduled and a follow-up email one
Vaccination Schedule Email Sent day prior to scheduled event. 14
Dosage-1 Completed Employee has received dose 1 Dosage-2 Completed Employee has received dose 2 Dosage-3 Completed Employee has received dose 3 Fail to take Vaccine When an employee fails to attend
scheduled vaccine event Vaccination Completed When an employee completes all
three doses 6. Developing a site-specific Exposure Control
Plan Summary
To create your Site-specific Exposure Control Plan Summary, perform the
following steps:
1. Open the email you received informing you that you have been selected
as a SESA.
2. Click the link in the email to launch the Tool.
Note: You must be logged into the DOE network to access the Tool.
3. Click the Exposure Control Plan button in the left-hand navigation
pane.
4. Select search options on the form, and then click the Search button.
5. Confirm that the SESA‘s information is correct. To make the plan sitespecific, scroll down and complete the blank spaces for each section.
6. Click the School’s DBN number.
7. Review the information in the Site Exposure Control Plan section of
this window with a list of SESAs.
8. Scroll down until you see a section to fill out the location and room
number of important equipment and tools.
9. In each field, enter the floor and room number where the equipment or
logs are located.
10. Click the Save Site Exposure Control Plan button.
11. Click the Print Site Exposure Control button to send your Exposure
Control plan to your printer.
15
16
7. Creating a cleaning schedule for medical
and change rooms
The cleaning schedule should reflect how surfaces in your school which may
have been contaminated with blood and OPIM are cleaned and disinfected.
Note: The cleaning schedule should be developed in consultation with your
School Custodian, School Nurse, and Principal.
To create your Cleaning Schedule, perform the following steps:
1. Click the Exposure Control Plan button in the left-hand navigation
pane.
2. Review the information in the Cleaning Schedule section.
3. Click in the Disinfectant box, and then select one or more of the
following options:
a. Alcohol Pads
b. Bleach
c. Caviwipes
d. DOE/School’s General Housekeeping Procedures
e. Sani-Cloth
f. Other EPA Disinfectant
g. Not Applicable
4. Click in the Frequency box, and then select one or more of the following
options:
a. After each student use
b. Daily or if visibly contaminated
c. DOE/School’s General Housekeeping Procedures
d. Not Applicable
5. Click in the Responsible Person box, and then select one or more of the
following options:
a. DOE School Custodian
b. OSH Staff (Nurses, Public Health Advisors, Public Health
Assistants)
c. School Staff (Occupational Therapist, Physical Therapist)
d. School Staff (Para, Health Para, Teacher)
e. Other
f. Not Applicable
6. Repeat these steps for all other sections of your cleaning schedule.
7. Click the Save Cleaning Schedule button.
8. Click the Print Cleaning Schedule button to send your cleaning
schedule to your printer.
9. Post cleaning schedules in change and medical rooms, respectively.
17