1
Ingenuity Variant Analysis Plugin
USER MANUAL
User manual for
Ingenuity Variant Analysis plugin
Windows, Mac OS X and Linux
September 7, 2015
This software is for research purposes only.
CLC bio, a QIAGEN Company
Silkeborgvej 2
Prismet
DK-8000 Aarhus C
Denmark
Contents
1 Installation of the Ingenuity Variant Analysis plugin
4
2 Uninstall
6
3 Introduction to the Ingenuity Variant Analysis plugin
7
4 Ingenuity Variant Analysis
9
5 Ingenuity Variant Analysis for Hereditary Diseases
13
6 Analysis using the plugin and the IVA web interface
18
7 Add Information from Allele Frequency Community
23
8 Remove Variants Found in Allele Frequency Community
26
9 Workflows
30
9.1 Identify and Interpret Causal Variants in a Family of Four (WGS) . . . . . . . . . .
31
9.2 Identify and Interpret Causal Variants in a Family of Four (WES)
. . . . . . . . . .
33
9.3 Identify and Interpret Causal Variants in a Family of Four (TAS) . . . . . . . . . . .
37
9.4 Identify and Interpret Causal Variants in a Trio (WGS) . . . . . . . . . . . . . . . .
40
9.5 Identify and Interpret Causal Variants in a Trio (WES) . . . . . . . . . . . . . . . .
42
9.6 Identify and Interpret Causal Variants in a Trio (TAS) . . . . . . . . . . . . . . . .
45
10 Changing Allele Frequency Community opt-in settings
3
49
Chapter 1
Installation of the Ingenuity Variant
Analysis plugin
The Ingenuity Variant Analysis is installed as a plugin. Plugins are installed using the plugin
manager1 :
Help in the Menu Bar | Plugins and Resources... (
or Plugins (
)
) in the Toolbar
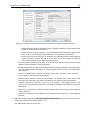
The plugin manager has three tabs at the top:
• Manage Plugins. This is an overview of plugins that are installed.
• Download Plugins. This is an overview of available plugins on CLC bio's server.
• Manage Resources. This is an overview of resources that are installed.
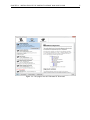
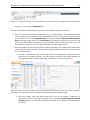
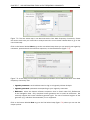
To install a plugin, click the Download Plugins tab. This will display an overview of the plugins
that are available for download and installation (see figure 1.1).
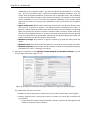
Clicking a plugin will display additional information at the right side of the dialog. This will also
display a button: Download and Install.
Click the Ingenuity Variant Analysis and press Download and Install. A dialog displaying progress
is now shown, and the plugin is downloaded and installed.
If the Ingenuity Variant Analysis is not shown on the server, and you have it on your computer
(e.g. if you have downloaded it from our web-site), you can install it by clicking the Install from
File button at the bottom of the dialog. This will open a dialog where you can browse for the
plugin. The plugin file should be a file of the type ".cpa".
When you close the dialog, you will be asked whether you wish to restart the CLC Genomics
Workbench. The plugin will not be ready for use until you have restarted.
1
In order to install plugins on Windows, the Workbench must be run in administrator mode: Right-click the program
shortcut and choose "Run as Administrator". Then follow the procedure described below.
4
CHAPTER 1. INSTALLATION OF THE INGENUITY VARIANT ANALYSIS PLUGIN
Figure 1.1: The plugins that are available for download.
5
Chapter 2
Uninstall
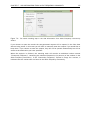
Plugins are uninstalled using the plugin manager:
Help in the Menu Bar | Plugins and Resources... (
or Plugins (
)
) in the Toolbar
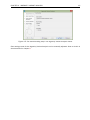
This will open the dialog shown in figure 2.1.
Figure 2.1: The plugin manager with plugins installed.
The installed plugins are shown in this dialog. To uninstall:
Click the Ingenuity Variant Analysis | Uninstall
If you do not wish to completely uninstall the plugin but you don't want it to be used next time
you start the Workbench, click the Disable button.
When you close the dialog, you will be asked whether you wish to restart the workbench. The
plugin will not be uninstalled until the workbench is restarted.
6
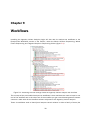
Chapter 3
Introduction to the Ingenuity Variant
Analysis plugin
The Ingenuity Variant Analysis plugin provides the ability to carry out an Ingenuity Variant
Analysis on variant tracks generated in the Workbench, and to annotate and filter variants
based on information present in the Allele Frequency Community. The latest available content
from the Ingenuity Knowledge Base and Allele Frequency Community is used in the biological
interpretation of input variants from whole genome, whole exome, targeted amplicon, or whole
transcriptome sequencing experiments. By using published biological knowledge of disease
biology, the Ingenuity Variant Analysis plugin can be used to prioritize your variants. The purpose
of the integration is to supplement the abilities of the Workbench with the biological knowledge
available in Ingenuity Variant Analysis and the Allele Frequency Community.
The plugin bundles four tools, which can be found in the toolbox:
• Ingenuity Variant Analysis used to analyze personal genomes, cancer genomes or to carry
out stratification analysis
• Ingenuity Variant Analysis for Hereditary Diseases used to analyze genetic diseases
• Add Information from Allele Frequency Community used to annotate with information from
the Allele Frequency Community database
• Remove Variants found in Allele Frequency Community used to filter out variants that are
present in the Allele Frequency Community database
In addition to the four tools, the plugin comes with six ready-to-use workflows for analysis
and interpretation of hereditary diseases. These workflows are installed under the respective
applications in the toolbox (Whole Genome Sequencing, Whole Exome Sequencing, or Targeted
Amplicon Sequencing). The six workflows are:
• Identify and Interpret Causal Variants in a Family of Four using IVA (WGS)
• Identify and Interpret Causal Variants in a Trio using IVA (WGS)
• Identify and Interpret Causal Variants in a Family of Four using IVA (WES)
7
CHAPTER 3. INTRODUCTION TO THE INGENUITY VARIANT ANALYSIS PLUGIN
8
• Identify and Interpret Causal Variants in a Trio using IVA (WES)
• Identify and Interpret Causal Variants in a Family of Four using IVA (TAS)
• Identify and Interpret Causal Variants in a Trio using IVA (TAS)
Furthermore, the plugin includes the possibility to update a variant track containing the results
of an Ingenuity Variant Analysis, if you change the filtering settings inside the Ingenuity Variant
Analysis web interface.
Access to Ingenuity Variant Analysis requires a subscription. However a trial period is available that
allows the analysis of up to 4 samples. The first step is to register for an Ingenuity Variant Analysis account https://apps.ingenuity.com/isa/account/signup/va?utm_source=
ingenuity&utm_medium=banner&utm_campaign=webpage-preview. Upon completion
of registration, you will receive an email to activate your new Ingenuity Variant Analysis account.
Once you've logged in for the first time and accepted the End User License Agreement, you
can use these credentials to allow the plugin to send variant data from Biomedical Genomics
Workbench to Ingenuity Variant Analysis.
If you opt into the Allele Frequency Community, you will get a month of free analysis without
a subscription to Ingenuity Variant Analysis. See chapter 10 to change your Allele Frequency
Community opt-in status.
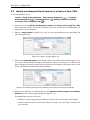
Chapter 4
Ingenuity Variant Analysis
The Ingenuity Variant Analysis tool is installed in the toolbox in a folder called Ingenuity Variant
Analysis, as shown in figure 4.1. The Ingenuity Variant Analysis tool ( ) can be launched from
the toolbox from the folder Ingenuity Variant Analysis ( ).
Figure 4.1: The Ingenuity Variant Analysis tool can be found in the toolbox in a folder called
"Ingenuity Variant Analysis".
If you are connected to a server, you will first be asked about where you would like to run the
analysis. If you are not connected to a server, the first step is to specify the input for the
analysis. The Ingenuity Variant Analysis tool accepts variant tracks ( ) as input. Select the
desired variant track or several variant tracks as input, as shown in figure 4.2. All the variant
tracks selected in this step are assumed to be "case" samples.
Figure 4.2: The first wizard step in the Ingenuity Variant Analysis. Select the variant track that you
would like to analyze and click on the button labeled Next to go to the next wizard step.
Click on the button labeled Next to go to the next wizard step where you can set the analysis
9
CHAPTER 4. INGENUITY VARIANT ANALYSIS
10
parameters, as described below (figure 4.3).
Figure 4.3: At this step you can specify the analysis parameters for the Ingenuity Variant Analysis
tool.
• Reference: Select the human reference sequence that is found under CLC_References
in the Navigation Area. Only complete human genomes can be used as references. We
currently support the human reference genome hg19. The use of selected regions of a
genome (e.g. individual chromosomes) is not supported.
• Control samples: This is an optional parameter. You may select one or more variant tracks,
which will be considered to be "control" samples in the analysis.
• Analysis pipeline name: Select the pipeline appropriate for your analysis. The Ingenuity
Variant Analysis is performed with predefined settings that differ depending on your choice
of analysis pipeline. The following options are available:
Personal genome: Useful if you have a single sample, and are looking for variants with
known disease or phenotypic associations.
Cancer: Useful if you're seeking to identify cancer driver variants. If this option is
selected, the type of cancer must be specified in the Disease name drop-down menu.
Stratification study: Useful if you have two groups of samples and are looking for
variants that distinguish the two.
Variant Analysis Custom Pipeline: Useful if you have already carried out an Ingenuity
Variant Analysis, where you have set up a desired filtering cascade, and want to re-use
the same filtering cascade for a new analysis. If this option is selected, the name
of the custom analysis must be specified in the Custom analysis name field. The
name you enter in the Custom analysis name field must match the "Name" field of
an existing analysis in Ingenuity Variant Analysis, exactly as it appears in the Ingenuity
Variant Analysis web interface. (Note: it is recommended that you provide unique
names to all your analyses in Ingenuity Variant Analysis.)
Upload only: Useful if you just want to upload samples and do not wish to carry out an
analysis. Note: in this case, no results will be downloaded.
CHAPTER 4. INGENUITY VARIANT ANALYSIS
11
• Analysis name: The name of the analysis. You can enter a name of your own choice by
typing in the name, or by using the options that appear when you press Shift + F1. The
available shorthand notations are: {input} will be substituted with the name of the input
experiment, {date} is substituted with a date stamp. The analysis name is the name that is
shown on the Ingenuity Variant Analysis page as the name when you choose "My Analyses".
The same analysis name can furthermore be used in a Variant Analysis Custom Pipeline, if
you specify it in the Custom analysis name field (see above).
• Analysis description: This will be the description of the analysis in Ingenuity Variant Analysis
once created. There are a few shorthand notations available: {input} will be substituted
with the name of the input experiment, {date} is substituted with a date stamp.
Click on the button labeled Next to go to the next wizard step, where you must specify your
Ingenuity username (email address) and password (figure 4.4). If you do not have an Ingenuity
username or password, you must first create an Ingenuity account. Account creation is described
in chapter 3.
Figure 4.4: Specify the account information: your Ingenuity username (email address) and password
are required at this step.
Click on the button labeled Next to go to the last wizard step (figure 4.5), where you can set
the output options. If the Import annotated and filtered variants option is checked, the tool will
produce a variant track as output. If it is unchecked, the analysis will be created, and can be
accessed inside the Ingenuity Variant Analysis web interface, but the results will not be imported
into the workbench. Note: it is not possible to import results if you have selected the Upload
only pipeline earlier in the wizard.
If you choose to open the results the two generated outputs will be opened in the View Area
without being saved. In this case you will have to manually save the outputs if you would like
to keep them. If you choose to save the outputs, click on the button labeled Next to specify
where to save the results and click on the button labeled Finish to start the Ingenuity Variant
Analysis. Your results will not be opened automatically but will be saved at the destination you
have specified.
The outputs are described in chapter 6. Note that after the analysis has been performed, the
CHAPTER 4. INGENUITY VARIANT ANALYSIS
12
Figure 4.5: The result handling step in the Ingenuity Variant Analysis wizard.
filter settings used for the Ingenuity Variant Analysis can be manually adjusted. How to do this is
also described in chapter 6.
Chapter 5
Ingenuity Variant Analysis for Hereditary
Diseases
The Ingenuity Variant Analysis for Hereditary Diseases tool is installed in the toolbox in a folder
called Ingenuity Variant Analysis, as shown in figure 5.1. The Ingenuity Variant Analysis for
Hereditary Diseases tool ( ) can be launched from the toolbox from the folder Ingenuity Variant
Analysis ( ).
Figure 5.1: The Ingenuity Variant Analysis for Hereditary Diseases tool can be found in the toolbox
in a folder called "Ingenuity Variant Analysis".
If you are connected to a server, you will first be asked about where you would like to run the
analysis. If you are not connected to a server, the first step is to specify the input for the analysis.
The Ingenuity Variant Analysis for Hereditary Diseases tool accepts a single variant track ( )
as input. Select the desired variant track, as shown in figure 5.2. The variant track selected
in this step will be considered the proband, i.e., the individual affected by the disease you are
studying.
Click on the button labeled Next to go to the next wizard step where you can set the analysis
parameters, as described below (figure 5.3).
• Reference: Select the human reference sequence that is found under CLC_References
in the Navigation Area. Only complete human genomes can be used as references. We
currently support the human reference genome hg19. The use of selected regions of the
genomes (e.g. individual chromosomes) is not supported.
• Analysis pipeline name: Select the appropriate pipeline for your analysis. The Ingenuity
Variant Analysis is performed with predefined settings that differ depending on your choice
of analysis pipeline. The following options are available:
Variant Analysis Genetic Disease Pipeline: to be used if you are studying genetic
disease.
13
CHAPTER 5. INGENUITY VARIANT ANALYSIS FOR HEREDITARY DISEASES
14
Figure 5.2: The first wizard step in the Ingenuity Variant Analysis for Hereditary Diseases.
Figure 5.3: At this step you can specify the analysis parameters for the Ingenuity Variant Analysis
for Hereditary Diseases tool.
Variant Analysis Custom Pipeline: useful if you have already carried out an Ingenuity
Variant Analysis where you had set up a desired filtering cascade and want to re-use
the same filtering cascade for a new analysis. If this option is selected, the name
of the custom analysis must be specified in the Custom analysis name field. The
name you enter in the Custom analysis name field must match the "Name" field of
an existing analysis in Ingenuity Variant Analysis exactly as it appears in the Ingenuity
Variant Analysis web interface. (Note: it is recommended that you provide unique
names to all your analyses in Ingenuity Variant Analysis.)
Upload only: useful if you just want to upload samples and do not wish to carry out an
analysis. Note: in this case, no results will be downloaded.
• Disease inheritance pattern: The disease inheritance pattern applicable to the disease
you are studying. Supported modes are: Dominant, Recessive, X-linked, De novo, or
Other/Unknown.
CHAPTER 5. INGENUITY VARIANT ANALYSIS FOR HEREDITARY DISEASES
15
• Analysis name: The name of the analysis. You can enter a name of your own choice by
typing in the name, or by using the options that appear when you press Shift + F1. The
available shorthand notations are: {input} will be substituted with the name of the input
experiment, {date} is substituted with a date stamp. The analysis name is the name that is
shown on the Ingenuity Variant Analysis page as the name when you choose "My Analyses".
The same analysis name can furthermore be used in a Variant Analysis Custom Pipeline, if
you specify it in the Custom analysis name field (see above).
• Analysis description: This will be the description of the analysis in Ingenuity Variant Analysis
once created. There are a few shorthand notations available: {input} will be substituted
with the name of the input experiment, {date} is substituted with a date stamp.
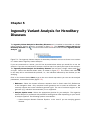
Click on the button labeled Next to go to the next wizard step, where you must specify family
data for the analysis (figure 5.4).
• Gender of proband: Select the gender of the individual affected by the disease.
• Variant track for father/mother: Select the variant track for the father or mother, as
appropriate. The variant track for at least one parent must be specified.
• Father/mother affected: Once you have selected a variant track for a parent, the option to
set the disease status of that parent will be enabled. Check this box if the given parent is
affected by the same disease as the proband. Uncheck this box if the given parent is not
affected.
Figure 5.4: Specify family data for your analysis. Data for at least one parent must be specified at
this step
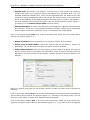
Click on the button labeled Next to go to the next wizard step, where you have the possibility to
specify further family data for the analysis (figure 5.5). Similarly to the previous step, you can
specify for each sibling a variant track, disease status and gender.
Click on the button labeled Next to go to the next wizard step, where you must specify your
Ingenuity username (email address) and password (figure 5.6). If you do not have an Ingenuity
CHAPTER 5. INGENUITY VARIANT ANALYSIS FOR HEREDITARY DISEASES
16
Figure 5.5: At this step, you have the option to specify variant tracks for siblings of the proband.
Figure 5.6: Specify the account information: your Ingenuity username (email address) and password
are required at this step.
username or password, you must first create an Ingenuity account. Account creation is described
in chapter 3.
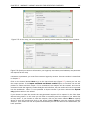
Click on the button labeled Next to go to the last wizard step (figure 5.7), where you can set
the output options. If the Import annotated and filtered variants option is checked, the tool will
produce a variant track as output. If it is unchecked, the analysis will be created, and can be
accessed inside the Ingenuity Variant Analysis web interface, but the results will not be imported
into the workbench. Note: it is not possible to import results if you have selected the Upload
only pipeline earlier in the wizard.
If you choose to open the results the two generated outputs will be opened in the View Area
without being saved. In this case you will have to manually save the outputs if you would like
to keep them. If you choose to save the outputs, click on the button labeled Next to specify
where to save the results and click on the button labeled Finish to start the Ingenuity Variant
Analysis. Your results will not be opened automatically but will be saved at the destination you
have specified.
CHAPTER 5. INGENUITY VARIANT ANALYSIS FOR HEREDITARY DISEASES
17
Figure 5.7: The result handling step in the Ingenuity Variant Analysis for Hereditary Diseases wizard.
If you choose to open the results the two generated outputs will be opened in the View Area without
being saved. In this case you will have to manually save the outputs if you would like to keep them.
If you choose to save the outputs, they will not be opened automatically but will be saved at the
destination you have specified.
The outputs are described in chapter 6. Note that after the analysis has been performed, the
filter settings used for the Ingenuity Variant Analysis can be manually adjusted. How to do this is
also described in chapter 6.
Chapter 6
Analysis using the plugin and the IVA
web interface
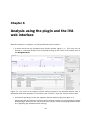
When the analysis is complete, you will get different kinds of output:
• A variant track with the annotated and filtered variants (figure 6.1). This track can be
opened in a Genome Browser View by double-clicking on the name of the variant track in
the Navigation Area.
Figure 6.1: The result of the Ingenuity Variant Analysis opened in the Genome Browser View in
Biomedical Genomics Workbench. The variant track is shown in split view with the variant table.
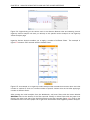
• A document providing a link to the Ingenuity Variant Analysis page (see figure 6.2).
Copying this link and pasting it into an internet browser will take you to the Ingenuity Variant
Analysis page, where you can narrow down your analysis further by applying different filters
or by adjusting the predefined filter settings.
18
CHAPTER 6. ANALYSIS USING THE PLUGIN AND THE IVA WEB INTERFACE
19
Figure 6.2: Copy this link into an internet browser to see the result of the Ingenuity Variant Analysis.
• A log file, if you ticked the Open log box.
There are two different approaches to how you can handle the identified variants:
• Open the variants in the Genome Browser View in the Workbench. The identified variants
can be viewed in track format in the Genome Browser View by double-clicking on the name
of the variant track in the Navigation Area. The button labeled Create Genome Browser
View in the upper right corner of the View Area can be used to create a list of tracks in the
same view, which allows comparison of the identified variants with other tracks, such as
the reference sequence, the CDS, read mappings, or other variant tracks.
• View the variants on the Ingenuity Variant Analysis web page. This option allows adjustment
of the predefined filter settings. The variants in Ingenuity Variant Analysis can be accessed
in two different ways:
1. Use the link provided in one of the output files in the Workbench. Copy the link and
paste it into an internet browser. This will send you directly to the variant analysis on
the Ingenuity Variant Analysis web page. An example is shown in figure 6.3.
Figure 6.3: Copy the link provided in one of the output files and paste it into an internet browser to
go directly to the specific variant analysis on the Ingenuity Variant Analysis page.
2. Open the variant track that was produced as one of the outputs. Right-click on
the variant track in the Genome Browser View and select Launch Ingenuity Variant
Analysis (figure 6.4). This will also send you directly to the Ingenuity Variant Analysis
web page.
CHAPTER 6. ANALYSIS USING THE PLUGIN AND THE IVA WEB INTERFACE
20
Figure 6.4: Right-clicking on the variant track in the Genome Browser View and selecting Launch
Ingenuity Variant Analysis will send you directly to the specific variant analysis on the Ingenuity
Variant Analysis page.
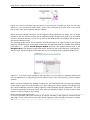
Ingenuity Variant Analysis enables you to apply a number of different filters. The example in
figure 6.5 shows a filter cascade with the default filters.
Figure 6.5: An example of an Ingenuity Variant Analysis filter cascade that narrows down the initial
number of variants to focus on a limited number of specific variants that are left after applying a
number of different filters.
After running the initial analysis from the Workbench, add more filters with the button labeled
Add Filter found at the bottom of the filter cascade. Modify or delete filters with the paper icon
found in the right hand side of the individual filters in the filter cascade (figure 6.6). Click on the
information icon next to the paper icon to get more information about Ingenuity Variant Analysis.
CHAPTER 6. ANALYSIS USING THE PLUGIN AND THE IVA WEB INTERFACE
21
Figure 6.6: Click on the paper icon (red arrow) if you would like to delete the filter, see the filter
details, or if you would like to adjust them. Click on the information icon (blue arrow) if you would
like to learn more about Ingenuity Variant Analysis.
When you have modified the filters on the Ingenuity Variant Analysis web page, you can either
choose to use the options provided on the Ingenuity Variant Analysis web page to go into detail
with the individual variants, or you can go back to the Workbench and visualize the variants in
the Genome Browser View.
The modified variant track can be imported into the Workbench by right-clicking on the original
Ingenuity Variant Analysis variant track output that was generated with the default filter settings
(see figure 6.7). Choose Variant Analysis Update and save the updated variant track in the
Navigation Area. The updated variant track will be saved with the name extension "(IVA update)",
which means that the original variant track will not be overwritten by the updated variant track.
Figure 6.7: If you have made changes to the used filters, you can import the updated variant track
into the Workbench by right-clicking on the original variant track and choosing "Variant Analysis
Update".
When you have imported the updated variant track, we recommend that you open the updated
variant track in split view with the table view. After running the variant analysis, the variant table
will contain additional columns holding Ingenuity Variant Analysis-specific information. The type
of analysis performed and which filters were used will determine which of these columns (see
figure 6.8) will be added to your results.
Please visit the Ingenuity websitehttp://www.ingenuity.com/products/variant-analysis
for more information about the wide range of options available on the Ingenuity Variant Analysis
web page. If you would like to learn more about Ingenuity Variant Analysis annotations, please
see http://ingenuity.force.com/variants/VariantTutorials.
CHAPTER 6. ANALYSIS USING THE PLUGIN AND THE IVA WEB INTERFACE
Figure 6.8: You can see which columns have been added in the Table view of the variants.
22
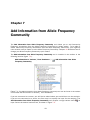
Chapter 7
Add Information from Allele Frequency
Community
The Add Information from Allele Frequency Community tool allows you to add Community
Frequency annotations from the Allele Frequency Community to variant tracks. To be able to
obtain Community Frequency annotations from the Allele Frequency Community, your Ingenuity
user account must be opted in to the Allele Frequency Community. Chapter 10 describes how to
change your Allele Frequency Community opt-in status.
The Add Information from Allele Frequency Community tool is installed in the toolbox in the
following location (figure 7.1):
Add Information to Variants | From Databases | (
Frequency Community
) Add Information from Allele
Figure 7.1: The Add Information from Allele Frequency Community tool can be found in the toolbox
in the folder Add Information to Variants | From Databases.
If you are connected to a server, you will first be asked where you would like to run the analysis.
If you are not connected to a server, the first step is to specify the input for the analysis. The
Add Information from Allele Frequency Community tool accepts a single variant track ( ) as
input. Select the desired variant track, as shown in figure 7.2.
23
CHAPTER 7. ADD INFORMATION FROM ALLELE FREQUENCY COMMUNITY
24
Figure 7.2: The first wizard step in the Add Information from Allele Frequency Community. Select
the variant track that you would like to analyze and click on the button labeled Next to go to the
next wizard step.
Click on the button labeled Next to go to the next wizard step where you can specify your Ingenuity
username, password and the reference sequence, as described below (figure 7.3).
Figure 7.3: At this step you can specify the analysis parameters for the Add Information from Allele
Frequency Community tool.
• Ingenuity username: email address used to log in to Ingenuity Variant Analysis
• Ingenuity password: password corresponding to your Ingenuity username
• Reference: select the human reference sequence that is found under CLC_References
in the Navigation Area. Only complete human genomes can be used as references. We
currently support the human reference genome hg19. The use of selected regions of the
genomes (e.g. individual chromosomes) is not supported.
Click on the button labeled Next to go to the final wizard step (figure 7.4) where you can set the
output options.
CHAPTER 7. ADD INFORMATION FROM ALLELE FREQUENCY COMMUNITY
25
Figure 7.4: The result handling step in the Add Information from Allele Frequency Community
wizard.
If you choose to open the results the two generated outputs will be opened in the View Area
without being saved. In this case you will have to manually save the outputs if you would like to
keep them. If you choose to save the outputs, they will not be opened automatically but will be
saved at the destination you have specified.
When the analysis is finished, the resulting track will contain an additional column named
"Community Frequency", containing the observed frequencies (in percent) of the variants in the
Allele Frequency Community. If the "Community Frequency" column is empty for a variant, it
indicates that the variant was not found in the Allele Frequency Community.
Chapter 8
Remove Variants Found in Allele
Frequency Community
The Remove Variants found in Allele Frequency Community tool allows you to add Community
Frequency annotations from the Allele Frequency Community to variant tracks, and to filter the
variants based on those annotations. To be able to obtain Community Frequency annotations
from the Allele Frequency Community, your Ingenuity user account must be opted in to the Allele
Frequency Community. Chapter 10 describes how to change your Allele Frequency Community
opt-in status.
The Remove Variants found in Allele Frequency Community tool is installed in the toolbox in the
following location (figure 8.1):
Remove Variants | From Databases |
Frequency Community
(
) Remove Variants Found in Allele
Figure 8.1: The Remove Variants found in Allele Frequency Community tool can be found in the
toolbox in the folder Remove Variants | From Databases.
If you are connected to a server, you will first be asked about where you would like to run the
analysis. If you are not connected to a server, the first step is to specify the input for the analysis.
The Remove Variants found in Allele Frequency Community tool accepts a single variant track
( ) as input. Select the desired variant track as shown in figure 8.2.
Click on the button labeled Next to go to the next wizard step where you can specify your Ingenuity
username, password and the reference sequence as described below (figure 8.3).
• Ingenuity username: email address used to log in to Ingenuity Variant Analysis.
26
CHAPTER 8. REMOVE VARIANTS FOUND IN ALLELE FREQUENCY COMMUNITY
27
Figure 8.2: The first wizard step in the Remove Variants found in Allele Frequency Community.
Figure 8.3: At this step you can specify the analysis parameters for the Remove Variants found in
Allele Frequency Community tool.
• Ingenuity password: password corresponding to your Ingenuity username
• Reference: select the human reference sequence that is found under CLC_References
in the Navigation Area. Only complete human genomes can be used as references. We
currently support the human reference genome hg19. The use of selected regions of the
genomes (e.g. individual chromosomes) is not supported.
Click on the button labeled Next to go to the next wizard step. Here you can specify the cutoff for
filtering by entering the desired value in the Maximum frequency field (figure 8.4). Only variants
whose Allele Frequency Community frequency is equal to or lower than the specified value will be
considered.
Click on the button labeled Next to go to the final wizard step (figure 8.5) where you can set the
output options.
If you choose to open the results the two generated outputs will be opened in the View Area
CHAPTER 8. REMOVE VARIANTS FOUND IN ALLELE FREQUENCY COMMUNITY
28
Figure 8.4: At this step you can specify the filter cutofff to be used by the Remove Variants found
in Allele Frequency Community tool.
Figure 8.5: The result handling step in the Remove Variants found in Allele Frequency Community
wizard.
without being saved. In this case you will have to manually save the outputs if you would like to
keep them. If you choose to save the outputs, they will not be opened automatically but will be
saved at the destination you have specified.
When the analysis is finished, the resulting track will contain an additional column named
"Community Frequency", containing the observed frequencies (in percent) of the variants in
the Allele Frequency Community. Furthermore, the number of variants will have been reduced
according to the cutoff parameter that you have specified.
Note that if the "Community Frequency" column is empty for a variant, it indicates that the
variant was not found in the Allele Frequency Community. This can happen when the variant is
a "new" one in the Allele Frequency Community database, but also for reference variant from
an heterozygous pair whose non-reference variant was kept by the Remove Variants found in
Allele Frequency Communitytool as no reference variants are ever found in the Allele Frequency
CHAPTER 8. REMOVE VARIANTS FOUND IN ALLELE FREQUENCY COMMUNITY
29
Community database. To filter out reference variants, click on the "Filter" button in the variant
table, select "Reference allele" in the drop-down menu, and keep only the variants that contain
"No". After this step, the only variants without an annotation in the "Community frequency"
column will be the ones considered as "new" variants, i.e., not previously found in the Allele
Frequency Community database.
Chapter 9
Workflows
Installing the Ingenuity Variant Analysis plugin will also add six ready-to-use workflows to the
Ready-to-Use Workflows section of the toolbox, under the Whole Genome Sequencing, Whole
Exome Sequencing and Targeted Amplicon Sequencing folders (figure 9.1).
Figure 9.1: Accessing the user settings inside the Ingenuity Variant Analysis web interface
The concept of the pre-installed ready-to-use workflows is that read data are used as input in one
end of the workflow and in the other end of the workflow you get a track based genome browser
view and a table with all the identified variants subjected to the Ingenuity Variant Analysis.
These six workflows seek to identify and interpret causal variants in either a family of three (the
30
CHAPTER 9. WORKFLOWS
31
proband and his two parents) or a family of four (the proband, his parents and a sibling). Once
you have selected the workflow in the folder relevant to your input data, you can read the steps
you need to take to start the workflow. For more information on the specific tools used in this
workflow, see the Biomedical Genomics Workbench manual chapter on Workflows.
9.1
Identify and Interpret Causal Variants in a Family of Four (WGS)
To run this workflow, go to:
Toolbox | Ready-to-Use Workflows | Whole Genome Sequencing ( ) | Hereditary
Disease ( ) | Identify and Annotate Variants in a Family of Four using IVA (WGS)
( )
1. Double-click on the Identify and Annotate Variants in a Family of Four using IVA (WGS)
tool to start the analysis. If you are connected to a server, you will first be asked where you
would like to run the analysis.
2. Select the sequencing reads for the sibling, father, mother and proband successively
(figure 9.2). You can do that by double-clicking on the reads file name or clicking once on
the file and then clicking on the arrow pointing to the right side in the middle of the wizard.
Click on the button labeled Next between each family member.
Figure 9.2: Specify the sequencing reads for each family members successively.
3. Specify the parameters for the Fixed Ploidy Variant Detection tool for the sibling (figure 9.3).
Figure 9.3: Specifying the parameters for the Fixed Ploidy Variant Detection tool.
The parameters that can be set are:
CHAPTER 9. WORKFLOWS
32
• Required variant probability is the minimum probability value of the 'variant site'
required for the variant to be called. Note that it is not the minimum value of the
probability of the individual variant. For the Fixed Ploidy Variant detector, if a variant
site - and not the variant itself - passes the variant probability threshold, then the
variant with the highest probability at that site will be reported even if the probability
of that particular variant might be less than the threshold. For example if the required
variant probability is set to 0.9 then the individual probability of the variant called
might be less than 0.9 as long as the probability of the entire variant site is greater
than 0.9.
• Ignore broken pairs: When ticked, reads from broken pairs are ignored. Broken pairs
may arise for a number of reasons, one being erroneous mapping of the reads. In
general, variants based on broken pair reads are likely to be less reliable, so ignoring
them may reduce the number of spurious variants called. However, broken pairs may
also arise for biological reasons (e.g. due to structural variants) and if they are ignored
some true variants may go undetected. Please note that ignored broken pair reads will
not be considered for any non-specific match filters.
• Minimum coverage: Only variants in regions covered by at least this many reads are
called.
• Minimum count: Only variants that are present in at least this many reads are called.
• Minimum frequency: Only variants that are present at least at the specified frequency
(calculated as 'count'/'coverage') are called.
4. Specify your reference and parameters for the Ingenuity Variant Analysis for Hereditary
Diseases, as well as your login information (figure 9.4).
Figure 9.4: Specify a reference and login information to Ingenuity Variant Analysis
The parameters that can be set are:
• Reference: Select the genome sequence you would like to work with, usually hg19.
• Analysis pipeline name: specify which kind of analysis you would like to perform on
your variants
CHAPTER 9. WORKFLOWS
33
Variant Analysis Genetic Disease Pipeline: pipeline available on the Ingenuity web
interface to identify causal variants.
Variant Analysis Custom Pipeline / specify analysis name: chose this option if you
want to run a customized pipeline available in your Ingenuity IVA account.
Upload only: does not carry out an analysis, just upload samples to the Ingenuity
Variant Analysis. Choose this option if you wish to run the analysis or create a
customized pipeline on the Ingenuity web interface.
• Custom analysis name: Enter a name in this field only if you have selected the Variant
Analysis Custom Pipeline in the field above.
• Gender of proband: you can choose between male, female, ambiguous (for babies born
with sex chromosomes anomalies or sexual organs that are not yet fully developed)
and unknown.
• Check if an other family member is affected: the mother, the father or the proband.
• If the sibling is affected, specify its gender.
• Analysis name: choose a name for your analysis. The default name is the name of the
first input file selected in the wizard, followed by the date and the word Analysis.
• Analysis description: choose a name for your analysis. The default name is the
name of the first input file selected in the wizard, followed by the date and the word
Description.
• Ingenuity VA username: usually the email address you used to sign in the Ingenuity
Variant Analysis.
• Ingenuity VA password: the password you chose when you signed in on the Ingenuity
website.
5. Specify the parameters for the Fixed Ploidy Variant Detection tool for the father, mother
and proband respectively as you did previously.
6. On the last wizard window, pressing the button Preview All Parameters allows you to
preview all parameters. At this step you can only view the parameters, it is not possible to
make any changes. Choose to save the results and click on the button labeled Finish.
Four types of output are generated:
• 4 Reads Track, one for each family member
• 4 Filtered Variant Track, one for each family member
• An Imported track
• A URL file
9.2
Identify and Interpret Causal Variants in a Family of Four (WES)
To run this workflow, go to:
Toolbox | Ready-to-Use Workflows | Whole Exome Sequencing ( ) or Targeted
Amplicon Sequencing ( ) | Hereditary Disease ( ) | Identify and Annotate Variants
in a Family of Four using IVA (WES) ( )
CHAPTER 9. WORKFLOWS
34
1. Double-click on the Identify and Annotate Variants in a Family of Four using IVA (WES)
tool to start the analysis. If you are connected to a server, you will first be asked where you
would like to run the analysis.
2. Specify a target region file (figure 9.5). This is a file that depends on the technology you
used for sequencing.
Figure 9.5: Specify a target region file
3. Select the sequencing reads for the sibling, father, mother and proband successively
(figure 9.6). You can do that by double-clicking on the reads file name or clicking once on
the file and then clicking on the arrow pointing to the right side in the middle of the wizard.
Click on the button labeled Next between each family member.
Figure 9.6: Specify the sequencing reads for each family members successively.
4. Specify your reference and parameters for the Ingenuity Variant Analysis for Hereditary
Diseases, as well as your login information (figure 9.7).
The parameters that can be set are:
• Reference: Select the genome sequence you would like to work with, usually hg19.
• Analysis pipeline name: specify which kind of analysis you would like to perform on
your variants
Variant Analysis Genetic Disease Pipeline: pipeline available on the Ingenuity web
interface to identify causal variants.
Variant Analysis Custom Pipeline / specify analysis name: chose this option if you
want to run a customized pipeline available in your Ingenuity IVA account.
Upload only: does not carry out an analysis, just upload samples to the Ingenuity
Variant Analysis. Choose this option if you wish to run the analysis or create a
customized pipeline on the Ingenuity web interface.
CHAPTER 9. WORKFLOWS
35
Figure 9.7: Specify a reference and login information to Ingenuity Variant Analysis
• Custom analysis name: Enter a name in this field only if you have selected the Variant
Analysis Custom Pipeline in the field above.
• Gender of proband: you can choose between male, female, ambiguous (for babies born
with sex chromosomes anomalies or sexual organs that are not yet fully developed)
and unknown.
• Check if an other family member is affected: the mother, the father or the proband.
• If the sibling is affected, specify its gender.
• Analysis name: choose a name for your analysis. The default name is the name of the
first input file selected in the wizard, followed by the date and the word Analysis.
• Analysis description: choose a name for your analysis. The default name is the
name of the first input file selected in the wizard, followed by the date and the word
Description.
• Ingenuity VA username: usually the email address you used to sign in the Ingenuity
Variant Analysis.
• Ingenuity VA password: the password you chose when you signed in on the Ingenuity
website.
5. Specify the parameters for the Fixed Ploidy Variant Detection tool for the proband, mother,
sibling and father successively (figure 9.8).
The parameters that can be set are:
• Required variant probability is the minimum probability value of the 'variant site'
required for the variant to be called. Note that it is not the minimum value of the
probability of the individual variant. For the Fixed Ploidy Variant detector, if a variant
site - and not the variant itself - passes the variant probability threshold, then the
variant with the highest probability at that site will be reported even if the probability
of that particular variant might be less than the threshold. For example if the required
CHAPTER 9. WORKFLOWS
36
Figure 9.8: Specifying the parameters for the Fixed Ploidy Variant Detection tool.
variant probability is set to 0.9 then the individual probability of the variant called
might be less than 0.9 as long as the probability of the entire variant site is greater
than 0.9.
• Ignore broken pairs: When ticked, reads from broken pairs are ignored. Broken pairs
may arise for a number of reasons, one being erroneous mapping of the reads. In
general, variants based on broken pair reads are likely to be less reliable, so ignoring
them may reduce the number of spurious variants called. However, broken pairs may
also arise for biological reasons (e.g. due to structural variants) and if they are ignored
some true variants may go undetected. Please note that ignored broken pair reads will
not be considered for any non-specific match filters.
• Minimum coverage: Only variants in regions covered by at least this many reads are
called.
• Minimum count: Only variants that are present in at least this many reads are called.
• Minimum frequency: Only variants that are present at least at the specified frequency
(calculated as 'count'/'coverage') are called.
6. On the last wizard window, pressing the button Preview All Parameters allows you to
preview all parameters. At this step you can only view the parameters, it is not possible to
make any changes. Choose to save the results and click on the button labeled Finish.
Six types of output are generated:
• 4 Reads Track, one for each family member
• 4 Coverage Report (Target Region Coverage Report), one for each family member
• 4 Per-region Statistics Track (Target Region Coverage), one for each family member
• 4 Filtered Variant Track, one for each family member
• An Imported track
• A URL file
CHAPTER 9. WORKFLOWS
9.3
37
Identify and Interpret Causal Variants in a Family of Four (TAS)
To run this workflow, go to:
Toolbox | Ready-to-Use Workflows | Whole Exome Sequencing ( ) or Targeted
Amplicon Sequencing ( ) | Hereditary Disease ( ) | Identify and Annotate Variants
in a Family of Four using IVA (TAS) ( )
1. Double-click on the Identify and Annotate Variants in a Family of Four using IVA (TAS)
tool to start the analysis. If you are connected to a server, you will first be asked where you
would like to run the analysis.
2. Specify a target region file (figure 9.9). This is a file that depends on the technology you
used for sequencing.
Figure 9.9: Specify a target region file
3. Select the sequencing reads for the sibling, father and mother and proband (figure 9.10).
You can do that by double-clicking on the reads file name or clicking once on the file and
then clicking on the arrow pointing to the right side in the middle of the wizard. Click on the
button labeled Next between each family member.
Figure 9.10: Specify the sequencing reads for each family members successively.
4. Specify your reference and parameters for the Ingenuity Variant Analysis for Hereditary
Diseases, as well as your login information (figure 9.11).
The parameters that can be set are:
• Reference: Select the genome sequence you would like to work with, usually hg19.
• Analysis pipeline name: specify which kind of analysis you would like to perform on
your variants
CHAPTER 9. WORKFLOWS
38
Figure 9.11: Specify a reference and login information to Ingenuity Variant Analysis
Variant Analysis Genetic Disease Pipeline: pipeline available on the Ingenuity web
interface to identify causal variants.
Variant Analysis Custom Pipeline / specify analysis name: chose this option if you
want to run a customized pipeline available in your Ingenuity IVA account.
Upload only: does not carry out an analysis, just upload samples to the Ingenuity
Variant Analysis. Choose this option if you wish to run the analysis or create a
customized pipeline on the Ingenuity web interface.
• Custom analysis name: Enter a name in this field only if you have selected the Variant
Analysis Custom Pipeline in the field above.
• Gender of proband: you can choose between male, female, ambiguous (for babies born
with sex chromosomes anomalies or sexual organs that are not yet fully developed)
and unknown.
• Check if an other family member is affected: the mother, the father or the proband.
• If the sibling is affected, specify its gender.
• Analysis name: choose a name for your analysis. The default name is the name of the
first input file selected in the wizard, followed by the date and the word Analysis.
• Analysis description: choose a name for your analysis. The default name is the
name of the first input file selected in the wizard, followed by the date and the word
Description.
• Ingenuity VA username: usually the email address you used to sign in the Ingenuity
Variant Analysis.
• Ingenuity VA password: the password you chose when you signed in on the Ingenuity
website.
5. Specify the parameters for the Fixed Ploidy Variant Detection tool for the proband, mother,
sibling and father successively (figure 9.12).
The parameters that can be set are:
CHAPTER 9. WORKFLOWS
39
Figure 9.12: Specifying the parameters for the Fixed Ploidy Variant Detection tool.
• Required variant probability is the minimum probability value of the 'variant site'
required for the variant to be called. Note that it is not the minimum value of the
probability of the individual variant. For the Fixed Ploidy Variant detector, if a variant
site - and not the variant itself - passes the variant probability threshold, then the
variant with the highest probability at that site will be reported even if the probability
of that particular variant might be less than the threshold. For example if the required
variant probability is set to 0.9 then the individual probability of the variant called
might be less than 0.9 as long as the probability of the entire variant site is greater
than 0.9.
• Ignore broken pairs: When ticked, reads from broken pairs are ignored. Broken pairs
may arise for a number of reasons, one being erroneous mapping of the reads. In
general, variants based on broken pair reads are likely to be less reliable, so ignoring
them may reduce the number of spurious variants called. However, broken pairs may
also arise for biological reasons (e.g. due to structural variants) and if they are ignored
some true variants may go undetected. Please note that ignored broken pair reads will
not be considered for any non-specific match filters.
• Minimum coverage: Only variants in regions covered by at least this many reads are
called.
• Minimum count: Only variants that are present in at least this many reads are called.
• Minimum frequency: Only variants that are present at least at the specified frequency
(calculated as 'count'/'coverage') are called.
6. On the last wizard window, pressing the button Preview All Parameters allows you to
preview all parameters. At this step you can only view the parameters, it is not possible to
make any changes. Choose to save the results and click on the button labeled Finish.
Six types of output are generated:
• 4 Reads Track, one for each family member
• 4 Coverage Report (Target Region Coverage Report), one for each family member
• 4 Per-region Statistics Track (Target Region Coverage), one for each family member
• 4 Filtered Variant Track, one for each family member
CHAPTER 9. WORKFLOWS
40
• An Imported track
• A URL file
9.4
Identify and Interpret Causal Variants in a Trio (WGS)
To run this workflow, go to:
Toolbox | Ready-to-Use Workflows | Whole Genome Sequencing ( ) | Hereditary
Disease ( ) | Identify and Annotate Variants in a Trio using IVA (WGS) ( )
1. Double-click on the Identify and Annotate Variants in a Trio using IVA (WGS) tool to start
the analysis. If you are connected to a server, you will first be asked where you would like
to run the analysis.
2. Select the sequencing reads for the father, mother and proband respectively (figure 9.13).
You can do that by double-clicking on the reads file name or clicking once on the file and
then clicking on the arrow pointing to the right side in the middle of the wizard. Click on the
button labeled Next between each family member.
Figure 9.13: Specify the sequencing reads for each family member successively
3. Specify the parameters for the Fixed Ploidy Variant Detection tool for the proband
(figure 9.14).
Figure 9.14: Specifying the parameters for the Fixed Ploidy Variant Detection tool.
The parameters that can be set are:
• Required variant probability is the minimum probability value of the 'variant site'
required for the variant to be called. Note that it is not the minimum value of the
CHAPTER 9. WORKFLOWS
41
probability of the individual variant. For the Fixed Ploidy Variant detector, if a variant
site - and not the variant itself - passes the variant probability threshold, then the
variant with the highest probability at that site will be reported even if the probability
of that particular variant might be less than the threshold. For example if the required
variant probability is set to 0.9 then the individual probability of the variant called
might be less than 0.9 as long as the probability of the entire variant site is greater
than 0.9.
• Ignore broken pairs: When ticked, reads from broken pairs are ignored. Broken pairs
may arise for a number of reasons, one being erroneous mapping of the reads. In
general, variants based on broken pair reads are likely to be less reliable, so ignoring
them may reduce the number of spurious variants called. However, broken pairs may
also arise for biological reasons (e.g. due to structural variants) and if they are ignored
some true variants may go undetected. Please note that ignored broken pair reads will
not be considered for any non-specific match filters.
• Minimum coverage: Only variants in regions covered by at least this many reads are
called.
• Minimum count: Only variants that are present in at least this many reads are called.
• Minimum frequency: Only variants that are present at least at the specified frequency
(calculated as 'count'/'coverage') are called.
4. Specify your reference for the Ingenuity Variant Analysis for Hereditary Diseases, as well
as your login information (figure 9.15).
Figure 9.15: Specify a reference and login information to Ingenuity Variant Analysis
The parameters that can be set are:
• Reference: Select the genome sequence you would like to work with, usually hg19.
• Analysis pipeline name: specify which kind of analysis you would like to perform on
your variants
Variant Analysis Genetic Disease Pipeline: pipeline available on the Ingenuity web
interface to identify causal variants.
CHAPTER 9. WORKFLOWS
42
Variant Analysis Custom Pipeline / specify analysis name: chose this option if you
want to run a customized pipeline available in your Ingenuity IVA account.
Upload only: does not carry out an analysis, just upload samples to the Ingenuity
Variant Analysis. Choose this option if you wish to run the analysis or create a
customized pipeline on the Ingenuity web interface.
• Custom analysis name: Enter a name in this field only if you have selected the Variant
Analysis Custom Pipeline in the field above.
• Gender of proband: you can choose between male, female, ambiguous (for babies born
with sex chromosomes anomalies or sexual organs that are not yet fully developed)
and unknown.
• Check if an other family member is affected: the mother, the father or the proband.
• If the sibling is affected, specify its gender.
• Analysis name: choose a name for your analysis. The default name is the name of the
first input file selected in the wizard, followed by the date and the word Analysis.
• Analysis description: choose a name for your analysis. The default name is the
name of the first input file selected in the wizard, followed by the date and the word
Description.
• Ingenuity VA username: usually the email address you used to sign in the Ingenuity
Variant Analysis.
• Ingenuity VA password: the password you chose when you signed in on the Ingenuity
website.
5. Specify the parameters for the Fixed Ploidy Variant Detection tool for the mother and the
father as you did previously.
6. On the last wizard window, pressing the button Preview All Parameters allows you to
preview all parameters. At this step you can only view the parameters, it is not possible to
make any changes. Choose to save the results and click on the button labeled Finish.
Four types of output are generated:
• 3 Reads Track, one for each family member
• 3 Filtered Variant Track, one for each family member
• An Imported track
• A URL file
9.5
Identify and Interpret Causal Variants in a Trio (WES)
To run this workflow, go to:
Toolbox | Ready-to-Use Workflows | Whole Exome Sequencing ( ) or Targeted
Amplicon Sequencing ( ) | Hereditary Disease ( ) | Identify and Annotate Variants
in a Trio using IVA (WES) ( )
CHAPTER 9. WORKFLOWS
43
1. Double-click on the Identify and Annotate Variants in a Trio using IVA (WES) tool to start
the analysis. If you are connected to a server, you will first be asked where you would like
to run the analysis.
2. Select the sequencing reads for the father and mother respectively (figure 9.16). You can
do that by double-clicking on the reads file name or clicking once on the file and then
clicking on the arrow pointing to the right side in the middle of the wizard. Click on the
button labeled Next between each family member.
Figure 9.16: Specify the sequencing reads for each family member successively
3. Specify a target region file (figure 9.17). This is a file that depends on the technology you
used for sequencing.
Figure 9.17: Specify a target region file
4. Select the sequencing reads for the proband.
5. Specify your reference for the Ingenuity Variant Analysis for Hereditary Diseases, as well
as your login information (figure 9.18).
The parameters that can be set are:
• Reference: Select the genome sequence you would like to work with, usually hg19.
• Analysis pipeline name: specify which kind of analysis you would like to perform on
your variants
Variant Analysis Genetic Disease Pipeline: pipeline available on the Ingenuity web
interface to identify causal variants.
Variant Analysis Custom Pipeline / specify analysis name: chose this option if you
want to run a customized pipeline available in your Ingenuity IVA account.
Upload only: does not carry out an analysis, just upload samples to the Ingenuity
Variant Analysis. Choose this option if you wish to run the analysis or create a
customized pipeline on the Ingenuity web interface.
CHAPTER 9. WORKFLOWS
44
Figure 9.18: Specify a reference and login information to Ingenuity Variant Analysis
• Custom analysis name: Enter a name in this field only if you have selected the Variant
Analysis Custom Pipeline in the field above.
• Gender of proband: you can choose between male, female, ambiguous (for babies born
with sex chromosomes anomalies or sexual organs that are not yet fully developed)
and unknown.
• Check if an other family member is affected: the mother, the father or the proband.
• If the sibling is affected, specify its gender.
• Analysis name: choose a name for your analysis. The default name is the name of the
first input file selected in the wizard, followed by the date and the word Analysis.
• Analysis description: choose a name for your analysis. The default name is the
name of the first input file selected in the wizard, followed by the date and the word
Description.
• Ingenuity VA username: usually the email address you used to sign in the Ingenuity
Variant Analysis.
• Ingenuity VA password: the password you chose when you signed in on the Ingenuity
website.
6. Specify the parameters for the Fixed Ploidy Variant Detection tool for the father, mother
and proband successively (figure 9.19).
The parameters that can be set are:
• Required variant probability is the minimum probability value of the 'variant site'
required for the variant to be called. Note that it is not the minimum value of the
probability of the individual variant. For the Fixed Ploidy Variant detector, if a variant
site - and not the variant itself - passes the variant probability threshold, then the
variant with the highest probability at that site will be reported even if the probability
of that particular variant might be less than the threshold. For example if the required
variant probability is set to 0.9 then the individual probability of the variant called
might be less than 0.9 as long as the probability of the entire variant site is greater
than 0.9.
CHAPTER 9. WORKFLOWS
45
Figure 9.19: Specifying the parameters for the Fixed Ploidy Variant Detection tool.
• Ignore broken pairs: When ticked, reads from broken pairs are ignored. Broken pairs
may arise for a number of reasons, one being erroneous mapping of the reads. In
general, variants based on broken pair reads are likely to be less reliable, so ignoring
them may reduce the number of spurious variants called. However, broken pairs may
also arise for biological reasons (e.g. due to structural variants) and if they are ignored
some true variants may go undetected. Please note that ignored broken pair reads will
not be considered for any non-specific match filters.
• Minimum coverage: Only variants in regions covered by at least this many reads are
called.
• Minimum count: Only variants that are present in at least this many reads are called.
• Minimum frequency: Only variants that are present at least at the specified frequency
(calculated as 'count'/'coverage') are called.
7. On the last wizard window, pressing the button Preview All Parameters allows you to
preview all parameters. At this step you can only view the parameters, it is not possible to
make any changes. Choose to save the results and click on the button labeled Finish.
Six types of output are generated:
• 3 Reads Track, one for each family member
• 3 Coverage Report (Target Region Coverage Report), one for each family member
• 3 Per-region Statistics Track (Target Region Coverage), one for each family member
• 3 Filtered Variant Track, one for each family member
• An Imported track
• A URL file
9.6
Identify and Interpret Causal Variants in a Trio (TAS)
To run this workflow, go to:
Toolbox | Ready-to-Use Workflows | Whole Exome Sequencing ( ) or Targeted
Amplicon Sequencing ( ) | Hereditary Disease ( ) | Identify and Annotate Variants
in a Trio using IVA (TAS) ( )
CHAPTER 9. WORKFLOWS
46
1. Double-click on the Identify and Annotate Variants in a Trio using IVA (TAS) tool to start
the analysis. If you are connected to a server, you will first be asked where you would like
to run the analysis.
2. Select the sequencing reads for the father and the mother (figure 9.20). You can do that
by double-clicking on the reads file name or clicking once on the file and then clicking on
the arrow pointing to the right side in the middle of the wizard. Click on the button labeled
Next between each family member.
Figure 9.20: Specify the sequencing reads for each family member successively
3. Specify a target region file (figure 9.21). This is a file that depends on the technology you
used for sequencing.
Figure 9.21: Specify a target region file
4. Select the sequencing reads for the proband.
5. Specify your reference for the Ingenuity Variant Analysis for Hereditary Diseases, as well as
your login information (figure 9.22).
The parameters that can be set are:
• Reference: Select the genome sequence you would like to work with, usually hg19.
• Analysis pipeline name: specify which kind of analysis you would like to perform on
your variants
Variant Analysis Genetic Disease Pipeline: pipeline available on the Ingenuity web
interface to identify causal variants.
Variant Analysis Custom Pipeline / specify analysis name: chose this option if you
want to run a customized pipeline available in your Ingenuity IVA account.
Upload only: does not carry out an analysis, just upload samples to the Ingenuity
Variant Analysis. Choose this option if you wish to run the analysis or create a
customized pipeline on the Ingenuity web interface.
CHAPTER 9. WORKFLOWS
47
Figure 9.22: Specify a reference and login information to Ingenuity Variant Analysis
• Custom analysis name: Enter a name in this field only if you have selected the Variant
Analysis Custom Pipeline in the field above.
• Gender of proband: you can choose between male, female, ambiguous (for babies born
with sex chromosomes anomalies or sexual organs that are not yet fully developed)
and unknown.
• Check if an other family member is affected: the mother, the father or the proband.
• If the sibling is affected, specify its gender.
• Analysis name: choose a name for your analysis. The default name is the name of the
first input file selected in the wizard, followed by the date and the word Analysis.
• Analysis description: choose a name for your analysis. The default name is the
name of the first input file selected in the wizard, followed by the date and the word
Description.
• Ingenuity VA username: usually the email address you used to sign in the Ingenuity
Variant Analysis.
• Ingenuity VA password: the password you chose when you signed in on the Ingenuity
website.
6. Specify the parameters for the Fixed Ploidy Variant Detection tool for the father, mother and
proband successively (figure 9.23).
The parameters that can be set are:
• Required variant probability is the minimum probability value of the 'variant site'
required for the variant to be called. Note that it is not the minimum value of the
probability of the individual variant. For the Fixed Ploidy Variant detector, if a variant
site - and not the variant itself - passes the variant probability threshold, then the
variant with the highest probability at that site will be reported even if the probability
of that particular variant might be less than the threshold. For example if the required
variant probability is set to 0.9 then the individual probability of the variant called
might be less than 0.9 as long as the probability of the entire variant site is greater
than 0.9.
CHAPTER 9. WORKFLOWS
48
Figure 9.23: Specifying the parameters for the Fixed Ploidy Variant Detection tool.
• Ignore broken pairs: When ticked, reads from broken pairs are ignored. Broken pairs
may arise for a number of reasons, one being erroneous mapping of the reads. In
general, variants based on broken pair reads are likely to be less reliable, so ignoring
them may reduce the number of spurious variants called. However, broken pairs may
also arise for biological reasons (e.g. due to structural variants) and if they are ignored
some true variants may go undetected. Please note that ignored broken pair reads will
not be considered for any non-specific match filters.
• Minimum coverage: Only variants in regions covered by at least this many reads are
called.
• Minimum count: Only variants that are present in at least this many reads are called.
• Minimum frequency: Only variants that are present at least at the specified frequency
(calculated as 'count'/'coverage') are called.
7. Specify the parameters for the Fixed Ploidy Variant Detection tool for the mother and the
proband.
8. On the last wizard window, pressing the button Preview All Parameters allows you to
preview all parameters. At this step you can only view the parameters, it is not possible to
make any changes. Choose to save the results and click on the button labeled Finish.
Six types of output are generated:
• 3 Reads Track, one for each family member
• 3 Coverage Report (Target Region Coverage Report), one for each family member
• 3 Per-region Statistics Track (Target Region Coverage), one for each family member
• 3 Filtered Variant Track, one for each family member
• An Imported track
• A URL file
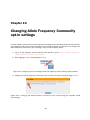
Chapter 10
Changing Allele Frequency Community
opt-in settings
In order to gain access to Community Frequency annotations from the Allele Frequency Community,
your Ingenuity user account must be opted in to the Allele Frequency Community. To change your
Allele Frequency Community opt-in settings, carry out the following steps:
1. Log in to the Ingenuity Variant Analysis web interface: go to http://www.ingenuity.
com/products/variant-analysis.
2. After logging in, go to Settings (figure 10.1)
Figure 10.1: Accessing the user settings inside the Ingenuity Variant Analysis web interface
3. Change your Allele Frequency Community opt-in status using the checkbox (figure 10.2)
Figure 10.2: Changing the Allele Frequency Community opt-in status using the checkbox inside
user settings
49