1
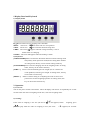
PCE Americas Inc.
711 Commerce Way
Suite 8
Jupiter
FL-33458
USA
From outside US: +1
Tel: (561) 320-9162
Fax: (561) 320-9176
[email protected]
PCE Instruments UK Ltd.
Units 12/13
Southpoint Business Park
Ensign way
Hampshire / Southampton
United Kingdom, SO31 4RF
From outside UK: +44
Tel: (0) 2380 98703 0
Fax: (0) 2380 98703 9
[email protected]
www.pce-instruments.com/english
www.pce-instruments.com
Laboratory Balances
PCE-TS
CONTENTS
1. Display Panel and Keyboard ----------------------------- (1)
2. Operation ---------------------------------------------------- (2)
3. Description Of User Selection ----------------------------- (3)
4. Remarks ------------------------------------------------------- (4)
5. Specifications ---------------------------------------------- (5)
1.Display Panel and Keyboard
1). Display Panel
Kg g lb oz t: There are five weighing units selectable.
ZERO : The arrow “ ”appears when scale is in zero position.
TARE: The arrow “ ”appears when this function being used.
CHRG: The arrow“ ”appears when the voltage of battery is low or
flashes when it is charging.
STABLE: The arrow“▼”appears when the reading is stable.
2). Keyboard
[CHECK/MODE]KEY is used for the alternation between normal counting mode
and quantity check operation mode,and for setting alarm number.
At setting status, this key can be used for setting mode key.
[UNITS/SHIFT]KEY is used for changing units in the weighing mode. At setting
status, this key can be used as shift key.
[TARE/ <] KEY is used for deducting the tare weight (box or container etc.
on the platform) from the gross weight. At setting status, this key
can be used as increase key.
[ZERO/ >] KEY is used for setting or re-adjusting the scale in correct zero
position for accurate weighing operation. At setting status, this
key can be used as decrease key.
2. Operation
1). Power on :
Turn on the power switch at the bottom. The LCD display will show 0~F sequentially for several
seconds. Then the value of weighing will be zero, and enter weighing status.
1
2). Zeroing:
If the value of weighing is not zero (the arrow“
0
”is not appears) before
[ZERO/>] key back the value of weighing to zero (the arrow
“
0
weighing, press
”appears) for accurate
weighing operation.
3). Tare Function:
Put the basket onto the scale platform and press the [TARE/<] key, then the LCD display will
show the indicating arrow “ ”, which means that the weight of the basket has been deducted. (if
the LCD display shows that the scale fails to return to zero, you’re requested to press the
[ZERO/>] key again.).
4). Units Selection:
Select the current unit in the weighing mode by press [UNITS/SHIFT] key. There are four units
( g, lb, oz and t) to be selected.
5). Weigh Check Setting:
Press [CHECK/MODE],The LCD display will show upper limit value and “ HI ”
Symbol, press [UNITS/SHIFT]、[TARE/<] or [ZERO/>] to enter upper limit value. Press
[CHECK/MODE]again, The LCD display will show lower limit value and “LOW” Symbol,
press [UNITS/SHIFT]、[TARE/<] or [ZERO/>] to enter upper limit value as well. Now Press
[CHECK/MODE] again to confirm and return weighing status. After such setting, if weigh check
alarm has been turned on, the weigh check function will work. when total weigh is under lower
limit value, beep sound slowly. If over upper limit value, beep sound quickly. If between lower
limit value and upper limit value, beep doesn’t sound.
6).Alarming Function:
a. Over load alarming: When the load on the platform is over 3% of maxim capacity, the beep
will sound and the LCD display will show “------OVR” , and you must remove the load from
platform immediately.
b. Low load alarming: If there isn’t platform on the scale or transducer is wrong, the beep will
sound and the LCD display will show “------LOW”.
c. Low battery alarming: When
appears on the LCD, you're requested to recharge the scale
over 12 hours. When the scale is in recharging, the mark
will be in flashing. The mark
will
disappear after recharge have finished, and auto switch off the charging power. If
and alarming
sound appear at the same time, you must stop using the scale and recharge it immediately.
3. Description Of User Selection
Turn on the power switch at the bottom while holding [TARE/<] key at same time to enter user
selection mode.
1). Selection Of Auto Power Off (“XXXXXX PWR”)
There are two power off modes (“OFF” and “ON”) selectable. “ON” means auto power off is
available,“OFF” means auto power off isn’t available.
The setting operation as follow. Press [MODE] key to select the auto power off
2
statue, and select “on” or “off” by
[Shift] key.
2). Selection Of Backlight Mode (“XXXXXX BL”)
There are two backlight modes (“OFF” and “ON”) selectable. “ON” means backlight keeping
on, “OFF” means backlight keeping off.
The setting operation as follow. Press [MODE] key to select the backlight statue, and select “on”
or “off” by [Shift] key.
3). Selection Of Weigh Check Alarming(“XXXXXX LIM”)
There are two alarming modes (“OFF” and “ON”) selectable. “ON” means weigh check
alarming is available, “OFF” means weigh check alarming isn’t available.
The setting operation as follow. Press [MODE] key to select the weigh check alarming statue, and
select “on” or “off” by [Shift] key.
4. Remarks
1). Both the LCD display and the keyboard are waterproof. However, completely immersing the
scale into water may cause serious damage.
2). When
appears on the LCD, you're requested to recharge the scale over 12 hours. When the
scale is in recharging, the mark
will be in flashing. The mark
will disappear after recharge
have finished, and auto switch off the charging power. If
and alarming sound appear at the
same time, you must stop using the scale and recharge it immediately.
3). As usual, you should keep the backlight off if the backlight is not necessary. You should turn
off the power when the scale is not used. Besides, you're requested to recharge the sealed lead-acid
battery as frequently as possible.
4). If the scale is used for a long period or is recharged over 12 hours but could not
work for a long time, it means that the battery is over used. In this case, you're requested to
replace the battery or ask your local distributor for replacement.
5). Use the DC adapter designed by the manufacturer for the indicator. Other adapters may cause
damage to the indicator.
5. Specifications
1). Response:
3-5 seconds
2). Display:
Large LCD display with backlight
3). Tare:
100% of capacity
4). Zero:
4% of capacity
5). Overload alarm: Auto software alarm over0. 3% of capacity
6). Over load capacity: Auto protect over 125% of capacity
7). Power source: DC 6V 4Ah rechargeable battery
AC 220V/DC10V 500mA adaptor
9). Temperature:
Storage: -10~+50 C
Operate: 0-40 C
10). Humidity:
Storage: 5%-90% R.H.
Operate: 10%-80% R.H.
Calibration procedure for Indicator (TCS-W LCD)
Description Of Server Selection
Turn on the power switch at the bottom while holding [CHECK/MODE] and [TARE/<] at same
time to enter server selection mode. The LCD display will show version code for three seconds,
then show current selective value and “FIL” symbol.
1). Selection Of Filter Mode (“XXXXXX FIL”)
There are six selective filter modes of preventing vibration (0~5).“0” no filter ,“1” average four
times filter, “2”smooth four times filter, “3”average eight times filter
“4”middle value filter, “5”wriggle track filter. The default selective value is “1”.
Enter server selection mode, press [MODE] key select “XXXXXX FIL” menu. Then choose the
filter mode by [SHIFT] key and press [MODE] key to confirm it. The display will show next
menu.
2). Selection Of Zero Tracking Range (“XXXXXX ZEO”)
There are five zero tracking ranges (3, 6, 10, 15,20). The number means the number of A/D value
for the zero tracking range. The default selective value is “6”.
Choose the zero tracking range by [SHIFT] key and press [MODE] key to confirm it. And the
display will show the next menu..
3). Selection Of Maxim Capacity (“XXXXXX CAP”)
The range of maxim capacity is from 1kg to 150t.
Choose the decimal point by [SHIFT] key and choose maxim value by press [TARE/<] or
[ZERO/>] key. Then press [MODE] key to confirm it. The display will show next menu.
4). Selection Of Division Value (“XXXXXX DIV”)
Choose the division by [SHIFT] key ,then press [MODE] key to confirm it. The display will
show next menu.
5). Zero Calibration And Weight Calibration (“XXXXXX WEI”)
“XXXXX” is input weight value.
Press [SHIFT] key to choose the digit then it will flash. Then input the value by [TARE/<] or
[ZERO/>] key (The minimum weight value must over 30% of capacity).Then press [MODE]
key ,Enter the state of zero calibration, it shows current zero A/D value“XXXXX CAL”(A/D
value must within 5000~30000). After the sign of stable appears, press [MODE] key to finish zero
calibration and enter weight calibration. Now the display will show current weight A/D value
“XXXXX LOD”.Put the weight on the platform as soon as possible (or keep the A/D value
unstable )till the action is finish. After several seconds a beep sound appears, it means finish
weight calibration. If the beep doesn’t appear, we can press [MODE] key to finish weight
calibration directly. The display will show next menu. Or reset the indicator, the setting will be
accepted and enter weighing mode.
6).Selection of units
Shift (ON X) or (OFF X ) by press [SHIFT] key, and press [MODE] key to confirm it and set
the next unit. Press [MODE] key to confirm it after the unit selection. The indicator will autoreset.
SAMPLE:(capacity 300kg division 20g)
1. While pressing [CHECK/MODE], [TARE/<] and turn on power switch, it will show
version code (230010) for three seconds
2. Display “I FIL”, press [MODE] selects it.
3. Display “6 ZEO”, press [MODE]select it
4. Display “XXXXX CAP”, adjust “XXXXX” to “300.00” by [SHIFT], [TARE] and
[ZERO]. Press [MODE] confirms it.
5. Display “XXXXX DIV”, adjust “XXXXX” to “0.02” by [SHIFT]. Press [MODE] confirms
it.
6. Display “XXXXX WEI”, adjust “XXXXX” to “200.00”(2/3 capacity) by [SHIFT], [TARE]
and [ZERO]. Press [MODE] confirms it.
7. Display “XXXXX CAL”. When the sign of stable“ ” appear, press [MODE].
8. Display “XXXXX LOD”, load 200kg weight, please note to put the weight on the platform
as soon as possible. After several seconds a beep sound appears. If the beep doesn’t appear,
press [MODE] key to finish weight calibration directly. Or reset the indicator.
9. Display “XXXXX X”, Shift (ON X) or (OFF X ) by press [SHIFT] key, and press
[MODE] key to confirm it and set the next unit. Press [MODE] key to confirm it after the
unit selection. The indicator will auto-reset.