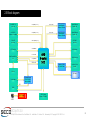
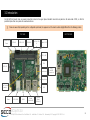
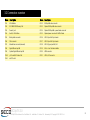
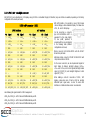
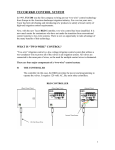
1
SECOpITX-GX Single Board Computer with AMD Embedded G-Series SOC on picoITX form factor REVISION HISTORY Revision Date Note Ref 1.0 26th November 2013 First Official Release. SB 1.1 4th March 2014 BIOS section updated SB 1.2 14th July 2014 Crimp terminal code corrected on description of connector CN15 Photos updated to rev C of the PCB SB 1.3 9th February 2015 BIOS section updated SB All rights reserved. All information contained in this manual is proprietary and confidential material of SECO S.r.l. Unauthorized use, duplication, modification or disclosure of the information to a third-party by any means without prior consent of SECO S.r.l. is prohibited. Every effort has been made to ensure the accuracy of this manual. However, SECO S.r.l. accepts no responsibility for any inaccuracies, errors or omissions herein. SECO S.r.l. reserves the right to change precise specifications without prior notice to supply the best product possible. Some of the information found in BIOS SETUP Chapter has been extracted from the following copyrighted Insyde Software Corp. documents: InsydeH2O Setup Utility - User Reference Guide The above mentioned documents are copyright © 2008 Insyde Software Corp. All rights reserved. For further information on this module or other SECO products, but also for getting the proper assistance for any and possible issues, please contact us using the dedicated web form available at http://www.seco.com (registration required). Our team will be pleased and ready to help you. SECOpITX-GX SECOpITX-GX User Manual - Rev. First Edition: 1.0 - Last Edition: 1.3 - Author: S.B. - Reviewed by G.G Copyright © 2015 SECO S.r.l. 2 INDEX Chapter 1. 1.1 1.2 1.3 1.4 1.5 1.6 1.7 1.8 INTRODUCTION .......................................................................................................................................................................... 6 Warranty ........................................................................................................................................................................................................................................ 7 Information and assistance ............................................................................................................................................................................................................. 8 RMA number request ..................................................................................................................................................................................................................... 8 Safety ............................................................................................................................................................................................................................................ 9 Electrostatic discharges ................................................................................................................................................................................................................. 9 RoHS compliance .......................................................................................................................................................................................................................... 9 Terminology and definitions .......................................................................................................................................................................................................... 10 Reference specifications .............................................................................................................................................................................................................. 13 Chapter 2. OVERVIEW ............................................................................................................................................................................... 15 2.1 2.2 2.3 Introduction .................................................................................................................................................................................................................................. 16 Technical specifications ............................................................................................................................................................................................................... 17 Electrical specifications ................................................................................................................................................................................................................ 18 2.3.1 Power available .................................................................................................................................................................................................................... 18 2.3.2 Power consumption ............................................................................................................................................................................................................. 19 2.3.3 RTC Battery ......................................................................................................................................................................................................................... 20 2.3.4 Power rails naming convention ............................................................................................................................................................................................. 20 2.4 Mechanical specifications............................................................................................................................................................................................................. 21 2.5 Block diagram .............................................................................................................................................................................................................................. 22 Chapter 3. 3.1 3.2 3.3 OVERVIEW ............................................................................................................................................................................... 23 Introduction .................................................................................................................................................................................................................................. 24 Connectors overview ................................................................................................................................................................................................................... 25 Connectors description ................................................................................................................................................................................................................ 26 3.3.1 Ethernet connectors ............................................................................................................................................................................................................. 26 3.3.2 USB ports............................................................................................................................................................................................................................ 27 3.3.3 LVDS / eDP + backlight connector ....................................................................................................................................................................................... 29 3.3.4 HDMI connector................................................................................................................................................................................................................... 31 3.3.5 VGA Connector ................................................................................................................................................................................................................... 32 3.3.6 Audio interface ..................................................................................................................................................................................................................... 33 3.3.7 Switch / LED header interface .............................................................................................................................................................................................. 34 3.3.8 S-ATA connectors ............................................................................................................................................................................................................... 35 3.3.9 μSD + miniSIM combo card slot ........................................................................................................................................................................................... 36 SECOpITX-GX SECOpITX-GX User Manual - Rev. First Edition: 1.0 - Last Edition: 1.3 - Author: S.B. - Reviewed by G.G Copyright © 2015 SECO S.r.l. 3 3.3.10 3.3.11 3.3.12 miniPCI-express slot ............................................................................................................................................................................................................ 37 FAN connector .................................................................................................................................................................................................................... 38 SO-DIMM DDR3 Slot ........................................................................................................................................................................................................... 38 Chapter 4. BIOS SETUP ............................................................................................................................................................................. 39 4.1 4.2 4.3 4.4 4.5 4.6 4.7 InsydeH2O setup Utility ................................................................................................................................................................................................................ 40 Main setup menu ......................................................................................................................................................................................................................... 41 4.2.1 Language ............................................................................................................................................................................................................................ 41 4.2.2 System Time / System Date ................................................................................................................................................................................................. 41 Advanced menu .......................................................................................................................................................................................................................... 42 4.3.1 Boot configuration submenu ................................................................................................................................................................................................. 42 4.3.2 Peripheral configuration submenu ......................................................................................................................................................................................... 42 4.3.3 IDE configuration submenu ................................................................................................................................................................................................... 43 4.3.4 Video configuration submenu ............................................................................................................................................................................................... 44 4.3.5 USB configuration submenu ................................................................................................................................................................................................. 44 4.3.6 Chipset configuration submenu ............................................................................................................................................................................................ 45 4.3.7 ACPI Table/features submenu .............................................................................................................................................................................................. 46 4.3.8 CPU related setting submenu ............................................................................................................................................................................................... 46 4.3.9 Memory configurations submenu .......................................................................................................................................................................................... 47 4.3.10 SDIO Configuration submenu ............................................................................................................................................................................................... 47 Security menu.............................................................................................................................................................................................................................. 48 Power menu ................................................................................................................................................................................................................................ 49 4.5.1 Advanced CPU control submenu ......................................................................................................................................................................................... 50 4.5.2 Thermal Zone configuration submenu ................................................................................................................................................................................... 50 4.5.3 Clocks and Voltages Optimizations submenu ........................................................................................................................................................................ 51 4.5.4 Watchdog Configuration submenu ....................................................................................................................................................................................... 51 Boot menu .................................................................................................................................................................................................................................. 52 4.6.1 Legacy submenu ................................................................................................................................................................................................................. 53 Exit menu .................................................................................................................................................................................................................................... 54 Chapter 5. 5.1 5.2 APPENDICES............................................................................................................................................................................ 55 Thermal Design ............................................................................................................................................................................................................................ 56 Accessories ................................................................................................................................................................................................................................. 57 5.2.1 Accessories kit CABKIT992 .................................................................................................................................................................................................. 57 5.2.2 VGA Adapter module M908 ................................................................................................................................................................................................. 57 5.2.3 USB-to-Serial port converter modules ................................................................................................................................................................................... 58 SECOpITX-GX SECOpITX-GX User Manual - Rev. First Edition: 1.0 - Last Edition: 1.3 - Author: S.B. - Reviewed by G.G Copyright © 2015 SECO S.r.l. 4 SECOpITX-GX SECOpITX-GX User Manual - Rev. First Edition: 1.0 - Last Edition: 1.3 - Author: S.B. - Reviewed by G.G Copyright © 2015 SECO S.r.l. 5 Chapter 1. Warranty Information and assistance RMA number request Safety Electrostatic discharges RoHS compliance Terminology and definitions Reference specifications SECOpITX-GX SECOpITX-GX User Manual - Rev. First Edition: 1.0 - Last Edition: 1.3 - Author: S.B. - Reviewed by G.G Copyright © 2015 SECO S.r.l. 6 1.1 Warranty This product is subject to Italian Law Decree 24/2002, acting European Directive 1999/44/CE on matters of sale and warranties to consumers. The warranty on this product lasts for 1 year. Under the warranty period, the Supplier guarantees the buyer assistance and service for repairing, replacing or credit of the item, at the Supplier’s own discretion. Shipping costs that apply to non-conforming items or items that need replacement are to be paid by the customer. Items cannot be returned unless formerly authorized by the supplier. The authorization is released after completing the specific form available on the web-site http://www.seco.com (RMA Online). The authorization number for returning the item must be put both on the packaging and on the documents shipped with the items, which have to include all the accessories in their original packaging, with no signs of damage to, or tampering with, any returned item. The error analysis form identifying the fault type must be completed by the customer and has must accompany the returned item. If any of the above mentioned requirements for returning the item is not satisfied, the item will be shipped back and the customer will have to pay any and all shipping costs. The supplier, after a technical analysis, will verify if all the requirements, for which a warranty service applies, are met. If the warranty cannot be applied, the Supplier will calculate the minimum cost of this initial analysis on the item and the repair costs. Costs for replaced components will be calculated separately. Warning! All changes or modifications to the equipment not explicitly approved by SECO S.r.l. could impair the equipment’s and could void the warranty SECOpITX-GX SECOpITX-GX User Manual - Rev. First Edition: 1.0 - Last Edition: 1.3 - Author: S.B. - Reviewed by G.G Copyright © 2015 SECO S.r.l. 7 1.2 Information and assistance What do I have to do if the product is faulty? SECO S.r.l. offers the following services: SECO website: visit http://www.seco.com to receive the latest information on the product. In most of the cases you can find useful information to solve your problem. SECO Sales Representative: the Sales Rep can help you in determining the exact cause of the problem and search the best solution for it. SECO Help-Desk: contact SECO Technical Assistance. A technician is at your disposal to understand the exact origin of the problem and suggest the correct solution. E-mail: [email protected] Fax (+39) 0575 340434 Repair center: it is possible to send the faulty product to the SECO Repair Centre. In this case, follow this procedure: o Returned items must be accompanied by a RMA Number. Items sent without the RMA number will be not accepted. o Returned items must be shipped in an appropriate package. SECO is not responsible for damages caused by accidental drop, improper usage, or customer neglect. Note: Please have the following information before asking for technical assistance: Name and serial number of the product; Description of Customer’s peripheral connections; Description of Customer’s software (operative system, version, application software, etc.); A complete description of the problem; The exact words of every kind of error message encountered. 1.3 RMA number request To request a RMA number, please visit SECO’s web-site. On the home page, please select “RMA Online” and follow the procedure described. You will receive a RMA Number within 1 working day (only for on-line RMA requests). SECOpITX-GX SECOpITX-GX User Manual - Rev. First Edition: 1.0 - Last Edition: 1.3 - Author: S.B. - Reviewed by G.G Copyright © 2015 SECO S.r.l. 8 1.4 Safety The SECOpITX-GX board uses only extremely-low voltages. While handling the board, please use extreme caution to avoid any kind of risk or damages to electronic components. Always switch the power off, and unplug the power supply unit, before handling the board and/or connecting cables or other boards. Avoid using metallic components - like paper clips, screws and similar - near the board when connected to a power supply, to avoid short circuits due to unwanted contacts with other board components. If the board has become wet, never connect it to any external power supply unit or battery. Check carefully that all cables are correctly connected and that they are not damaged. 1.5 Electrostatic discharges The SECOpITX-GX board, like any other electronic product, is an electrostatic sensitive device: high voltages caused by static electricity could damage some or all the devices and/or components on-board. Whenever handling a SECOpITX-GX board, ground yourself through an anti-static wrist strap. Placement of the board on an antistatic surface is also highly recommended. 1.6 RoHS compliance The SECOpITX-GX board is designed using RoHS compliant components and is manufactured on a lead-free production line. It is therefore fully RoHS compliant. SECOpITX-GX SECOpITX-GX User Manual - Rev. First Edition: 1.0 - Last Edition: 1.3 - Author: S.B. - Reviewed by G.G Copyright © 2015 SECO S.r.l. 9 1.7 Terminology and definitions AC’97 ACPI AHCI API BIOS CAN Bus CEC CPLD CRT DDC DDR DDR3 DP DVI eDP EHCI FFC/FPC FPGA GBE Gbps GND GPI/O HD Audio HDMI I2C Bus JTAG Audio Codec’97, a standard for audio hardware codecs developed by Intel® in 1997 Advanced Configuration and Power Interface, an open industrial standard for board’s devices configuration and power management Advanced Host Controller Interface, a standard which defines the operations modes of SATA interface Application Program Interface, a set of commands and functions that can be used by programmers for writing software for specific Operating Systems Basic Input / Output System, the Firmware Interface that initializes the board before the OS starts loading Controller Area network, a protocol designed for in-vehicle communication Consumer Electronics Control, an HDMI feature which allows controlling more devices connected together by using only one remote control Complex Programmable Logic Device, types of programmable logical devices with complexity lower than that of FPGAs Cathode Ray Tube. Initially used to indicate a type of monitor, this acronym has been used over time to indicate the analog video interface used to drive them. Display Data Channel, a kind of I2C interface for digital communication between displays and graphics processing units (GPU) Double Data Rate, a typology of memory devices which transfer data both on rising and on falling edge of the clock DDR, 3rd generation Display Port, a type of video digital display interface Digital Visual interface, a type of video digital display interface embedded Display Port, a type of video digital display interface aimed to internal connections between boards and digital displays Enhanced Host Controller interface, a high-speed controller for USB ports, able to support USB2.0 standard Flexible Flat Cable / Flat Panel Cable Field-programmable gate array, a device designed to be fully programmed by customers in order to implement different functionalities Gigabit Ethernet Gigabit per second Ground General purpose Input/Output High Definition Audio, newer standard for hardware codecs developed by Intel® in 2004 for higher audio quality High Definition Multimedia Interface, a digital audio and video interface Inter-Integrated Circuit Bus, a simple serial bus consisting only on data and clock line, with multi-master capability Joint Test Action Group, common name of IEEE1149.1 standard for testing printed circuit boards and integrated circuits through the Debug port SECOpITX-GX SECOpITX-GX User Manual - Rev. First Edition: 1.0 - Last Edition: 1.3 - Author: S.B. - Reviewed by G.G Copyright © 2015 SECO S.r.l. 10 LPC Bus LVDS Mbps MMC/eMMC N.A. N.C. OHCI OpenCL OpenGL OpenVG OS OTG PCI-e PSU PWM PWR PXE SATA SD SDHC SDIO SIM SM Bus SPI TBM Low Pin Count Bus, a low speed interface based on a very restricted number of signals, deemed to management of legacy peripherals like Low Voltage Differential Signaling, a standard for transferring data at very high speed using cheap twisted pairs copper cables, usually used for video applications Megabit per second MultiMedia Card / embedded MMC, another type of memory card, with same interface of SD. eMMC are the embedded version on MMC, i.e. they are devices including both the memory controller and the flash memories on a single BGA chip Not Applicable Not Connected Open Host Controller Interface, full-speed and low-speed controller for support of USB 1.1 ports Open Computing Language, a software library based on C99 programming language, conceived explicitly to realise parallel computing using Graphics Processing Units (GPU) Open Graphics Library, an Open Source API dedicated to 2D and 3D graphics Open Vector Graphics, an Open Source API dedicated to hardware accelerated 2D vector graphics Operating System On-the-Go, a specification that allows to USB devices to act indifferently as Host or as a Client, depending on the device connected to the port Peripheral Component Interface Express Power Supply Unit Pulse Width Modulation Power Preboot Execution Environment, a way to perform boot from the network ignoring local data storage devices and/or installed OS Serial Advance Technology Attachment, a differential full duplex serial interface for Hard Disks Secure Digital, a memory card type Secure Digital Host Controller Secure Digital Input/Output, an evolution of SD standard that allow to use the same SD interface to drive different Input/Output devices, like cameras, GPS, Tuners and so on Subscriber Identity Module, a card which stores all data of the owner necessary to allow him accessing to mobile communication networks System Management Bus, a subset of I2C bus dedicated to communication with devices for system management, like smart battery and other power supply-related devices Serial Peripheral Interface, a 4-Wire synchronous full-duplex serial interface which contemplates a master and one or more slaves, individually enabled through a Chip Select line To be measured SECOpITX-GX SECOpITX-GX User Manual - Rev. First Edition: 1.0 - Last Edition: 1.3 - Author: S.B. - Reviewed by G.G Copyright © 2015 SECO S.r.l. 11 TMDS TTL UEFI UIM USB V_REF VGA xHCI Transition-Minimized Differential Signaling, a method for transmitting high speed serial data, normally used on DVI and HDMI interface Transistor-transistor Logic Unified Extensible Firmware Interface, a specification defining the interface between the OS and the board’s firmware. It is meant to replace original BIOS interface User Identity Module, an extension of SIM modules. Universal Serial Bus Voltage reference Pin Video Graphics Array. An analog computer display standard, commonly referred also as CRT. eXtensible Host Controller Interface, Host controller for USB 3.0 ports, also able to manage USB 2.0 and USB1.1 ports SECOpITX-GX SECOpITX-GX User Manual - Rev. First Edition: 1.0 - Last Edition: 1.3 - Author: S.B. - Reviewed by G.G Copyright © 2015 SECO S.r.l. 12 1.8 Reference specifications Here below it is a list of applicable industry specifications and reference documents. Reference Link AC’97 http://download.intel.com/support/motherboards/desktop/sb/ac97_r23.pdf ACPI http://www.acpi.info AHCI http://www.intel.com/content/www/us/en/io/serial-ata/ahci.html CAN Bus http://www.bosch-semiconductors.de/en/ubk_semiconductors/safe/ip_modules/can_literature/can_literature.html DDC http://www.vesa.org DP, eDP http://www.vesa.org Gigabit Ethernet http://standards.ieee.org/about/get/802/802.3.html HD Audio http://www.intel.com/content/dam/www/public/us/en/documents/product-specifications/high-definition-audio-specification.pdf HDMI http://www.hdmi.org/index.aspx I2C http://www.nxp.com/documents/other/UM10204_v5.pdf ® Intel Front Panel I/O connectivity DG http://www.formfactors.org/developer/specs/A2928604-005.pdf LPC Bus http://www.intel.com/design/chipsets/industry/lpc.htm LVDS http://www.ti.com/ww/en/analog/interface/lvds.shtml http://www.ti.com/lit/ml/snla187/snla187.pdf MMC/eMMC http://www.jedec.org/committees/jc-649 OpenCL http://www.khronos.org/opencl OpenGL http://www.opengl.org OpenVG http://www.khronos.org/openvg PCI Express http://www.pcisig.com/specifications/pciexpress PCI Express mini cards http://www.pcisig.com/specifications/pciexpress/specifications/specifications/pciexpress/base2/#MCEM2 SATA https://www.sata-io.org SD Card Association https://www.sdcard.org/home SECOpITX-GX SECOpITX-GX User Manual - Rev. First Edition: 1.0 - Last Edition: 1.3 - Author: S.B. - Reviewed by G.G Copyright © 2015 SECO S.r.l. 13 SDIO https://www.sdcard.org/developers/overview/sdio SM Bus http://www.smbus.org/specs TMDS http://www.siliconimage.com/technologies/tmds UEFI http://www.uefi.org USB 2.0 and USB OTG http://www.usb.org/developers/docs/usb_20_070113.zip USB 3.0 http://www.usb.org/developers/docs/usb_30_spec_070113.zip AMD GX SOC http://www.amd.com/US/PRODUCTS/EMBEDDED/PROCESSORS/Pages/g-series.aspx SECOpITX-GX SECOpITX-GX User Manual - Rev. First Edition: 1.0 - Last Edition: 1.3 - Author: S.B. - Reviewed by G.G Copyright © 2015 SECO S.r.l. 14 Chapter 2. Introduction Technical specifications Electrical specifications Mechanical specifications Block diagram SECOpITX-GX SECOpITX-GX User Manual - Rev. First Edition: 1.0 - Last Edition: 1.3 - Author: S.B. - Reviewed by G.G Copyright © 2015 SECO S.r.l. 15 2.1 Introduction SECOpITX-GX is a Single Board Computer in pico-ITX form factor (just 100 x 72mm) based on the newest AMD Embedded G-Series System on Chip (SOC), a family of Dual/Quad Core x86 CPU with integrated discrete-class GPU and I/O controller on a single Chip. Such a level of integration allows realizing a PC Desktop-like architecture in an extremely reduced space, with low power consumption and high performances. This single chip solution include the memory controller, which gives support for up to 8GB of DDR3 SODIMM Memory, and also a high performance GPU, able to drive up to two independent display using native interfaces available on the module: HDMI, LVDS / embedded Display Port and CRT. Graphic section is embedded in the SOC; which offers an embedded AMD HD Radeon GPU, able to support dual independent displays using native LVDS / embedded Display Port, CRT or HDMI interface. Any combinations of these video interfaces are supported. GPUs embedded in the SOC also support DirectX® 11.1, OpenGL® rel.4.2 and OpenCL rel. 1.2. Further features, managed directly by the G-Series SOC and included in SECOpITX-GX board, are two SATA Channels, SDIO interface, six USB ports (two USB 3.0 and four USB 2.0), HD Audio interface and three PCI Express lanes; two PCI express lanes are then used for the implementation of up to two Gigabit Ethernet interfaces (one of them is offered as a factory option), the other is carried out on half size miniPCI express slot. This latest slot is also connected to a mini-SIM card slot, so that the SECOpITX-GX board can also be equipped with miniPCI-express modems. Please refer to following chapter for a complete list of all peripherals integrated and characteristics. SECOpITX-GX SECOpITX-GX User Manual - Rev. First Edition: 1.0 - Last Edition: 1.3 - Author: S.B. - Reviewed by G.G Copyright © 2015 SECO S.r.l. 16 2.2 Technical specifications SOC AMD GX-420CA, Quad Core @ 2.0GHz, 2MB L2 Cache, TDP 25W AMD GX-415GA, Quad Core @ 1.5GHz, 2MB L2 Cache, TDP 15W AMD GX-217GA, Dual Core @ 1.65GHz, 1MB L2 Cache, TDP 15W AMD GX-210HA, Dual Core @ 1.0GHz, 1MB L2 Cache, TDP 9W AMD GX-210JA, Dual Core @ 1.0GHz, 1MB L2 Cache, TDP 6W Ethernet Up to 2 x Gigabit Ethernet connector USB 2 x standard USB 3.0 Type A 4 x internal USB 2.0 ports Memory Up to 8GB on DDR3 1600MHz SO-DIMM @1.5V * (DDR3-1333MHz with GX-210HA, DDR3-1066MHz with GX-210JA) USB 2.0 interface on miniPCI-e Slot Audio HD Audio Codec Realtek ALC886 Embedded Graphics Embedded AMD HD RADEON GPUs HD8400E @ 600MHz (GX-420CA), HD8330E @ 500MHz (GX-415GA) HD8280E @ 450MHz (GX-217GA), HD8210E @ 300MHz (GX-210HA) HD8180 @ 225MHz (GX-210JA), Dual independent display support Supports DirectX® 11.1, OpenGL rel. 4.2 and OpenCL rel. 1.2 Graphic Interface HDMI connector, with resolution up to 1920 x 1200 Single Channel 18bit LVDS connector, resolution up to 1600 x 900 (up to 1920 x 1200 through external adapter) Alternatively, embedded Display Port connector, resolution up to 2560 x 1600 CRT interface (requires external Video Adapter), resolution up to 2048 x 1536 Mass Storage 2 x standard S-ATA connectors microSD Card slot (combo connector) * Please notice that total amount of 8GB would be usable only with 64-bit OS. Total amount of memory available with a 32-bit OS depends on the OS itself (it will be less than 4GB, however). Mic In, Line out internal pin header connector I/O Half miniPCI-e slot miniSIM slot (combo connector) FAN connector Front Header Expansion connector RTC Battery with lead cable and connector Power supply voltage: +12VDC ± 10% Operating temperature: 0°C ÷ +60°C** Dimensions: 72 x 100 mm (4.53” x 6.50”). Supported Operative Systems: Microsoft® Windows® 7, 32-bit and 64-bit Microsoft® Windows® 8, 32-bit and 64-bit Linux, 32-bit and 64-bit ** Temperatures indicated are the maximum temperature that the heatspreader / heatsink can reach in any of its parts. This means that it is customer’s responsibility to use any passive cooling solution along with an application-dependent cooling system, capable to ensure that the heatspreader / heatsink temperature remains in the range above indicated. Please also check paragraph 5.1 2.3 Electrical specifications SECOpITX-GX needs to be supplied only with an external 12VDC ± 10% power supply, minimum 40W for basic functionalities recommended. This voltage can be supplied through a standard 6.3mm (internal pin, diameter 2.0 mm) Power Jack. Internal pin is VIN power line. 2.3.1 Power available When powering SECOpITX-GX with a PSU with characteristics greater or equal to the one described at beginning of previous paragraph, please consider well what is the typical scenario for using the board (i.e., which peripherals will be connected) Internal power section is able to supply a maximum of 8A@5V for external devices supplied directly by the module (i.e. USB devices, optionally SSD or SATA disks, display). Consider that each USB 2.0 port requires 500mA, and USB 3.0 ports need 0.9A each, so if all 6 USB ports are used, then the 5V power section would be able to supply further 4.2A (about 21W) to other peripherals, like SATA Disk and/or LVDS display. Anyway, if all this current is needed by external peripherals, a 40W PSU cannot supply further power tor internal circuitry of the board. Since all the power must be supplied by an external PSU only, please balance well your typical final configuration, considering both the power consumption of the board itself (up to 20W, depending on the SOC used and the total memory soldered onboard. In paragraph 2.3.2 are detailed current consumption for possible different SOCs) and the power consumption of external devices. This way it is possible to calculate preliminarily if a 40W PSU can be sufficient for system needing or if most powerful PSUs are required. 2.3.2 Power consumption Using the following setup, and using all possible SOCs offered for SECOpITX-GX board, the current consumption has been measured on +12VDC VIN power line. O.S. Windows 7 ultimate SP1 2GB DDR3 1066MHz CL7 SODIMM (Transcend p/n TS256MSK64V1U) 32GB SSD (p/n SandDisk SDSSDRC-032G) directly plugged on connector CN14. USB mouse and keyboard connected HDMI display connected, resolution 1920x1200. Both Network connections plugged to Gigabit Ethernet Network. Optional adapter module for audio jacks, pushbuttons and status LEDs connected. Bios Release. Rc00.101. No FAN connected. SOC Status GX-210JA GX-210HA GX-217GA GX-415GA GX-420CA Idle, power saving configuration 350mA 380mA 388mA 400mA 420mA OS Boot, power saving configuration 650mA 670mA 935mA 950mA 1455mA 664mA 700mA 930mA 950mA 1170mA 720mA 730mA 950mA 970mA 1220mA 760mA 840mA 975mA 1110mA 1400mA 810mA 860mA 1200mA 1230mA 1540mA Video reproduction@720p, power saving configuration Video reproduction@1080p, power saving configuration 3DMark2005 benchmark, power saving configuration 3DMark2005 benchmark, maximum performance Independently by the SOC mounted onboard, the following power consumptions are common to all boards: Battery Backup power consumption: Soft-Off State power consumption: Suspend State power consumption: 3,5μA 46mA (wake on LAN enabled) 64mA (resume from LAN + Resume from USB enabled) SECOpITX-GX SECOpITX-GX User Manual - Rev. First Edition: 1.0 - Last Edition: 1.3 - Author: S.B. - Reviewed by G.G Copyright © 2015 SECO S.r.l. 19 2.3.3 RTC Battery For the occurrences when the module is not powered with an external power supply, on board there is a cabled coin Lithium Battery to supply, with a 3V voltage, the Real Time Clock embedded inside AMD G-Series SOC. Battery used is a cabled CR2032-LD Lithium coin-cell battery, with a nominal capacity of 220mAh. Battery connector - CN5 Pin Signal 1 VRTC 2 GND The battery is not rechargeable, and can be connected to the board using dedicated connector CN5 which is a 2-pin p1.27 mm type MOLEX p/n 53398-0271 or equivalent, with pinout shown in the table on the left. Mating connector: MOLEX 51021-0200 receptacle with MOLEX 50079-8000 female crimp terminals. In case of exhaustion, the battery should only be replaced with devices of the same type. Always check the orientation before inserting and make sure that they are aligned correctly and are not damaged or leaking. Never allow the batteries to become short-circuited during handling. CAUTION: handling batteries incorrectly or replacing with not-approved devices may present a risk of fire or explosion. Batteries supplied with SECOpITX-GX are compliant to requirements of European Directive 2006/66/EC regarding batteries and accumulators. When putting out of order SECOpITX-GX, remove the batteries from the board in order to collect and dispose them according to the requirement of the same European Directive above mentioned. Even when replacing the batteries, the disposal has to be made according to these requirements. 2.3.4 Power rails naming convention In all the tables contained in this manual, Power rails are named with the following meaning: _S: Switched voltages, i.e. power rails that are active only when the board is in ACPI’s S0 (Working) state. Examples: +3.3V_S, +5V_S. _A: Always-on voltages, i.e. power rails that are active both in ACPI’s S0 (Working), S3 (Standby) and S5 (Soft Off) state. Examples: +5V_A, +3.3V_A. _U: unswitched ACPI S3 voltages, i.e. power rails that are active both in ACPI’s S0 (Working) and S3 (Standby) state. Examples: +1.5V_U Other suffixes are used for application specific power rails, which are derived from same voltage value of voltage switched rails, if it is not differently stated (for example, +5VHDMI is derived from +5V_S, and so on). SECOpITX-GX SECOpITX-GX User Manual - Rev. First Edition: 1.0 - Last Edition: 1.3 - Author: S.B. - Reviewed by G.G Copyright © 2015 SECO S.r.l. 20 2.4 Mechanical specifications According to picoITX form factor, board dimensions are: 72 x 100 mm (4.53” x 6.50”). The printed circuit of the board is made of twelve layers, some of them are ground planes, for disturbance rejection. SECOpITX-GX SECOpITX-GX User Manual - Rev. First Edition: 1.0 - Last Edition: 1.3 - Author: S.B. - Reviewed by G.G Copyright © 2015 SECO S.r.l. 21 2.5 Block diagram Dual USB 3.0 connector USB ports [0 ÷ 1] PCI-e x1 #0 RTL8111F-VB-CG Realtek Gigabit Ethernet Controller Gigabit Ethernet interface #0 4 x USB 2.0 internal pin headers USB ports [2 ÷ 5] PCI-e x1 #1 RTL8111F-VB-CG Realtek Gigabit Ethernet Controller Gigabit Ethernet interface #1 2 x S-ATA connectors SATA ports [0 ÷ 1] LVDS/eDP connector SD Interface μSD Card slot PCI-e x1 #2 Half Size miniPCI-e slot USB port #6 SM Bus #1 VGA interface AMD G-series SOC FAN Connector Realtek ALC886 HD Audio Codec Line Out, Mic In Header SIM slot SPI Flash STMicroelectronics STM32F100R4 microcontroller Front Header CEC HDMI Power section DDR3 System Memory (SODIMM) +12VDC SECOpITX-GX SECOpITX-GX User Manual - Rev. First Edition: 1.0 - Last Edition: 1.3 - Author: S.B. - Reviewed by G.G Copyright © 2015 SECO S.r.l. 22 Chapter 3. Introduction Connectors overview Connectors description SECOpITX-GX SECOpITX-GX User Manual - Rev. First Edition: 1.0 - Last Edition: 1.3 - Author: S.B. - Reviewed by G.G Copyright © 2015 SECO S.r.l. 23 3.1 Introduction On SECOpITX-GX board, there are several connectors located on the upper plane. Standard connectors are placed on the same side of PCB, so that it is possible to place them on a panel of an eventual enclosure. Please be aware that, depending on the configuration purchased, the appearance of the board could be slightly different from the following pictures. TOP SIDE miniPCI-e Halfsize slot Power 2. 3 3.3.4 3.3.10 SATA #0 3.3 .2 USB #0 #1 3.3.2 3.3.6 HDMI Switch / LED 3.3.7 3.3.3 3.3.2 Line Out + Mic In USB #4 #5 3.3.5 3.3.1 3.3.8 3.3 3.3.8 USB #2 #3 LVDS / eDP VGA Manufacturer 2.3.3 SATA #1 μSD + miniSIM combo slot 3.3 .9 Battery Holder 3.3 .1 3.3 .1 Gigabit Ethernet #0 3.3.1 1 Optional SATA Power BOTTOM SIDE FAN Optional Gigabit Ethernet #1 SECOpITX-GX SECOpITX-GX User Manual - Rev. First Edition: 1.0 - Last Edition: 1.3 - Author: S.B. - Reviewed by G.G Copyright © 2015 SECO S.r.l. 24 3.2 Connectors overview Name Description Name Description CN1 VGA Interface CN12 SATA port#1 male connector CN2 SO-DIMM DDR3 Memory Slot CN13 Optional SATA port#0 male connector CN3 Power In Jack CN14 Optional SATA port#0 + power female connector CN4 Switch / LED interface CN15 Optional power connector for SATA #0 male CN5 Battery holder connector CN16 USB 2.0 ports #4-5 pin header CN6 FAN connector CN17 USB 2.0 ports #2-3 pin header CN7 Manufacturer connector (reserved) CN18 USB 3.0 type A ports #0 / #1 CN8 Gigabit Ethernet port #0 CN19 Mic In + Line Out Audio interface CN9 Optional Gigabit Ethernet port #1 CN20 HDMI connector CN10 μSD + miniSIM Combo Slot CN21 LVDS / eDP connector CN11 miniPCI-e slot SECOpITX-GX SECOpITX-GX User Manual - Rev. First Edition: 1.0 - Last Edition: 1.3 - Author: S.B. - Reviewed by G.G Copyright © 2015 SECO S.r.l. 25 3.3 Connectors description 3.3.1 Ethernet connectors Gigabit Ethernet Port #0 - CN8 Pin Signal Pin Signal 1 GBE0_MDI0+ 5 GBE0_MDI2- 2 GBE0_MDI0- 6 GBE0_MDI1- 3 GBE0_MDI1+ 7 GBE0_MDI3+ 4 GBE0_MDI2+ 8 GBE0_MDI3- Optional Gigabit Ethernet Port #1 - CN9 Pin Signal Pin Signal 1 GBE1_MDI0+ 5 GBE1_MDI2- 2 GBE1_MDI0- 6 GBE1_MDI1- 3 GBE1_MDI1+ 7 GBE1_MDI3+ 4 GBE1_MDI2+ 8 GBE1_MDI3- On board, there can be up to two Gigabit Ethernet connections, for the use of up to two different LANs. Both connections use a dedicated Realtek RTL8111F (or equivalent) controller. Please consider that first Gigabit Ethernet is always available (on dedicated connector CN8), while the second Gigabit Ethernet controller (on dedicated connector CN9) is optional, it depends on the version of SECOpITX-GX module purchased. Both connectors are RJ-45 sockets type LINK-PP p/n LPJG16314A4NL or equivalent, with 2kV decoupling capacitor, 100 Ohm impedance. On the connectors there are also two bicolor Green/Yellow LEDs: LED1 (Left LED) shows 10/100 or 1000 connection: green means 100Mbps connection, yellow means 1000Mpbs connection, when the LED is Off then 10Mpbs or no connection is available. LED2 (Right LED) shows ACTIVITY presence. These two interfaces are compatible both with Gigabit Ethernet (1000Mbps) and with Fast Ethernet (10/100Mbps) Networks. They will configure automatically to work with the existing network. Please be aware that they will work in Gigabit mode only in case that they are connected to Gigabit Ethernet switches/hubs/routers. For the connection, cables category Cat5e or better are required. Cables category Cat6 are recommended for noise reduction and EMC compatibility issues, especially when the length of the cable is significant. GBEx_MDI0+/GBEx_MDI0-: Ethernet Controller #x Media Dependent Interface (MDI) I/O differential pair #0. It is the first differential pair in Gigabit Ethernet mode, and the Transmit differential pair in 10/100 Mbps modes. GBEx_MDI1+/GBEx_MDI1-: Ethernet Controller #x Media Dependent Interface (MDI) I/O differential pair #1. It is the second differential pair in Gigabit Ethernet mode, and the Receive differential pair in 10/100 Mbps modes. GBEx_MDI2+/GBEx_MDI2-: Ethernet Controller #x Media Dependent Interface (MDI) I/O differential pair #2. It is the third differential pair in Gigabit Ethernet mode; it is not used in 10/100Mbps modes. GBEx_MDI3+/GBEx_MDI3-: Ethernet Controller #x Media Dependent Interface (MDI) I/O differential pair #3. It is the fourth differential pair in Gigabit Ethernet mode; it is not used in 10/100Mbps modes. SECOpITX-GX SECOpITX-GX User Manual - Rev. First Edition: 1.0 - Last Edition: 1.3 - Author: S.B. - Reviewed by G.G Copyright © 2015 SECO S.r.l. 26 3.3.2 USB ports AMD G-Series SOC is able to manage up to 10 USB ports, which are managed by three EHCI/OHCI controllers (for USB 2.0 and USB 1.1 functionalities) and one xHCI controller (which manages two ports able to work in USB 3.0 / USB 2.0 and USB 1.1 mode). Double USB 3.0 type A receptacle - CN18 Pin Signal Pin Signal 1 +5VUSB0 10 +5VUSB1 2 USB_P0- 11 USB_P1- 3 USB_P0+ 12 USB_P1+ 4 GND 13 GND 5 USB_SSRX0- 14 USB_SSRX1- 6 USB_SSRX0+ 15 USB_SSRX1+ 7 GND 16 GND 8 USB_SSTX0- 17 USB_SSTX1- 9 USB_SSTX0+ 18 USB_SSTX1+ On SECOpITX-GX board, four USB 2.0 ports and the two USB 3.0 ports are used for standard type A connectors. USB 3.0 ports are available on a double USB connector, CN18, which is placed near the Gigabit Ethernet connectors. The connector used is a double type-A USB 3.0 receptacle, type Winning p/n WDU3R-18F1B4PBUW3 or equivalent. Since this connector is a standard type receptacle, it can be connected to all types of USB 1.1 / USB 2.0 / USB 3.0 devices using Standard-A USB 3.0 or USB 2.0 plugs. For USB 3.0 connections it is mandatory the use of SuperSpeed certified cables, whose SuperSpeed differential pairs are individually shielded inside the global cable’s external shielding. USB 2-3 pin header - CN17 USB 4-5 pin header - CN16 Pin Signal Pin Signal Pin Signal Pin Signal 1 +5VUSB2 2 +5VUSB3 1 +5VUSB4 2 +5VUSB5 3 USB_P2- 4 USB_P3- 3 USB_P4- 4 USB_P5- 5 USB_P2+ 6 USB_P3+ 5 USB_P4+ 6 USB_P5+ 7 GND 8 GND 7 GND 8 GND 10 --- 10 --- Managed by OHCI Controller #1, there are also four additional USB 2.0 ports, which are hosted on two 9-pin p2.54mm pin headers ,h= 6mm, type NELTRON p/n 2213S-10G-E9 or equivalent, with the pinout shown in the tables on the left (it is a common pinout for USB headers in PC motherboards). All USB ports’ voltages (+5VUSBx) are derived from +5V_U standby voltages. This means that the ports can be powered also when the OS is in Suspend-to-RAM (S3) state in order to support (if enabled) e the “Wake-Up on USB” functionality. For the connection of standard devices to this pin headers, it is needed an adapter cable. SECO can optionally provide for such an adapter cable, as a part of the accessory kit p/n CABKIT992 (please check chapter 5.2.1 for further details). Signal description: SECOpITX-GX SECOpITX-GX User Manual - Rev. First Edition: 1.0 - Last Edition: 1.3 - Author: S.B. - Reviewed by G.G Copyright © 2015 SECO S.r.l. 27 USB_P0+/USB_P0-: USB Port #0 differential pair; it is managed by OHCI #3 / EHCI #3 / xHCI controllers (depending on BIOS settings). USB_SSRX0+/USB_SSRX0-: USB Super Speed Port #0 receive differential pair; it is managed by xHCI controller. USB_SSTX0+/USB_SSTX0-: USB Super Speed Port #0 transmit differential pair; it is managed by xHCI controller. USB_P1+/USB_P1-: USB Port #1 differential pair; it is managed by OHCI #3 / EHCI #3 / xHCI controllers (depending on BIOS settings). USB_SSRX1+/USB_SSRX1-: USB Super Speed Port #1 receive differential pair; it is managed by xHCI controller. USB_SSTX1+/USB_SSTX1-: USB Super Speed Port #1 transmit differential pair; it is managed by xHCI controller. USB_P2+/USB_P2-: USB Port #2 differential pair; it is managed by OHCI #1 and EHCI #1 internal controllers. USB_P3+/USB_P4-: USB Port #3 differential pair; it is managed by OHCI #1 and EHCI #1 internal controllers. USB_P4+/USB_P4-: USB Port #4 differential pair; it is managed by OHCI #1 and EHCI #1 internal controllers. USB_P5+/USB_P5-: USB Port #5 differential pair; it is managed by OHCI #1 and EHCI #1 internal controllers. Common mode chokes are placed on all USB differential pairs for EMI compliance. For ESD protection, on all data and voltage lines are placed clamping diodes for voltage transient suppression. Please be aware that Windows® 7 OS doesn’t have native support for USB 3.0 functionalities. They will be supported only after installing chipset’s driver. This could lead to problems during OS installation, since during this phase USB keyboard and mouse will not work, if connected to the standard USB 3.0 ports available on connector CN18. To perform Windows® 7 installation, therefore, it is suggested to connect USB mouse and keyboard to the internal ports available on connectors CN16 or CN17 (one adapter cable, contained inside the accessories kit CABKIT992, is required). Alternatively, it is possible to disable USB 3.0 functionalities by entering “InsydeH2O Setup utility” (“Advanced” menu “USB Configuration” submenu “USB 3.0”, see paragraph 4.3.5) before performing Windows® 7 and chipset’s driver installation SECOpITX-GX SECOpITX-GX User Manual - Rev. First Edition: 1.0 - Last Edition: 1.3 - Author: S.B. - Reviewed by G.G Copyright © 2015 SECO S.r.l. 28 3.3.3 LVDS / eDP + backlight connector SECOpITX-GX can be interfaced to LCD displays using its LVDS or embedded Display Port interface (only one interface is available, depending on the factory configuration of the board purchased). LVDS / eDP connector - CN21 LVDS Interface eDP Interface Pin Signal Pin Signal Pin Signal Pin Signal 1 +12VLCD 2 +12VLCD 1 +12VLCD 2 +12VLCD 3 +3.3VLCD 4 +5VLCD 3 +3.3VLCD 4 +5VLCD 5 +3.3VLCD 6 +5VLCD 5 +3.3VLCD 6 +5VLCD 7 GND 8 GND 7 GND 8 GND 9 LVDS_A0- 10 LVDS_A0+ 9 eDP0_TX2- 10 eDP0_TX2+ 11 GND 12 GND 11 GND 12 GND 13 LVDS_A1- 14 LVDS_A1+ 13 eDP0_TX1- 14 eDP0_TX1+ 15 GND 16 GND 15 GND 16 GND 17 LVDS_A2- 18 LVDS_A2+ 17 eDP0_TX0- 18 eDP0_TX0+ 19 GND 20 GND 19 GND 20 GND 21 --- 22 --- 21 +3.3V_S 22 eDP_HPD 23 GND 24 GND 23 GND 24 GND 25 LVDS_CLK- 26 LVDS_CLK+ 25 eDP0_TX3- 26 eDP0_TX3+ 27 BKLT_EN 28 BLT_CTRL 27 BKLT_EN 28 BLT_CTRL 29 LVDS_DDC_CLK 30 LVDS_DDC_DAT 29 eDP0_AUX- 30 eDP0_AUX+ With LVDS interface, it is possible to connect 18 bit single channel displays, while embedded Display Port allows use of 18-, 24- and 30-bit displays. For the connection, a connector type HR A1014WVA-S-2x15P or equivalent (2 x 15p, male, straight, P1, low profile, polarised) is provided, with the pin-out indicated in the following table (different configurations are shown). Mating connector: HR A1014H-2X15P with HR A1014-T female crimp terminals. Alternative mating connector, MOLEX 501189-30120 with crimp terminals series 501334. On the same connectors, are also implemented signals for direct driving of display’s backlight: voltages (+12VLCD, +5VLCD and +3.3VLCD) and control signals (Backlight enable signal @ 5V, BKLT_EN, and Backlight Brightness Control signal, BLT_CTRL). When building a cable for connection of LVDS / eDP displays, please take care of twist as tight as possible differential pairs’ signal wires, in order to reduce EMI interferences. Shielded cables are also recommended. Here following the signals related to LVDS management: LVDS_A0+/LVDS_A0-: LVDS Channel #0 differential data pair #0. LVDS_A1+/LVDS_A1-: LVDS Channel #0 differential data pair #1. LVDS_A2+/LVDS_A2-: LVDS Channel #0 differential data pair #2. SECOpITX-GX SECOpITX-GX User Manual - Rev. First Edition: 1.0 - Last Edition: 1.3 - Author: S.B. - Reviewed by G.G Copyright © 2015 SECO S.r.l. 29 LVDS_CLK+/LVDS_CLK-: LVDS Channel #0 differential Clock. LVDS_DDC_DAT: DisplayID DDC Data line for LVDS flat Panel detection. Bidirectional signal, electrical level +3.3V_S with a 2k2Ω pull-up resistor. LVDS_DDC_CLK: DisplayID DDC Clock line for LVDS flat Panel detection. Output signal, electrical level +3.3V_S with a 2k2Ω pull-up resistor. Boards configured for embedded Display Port (eDP) interface, instead, will have the following signals: eDP0_TX0+/eDP0_TX0-: embedded DP differential data pair #0. eDP0_TX1+/eDP0_TX1-: embedded DP differential data pair #1. eDP0_TX2+/eDP0_TX2-: embedded DP differential data pair #2. eDP0_TX3+/eDP0_TX3-: embedded DP differential data pair #3. eDP0_AUX+/eDP0_AUX-: embedded DP auxiliary channel differential data pair. eDP_HPD: embedded DP Hot Plug Detect. +3.3V_S electrical level signal with 100kΩ pull-down resistor In both configurations, the following signals are used to manage the backlight: BKLT_EN: +5V_S electrical level Output, 10kΩ pull-up resistor, Backlight Enable signal. It can be used to turn On/Off the backlight’s lamps of connected displays. BLT_CTRL: this signal can be used to adjust the backlight brightness in displays supporting Pulse Width Modulated (PWM) regulations (+3.3V_S electrical level). SECOpITX-GX SECOpITX-GX User Manual - Rev. First Edition: 1.0 - Last Edition: 1.3 - Author: S.B. - Reviewed by G.G Copyright © 2015 SECO S.r.l. 30 3.3.4 HDMI connector HDMI Connector - CN20 Pin Signal Pin Signal AMD G-series SOC offers a HDMI 1.4a compliant interface. For this reason, on SECOpITX-GX board there is the possibility of connecting directly one HDMI displays, using a standard certified HDMI connector, type A, model TYCO Electronics p/n 2007435-1. 1 TMDS_LANE2+ 2 GND 3 TMDS_LANE2- 4 TMDS_LANE1+ Signals involved in HDMI management are the following: 5 GND 6 TMDS_LANE1- TMDS_CLK+/TMDS_CLK-: TMDS differential Clock. 7 TMDS_LANE0+ 8 GND TMDS_LANE0+/TMDS_LANE0-: TMDS differential pair #0 9 TMDS_LANE0- 10 TMDS_CLK+ TMDS_LANE1+/TMDS_LANE1-: TMDS differential pair #1 11 GND 12 TMDS_CLK- TMDS_LANE2+/TMDS_LANE2-: TMDS differential pair #2 13 CEC 14 --- 15 SCL 16 SDA SDA: DDC Data line for HDMI panel. Bidirectional signal, electrical level +5VHDMI with a 2k2Ω pull-up resistor. 17 GND 18 +5VHDMI 19 HPD SCL: DDC Clock line for HDMI panel. Output signal, electrical level +5VHDMI with a 2k2Ω pullup resistor. CEC: HDMI Consumer Electronics Control (CEC) Line. Bidirectional signal, electrical level +3.3V_A with a 27kΩ pull-up resistor. HPD: Hot Plug Detect Input signal. +3.3V_S electrical level signal with 100kΩ pull-down resistor For ESD protection, on all data and voltage lines are placed clamping diodes for voltage transient suppression. Always use HDMI-certified cables for the connection between the board and the HDMI display; a category 2 (High-Speed) cable is recommended for higher resolutions, category 1 cables can be used for 720p resolution. SECOpITX-GX SECOpITX-GX User Manual - Rev. First Edition: 1.0 - Last Edition: 1.3 - Author: S.B. - Reviewed by G.G Copyright © 2015 SECO S.r.l. 31 3.3.5 VGA Connector VGA Connector - CN1 Pin Signal Pin Signal In addition to LVDS/eDP and HDMI, SECOpITX-GX board also offers an additional VGA interface. Considering that integrated AMD HD Radeon GPUs are able to manage up to two independent displays, it is possible this way to have many possible combinations of display, using VGA, LVDS and HDMI connectors. 1 CRT_RED 7 CRT_HSYNC 2 GND 8 CRT_VSYNC 3 CRT_GREEN 9 +5V_S VGA connector is an FFC/FPC connector, top contacts, type HIROSE FH12-12S-0.5SV(55), with pinout shown in the table on the left. 4 GND 10 CRT_DDC_CLK Connector mates with 0.5mm pitch 12-poles FFC cables. 5 CRT_BLUE 11 CRT_DDC_DATA 6 GND 12 GND Here following the VGA signals’ description: CRT_RED: G-series SOC internal DAC’s Red Signal video output. A 150Ω pull-down resistor is placed on the line. CRT_GREEN: G-series SOC internal DAC’s Green Signal video output. A 150Ω pull-down resistor is placed on the line. CRT_BLUE: G-series SOC internal DAC’s Blue Signal video output. A 150Ω pull-down resistor is placed on the line. CRT_HSYNC: G-series SOC internal DAC’s Horizontal Synchronization output signal. CRT_VSYNC: G-series SOC internal DAC’s Vertical Synchronization output signal. CRT_DDC_CLK: internal DAC’s DDC Clock line for VGA displays detection. Output signal, electrical level +3.3V_S. CRT_DDC_DATA: internal DAC’s DDC Clock line for VGA displays detection. Bidirectional signal, electrical level +3.3V_S Please be aware that for the connection to external VGA displays, adapter circuitry is needed; it will provide for ESD protection, voltage level shifting for DDC, filtering for reduction of noise and EMI, and so on. Optionally, SECOpITX-GX board can be supplied with a dedicated VGA adapter, able to carry out the signals coming out from connector CN20 to a standard DB15 HD VGA connector. The adapter is also provided with necessary FFC cable, length 20cm. Please check chapter 5.2.2 for further details. SECOpITX-GX SECOpITX-GX User Manual - Rev. First Edition: 1.0 - Last Edition: 1.3 - Author: S.B. - Reviewed by G.G Copyright © 2015 SECO S.r.l. 32 3.3.6 Audio interface HD Audio Front Panel Interface - CN19 Signal In order to reduce the space dedicated to connectors, SECOpITX-GX board doesn’t offer any standard audio jack. However, SECOpITX-GX integrates a High Definition Audio Codec, Realtek ALC886GR, that makes basic audio connection available on dedicated connector CN19, which is a 9-pin pin header, p2.54 mm h= 6mm, type NELTRON p/n 2213S-10G-E8 or equivalent, with the pinout shown in the table on the left. Pin Signal Pin 1 Mic_Left 1 GND_Audio 3 Mic_Right 4 --- 5 LineOut_Right 6 Mic_Jack_Detect 7 GND_Audio The pinout of this connector complies with Intel® Front Panel I/O connectivity Design Guide, High Definition Audio section, chapter 2.5. 9 LineOut_Left 10 LineOut_Jack_Detect Using this dedicated connector, it will be possible to connect any Azalia compliant panel audio jack to remote audio connectors in the preferred position. Alternatively, it is also possible to buy SECO’s dedicated front panel module, which offers two standard audio jacks, two pushbuttons (for reset and power on) and two LEDs, for SATA activity and Power status signalling. This adapter module is also contained inside the dedicated accessories kit p/n CABKIT992 for SECOpITX-GX board. Please also check chapter 5.2.1 for further details. Signals Description Mic_Left: Analog Port 1 - Microphone Left Channel. Mic_Right: Analog Port 1 - Microphone Right Channel. Mic_Jack_Detect: Analog Port 1 - Jack detection return signal. LineOut_Left: Analog Port 2 - Headphone Left Channel. LineOut_Right: Analog Port 2 - Headphone Right Channel. LineOut_Jack_Detect: Analog Port 2 - Jack detection return signal. SECOpITX-GX SECOpITX-GX User Manual - Rev. First Edition: 1.0 - Last Edition: 1.3 - Author: S.B. - Reviewed by G.G Copyright © 2015 SECO S.r.l. 33 3.3.7 Switch / LED header interface Switch / LED Header Interface - CN4 Pin Signal Pin Signal 1 HD_LED_P 2 FP PWR_P/SLP_N 3 HD_LED_N 4 FP PWR_N/SLP_P 5 RST_SW_N 6 PWR_SW_P 7 RST_SW_P 8 PWR_SW_N 9 --- To allow the integration of a SECOpITX-GX based system inside a box PC-like, there is a connector on the board that allows to remote signals for the Power Button (to be used to put the system in a Soft Off State, or awake from it), for the Reset Button, and the signal for optional LED signaling activity on SATA Channel and Power On states. The pinout of this connector complies with Intel® Front Panel I/O connectivity Design Guide, Switch/LED Front Panel section, chapter 2.2. It is shown in the table on the left. Connector CN4 is an internal 9-pin standard male pin header, p 2.54 mm, 5+4 pin, h= 6mm, type NELTRON p/n 2213S-10G-E10 or equivalent. As already written in the previous paragraph dedicated to Audio interface, it is possible to buy SECO’s dedicated front panel module, which offers standard connections: two standard audio jacks, two pushbuttons (for reset and power on) and two LEDs, for SATA activity and Power status signaling. This adapter module is also contained inside the dedicated cable kit (CABKIT992) for SECOpITX-GX board. Please also check chapter 5.2.1for further details. Signals Description HD_LED_P: Hard Disk Activity LED signal’s pull-up to +5V_S voltage (510Ω pull-up). HD_LED_N: Hard Disk Activity LED output signal RST_SW_N: Reset Switch GND RST_SW_P: Reset switch input signal. This signal has to be connected to an external momentary pushbutton (contacts normally open). When the pushbutton is pressed, the pulse of Reset signal will cause the reset of the board. PWR_SW_P: Power switch input signal, +3.3V_A electrical level with 10kΩ pull-up. This signal has to be connected to an external momentary pushbutton (contacts normally open). Upon the pressure of this pushbutton, the pulse of this signal will let the switched voltage rails turn on or off. PWR_SW_N: Power Switch GND FP PWR_P/SLP_N: Power/Sleep messaging LED terminal 1 with 510Ω pull-up resistor to +5V_A voltage. Connect it to an extremity of a dual-color power LED for power ON/OF, sleep and message waiting signaling. Please refer to Intel® Front Panel I/O connectivity Design Guide, chapter 2.2.4, for LED functionalities and signal meaning. FP PWR_N/SLP_P: Power/Sleep messaging LED terminal 2 with 510Ω pull-up resistor to +5V_A voltage. Connect it to the other extremity of the dual-color power LED above mentioned. SECOpITX-GX SECOpITX-GX User Manual - Rev. First Edition: 1.0 - Last Edition: 1.3 - Author: S.B. - Reviewed by G.G Copyright © 2015 SECO S.r.l. 34 3.3.8 S-ATA connectors S-ATA Connector - CN12 AMD G-series SOC embeds a SATA Controller, which offers a SATA II, 3.0 Gps interface, able to drive up to two external devices. Pin Signal For this reason, for the connection of external Mass Storage Devices, there are two standard S-ATA connectors. 1 GND 2 SATA1_Tx+ A male S-ATA connector, CN12, is always available, independently by the version of SECOpITX-GX board purchased. 3 SATA1_Tx- 4 GND 5 SATA1_Rx- 6 SATA1_Rx+ 7 GND Optional male S-ATA Connector - CN13 Pin Optional S-ATA female Connector - CN14 Signal Pin Signal Pin Signal 1 GND S1 GND P5 GND 2 SATA0_Tx+ S2 SATA0_Tx+ P6 GND 3 SATA0_Tx- S3 SATA0_Tx- P7 +5V_S 4 GND S4 GND P8 +5V_S 5 SATA0_Rx- S5 SATA0_Rx- P9 +5V_S 6 SATA0_Rx+ S6 SATA0_Rx+ P10 GND 7 GND S7 GND P11 GND P1 --- P12 GND P2 --- P13 +12V_S P3 --- P14 +12V_S P4 GND P15 +12V_S A second SATA port is factory available in two different versions: A) SATA male connector CN13 B) SATA female connector CN14 connector for direct SATA disk powering. with integrated In first case, on board there will be available a second SATA male connector, CN13, identical to the other.. Second factory alternative offers a unique standard female 22 poles S-ATA connector, which can be used also for direct powering of SATA Hard Disk Drive. Please be aware that S-ATA connector CN14 doesn’t provide +3.3V power rail, so SATA disks requiring such a voltage cannot be used with this board. Connector used is type MOLEX p/n 87779-1001 or equivalent, with pinout shown in the dedicated table on the left. SECOpITX-GX SECOpITX-GX User Manual - Rev. First Edition: 1.0 - Last Edition: 1.3 - Author: S.B. - Reviewed by G.G Copyright © 2015 SECO S.r.l. 35 S-ATA Power Connector - CN15 A dedicated power connector, CN 15, can be used to give supply to external Hard Disks (or Solid State Disks) connected to one of the two SATA male connectors. Pin Signal 1 +12V_S The dedicated power connector is a 4-pin male connector, type MOLEX p/n 89400-0420 or equivalent, with pinout shown in the table on the left. 2 GND Mating connector: MOLEX 87369-0400 crimp housing with MOLEX 50212 crimp terminals. 3 GND 4 +5V_S An adapter cable for powering SATA disks from this connector is also contained inside the dedicated cable kit (CABKIT992) for SECOpITX-GX board. Please also check chapter 5.2.1for further details. Here following the signals related to SATA interface: SATA0_TX+/SATA0_TX-: Serial ATA Channel #0 Transmit differential pair SATA0_RX+/SATA0_RX-: Serial ATA Channel #0 Receive differential pair SATA1_TX+/SATA1_TX-: Serial ATA Channel #1 Transmit differential pair SATA1_RX+/SATA1_RX-: Serial ATA Channel #1 Receive differential pair 10nF AC series decoupling capacitors are placed on each line of SATA differential pairs. 3.3.9 μSD + miniSIM combo card slot μSD + miniSIM Combo Card Slot - CN10 Pin Signal Pin Signal S1 UIM_PWR T3 SD_CMD S2 UIM_RST T4 +3.3V_S S3 UIM_CLK T5 SD_CLK S4 GND T6 GND S5 UIM_SPU T7 SD_DATA0 S6 UIM_DATA T8 SD_DATA1 T1 SD_DATA2 ST1 SD_CD# T2 SD_DATA3 ST2 GND AMD G-Series SOC embeds a SD 3.0 compliant Host controller, supporting SDxc UHS-1 cards (speed transfer up to 104 MB/S with 4.bit SD cards). For this reason, on SECOpITXGX board there is also a socket, for the use of standard microSD cards, which can be used as Mass Storage and/or Boot Devices. Moreover, SECOpITX-GX board is designed to accept also miniSIM cards, for use of miniPCI Express modems. These cards can be inserted in the dedicated slot of connector CN10, which is a combo μSD/MMC + miniSIM connector, push-push type, 2.7 mm global height, type AVX p/n 009162006501150 or equivalent. Pinout here reported is related only to signal routing on specific connector; internally the pin-out is the same of any standard SD 3.0 and SIM card. For ESD protection, on all signal lines are placed clamping diodes for voltage transient suppression. SECOpITX-GX SECOpITX-GX User Manual - Rev. First Edition: 1.0 - Last Edition: 1.3 - Author: S.B. - Reviewed by G.G Copyright © 2015 SECO S.r.l. 36 3.3.10 miniPCI-express slot miniPCI-express Slot - CN11 Pin Signal Pin Signal To add communications functionality, or other features not available on SECOpITX-GX board, it is possible to use Half-size mini-PCI Express cards, using the dedicate connector, CN11, which is a standard 52pin miniPCI Express connector, type TYCO 1775861-1 or equivalent, H=4mm, with the pinout shown in the table on the left. 1 PCIE_WAKE# 2 +3.3V_A 3 N.C. 4 GND 5 N.C. 6 +1.5V_S 7 CLKREQ# 8 UIM_PWR 9 GND 10 UIM_DATA 11 PCIE2_Clock- 12 UIM_CLK On the slot are also available the signals for interfacing to SIM cards, so that it is possible to use miniPCI Express modems. 13 PCIE2_Clock+ 14 UIM_RST PCI express Gen 2.0 is supported. 15 GND 16 UIM_SPU Signals carried to miniPCI-express slots are the following: 17 N.C. 18 GND PCIE2_TX+/PCIE2_TX-: PCI Express lane #2, Transmitting Output Differential pair 19 N.C. 20 W_DISABLE# PCIE2_RX+/PCIE2_RX-: PCI Express lane #2, Receiving Input Differential pair 21 GND 22 PCIE_RESET# 23 PCIE2_RX- 24 +3.3V_A 25 PCIE2_RX+ 26 GND 27 GND 28 +1.5V_S 29 GND 30 SMB_CLK 31 PCIE2_TX- 32 SMB_DATA 33 PCIE2_TX+ 34 GND 35 GND 36 USB_P6- 37 GND 38 USB_P6+ 39 +3.3V_A 40 GND 41 +3.3V_A 42 N.C. 43 GND 44 N.C. Due to the reduced dimensions of the board itself, on the SECOpITX-GX board it is only possible to insert Half-Size miniPCI express cards. PCIE2_Clock+ / PCIE2_Clock-: PCI Express Reference Clock for lane #2, Differential Pair PCIE_WAKE#: Board’s Wake Input, it must be externally driven by the miniPCI-e module inserted in the slot when it requires waking up the system. PCIE_RESET#: Reset Signal that is sent from G-Series SOC to all PCI-e devices available on the board (i.e. the GbE controllers) and on the miniPCI-e module. It is a 3.3V active-low signal. CLKREQ#: PCI Express Clock Request Input. This signal shall be driven correctly by any module inserted in the miniPCI express slot, in order to ensure that G-Series SOC makes available the reference clock. SMB_CLK: SM Bus control clock line for System Management. Output signal, electrical level +3.3V_S with a 2k2Ω pull-up resistor. SMB_DATA: SM Bus control data line for System Management. Bidirectional signal, electrical level +3.3V_S with a 2k2Ω pull-up resistor. SECOpITX-GX SECOpITX-GX User Manual - Rev. First Edition: 1.0 - Last Edition: 1.3 - Author: S.B. - Reviewed by G.G Copyright © 2015 SECO S.r.l. 37 45 N.C. 46 N.C. 47 N.C. 48 +1.5V_S 49 N.C. 50 GND 51 N.C. 52 +3.3V_A USB_P6+ / USB_P6-: USB Port #4 differential pair; it is managed by OHCI #2 and EHCI #2 internal controllers. W_DISABLE#: Wireless Disable signal, managed by a G-Series SOC GPIO signal. It is provided for those Wireless miniPCI-express cards able to manage the software switching on/off. UIM_PWR: Power line for UIM module UIM_DATA: Bidirectional Data line between miniPCI-express card and UIM module UIM_CLK: Clock line, output from miniPCI-express card to the UIM module. UIM_RST: Reset signal line, sent from miniPCI-express card to the UIM module. UIM_SPU: UIM Standard or Proprietary Use signal Please be aware that all signals related to User Identity Modules are managed directly by the miniPCI-express card circuitry, they don’t involve AMD G-series SOC’s management. The SECOpITX-GX board embeds only clamping diodes for ESD protection on UIM signal and voltage lines. 3.3.11 FAN connector FAN Connector - CN6 Pin Signal Depending on the usage model of SECOpITX-GX, for critical applications/environments on SECOpITX-GX it is available a 3-pin dedicated connector for an external +12VDC FAN. 1 GND FAN Connector is a 3-pin single line SMT connector, type MOLEX 53261-0371 or equivalent, with pinout shown in the table on the left. 2 FAN_POWER Mating connector: MOLEX 51021-0300 receptacle with MOLEX 50079-8000 female crimp terminals. 3 FAN_TACHO_IN Please be aware that the use of an external fan depends strongly on customer’s application/installation. Please refer to chapter 5.1 for considerations about thermal dissipation. FAN_POWER: +12VIN derived power rail for FAN, managed by AMD G-Series SOC via PWM signal FAN_TACHO_IN: tachometric input from the fan to the G-Series SOC, +3.3V_S electrical level signal with 10kΩ pull-up resistor. 3.3.12 SO-DIMM DDR3 Slot Depending on the version of the SOC used, the SECOpITX-GX board supports DDR3 memories up to 1600MHz. Please refer to Technical Specifications chapter for a detail of memory speeds supported by each type of AMD G-Series SOC. For use of these memories, on board there is one SO-DIMM DDR3 socket (CN2), type LOTES p/n AAA-DDR-111-K01 or equivalent, a right angle, high profile socket, used for high speed system memory applications. SECOpITX-GX SECOpITX-GX User Manual - Rev. First Edition: 1.0 - Last Edition: 1.3 - Author: S.B. - Reviewed by G.G Copyright © 2015 SECO S.r.l. 38 Chapter 4. InsydeH2O setup Utility Main setup menu Advanced menu Security menu Power menu Boot menu Exit menu SECOpITX-GX SECOpITX-GX User Manual - Rev. First Edition: 1.0 - Last Edition: 1.3 - Author: S.B. - Reviewed by G.G Copyright © 2015 SECO S.r.l. 39 4.1 InsydeH2O setup Utility Basic setup of the board can be done using Insyde Software Corp. “InsydeH2O Setup Utility”, that is stored inside an onboard SPI Serial Flash. It is possible to access to InsydeH2O Setup Utility by pressing the <ESC> key after System power up, during POST phase. On the splash screen that will appear, select “SCU” icon. On each menu page, on left frame are shown all the options that can be configured. Grayed-out options are only for information and cannot be configured. Only options written in blue can be configured. Selected options are highlighted in white. Right frame shows the key legend. KEY LEGEND: ←/→ Navigate between various setup screens (Main, Advanced, Security, Power, Boot...) ↑/↓ Select a setup item or a submenu <F5> / <F6> <F5> and <F6> keys allows to change the field value of highlighted menu item <F1> The <F1> key allows you to display the General Help screen. <F9> <F9> key allows loading Setup Defaults for the board. After pressing <F9> BIOS Setup utility will request for a confirmation, before saving and exiting. By pressing <ESC> key, this function will be aborted <F10> <F10> key allows save any changes made and exit Setup. After pressing <F10> key, BIOS Setup utility will request for a confirmation, before saving and exiting. By pressing <ESC> key, this function will be aborted <ESC> <Esc> key allows you to discard any changes made and exit the Setup. After pressing <ESC> key, BIOS Setup utility will request for a confirmation, before discarding the changes. By pressing <Cancel> key, this function will be aborted <ENTER> <Enter> key allows to display or change the setup option listed for a particular setup item. The <Enter> key can also allow you to display the setup sub- screens. SECOpITX-GX SECOpITX-GX User Manual - Rev. First Edition: 1.0 - Last Edition: 1.3 - Author: S.B. - Reviewed by G.G Copyright © 2015 SECO S.r.l. 40 4.2 Main setup menu When entering the Setup Utility, the first screen shown is the Main setup screen. It is always possible to return to the Main setup screen by selecting the Main tab. In this screen, are shown details regarding BIOS version, Processor type, Bus Speed and memory configuration. Only three options can be configured: 4.2.1 Language Use this option to select the language that the Setup utility must use. Possible options are English, French. 4.2.2 System Time / System Date Use this option to change the system time and date. Highlight System Time or System Date using the <Arrow> keys. Enter new values directly through the keyboard, or using + / - keys to increase / reduce displayed values. Press the <Enter> key to move between fields. The date must be entered in MM/DD/YY format. The time is entered in HH:MM:SS format. Note: The time is in 24-hour format. For example, 5:30 A.M. appears as 05:30:00, and 5:30 P.M. as 17:30:00. The system date is in the format mm/dd/yyyy. SECOpITX-GX SECOpITX-GX User Manual - Rev. First Edition: 1.0 - Last Edition: 1.3 - Author: S.B. - Reviewed by G.G Copyright © 2015 SECO S.r.l. 41 4.3 Advanced menu Menu Item Options Description Boot Configuration See submenu Configures settings for Boot Phase Peripheral Configuration See submenu Configures the peripherals IDE configuration See submenu Select the IDE controller and hard disk drive type installed in the system Video Configuration See submenu Configures the options for video section USB Configuration See submenu Configures USB Section Chipset Configuration See submenu Configure Chipset’s parameters ACPI Table / Features Control See submenu Configures the parameters for ACPI management CPU Related settings See submenu Configures CPU related parameters Memory Configurations See submenu Configures Memory Controller features and memory clock SDIO Configuration See submenu SDIO Configuration submenu 4.3.1 Boot configuration submenu Menu Item Options Description Numlock On / Off Allows to choose whether NumLock Key at system boot must be turned On or Off Fast recovery Disabled / Enabled Enable / Disable Fast Recovery test 4.3.2 Peripheral configuration submenu Menu Item Options Description OHCI 1 Disabled / Enabled Enabled: Enable the OHCI controller 1 (for USB 1.1 support), which manages USB ports available on pin headers CN16 & CN17 Disabled: Disable the OHCI Controller 1 OHCI 2 (port 4 on miniPCIE slot) Disabled / Enabled Enabled: Enable the OHCI controller 2 (for USB 1.1 support), which manages USB port available on miniPCI-e slot Disabled: Disable the OHCI Controller 2 SECOpITX-GX SECOpITX-GX User Manual - Rev. First Edition: 1.0 - Last Edition: 1.3 - Author: S.B. - Reviewed by G.G Copyright © 2015 SECO S.r.l. 42 OHCI 3 Disabled / Enabled Enabled: Enable the OHCI controller 3 (for USB 1.1 support) which manages USB ports available on connector CN18 Disabled: Disable the OHCI Controller 3 EHCI 1 Disabled / Enabled Enabled: Enable the EHCI controller 1 (for USB 2.0 support), which manages USB ports available on pin headers CN16 & CN17 Disabled: Disable the EHCI Controller 1 EHCI 2 (port 4 on miniPCIE slot) Disabled / Enabled Enabled: Enable the EHCI controller 2 (for USB 2.0 support), which manages USB port available on miniPCI-e slot Disabled: Disable the EHCI Controller 2 EHCI 3 Disabled / Enabled Enabled: Enable the EHCI controller 3 (for USB 2.0 support), which manages USB ports available on connector CN18 Disabled: Disable the EHCI Controller 3 Azalia Disabled / Enabled Enabled: Enable the HD Audio Codec Disabled: Disable the internal HD Audio Controller SATA Disabled / Enabled Enabled: Enable the SATA controller. Disabled: Disable the SATA controller 4.3.3 IDE configuration submenu Menu Item Options Description SATA Configure As IDE AHCI IDE AHCI AMDAHCI IDE AMDAHCI Set SATA Configuration type With AHCI, is not possible to install/boot UEFI O.S., only Legacy OS can be installed (a simpler driver is required). Setting to IDE, the controller is managed as a PCI device, so addresses reallocation and INT line sharing is possible. With IDE AHCI, it is possible to install both UEFI and Legacy OS, it uses IDE to avoid the need for an UEFI driver. With AMDAHCI, AHCI ID will be 7804 (not 7801) so that Windows7 will install an AMD AHCI specific driver instead of default AHCI driver Using IDE AMDAHCI, the behavior will be similar to IDE AHCI, but will use AHCI ID 7804 like described for AMDAHCI Serial ATA Port 0 / 1 Disabled / Enabled Shows information related to eventual devices connected to SATA ports 0 or 1 SECOpITX-GX SECOpITX-GX User Manual - Rev. First Edition: 1.0 - Last Edition: 1.3 - Author: S.B. - Reviewed by G.G Copyright © 2015 SECO S.r.l. 43 4.3.4 Video configuration submenu Menu Item Options Description UMA Frame buffer Size Auto / 64 MB / 128 MB / 256 MB / 384 MB / 512 MB / 1 GB / 2 GB Set UMA Frame buffer Size HDMI Audio Disabled / Enabled Enable or Disable Audio on HDMI LFP Disabled / External EDID / 640x480 / 800x480 / 800x600 / 1024x600 / 1024x768 / 1280x720 / 1280x800 / 1280x1024 / 1366x768 / 1440x900 / 1600x900 / 1680x1050 / 1920x1080 Select a software resolution (EDID settings) to be used for the internal flat panel. Using External EDID, LVDS display resolution is taken by external EDID interface Resolutions above 1600x900 are available only using eDP interface, please take care if the board purchased offers LVDS or eDP. LFP Color Mode VESA 24 bpp JEIDA 24 bpp 18 bpp LFP Bus Mode Single Channel Dual Channel LFP Default Brightness 0 ÷ 100 Set the booting LVDS brightness percentage. Please be aware that a very low brightness level could make the panel not visible. LFP BackLight Frequency Numeric value Set the LVDS Backlight Frequency in Hertz This item is effeticve only for boards factory configured with eDP video output on connector CN21, and an external eDP-to-LVDS module is used. Select the color depth of LVDS interface. For 24-bit color depth, it is possible to choose also the color mapping on LVDS channels, i.e. if it must be VESA-compatible or JEIDA compatible. This item is effeticve only for boards factory configured with eDP video output on connector CN21, and an external eDP-to-LVDS module is used. Allows configuration of LVDS interface in Single or Dual channel mode 4.3.5 USB configuration submenu Menu Item Options Description USB 2.0 Disabled / Enabled Enable/Disable internal USB 2.0 controller. USB 3.0 Disabled / Enabled Enable/Disable internal USB 3.0 controller. USB BIOS Support Disabled / Enabled / UEFI only This option allows enabling USB support for Keyboard / mouse / Storage on DOS and UEFI environments. UEFI will be supported only if the item is set to “UEFI only” SECOpITX-GX SECOpITX-GX User Manual - Rev. First Edition: 1.0 - Last Edition: 1.3 - Author: S.B. - Reviewed by G.G Copyright © 2015 SECO S.r.l. 44 4.3.6 Chipset configuration submenu Menu Item Options Description NorthBridge/GNB options See submenu PCI Latency timer 32 / 64 / 96 / 128 / 160 / 192 / 224 / 248 Set this value to allow the PCI Latency Timer to be adjusted. This option sets the latency of all PCI devices on the PCI bus. Values are in units of PCI clocks. Adaptive S4 Enabled / Disabled Enable/Disable Adaptive S4 Power management 4.3.6.1 Northbridge/GNB configuration submenu Menu Item Options Description PCI Express Configurations See following options PSPP Policy Disabled / Performance / PCIe Speed Power policy: the processor can dynamically support the changing to the link Balanced High / Balanced Low/ frequency due to changes in system configuration and power policy. Power Saving / Auto Internal LAN0: APU GPP0 slot configuration Internal LAN1: APU GPP1 slot configuration See following options Half Mini PCIE slot: APU GPP2 slot configuration These menu are to be used to set single PCI express ports features, see the following menu items GPP Enabled Disabled / Enabled Use this item to enable this GPP. Link ASPM Disabled / L0s / L1 / L0s & L1 Manages PCI Express L0s and L1 power states, for OSs able to handle Active State Power Management (ASPM) Speed Mode Auto / Gen1 / Gen2 This menu item is available only for APU GPP2 slot, when “GPP Enabled” is set to Enabled. Set PCI-e ports link speed/capability SECOpITX-GX SECOpITX-GX User Manual - Rev. First Edition: 1.0 - Last Edition: 1.3 - Author: S.B. - Reviewed by G.G Copyright © 2015 SECO S.r.l. 45 4.3.7 ACPI Table/features submenu Menu Item Options Description FACP - C2 Latency Value Enabled / Disabled Allows definition of C2 latency value to be defined in FACP Table. Values smaller than 100 mean C2 Enabled, values larger than 100 mean C2 Disabled FACP - C3 Latency Value Enabled / Disabled Allows definition of C3 latency value to be defined in FACP Table. Values smaller than 1000 mean C3 Enabled, values larger than 1000 mean C3 Disabled FACP - RTC S4 wakeup Enabled / Disabled Enable or disable FACP support for S4 wakeup from RTC HPET - HPET Support Enabled / Disabled High Precision Event Timer is supported in Windows Vista or above. HPET controller should not been seen in Windows XP, no matter if enabled/disabled in SCU. If this feature is enabled, the HPET table will be added into ACPI Tables. _OSC Support Enabled / Disabled Enable or Disable ACPI Operating System Capabilities (_OSC) Method to communicate to the O. S. which features available in the system can be controlled by the operating system Fusion Utility Enabled / Disabled Enable/Disable AMD Fusion Utility Support Acpi Time Wake Alarm Device Enabled / Disabled Enable/Disable Acpi Time Wake Alarm Device 4.3.8 CPU related setting submenu Menu Item Options Description CPU P-State Setting Auto / Lowest Speed Sets the CPU P-States behavior, if AUTOmatic or fixed at lowest speed SVM support Enabled / Disabled Enable or Disable Secure Virtual Machine Mode (SVM) support, for users who require to use Virtual Machines SMM Code Lock Enabled / Disabled Enable or disable locking of the SMM (System Management Mode) code segment / registers for preventing changes to the internal code/registers SECOpITX-GX SECOpITX-GX User Manual - Rev. First Edition: 1.0 - Last Edition: 1.3 - Author: S.B. - Reviewed by G.G Copyright © 2015 SECO S.r.l. 46 4.3.9 Memory configurations submenu Menu Item Options Description Memory clock setting mode select Auto / Limited This item allows selecting the memory clock settings. In Auto mode, the clock will run according to SPD data. In limited mode, if SPD clock is higher than the limit, then memory clock will follow limit clock Select memory clock value 800 MHz / 1066 MHz / 1333 MHz / 1600 MHz This menu item is available only when “Memory clock setting mode select” is not set to Auto. Specifies the memory clock limit or set a specific memory clock, according to previous setting Please be aware that changing Memory clock settings could lead to system instability. 4.3.10 SDIO Configuration submenu Menu Item Options Description SD Mode Disabled / ADMA / DMA / PIO Select the data transfer method that must be used by the Host Controller driver. It can be PIO Mode, DMA mode or Advanced DMA mode, as described in SD Host Controller Specifications SD HC Version SD 2.0 / SD 3.0 SD Host Controller Version SECOpITX-GX SECOpITX-GX User Manual - Rev. First Edition: 1.0 - Last Edition: 1.3 - Author: S.B. - Reviewed by G.G Copyright © 2015 SECO S.r.l. 47 4.4 Security menu Menu Item Options Description Set Supervisor Password Install or Change the password for supervisor. Length of password must be greater than one character. Power on Password Available only when Supervisor Password has been set. Enabled: System will ask to input a password during P.O.S.T. phase. Disabled: system will ask to input a password only for entering Setup utility Enabled / Disabled SECOpITX-GX SECOpITX-GX User Manual - Rev. First Edition: 1.0 - Last Edition: 1.3 - Author: S.B. - Reviewed by G.G Copyright © 2015 SECO S.r.l. 48 4.5 Power menu Menu Item Options Description Advanced CPU Control See submenu These items control various CPU parameters Thermal Zone configuration See submenu Thermal Zone Configuration: Active and Passive Cooling Settings. Clocks & Voltages Optimizations See submenu Change Clocks and voltages Settings Watchdog Configuration See submenu Watchdog Configuration Settings ACPI S3 Enabled / Disabled Enable or Disable ACPI S3 Sleep State Power Fail Resume Type Always OFF Last State Always ON Determine the System Behavior after a power failure event. In case the option is “Always ON”, the board will start every time the power supply is present. When the option is “Always OFF”, the board will not start automatically when the power supply returns. Finally, if this option is set to “Last State”, the board will remember the state it had when the power supply went down: so, if the board was on, it will start again when the power returns, and will remain off if the board was in this state when the power went down. Wake on PME Enabled / Disabled Determines whether the system must wake up or not when the system power is off and occurs a PCI Power Management Enable wake-up event. Auto Wake on S5 Disabled By Every Day By Day of Month Auto wake up from S5 state, it can be set to happen “By Day of month” or at a “Fixed time of every day”. Wake on S5 time [hh:mm:ss] This menu item is available only when “Auto Wake on S5” is not set to Disabled. Set time of the day when the board must wake up automatically Day of month 1 ÷ 31 This menu item is available only when “Auto Wake on S5” is set to “By Day of Month” This is the help for the day field. Valid range is from 1 to 31. Error checking will be done against month/day/year combinations that are not supported. Use + / - to Increase / reduce SECOpITX-GX SECOpITX-GX User Manual - Rev. First Edition: 1.0 - Last Edition: 1.3 - Author: S.B. - Reviewed by G.G Copyright © 2015 SECO S.r.l. 49 4.5.1 Advanced CPU control submenu Menu Item Options Description Cool N’ Quiet Support Enabled / Disabled Enable or Disable “Cool N’ Quiet” power saving and speed throttling technology for CPU idle states. Multi CORE support Auto / Disabled Enable / Disable Multi CORE Support CPU C-States Auto / Disabled C-State ACPI Management 4.5.2 Thermal Zone configuration submenu Menu Item Options Description Onboard FAN Enabled / Disabled Enable or Disable Onboard FAN Low Threshold (°C) 0 °C ÷ 115 °C This submenu is available only when “Onboard FAN” is set to Enabled. Select the lowest temperature under which the onboard FAN must be Off High Threshold (°C) 0 °C ÷ 115 °C This submenu is available only when “Onboard FAN” is set to Enabled. Select the highest temperature above which the onboard FAN must work always at Full Speed Mid Duty Cycle 0 ÷ 100 This submenu is available only when “Onboard FAN” is set to Enabled. Use this item to set the Duty Cycle for the FAN when the APU temperature is between Low and High threshold. Values that can be accepted are between 0 (0% OFF) and 100 (100%Full Speed) Passive Cooling Threshold (°C) 0 °C ÷ 115 °C Use this item to set the temperature threshold for the CPU. Above this temperature value, the CPU swill start to lower its frequency. Critical temperature (°C) 0 °C ÷ 115 °C Use this item to set the maximum temperature that the CPU can reach. Above this temperature value, the system will perform a critical shutdown SECOpITX-GX SECOpITX-GX User Manual - Rev. First Edition: 1.0 - Last Edition: 1.3 - Author: S.B. - Reviewed by G.G Copyright © 2015 SECO S.r.l. 50 4.5.3 Clocks and Voltages Optimizations submenu Menu Item Options Description LVDS Spread Spectrum Percentage 0 ÷ 1000 LVDS Spread Spectrum Percentage (Downspread) in 0.01% units. For example: 0 = No Spread Spectrum, 40 = -0.40 spread spectrum HDMI Spread Spectrum Percentage 0 ÷ 1000 HDMI Spread Spectrum Percentage (Downspread) in 0.01% units. For example: 0 = No Spread Spectrum, 40 = -0.40 spread spectrum PCIE Spread Spectrum Percentage 0 ÷ 1000 PCIE Spread Spectrum Percentage (Downspread) in 0.001% units. For example: 0 = No Spread Spectrum, 375 = -0.375 spread spectrum DisplayPort Fixed Voltage Swing 0.4V 0dB / 0.6V 0dB / 0.8V 0dB 1.2V 0dB / 0.4V 3.5dB / 0.6V 3.5dB Display Port Fixed Voltage Swing 0.8V 3.5dB/ 0.4V 6dB / 0.6V 6dB / 0.4V 5dB 4.5.4 Watchdog Configuration submenu Menu Item Options Description Watchdog Enabled / Disabled Enable / Disable Watchdog. System Reset Power Button 1s Power Button 4s (Shutdown) This submenu is available only when “Watchdog” is set to Enabled. Specifies the action that must be performed when Watchdog timeout occurs. With System Reset, the module will reset itself With “Power Button 1s”, the system will simulate the pressure for 1 sec. of Power button, which will lead the O.S. to close all his tasks then shutdown. With “Power Button 1s”, the system will simulate the pressure for 1 sec. of Power button, which will lead to the immediate shutdown of the module Delay To Start (sec.) 0 ÷ 600 This submenu is available only when “Watchdog” is set to Enabled. This menu item specifies the seconds of delay, after system power up, before the watchdog timout starts counting Timout (sec.) 0 ÷ 600 This submenu is available only when “Watchdog” is set to Enabled. This menu item specifies the seconds of delay before the watchdog timout Watchdog Action SECOpITX-GX SECOpITX-GX User Manual - Rev. First Edition: 1.0 - Last Edition: 1.3 - Author: S.B. - Reviewed by G.G Copyright © 2015 SECO S.r.l. 51 4.6 Boot menu Menu Item Options Description Boot type Dual boot Type Legacy Boot Type UEFI Boot Type Allows to select if the OS must be booted using Legacy Boot Mode, UEFI Boot mode or indifferently using both modalities (depending on the OS) Quick Boot Enabled / Disabled Skip certain tests while booting. This will decrease the time needed to boot the system. Quiet Boot Enabled / Disabled Disables or enables booting in Text Mode. Network Stack Enabled / Disabled This submenu is available only when “Boot Type” is set to “UEFI Boot type” or “Dual Boot type”. When enabled, this option will make available the following Network Stack services: Windows 8 BitLocker Unlock UEFI IPv4/IPv6 PXE Legacy PXE OpROM PXE Boot Capability Disabled UEFI: IPv4 UEFI: IPv6 UEFI: IPv4/IPv6 Legacy This submenu is available only when “Network Stack” is Enabled Specifies the PXE (Preboot Execution Environment) Boot possibilities. When Disabled, Network Stack is supported For UEFI, it is possible to support IPv4, IPv6 or both of them In Legacy mode, only Legacy PXE OpROM is supported PXE Boot to LAN Enabled / Disabled This submenu is available only when “Boot Type” is set to “Legacy Boot type”. Disables or enables the possibility for the PXE to perform the boot from LAN. Add Boot options First / Last / Auto Specifies the position in Boot Order for Shell, Network and Removable Disks ACPI selection Acpi1.0B / Acpi3.0 / Acpi4.0 / Using this menu item is possible to select to which specifications release the ACPI tables must be Acpi5.0 compliant. USB Boot Enabled / Disabled Disables or enables booting from USB boot devices. EFI Device First Enabled / Disabled Determine if boot must happen first through EFI devices or through legacy devices. When enabled, it will happen first from EFI devices. When disabled, it will happen first from Legacy devices. Windows® 8 Fast Boot Enabled / Disabled This submenu is available only when “Boot Type” is set to UEFI Boot Type. If enabled, the system firmware does not initialize keyboard and check for firmware menu key. SECOpITX-GX SECOpITX-GX User Manual - Rev. First Edition: 1.0 - Last Edition: 1.3 - Author: S.B. - Reviewed by G.G Copyright © 2015 SECO S.r.l. 52 USB Hot Key Support Enabled / Disabled This submenu is available only when “Boot Type” is set to UEFI Boot Type and “Windows® 8 Fast Boot” is Enabled. Enable or disable the support for USB HotKeys while booting. This will decrease the time needed to boot the system Timeout 0 ÷ 300 The number of seconds that the firmware will wait before booting the original default boot selection. Automatic Failover Enabled / Disabled When this item is enabled, if boot from the default device fails, then the system will attempt directly to boot from the next device on the Boot devices list When this item is disabled, in case of failure from booting from the first boot device, then a Warning Message will pop up and subsequently enter into Firmware UI. EFI See Submenu This submenu is available only when “Boot Type” is not set to “Legacy Boot type”. Entering the submenu, will show a list of EFI boot devices. Use F5 and F6 key to change order for boot priority. Legacy See Submenu This submenu is available only when “Boot Type” is not set to “UEFI Boot type”. Menu Item Options Description Boot Menu Normal / Advance When set to Normal, this submenu will allow configuring all possible options for Legacy boot. When set to Advance, it will be possible to configure Boot Order only for bootable devices found in the system Boot Type Order Floppy Drive / Hard Disk Drive CD/DVD-ROM Drive / USB / Others This voice will be selectable only when “Boot menu” is set to “Normal”. The list shown under this item will allows selecting the boot from different devices. Use the + and - Keys to change the boot order priority Hard Disk Drive List of HD Drives found connected This voice will be selectable only when “Boot menu” is set to “Normal” and if there are HD drives connected. The list shown under this item will show different Disk drives found connected to the module, therefore changing the boot priority for them. Use the + and - Keys to change the boot order priority USB List of HD Drives found connected This voice will be selectable only with “Boot menu” set to “Normal” and if there are USB disks connected. The list shown under this item will show different USB disks found connected to the module, therefore changing the boot priority for them. Use the + and - Keys to change the boot order priority 4.6.1 Legacy submenu SECOpITX-GX SECOpITX-GX User Manual - Rev. First Edition: 1.0 - Last Edition: 1.3 - Author: S.B. - Reviewed by G.G Copyright © 2015 SECO S.r.l. 53 4.7 Exit menu Menu Item Options Description Exit Saving Changes Exit system setup after saving the changes. F10 key can be used for this operation. Save Change Without Exit Save all changes made, but doesn’t exit from setup utility. Exit Discarding Changes Exit system setup without saving any changes. ESC key can be used for this operation. Load Optimal Defaults Load Optimal Default values for all the setup items. F9 key can be used for this operation. Load Custom Defaults Load Custom Default values for all the setup items. Save Custom Defaults Save Custom Default values for all the setup items. Discard Changes Discard all the changes made SECOpITX-GX SECOpITX-GX User Manual - Rev. First Edition: 1.0 - Last Edition: 1.3 - Author: S.B. - Reviewed by G.G Copyright © 2015 SECO S.r.l. 54 Chapter 5. Thermal Design Accessories SECOpITX-GX SECOpITX-GX User Manual - Rev. First Edition: 1.0 - Last Edition: 1.3 - Author: S.B. - Reviewed by G.G Copyright © 2015 SECO S.r.l. 55 5.1 Thermal Design A parameter that has to be kept in very high consideration is the thermal design of your system. Highly integrated modules, like SECOpITX-GX board, offer to the user very good performances in minimal spaces, therefore allowing the system’s minimization. On the counterpart, the miniaturizing of IC’s and the rise of operative frequencies of processors lead to the generation of a big amount of heat, that must be dissipated to prevent system hang-off or faults. The board can be used along with specific heatspreaders, but please remember that they will act only as thermal coupling device between the board itself and an external dissipating surface/cooler. The heatspreader also needs to be thermally coupled to all the heat generating surfaces using a thermal gap pad, which will optimize the heat exchange between the module and the heatspreader. The heatspreader is not intended to be a cooling system by itself, but only as means for transferring heat to another surface/cooler, like heatsinks, fans, heat pipes and so on. When using SECOpITX-GX boards, it is necessary to consider carefully the heat generated by the module in the assembled final system, and the scenario of utilization. Until the board is used on a laboratory shelf, on free air, just for software development and system tuning, then a heatsink with integrated fan could be sufficient for board’s cooling. Anyhow, please remember that all depends also on the workload of the processor. Heavy computational tasks will generate much heat with all SOCs versions. Therefore, it is always necessary that the customer studies and develops accurately the cooling solution for his system, by evaluating processor’s workload, utilization scenarios, the enclosures of the system, the air flow and so on. SECO can provide SECOpITX-GX specific heatspreaders, passive heatsinks and heatsinks with fan, but please remember that their use must be evaluated accurately inside the final system, and that they should be used only as a part of a more comprehensive ad-hoc cooling solutions. The customer shall always ensure that the heatspreader/heatsink surface temperature remains in the range 0 ÷ 60 °C. Ordering Code Description S992-DISS-1 SECOpITX-GX Heatspreader Kit S992-DISS-2 SECOpITX-GX Heatsink Kit S992-DISS-3 SECOpITX-GX Heatsink with integrated FAN Kit SECOpITX-GX SECOpITX-GX User Manual - Rev. First Edition: 1.0 - Last Edition: 1.3 - Author: S.B. - Reviewed by G.G Copyright © 2015 SECO S.r.l. 56 5.2 Accessories SECO can offer various accessories in completion of SECOpITX-GX functionalities 5.2.1 Accessories kit CABKIT992 This accessories kit includes the following items 2 x Dual USB 2.0 Type A adapters with standard PC mounting plate. Can be used to carry out the signals of internal USB ports #2-#3 and #4-#5 to standard USB 2.0 Type A receptacles Front Panel I/O board V995, which allows the integration on a panel of an optional enclosure of two Audio jacks (Earphone and Mic in), Reset Button, Power button and two LED (for SATA activity and Power Status of the board itself). For fixing of the front panel I/O board to the external enclosure’s panel, the module is equipped with two brackets and screws for the fixing of the brackets to the module. Cables for connection of the Front Panel I/O board to SECOpITX-GX board. Connection cable CV-837/30 is needed for audio functionalities; it has to be connected to SECOpITX-GX board’s connector CN19 and to V995 module’s connector CN2. Connection cable CV-836/30 is needed for connection of power and reset pushbuttons and SATA / power LEDs; it has to be connected to SECOpITX-GX board’s connector CN4 and to V995 module’s connector CN1. SATA power cable, for connection of power rails of external SATA disks / SSDs to internal SATA power connector CN15. 5.2.2 VGA Adapter module M908 Due to the reduced space available, on SECOpITX-GX board the VGA interface is not available through a standard DB-15 HD connector, which is commonly used for connection of common VGA monitors. Instead, this interface is available through a FFC/FPC connector. SECO can offer an optional VGA adapter module, ordering code M908, which can be used for the connection of standard VGA displays. The Adapter module is equipped directly with a 20cm long FFC cable for its connection to SECOpITX-GX board’s connector CN1. DB-15 HD CRT connector is VESA VGA DDC2 compliant. SECOpITX-GX SECOpITX-GX User Manual - Rev. First Edition: 1.0 - Last Edition: 1.3 - Author: S.B. - Reviewed by G.G Copyright © 2015 SECO S.r.l. 57 5.2.3 USB-to-Serial port converter modules This optional module has been designed to convert one of the internal USB ports (available on connectors CN16 and CN17) into a serial port, which can be of RS-232, RS-422 or RS-485 type. Depending on the type of serial port needed, different module configurations are available; moreover, the output of the module can be available on standard DB-9 male connector or on RJ-45 sockets. All modules type mounts an FTDI FT232R USB-to-Serial UART interface IC; RS-232 converter module then mounts a Serial Port RS-232 Transceiver with 15kV ESD protection. Instead, the other converters mount and RS-485/RS-422 transceiver. Modules with DB-9 connector Pin Signal RS-232 Signal RS-422 converter converter Modules with RJ-45 socket Signal RS-485 converter Pin Signal RS-232 converter Signal RS-422 converter Signal RS-485 converter 1 DCD# N.C. N.C. 1 DTR# N.C. N.C. 2 RX RX- N.C. 2 CTS# RX+ N.C. 3 TX TX- RX- / TX- 3 N.C. N.C. N.C. 4 DTR# N.C. N.C. 4 RX RX- N.C. 5 GND GND GND 5 N.C. N.C. N.C. 6 DSR# N.C. N.C. 6 TX TX- RX- / TX- 7 RTS# TX+ RX+ / TX+ 7 GND GND GND 8 CTS# RX+ N.C. 8 RTS# TX+ RX+ / TX+ 9 RI# N.C N.C. Ordering Code Description VA13-0000-1100-C0 USB to RS232 serial port converter with DB9 connector VA13-0000-1200-C0 USB to RS422 serial port converter with DB9 connector VA13-0000-1300-C0 USB to RS485 serial port converter with DB9 connector VA13-0000-2100-C0 USB to RS232 serial port converter with RJ-45 connector VA13-0000-2200-C0 USB to RS422 serial port converter with RJ-45 connector VA13-0000-2300-C0 USB to RS485 serial port converter with RJ-45 connector SECOpITX-GX SECOpITX-GX User Manual - Rev. First Edition: 1.0 - Last Edition: 1.3 - Author: S.B. - Reviewed by G.G Copyright © 2015 SECO S.r.l. In the table on the left are shown the pinout of DB-9 connector and of RJ-45 socket for all kind of modules. 120Ω termination resistors on differential pairs are available both on RS-422 and on RS-485 modules. 58 SECO Srl - Via Calamandrei 91 52100 Arezzo - ITALY Ph: +39 0575 26979 - Fax: +39 0575 350210 www.seco.com SECOpITX-GX SECOpITX-GX User Manual - Rev. First Edition: 1.0 - Last Edition: 1.3 - Author: S.B. - Reviewed by G.G Copyright © 2015 SECO S.r.l. 59