1
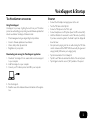
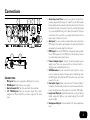
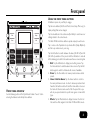
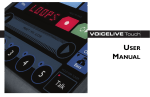
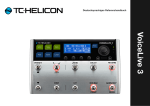
INPUT
Edit
Setup
Store
Mix
Home
Loop
Hold for Genre
Effects
Voices
Tap
Hit
Hold for Talk
Quick Guide
Important Safety Instructions
Important
safety instructions
Read these instructions.
Keep these instructions.
Heed all warnings.
Follow all instructions.
Do not use this apparatus near water.
Clean only with dry cloth.
Do not block any ventilation openings.
Install in accordance with the manufacturer’s instructions.
Do not install near heat sources such as radiators, heat registers,
stoves, or other apparatus (including amplifiers) that produce heat.
10. Only use attachments/accessories specified by the manufacturer.
11. Refer all servicing to qualified service personnel. Servicing is required
when the apparatus has been damaged in any way, such as powersupply cord or plug is damaged, liquid has been spilled or objects
have fallen into the apparatus, the apparatus has been exposed to
rain or moisture, does not operate normally, or has been dropped.
Caution
You are cautioned that any change or modifications not expressly approved in this manual could void your warranty.
Warning!
• To reduce the risk of fire or electrical shock, do not expose this
equipment to dripping or splashing and ensure that no objects filled
with liquids, such as vases, are placed on the equipment.
• Do not install in a confined space.
• Reorient or relocate the receiving antenna.
• Increase the separation between the equipment and the receiver.
• Connect the equipment to an outlet on a circuit different from the
one to which the receiver is connected.
• Consult the dealer or an experienced radio/TV technician for help.
Service
• All service must be performed by qualified personnel.
For the customers in Canada:
This Class B digital apparatus complies with Canadian ICES-003.
1.
2.
3.
4.
5.
6.
7.
8.
9.
EMC/EMI
This equipment has been tested and found to comply with the limits for
a Class B Digital device, pursuant to part 15 of the FCC rules.
These limits are designed to provide reasonable protection against
harmful interference in residential installations. This equipment generates, uses and can radiate radio frequency energy and – if not installed
and used in accordance with the instructions – may cause harmful interference to radio communications. However, there is no guarantee that
interference will not occur in a particular installation. If this equipment
does cause harmful interference to radio or television reception – which
can be determined by turning the equipment off and on –, the user is
encouraged to try correcting the interference by one or more of the
following measures:
Cet appareil numérique de la classe B est conforme à la norme NMB003 du Canada.
Table of contents
About
this Quick Guide
This is version 1.0 of the VoiceLive Touch 2 Quick Guide.
This Quick Guide is intended to help you learn the basic functions
of VoiceLive Touch 2. The full user manual is available only as a PDF
download from the TC-Helicon website.
To get the most from this guide, please read it from start to finish, or you
may miss an important piece of information. Once you’ve connected
external equipment (mic, PA etc.) as described in the “Connections”
section, all subsequent sections assume you are correctly connected and
familiar with the previous sections.
To download the full user manual and to view the product warranty,
visit www.tc-helicon.com/support and select your product from the
drop-down menu.
Before
you get started
Download VoiceSupport
To install the latest firmware on your device and see tips and tricks, and
videos for your product, please download and install the VoiceSupport
software from www.tc-helicon.com/voicesupport to your computer.
VoiceSupport is available for Microsoft Windows and Mac OS X.
Register your product
To register your product using the VoiceSupport software, launch
VoiceSupport and click on the ACCOUNT button.
Table
of contents
Mounting to a mic stand. . . . . . . . . . . . . . . . . . . . . . . . . . . . . . . . . . . . . . . 1
The VoiceSupport application. . . . . . . . . . . . . . . . . . . . . . . . . . . . . . . . . . . 2
Startup. . . . . . . . . . . . . . . . . . . . . . . . . . . . . . . . . . . . . . . . . . . . . . . . . . . . . . 2
Connections. . . . . . . . . . . . . . . . . . . . . . . . . . . . . . . . . . . . . . . . . . . . . . . . . . 3
Front panel overview. . . . . . . . . . . . . . . . . . . . . . . . . . . . . . . . . . . . . . . . . . 4
Using the front panel buttons. . . . . . . . . . . . . . . . . . . . . . . . . . . . . . . . . . . 4
Using the Slider FX Bar. . . . . . . . . . . . . . . . . . . . . . . . . . . . . . . . . . . . . . . . 5
Using the arrow buttons. . . . . . . . . . . . . . . . . . . . . . . . . . . . . . . . . . . . . . . 6
Using the Matrix. . . . . . . . . . . . . . . . . . . . . . . . . . . . . . . . . . . . . . . . . . . . . . 6
Selecting and auditioning presets. . . . . . . . . . . . . . . . . . . . . . . . . . . . . . . . 6
Working with Favorites. . . . . . . . . . . . . . . . . . . . . . . . . . . . . . . . . . . . . . . . 6
Effects and Voices. . . . . . . . . . . . . . . . . . . . . . . . . . . . . . . . . . . . . . . . . . . . . 7
The Effects button. . . . . . . . . . . . . . . . . . . . . . . . . . . . . . . . . . . . . . . . . . . . 7
The Voices button. . . . . . . . . . . . . . . . . . . . . . . . . . . . . . . . . . . . . . . . . . . . . 7
Editing a preset. . . . . . . . . . . . . . . . . . . . . . . . . . . . . . . . . . . . . . . . . . . . . . . 7
Using the Harmony and Hardtune effects. . . . . . . . . . . . . . . . . . . . . . . . . 8
Looping. . . . . . . . . . . . . . . . . . . . . . . . . . . . . . . . . . . . . . . . . . . . . . . . . . . . . . 9
Advanced loop function tutorial. . . . . . . . . . . . . . . . . . . . . . . . . . . . . . . . . 9
Slider FX Bar effects. . . . . . . . . . . . . . . . . . . . . . . . . . . . . . . . . . . . . . . . . . 10
Guitar effects. . . . . . . . . . . . . . . . . . . . . . . . . . . . . . . . . . . . . . . . . . . . . . . . 11
Optional accessories. . . . . . . . . . . . . . . . . . . . . . . . . . . . . . . . . . . . . . . . . . 11
Troubleshooting. . . . . . . . . . . . . . . . . . . . . . . . . . . . . . . . . . . . . . . . . . . . . . 12
Specifications. . . . . . . . . . . . . . . . . . . . . . . . . . . . . . . . . . . . . . . . . . . . . . . . 14
Mounting to a mic stand
Mounting
to a mic stand
Mic stand setup
1. With no cables attached to the product, grasp it on both sides so
the printed top faces you and is approximately level.
2. Slide VoiceLive Touch 2 to the left so that the upper shaft of your
mic stand is captured by the lower slot on the product (see Figure 1).
3. Slowly but firmly lower the front of the product so the serrated
slot fully captures the mic stand shaft (see Figure 2). You’ll feel initial
resistance, then the shaft should snap in and seat tightly.
Removal is the reverse: Lift the front of the product so it snaps free of
the mic stand shaft, then slide to the right to remove it from the stand.
Note that the diameter oft the mic stand should not exceed 16.5 mm.
Cabling
The horizontal mounting slot on VoiceLive Touch 2 is also used to collect your cables. As shown in the graphic below, cables can be threaded
through the slot. Use the provided cable wrap to tie your cables neatly
to your mic stand.
1
VoiceSupport & Startup
The VoiceSupport
application
Using VoiceSupport
VoiceSupport is your way of getting the most from your TC-Helicon
product, as well as letting your product grow with firmware updates that
include new features. VoiceSupport features include:
•
•
•
•
Preset management using an elegant drag & drop interface
Access to firmware updates and new features
Videos, artist profiles, tips and tricks
Registration of your product.
Downloading and running the VoiceSupport application
1. Download VoiceSupport from www.tc-helicon.com/voicesupport
to your computer.
2. Install VoiceSupport on your computer.
3. Connect your TC-Helicon product via USB to your computer.
Startup
•
•
•
•
•
•
•
•
•
Connect the AC adaptor and apply power to the unit.
Turn the Mic Gain control fully left.
Connect a Microphone to the Mic In jack.
Connect headphones or a PA system (lower the PA’s volume first!).
Hold the Hit button for a moment to enter Talk mode (no effects).
If you have connected a guitar to the Guitar In jack, the display will
show the tuner.
Set input level by singing into the mic while turning the Mic Gain
control clockwise until the INPUT LEDs show mostly the green and
orange (middle) LEDs when you’re singing loudly.
Tap the Home button if it isn’t already lit.
Tap Hit to exit Talk mode and hear the effects of the current preset.
Tap Hit again to hear the second (“Hit”) variation of the preset.
4. Run VoiceSupport.
5. Read the news, click on tabs and browse the features of the application.
2
Connections
3
6
4
1
7
8
5
2
10
9
11
Connections
1.
2.
3.
4.
12
Mic Input: Balanced, low impedance XLR input for your mic.
XLR Output: Will produce a mono signal.
Guitar Ground Lift: Tap this to assist with hum reduction.
1/4” TRS Outputs: These are the main outputs. They can be
configured for Mono, Dual Mono or Stereo output in the Setup
menu.
5. Guitar Input and Thru: Connect your guitar to the high Z (impedance) In jack directly using a 1/4” cable. If you use effect pedals,
these pedals should be connected after VoiceLive Touch 2. Connect
the Guitar Thru jack on VoiceLive Touch 2 to your first effect pedal
or to your amplifier/PA using a 1/4” cable. If you leave the Thru jack
unconnected, the sound from your guitar will be mixed into the
main output of VoiceLive Touch 2.
6. Aux Input: You can connect an external stereo device (such as an
MP3 player) to this jack to add its signal to the main mix. No effects
are applied to the audio signal from this input.
7. MIDI Input: Connect the MIDI Out of a keyboard, audio workstation or MIDI sequencer to the MIDI input of the VoiceLive Touch 2
to control harmony and select presets.
8. Power Adaptor Input: Connect the factory-supplied power
adaptor here. There is no power switch on VoiceLive Touch 2 –
applying power automatically turns it on.
9. USB Connector: You can connect VoiceLive Touch 2 to a computer to update the device’s firmware and for transferring audio
and MIDI signals. Note that the USB connection does not provide
power for the unit.
10. Footswitch Input: Allows connection of a TC-Helicon Switch 3
footswitch. This footswitch can be set to control several useful functions in the Setup menu. This requires a 3 conductor (TRS) cable.
11. Input Level Control: Adjust this knob while you sing so that the
middle, orange LED lights on your loudest singing. The red LED
should not light.
12. Headphone Output: Connect standard 1/8” stereo headphones
here.
3
Front panel
Using
the front panel buttons
All buttons require only a soft tap to engage.
Tap the mode buttons (Edit, Store, Effects, Voices, Setup, Mix, Loop) to
display settings that can be changed.
INPUT
1
Edit
Setup
7
Tap the nine buttons in the center area (the Matrix) to select menus or
settings related to the current mode.
2
Store
Mix
8
The Slider FX Bar and Arrow buttons operate uniquely in each mode.
Home
Loop
9
Tap ¼ notes on the Tap button to sync timed effects (Delay, Rhythmic)
and the Loop metronome to your song.
10
Tap the Hit button to switch between the base (Hit LED off) and Hit
(Hit LED on) variations of the preset. Hold the Hit button to mute all
effects, allowing you to talk to the audience and tune a connected guitar.
3
Hold for Genre
4
Effects
5
Voices
6
Tap
12
13
14
Front
Hit
Hold for Talk
11
15
panel overview
See the following sections of this Quick Guide for basic “how to” tutorials using the features controlled by these buttons.
1. Edit: Tap the Edit button to display preset editing screens. Tap
the Arrow buttons to switch between these screens. Tap the Edit
button again to switch to Advanced edit screens, if available.
2. Store: Tap the Store button to rename presets and save edited
presets.
3. Home / Hold for Genre: Tap the Home button to return to
the main performance mode. In order to browse presets and load
Favorites, this button must be lit. Hold the Home button to access
the Genre list. Genres can be used to filter the preset list so you
will only see presets related to specific music genres or main effect
types.
4. Effects: Tap the Effects button to display VoiceLive Touch 2’s effects and the effect assigned to the Slider FX Bar in Effects mode.
4
Front panel
5. Voices: Tap the Voices button to display the Harmony voice
intervals for the current preset and the HARMONY LEVEL Slider
FX assignment. To hear the voices created by the VoiceLive
Touch 2, the HARM (Harmony) effect must be active.
6. Tap: Tap this button rhythmically to set the global tempo for the
Delay effects, the Rhythm effects and the Loop metronome.
7. Setup: Tap the Setup button to adjust global settings such as
stereo/mono output mode, MIDI channel etc. and to enable microphone phantom power (by setting Input to “Condenser”).
8. Mix: Tap the Mix button to display the global audio levels. Tap
the Mix button again to switch between the two menu pages.
Individual effects levels within presets are not adjusted here – this is
done in the Edit menus.
9. Loop: Tap the Loop button to display the loop options and the
effect assigned to the Slider FX Bar in Loops mode. Tap again to
display the advanced loop menu.
10. Play & Record: These are the Loop transport controls that are
active in all modes.
11. Hit / Hold for talk: Tap the Hit button to activate one or multiple effects in a preset with a single tap. To see what effects are
used when Hit is on or off, tap the Effects button, then tap the Hit
button a couple of times. To edit the effects status for each state
(Hit on / Hit off), tap the respective Matrix buttons.
Using
the
Slider FX Bar
Using the Slider FX Bar: swiping
A quick flick along the Slider FX Bar (13) will start it freewheeling through
the parameter values or presets. A single tap during freewheeling will
stop scrolling.
Using the Slider FX Bar: dragging and tapping
Moving your finger along the Slider FX Bar slowly without releasing is
useful for a small range of values. You can also tap just to the left or right
of the center to increment or decrement by one value.
For descriptions of (12) to (15), please see the following sections.
5
Working with Presets and Favorites
• In Home mode (when the Home button is selected/lit), the Slider
FX Bar will scroll through presets.
• In Effects, Voices and Loop mode menus, the Slider FX Bar can be
used to control the effect shown at the bottom of the menu.
• When editable parameters are displayed, the Slider FX Bar will
change the value of the currently selected (highlighted) parameter.
Using
the arrow buttons
• In Home mode, press the Arrow buttons (14 & 15) to load the next
or previous preset.
• In the Edit, Setup and Mix modes, press the Arrow buttons to select
the next or previous menu.
• In Store mode, press the Arrow buttons to move the cursor left or
right when naming a preset.
• In Edit and Setup modes, holding either arrow will jump to the first
or last menu respectively.
Using
the Matrix
When a mode button (Edit, Setup etc.) is lit, the Matrix buttons (12)
correspond to settings shown in the display that can be edited, or to
menus for deeper editing.
When the Home button is lit, no selections are shown in the display,
but pressing the Matrix buttons will jump to Favorite locations (see
“Working with Favorites”).
Selecting
and auditioning presets
Ensure the Home button is lit. Home is the main operational mode. You
can always press the Home button (3) to exit any of the other menus.
• Tap the arrows on the Slider FX Bar to change presets.
• Sing to hear the presets.
• To scroll quickly, hold an Arrow button or swipe and release your
finger along the Slider FX Bar.
• Tap the Slider FX Bar to stop auto scrolling.
• If the preset has an echo or rhythmic effect, you can tap out the
tempo of your song with the Tap button.
• To hear the main and secondary effects programmed into the preset, tap Hit on and off in any preset.
Working
with Favorites
When the Home button is lit, pressing any Matrix button will jump
directly to the preset that has been assigned to that button. The Matrix
gives you nine Favorite locations where you can place the presets you
want to access quickly during a performance.
To make a preset a Favorite, simply select the preset using the Slider
FX Bar, hold the Favorite button in the Matrix that you want to assign
it to and tap Store.
6
Effects, Voices and basic editing
Effects
and Voices
Tap the Effects and Voices buttons to display menus where you can
modify the current preset. The parameters of each menu are assigned
to the positions of the nine Matrix buttons. These assignments are
shown in the display. You can always press the Home button to return
to preset selection / main operation mode.
The Effects
button
• Load a preset you like or load preset #1.
• Tap the Effects button to display the effect modules and their states
(light background = effect active; dark background = effect off).
• Sing as you tap any of the Matrix buttons to turn the other available
effects on and off.
• Sing as you slide your finger along the Slider FX Bar.
The Voices
button
• First, tap the Effects button and ensure that only the HARM Matrix
button is lit.
• Tap the Voices button.
• Sing as you tap on any of the Matrix buttons to hear up to 4 Harmony voices that are set to different intervals.
• Slide your finger along the Slider FX Bar to change the volume of
the Harmony voices.
Note that Harmony requires a musical reference from either:
a) guitar chords from a guitar connected to the Guitar In,
b) music from an MP3 player
c) chords from a MIDI keyboard connected to the MIDI in or
d)the key of your song (see Using Harmony below).
Tip: You can access additional settings for each voice by holding the
respective Voice buttons.
Editing
a preset
• Find a preset you like.
• Tap the Edit button once. This will present an edit menu for one of
the nine effects (e.g. “Reverb 3/9”).
• Tap the Matrix buttons to select a setting that you want to change
(e.g. “Style”). The selected setting will be highlighted.
• Swipe the Slider FX Bar to change the value of the selected setting.
• Tap the arrow buttons to browse edit menus for the other effects.
• Tap the Edit button again to enter an effect’s advanced menu with
additional settings. To return to basic editing mode, tap the Edit
button once more.
• Make changes and either store the edited preset by pressing the
Store button or discard your changes by pressing Home.
Tip: To jump directly to the edit menu of a specific effect, tap the Effects
button and hold the Matrix button assigned to that effect.
7
Harmony and Hardtune effects
Using
the Harmony and Hardtune effects
To make Harmony and Hardtune effects relate correctly to your music,
you’ll need a musical accompaniment – whether it’s an acoustic piano,
an electric guitar or an MP3 player.
With acoustic instruments – using Roomsense
The VoiceLive Touch 2’s Roomsense mics can pick up chords from
a nearby acoustic instrument and use them to guide Harmony and
Hardtune. Ensure your vocal mic is further from the Roomsense mics
than your instrument.
• Tap the Setup button and use the arrow buttons to locate the
INPUT menu.
• Use the Matrix buttons to select the ROOMSENSE setting.
• Use the Slider to change the value to AMBIENT/AUTO.
• Select a Harmony preset or enable the Harmony effect for the currently selected preset in the Effects menu.
• Sing while you play your instrument.
With electric instruments or a music player
• Connect a cable from a guitar, MIDI keyboard or MP3 player to the
respective input on VoiceLive Touch 2.
• Enable Harmony or Hardtune by either finding a preset that has it
or by enabling the Harmony effect for the currently selected preset
in the Effects menu.
• Sing while you play your instrument or MP3 player. The effect will
follow your music and sound musically correct. “NP” (NaturalPlay)
will show in the display as new chords are detected.
With acoustic instruments – setting a fixed key
• Find out the key of a song you’re singing.
• Locate the Harmony edit menu (4/9) by tapping the Edit button and
using the arrow buttons. Note the Hardtune key is set here as well.
• Select the AUTO KEY setting with the Matrix buttons.
• Set the song’s key with the Slider FX Bar. Note this defaults to major
scale, so “C” equals C major.
• To change to a minor scale, tap the Edit button to enter the advanced menu for Harmony and change the SCALE setting.
8
Setup
Mix
Looping
Looping
Basic looping
Loop in Home mode
• Find a preset you like.
INPUT
• To start recording,
tap the Record button on the downbeat of a
rhythmic singing performance.
Setup
Mixrecording, tap Record again. You will immediately hear the
• To stop
loop you
Hitjust recorded.
Hold for Talk
• If you
want to set the loop point and continue recording immediately, tap the Play button instead. This will allow you to overdub
your first recording without any delay.
Loop
• To stop
and start loop playback, tap the Play button.
• To erase your loop, hold the Record button while playback/recording is stopped.
Advanced looping in Loop mode
Hit additional looping functions by tapping the Loop button:
You can access
Hold for Talk
• LoopAssist (Metronome and quantization functions)
• Loop layering (up to 6 independent layers)
• Loop effects controlled by the Slider FX Bar
• Erase, Undo etc.
Advanced
loop function tutorial
• Tap the Loop button once or twice to display the loop functions
menu (Erase, Clear etc).
• Tap the Matrix button associated to MET: so it shows “MET:ON.”
You will hear the metronome.
• Use the Tap button to adjust the tempo if needed.
• Record a loop, tapping the Record and Play buttons as close as
possible to the Metronome tempo. Your button taps are corrected
to help you make better, more rhythmic loops.
• Set MET to SHH (quantized Rec/Loop but metronome sound
muted) or OFF (no Assist, muted metronome sound) if you prefer.
Otherwise leave it on.
• Tap the Loop mode button to switch to the loop selection menu
(showing the “Select”, “Mute” and “Shots” labels). As you see, this
menu gives you access to six loop slots (“Loop1” to “Loop6”).
• Ensure SELECT is highlighted before tapping an open loop slot.
• Record additional loop layers in each of the slots. Slots can be selected and new loops recorded while Record is enabled. This helps
you build loops quickly.
• Select MUTE and tap the Matrix buttons corresponding to the six
loop layers to mute and unmute them.
• Select SHOTS to solo and play one layer at a time.
9
Slider FX Bar effects
Slider FX Bar
effects
Using the Slider FX Bar effects
In Effects and Loop modes, the Slider FX Bar can be used to control
an effect. The name of the effect is shown at the bottom of the display.
Slide your finger, drag and stop or tap at any point to experiment with
the current effect.
Assigning effects to the Slider FX Bar
There are a number of different Slider effect assignments available in the
Effects and Loop modes.
While recording or playing loops, you can change most sound-related
settings. E.g., you can…
•
•
•
•
•
switch to Home mode and change presets
switch to Effects mode and turn effects on or off
activate Hit mode
change Harmony voices
switch to Mix mode and adjust the mix.
Experiment with combinations of loop layers and sounds. For example,
you could use one slot to record a basic rhythm with some “Lo-Fi”
Transducer effects and record song sections with classic vocal effects to
other loop slots that you can select and mute as required.
To change the Slider effect, hold the respective mode button (Effects or
Loop) and then, while still holding the mode button, tap either arrow
button. Continue tapping to see and try all available options.
Effect action (Effects mode only)
In Effects mode, you can choose between four different effect actions
that determine how your finger’s position on the Slider FX Bar changes
the effect assigned to the Slider. The arrows to the left and the right of
the Slider FX Bar effect name (e.g. > DUAL FILTER <) show which effect action is set. To try out other effect actions, hold the Effects button,
then tap near the middle of the Slider FX Bar. The arrows shown in the
display will change direction. Continue tapping to see and try all of the
options available for the selected effect.
10
Guitar effects & optional accessories
Guitar
effects
Accessing the guitar effects
If you have connected a guitar to the GUITAR IN, subtle Reverb and
Chorus effects are applied to the guitar signal by default. Compression
and EQ are also available for the guitar input. These are global settings,
they will not change per preset. Changes made in the Setup menu are
automatically stored.
Changing the guitar effects
• Enter the Setup menu.
• Use the Arrows to locate the GUITAR 3/10 and GUITAR 4/10
menus.
• Select effect settings using the Matrix.
• Modify the selected setting using the Slider FX Bar.
Optional
accessories
You can control VoiceLive Touch 2 remotely using the following optional accessories:
• TC-Helicon MP-75 microphone with Mic Control
• Sennheiser e 835 FX microphone with Mic Control
• TC-Helicon Switch 3 footswitch.
Using Mic Control
• Connect a microphone supporting Mic Control.
• Enter the Setup menu and set INPUT to MP-75 Mic. This enables
Mic Control and sets the default target of the mic switch to Hit on/
off.
• Tap Home and sing while you try different presets and control Hit
from the mic.
• Experiment with different Mic Control targets in the Setup menu.
This is a global setting, it will not change per preset.
11
Troubleshooting
Using the Switch 3 footswitch
• Connect the Switch 3 to the FOOTSWITCH jack.
• Tap each footswitch in turn to see what the default assignments are.
The default assignments of the footswitches are (from left to right):
• Switch 1: Preset Down
• Switch 2: Preset Up
• Switch 3: Hit on/off.
Experiment with the custom assignments for the footswitch in the
Switch 3 page of the Setup menu.
Troubleshooting
“Where can I find support for this product?”
Point your web browser to www.tc-helicon.com/support.
“Why am I hearing feedback?”
Move your vocal monitor so it faces the jack end of your mic. In the
Setup menu (1), set Tone Style to “Less Bright” or “Off”.
“The Harmony button is on in some presets – but there’s
no harmony.”
These are likely Notes mode presets. Connect a MIDI keyboard to
control Harmony or choose another preset.
“Why doesn’t my guitar change the harmonies correctly?”
• Check that the volume control on your guitar is up.
• Confirm your guitar cable is good by connecting your guitar directly
to your amp.
• Remove any guitar effect pedals between your guitar and VoiceLive
Touch 2’s input.
• Ensure that you are playing guitar chords made up of at least a root
note and a major or minor third.
• Check that in the Harmony Edit menu, KEY is set to “Auto”.
“My guitar is connected, but I can’t hear it. What’s wrong?”
• Tap the Talk button to exit Tuner mode.
• Check that the GUITAR level in the Mix menu is turned up.
“Can I use alternate tunings on my guitar?”
Alternate tunings e.g. drop D, DADGAD, etc. can be used. The most
important notes of your chord (as far as VoiceLive Touch 2 is con-
12
cerned) are the chord root and the third – so make sure these notes are
clearly voiced. Your guitar can be tuned to alternate tunings as long as
you are in tune with the onboard tuner.
“The loop won’t stop or start immediately.”
The Metronome is set to ON or SHH – which quantizes the transport
to beats. Set Metronome to OFF if you want full control over Loop
timing.
“Why can’t I cycle through the edit screens with the arrow
buttons?”
You may be in an advanced edit screen. Tap the Edit button to exit.
“I can’t see any voices when I tap the Voices button.”
In MIDI Notes mode presets, the Voices screen is not available as voices
are controlled via MIDI.
“I can’t hear harmony in Harmony presets.”
There is a selection of presets dedicated to MIDI keyboard players that
require MIDI input. Choose another preset.
“I can’t see the Tuner.”
Connect a guitar to the GUITAR IN to see the tuner display when in
Talk mode.
“I can’t see any INPUT indication when I sing into my mic.”
Make sure that…
• the INPUT setting in the Setup menu is set to CONDENSER MIC
if you need phantom power.
• the ROOMSENSE setting in the Setup menu is not set to VOICE
• the Input Level control knob is not set to minimum position.
“Tapping a tempo won’t change delay time.”
You have set Delay style to “Set Time” or “Classic Slap”. Choose a different Delay style (or another preset) and then tap your tempo.
Guitar performance tips
To ensure that the harmony voices follow your guitar playing closely, it’s
best to play as cleanly as you can. Also, at the beginning of your song,
it’s important to play a chord if you want to sing right on the downbeat.
Your guitar should be well-tuned to the onboard tuner or an external
one set to A=440 Hz. If the song section you want vocal harmony on
has fast chord changes, single note runs or very slow arpeggios, you can
use Scale mode to produce harmony.
Singing performance tips
The more in tune you sing, the better the harmonies will sound. There
is a slight amount of pitch correction on the harmony voices – but it’s
mostly up to you! Try to ensure that your amp or monitor is not facing
your mic directly as this can confuse VoiceLive Touch 2.
13
Specifications
Specifications
Analog inputs
Connectors: Mic: Balanced XLR, Guitar: 1/4” phone jack, Aux: 1/8”
stereo mini jack
Input Impedance: Balanced/Unbalanced Mic.: 3.08/1.54 kOhm
Mic Input Level @ 0 dBFS: -42 dBu to +4.2 dBu
EIN @ Max Mic Gain Rg = 150 Ohm: -127 dBu
Mic SNR: >100 dB at typical Mic Input gain
Guitar Input Impedance: 1 MOhm
Guitar Input Level @ 0 dBFS: -7 dBU to 17 dBu
Guitar Input SNR: >108 dB
Aux Input Level @ 0 dBFS: +2 dBu
A to D Conversion: 24 Bit, 128 x oversampling bitstream, 110 dB
SNR A-weighted
Analog outputs
Connectors, balanced: XLR (for mono) and 1/4” TRS phone jack
Output Impedance: Balanced/Unbalanced: 80/40 Ohm
Output Range: Line: +2 dBu
Dynamic Range: >109 dB, 20 Hz to 20 kHz
Frequency Response: +0/-0.3 dB, 20 Hz to 20 kHz
Headphone Out: 1/8” Mini stereo jack, 16 Ohm, +17 dBu max
(50 mW max)
D to A Conversion: 24 Bit, 128 x oversampling bitstream, 115 dB
SNR A-weighted
MIDI: In 5 Pin DIN
Pedal: 1/4” TRS phone jack
Power
External Power Supply: 100 to 240 VAC,
50 to 60 Hz (auto-select)
Power Consumption: <14 W
Safety
EMC: Complies with EN 55103-1 and EN 55103-2 FCC part 15,
Class B, CISPR 22, Class B
Safety: Certified to IEC 65, EN 60065, UL6500 and CSA IEC 65, EN
60065, UL6500 and CSA
Operating requirements
Operating Temperature: 32° F to 122° F (0° C to 50° C)
Storage Temperature: -22° F to 167° F (-30° C to 70° C)
Humidity max.: 90 % non-condensing
Size & weight
Dimensions: 9” x 4” x 7” (230 x 100 x 180)
Weight: 5 lb. (2.3 kg)
Warranty
See www.tc-helicon.com/support for warranty information.
Control
USB: USB-B (control, MIDI and audio I/O)
14