1
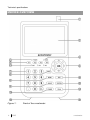
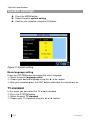
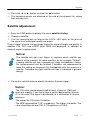
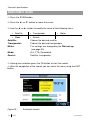
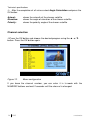
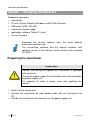
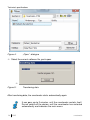
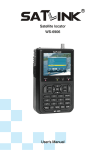
Digital
SatelliteMeter
User manual
Version: 06.10.2008
Index
Preface
Dear Customer,
thank you for buying the Smart digital satellite meter.
Please read this user manual carefully before using this device.
This operating manual will help you in the
• appropriate,
• safe and
• favourable
usage of the smartmeter.
We assume that the user of the smartmeter has overall knowledge regarding
the handling of audio and video equipment.
Each person who
• connects-up,
• operates,
• cleans or
• disposes of
this smartmeter must be familiar with the entire content of this operating
manual.
This device must be familiar with the entire content of this operating manual.
Always keep this operating manual in the proximity of the devise.
Please keep this instruction manual for consulting near by the device.
smart electronic GmbH
2
ENG
smartmeter
Description
Index
Preface ............................................................................................................. 2
Description....................................................................................................... 5
Safety instructions .......................................................................................... 5
Safety of persons .............................................................................................. 5
General information........................................................................................... 6
Appropriate Usage .......................................................................................... 7
Delivery range.................................................................................................. 7
Device overview .............................................................................................. 8
Start of operation .......................................................................................... 10
Battery ............................................................................................................. 10
Switch-on the Device ...................................................................................... 10
Lithium-ions-battery ..................................................................................... 11
Charging the battery........................................................................................ 11
Storing of the batteries .................................................................................... 11
System settings............................................................................................. 12
TV-standard..................................................................................................... 12
Timer ............................................................................................................... 13
Delete channels .............................................................................................. 13
Factory reset ................................................................................................... 14
Software Version ............................................................................................. 14
Factory reset.................................................................................................. 15
Satellite finding.............................................................................................. 16
Finding channels manual ................................................................................ 16
Satellite adjustement....................................................................................... 17
smartmeter
ENG
3
Index
Satellite setting.............................................................................................. 18
Dish set-up..................................................................................................... 20
Automatic scan ............................................................................................. 22
Angle calculation .......................................................................................... 23
Update / changing parameters..................................................................... 26
Preparing the smartmeter ............................................................................... 26
Executing update ............................................................................................ 27
Editing parameters .......................................................................................... 29
Cleaning ......................................................................................................... 32
Trouble shooting........................................................................................... 33
Disposal ......................................................................................................... 34
Technical specifications............................................................................... 35
Supplier .......................................................................................................... 37
Warrenty......................................................................................................... 37
Declaration of conformity............................................................................ 37
4
ENG
smartmeter
Description
Description
The smartmeter is a handy digital antenna measuring device for an quick
and easy alignment of satellite antennas. If a satellite is found, the smartmeter
shows it on the display and emits a audible signal. Signal strength and quality
are displayed as numerical values and bar graphs. Another measurement
value is the forward error correction (FEC) and the bit error rate (BER). In
addition, the picture quality can be revised on the high-resoluted 8.9-inch TFT
LCD screen. Many satellites are pre-programmed in order to an quick antenna
adjustment.
The scope of supply contains, among the charger, a USB cable which allows
you to update the smartmeter’s software.
A carrying case serves as protection and for the transport. It cares for better
readability of the display at sunshine.
Safety instructions
Attention!
Please read the safety instructions carefully before operating
the device.
Please follow all warnings and instructions on the equipment
and in the operating manual.
Safety of persons
Ensure that nobody can be hurt by falling tools or parts of the satellite
antenna during the adjustment and installation of the antenna. For your own
security use a rope on sloping roofs.
smartmeter
ENG
5
General information
General information
Attention!
The devise should only be operated with the supplied AC
adapter at the mains.
Do not open the meter or the included AC adapter. There is
danger of life through electric shock!
Wrong usage of the ports can lead to the destruction of the
measuring device.
Proceed carefully with the measuring device:
• Avoid low temperatures (below 0 °C) or to high humidity.
• The TFT display can be damaged by mechanical impacts.
• Avoid excessive input voltages. Please refer to the technical data
starting from page 35.
Do not operate with the device:
• if it has visible damage,
• if there are loose parts in the device,
• if the device was located outdoors or in damp rooms a extended period of
time.
6
ENG
smartmeter
Supplier
Appropriate Usage
The measuring device smartmeter was developed to measure signals of
digital satellite antennas and satellite systems. It is exclusively for this purpose
and should only be used for this purpose. Use the equipment only for the
purpose, which is described in this manual.
Follow all information in this manual, particularly the safety instructions on
page 5.
Any other usage is rated as not properly and can result in damage or even
injury.
There will be no liability for damages caused by a non-intended use.
Delivery range
Please check if the delivery is complete.
Included in delivery:
• device smartmeter,
• a carrying bag with sunshade,
• a PC connection cable with RS-232- and USB plug (Type A),
• a car adapter cable 12 V,
• an extern charger,
• an Euro-mains cable.
• an user manual,
• a CD-ROM including the Software for the smartmeter.
If the delivery should be incomplete, contact your specialist dealer or
smart electronic GmbH
Industriestraße 29
78112 St. Georgen
GERMANY
Service Hotline:
00 49 1805 / 93 52 11
Telefax:
00 49 7724 / 94 78 333
E-Mail:
[email protected]
smartmeter
ENG
7
Technical specifications
Device overview
Figure 1:
8
ENG
Front of the smartmeter
smartmeter
Supplier
No.
Decription
1
2
LNB-IN
LC-Dispay
3
POWERLED
4
5
LOCK-LED
FUNCTION
keys
5.1
6
6.1
7
8
9
10
11
12
13
14
15
16
22K/13V/18V
-LEDs
Navigationcross
OK - button
Numeric
keys
FIND-button
Menu-button
EXIT-button
ANGLEbutton
SYSTEMbutton
POWERbutton
SCAN-button
AC adapter
port
USB-Port
smartmeter
Digital satellite signal input
Display of the TV picture, the menu and the
measured values
Display of the energy state:
Operation:
red: the measuring device is switched on.
Off: the measuring device is switched off.
In charge:
Green: The battery is charged
Red: The battery is fully charged
LED lights when a signal is received.
F1: toggle the Display
F2: Mute
F3: Additional information about the current program
F4: switch between radio/TV mode
Lights if 22K/13V/18V signals are received
Navigation through menus,
switching programs ▲, ▼
volume control ◄, ►
OK button: confirmation of a selection
Direct enter of numbers
FIND menu: for a quick and easy alignment of a
satellite antenna
Display the main menu
Leave the current menu, cancel operation
Display the calculation menu
Configuration of all system parameter.
Display current software version.
Switch device on/off
Display the auto scan menu
Low volt port – for power supply connection
USB port for PC connection
ENG
9
Technical specifications
Start of operation
Battery
Before the first operation with the measuring device charge the battery
completely. (see also chapter “Lithium-Ion battery” on page 11).
Load the accumulator during the first loading procedure at least 5
hours.
The maximum battery charging time is approximately 12 hours.
Switch-on the Device
Press at least 2 seconds the red power button on the smartmeter.
Enter the registration code using the numeric keys.
You have to enter the registration code before the first
operation.
You can find the appropriate registration code at the back of
the measuring device.
Please contact your dealer in case of a missing registration code.
10
ENG
smartmeter
Supplier
Lithium-ions-battery
Explosion danger!
Never conntect the two poles (+ and -) with each other!
Attention!
Do not store or operate the accumulator above 40° C.
Do not burn or damage accumulator.
Avoid contact with water.
Charging the battery
The maximum battery charging time is approximately 12 hours..
A charging circuit in the measuring device provides an optimal charge of the
battery. The device is charged if it is switched off.
Turn the device off, if it is not already off.
Connect the Euro-main cable with the external AC adapter.
Connect the external AC adapter to the power grid.
Connect the AC adapter to the low-voltage port at the bottom.
The battery is charged as soon as you connect the AC adapter to the
smartmeter
The Power-LED shows the battery status:
• green: the battery is charged
• red: the battery is completely loaded
Storing of the batteries
Store the batteries between 0° Celsius and 40° Celsius.
Load the accumulator at a longer storage every two weeks to avoid a
depth discharge.
smartmeter
ENG
11
Technical specifications
System settings
Press the MENU button.
Select the point system setting.
Confirm your selection using the OK button.
Figure 2: System setting
Menu language setting
Press the SYSTEM button to change the menu language.
Select the point Language select.
Choose your desired language using the ◄- or ►- button.
After your selection press the EXIT button and follow the instructions on.
TV-standard
In this menu you can select the TV output standard.
Press the SYSTEM button.
Select the point TV standard.
Choose your TV standard using the ◄- or ►- button.
12
ENG
smartmeter
Supplier
You can choose between the following TV standards:
• PAL
• SECAM
• NTSC
• Auto
After completion of your selection press the EXIT button and follow the
instructions on the display.
Timer
Through this setting you can select the satellitemeter’s LCD shut off time.
Press the SYSTEM button.
Press the ◄- or ►- button to set the timer.
At least press the EXIT button and follow the instructions on the display.
Delete channels
You can delete single channels from your channel list in this menu.
Press the SYSTEM button to retriever the menu system settings.
Select the menu item delete channels
Select the channels you would like to delete. Press respectively the
OK button. Next to channels you would like to delete should
appear an “x”.
Press the EXIT button and obey to the instruction on the display.
smartmeter
ENG
13
Technical specifications
Factory reset
This menu item is described on page 15.
Software Version
Press the SYSTEM button.
At software version you can read the current software state of the
smartmeter.
How to update the software is described on page 26.
Note!
In the support area at http://www.smart-electronic.de , you have got
the option to download the topical software for the smartmeter.
14
ENG
smartmeter
Supplier
Factory reset
Figure 3:
Factory reset
In this menu item, you can put your equipment back to the delivery status.
Press the SYSTEM button to display the System setting menu.
Select the point factory reset.
Note the instructions on the display and confirm your selection with the OK
button or cancel it using the EXIT button.
Attention!
All programs and settings, configured by you, will be reset to
delivery status.
Note!
After reset to factory default you will have to enter the
registration code. You can find the appropriate registration
code at the back of the measuring device.
Please contact your dealer in case of a missing registration code.
smartmeter
ENG
15
Technical specifications
Satellite finding
In this menu you have the option to search for single channels or using the
display for lining a satellite dish up.
Press the SYSTEM button to display the System setting menu.
Satellite
identification
Signal strength
(in dBuV)
Figure 4: Satellite Finding
Finding channels manual
Press the FIND button to display the menu satellite finding.
Press the ◄- or ►- button to select a satellite.
Press the ▼- button to choose between the following points.
• LNB-type
• Low L.O.F.
• High L.O.F.
• Frequency
• Symbol rate
• Polarisation
Press the ◄- or ►- button to select a LNB type..
If you would like to enter a customised L.O.F. select the point
“customised” and enter the low L.O.F. and high L.O.F. frequency using
the NUMERIC buttons.
Enter the frequency using the NUMERIC buttons.
Enter the symbol rate using the NUMERIC buttons.
16
ENG
smartmeter
Supplier
Press the ◄- or ►- button to select the polarisation.
The located channels are attached at the end of the channel list, unless
they already exist.
Satellite adjustement
-> Press the FIND button to display the menu satellite finding.
Choose a satellite.
Turn the receiving dish as long as the LOCK- LED lights, or the joists of
the signal level and signal quality are green.
Once a signal is found, the bar graph shows the signal strength and quality. In
addition C/N, FEC and a.BER (after BER) are displayed. In addition an
acoustic signal is represented.
Notice!
The satellite call sign (see Figure 4) registers which satellite you
receive at the moment. At some satellites, as for example "Türksat",
a wrong satellite call sign is present on single transponders, hence,
the announcement can be falsified. Therefore, we recommend to
leave the setting on the preset first transponder with the search of a
satellite. Therefore the right satellite call sign is indicated in general
always.
Set up the satellite antenna exactly to receive the best signal.
Notice!
The C/N value should amount 6dB at least. Values of 10dB and
more are urgently if you like to have a certain bad weather reserve.
Or in the case if the signal is distributed via a multiswitch to several
receivers.
The higher the C/N value, the better.
The BER value behind “10E” is important. The higher, the better. The
value should be minimal 10E-4. The optimum is 10E-6.
smartmeter
ENG
17
Technical specifications
Satellite setting
Edit satellites
Press the MENU button to display the main menu.
Press the ▲- or ▼- button to move the cursor.
Select the point satellite setting and press the OK button
Figure 5::
Satellite setting
Select the point Edit satellites and press the OK button.
Figure 6:
Edit satellites
Press the ◄- or ►- button to switch between the satellites and transponder
list of the chosen satellite.
18
ENG
smartmeter
Supplier
Press the OK button to display the angle and position of the current
satellite.
Press the ►- button to switch to the transponder list.
Press the OK button. After that you can modify the frequency, polarisation
and the symbol rate.
To store your changes select save and press the OK button.
Figure 7:
smartmeter
Propertys of the selected satellite
ENG
19
Technical specifications
Dish set-up
Select the point Dish set-up and press the OK-button.
Figure 9:
Dish set-up
Press the ▲- or ▼- button to move to the desired item
Press the ◄- or ►- button to modify the value of the selected item. Use the
NUMERIC buttons if necessary.
• Satellite
• LNBType
• Low L.O.F.
• Hight L.O.F.
• 22K
• LNB
power
• DiSEqC-Level
• Switch inuput
• Motor
Satellite: Satellite selection
LNB-Type: UNIVERSAL, 5150, 9750, 10750, 11300, 10700, Customised
Low L.O.F.: Use the NUMERIC keys to input the Low L.O.F. The LNB Type
must be set to Customised.
Hight L.O.F.: Use the NUMERIC keys to input the High L.O.F. The LNB Type
must be set to Customised.
22K: AUTO, ON, OFF4
LNB power (LNB-Tension): Off, Auto, 13V, 18V
20
ENG
smartmeter
Supplier
DiSEqC-Level: - / DiSEqC 1.0
Switch Input: 1, 2, 3, 4
Motor: Fixed, DiSEqC 1.2, USALS
Press the F4 button to save the setting, or the EXIT button to store the
settings or to leave the menu. Follow the instructions on the display.
smartmeter
ENG
21
Technical specifications
Automatic scan
Press the SCAN-button.
Press the ▲- or ▼- button to move the cursor
Use the ◄- or ►- button to modify the value of the following items:
• Satellite
• Transponder
• Mode
• Search
Satellite:
Transponder:
Motor:
Mode:
Search:
• Motor
Choose the desired satellite
Choose the desired transponders
This settings are changed by the Dish set-up
(see page 20)
ALL, FTA, Scrambled
Satellite, transponder
Having your selection press the OK button to start the search.
After the completion of the search you can leave the menu using the EXIT
button.
Figure10:
22
ENG
Automatic search
smartmeter
Supplier
Angle calculation
Press the ANGLE button to display the calculation menu.
Press the ◄- or ►- button or use the NUMERIC keys to change the
configuration of the selected menu point.
Figure 11:
Angle Calculation
Press the ▲- or ▼- button to select the following points:
• Satellite
• Longitude
• Hemisphere
• Angle
calculation
Satellite:
Longtitude:
Location:
Latitude:
Hemisphere:
smartmeter
• Location
• Latitude
Select the desired satellite
Input your local longtitude
Input the direction
Input your local latitude
Input your local hemisphere
ENG
23
Technical specifications
After the completion of all values select Angle Calculation and press the
OK button.
Azimut:
Elevation:
Polarity:
shows the azimuth of the chosen satellite
shows the angle of elevation of the chosen satellite
shows the polarity angle of the chosen satellite
Channel selection
Press the OK button and choose the desired program using the ▲- or ▼button. Press the OK button again.
Figure 12:
Menu configuration
If you know the channel number, you can enter it in tv-mode with the
NUMERIC buttons and wait 2 seconds until the channel is changed.
24
ENG
smartmeter
Supplier
Channel information
Press the F3 button in the TV mode to get additional information about the
current channel.
Figure 13:
Additional Information
Use this menu to check the satellite name, channel name, the transponder
parameter or the signal strength etc.
System-Button
You can request current information or the software version of your device.
Note: This information is useful to check if there is a newer software available
version than the current version on your device.
smartmeter
ENG
25
Technical specifications
Update / changing parameters
Needed for operation:
• smartmeter
• PC with System Software Windows and RS-232-Interface
• USB cable (USB - RS-232)
• smartmeter-Power supply
• application software "MeterV1.2.exe"
• Current firmware
Download the current software from the smart website
www.smart-electronic.de.
The transmitting software and the original firmware with
software version of the delivery status contains the enclosed
CD-ROM.
Preparing the smartmeter
Attention!
Secure, that during the update the smartmeter is provided
with electricity.
During the update supply the smartmeter with electrical power
by power supply unit.
It’s important to make a factory reset after updating the
device.
Switch off the smartmeter.
Connect the smartmeter by zero modem cable with the interface of the
PC.
Provide the smartmeter with electricity via the power supply unit.
26
ENG
smartmeter
Supplier
• The connecting cable (USB – RS-232) is included in the
delivery range.
Executing update
Figure 2:
CD-ROM contents
Switch on the smartmeter. Wait until the "main menu" on the screen
smartmeter is indicated.
Load the transmitting software "MeterV1.2.exe".
Figure 3:
Sattelitemeterr –main menu
Select the serial interface on the PC the cable is connected. (COM1)
Push the button load software.
smartmeter
ENG
27
Technical specifications
Figure 4:
„Open“ -dialogue
Select the current software file, push open
Figure 5:
Transfering data
After transfering data, the smartmeter starts automatically again.
It can pass up to 2 minutes, until the smartmeter restarts itself.
Do not switch off the device, until the smartmeter has restarted
automatically and indicates the main menu.
28
ENG
smartmeter
Supplier
Now the smartmeter is up-to-date and can be reinstated, after a factory reset
was made.
Editing parameters
Select the right serial interface on the PC (COM1).
To change the parameters of the smartmeter, press read parameters to
save its current configuration.
Select a file name (e.g. data.bin) and wait until the process is completed.
Press edit parameters and choose the file which you have just selected
(in the example: data.bin).
Figure 5:
Edit parameter
Now you’ve got the option to delete, to edit, to add as well the transponder as
the satellite parameters.
smartmeter
ENG
29
Technical specifications
Adding satellites
Figure 6:
Adding satellites
To add a satellite, press Add SAT and give the satellite name and the
position. After the end of this process press apply.
Delete satellites
Choose the satellite which you would like to remove, and press delete SAT.
After the end of this process press apply.
Edit satellites
Doubleclick on the satellite which you would like to work on.
Additing transponders
To add a transponder, select a satellite. Press ADD TP. An empty transponder
is added.
30
ENG
smartmeter
Supplier
Now you can change the frequency, symbol rate and polarisation of the
transponder, while doubleclicking on the respective value. After the end of this
process press apply.
As soon as you are ready with the treatment, you can write these
parametres on the smartmeter. Press write parameters. After successful
transfer the measuring instrument will restart itself independently.
Attention!
Never switch off the smartmeter during the update processes.
Wait until the smartmeter independently restarts. This can
take up to 2 minutes.
Alternatively to „Sattelite Meter tools“ you can also use the
"SetEditsmartmeter" that you can find on the added CD-ROM
or download at:
http://www.setedit.de/SetEditsmartmeter_de.html
smartmeter
ENG
31
Technical specifications
Cleaning
Danger of electric shock!
There should be no liquid in the device. Never clean it with a
wet cloth. Pull all plugs before cleaning the device.
Attention!
Never use solvet-containing agents like benzene or similar.
Agents like these can damage the surface of the housing.
Pull all plugs from the device (USB-, antenna cable) before cleaning.
Clean the housing and the display using a soft, lint-free cloth. In case of
stronger dirt you can use a mild soap sud.
The keys can be cleaned using compressed air (max. 2 Bar). Do not use
any solvents.
Storing the Product
Unplug the device from the mains.
Unscrew the LNB cable from the device.
Pull all plugs out of the sockets.
Pack the device and all cables into the original carton.
Store the device and all accessories at a dry and dust-free location.
Protect the device from frost.
32
ENG
smartmeter
Supplier
Trouble shooting
Fault
phenomenon
Probabable reasons
Solutions
Device does not
react.
The battery is empty.
Charge the battery.
Bad picture , block
defect
The antenna is not
adjusted to the satellite.
Adjust the antenna.
The LNB is defect
No or only weak
signal.
No picture, no
sound.
Display/ Sounds turned off
Replace the LNB.
Please check all cable
connections.
Adjust the antenna.
Turn on the display by
pushing the F1 button.
Turn on the sound by
pushing the F2 or ► button.
If you cannot find out what is wrong with your device please contact your local
specialized dealer.
At www.smart-electronic.de you can find the area „Support“
and FAQ being provided in the topical problem solutions.
smartmeter
ENG
33
Technical specifications
Disposal
Attention!
Never throw the receiver and the batteries in normal
household waste. They may contain toxic agents that are
hazardous to health and environment. Therefore dispose of
the device and the batteries immediately according to the
prevailing statutory regulations. Never throw the batteries in
normal household waste.
Figure 13:
WEEE-Symbol
Used devices contain valuable materials that should be recycled. Electronic
equipment is not household waste - in accordance with directive 2002/96/EC
OF THE EUROPEAN PARLIAMENT AND THE COUNCIL of 27th January
2003 on used electrical and electronic equipment it must be disposed of
properly. At the end of its service life take this unit for disposal at a relevant
official collection point.
Help to keep our environment clean wich we are living in!
34
ENG
smartmeter
Supplier
Technical specifications
LNB/Tuner input
F-type connector
IEC 169-24
Frequency range
950 MHz ~ 2150 MHz
Input level
-65 dBm bis -25 dBm
LNB power supply
13/18 V, max. 400 mA
LNB control signal
22 kHz
DiSEqC control
Version 1.0
Demodulator
Front-end-modul
QPSK
Symbol rate
1,5 Mbps bis 45 Mbps
SCPC- und MCPC
Spectral inversion
Auto conversion
System resource
Processor
32 bit
SDRAM
16 MByte
FLASH
2 MByte
EEPROM
8Kbyte
Vide decoder
Data rate
up to 15 Mbit/s
Resolution
720 x 576 (PAL), 720 x 480 (NTSC)
Video format
PAL, NTSC, SECAM
Connectors
Serial data interface
smartmeter
USB (Type A)
ENG
35
Technical specifications
Power supply
Supply voltage
12,6 V
Li-oN battery
1950 mA
Charger
90 – 240 V
Supply voltage (charger)
175 - 250 V ~, 50/60 Hz
Dimensions
Length x width x height
9,5 x 15,5 x 4,5 cm
Gewicht
0,5 Kg
Temperature
Operating temperature
0° C to +40° C
Storage temperature
-40° C to +65° C
36
ENG
smartmeter
Supplier
Supplier
smart electronic GmbH
Industriestraße 29
78112 St. Georgen
Deutschland
Service Hotline:
Telefax:
E-Mail:
Internet:
00 49 1805 / 93 52 11
00 49 7724 / 94 78 333
[email protected]
www.smart-electronic.de
Warrenty
The warranty for the digital satellite receiver Smart smartmeter of the company
smart electronic GmbH is in conformity with the prevailing statutory regulations
at the time of purchasing the product..
Declaration of conformity
The company smart electronic GmbH, Industriestraße 29, 78112 St. Georgen
hereby declares conformity with the following guidelines and standards for this
product:
•
Guideline for low voltage 2006/95/EG
• EN 60 335-1
• EN 60 335-2-15
•
Guideline for electromagnetic compatibility 2004/108/EG
• EN 55 013:2001
• EN 55 020
• EN 61 000-3-2:2000
• EN 61 000-3-3:1995+A1:2001
• EN 61 938
• Equipment type / model: Digital smartmeter
smart electronic GmbH
smartmeter
ENG
37