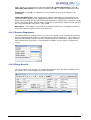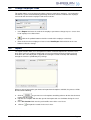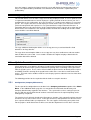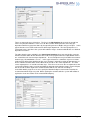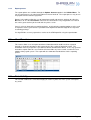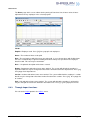
1
Shireburn Payroll System
User’s Manual
Shireburn Software Ltd
Carolina Court, Guze Cali Street
Ta’ Xbiex, XBX 1425, Malta
Tel (+356) 21 319977
Fax (+356) 21 319528
[email protected]
www.shireburn.com
TABLE OF CONTENTS
1.
GENERAL FEATURES OF SPS............................................................................................................................ 1
1.1
LOADING SPS ..................................................................................................................................................... 1
1.2
ACCESSING THE MAIN FUNCTIONS ...................................................................................................................... 2
1.2.1
Using Shortcut Buttons ............................................................................................................................... 2
1.2.2
Using the Menus ......................................................................................................................................... 2
1.3
TOOL BAR BUTTONS ........................................................................................................................................... 2
1.4
ADDITIONAL TOOL BAR BUTTONS ..................................................................................................................... 3
1.4.1
Specific Toolbar Buttons ............................................................................................................................ 3
1.4.2
Hints ........................................................................................................................................................... 4
1.5
FUNCTION KEYS .................................................................................................................................................. 4
1.5.1
Cycle through Form Tabs ........................................................................................................................... 4
1.5.2
ESC (Escape) .............................................................................................................................................. 4
1.6
EDIT MODE ......................................................................................................................................................... 4
1.6.1
Tab ()....................................................................................................................................................... 4
1.6.2
Alt+ (Down Arrow) .................................................................................................................................. 4
1.6.3
ENTER ( ). ............................................................................................................................................... 5
1.6.4
ESC (Escape) .............................................................................................................................................. 5
1.7
FILTERING ........................................................................................................................................................... 5
1.8
SEARCHING ......................................................................................................................................................... 6
1.9
SAVING FORM COLUMNS .................................................................................................................................... 7
2.
USER TOOLS .......................................................................................................................................................... 7
2.1
2.2
2.3
2.4
3.
CHANGE COMPANY ............................................................................................................................................. 7
CHANGE USER..................................................................................................................................................... 8
CHANGE YEAR .................................................................................................................................................... 8
CHANGE PASSWORD............................................................................................................................................ 8
ADMINISTRATION................................................................................................................................................ 9
3.1
USER ACCOUNTS ................................................................................................................................................. 9
3.1.1
Configure User Companies ...................................................................................................................... 10
3.1.2
Change User Password ............................................................................................................................ 10
3.2
GROUPS RIGHTS ................................................................................................................................................ 11
3.2.1
Copying Permissions ................................................................................................................................ 12
3.2.2
Permissions for Groups ............................................................................................................................ 12
3.2.3
Adding permissions to a Group ................................................................................................................ 13
3.3
ACTIVE USERS .................................................................................................................................................. 13
3.4
VIEW LOGIN INFORMATION ............................................................................................................................... 14
3.5
VIEW ERROR LOG ............................................................................................................................................. 14
3.6
RE-INDEX .......................................................................................................................................................... 14
3.6.1
Company Data Files ................................................................................................................................. 15
3.6.2
System Files .............................................................................................................................................. 15
3.6.3
Selecting files to reindex ........................................................................................................................... 15
3.7
BACKUP ............................................................................................................................................................ 15
3.8
RESTORE ........................................................................................................................................................... 16
3.9
FIX CORRUPTED DATA FILES ............................................................................................................................. 17
3.10 UPDATE STRUCTURE CHANGES ......................................................................................................................... 17
3.11 COMPANY MAINTENANCE................................................................................................................................. 18
3.11.1
Main Details ............................................................................................................................................. 18
3.11.2
Additional Details..................................................................................................................................... 18
3.11.3
Creating a new company .......................................................................................................................... 19
3.12 AUDIT LOG........................................................................................................................................................ 20
3.13 FINALISATION AUDIT LOG ................................................................................................................................ 21
3.14 END OF YEAR ................................................................................................................................................... 21
3.14.1
Common issues related to end of year procedures. .................................................................................. 21
4.
SUPPORT FILES ................................................................................................................................................... 27
GRADES............................................................................................................................................................. 28
4.1
4.2
DEPARTMENTS/SECTIONS/UNITS ...................................................................................................................... 29
4.3
CLASSIFICATIONS .............................................................................................................................................. 31
4.4
EMPLOYMENT TYPES ........................................................................................................................................ 32
4.5
ADJUSTMENT TYPES ......................................................................................................................................... 33
4.6
BANK BRANCHES .............................................................................................................................................. 33
4.7
SHIFTS / PRO-RATA PAYMENTS......................................................................................................................... 34
4.8
COMMISSION TYPES .......................................................................................................................................... 34
4.9
CHART OF ACCOUNTS ....................................................................................................................................... 35
4.10 NI CATEGORIES................................................................................................................................................. 35
4.11 UNIONS / POST TAX DEDUCTIONS ..................................................................................................................... 36
4.12 FSS RATES ........................................................................................................................................................ 37
4.13 BONUSES ........................................................................................................................................................... 37
4.14 FRINGE BENEFITS .............................................................................................................................................. 38
4.15 PAY SCALES ...................................................................................................................................................... 39
4.16 EMPLOYEE DETAILS .......................................................................................................................................... 39
4.16.1
Employee List ........................................................................................................................................... 40
4.16.2
Employee Transactions ............................................................................................................................ 41
4.16.3
Leave Entitlement and Transactions ........................................................................................................ 41
4.16.4
Show / Hide terminated employees ........................................................................................................... 43
4.16.5
Image ........................................................................................................................................................ 43
4.16.6
Free Text................................................................................................................................................... 44
4.16.7
Additional Details Menu........................................................................................................................... 45
4.16.8
Employee Details ...................................................................................................................................... 45
4.16.9
Pay Planner .............................................................................................................................................. 46
4.16.10
Adjustments........................................................................................................................................... 46
4.16.11
Previous Employment ........................................................................................................................... 47
4.16.12
Fringe Benefits ..................................................................................................................................... 47
4.16.13
Unions / Deductions ............................................................................................................................. 48
4.16.14
Split Payments ...................................................................................................................................... 49
5.
UTILITIES ............................................................................................................................................................. 50
5.1
GLOBAL BASIC ADJUSTMENTS .......................................................................................................................... 50
5.2
CHANGE EMPLOYEE CODE ................................................................................................................................ 51
5.3
IMPORT.............................................................................................................................................................. 51
5.4
COPY EMPLOYEE RECORD ................................................................................................................................ 52
5.5
UPDATE ACCOUNTS .......................................................................................................................................... 52
5.5.1
Configuration (Company Maintenance) ................................................................................................... 52
5.5.2
Configuration ( Departments File ) .......................................................................................................... 54
5.5.3
Export process .......................................................................................................................................... 55
5.6
VIEW PUNCHES ................................................................................................................................................. 55
5.7
DATA VALIDITY ................................................................................................................................................ 55
6.
PAYROLL CALCULATION................................................................................................................................ 56
6.1
ROLL SETUP ...................................................................................................................................................... 56
6.2
ROLL ADJUSTMENTS ......................................................................................................................................... 57
6.3
THE PAYROLL CALCULATION SCREEN ............................................................................................................... 58
6.3.1
Calculation of Commissions ..................................................................................................................... 59
6.3.2
Calculation options menu ......................................................................................................................... 59
6.4
ENTERING PAYROLL DETAILS ............................................................................................................................ 60
6.4.1
Through individual employees’ calculations ............................................................................................ 60
6.4.2
Through calculation menu options ........................................................................................................... 61
6.4.3
Through Import functions ......................................................................................................................... 66
7.
PAYROLL REPORTS........................................................................................................................................... 67
7.1
8.
PAYROLL REPORT OPTIONS ............................................................................................................................... 67
PAYMENTS MENU .............................................................................................................................................. 69
8.1
PAY SLIPS ......................................................................................................................................................... 69
8.1.1
Payslip Printing options ........................................................................................................................... 69
8.2
CHEQUE PRINTING ............................................................................................................................................ 72
8.3
DIRECT CREDITS ............................................................................................................................................... 74
1.
General Features of SPS
This section of the manual will explore the general features available within SPS.
1.1
Loading SPS
To load SPS look for this Icon on your desk top and double click. To load the system, the user needs
to enter the user ID and password.
Upon loading, SPS will present the following screen. It is from this screen that users will have
access to all the modules and functions available within the package.
Users may access these functions by using either the keyboard or else the mouse pointer
WinSPS - User Manual
Page 1
1.2
Accessing the Main functions
There are two ways to access the main functions within the package, one is from the short cut
buttons in the tool bar and the other option is from the menus at the top of the screen.
1.2.1
Using Shortcut Buttons
The short cut button provides immediate access to any of the available functions.
As an example users may click the Leave button to load the Leave Update screen.
1.2.2
Using the Menus
Users can access the menus in two ways, one is by using the mouse and clicking on the required
option, which will either load the desired function or else grant access to sub-menus if available.
The other option is to use the keyboard by just pressing
the <ALT> key. This will trigger the menu and provide
access to all options available on the main menu. The
system also has short keys, by displaying an underscore
on the letter of the available option.
These option letters are unique within the list and selecting
anyone of these keys, the system will automatically
execute the request. Selecting the letter <C> from the
keyboard, the letter with the underscore, will open up the
calculation menu.
These hot keys or fast keys as they are sometimes know,
are convenient and provide fast access to options without the need to use the mouse. Throughout
the application while a user is accessing functions within SPS, the system always provides a
number of short keys by making use of the keyboard. There are a small number of instances
where the use of the mouse is mandatory, like moving columns dealt with later on in this
document.
1.3
Tool Bar Buttons
The tool bar buttons provide a number of features that allow users to make better use of the
package as they browse for the required data.
The following are the functions provided and their corresponding key stroke.
•
<Insert>
This will provide the option to insert a new record in the current screen. If in
browse mode the system will automatically switch to the details screen view, where applicable
•
<Delete>
This option deletes the current selected record. The system will only delete the
record after the necessary validation that the record is not in use (where applicable).
•
<F9>
The user has the option to go into edit mode on the currently selected record
and the system will automatically make available the editable fields to the user
WinSPS - User Manual
Page 2
•
While inserting or amending a record, the user will have the option to confirm and post the
entry. This is only available during insert or edit mode. Another way to save a record is by
simply pressing the <Tab> or <Enter> key until the end of the record when it is automatically
saved.
•
<ESC>
While posting a record, the user will have the option to cancel the entry and go
back to browse mode. This is only available during insert or edit mode
•
<Home>
Pressing the Home key will take you to the first record of the list on then screen,
both in browse mode and in full screen mode
•
<End>
The End key enables the user to go to the bottom of the list, both in browse and
in full screen mode
•
<↓>
The down arrow moves the user on to the next record, both in browse and full
screen mode
•
<↑>
The up arrow moves the user to the previous record, both in browse and in full
screen mode
•
<F4>
This button cycles through the indexed fields. Indexed fields have a bold
column header. The available indexes vary from screen to screen. In any order, the system
will provide fast searching facilities.
•
<F7>
Pressing the print button will bring up the report print form below. The system
will show a full report list available on the form where applicable. Once a user selects a
report, the system will bring up the print dialogue box with options to print, preview, export and
e-mail the report.
The system will automatically select the user’s default printer but will allow selection of
another printer from the available printer list.
Using the Advanced option in this dialogue allows users to change paper size, orientation,
number of copies etc....
1.4
Additional Tool Bar Buttons
The replicate button contained in some support files allows users to copy entire support files
across companies. This is particularly useful at times like the beginning of a new year when users
might update new NI and tax rates in one company then copy them over to the rest of the payroll
companies.
<F2> and <F6>The system provides these two buttons keys to filter a range of records. F2 is the
start of the range whereas F6 is the end of the range. F2 and F6 only work with indexed fields (the
columns with the bold header are indexed fields). The result for using these two options will filter
the data on screen based on the selected range.
1.4.1
Specific Toolbar Buttons
Some screens will have particular toolbar buttons which allow users to carry out functions specific
to those screens.
WinSPS - User Manual
Page 3
1.4.2
Hints
To understand the functionality behind each of the above buttons,
the user can move the mouse pointer onto a button and the system
will display the Hint for a few seconds. The Hint will show the
button’s function and where applicable the system will display the
keyboard shortcut attached to the button.
1.5
Function Keys
The application provides a number of function keys to enable the user to perform tasks in an easier
and more effective way to manage the system better. The functions keys provide for the better
administration and display of data.
1.5.1
Cycle through Form Tabs
When there is more than one tab per form the user can switch from tab to tab by pressing the F8
key.
1.5.2
ESC (Escape)
Pressing <ESC> will close the form.
1.6
Edit Mode
During the process of amending a record the system will provide a number of functions to enhance
the amend mode function
1.6.1
Tab (
)
The <TAB> button moves the focus to the next control or field name, i.e. from one text box to the
next. Pressing the Shift (
) button before pressing the <TAB> will move the focus to the previous
control or field name. Pressing <TAB> repetitively past the last field will automatically save the
record.
1.6.2
Alt+
(Down Arrow)
When a form has a Combo box or Lookup as shown in the following figure, pressing the Alt+
the
system will drop down the list, or display the pop up grid. It will have the same effect as pressing
the arrow in the combo box/lookup editor.
WinSPS - User Manual
Page 4
1.6.3
ENTER ( ).
The <ENTER> button moves the focus to the next control or field name, i.e. from one text box to
the next. Pressing < ENTER > repetitively past the last field will automatically save the record.
1.6.4
ESC (Escape)
When editing a record, pressing the ESC button will cancel all the changes, and put the form back
into Browse mode
1.7
Filtering
Filtering is a very useful feature that enables users to locate records based on their search criteria.
The user can apply these filtering conditions on most of the main screens within the payroll
system. Users may trigger the filter function by first opening the screen relating to the data they
need to filter and then selecting the filter option from the application menu bar as illustrated below.
All the user needs to know is the values that are required from the system. The dialogue below will
provide the functions to achieve the desired results. Filters may consist of multiple criteria.
The following is the main filtering screen.
• The Upper Panel: this displays the table which is currently selected and its current order.
• The Filter Panel allows users to select a field from the selected file upon which to filter.
• The Operand combo box allows users to select from a preset list of conditions.
• The value field allows users to define the value to compare against.
• The toolbar below the value field includes the following functions buttons
Adds another criteria to the list of criteria
Saves and runs the filter
WinSPS - User Manual
Page 5
Cancels the filter
Exports the filtered data to Excel
• The Criteria panel displays the list of user defined criteria. In case alternative criteria exist
users may use the Or button
on the right hand side of this panel. The Delete filter
allows users to delete individual criteria while the Clear Filter button
button
allows users to clear all criteria.
• If it is expected that a particular filter will be used repetitively users have the option to
memorise the criteria for later use through the save custom filter button
When required the Load custom filter button
.
allows users to reload saved filters.
The filtering function may be used simply to export all data to an Excel spreadsheet even without
specifying any filtering criteria. In this case after loading the Filter dialogue users must simply click
on the Export To Excel button
which loads the following dialogue.
Users may select the fields required in the spreadsheet by transporting them from the panel on the
will prompt the user
left to the one on the right. Clicking on the Export data to Excel button
to select a destination file and folder and then proceed to generate the required Excel sheet.
1.8
Searching
The Search works accordingly to the selected column and current selected index. If the current
selected column has an active index ( the column header is in bold font ) and it is of type character
the search performs a fast search on the indexed column.
WinSPS - User Manual
Page 6
1.9
Saving Form Columns
The system provides an option to move columns around on screen to set up the form display as
required by the user. This will enable users to achieve the optimum usability of the system.
To set the column order the user can click on the required column and drags it to the preferred
position. When ready the user will let go of the mouse and the system will place the column where
desired. To save the positioning of the columns, the user needs to right click the mouse on the
top left hand corner of the form as shown below.
These system settings are at user level and do not conflict in any way with other settings for the
different users of the system.
Right Click the mouse
pointer on this corner of
the form
2.
User Tools
The user tools menu provides the following options
2.1
Change Company
SPS supports multi company installations. A user has the option to move from one company to
another after login. The user can do this by either by accessing the User Tools menu or from the
Change Company Button. On selection of this process, the system will provide the full list of
companies on the system as follows
WinSPS - User Manual
Page 7
2.2
Change User
From time to time, the need may arise to change the User.
This may be, for example, for the Administrator to access
functions that the current user does not have access to.
On entering this process, the system presents the
following screen:
2.3
Change Year
SPS allows data related to an indefinite number of payroll years to be stored and all this data
remains accessible to users through the Change Year function in this menu.
2.4
Change Password
For general security practices, the user may periodically
change the login password.
The user needs to provide the current password for
validation purposes and if this is not the correct one, the
system will not process the request to change the password.
This check is to protect the current user’s password
confidentiality. While the system provides for a direct
change of the user’s password without this validation, from
the Administrative Function, the system provides for the
encryption of the user’s password.
WinSPS - User Manual
Page 8
3.
Administration
The system provides for the General Administration of SPS through the Administration Menu.
The following are the various options available on this menu.
3.1
User Accounts
The User Accounts process allows the creation and amendment of users authorised to access
SPS and the allocation of those users to a particular user group. The security level of access that
a user has is dependent on the allocation of the group. On selection of this option, the system will
display the following screen.
The screen identifies the user ID, user name, the current Group allocation as well as the last login
and logout dates and times.
The dates and times identify when each of the users last entered and exited the system. If the
administrator notices that a user's Last Logout time is not logical, it may be that that particular user
is turning the computer off without logging out normally from the system.
User ID's must be unique. On entry into the Group field, pressing the <TAB> or <ENTER> key
without affecting an entry will result in a pop-up of available groups as contained within the Groups
WinSPS - User Manual
Page 9
file. There are no limits to the number of users accessing the system however a user can only be
allocated to one particular group.
3.1.1
Configure User Companies
This function allows the system administrator to allocate access to selected companies per user.
The full list of companies is displayed in the left pane and companies to which the current user
should have access to must be moved to the right pane. Access is granted once the confirm
button is selected.
3.1.2
Change User Password
This shortcut key allows users to change passwords .
The user needs to provide the current password for
validation purposes and if this is not the correct one, the
system will not process the request to change the password.
This check is to protect the current user’s password
confidentiality. While the system provides for a direct
change of the user’s password without this validation, from
the Administrative Function, the system provides for the
encryption of the user’s password.
WinSPS - User Manual
Page 10
3.2
Groups Rights
The Groups and Permissions function allows administrators to control the access levels to the
various aspects of SPS. The Shireburn Payroll System conontains a sophisticated administratordefinable security system to ensure that only authorised users have access to the functionality of
the system. This system revolves around secure functions and the level of access that a user may
have to a particular secure function.
A secure function is a task or process within SPS that Shireburn has considered may require
control as to its access. System administrators apply rights to access a secure function within the
system from the groups of users. Users who are members of a particular group are allowed
access to all the secure functions, which have been granted to that group by the administrator of
the system.
An administrator is able to grant to a group one of six levels of access to a secure function:
• View data
• Amend data
• Create new records
• Delete records
• Print data
• Mail/Export reports
On entry into the Groups and Permissions process, the screen displays the various existing groups
on the system. This identifies the currently set groups by means of their Group Code and Group
Name. The system makes available the standard keys create/amend group entries. A user can
create as many user groups as required to manage the system effectively. However, there is oneto-one allocation of users to group.
WinSPS - User Manual
Page 11
3.2.1
Copying Permissions
Administrators can create new user Groups from this tab. When a new Group is created, the
Administrator has the possibility to copy the permissions from an existing Group.
If the Administrator confirms, the user will be asked from which Group s/he would like to copy from.
The user is presented with a list of available Groups within SPS.
The system will keep asking whether the user wants to add rights from another group until the user
refuses.
3.2.2
Permissions for Groups
The permissions tab grants access to the various secure functions available to that group. On use
of this tab, the following screen will be displayed:
This screen defines the details of the currently selected group and lists the various secure
functions that the selected group has access to. Each function has a code and a description. The
WinSPS - User Manual
Page 12
rights at the far right hand side of the screen define the access level that the group has to the
particular secure function. These are View, Edit, Create, Delete and Mail/Export.
Changing Access Rights
Amendment of the level of access to a particular secure function is effected by highlighting the
function and then by means of the standard <AMEND> button.
Removing Access Rights
Complete removal of the right to access a particular secure function for the selected group is
available using the Del key when highlighting the particular function. This requires user
confirmation.
3.2.3
Adding permissions to a Group
Inserting Access Rights
The insertion of new rights to a particular group is effected by pressing the <NEW RECORD>
button.
The user can use the search to look for the required function. The search will list the rights
currently not available to the group in question. When the function has been selected the user
must click on the buttons related to the rights required so that they are assigned.
Note Make sure that management of the group rights to the administrator's group is handled
carefully. If access to the Systems Administration Menu function is denied to the administrator, it
will not be possible for anyone to enter this process again and reverse this access control.
3.3
Active Users
The Active User List is a process, which is particularly useful for users on a network and especially
those with a significant number of users operating on the system. This allows identification of the
users currently operating on the system. The system will display the following screen:
This screen may display users reportedly "on the system" that may in fact not be. This would
result from users having exiting the system in an abnormal manner. In fact, the number of logins
column would also indicate this
The displayed data consists of the following:
Fields:
User ID - the three characters ID of the various users on-line.
WinSPS - User Manual
Page 13
User Name - the full name of the user
User Group – The group that the user belongs to
Number of logins - this figure defines the number of times the user has logged in without logging
out.
Login Date & Time
Logout Date & Time
Network station ID - only applicable on a network and displays the ID of the workstation currently
on-line. This can define the actual workstation from which the user is accessing the system.
Network connection number - only applicable on a network and displays the network connection
number of the workstation currently on-line.
Computer Name – The name of the users work station.
3.4
View login Information
This option allows administrators to view details like dates and times regarding users logins and
logouts
3.5
View Error Log
This option allows administrators to view a detailed history of errors generated whilst using the
system
3.6
Re-Index
Re-indexing is a process whereby all the indexes on a database are re-organised. Although this
process will marginally improve performance on a system, its main use is following the corruption
WinSPS - User Manual
Page 14
of any indexes that may arise following an abnormal shutdown of the system. An abnormal
shutdown is one where the user did not exit via the main menu but rather either turned off his
machine or the electricity or computer itself failed. In such a case, we recommend that a Re-Index
be effected.
In the case of users on a network, it is important that all users are out of the system when this
Re-Index is effected otherwise an error may occur. The files Re-Indexed during this process are
the files related to the particular company. Multi-company sites need to run a Re-Index process on
the various companies.
The re-indexing function also optimises performance of the system especially databases with large
volumes.
3.6.1
Company Data Files
The Re-Index Company Data files option performs a
Re-Index of the data files of the currently selected
company. These data files include the all support and
transaction tables.
3.6.2
System Files
The Re-Index System Data files option performs a ReIndex of those data files which are common across all
the companies installed on a system rather than those
containing data related only to a particular company.
These data files include the company details file, users
file etc. This process also clears the number of logins
field in the Active User List - (see System
Administration - Active User List 3.3)
Again, in the case of users on a network, it is
important that all users are out of the system when
this Re-Index is effected otherwise an error may occur.
3.6.3
Selecting files to reindex
The norm is to tick the All Tables option to reindex all files but users may reindex individual files
by ticking the box next to the required file name.
The pack option will prompt the system to clean selected files of deleted records which although
invisible are still on file.
Clicking on the Reindex will start the reindexing process.
3.7
Backup
WinSPS - User Manual
Page 15
It is always advisable to take a backup of your data from time to time. This could also be part of a
company’s policy. If a user would like to take a backup, s/he needs to go to the Administration
menu and select Backup.
The user has the option to save the backup files on any drive
(local or network drives) as well as on a floppy disk. However
the system can not write the data on to a CD or DVD as this
requires additional software.
The user can select the location to save to by pressing on the
Browse button. This will pop up a save dialog. (This dialog
may vary depending on the Windows ® version).
Select the location, type in a name for the backup, and press
Save. The Save dialog will close and the user must then
press the Backup button to continue.
3.8
Restore
The Restore process allows the reinstatement of the backed up data for the selected company.
On selecting this option, the user is able to select the drive letter from which the restoration is to be
effected. This is done by means of the following window:
The Restore form is very similar to the Backup form. The user can select the backup from an Open
dialog.
The user can select a folder from various media. When the correct file has been selected, the user
must press the Open button. After that pressing on the Restore button will restore the data.
WinSPS - User Manual
Page 16
3.9
Fix Corrupted data files
When the All Tables option is ticked this function cycles through all the data files for the currently
selected company to detect any corrupted or damaged ones and attempt to fix them.
Users may alternatively run this process on specific files by ticking the box next to the required file
name instead of using the All Tables option.
3.10
Update Structure changes
Running this function ensures that the data files of the currently selected company are updated
with latest structure changes. These may include new fields, altered field sizes or even new
indexes.
WinSPS - User Manual
Page 17
3.11
Company Maintenance
The Company Maintenance option provides facilities for the maintenance of data relating to the
currently selected company. On selecting this option the following screen is displayed:
The standard <AMEND> button is available to allow editing of the company details.
3.11.1 Main Details
In this screen users may update general details relating to the company like address, Phone
number etc...
Name It is important that the company name is not altered without authorisation from Shireburn
staff as it is directly linked to the Access code provided by us and if the company name does not
correspond to this access code the system will fail to load.
Menu Name This is the name which will be shown in the company selection menu.
Sort Code This is the sort code of the bank branch where the wages bank account is held and is
required if using the direct credits functions in the package
Account This is the wages account number and is required if using the direct credits functions in
the package
N/L Code This is the nominal ledger code relating to the wages bank account and is required if
using the automatic accounting interface functions in the package. This code is validated against
the chart of accounts in SFM.
Dir. Credits ID. This is the company ID agreed with the bank if using the direct credits functions in
the package. The direct credits file name will be inherited from this field.
3.11.2 Additional Details
WinSPS - User Manual
Page 18
This screen allows users who use the automatic posting of payroll entries to SFM to configure the
paths of the related SFM company and also the level and type of interface desired.
SFM Data Directory Using the browse button the user may locate the folder where the SFM data
is stored.
Company Here the user specifies which SFM company the current payroll company is to link to
particularly in case of multiple SFM companies. The folder names are directly related to the
company numbers E.g. SSL001 refers to SFM company 1.
Level In SFM users may have separate accounts per department, section or unit and this field
allows users to define the level of interface required.
Type This field allows users to choose the required type of interface. Details regarding the
options available are listed in the Utilities > Update Accounts section.
3.11.3 Creating a new company
Creation of a new company is triggered in the normal fashion by either using the relevant + toolbar
button or by pressing the <Insert> Key.
The user must enter the official company name which will show on the system reports etc… and
also a menu name which is what will be shown in the company selection screen. No new
companies may be created without the required authorization key. In order to obtain this key from
Shireburn staff the user must first supply the Exact Company Name.
WinSPS - User Manual
Page 19
3.12
Audit Log
The system automatically maintains a full audit of all changes to any employee details and also of
all transactions posted.
The Audit Log option in the Admin menu allows users to view the system audit log.
Fields:
Audit reference A system generated audit reference number to ensure integrity of records
Employee Code of employee concerned
Module The module to which amendments were done.
Date Date on which modifications were done
Description The data field which was changed
Old Value The value of the field before the change
New value The value of the field after the change
The status bar at the bottom of the screen displays the User ID of the user effecting the change
and also the date and time when the change was effected.
This data can be filtered using the range buttons and a report may be generated using the
standard print button.
WinSPS - User Manual
Page 20
3.13
Finalisation Audit Log
A full audit is maintained in the system of all the times when any payrolls are calculated, deleted,
finalised or unfinalised and this option allows users to view the finalisation history.
3.14
End Of Year
Winsps contains fully automated and user driven end of year procedures.
The end of year process will create the next payroll year. It will carry forward into the new year
details of employees still employed at the end of the previous year. It will also carry forward their
outstanding leave balances.
After updating details like the new NI and Tax rates users may immediately start processing the
new year’s payrolls.
3.14.1 Common issues related to end of year procedures.
The following are some notes related to issues which normally arise at the end of a payroll year but
are not directly related to the End of year procedures.
Adjusting payrolls that span across different years
st
If the payroll periods are not monthly there may be cases where the 1 of January occurs part way
st
during a payroll period and users may decide to adjust the last payroll of the year to pay up to 31
December.
In these cases the payroll provides the functionality to adjust the number of basic hours paid and
NI contibutions deducted as required.
th
Let us take the case below of a forthnightly payroll covering up to 30 December which is a
Sunday.
st
This would mean that the 1 January would occur on a Tuesday and to close off the year the user
st
may decide to pay the extra day up to 31 December in the last payroll.
WinSPS - User Manual
Page 21
To do this the user must enter 8 Hrs ( 1 extra day ) in the Extra Hours field of the roll setup record
related to the payroll concerned. This would mean that for this payroll employees would
automatically be paid for 88 basic hours instead of the usual 80.
th
N.B. Apart from adjusting basic hours one must note that there is an extra Monday ( 31st
December) to consider. This NI must be deducted from a payroll in the current year to reconcile
the number of NI’s deducted during the year with the actual number of Mondays which this year
total up to 53. Another reason is that it must be deducted at the current year’s rate and in the next
year the NI rates will change as will the currency. To deduct and extra NI contribution the user
must change the value in the NI Contribution field in the roll setup screen.
The reverse must naturally be done after the end of year procedures in the first payroll of the year
to compensate. The Extra Hours must be set to -8 whilst the NI Contribution field must be set to
1.
th
Let us now take the case of a fortnightly payroll starting on 24 December. This would mean that
st
the 1 January would occur on a Tuesday before the end of the fortnight and to close off the year
st
at 31 December the user may decide to pay the last 4 days less.
To do this the user must enter -32 Hrs ( 4 days at 8 Hrs per day ) in the Extra Hours field of the
roll setup record related to the payroll concerned. This would mean that for this payroll employees
would automatically be paid for 48 basic hours instead of the usual 80.
Since in this case both Mondays are in the current year 2 NI’s must be deducted normally.
The reverse must naturally be done after the end of year procedures in the first payroll of the year
to compensate. The Extra Hours must be set to 32.
Paying off or carrying forward leave balances
WinSPS - User Manual
Page 22
At the end of the year it is normal for staff to have outstanding leave balances. There are mainly
two ways of catering for this situation, carrying forward outstanding balances to the next year or
paying them off .
The end of year process will automatically carry forward the outstanding leave balances to the new
year as opening entitlements. This applies to all leave types except sick and injury leave. In the
new year the user has the opportunity to transfer any entitlements brought forward to another
leave type. Eg. From OPT (Optional) to ACCU (Accumulated). This can be done through the
‘Convert Leave Codes’ button in the leave entitlement screen. ACCU would now reflect the leave
carried forward while the new year’s entitlements would be created with the code OPT after having
converted the balances brought forward to ACCU. IF entitlement for type ACCU already existed
any leave converted from OPT would be added to the existing ACCU entitlement.
The new year’s entitlements can be created globally or for a selected group of employees through
the global leave button available in the leave entitlement screen.
If you decide to pay off any outstanding leave balances in the last payroll of the year you must tick
the Pay Off Leave option in the roll setup screen.
This will prompt the system to calculate the value of outstanding leave and pay it off as an
adjustment in the specified payroll. The leave types paid off are those which have been flagged as
payable in the Leave Type file
WinSPS - User Manual
Page 23
Paying bonus separately before the payroll run.
To pay the December government bonus separately before the December payroll the user must
create a roll setup with a payroll period which includes the trigger date of the required bonus. In
this setup the user must tag the Pay bonus only check box provided in the roll setup screen. This
will cause the system to calculate a payroll without taking into account anything but the bonus
payment. This payment is generated as an entry in the adjustments screen.
Another check box next to the Pay bonus only check box allows the user to decide whether or not
to deduct tax on the bonus in the bonus roll. If the bonus is not taxed and another payroll is to
follow the bonus roll, tax in this roll will automatically cover the bonus payment of the previous roll.
If the bonus roll is the last roll of the year and it is not taxed then tax will never be deducted on the
bonus so in this case it is recommended that the Taxable check box be tagged.
When creating a Bonus Only roll, it is important to omit the Leave Period dates in the roll setup
screen.
ATTENTION TIME & ATTENDANCE MODULE USERS
Please note that to avoid carrying over old attendance data to the new year users must archive as
many dates as possible through the archiving functions in the T&A module before running the the
End Of Year process. Archived data will not be carried forward to the new year but it shall remain
accessible through previous years. Any T&A data including rosters left in the current files will be
carried forward to the new year.
RUNNING THE END OF YEAR PROCEDURE
The following procedure should be run only after all payrolls for the current year have been
finalised. The current year’s data will be automatically moved to the previous year directories so
electronic lodgement and printing of FS3's and other end of year reports can be printed from the
previous year after running the End of Year procedures. All reporting functions will also be
available from this option. All previous years will remain accessible through functions available in
the payroll.
1. Take full Backups:
Utilise the Admin > Backup > Full Back Up option. This
will back up the data for all the companies and all active
years.
2. Run End Of Year Routine: Admin > End Of Year Run
Utilise the Admin > End of Year option. The End of Year
run routine must be run individually for each company and the
user must exit and re-enter the payroll system before running
End of Year process on another company.
WinSPS - User Manual
Page 24
When running End of year procedure users may decide whether or not to carry forward
outstanding leave balances to the new year.
UPDATING REQUIRED SUPPORT FILES WITH NEW YEAR’S RATES
The following maintenance should be carried out in the Payroll system AFTER the End of Year run
is processed for each individual company. These modifications are to be effected on to the new
year before running the first payroll in the order shown below.
Some support files contain a button which allows the user to replicate any changes done in one
company across to similar support files in other companies.
1)
NI Categories - Support Files > Rates >NI Categories
This file must be updated before any changes are done to the employee’s details like wage
increases etc…
The user should amend the NI rates, contribution values, and wage bands according to the values
provided by the relevant authorities
2)
Tax Rates - Support Files > Rates >Tax Rates
The user should amend the tax bands according to the values provided by the relevant authorities.
3)
Union/ Deduction Rates
- Support Files > Rates > Unions/Deductions
The user should update the union contribution and deduction rates if applicable as well as the
sickness and injury benefit rates according to the values provided by the relevant authorities
Sickness Benefits - Married
Sickness Benefits - Single
Injury Benefits - Married
Injury Benefits - Single
SBENM
SBENS
IBENM
IBENS
4)
Cost of living pay increases ( If Applicable Eg : €4.50 weekly ) - Utilities_Menu >
Global Basic Adjustment
The user should enter the appropriate weekly increase and an effective date. The effective date
should be the first date payable at the new pay rate, normally the first of January.
If the increase is also to be added to the pre-planned wage changes in the Pay Planner then check
the option Pay Planner. If you do not use the pay planner, do not tick this option.
5)
New leave entitlements
These must be generated through the global leave entitlement functions in the leave entitlement
module accessed through Main Menu > Leave Module > Leave entitlement.
6)
System Variables - Payroll > System Administration > System Variables
WinSPS - User Manual
Page 25
The user should update the required new values in the record containing data relevant to the new
year:
7)
Classifications - Payroll > Suppot Files > Classifications
This file contains information regarding the number of standard leave and sick leave entitlement
hours which must be updated per classification if required.
8)
Bonuses - Payroll > Support Files > Rates > Bonuses
This file contains information regarding the quarterly statutory bonuses and the end of year
process will automatically roll over the dates for the following year.
N.B. For new rates related to NI, FSS, etc. please refer to the relevant
authorities as we do not have any particular sources for obtaining this
information.
WinSPS - User Manual
Page 26
4.
Support Files
The support files menu provides access to those files which allow the user to create lists of
parameters / categorizations which will be used throughout the whole payroll.
Lists such as Departments / Sections / Units allow the user to segregate employees into the
desired groups while others such as the NI Categories and Tax Rate lists will directly effect the
automatic calculation of standard items such as NI and Tax. Other lists simply provide the user
with preset standardized selections during data entry.
Some support files will only be updated upon implementation of WinSPS while others which
normally contain rates effecting the payroll calculation will need to be periodically updated by the
user with the latest relevant information.
Security Function:
SUPPORT: Support Menu
This is a screen shot of the support Files menu found in the system.
We shall go through all the support files explaining their purpose in SPS but we shall leave the
employee details support file for last as we would need to refer to all other support files in the
process of entering employee details.
WinSPS - User Manual
Page 27
4.1
Grades
The Grades Maintenance process allows the creation of the various grades in use within the
company and the definition of certain parameters relating to the grade.
On selection of this option, the following screen appears:
Grades are most useful in environments with defined grade structures especially where an
employee’s basic pay is directly related to his grade. Grades can also be used for grouping when
reporting.
Fields:
Code & Description. In this form the user can enter the code and description of the grade.
Basic & Effective Date. The Basic and Effective Date values are optional but if such values are
entered, when a new employee is created belonging to this grade, the basic pay in his employee
details file is automatically inherited from the related Grade record. Basic pay values may still be
overwritten and assigned on an individual basis in the employee details file.
OT Value/Hr. Here the user may stipulate an overtime flat rate per grade so that this rate is
automatically defaulted when posting overtime at flat rates for employees belonging to the related
grade.
NI Limit. In some environments it is desirable that the number of NI contributions deducted for
part timers in a payroll period is directly related to the number of hours worked during the same
period. The law currently stipulates that NI must be paid if an employee works more than 8 hours
in a week. The NI Limit field allows automation of such a process. It is recommended that grades
are created to group part timers who do not work fixed hours and who earn the same hourly rate of
pay. The user must enter a value in the NI Limit field which is equivalent to 8 hours pay for such
part timers. During payroll calculation the system will calculate the value of basic pay earned for
the relative period. Next it will deduct one NI contribution of category B for each portion of that
basic pay equivalent to the national weekly minimum pay. When the remainder is less than the
national minimum weekly wage the system will compare it with the value in the NI Limit field. If the
value of the remainder is equal to or greater than the limit the system will deduct another NI
contribution at category B because it means that the employee worked more than 8 hours.
Alternatively no more contributions will be deducted.
Global Grade Update button.
Typically when a new wage agreement comes into force users may update the new pay rates in
the grades support file and then use the Global Grade Update
button to update the pays of all employees belonging to the
currently highlighted grade.
Selecting the option Replace Basic Pay replaces the value of the
current basic pay in the employee details file with the value in the
grades file.
Selecting the option Add to Basic Pay adds the value in the grades
file to the value of the current basic pay in the employee details file.
WinSPS - User Manual
Page 28
This way the function can also be used to apply increments.
4.2
Departments/Sections/Units
SPS allows each company to be organised /divided into Departments. Furthermore each
department can be sub divided into Sections and each section can be further sub divided into
Units.
The main reason is for departmental accounting analysis so when users are printing reports or
ordering data they always have the option to group or sub-total by department/section/unit. In the
Time & Attendance module of SPS users can be allocated rights to access attendance data of
specific departments if required but this security level is not available in the main payroll module.
In the example below the organisation is divided into 2 departments. In the first screen shot we
see the list of departments. In the second screen shot we see how the ADMIN department is subdivided into 2 sections and in the third screen shot we see how the FINANCE section is further
sub-divided into 2 units.
For reasons of referential data integrity each department must contain at least one section and
each section must contain at least one unit
Each employee created must be allocated to a department, a section within the same department
and finally a unit within the same section as we shall see in the section regarding the Employee
details file.
WinSPS - User Manual
Page 29
WinSPS - User Manual
Page 30
4.3
Classifications
The classification groups employees according to their working week, working day, overtime flat
rate, annual leave entitlements etc.... From this classification the system will identify the weekly
working hours and calculate the hourly pay rates which are used in various functions within the
system.
Fields:
Code: A unique five character code. (Mandatory)
Description: Brief description of the classification. (Mandatory)
Weekly Hours: This value identifies the standard number of hours worked during the week. Details
include 40 hours for the normal week; fixed weekly hours value for part timers who work fixed
hours, a 1 value for part timers who work irregular hours during the week.
Days per week: This value identifies the working days in a week.
Leave Days : This value identifies the days of the week on which leave can be allocated. A
value of 5 would mean that the employee works Monday to Friday and these are the only days
when leave may be allocated. In the Leave Module when allocating continuous periods of vacation
leave the system will automatically skip Saturdays and Sundays. In the case of a six day week,
only Sunday is skipped over for allocation of leave days taken.
Hours/day: This value identifies the number of hours per working day for this classification and is
used to convert leave, sick leave, etc from hours to days and to default the number of hours in a
day’s leave.
Def. O/T rate: The user will enter the default overtime rate which is normally 1.5 i.e. 1.5 hours of
the basic pay.
Leave Ent. Here the user identifies the number of annual hours of leave due to this class of
employee.
Sick Ent. Here the user identifies the number of annual hours of sick leave due to this class of
employee.
PT Treshold. This is related to part timers to whom pro-rata leave and bonus is due. It dictates
the minimum number of weekly average hours required for this classification of employee to get
pro-rata payments of leave and bonus ( normally set to 1 ).
Pro-rata base. This is related to part timers to whom pro-rata leave and bonus is due. It dictates
the base weekly hours ( normally 40 ) upon which the percentage of the weekly average hours is
calculated.
Requirement:
WinSPS - User Manual
This support file requires at least one entry.
Page 31
4.4
Employment Types
This support file is required to identify employment type of each employee in the payroll system.
These could be Full Time, Part Time and/or Students etc...
In the case of part timers one needs to identify the employment type of part timers in two
categories, regular part timer (working fixed hours per week) or irregular part timers (working a
number of hours which varies from one week to another). Each of these
Fields:
Code: Employment type code. (Mandatory)
Description: Brief description of the type (Mandatory)
NI Type: There are three type of NI type and the user needs to select one from the following
[R] = Regular, [S] = Student, [N] = No NI contribution is deducted
Bonus %: This field will identify what percentage of the statutory bonuses is due to this type of
employee. In case of part timers to whom pro-rata bonus is due the value must be 0.
Full Leave: This will identify whether the employees belonging to this type get full leave
entitlement or not. This field is normally used at the beginning of the year when allocating the
global entitlement or when allocating additional leave hours in lieu of Public Holidays, which fall on
weekends. We recommend that such leave allocations be only done after the Public Holidays falls
due. This will avoid miscalculations when an employee terminates employment before the actual
date of Public Holiday.
Hourly Pay: This is a logical Y/N field and identifies if employees with this employment type are
paid on an hourly basis. Therefore, if YES is entered for this type, the system will not allocate
basic hours but the payroll user will enter the number of hours worked manually. This is mainly
used for part timers.
Pro-rata bonus. This is a logical field and it will dictate whether employees get pro-rata bonus and
leave. Normally the value is set to Y if they are part timers and pay NI.
Requirement: This support file requires at least one entry.
WinSPS - User Manual
Page 32
4.5
Adjustment Types
When calculating payrolls one may need to post particular payments other than basic pay or
overtime. Some of these payments may be required regularly like in the case of recurring
allowances or commission payments. In these cases the list of payment/adjustment types may be
standardised using the adjustment types support file. When posting adjustments users may
request a pop up list containing all the standard adjustment types which is automatically generated
through this support file to choose from.
This standardised list also facilitates reporting by type of adjustment.
Fields:
Code: Adjustment type code. (Mandatory)
Description: Brief description of the type (Mandatory)
Tax Type : This field specifies whether the adjustment is taxable or not. The options are A - After
tax (non taxable) or B - Before tax (taxable). This type will be defaulted but can be changed by
the user when posting adjustments in the payroll calculation process.
4.6
Bank Branches
A list of Bank branches may be maintained here for reference. When employees are paid through
direct credit, users need to specify which bank branch their account relates to and this support file
provides users with a pop up list of Bank branches to choose from.
WinSPS - User Manual
Page 33
4.7
Shifts / Pro-Rata Payments
This support files allows for creation of a standard list of pro-rata payment types and rates used
within an organisation.
Shift allowances are typical pro-rata payments where employees get a payment per shift worked.
During payroll users need to select the payment type from a pop up list which is automatically
generated through this support file and then specify the number of payments to post. The system
will calculate the respective amounts due.
As seen in the above screen shots payments can either be a fixed amount per unit allocated or
else they can be a percentage of the hourly rate.
In the Danger Allowance example above the number of payments would be the number of hours
worked in dangerous conditions. Each hour / payment would be paid at 200% of the employee’s
basic hourly rate i.e. double time.
In the Night Shift example the employee would receive €2 for each night shift worked.
4.8
Commission Types
This screen allows the creation of a standard list of sales commission payment types and rates
used within an organisation.
During payroll users need to select the commission type from a pop up list which is automatically
generated through this support file and then specify the value of the sale. The system will
calculate the respective amounts due based on the percentage stipulated in the support file.
WinSPS - User Manual
Page 34
4.9
Chart of Accounts
This screen allows users to build a chart of accounts with the nominal account codes related to
payroll so that they can produce a posting report which they can export to spreadsheet format for
import into an accounting system once a payroll has been calculated and finalised.
Clients using the Shireburn Financial Manager (SFM) need not use this as the payroll software will
interface directly to the chart of accounts in the Nominal Ledger of the related company in SFM.
4.10
NI Categories
This module allows users to maintain the correct rates applicable to the official NI categories as
stipulated by the relevant authorities.
This file must normally be updated at the beginning of each year in a new payroll year after running
the end of year procedures and before any changes are done to the employee’s details like wage
increases etc…
The user should amend the NI rates, contribution values, and wage bands according to the values
provided by the relevant authorities
Fields:
Code: NI category code. (Mandatory)
Student : Whether category refers to student NI rates.
WinSPS - User Manual
Page 35
Age Group : Which age group the category applies to. Options are U – Under 18, O – Over 18
and B – Both.
Min Wage : The minimum wage range to which the category applies.
Max Wage : The maximum wage range to which the category applies.
Emp Rate: The rate (percentage of weekly wage) paid by the employee per contribution. This can
be set to 0 when the payment is at flat rate.
Emp Min : The minimum weekly amount payable by the employee
Emp Max : The maximum weekly amount payable by the employee
Comp Rate : The rate (percentage of weekly wage) paid by the employer per contribution. This
can be set to 0 when the payment is at flat rate.
Comp Min : The minimum weekly amount payable by the employer
Comp Max : The maximum weekly amount payable by the employer
4.11
Unions / Post Tax Deductions
This support files allows for creation of a standard list of post tax deduction types and rates used
within an organisation.
Typical examples are union contributions, sick and injury benefit deductions and transport
payments.
During payroll users need to select the deduction type from a pop up list which is automatically
generated through this support file and then specify the number of contributions to deduct. The
system will calculate the respective amounts to deduct according to the rates in this list.
The entries seen above relating to injury and sickness benefits also prompt the automatic
generation of benefit deductions when posting leave or sick leave. Deleting these entries will
deactivate this automation.
Fields:
Code: Deduction type code. (Mandatory)
Description: Brief description of the deduction (Mandatory)
Rate : Value per unit of deduction.
WinSPS - User Manual
Page 36
4.12
FSS Rates
This support file allows users to maintain the tax bands, rates and credits as stipulated by the
relevant authorities.
This file must normally be updated at the beginning of each year in a new payroll year after running
the end of year procedures and before calculating any payrolls in the new year.
Fields:
FSS Status: Whether respective band applies to employees with a separate or married tax
computation status. (Mandatory)
Range From : The minimum annual wage range to which the band applies.
Max Wage : The maximum annual wage range to which the category applies.
Tax Rate : The tax rate applicable to the respective band.
Subtract : The annual non-taxable amount applicable to the respective band.
4.13
Bonuses
This support file allows users to maintain details related to statutory bonuses.
The dates in this file are automatically moved forward by one year each time the end of year
procedures are run.
When a payroll which includes the trigger date of any of the bonuses is calculated, the payment of
the respective bonus is triggered automatically. Terminating an employee will also trigger the
calculation and payment of the pro-rata bonus amount due.
Fields:
WinSPS - User Manual
Page 37
Description : Description of bonus. C.O.L.A. is the cost of living adjustment paid out in March and
September while Gov. Bonus is the government bonus paid out in June and December.
Amount : The amount paid to employees who work the period between the From and To dates.
Bonus will be calculated pro-rata for employees. Bonus will be calculated pro-rata for employees
who do not work the full period.
Type : Whether bonus is taxable or not. Options are B – Before tax, A – After tax.
C.O.L.A. : Whether bonus is a cost of living adjustment and therefore calculated on a weekly rate
basis.
From : Start date of period to which full value applies.
To : Start date of period to which full value applies.
Trigger Date : Date which will trigger bonus payment in the payroll period within which it lies.
PT Date From : Start date of work period which will be taken into consideration when the system
is calculating pro-rata bonuses payable to part timers.
PT Date To : End date of work period which will be taken into consideration when the system is
calculating pro-rata bonuses payable to part timers..
4.14
Fringe Benefits
This support file allows users to maintain details related to fringe benefit types for tax calculation.
Fields:
Code : Unique code of fringe benefit type (Mandatory)
Description : Description of fringe benefit type
Category : Category of benefit as stipulated by the authorities
Cash : Whether benefit type is paid in cash in payroll.
Taxed % : In case of cash benefits, what percentage of the benefit is taxable.
Annual Max : In case of cash benefits this indicates the maximum allowable annual benefit value
to which the taxed % rule applies.
Credit : In case of cash benefits where the annual amount exceeds the maximum allowable this
indicates the annual non-taxable benefit value.
WinSPS - User Manual
Page 38
4.15
Pay Scales
This support file allows users to maintain details related to pay scales for the automatic periodic
updates of basic pays when due to employees belonging to the respective scales.
The first screen allows users to define a code, description and starting salary for a particular scale.
In the second screen the user defines the new basic salary and the number of months from the
previous increment after which the respective salary increment is due.
In the employee details file employees may optionally be allocated a pay scale code and an
effective scale start date.
At each payroll calculation the system will evaluate whether enough time has elapsed from the
employee’s scale date to require a move to the next scale increment. If an increment is due the
system will automatically effect the required pay change in the employee file prior to calculating the
payroll so calculations are based on the new salary.
4.16
Employee details
This support file allows users to maintain details related to employees.
WinSPS - User Manual
Page 39
4.16.1 Employee List
On loading this option the user is presented with a list of employees on file.
Columns with Bold headers contain indexed fields and clicking on these headers changes the
order of viewing to this field. The system will perform a quick search in the highlighted column for
any text typed. To search by name just click on the header of the Name column and type in the
name.
Records related to terminated employees will show highlighted in red.
WinSPS - User Manual
Page 40
4.16.2 Employee Transactions
Clicking on the employee transactions button presents the user with a list of all payroll transactions
related to the highlighted employee for the whole payroll year including annual totals at the bottom.
The itemised tabs at the top of the list allow users to drill down further into the details of the
selected item for the highlighted payroll period.
4.16.3 Leave Entitlement and Transactions
This function presents the user with a list of all the leave entitlements related to the highlighted
employee. Users may also use this screen to create new leave entitlements.
Clicking on the Details tab switches to a screen listing all the leave transactions related to the
entitlement record highlighted in the previous screen.
Pro-rate leave
WinSPS - User Manual
Page 41
This function is only available for employees whose data of employment is within the current
payroll year and who do not already have an optional leave entitlement. Clicking on this button
results in the system automatically calculating what pro-rata optional leave entitlement is due to the
new employee and presenting the user with the window below to confirm or adjust the figure as
required.
Leave Planner
This function presents a printable calendar view of an employee’s leave transactions. Each leave
type will have a distinct colour code. Leave records within a payroll period which has not already
been finalised will have a red border and vice-versa.
This function may be usedl to highlight a pattern to an employee’s sick leave etc...
WinSPS - User Manual
Page 42
Pay off leave
This function may be used to pay off part of an employee’s entitlement. The user must specify a
number of hours to pay and a payroll period in which to effect the payment.
Attachments
Clicking on this button allows users to link any electronic documents stored in an accessible
location to the currently selected employee record by clicking on the attach button.
There is no limit to the number of documents that can be linked. The system creates a link not a
copy of the documents so if the document is moved the link must be refreshed.
When a document link is no longer required it may be removed using the Detach button.
4.16.4 Show / Hide terminated employees
Pressing this button results in the employee records of terminated employees being hidden. This
is useful when one needs to generate reports or export details only regarding employees who are
still in employment. Companies with a high staff turnover will also benefit from a less cluttered
screen.
4.16.5 Image
This function allows users to link an image of the employee to his employee record for quick
access.
WinSPS - User Manual
Page 43
4.16.6 Free Text
The Free text function presents the user with the screen below where he may enter any free text
notes he may want to store related to the selected employee.
WinSPS - User Manual
Page 44
4.16.7 Additional Details Menu
Clicking on the Additional Details button at the top right hand corner of the screen will open a
menu allowing users to access further details related to the highlighted employee.
4.16.8 Employee Details
This option presents a view of all the employee’s main details for amending or creating of records.
Pressing the amend or create button in the list view screen automatically switches to full screen
mode.
WinSPS - User Manual
Page 45
4.16.9 Pay Planner
The pay planner screen allows users to enter multiple future pay changes for the currently selected
employee. The system will automatically effect these changes in the main employee details record
as they fall due. The remarks column allows entry of free text remarks.
Fields:
Change date : Effective future date for pay change (Mandatory)
Basic Pay : Basic pay value per payroll period
NI Category : The system will allocate an NI category automatically based on parameters in the NI
category support file
Remarks : The remarks column allows entry of free text remarks.
If a new employee record is created relating to a person who is less than 18 years old and earns
less than the minimum weekly wage, the system will automatically create a record in the pay
planner to trigger a change in his NI Category from A to B on his birthday.
4.16.10 Adjustments
This screen allows for entry of automatic recurring adjustments to an employee’s payroll like
regular allowances or deductions per payroll period.
Fields:
Desc : 10 Character description of adjustment. Pressing the [ ? ] button here presents the user
with a list of adjustment types based on the Adjustment Types support. Alternatively users may
enter a free text 10 character adjustment description. (Mandatory)
Amount : Value of adjustment per payroll period. This value can also be negative in the case of
deductions. (Mandatory)
WinSPS - User Manual
Page 46
Type : Whether the adjustment is to be posted before (B - taxable adjustments) or after (A –
non-taxable adjustments) tax has been calculated. Type (N) is available for adjustments to NI.
Company NI : If Type (N) is used then the user must define the value of the company’s NI
contribution.
Trigger Date/Expiry Date : If the Trigger Date is left blank along with the Expiry Date then the
adjustment will be applied at each payroll run indefinitely. If the Trigger Date is defined and the
Expiry date is left blank the adjustment will only be posted once when the date is within the payroll
period. If the Expiry Date is defined and the Trigger date is left blank the adjustment will start from
the next payroll until the expiry date is super ceded.
Add to Basic : If this option is selected then the hourly overtime rate is calculated based on the
value of the adjustment plus the value of the basic pay.
4.16.11 Previous Employment
This option provides an interface where users may enter earnings, taxes and fringe benefits from
previous employments for employees employed part way along a payroll year. These figures are
taken into consideration when the system is calculating FSS tax so that the tax values reflect the
total earnings for the year to date. They will not be included in any tax returns issued from the
system.
4.16.12 Fringe Benefits
This screen allows users to enter any recurring fringe benefits which are to be included or taxed
per payroll in the selected employee’s payroll calculations.
WinSPS - User Manual
Page 47
Fields:
Code : Unique code of fringe benefit (Mandatory). This is validated against the Fringe Benefits
types support file. Press [ ? ] for a popup list of Benefit types.
Description : Description of fringe benefit type from Fringe benefit types support file
Category : Category of benefit from Fringe benefit types support file as stipulated by the
authorities
Value : The value of benefit which is to be posted/taxed automatically per payroll period. In case of
Car Cash Benefits the value should include both the taxable and also the non taxable portions of
the benefit. The system will automatically compute which portion is to be taxed.
Start Date : The date from which the benefit will be applied.
End Date : The date up to which the benefit will be applied.
N.B. Multiple benefits of the same type may be entered as long as period dates do not overlap.
This allows for same benefit types with different values for different periods like when a company
car changes value along the year.
4.16.13 Unions / Deductions
This screen allows users to enter any recurring Union / Post-tax deductions which are to be
included per payroll in the selected employee’s payroll calculations.
Fields:
Code : Unique code of deduction (Mandatory). This is validated against the Unions/Deductions
support file. Press [ ? ] for a popup list of Union Codes.
Description : Description of deduction type from Unions/Deductions support file.
Contributions : The number of contributions to deduct per payroll period. If the selected
deduction type is a union this field must be left blank. The number of union contributions deducted
per payroll is dictated by the value of the ‘Unions’ field in the payroll setup screen.
Reference : In case of union deductions this refers to the union membership reference ( ID
Number)
WinSPS - User Manual
Page 48
4.16.14 Split Payments
If the employee gets paid through the direct credit system this screen allows users to enter any
payments that need to be deducted from the employee’s net pay and paid into a different account.
This distribution of payments is processed automatically by the system during the direct credit
payment process.
Fields:
Payee Ref : Unique payee reference (Mandatory). This reference is system generated but may be
overwritten as long as it is unique.
Name : Payee Name
Surname : Payee Surname
Amount : Amount to be paid ( deducted from employee’s net pay)
% : Percentage of employee’s net pay to be paid ( deducted from employee’s net pay)
Method : Method of payment
From : Date from which payment is to be effected
To : Date to which payment is to be effected
Branch : Bank branch of payee’s account
Account : Payee’s bank account
Iban : Payee’s Iban Number
WinSPS - User Manual
Page 49
5.
Utilities
The Utilities menu provides a series of tools which assist users in certain aspects of the
maintenance and updating of employee information and also importing and exporting payroll
information to and from third party applications. This includes the automated exporting of payroll
figures to the Shireburn Financial Manager or even to a ‘Posting report’ saved in excel format for
eventual import to third party financial applications.
This menu function is sub divided into the following functions.
5.1
Global Basic Adjustments
This function allows users to apply a change in weekly basic salary across the board to all
employees. This is particularly useful at the beginning of a new payroll year when applying the cost
of living payroll increases to all employees.
Weekly Increase Amount This option allows users to enter a weekly increase amount which will
be added to all full timers’ basic pay. The increase will be automatically applied according to each
individual’s payroll period i.e. Monthly, fortnightly etc.....
Weekly increase percentage This option allows users to allocate a % increase which will be
topped onto the current employees’ basic pay.
Part timers Hourly increase The function also allows for the global update of the hourly rate for
part timers who do not work fixed hours.
Change Date Here the user must specify the date from which the new basic pay will be effective.
st
At the beginning of a new payroll year the date is normally set to the 1 of January of the new year.
It does not matter if the payroll period does not start on this date because the system will
automatically calculate payroll and NI contributions based on the 2 different rates applicable to the
period.
Update pay planner Since the system allows user to record pre-planned pay changes for
individual employees this option gives one the opportunity to specify whether or not to apply the
pay increase to the future planned pay changes.
WinSPS - User Manual
Page 50
5.2
Change Employee Code
This option allows users to change the unique reference code of an employee. On running this
function the system will automatically go through all the data elements related to the employee
concerned and convert the employee code to the new one.
1. In the Empno field enter the code of the employee you want to change or press <enter> for a
list of employees to choose from.
2.
Click on the padlock button to lock the record of this employee exclusively
3. Enter the desired new employee reference in the New Empno field and click on the save
button to effect the change.
5.3
Import
The import function allows users to import transactions related to adjustments, overtime, leave,
basic hours and even employee details from an excel spreadsheet into the payroll system for
inclusion in the selected payroll as opposed to entering the records manually and individually
through the interfaces provided by the package.
Whatever type of transaction you choose to import from the options available, the process will be
identical to the following.
1. Click on
to generate an excel template containing columns for the data elements
required for the import.
2. Populate the template with the data you wish to import and save it without closing the excel
sheet.
3. In the File location field enter the path and file name of the excel sheet.
4.
Click on
WinSPS - User Manual
to import the records in the excel sheet.
Page 51
Once the import is complete the lower part of the screen will display the import report and users
may use the option buttons provided to select whether to view all records / updated only /not
updated only.
5.4
Copy Employee Record
This function allows users to make a copy of an existing employee record. A case in point for such
a requirement would be when a female employee is getting married so for the current year she is
entitled to the tax free ceiling twice, once on her income as a single person and once as a married
person. This requires that she has two employee records for the same year so that her income is
split in the two periods and separate fs3’s are generated for her single and married income. A
termination date must be entered in the single record and this feature can then be used to copy her
details onto a new record where her employment date would be the wedding date and the marital
status would be set to M for Married.
The copy additional details option allows users to copy over any associated data like fixed
allowances or fringe benefits
The copy leave records option allows users to copy over any leave entitlements and transactions
from the old to the new record. Leave records related to the original employee dated after the
termination date will be deleted.
5.5
Update Accounts
Clients who make use of both the Shireburn Payroll and the Shireburn Financial Manager have the
opportunity to interface both system to automate the posting of the accounting entries generated
from the payroll system. These entries will cover both the journal entries to identify all the expense
and liability accounts covering all the payroll entries while at the same time account for the bank
entries. The bank entries could be made of each cheque payments and/or the transfer of the direct
credit values.
The following provides for the required technical details to setup this interface.
5.5.1
Configuration (Company Maintenance)
The first part of the configuration must be done in the Company maintenance option of the Admin
Menu. In the Additional details page the user may define the SFM main data directory and
Company data directory required in the interface. The system will use these settings to present
the user with the correct SFM chart of accounts and also to transfer the required postings to the
SFM gateway / import file.
The interface level is directly related to the Department / Section / Unit support file and one may opt
to interface at any of these three levels. If one opts to interface at department level then one must
have separate nominal codes per department. The same applies if interfacing at any other level.
For the purposes of this document we will assume that the department level has been selected.
WinSPS - User Manual
Page 52
There are two main types of interface. The first is the Net Interface where only the payroll net
values are posted to nominal. In this case all direct credits will be posted as one entry per
department whilst any payments done by cheque will generate a double entry per cheque. In this
type of interface an account code must be defined per department. The Net export process is
carried out in one step where the system will credit the wages account and debit the user defined
department account.
The other interface type available is the Cost Centre Interface where one may define separate
nominal account codes for the different cost heads in the payroll and in the export double entries
are created for each cost head per department. As an example one may have different accounts
for basic pay, NI contributions, tax etc... In this type of interface a control or suspense account
code must be defined per department (the same account is normally used for all departments) as
well as nominal account codes for the different cost heads in the same department . The Cost
centre export process is carried out in two steps. First the user must run the net export where the
system will credit the wages account and debit the departmental control account. Next it will post
the cost head accounts against the control account with the net effect of cancelling it.
In the Main details page the user must specify the Nominal ledger account code related to the
account from which wages are paid. When entering the account code the system will validate it
against the chart of accounts of the related SFM company.
WinSPS - User Manual
Page 53
5.5.2
Configuration ( Departments File )
The next step is to define the nominal account codes related to the specific departments and this is
done through the department/section/unit support file.
If the interface level has been set to department the nominal account must be entered in the
departments page of this module and the same applies to the other levels.
If the interface type has been set to Cost Centre the user must enter the control/suspense account
here otherwise the department account code must be entered. Pressing ? on the Accode field will
present the chart of accounts for selection of account code.
If the interface type has been set to Cost Centre, pressing the Nominal Account Codes button in
the toolbar will take the user to a screen where to enter the account codes per cost head. Pressing
? on the Accode field will present the chart of accounts for selection of account code.
WinSPS - User Manual
Page 54
5.5.3
Export process
The export options are available through the Update Accounts option in the Utilities Menu. To
run the export process the required payroll must first be finalised. The export process may be run
for payrolls and also advance payments.
Buttons in the tool bar allow the user to import from payroll and generate postings for either the
Net Values or else the Cost Centre Values for the selected roll. If any irregularities are noticed
the entries generated may be cleared and the process rerun.
If one is using an alternative accounting package, at this point the reporting options may be used
to export the entries generated to a spreadsheet for import into Nominal ledger of the respective
accounting package.
If using SFM the user may export these entries to the SFM import file using the export button.
5.6
View Punches
This feature allows users to import attendance information which could have been captured
through an electronic attendance data capture device like a palm or fingerprint reader. The
information must be prepared in a pre-defined comma delimited CSV format. Users may generate
attendance reports from this screen which will also include any leave records saved in the leave
module of the payroll system. The report will also show total attended times for the reporting
period.
5.7
Data Validity
This function validates the referential integrity of certain key data files in the system and reports
any errors.
WinSPS - User Manual
Page 55
6.
Payroll calculation
This section will describe the payroll calculation process.
6.1
Roll Setup
The first step in calculating a payroll is to create roll setup details to define the parameters like
dates and roll type related to the specific payroll run.
To create a new payroll period just click on the plus button in the toolbar
Fields.
Roll No : The roll no is system generated and each new roll is given the next number
Roll Type : This is a multiple choice field where you define whether you are creating a monthly,
twice monthly, four weekly, fortnightly or weekly payroll.
Pay Bonus only / Taxable : This feature is normally used when users want to pay out the
statutory bonus separately at mid-month as opposed to paying it in the normal payroll run.
Selecting this option will mean that only bonuses and adjustments will be included in this payroll
run. No NI contributions will be deducted and unless the Taxable option is selected no tax will be
deducted either. If the Taxable option is not selected make sure that it is not the last payroll of the
year otherwise tax will never be deducted on this payment. As long as subsequent payrolls are
calculated they will automatically include tax on the previously paid bonuses.
Pay Off Leave : This option allows users to pay off any outstanding leave balances and it can
normally be used in the last payroll of the year as opposed to carrying forward such balances to
the new year.
Extra Hours : This field allows users to define an adjustment on the standard hours paid in the
roll. This may be either a positive or negative figure. It is generally also used at the end of year
when a payroll falls partly in one year and partly in another so the hours paid can be adjusted to
st
cut off the payroll on the 31 of December. Subsequently it can be used again to adjust the hours
in the first payroll of the following year.
Pay From : The start date of the roll period.
WinSPS - User Manual
Page 56
Pay To : The end date of the roll period
Leave From : The start date of the leave period to be included in the payroll.
Leave To : The end date of the leave period to be included in the payroll. The leave period can
be different from the payroll period to allow users to have a cut off date for leave which is earlier
than the payroll period end date as the payroll normally has to be calculated some days before the
pay date.
Pay Date : The date when the payment will be effected particularly in the case of payment
through Bank Direct Credit.
Month No. : The month number to which the payroll will be associated. The payroll figures will be
included in the monthly government returns (FS5’s) of the selected month. We recommend that
users select the month containing the first Monday (NI Contribution) of the payroll period.
N.I. Contrib : The number of NI contributions to be deducted in the payroll calculation. The system
defaults the number of Mondays contained in the payroll period.
Union Contrib : The number of union contributions to be deducted in the payroll.
Finalised : This field indicates whether the currently selected payroll has been finalised.
6.2
Roll Adjustments
This option allows users to define taxable/non-taxable adjustments which will be automatically paid
to all employees included in the selected payroll calculation
Fields:
Desc : 10 Character description of adjustment. Pressing the [ ? ] button here presents the user
with a list of adjustment types based on the Adjustment Types support. Alternatively users may
enter a free text 10 character adjustment description. (Mandatory)
Amount : The value of the adjustment
Type : Whether the adjustment is to be posted before (B) or after (A) tax has been calculated.
WinSPS - User Manual
Page 57
6.3
The payroll calculation screen
The payroll calculation screen can be accessed either through the Main Menu > Calculations
option
or else through the Shortcut button in the system toolbar.
Users may select the required payroll period through the Roll List tab in the list of tabs to the left
of the screen. With the required payroll period highlighted the user may click on the Employees
tab to see a list of employees to be calculated in the selected roll period.
When viewing this list of employees, those employees whose payroll has not yet been calculated
will show in blue while others will show in the normal black font.
WinSPS - User Manual
Page 58
6.3.1
Calculation of Commissions
This option accessed through the toolbar of the calculation screen allows users to select the type
of sale upon which to calculate commission (validated against the commissions support file), to
enter the value of sales and specify whether the commission is to be paid Before or After tax.
The system will calculate the commission value based on the rates stipulated in the commissions
support file and then generate a pre/post tax adjustment in the employee’s calculation.
6.3.2
Calculation options menu
This menu allows access to calculations functions such as calculating or deleting payrolls, viewing
a report of calculation exceptions and printing reports detailing how FSS tax or pro-rata bonus was
calculated for the selected employee.
The Calculate Roll option will trigger the payroll calculation of all the employees related to the
selected roll period. The employees left uncalculated are the ones whose net pay is less than zero
as these calculation records will not be saved. An example of this is an hourly paid part time
employee whose hours worked have not yet been entered into the system.
The Delete Roll Option allows users to delete an entire payroll. The user will be presented with
the screen below and allowed to select which elements of the payroll are to be deleted or not.
Deleted elements will need to be re-entered by the user.
If just the Calculation Record/s option is tagged any entries related to overtime, adjustments etc...
will not be deleted and will not need to be re-entered for the next calculation.
WinSPS - User Manual
Page 59
6.4
Entering payroll details
There are 3 main methods in which to enter payroll details like overtime, adjustments etc... to
process a payroll depending mostly on the number of employees and the amount of
information/adjustments that need to be input related to that specific payroll run. Another factor is
the format in which the information is received by the payroll officer.
6.4.1
Through individual employees’ calculations
This method is particularly suited for environments with a small number of employees or where all
the payroll details related to one employee are in one source. E.g. Where all the payroll details for
an employee for a complete payroll period are on one timesheet so it would make sense to enter
all details from this timesheet and then move on to the next employee.
Using this method one may enter the calculation screen then go through each employee’s
calculation individually by highlighting the required employee in the employee list page then
clicking on the Calculations tab.
The system will initially calculate for the employee based on the basic pay and any fixed
adjustment or allowances and the user may then enter any additional information such as overtime
and leave records as required through the list of tabs to the left of the screen or else by clicking on
the actual test boxes.
When the user clicks on a tab or textbox the system will load the data entry screen related to that
item and all entries will be allocated to the selected employee. Once an entry is saved the
employee’s calculation is refreshed automatically.
WinSPS - User Manual
Page 60
6.4.2
Through calculation menu options
We would recommend this method of processing payroll to environments with a large number of
employees and where payroll details of a particular type like overtime, for all employees come from
one source. E.g. All overtime details for all employees for a complete payroll period are in one
report.
The Calculations menu allows users to access data entry screens for most major payroll items
like overtime, adjustments, part-timers’ hours etc.. Here users may enter all payroll details for any
employee included in the selected payroll period.
After going through all the data entry screens to update the required payroll one would enter The
payroll calculation screen and choose the Calculate Roll option in the Calculation options menu to
calculate payroll for all employees.
Each screen consists of 2 pages. The first page allows users to select the required payroll period.
The second page allows for data entry of the related payroll items.
Copy and paste button
This button allows users to copy and paste an entry when the same details need to be entered for
different employees.
WinSPS - User Manual
Page 61
Overtime
The overtime page of this screen allows for the posting of overtime for any employee in the
selected payroll. Overtime may be entered individually per employee per date or else cumulatively
so all the overtime of a certain rate for the same employee can be entered as one figure. In the
second case the user must select a date onto which to allocate the total overtime entry.
Fields:
EmpNo : Employee code. Press [ ? ] for a popup list of employees.
Full Name : Employee full name populated by the system
Date : Date overtime was worked
Hours : Number of hours of overtime worked
OT Rate : Overtime rate. This rate will be multiplied by the employee’s basic hourly rate to
calculate the overtime hourly value. If the overtime rate is 0 and a default overtime hourly value
has been defined for the employee’s grade then the system will prompt the default value in the
Value/Hr field.
Value/Hr : Hourly value of overtime computed by the system. If the overtime rate is 0 and no
default overtime hourly value has been defined for the employee’s grade then the user must enter
the hourly value.
Depart : Department code where overtime was worked. The system will default the employee’s
department but this may be changed to reflect overtime worked in alternative departments. Press
[ ? ] for a popup list of departments.
Section : Section code where overtime was worked. The system will default the employee’s
section but this may be changed to reflect overtime worked in alternative sections. Press [ ? ] for a
popup list of sections.
Unit : Unit code where overtime was worked. The system will default the employee’s unit but this
may be changed to reflect overtime worked in alternative units. Press [ ? ] for a popup list of units.
WinSPS - User Manual
Page 62
Adjustments
The adjustments page of this screen allows for the posting of adjustments for any employee in the
selected payroll.
Fields:
EmpNo : Employee code. Press [ ? ] for a popup list of employees.
Full Name : Employee full name populated by the system
Desc : A 10 Character description of the adjustment. Pressing the [ ? ] button here presents the
user with a list of adjustment types based on the Adjustment Types support. Alternatively users
may enter a free text 10 character adjustment description. This description will also show on the
payslip.
Type : Whether it is a taxable or non-taxable adjustment. Press [ ? ] for a popup list of adjustment
types. The options are B – Before Tax (Taxable) A – After tax (Non-Taxable) or N – NI adjustment.
The last option is seldom required but it is available for cases when one needs to make an
adjustment to National Insurance payments normally required due to payments in arrears.
Comp NI : In case the N type is selected the user may enter in this field the value of the
employer’s NI contribution related to this adjustment.
Amount : The value of the adjustment. This can also be a negative amount.
Date : The date of payment of the adjustment
WinSPS - User Manual
Page 63
Shift / Pro-Rata
The Shift Details page of this screen allows for the posting of shift allowances or pro-rata
payments for any employee in the selected payroll.
Fields:
EmpNo : Employee code. Press [ ? ] for a popup list of employees.
Full Name : Employee full name populated by the system
Code : A 5 character allowance code validated against the Shifts / Pro-Rata Payments support file.
This code will also show on the payslip. Press [ ? ] for a popup list of codes.
Number : The number of payments to be allocated.
Date : Related date
Amount : The total value of payments computed by the system.
Depart : Department code where shifts were worked. The system will default the employee’s
department but this may be changed to reflect shifts worked in alternative departments. Press [ ? ]
for a popup list of departments.
Section : Section code where shifts were worked. The system will default the employee’s section
but this may be changed to reflect shifts worked in alternative sections. Press [ ? ] for a popup list
of sections.
Unit : Unit code where shifts were worked. The system will default the employee’s unit but this
may be changed to reflect shifts worked in alternative units. Press [ ? ] for a popup list of units.
WinSPS - User Manual
Page 64
Benefits
The Benefits page of this screen allows for the posting of Fringe Benefits for any employee in the
selected payroll.
Fields:
EmpNo : Employee code. Press [ ? ] for a popup list of employees.
Full Name : Employee full name populated by the system
Code : A 5 character Benefit Type code validated against the Fringe Benefits support file. This
code will also show on the payslip. Press [ ? ] for a popup list of codes.
Category : The category of the selected fringe benefit. This is automatically assigned by the
system according to the Fringe benefits support file.
Amount : The value of the fringe benefit. In case of Car Cash Benefits the value should include
both the taxable and also the non taxable portions of the benefit. The system will automatically
compute which portion is to be taxed.
WinSPS - User Manual
Page 65
Basic Hours
The Hours page of this screen allows for the posting of Part-timers’ basic hours or basic hours
adjustments for any employee in the selected payroll.
Fields:
EmpNo : Employee code. Press [ ? ] for a popup list of employees.
Hours : The number of hours to be paid.
Rate : The rate hourly at which the hours are to be paid. In case of part timers with flexible hours
this rate is automatically assigned according to the basic hourly rate specified in the employee
details record. This rate may be overwritten.
Desc : An optional description of the hours entered.
Depart : Department code where hours were worked. The system will default the employee’s
department but this may be changed to reflect hours worked in alternative departments. Press [ ? ]
for a popup list of departments.
Section : Section code where hours were worked. The system will default the employee’s section
but this may be changed to reflect hours worked in alternative sections. Press [ ? ] for a popup list
of sections.
Unit : Unit code where hours were worked. The system will default the employee’s unit but this
may be changed to reflect hours worked in alternative units. Press [ ? ] for a popup list of units.
6.4.3
Through Import functions
Pls refer to the Import option in the Utilities menu.
WinSPS - User Manual
Page 66
7.
Payroll reports
The payroll reports function provides extensive payroll related reporting and analysis.
This option is accessible either through the shortcut button provided in the system toolbar
or else through the Main Menu > Calculations > Payroll Reports menu option.
The report interface allows users to set all the required parameters from pre-defined options like
report type and grouping before actually printing the report.
7.1
Payroll Report options
Roll Selection
Payroll reports may be printed either for a single payroll or else for a range of payrolls. In the
second case the system will sum up all the payroll figures for the selected period of rolls.
On first entering this screen the payroll printing range fields will be empty and the grid on the right
hand side of the screen will contain a list of all the payroll periods existing in the Roll setup file.
Highlight the first required payroll period in the grid and click on the range from button
Highlight the last required payroll period in the grid and click on the range to button
To print for just one payroll period highlight the selected payroll
period and click on both range selection buttons consecutively.
The selection will result in the list of payrolls being filtered
according to the selected range.
To reset the selection click on the Clear range button
WinSPS - User Manual
Page 67
Report Type
Users may choose from several preset report types according to their requirements.
Pay Type
If the Pay List report type is selected users may filter the content of the report according to the
payment type of the employees by ticking the check boxes next to the required pay types.
Group
Payroll reports may be grouped and filtered according to user selected options.
Company : Selecting this option will present the user with a list of all employees and the range
buttons may be used to filter a single or range of employees. If no range is selected the report will
print for all employees. No grouping or sub-totals will be applied if this option is selected.
Department : Selecting this option will present the user with a list of all departments and the
range buttons may be used to filter a single or range of departments. If no range is selected the
report will print for all departments with a new page and sub-total for each.
Section : Selecting this option will present the user with a list of all departments and their related
sub-sections and the range buttons may be used to filter a single or range of sections. If no range
is selected the report will print for all sections with a new page and sub-total for each.
Unit : Selecting this option will present the user with a list of all departments and their related subsections and units and the range buttons may be used to filter a single or range of units. If no
range is selected the report will print for all units with a new page and sub-total for each.
Grade : Selecting this option will present the user with a list of all grades and the range buttons
may be used to filter a single or range of grades. If no range is selected the report will print for all
grades with a new page and sub-total for each.
Category
If a category is selected the report will first be grouped by category then by group so if for example
the Status category is selected along with the Department group, the report will list payroll details
per department for full timers and then it will list payroll details per department for part timers etc..
The report will contain sub-totals per category and group.
Order
The order option allows users to select whether to display individual employee records in order of
employee code or name.
WinSPS - User Manual
Page 68
Reallocated
The rostering functions contained in the Time & Attendance module of the payroll allow users to
allocate the hours of a single employee across various departments where he works. For such
users, selecting the Reallocated option in the payroll report will result in the payroll figures being
apportioned pro-rata according to the departments in which the employee was rostered.
8.
Payments Menu
The Shireburn Payroll System offers 3 main options regarding the effecting of payments to
employees.
8.1
Pay Slips
The payslip printing function provides users with an effective way to
print and distribute payslips. This option is accessible either through
the shortcut button provided in the system toolbar or else through the
Main Menu > Payments Menu > Payslips option.
8.1.1
Payslip Printing options
Roll Selection
Payslips may be printed either for a single payroll or else for a range of payrolls. In the second
case the system will sum up all the payroll figures for the selected period of rolls.
On first entering this screen the payslip printing range fields will default to the last finalised roll and
the grid on the right hand side of the screen will contain a list of all the employees in the selected
roll.
To change to a different roll period click on the Roll No text box so that the grid on the right hand
side of the screen will show the details of the selected roll.
WinSPS - User Manual
Page 69
To reset the selection first click on the Clear range button
Highlight the first required payroll period in the grid and click on
the range from button
Highlight the last required payroll period in the grid and click on
the range to button
To print for just one payroll period highlight the selected payroll
period and click on both range selection buttons consecutively.
The selection will result in the list of payrolls being filtered according to the selected range.
Payment Type
Users may choose to print payslips for All employees, just for those paid through Direct Credits or
all Others.
Group
Payslips may be grouped and filtered according to user selected options.
Company : Selecting this option will present the user with a list of all employees and the range
buttons may be used to filter a single or range of employees. If no range is selected the report will
print for all employees. No grouping if this option is selected.
Department : Selecting this option will present the user with a list of all departments and the
range buttons may be used to filter a single or range of departments. If no range is selected the
report will print for all departments.
Section : Selecting this option will present the user with a list of all departments and their related
sub-sections and the range buttons may be used to filter a single or range of sections. If no range
is selected the report will print for all sections.
Unit : Selecting this option will present the user with a list of all departments and their related subsections and units and the range buttons may be used to filter a single or range of units. If no
range is selected the report will print for all units.
Category
If a category is selected the report will first be grouped by category then by group so if for example
the Status category is selected along with the Department group, the report will list payslips per
department for full timers and then it will list payslips per department for part timers etc..
Selecting this option will present the user with a list of all statuses and the range buttons may be
used to filter a single or range of statuses. If no range is selected the report will print for all
statuses.
WinSPS - User Manual
Page 70
Order
The order option allows users to print in order of employee code or name.
Email
Payslips may be emailed to employees to the address entered in their employee details record.
Selecting the Email option will filter the list of employees on the right hand side of the screen to
those who have an email address so that their payslips may be emailed.
Selecting the Non-Email option will filter the list of employees on the right hand side of the screen
to those who do not have an email address so that their payslips may be printed.
Selecting the All option will remove any filter from the list of employees on the right hand side of
the screen so that all payslips may be printed.
Payslip Comments
This function allows users to enter comments which will be printed at the bottom of each payslip.
Printing Payslips
The payslip printing interface has an additional option which allows users to edit the text in the
body of the email before being sent with the payslip attached.
WinSPS - User Manual
Page 71
8.2
Cheque Printing
The cheque printing function provides options to print payment details on
pre-printed cheque stationary. This option is accessible through the Main
Menu > Payments Menu > Cheque Printing option.
Roll Selection
Chques may be printed either for a single payroll or else for a range of payrolls. In the second
case the system will sum up all the payroll figures for the selected period of rolls.
On first entering this screen the payslip printing range fields will default to the last finalised roll and
the grid on the right hand side of the screen will contain a list of all the employees in the selected
roll.
To change to a different roll period click on the Roll No text box so that the grid on the right hand
side of the screen will show the details of the selected roll.
To reset the selection first click on the Clear range button
Highlight the first required payroll period in the grid and click on
the range from button
Highlight the last required payroll period in the grid and click on
the range to button
To print for just one payroll period highlight the selected payroll
period and click on both range selection buttons consecutively.
The selection will result in the list of payrolls being filtered according to the selected range.
Cheque Number
WinSPS - User Manual
Page 72
Here users may enter the first cheque number from the pre-printed cheque stationary that has
been loaded into the printer. The system will start printing from this number automatically
incrementing as cheques are printed.
Group
Cheques may be grouped and filtered according to user selected options.
Company : Selecting this option will present the user with a list of all employees and the range
buttons may be used to filter a single or range of employees. If no range is selected the report will
print for all employees. No grouping if this option is selected.
Department : Selecting this option will present the user with a list of all departments and the
range buttons may be used to filter a single or range of departments. If no range is selected the
report will print for all departments.
Section : Selecting this option will present the user with a list of all departments and their related
sub-sections and the range buttons may be used to filter a single or range of sections. If no range
is selected the report will print for all sections.
Unit : Selecting this option will present the user with a list of all departments and their related subsections and units and the range buttons may be used to filter a single or range of units. If no
range is selected the report will print for all units.
Category
If a category is selected the report will first be grouped by category then by group so if for example
the Status category is selected along with the Department group, the report will list payslips per
department for full timers and then it will list payslips per department for part timers etc..
Selecting this option will present the user with a list of all statuses and the range buttons may be
used to filter a single or range of statuses. If no range is selected the report will print for all
statuses.
Order
The order option allows users to select whether to print in order of employee code or name.
Comments
This function allows users to enter comments which will be printed at the bottom of each cheque.
WinSPS - User Manual
Page 73
8.3
Direct Credits
WinSPS - User Manual
Page 74
Appendix I. Security Functions
This appendix shows a list of the Security Functions within SPS, the Function’s description, and
what the function controls.
Function Code
ADMIN_ACC
WinSPS - User Manual
Function Descrition
ADMIN: Accounting Utilities
Use of Function
Access to Accounting Utilities menu
in Main Menu
Page 75