1
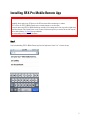
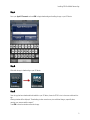
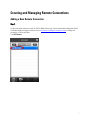
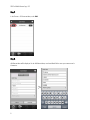
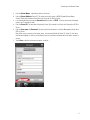
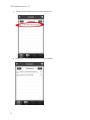
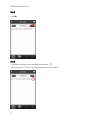
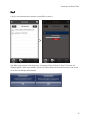
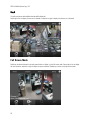
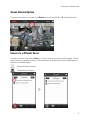
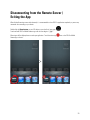
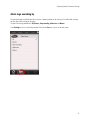
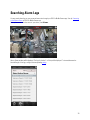
SRX-Pro Mobile Remote App - iOS
©2013 i³ International Inc.
The contents of this user manual are protected under copyright
and computer program laws.
INNOVATIONS AT THE SPEED OF THOUGHT
™
Table of Contents
Installing SRX-Pro Mobile Remote App ....................................................................................................................... 3
Creating and Managing Remote Connections .............................................................................................................. 7
Adding a New Remote Connection ........................................................................................................................ 7
Editing Existing Remote Connection ..................................................................................................................... 11
Deleting Existing Remote Connection ................................................................................................................... 15
Server Groups ................................................................................................................................................... 18
Creating a Server Group................................................................................................................................. 18
Renaming or Deleting a Server Group ............................................................................................................. 22
Connecting to the Remote Server ............................................................................................................................ 24
Full Screen Mode ............................................................................................................................................... 26
Screen Division Options ...................................................................................................................................... 27
Connect to a different Server .............................................................................................................................. 27
Channel Mapping ............................................................................................................................................... 28
Disconnecting from the Remote Server / Exiting the App............................................................................................ 29
Configuring Remote Connection Settings .................................................................................................................. 31
Ratio View ........................................................................................................................................................ 32
Select Active Server ........................................................................................................................................... 33
Frame per second .............................................................................................................................................. 34
Video Quality ..................................................................................................................................................... 35
View alarm list in ............................................................................................................................................... 36
Alarm logs searching by ..................................................................................................................................... 37
Searching Alarm Logs ............................................................................................................................................. 39
Controlling PTZ Camera .......................................................................................................................................... 41
Taking a Snapshot .................................................................................................................................................. 42
Saving the Snapshot .......................................................................................................................................... 42
Sending Snapshot via E-mail ............................................................................................................................... 45
Index..................................................................................................................................................................... 47
iii
SRX-Pro Mobile Remote App User Guide - iOS
Copyright © 2013 i³ International Inc.
All rights reserved. No part of this manual may be reproduced or transmitted in any form or by any means, electronic or
mechanical, including photocopying, recording, or by any information storage or retrieval system, without the prior written
permission of the copyright owner and the publisher. SRX-Pro is a registered trademark of i³ International. i³ reserves the
right to change the contents of this manual without notice.
Disclaimer
SRX-Pro Mobile Remote App User Guide - iOS is provided as is, without warranty of any kind, expressed or implied,
including but not limited to performance, merchantability, or fitness for any particular purpose. Neither i³ International Inc.
nor its dealers or distributors shall be liable to any person or entity with respect to any liability, loss, or damage, caused or
alleged to have been caused directly or indirectly by this information.
Furthermore i³ International Inc. reserves the right to revise this publication, and to make changes to the content at any
time, without notice.
FCC
This device complies with part 15 of the FCC Rules. Operation is subject to the following two conditions: (1) This device
may not cause harmful interference, and (2) this device must accept any interference received, including interference that
may cause undesired operation.
Address:
i³ International Inc. • 780 Birchmount Road, Unit 16 • Scarborough • Ontario • Canada M1K 5H4
Tech Support: 1.877.877.7241 / [email protected]
Web Site: www.i3international.com
1
Installing SRX-Pro Mobile Remote App
DISCLAIMER:
If available, always switch your iOS device to the WiFi connection before connecting to a remote
SRX-Pro Server via SRX-Pro Mobile Remote app to minimize charges to your data plan.
Be cautious when using SRX-Pro Mobile Remote app outside of your roaming zone as this may result in higher-thannormal data charges. Once finished, there is only one way of disconnecting from your remote Servers that stops all
and any data streaming - by Exiting the app completely.
See corresponding section for more information.
Step 1.
Start by downloading SRX-Pro Mobile Remote app from the Apple store. Search "srx" to locate the app.
3
SRX-Pro Mobile Remote App - iOS
Step 2.
Select SRX-Pro by i³ International Inc. app from the list and touch Install.
Step 3.
Touch Install again.
4
Installing SRX-Pro Mobile Remote App
Step 4.
Enter your Apple ID Password and touch OK to begin downloading and installing the app to your iOS device.
Step 5.
Wait while the app is downloading to your iOS device.
Step 6.
Once the app has been downloaded and installed to your iOS device, locate the SRX-Pro icon in the menu and launch the
app.
Warning window will be displayed: "Downloading via data networks may incur additional charges, especially when
roaming on an overseas mobile network."
Touch OK to close the window and launch the app.
5
SRX-Pro Mobile Remote App - iOS
Step 7.
Connect window will be displayed by default. Read the following chapter to learn how to add SRX-Pro Remote
connections to your iOS device.
6
Creating and Managing Remote Connections
Adding a New Remote Connection
Step 1.
To add a new remote connection, launch the SRX-Pro Mobile Remote app, Connect window will be displayed by default.
This window displays the remote connection Groups. Instructions on adding new connection Groups or adding new
connections to a Group will follow.
Touch All Servers.
7
SRX-Pro Mobile Remote App - iOS
Step 2.
In the Connect - All Servers window, touch Add.
Step 3.
Add New window will be displayed. In the Add New window, touch each blank field to enter your remote server's
information.
>
8
Connecting to the Remote Server
a. Enter the Server Name - a descriptive name for the server.
b. Enter the Server Address (Server IP). This value can be either static or DDNS (Dynamic Domain Name
System). Obtain this information from Server Info Setup tab on SRX-Pro Server.
c. It is recommended that you keep the Server Port default value of 13225. If the port value must be changed,
contact your IT specialist for help.
d. Enter the Server ID. This must match the remote Server ID as entered in the Server Info Setup tab on SRX-Pro
Server.
e. Enter the User name and Password. This must match user information in the User Management Setup tab on
SRX-Pro Server.
Note: When trying to connect to the remote server, the system will check the Server ID, Server IP, User name
and Password together. If either of the variables is incorrect, the Remote software will not be able to connect to
the site.
f. Touch Save to add the new remote connection to the list.
9
SRX-Pro Mobile Remote App - iOS
g. The new connection will be saved to the remote connections list.
h. Repeat Steps 1-3 to add other remote SRX-Pro Server connections
10
Connecting to the Remote Server
Editing Existing Remote Connection
When changes are made to the remote Server, such as IP Address change, User Name or Password change, or Server ID
change - you must update your saved remote connection in the SRX-Pro Mobile app, otherwise you will no longer be able
to connect to your remote Server and one of these error messages will be displayed.
Step 1.
To make a change to the remote connection, launch the SRX-Pro Mobile Remote app, Connect window will be displayed
by default.
Touch All Servers or touch the name of the Group (if applicable).
11
SRX-Pro Mobile Remote App - iOS
Step 2.
Touch Edit.
Step 3.
The Settings icon will appear next to each added remote connection:
Touch the Settings icon
12
next to the remote connection that needs to be edited.
Connecting to the Remote Server
Step 4.
Touch Server Info.
Step 5.
In the Edit Server window, make changes to the Server settings: Server Name, Server Address, Server Port, Server ID,
User Name or Password.
In the example below, changes were made to the Server Address information. Touch Save to apply changes.
>
13
SRX-Pro Mobile Remote App - iOS
Step 6.
You will be returned to the Connect window. Touch Done to commit all changes.
>
14
Connecting to the Remote Server
Deleting Existing Remote Connection
Occasionally you may wish to delete a remote Server connection from the list of stored remote connections.
Step 1.
To delete an existing remote connection, launch the SRX-Pro Mobile Remote app, Connect window will be displayed by
default.
This window displays the remote connection Groups. Touch All Servers or touch the name of the Group (if applicable).
15
SRX-Pro Mobile Remote App - iOS
Step 2.
Touch Edit.
The Settings icon will appear next to each added remote connection:
Touch the Settings icon
16
next to the remote connection that needs to be edited.
Connecting to the Remote Server
Step 3.
Touch Delete.
17
SRX-Pro Mobile Remote App - iOS
Server Groups
For convenience, you may choose to arrange your stored remote connections into groups.
Creating a Server Group
Step 1.
To create a new connections group, launch the SRX-Pro Mobile Remote app, Connect window will be displayed by default.
Touch Add.
18
Connecting to the Remote Server
Step 2.
Type the name of the group and touch Done to save the new group.
>
Step 3.
Touch All Servers to locate the remote server connection that will be assigned to the new group.
Touch Edit, then touch the Settings icon
next to the remote connection that needs to be sorted into the new group.
>
19
SRX-Pro Mobile Remote App - iOS
Step 4.
Inside Edit Server window, touch Add to group.
Step 5.
Touch the Group name in the list. The remote connection will now be added to the selected group. Edit Server window
will be displayed again. Touch Save.
>
20
Connecting to the Remote Server
Step 6.
In the All Servers window, touch Done to save all changes.
Step 7.
To make sure your remote connection has been saved to your chosen Group, touch the Back arrow in the All Servers
window, touch the group name and make sure your remote connection appears in the group list.
>
>
21
SRX-Pro Mobile Remote App - iOS
Renaming or Deleting a Server Group
Deleting the server group will move all remote server connections assigned to the group back into "All Servers" category.
To delete one or more remote server connections, see Deleting Existing Remote Connection section.
To rename the Server Group, launch the SRX-Pro Mobile Remote app, Connect window will be displayed by default.
Step 1.
Touch Edit in the Connect window. Two buttons will appear next to each server group: "Text" and "Delete".
22
Connecting to the Remote Server
Step 2.
Touch Text to rename the server group. Enter the new server group name. Touch Done to apply new server group name.
>
Step 3.
To delete server group, touch Delete. Touch Yes in the confirmation window.
>
23
SRX-Pro Mobile Remote App - iOS
Connecting to the Remote Server
Step 1.
To connect to a remote SRX-Pro location with your iOS device, launch the SRX-Pro Mobile Remote app, Connect window
will be displayed by default.
This window displays the remote connection Groups. See Server Groups section to learn how to sort your saved remote
connections into groups.
Touch All Servers or the name of the Group that the remote connection belongs to (if applicable).
24
Connecting to the Remote Server
Step 2.
In the list, touch the remote server connection you would like to connect to.
>
Note: When trying to connect to the remote server, the system will check the Server ID, Server IP, User name and
Password together. If either of the variables is incorrect, the Remote software will not be able to connect to the site and
one of these error messages will be displayed.
25
SRX-Pro Mobile Remote App - iOS
Step 3.
The split quad screen with available channels will be displayed.
Swipe right-to-left to display the next set of channels or swipe left-to-right to display the previous set of channels.
Full Screen Mode
Double-tap the desired channel in the split screen division to display it in the full screen mode. Swipe right-to-left to display
the next channel or swipe left-to-right to display the previous channel. Double-tap to return to the split-screen mode.
26
Connecting to the Remote Server
Screen Division Options
To see more or less cameras on the screen, touch Division option, then touch '4', '9' or '16' screen division options.
Connect to a different Server
To connect to a different server, touch the Home icon. The list of remote server connections will be displayed. Touch the
remote connection you would like to connect to. The app will connect to the selected remote server and will display the
quad screen with available channels.
Disconnected Remote Connection
Connected Remote Connection
>
27
SRX-Pro Mobile Remote App - iOS
Channel Mapping
SRX-Pro Remote Mobile app allows you the flexibility of arranging the video channels on the screen in the order most
convenient for you.
For example, if your screen display is set to 4 divisions, assign four video inputs most important to you to the Channels
1-4 for quick display. This way the most important channels will be displayed first once you have connected to your
Remote server through your iOS device.
To swap channels on the screen, touch and hold the video channel you would like to move into a different screen division
position. Channel Mapping window will be displayed.
In the Channel Mapping window, arrange channels from the connected server in a way that is most convenient to you.
Touch each position to display the list of available video channels. Touch the channel you would like to display in that
screen division position.
28
Disconnecting from the Remote Server /
Exiting the App
When finished browsing remote video channels, it is recommended to close SRX-Pro application completely to prevent any
unwanted data streaming to your device.
Double-click the Home button on your iOS device to open the list of open apps.
Touch and hold SRX-Pro Mobile Remote app until the icons begin to "jiggle".
Minus signs will be displayed next to each open application. Touch the minus sign
Remote app to close it.
next to the SRX-Pro Mobile
>
29
Configuring Remote Connection Settings
SRX-Pro Mobile Remote app allows making setting changes to the remote connection. To access Settings, Connect to the
remote server first.
Once you're connected to the server of your choice, touch Settings.
Settings window will be displayed.
31
SRX-Pro Mobile Remote App - iOS
Ratio View
Ratio View can be set to either:
> Stretch: will stretch to fit your iOS device's resolution
> Keep Origin Ratio
Touch Settings to return to the Settings window OR touch the Live icon to return to the video screen.
32
Configuring Remote Connection Settings
Select Active Server
Select Active Server option allows switching between connected servers in order to access their respective settings.
Touch the remote connection in the list of connected servers. Active remote connection will be identified with a check
mark.
Touch Back to return to the Settings window OR touch the Live icon to return to the video screen.
33
SRX-Pro Mobile Remote App - iOS
Frame per second
Frame per second setting allows configuring the display frame rate for the SRX-Pro Mobile Remote app. This setting
will apply to all channels of the connected active remote site.
The frame rate can be set from 1 fps to 30 fps.
The lower the frame rate, the choppier the video will appear. However, if your Connection is set to your device's data
plan, lower frame rate also means lower data usage.
The higher the frame rate, the more fluid the video will appear. The higher frame rate setting will also mean higher data
usage when the Connection is set to your device's data plan.
Touch Settings to return to the Settings window OR touch the Live icon to return to the video screen.
34
Configuring Remote Connection Settings
Video Quality
Video Quality setting allows configuring the quality of video transmitted through SRX-Pro Mobile Remote app. This
setting will apply to all channels of the connected remote site.
Video Quality can be set to 10% - 100% in 10% increments.
The lower the video quality, the grainier the video will appear. When connected using the device's data plan, lower video
quality also means lower data usage.
The higher the frame rate, the finer the video will appear. The higher video quality setting will also mean higher data
usage when connected using the device's data plan,
Touch Settings to return to the Settings window OR touch the Live icon to return to the video screen.
35
SRX-Pro Mobile Remote App - iOS
View alarm list in
The SRX-Pro Mobile Remote app will display the list of alarm logs for the past X number of days based on this setting. The
setting options are 1-5 days.
Touch Settings to return to the Settings window OR touch the Live icon to return to the video screen.
36
Configuring Remote Connection Settings
Alarm logs searching by
This setting will apply the default quick filter to the list of alarm logs based on the event type. You will be able to change
the filter options after running the log report.
The quick filter settings available are: All, Sensor, Stop recording, Video loss and Motion.
Touch Settings to return to the Settings window OR touch the Live icon to return to the video screen.
37
Searching Alarm Logs
You may search alarm logs on your connected remote site through your SRX-Pro Mobile Remote app. Start by Connecting
to the Remote Server via SRX-Pro Mobile Remote app.
Once you're connected to the server of your choice, touch Alarms.
History Alarms window will be displayed. The logs for the last 1 to 5 days will be displayed. To increase/decrease the
historical length of the logs, configure the corresponding setting.
39
SRX-Pro Mobile Remote App - iOS
Alarms log will display either All, Sensor, Stop Recording, Video Loss or Motion alarm logs based on the default
setting.
You may change the filter setting at any time. Touch Filter by drop-down menu to select your filter.
In the example below, the Stop Recording filter has been applied to the alarm log to display only Stop Recording-type
alarm events.
40
Controlling PTZ Camera
You can remotely control a PTZ camera on your connected remote site through your SRX-Pro Mobile Remote app.
Start by Connecting to the Remote Server via SRX-Pro Mobile Remote app.
Once you're connected to the server of your choice double-tap on the PTZ channel in the split-screen division to display it
in the Full Screen mode.
Note: If you cannot see your PTZ channel in the split-screen displayed on your phone, keep swiping in a right-to-left
motion to display the next set of channels until you locate the PTZ channel.
Touch the PTZ icon in the top right corner of the display screen:
PTZ on-screen controls will be displayed on top of the display screen.
Touch and hold one of the on-screen arrows that is pointing in the direction in which you would like the PTZ channel to
Pan/Tilt. Lift your finger off the screen to make the camera stop Panning/Tilting.
Touch the on-screen Plus (+) and Minus (-) icons to Zoom In or to Zoom Out.
41
SRX-Pro Mobile Remote App - iOS
Taking a Snapshot
SRX-Pro Mobile Remote app allows you to take snapshots of the live video transmitted from the connected remote site.
You may save the snapshot to your Photo Library or send it to one or more Email recipients.
Saving the Snapshot
Step 1.
To save the snapshot, start by Connecting to the Remote Server via SRX-Pro Mobile Remote app.
Once you're connected to the server of your choice, double-tap on the channel to bring it into the Full Screen mode.
Touch Snapshot.
Step 2.
Touch Save Snapshot in the menu.
42
Taking a Snapshot
Step 3.
Wait while snapshot is being saved to your iOS device.
Step 4.
Wait for the confirmation message to be displayed and touch OK.
43
SRX-Pro Mobile Remote App - iOS
Step 5.
To locate your new snapshot, press the Home button on your iOS device:
Touch Photos, then touch Camera Roll and locate your new snapshot.
>
44
Taking a Snapshot
Sending Snapshot via E-mail
Step 1.
To e-mail the snapshot, start by Connecting to the Remote Server via SRX-Pro Mobile Remote app.
Once you're connected to the server of your choice, double-tap on the channel to bring it into the Full Screen mode.
Touch Snapshot.
Step 2.
Touch Send via E-mail in the menu.
45
SRX-Pro Mobile Remote App - iOS
Step 3.
The e-mail screen will be displayed with your new snapshot in the attachment.
Enter the recipient's address in the To: line, enter any additional E-mail addresses in the Cc/Bcc: line, change the
Subject line if necessary and then touch Send to send your new snapshot via e-mail.
46
Index
A
Add New Server........................................................9
Alarm List ............................................................... 45
Alarm Logs ............................................................. 45
Filtering ............................................................. 46
Searching........................................................... 45
C
Channel Mapping .................................................... 33
Connecting ............................................................. 29
D
Disconnecting ......................................................... 35
E
Exiting.................................................................... 35
F
Frame per Second ................................................... 40
Frame Rate ............................................................. 40
Full Screen.............................................................. 31
G
Groups ................................................................... 20
Adding ............................................................... 20
Deleting ............................................................. 25
H
History Alarms ........................................................ 45
P
Password ............................................................... 11
PTZ ........................................................................ 49
R
Ratio View ............................................................. 38
Remote Connection ................................................... 9
Adding ................................................................ 9
Deleting ............................................................ 18
Editing .............................................................. 13
Organizing ......................................................... 20
Sorting .............................................................. 20
S
Screen Division ....................................................... 31
Server Address ....................................................... 11
Server ID ............................................................... 11
Server Name .......................................................... 11
Server Port ............................................................ 11
Settings ................................................................. 37
Snapshot ............................................................... 51
Email................................................................. 54
Locate ............................................................... 53
Take ................................................................. 51
SRX-Pro Mobile Remote App ..................................... 3
Downloading ....................................................... 3
Installing ............................................................. 3
U
User Name ............................................................. 11
V
Video Quality .......................................................... 41
47
i³ INTERNATIONAL INC.
1.866.840.0004
www.i3international.com
U.S.A. 1967 Wehrle Drive, Suite 1
PMB# 034 Buffalo,
NY 14221
Canada 780 Birchmount Road,
Unit 16, Scarborough.
ON, M1K 5H4
49