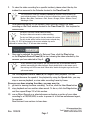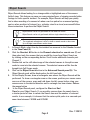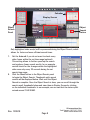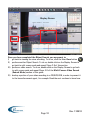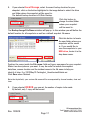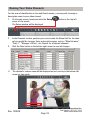
1
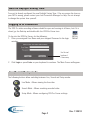
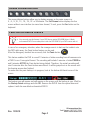
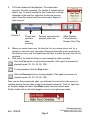
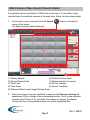
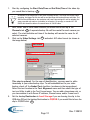
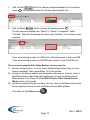
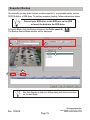
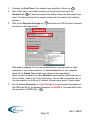
SRX-PRO SERVER v. 3.0
QUICK USER GUIDE
Quick Help Guide for
©2013 i3 International Inc.
The contents of this user manual are protected under copyright and computer program laws.
Note on Daylight Saving Time
Your unit is already configured for new Daylight Saving Time. If for any reason the time on
your DVR is wrong, please contact your Loss Prevention Manager for help. Do not attempt
to change the system time yourself.
Logging In & Passwords
The SRX-Pro video-recording software should be open and running at all times, but if it is
closed, go the Desktop and double-click the SRX-Pro Server icon:
To log into the SRX-Pro Server, do the following:
1. Enter your assigned User Name and your assigned Password in the login
window.
Use Virtual
keyboard
if necessary
2. Click Login or press Enter on your keyboard to continue. The Main Screen will appear.
Live/Search/Setup mode
The following buttons allow switching between Live, Search and Setup modes:
Live Mode - Allows viewing the live video.
Search Mode - Allows searching recorded video.
Setup Mode - Allows configuring SRX-Pro Server settings.
Page 2
Rev. 130618
Screen Division Buttons
The screen division buttons allow you to display cameras on the main screen in a
4-, 6-, 9-,10-, 13-, 16-, 25-, 32- or 64-division. The Full Screen button displays the live
screen without user interface (no menu bars shown). To exit, press the Esc button on the
keyboard.
Panic Button Record Feature
You can only use this feature if your DVR has an optical (CD-ROM) drive. A blank
unformatted DVD-R must always be inside the DVD-ROM (if your DVR comes with it).
In case of an emergency situation, when the manager wants to back up the incident onto
the DVD right away, the Panic button feature can be used.
After the emergency incident has occurred, click the Panic button.
This feature enables the DVR to record 10 minutes of video recording from all cameras onto
a DVD-R in an i3 encrypted format. The recording will include 5 minutes of video PRIOR to
and 5 minutes AFTER the Panic button being clicked. Therefore, the actual recording will
start 5 minutes after the Panic button was clicked. It will be grayed out on the screen until
the burning process has finished.
To make sure the panic backup is in progress, look at the bottom left-hand corner of the
screen.
The backup icon will appear and will remain on the screen until the backup is over. Wait for
the Backup Finish message and click OK. Remove the DVD-R from the optical drive and
replace it with the new blank unformatted DVD-R.
Rev. 130618
Page 3
i3 International Inc.
Tech Support: 1.877.877.7241
www.i3international.com
Searching Recorded Video
DVR/NVR technology allows you to access recorded video based on date or video
channel. You may want to review video recorded in the past few minutes/hours or
you may want to search for an incident that was recorded yesterday / last week or
even month, when applicable. The instructions on the next page will show you how to
review video recordings on your DVR/NVR system.
Single Camera Video Search (Live Mode)
If an incident has just occurred and you would like to review recorded video on one of
the cameras, follow these steps to search for the video recorded since 12AM of
the current calendar day.
Note: To search for the video recorded earlier, please see the next section.
1. In the Live mode, locate the desired video channel.
2. Double-click on the video image to bring it into Full Screen mode for best results.
(This step is optional).
3. Right-click on the video image and select “Search Mode” from the context menu.
(Context menu has been enlarged for demonstration purposes)
Page 4
Rev. 130618
4. A 24-hour timeline will be displayed. The colored bars
represent the video recording. The timeline is zoomed into for
ease of use. To search beyond the time frame that is initially
displayed on the time line, right-click on the time line and
select Zoom Out option from the context menu. Repeat to
fully zoom out.
Channel #
Colored bars
represent
video
recording
Red oval represents the
playback start time.
Video Playback
Control buttons:
Reverse, Stop, Play
5. Move your mouse cursor over the time line. Let your mouse cursor rest for a
moment to view the exact time code of the spot where the cursor is pointing to.
Position the cursor over the timeline and left-click to select the start time for the
play back.
6. Click one of the control buttons to start viewing the video recording.
Click the Play button to start/resume playback. Click again to increase the
playback speed (1X, 2X, 4X, 8X, 16X)
To stop playback, click the Stop button
Click the Reverse button to reverse playback. Click again to increase the
playback speed (1X, 2X, 4X, 8X, 16X)
Once you are done viewing the video, you will want to return to the Live screen to continue viewing the live video stream from selected camera(s). To do so, right-click
on the video image and select Live Mode option from the context menu.
Finally, double-click on the video image to return to the split-screen mode.
Rev. 130618
Page 5
i3 International Inc.
Tech Support: 1.877.877.7241
www.i3international.com
Multi-Camera Video Search (Search Mode)
If an incident has occurred before 12AM of the current day or if you’d like to view
recorded video from multiple cameras at the same time, follow the instructions below:
1. On the main screen, locate and click the Search
corner of the screen.
The Search window will be displayed.
button in the top left
2
3
1
4
5
6
8
7
9
(1) Display Window
(6) Playback Control Panel
(2) Screen Division Panel (7) Channel selection for search
(3) Time Panel
(8) 24-hour Timeline
(4) Tools Panel (9) Current Time/Date
(5) Advanced Search panel/ Image Settings Panel
2. Select the cameras that you would like to search in the Channel selection for
search area (7) by clicking on the corresponding buttons. Scroll to see additional
channels past Channel 4. As you select the cameras for review, the channel
buttons and their corresponding timeline row will be highlighted blue.
Page 6
Rev. 130618
3. To view the video recording for a specific incident, please select the day the
incident has occurred in the Calendar located in the Time Panel (3).
The colored bars inside the 24-Hour Timeline (8) represent video recording for
each individual camera. The color of the bar indicates the type of video recording.
Motion=Navy Blue, Continuous=Pink, Sensor=Orange, Sensor+Motion=Green,
VideoLogix=Lime
4. After selecting the day of the incident, select the start time of the video
recording on the Clock window located in the Time Panel (3). Use keyboard or
mouse cursor.
The days in red color contain video recording.
The days in blue color contain no video recording.
The day in a filled gray oval is the day selected for review.
The day circled with a red line is the current calendar day.
E.g. May 13, 2013 in the image is the current calendar day and is
selected for review. May 1-12 all have video recording.
5. Once you’ve selected the incident’s Date and Time, click the Play button
on the Playback Control Panel (6) to start viewing the video recorded by the
cameras you have selected in Step 4.
At any time during the playback, you can zoom into any of the selected cameras
without interrupting the video playback. Simply double-click on the camera you’d
like to bring to a Full Screen mode. When done, double-click again to go back to the
split screen mode.
6. Use the Playback Control Panel (6) to navigate video playback. You can
increase/decrease the speed of the playback by using the Speed slider, you may
stop or reverse playback, or view video recording frame-by-frame.
Once you are done viewing the video, you may want to:
I) go back to viewing live view recording. To do so, click the Live View button
II) stop playback and run another video search. To do so, click the Stop button
and then repeat Steps 2-6 of this section.
III) run an Object Search on a selected camera or backup a portion of your video
recording to a CD/DVD/USB, in order to present it to the law enforcement agent,
for example.
Read the next two sections to learn how.
Rev. 130618
Page 7
i3 International Inc.
Tech Support: 1.877.877.7241
www.i3international.com
Object Search
Object Search allows looking for a change within a highlighted area of the camera
field of view. This feature can save you many minutes/hours of viewing recorded video
footage to find a specific incident. For example, Object Search will help you quickly
find a video recording of a moment of when a car has parked on a reserved parking
spot or when an object of interest (e.g. a display stand in a store) was moved.Follow
these instructions to perform the Object Search:
Object Search can be only performed on one camera at a time.
Object Search can be only performed within a single calendar day at a time.
To narrow down your search, highlight only the area of interest.
The completed rectangle are can be re-sized or moved around on the screen.
Up to 8 (eight) search areas can be drawn.
1. In Search Mode, select the day the incident has occurred in the Calendar located
in the Time Panel (3)
2. Click the Deselect All button in the Channel selection for search area (7) and
then select only the camera that you would like to perform Object Search on
by clicking on the corresponding button. Scroll to see additional channels past
Channel 7.
3. Double-click on the still video image of the selected camera in the split-screen
mode to zoom into the selected camera. The selected camera will be then be
brought into Full Screen mode.
4. Click on the Object Search button in the Advanced Search panel (5). The
Object Search panel will be displayed on the left-hand side.
5. On the Display Screen, draw a rectangular area where the Object Search will be
performed. To draw a rectangular area on the screen, position your mouse cursor
over one of the corners, press and hold down the left mouse button, drag your
mouse cursor in the desired direction until a rectangle has been drawn. Release
the mouse button
6. In the Object Search panel, configure the Start and End
Time for your Object Search. If you are able, narrow down the search time to
a shorter period of time to reduce the Search time and the number of returned
results. In our example, it is known that the motorcyclist parks in a reserved spot
some time between 7:50AM and 8:20AM.
Page 8
Rev. 130618
Calendar
Display Screen
Object
Search
Panel
Camera
Selected
for
Object
Search
Object
Search
Area
Object
Search
Button
Only highlighted video area(s) will be processed during the Object Search, which
allows for faster and more efficient search times.
7. Set the Interval if you do not want to check every
video frame within the set time range (optional).
This setting allows to further speed up the search
and produces fewer search results. In our example,
we will check for the changes within the highlighted
video area only every 30 seconds during the set
search time range.
8. Click the Start button in the Object Search panel
to begin the Object Search. Thumbnails with search
results will be displayed below. Wait until the Object
Search is complete. Once the Object Search is done, you can scroll through the
search result thumbnails below and view them in Display Screen by clicking
on the individual thumbnails. In our example, we can see that the motorcyclist
arrived around 7:56:30AM.
Rev. 130618
Page 9
i3 International Inc.
Tech Support: 1.877.877.7241
www.i3international.com
Display Screen
Once you have completed the Object Search, you may want to:
I) go back to viewing live view recording. To do so, click the Live View button
II) perform another Object Search. To do so, double-click on the Display Screen to
go back to split screen mode and repeat Steps 2-9 of this section
III) perform a video search. To do so, double-click on the Display Screen to go back
to split screen mode and repeat Steps 4-8 of the Multi-Camera Video Search
(Search Mode) section of this guide.
IV) backup a portion of your video recording to a CD/DVD/USB, in order to present it
to the law enforcement agent, for example. Read the next sections to learn how.
Page 10
Rev. 130618
Video Backup
Occasionally you may want to save a portion of your video recording to a removable
media, such as CD/DVD disk or a USB drive. To perform video backup, follow
instructions below.
Connect your USB drive to the USB port on the DVR
or insert the disk into the DVD drive.
In Search Mode, click the Backup button on the Tools panel (4).
The Backup Search Mode window will be displayed.
1
4
3
2
6
5
Use this diagram to help you follow along with the instructions
on the next page.
Rev. 130618
Page 11
i3 International Inc.
Tech Support: 1.877.877.7241
www.i3international.com
1. Start by configuring the Start Date/Time and End Date/Time of the video clip
you would like to back up. 1
Be mindful of the length/size of the video recording backup. The longer the backup video
recording, the bigger the file size will be and the longer the backup process will take. The
AVI file size will depend on the resolution and frame rate settings as well as whether the
scene recorded was static or included a lot of motion. On average, a standard 4.7 GB
DVD-R disk should be able to fit several hours of Full HD video.
2. Next, select one or more video channels you would like to back up in the
Channels tab. 2 A separate backup file will be created for each camera you
select. The start/end date and time of the backup will remain the same for all
selected cameras.
3. Click on the Video Settings tab 3 and select AVI video format (as shown in
the image below).
4
This step is optional. For the ease of identification, you may want to add a
timestamp to your video backup clips. To add embedded text to your video
backup, check off the Embed Text checkbox (as shown in the image above).
Select the text location in the Text Alignment menu and then select the type of
text you’d like to add in the Text Format menu. You can add a timestamp only, or
you can combine it with Server IP address, Channel name, and/or Frame count.
4. Set the backup Destination to Local Storage if you are burning the clip to the
USB drive OR set the backup Destination to CD/DVD if you would like to burn the
clip to CD/DVD disk. 4
Page 12
Rev. 130618
5. If you selected Local Storage, select the exact backup location for your video:
click on the button highlighted in the image below to select the drive and folder
where the video clips will be saved to.
The default backup location is D:\i3dvr Backup.
Click this button to
change the drive/folder
where your video backup
clips will be saved to.
The Backup File Name window will pop up. In this window you will define the
default location for all backup video clips as well as a default video backup clip name.
Click this button to locate
the new folder where your
video backup clips will be
saved to. If you would like
to save the backup clips to
your USB drive, locate it
in the drop-down menu.
Position the cursor inside the File name: field and type a new name for your video
backup clip. Make it as descriptive as you want. It may be useful to include the video clip date/time, camera location and the incident name in the file name to help you
identify it later. E.g. 2013May13-ParkingLot_UnauthorizedVehicle.avi
Click Save when finished.
Note that by default, your custom file name will be accompanied by channel number, Clip
Name, video resolution and frame rate of the recording.
6. If you selected CD/DVD, you can set the number of copies to be made.
By default, only 1 copy will be burned.
Rev. 130618
Page 13
i3 International Inc.
Tech Support: 1.877.877.7241
www.i3international.com
7. Click the Add button to add the configured backup clip to the backup
5
lineup.
You Backup Sessions list will look something like this:
8. Click the Start
button to begin the backup process. 6
The clip status will change from “Ready” to “Active: % completed” and to
“Finished”. Wait until the backup clip status says “Finished”. Your backup is now
complete.
If you were backing up video to a USB drive, safely disconnect it from your DVR.
If you were backing up video to a CD/DVD disk, remove it from the DVD drive.
Once you have completed the Video Backup, you may want to:
I) perform another backup. To do so, select and delete any backup clips you have
already completed. Then, repeat Steps 1-8 of this section.
II) go back to the Search mode to perform another video search. To do so, click on
the Close button in the bottom right-hand corner to close the Backup Search
Mode window. Then Steps 4-8 of the Multi-Camera Video Search (Search
Mode) section of this guide.
III) go back to viewing live view recording. To do so, click on the Close button in the
bottom right-hand corner to close the Backup Search Mode window.
Then click the Live View button
Page 14
Rev. 130618
Snapshot Backup
Occasionally you may want to save a video snapshot to a removable media, such as
CD/DVD disk or a USB drive. To perform snapshot backup, follow instructions below.
Connect your USB drive to the USB port on the DVR
or insert the disk into the DVD drive.
In Search Mode, click the Backup button on the Tools panel (4).
The Backup Search Mode window will be displayed.
1
4
3
2
6
5
Use this diagram to help you follow along with the instructions
on the next page.
Rev. 130618
Page 15
i3 International Inc.
Tech Support: 1.877.877.7241
www.i3international.com
1. Configure the Date/Time of the snapshot you would like to back up. 1
2. Next, select one or more video channels you would like to back up in the
Channels tab. 2 A separate snapshot file will be created for each camera you
select. The date and time of the snapshot will remain the same for all selected
cameras.
3. Click on the Snapshot Settings tab 3 and make sure JPEG format is selected
(as shown in the image below).
4
This step is optional. For the ease of identification, you may want to add a
timestamp to your video snapshots. To add embedded text to your snapshot,
check off the Embed Text checkbox (as shown in the image above).
Select the text location in the Text Alignment menu and then select the type of
text you’d like to add in the Text Format menu. You can add a timestamp only, or
you can combine it with Server IP address, Channel name, and/or Frame number.
4. Set the backup Destination to Local Storage if you are burning the shapshot to
the USB drive OR set the backup Destination to CD/DVD if you would like to burn
the snaptshot to CD/DVD disk. 4
Page 16
Rev. 130618
5. If you selected Local Storage, select the exact backup location for your
shapshot: click on the button highlighted in the image below to select the drive
and folder where the snapshot will be saved to.
The default backup location is D:\i3dvr Backup.
Click this button to
change the drive/folder
where your snapshot
will be saved to.
The Backup Image File Name window will pop up. In this window you will define the
default location for all snapshots as well as a default snapshot file name.
Click this button to locate
the new folder where your
snapshots will be saved
to. If you would like to
save the snapshots to your
USB drive, locate it in the
drop-down menu.
Position the cursor inside the File name: field and type a new name for your snapshot.
Make it as descriptive as you want. It may be useful to include the snapshot date/time, camera location and the incident name in the file name to help you
identify it later. E.g. 2013May13-ParkingLot_UnauthorizedVehicle.avi
Click Save when finished.
Note that by default, your custom file name will be accompanied by channel number, date and
time.
6. If you selected CD/DVD, you can set the number of copies to be made.
By default, only 1 copy will be burned.
Rev. 130618
Page 17
i3 International Inc.
Tech Support: 1.877.877.7241
www.i3international.com
7. Click the Add button to add the snapshot to the backup lineup. 5
You Backup Sessions list will look something like this:
8. Click the Start
button to begin the backup process. 6
The snapshot status will change from “Ready” to “Active: % completed” and to
“Finished”. Wait until the status says “Finished” for all snapshots. Your backup is
now complete.
If you were backup up a snapshot to a USB drive, safely disconnect it from your DVR.
If you were backup up a snapshot to a CD/DVD disk, remove it from the DVD drive.
Once you have completed the Snapshot Backup, you may want to:
I) perform another backup. To do so, select and delete any backup clips you have
already completed. Then, repeat Steps 1-8 of this section.
II) go back to the Search mode to perform another video search. To do so, click on
the Close button in the bottom right-hand corner to close the Backup Search
Mode window. Then Steps 4-8 of the Multi-Camera Video Search (Search
Mode) section of this guide.
III) go back to viewing live view recording. To do so, click on the Close button in the
bottom right-hand corner to close the Backup Search Mode window.
Then click the Live View button
Page 18
Rev. 130618
Naming Your Video Channels
For the ease of identification in Live and Search modes, you may wish to assign a
descriptive name to your video channel.
1. On the main screen, locate and click the Setup
button in the top left
corner of the screen.
The Setup window will be displayed.
2. In the Channels section, position your cursor inside the Name field for the channel you would like to name. Enter a descriptive name, such as “Main Entrance”,
“Cash 1”, “Manager’s Office”, etc. Repeat for all desired channels
3. Click the Save button in the bottom right corner to save all changes.
4. The channel’s custom name will be displayed as text overlay in the bottom left
corner on Live mode.
Rev. 130618
Page 19
i3 International Inc.
Tech Support: 1.877.877.7241
www.i3international.com
i3 INTERNATIONAL INC.
1.866.840.0004
www.i3international.com
U.S.A. 1967 Wehrle Drive, Suite 1
PMB# 034
Buffalo, NY 14221
Canada 780 Birchmount Road,
Unit 16, Scarborough.
ON, M1K 5H4