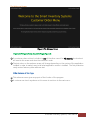
1
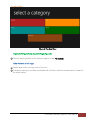
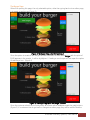
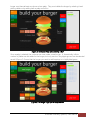
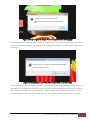
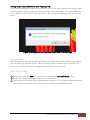
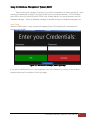
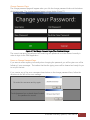
2013
Smart Inventory
System
User Manual
User Manual
Automatic Inventory Systems
4/12/2013
Automatic Inventory Systems | How to use this Manual: 1
Table of Contents
How to use this Manual:.............................................................................................................................................. 4
Employees: ...................................................................................................................................................................... 5
What is the SIS? What does it do? ...................................................................................................................... 5
Using the Program ................................................................................................................................................... 5
Starting the Customer Based POS system .................................................................................................... 5
Available Menus ................................................................................................................................................... 5
The Welcome Screen ..................................................................................................................................... 6
The Main Menu ................................................................................................................................................ 7
The Burger Page .............................................................................................................................................. 8
The Sides Page ................................................................................................................................................ 11
The Drinks Page .............................................................................................................................................. 11
The Salads Page.............................................................................................................................................. 11
The Desserts Form .........................................................................................................................................12
The Checkout Page ........................................................................................................................................12
The Thank You Page .................................................................................................................................... 14
Checkout Disabled Message ...................................................................................................................... 14
Other Functions ...................................................................................................................................................15
Go Back Button ...............................................................................................................................................15
Start Over Button............................................................................................................................................15
Delete Button...................................................................................................................................................15
Pay Now Button ..............................................................................................................................................16
Other Things to Note ....................................................................................................................................16
Managers: ......................................................................................................................................................................17
What is the SIS? What does it do? .....................................................................................................................17
What can the SIS do for your restaurant?.........................................................................................................17
Using the Database Management System (DBM) ..........................................................................................18
Login Page .......................................................................................................................................................18
Change Password Page ................................................................................................................................19
Errors on Change Password Page .............................................................................................................19
Database Manager (DBM) Home Screen ............................................................................................... 20
View Database Page ......................................................................................................................................21
Saving Database as PDF .............................................................................................................................. 22
Automatic Inventory Systems | User Manual 2
PDF Database Report ................................................................................................................................... 23
Edit Inventory Button Functionality ........................................................................................................... 24
Inventory Table .......................................................................................................................................... 25
Products Table ........................................................................................................................................... 26
Submitting Orders to Inventory ................................................................................................................. 27
Message Boxes when Submitting Orders........................................................................................... 27
Automatic Inventory Systems | User Manual 3
How to use this Manual:
This instruction manual will provide the main users of the SIS (Smart Inventory System) with the
information they need to perform their job using the SIS.
The Employee section will describe basic information about the program, including its main features;
as it pertains to an employee. It will inform employees about the function of the SIS, how it will help
them in their job, how to start the terminals, and provide support to customers.
The Manager section will describe information on using the database management application and
how to add an order to the database, view the database and edit the database. It will also inform
the manager on troubleshooting their system and on other features available to them on their office
computer (thinclient).
Automatic Inventory Systems | User Manual 4
Employees:
What is the SIS? What does it do?
The SIS is a system designed to speed up the inventory process in fast food restaurants and
increase the accuracy and efficiency of the customer ordering process.
On the customer side, the SIS will allow a customer to place their own order using a touch
screen interface. This will increase the accuracy of their order since they will not have to relay their
order to a cashier, who may not understand their order. The customer can place the order much
more quickly than a cashier can because they do not have to speak their order to a cashier.
On the employee side, you will have much greater accuracy on your inventory, and will not
need to spend anywhere near as much time conducting inventory counts. This is because once a
customer places an order on say, a burger; the system will automatically subtract the bun, meat, and
condiments from your inventory. Now you will be free to do a different, perhaps more exciting job,
rather than counting boxes in a cold freezer.
The interface has been designed to resemble touch screen interfaces on iPhones, Android
Phones, Tablets and windows 8 devices that people are used to using every day and should be very
familiar with.
Using the Program
Starting the Customer Based POS system
The SIS on the customer side will runs off a little computer called a thin client. It gets all its
information from another computer, called a server, that is located somewhere else in your
restaurant.
To turn on the POS system, find the power button on the back of the stand and press it. In about
one minute, the system should be up and running, showing the touch to continue page. If the
system doesn’t turn on, check the following things:
1.
2.
3.
4.
5.
Is there power to the terminal?
Is the screen connected and turned on?
Is the network cable firmly connected to the system?
Get your manager to check if the other computers (the servers) are on and working
If you still cannot get it to start, get your manager, or get them to call Tech Support
Available Menus
The system allows customers to select a variety of options. The options available to the customer
are organized as follows:
Automatic Inventory Systems | User Manual 5
The Welcome Screen
(Figure 1) The Welcome Screen
Important Things to Note about this Page (Figure 1):
If a customer does not touch a button in any of the other menu’s for 45 seconds, the checkout
will reset to this screen and clear the customer’s order
The text colour on the welcome screen will change depending on the version of the application
installed in order to make it easy to tell what application version is installed. The first production
ready version features yellow welcome text.
Other Features of this Page:
This welcome screen gives a synopsis of the function of the program
A customer can touch anywhere on this screen to continue to the main menu
Automatic Inventory Systems | User Manual 6
The Main Menu
(Figure 2) The Main Menu
Important Things to Note about this Page (Figure 2):
The only way to get back to the welcome page is to wait 45 seconds
Other Features of this Page:
Simple large buttons occupy most of this form
Customers wanting to purchase a milkshake will find them under the desserts section instead of
the drinks section
Automatic Inventory Systems | User Manual 7
The Burger Page
When first opening this page, the only selectable option, other than going back or to another page,
is to create a new burger (Figure 3).
(Figure 3) The Burger Page, when first opening it
Once the option to create a new burger has been selected, an item called Burger with the price of
$0.00 appears in the receipt. It will be highlighted. Creating a new burger will now open the option
of selecting a bun. (Figure 4)
(Figure 4) The Burger Page after New Burger Selection
Once the customer selects the bun they want, all buttons will be disabled except the patty buttons.
(Figure 5) If a customer tries to go back or change to another page, they will be notified that the
Automatic Inventory Systems | User Manual 8
burger must have at least one bun and one patty. They must delete the burger by selecting it and
picking delete or by adding both a patty and a bun.
(Figure 5) The Burger Page after Selecting a Bun
Once a patty is selected, the customer can now create a new burger. A, theoretically, infinite
number of patties can be added to the burger, but only one bun. Any toppings can now be selected
as well. (Figure 6) Ensure that the burger you want to add toppings to is highlighted green.
(Figure 6) The Burger Page after a Patty Selection
Automatic Inventory Systems | User Manual 9
(Figure 7) Burger Page Error, Burger Must be complete before leaving page
In the event that the customer wants to delete a patty or bun and go to another page, they will be
given the above error (Figure 7), notifying them to add a bun or patty, or delete the burger before
continuing.
(Figure 8) Deleting Bun or Last Patty from Burger While on another Page
If the customer moved to another page with a completed burger and attempts to delete the bun or
last patty to the burger from that other page, they will receive the above error (Figure 8), notifying
them that they must go to the burger page in order to add/remove patties and/or buns. If they
want to delete the entire burger or toppings, they can do that without visiting the burger page.
Automatic Inventory Systems | User Manual 10
The Sides Page
(Figure 9) The Sides Page
The side’s page (Figure 9) showcases all the available sides at the restaurant. Simply tap the button
you want and it will be added to the receipt and the subtotal.
The Drinks Page
(Figure 10) The Drinks Page
The drinks page (Figure 10) allows a customer to order a drink, although only in one size. Tapping
the button of the item you want will add it to the “receipt” and to the subtotal.
The Salads Page
Automatic Inventory Systems | User Manual 11
(Figure 11) The Salads Page
A customer can order a salad from this page (Figure 11) by tapping the corresponding button of the
salad they want. It will be added to the “receipt” and to the subtotal.
The Desserts Form
(Figure 12) The Desserts Page
A customer can order desserts, including milkshakes from this page by tapping the corresponding
button. It will be added to the receipt and the subtotal.
The Checkout Page
Automatic Inventory Systems | User Manual 12
(Figure 13) The Checkout Page, with all Available Payment Options
Once a customer is done with their order, they can click the pay now button right below the receipt,
on the burger page, drink page, sides page, salads page or the desserts page. Clicking that button
will bring them to the checkout page. (Figure 13) On the checkout page, the customer will be
provided with many payment options. Since the Smart Inventory System is not completely ready for
deployment, there is no pin pad or cash acceptance functionality. All the buttons will “pay” for the
order. The Smart Inventory System will subtract items that the customer purchased from the
inventory database and the checkout will display a thank you page, as shown on the next page.
Automatic Inventory Systems | User Manual 13
The Thank You Page
(Figure 14) The Thank You Page
The Thank You page (Figure 14) will be displayed once payment for the order has been accepted.
The momentary wait time for the checkout to reset gives the Smart Inventory System time to
subtract the purchased items from the inventory.
Checkout Disabled Message
(Figure 15) The Burger Page after New Burger Selection
The sorry message (Figure 15) will be displayed if the database is unavailable. Without the database,
the prices for items and inventory subtraction upon payment cannot be done.
Automatic Inventory Systems | User Manual 14
Other Functions
Go Back Button
This button will take a user back to the menu page where they can select a different page to go to.
A user can also navigate between different product categories with navigation buttons in the top left
corner of the screen.
Start Over Button
The start over button will clear the customer’s current order and return them to the welcome screen.
Delete Button
The delete button can be used to delete items from the receipt. The customer should tap the item
they want to delete in the receipt first, and then press the delete button. The text colour of the
delete button will change to white if there is an item selected that can be deleted. All items can be
deleted from every page with a receipt, with the exception of hamburger buns and patties.
Special rules apply to deleting the buns and patties from burgers. These rules are described below:
Deleting Burger Patties and Bun from Burger Page (Figure 7)
If the customer wants to delete the bun or the only patty to a burger from the burger page, they will
be forced to add a bun or patty to the burger again before continuing; otherwise they should delete
the burger by selecting “Burger” and pressing delete. The customer will receive the prompt shown
below when attempting the above action.
(Figure 7) Burger Page Error, Burger Must be complete before leaving page
Automatic Inventory Systems | User Manual 15
Deleting Burger Patties and Bun from Other Page (Figure 8)
If the customer attempts to delete the last patty or bun from a page other than the burger page,
they will be given a prompt asking if they want to go to the burger page. You cannot delete the
bun or patty from the burger from another page. The prompt that appears to the user is shown
below.
(Figure 8) Deleting Bun or Last Patty from Burger While on another Page
Pay Now Button
When the customer presses the pay now button, they will be taken to the checkout menu where
they can select any payment option. After a payment option is selected and is successful, the
checkout will display a thank you message and reset for the next customer.
Other Things to Note
Burgers can only have one bun, but they can have between one and infinite patties.
Burgers can have a theoretical infinite amount of toppings
Items added to the receipt will be alphabetically organized. If the customer adds an item and
cannot see it, they should scroll to where the item would be listed alphabetically.
Automatic Inventory Systems | User Manual 16
Managers:
What is the SIS? What does it do?
The SIS provides an improved inventory management system with two applications, the selfservice menu application and the Database Management application (DBM).
The DBM runs from a thinclient in the manager’s office and allows the restaurant manager to
view current inventory levels, which will change each time a customer makes a purchase. The
current inventory levels can be saved to a PDF file with the current date and time automatically
added. The PDF file can be printed to the office printer, which is connected to the thinclient.
The manager can edit the database of items sold at the restaurant and can change the
pricing and the quantity of items shipped in each box. Any entry errors made when adding items
that were shipped to the restaurant can be corrected with this feature.
Items can be added to the database via three specialized barcodes that can update up to 45
items at one time. This method is considerably faster than scanning in each received box
individually.
What can the SIS do for your restaurant?
From a customer perspective, the SIS will provide a unique, fast, accurate and fun ordering
method. According to a report compiled by SelfServiceWorld, self-order kiosks can increase
customer volume by 20%. Customers will also spend on average 15% more than usual because all
menu options will be available to them, rather than a traditional menu which cannot showcase all
items the restaurant sells as effectively.
Excluding the increases in customer satisfaction and increased customer volume, the SIS will
also provide an extremely efficient inventory system, reducing time for daily inventory counts by up
to 90%. Inventory levels can be seen changing live on the DBM as customers purchase items; a
unique feature of the SIS.
Price updates can be done in less than one minute in a single location by a manager, with no
need to have IT personnel come in just to update the prices in the cash registers.
In short, the SIS utilizes modern technology to increase customer satisfaction, increase
restaurant sales and create a less stressful and efficient work environment.
Automatic Inventory Systems | User Manual 17
Using the Database Management System (DBM)
When booting the manager’s thinclient, you will be prompted for a startup password. Upon
entering this password correctly, the thinclient will boot to a windows desktop. On the desktop,
there will be icons for entire Microsoft Office Suite, Adobe Reader, an internet browser, and the
Database Manager. Start the database manager by double clicking the Database Manager icon.
Login Page
When the DBM opens, a login window will appear (Figure 16) prompting for username and
password credentials.
(Figure 16) The Database Manager (DBM) Login Page
If you are unsatisfied with your current password, you can change it by clicking on the change
password button at the bottom of the login page.
Automatic Inventory Systems | User Manual 18
Change Password Page
The change password page will appear when you click the change password button at the bottom
of the login page. The change password page is shown below (Figure 17):
(Figure 17) The Change Password Page of the Database Manager
The correct username, old password and matching new passwords must be entered correctly in
order to login to the DBM application.
Errors on Change Password Page
If you were to enter anything incorrectly when changing the password, you will be given one of the
following 3 error messages. The textbox that has the typing errors will be cleared and ready for you
to re input the text.
If you receive any of the error messages shown below on the change password form, follow the
directions to the left of the error message:
Re-enter the username and try again.
The old password you entered doesn’t match
the password on record.
Automatic Inventory Systems | User Manual 19
When typing your new password, the
passwords you entered did not match.
Database Manager (DBM) Home Screen
Upon successful logon into the database manager, the home screen will be displayed (Figure 18).
You can perform one of three tasks on this page: view the current inventory levels, edit the inventory
and pricing for items on the menu, or input an order via barcodes.
(Figure 18) The Home Screen of the Database Manager
Automatic Inventory Systems | User Manual 20
View Database Page
(Figure 19) The View Database Page
The View Database page (Figure 19) is viewed by clicking the “View Database” button. It allows the
manager to see the whole database, updated with every purchase a customer makes. Clicking the
refresh button will reload all the data from the database, showing the most current inventory levels.
Automatic Inventory Systems | User Manual 21
Saving Database as PDF
If you want to save a copy of the current database levels for reference, clicking the save as PDF
button will open a save box (Figure 20), allowing you to save the inventory in a neatly organized PDF
file. The DBM will set the default file name of the PDF file to the current date and time, and a date +
time stamp will also be added to the top of the PDF document. The PDF can then be printed from
Adobe reader to the printer called “Manager Printer”.
(Figure 20) Saving a PDF Database Report as the file
Automatic Inventory Systems | User Manual 22
PDF Database Report
(Figure 21) Sample of a PDF Database Report
The above screenshot (Figure 21) is a sample of a saved database report. As mentioned above, the
date at the top of the document will automatically change to the date and time that you saved the
file.
Automatic Inventory Systems | User Manual 23
Edit Inventory Button Functionality
Upon clicking the Edit Inventory button in the Database Management Application, a separate
application, MySQL Workbench (Figure 22), will open. This software is used to make changes to the
database in terms of item pricing, box quantities of items and correcting any stock entry errors.
(Figure 22) Opening Screen of the MySQL Workbench
Double Clicking on the manager user account (In the left pane) will bring up a password box
prompting for the password of the Manager account on the database. (This password is different
from the DBM password)
(Figure 23) Password Prompt of the MySQL Workbench for the Manager User Account
Automatic Inventory Systems | User Manual 24
Once you have successfully logged into the
MySQL Workbench, you should see pane on the
left hand corner of the screen that looks similar to
Figure 24. AISI is the database, click to expand it.
You will see Tables, views, and routines appear
as sub items. Click on the Tables item to expand
it. You will see three tables, inventory (The
tracking of inventory in the restaurant),
password_table (a storage place for the
encrypted password of the DBM) and the
products table (a list of all products at the
restaurant, their prices and the number of units
per box).
(Figure 24) Pane showing inventory, products and passwords tables for database
Inventory Table
The inventory table (Figure 25) shows the ID of each product, the name of each product, the
number of units on hand and a category of the item.
Automatic Inventory Systems | User Manual 25
(Figure 25) The inventory table with, UPC, Product and units columns
Products Table
The products table (Figure 25) contains the ID of each item, the product name, the number of units
per box (box_units), the cost per unit (per_unit) and the category of the items.
(Figure 25) Products table showing the UPC, product name, box_units, $ per_unit and category of all items sold
When changing the prices of items or the number of items in the box, you must make sure to click
the apply button (Figure 26) in order to make your changes final.
(Figure 26) The Apply Button. This Button must be Clicked after Making a Change in the Database
Automatic Inventory Systems | User Manual 26
Submitting Orders to Inventory
When the restaurant manager receives orders, a sheet will be given with the quantity of all boxes
shipped there, and 3 barcodes, with the quantity of boxes encoded into them. The restaurant
manager should log into the DBM, and at the bottom of the main menu, they will see a section to
input these barcodes (Figure 18). Simply scan each barcode twice and click the submit button. The
application should automatically tab to the next text box when inputting data.
(Figure 18) The Home Screen of the Database Manager
Message Boxes when Submitting Orders
If submitting orders to inventory is unsuccessful, the cause is one of three reasons:
Reason
Error Message
1.
You did not enter any barcodes in the application.
2.
The barcodes should each be scanned twice in a row.
These barcodes must match.
3.
The database was successfully updated.
Automatic Inventory Systems | User Manual 27