1
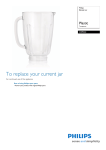
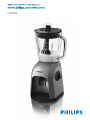
HR2800
2
3
A
B
1
P
O
C
D
E
F
G
H
I
N
J
M
K
L
4
HR2800
English 6
Dansk 13
Deutsch 20
Ελληνικα 27
Español 35
Suomi 42
Français 48
Italiano 55
Nederlands 62
Norsk 69
Português 76
Svenska 83
Türkçe 90
6
English
Introduction
Congratulations on your purchase and welcome to Philips! To fully benefit from the support that
Philips offers, register your product at www.philips.com/welcome.
Important
Read this user manual carefully before you use the appliance and save it for future reference.
Danger
-- Never immerse the motor unit in water or any other liquid, nor rinse it under the tap. Only use
a moist cloth to clean the motor unit.
Warning
-- Check if the voltage indicated on the appliance corresponds to the local mains voltage before
you connect the appliance.
-- Do not use the appliance if the plug, the mains cord or other parts are damaged.
-- If the mains cord is damaged, you must have it replaced by Philips, a service centre authorised by
Philips or similarly qualified persons in order to avoid a hazard.
-- Do not let the mains cord hang over the edge of the table or worktop on which the
appliance stands.
-- Do not touch the blades, especially when the appliance is plugged in. The blades are very sharp.
-- Make sure the blade unit is securely fastened to the blender jar before you assemble the
blender jar onto the motor unit.
-- Never reach into the blender jar with your fingers or an object (except the spatula
provided) while the appliance is running.
-- This appliance is not intended for use by persons (including children) with reduced physical,
sensory or mental capabilities, or lack of experience and knowledge, unless they have been given
supervision or instruction concerning use of the appliance by a person responsible for their
safety.
-- Children should be supervised to ensure that they do not play with the appliance.
-- Never let the appliance run unattended.
-- Do not touch the cutting edges of the blade unit when you handle, empty or clean it. They are
very sharp and you could easily cut your fingers on them.
-- If the blade unit gets stuck, unplug the appliance before you remove the ingredients that block
the blade unit.
-- Never use the blender jar to switch the appliance on and off.
Caution
-- Only connect the appliance to an earthed wall socket.
-- Always unplug the appliance before you assemble, disassemble or make adjustments to any of
the parts.
-- Unplug the appliance immediately after use.
-- Never use any accessories or parts from other manufacturers or that Philips does
not specifically recommend. If you use such accessories or parts, your guarantee becomes
invalid.
-- The appliance is intended for household use only and may only be used indoors. It is not
intended for commercial or industrial use.
-- Never place the blade unit on the motor unit without having assembled the blender jar onto it.
-- Always make sure that the blade unit and the blender jar are correctly assembled before you
plug in and switch on the appliance.
-- Never forget to place the sealing rings on the dispenser and the blade unit before you assemble
the blender jar, otherwise leakage will occur.
English
7
-- If food sticks to the wall of the blender jar, switch off the appliance and unplug it. Then use a
spatula to remove the food from the wall.
-- Never fill the blender jar with ingredients hotter than 60°C.
-- To prevent spillage, do not put more than 1.5 litres of liquid in the blender jar, especially when
you process at high speed (speed 2). Do not put more than 1 litre in the blender jar when
you process hot liquids or ingredients that tend to foam strongly.
-- Always make sure the blender lid is properly assembled on the blender jar and the measuring
cup or the spatula is inserted in the lid before you switch on the appliance.
-- Do not use any other spatula than the one provided with this appliance.
Electromagnetric fields (EMF)
This Philips appliance complies with all standards regarding electromagnetic fields (EMF). If handled
properly and according to the instructions in this user manual, the appliance is safe to use based on
scientific evidence available today.
General description (Fig. 1)
A
B
C
D
E
F
G
H
I
J
K
L
M
N
O
P
Lid of blender jar
Blender jar
Sealing ring for coupling unit
Coupling unit
Sealing ring for dispenser
Dispenser
Sealing ring for blade unit
Blade unit
Dispenser cover
Dispensing lever
Drip tray
Rubber foot (4x)
Cord storage facility
Control knob
Spatula
Measuring cup
Before first use
1 Thoroughly clean the parts that come into contact with food before you use the appliance
for the first time (see chapter ‘Cleaning’).
Preparing for use
1 Fasten the coupling unit to the blender jar (Fig. 2).
Make sure the sealing ring is positioned correctly between the blender jar and the coupling unit.
2 Slide the small sealing ring around the threaded connector of the coupling unit of the blender
jar (Fig. 3).
3 Place the dispenser on the threaded connector of the coupling unit of the blender jar (1).
Screw the dispenser clockwise onto the coupling unit of the blender jar (2) (Fig. 4).
4 Put the thin sealing ring on the blade unit.  (Fig. 5)
Make sure that the sealing ring is placed correctly.
5 Insert the blade unit into the bottom of the coupling unit (1). Screw the blade unit anticlockwise until it is properly fixed (2) (Fig. 6).
8
English
Note:The blade unit only fits in the coupling unit in one way.When attaching the blade unit to the
coupling unit, make sure the arrow on the blade unit points towards the ‘unlocked’ symbol, then turn it to
the ‘locked’ symbol.
6 Open the dispenser cover (1) and put the assembled blender jar on the motor unit
(2) (Fig. 7).
Make sure the blender jar is properly placed and then close the dispenser cover.
7 Slide the drip tray into place (Fig. 8).
8 Put the mains plug in the wall socket.
Using the appliance
This blender is intended for making smoothies and juices. It is also suitable to prepare soups and
sauces, to process vegetables and fruits, to make batter etc.
1 Put the ingredients in the blender jar.  (Fig. 9)
2 Place the lid on the blender jar and push it down to fix it (Fig. 10).
3 Place the measuring cup in the opening in the lid (Fig. 11).
Tip: If you are processing ingredients that are difficult to blend, you can use the spatula (see section
‘Spatula’ below).
4 Turn the control knob to speed 1 or 2 (Fig. 12).
If you want to process ingredients very briefly, turn the control knob to pulse position.
If you are not satisfied with the result, the following tips may help:
-- Switch off the appliance and turn the control knob to pulse position a few times to let the
blender run briefly.
-- Use the spatula to stir the ingredients, either while the blender is running or while the blender is
switched off.
-- Switch off the appliance, remove part of the ingredients from the jar and process a smaller
amount.
-- Add more liquid.
-- For recipes in the chapter ‘Recipes’, switch off the appliance and let it cool down to room
temperature before you let it run again for the next operation.
-- Do not let the appliance run for more than 3 minutes at a time. If you have not finished
processing after 3 minutes, switch off the appliance and let it cool down to room temperature
before you let it run again.
5 Place your glass against the dispensing lever to let the smoothie flow into the glass (Fig. 13).
You can switch off the blender to dispense the smoothie. If the smoothie does not flow out
smoothly, switch on the blender. This increases the dispensing speed.
Note:When you use a tall glass, slightly tilt the glass when you put it under the dispenser. Make sure that
the edge of the glass does not get caught behind the dispensing lever.
Tips
-- If you want to crush ice cubes, put not more than 6 ice cubes (of approx. 25x35x25mm) in the
blender jar and turn the control knob to pulse position a few times.
-- Do not process a large quantity of solid ingredients at the same time. To get good results, we
advise you to process these ingredients in a series of small batches.
-- To make tomato juice, cut the tomatoes in four and drop the pieces through the opening in the
lid onto the rotating blades.
English
9
Measuring cup
You can use the measuring cup to measure ingredients.
Spatula
You can use the spatula when you process ingredients that are difficult to blend. You can use the
spatula while the blender is switched on or while it is switched off. You can also fit the measuring
cup on top of the spatula for better grip.
1 Put the ingredients to be processed in the blender jar.
2 Put the lid on the jar without the measuring cup.
3 Insert the spatula into the jar through the hole in the lid (Fig. 14).
Only use the spatula if the lid is fixed on the jar.
Do not use any other spatula than the one provided with this appliance.
4 Switch on the appliance.
Of course, you can also use the spatula while the blender is switched off.
5 Use the spatula when needed. Move it up and down or anti-clockwise for thorough
mixing (Fig. 15).
Note:You can safely move the spatula while the blender is running as long as the spatula rests on the lid.
Cleaning
Never use scouring pads, abrasive cleaning agents or aggressive liquids such as petrol or acetone
to clean the appliance.
Tip: Cleaning the appliance and its parts is easiest immediately after use.
1 Make sure the appliance is switched off and unplugged.
2 Disassemble all removable parts from the motor unit.
1 Remove the lid with the measuring cup from the blender jar. If you have attached the spatula to
the measuring cup, detach it.
2 Lift the assembled blender jar off the motor unit (Fig. 16).
3 Turn the blade unit anti-clockwise (1) and remove it from the coupling unit (2) (Fig. 17).
4 Turn the dispenser anti-clockwise (1) and detach it from the coupling unit (2) (Fig. 18).
5 To clean the inside of the dispenser, turn the bottom part of the dispenser clockwise (1) and
remove the bottom part (2).  (Fig. 19)
6 Remove the sealing rings from the dispenser, the blade unit and the blender jar.
Never detach the soft plastic part from the inside of the dispenser (Fig. 20).
3 Clean the motor unit with a moist cloth.
Never immerse the motor unit in water or any other liquid, nor rinse it under the tap.
4 Remove the coupling unit and the sealing ring from the blender jar.
5 Clean the removable parts in hot water, if necessary with some washing-up liquid, or in the
dishwasher.
All parts except the motor unit are dishwasher-proof.
Storage
1 To store the mains cord, wind it round the reel in the bottom of the appliance (Fig. 21).
10
English
Environment
-- Do not throw away the appliance with the normal household waste at the end of its life, but
hand it in at an official collection point for recycling. By doing this, you help to preserve the
environment (Fig. 22).
Guarantee & service
If you need service or information or if you have a problem, please visit the Philips website at
www.philips.com or contact the Philips Consumer Care Centre in your country (you find its phone
number in the worldwide guarantee leaflet). If there is no Consumer Care Centre in your country,
go to your local Philips dealer.
Recipes
Fruit smoothie
Ingredients:
-- 400g peeled kiwi
-- 200g banana
-- 300g pineapple juice
-- 200g strawberries (frozen)
1 Cut the kiwi into pieces of 3x3x3cm.
2 Cut the banana into slices of 1cm.
3 Wash and dry the strawberries. Freeze them for 16 hours.
4 Put the ingredients in the blender jar in above mentioned order and blend for 30 seconds or
blend until smooth.
Note: Use the strawberries straight from the freezer.
5 Serve the smoothie.
Creamy fruit smoothie
Ingredients:
-- 400g strawberries (frozen)
-- 500ml fresh milk
-- 8 ice cubes (big and angular)
-- 2tsps sugar
-- 2tsps vanilla extract (vanilla sugar)
1 Wash and dry the strawberries. Freeze them for 16 hours.
2 Put the ingredients in the blender jar in the order mentioned above and blend for 45
seconds.
Note: Use the strawberries straight from the freezer.
3 Serve the smoothie.
Thick banana milkshake
Ingredients:
-- 4  medium-sized bananas (sliced)
-- 350ml semi-skimmed milk
-- 350g vanilla ice cream (approximately -18°C)
1 Cut the bananas into 1cm slices.
English 11
2 Put the ingredients in the blender jar in the above-mentioned order and blend for 30
seconds. If necessary, e.g. to get a finer result, you can switch off and unplug the appliance and
stir the mixture with the spatula. Then continue to blend again.
3 Serve the smoothie.
Raspberry cream
Ingredients:
-- 450ml raspberry yoghurt
-- 250ml orange juice
-- 150g frozen raspberries
-- 150g frozen yoghurt (vanilla flavour)
1 Put all ingredients in the jar and blend for 35 seconds.
2 Serve the smoothie.
Troubleshooting
This chapter summarises the most common problems you could encounter with the appliance. If
you are unable to solve the problem with the information below, contact the Consumer Care
Centre in your country.
Problem
Solution
The appliance does
not work.
Check if you have plugged in the appliance. Also check if the blender jar
is properly attached.
The motor produces
an unpleasant smell
during processing.
It is common for a new appliance to give off an unpleasant smell or emit
some smoke the first few times it is used. This phenomenon stops after
you have used the appliance several times. The appliance may also give
off an unpleasant smell or emit some smoke if it has been used too long.
In this case, set the control knob to 0 and let the appliance cool down
for 60 minutes.
The blade unit blocks
during processing.
Set the control knob to 0 and use a spatula to dislodge the ingredients
that block the blade unit. We also advise you to process a smaller
quantity and/or to cut ingredients into smaller pieces.
The blender jar leaks.
Set the control knob to 0 and remove the ingredients from the jar.
Check if the blade unit, the dispenser and their sealing rings are
assembled properly.
The smoothie is not
dispensed smoothly.
Let the blender operate when you dispense the smoothie. This increases
the dispensing speed.
The glass does not fit
under the dispenser.
When you use a tall glass, slightly tilt the glass when you put it under the
dispenser. Make sure that the edge of the glass does not get caught
behind the dispensing lever.
Frequently asked questions
This chapter lists the questions most frequently asked about the appliance. If you cannot find the
answer to your question, contact the Consumer Care Centre in your country.
12
English
Question
Answer
Can I clean all parts in the
dishwasher?
Only the motor unit is not dishwasher-proof. All other parts can
be cleaned in the dishwasher.
What does ‘pulse’ mean?
When you turn the control knob to the pulse setting, the
appliance runs at its highest speed as long as you keep the knob in
this position. Use the pulse setting if you want to have more
control over the processing jobs.
Can I pour boiling hot liquids
into the blender jar?
No, let hot liquids cool down to 60°C to avoid damage to the jar.
What can I do with the
spatula?
You can use the spatula to stir ingredients that are difficult to
blend. The spatula helps to mix the ingredients more thoroughly.
98
2
3
4
5
6
7
8
9
10
11
12
13
14
15
16
17
18
19
20
21
1
2
3
2
1
1
2