1
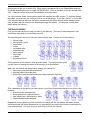
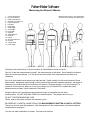
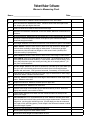
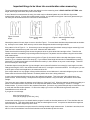
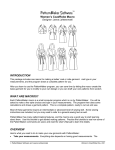
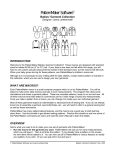
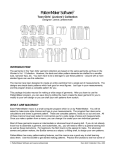
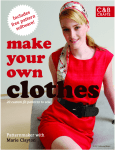
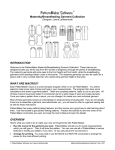
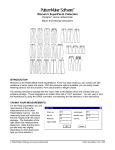
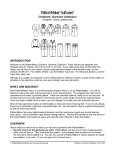
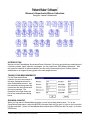
PatternMaker Software Women's SuperJacket/Dress Collection Designer: Leena Lahteenmaki INTRODUCTION Welcome to the PatternMaker SuperJacket/Dress Collection! By mixing and matching combinations of necklines, pockets, lapels, sleeves, and lengths, you can create over 1000 different garments!. With the extensive selection of options available, you can easily create anything from a breezy summer windbreaker to an elegant evening gown to an ankle-length raincoat. TAKING YOUR MEASUREMENTS For the SuperJacket/Dress collection you will need several of the same measurements as for other PatternMaker macros. Use the standard measuring chart and instructions that are included with this macro package. The illustration at the right shows the first of two measurements dialog boxes. RUNNING A MACRO When you first start the PatternMaker program, you will see a blank drawing area. To run the SuperJacket/Dress macro, select the MACRO command from the File menu, or click on the icon which has the word MAC. (Users of PatternMaker Basic should select OPEN from the File menu, or click the OPEN icon.) PatternMaker Software and Leena Lahteenmaki SuperJacket/Dress Collecion Rev. 1/00 SuperJacket/Dress Collection A dialog box will ask you to select a file. Each macro is a separate file in your PatternMaker directory. The SuperJacket/Dress macro is called SUPERJKT.MAC. Click on the name of the file, and then click “OK”. It may take a few seconds for PatternMaker to load the macro. You will now see a series of dialog boxes which ask questions and offer choices. To continue through the macro, you must use your mouse to click on one of the options. If you click "Cancel," or if you click "OK" without making a selection, the macro will abort and you will be returned to the drawing screen. Also, be aware that you cannot move backwards through the options. You may wish to write down which options you choose. THE DIALOG BOXES First you will select how much ease you want in your garment. There are 10 ease categories, from close-fitting underwear to a loose-fitting overcoat. The next dialog box asks you to choose a collar/neckline style. Choose one of the following: • tailored collar • tailored collar, round • shawl collar • tuxedo • convertible collar • mandarin collar • jewel neckline • raised neck • v-shape • asymmetrical front All the garments in this collection have princess seams. The next dialog box gives you the choice of drawing the seams to the armscye or to the shoulder. Work your way through the dialog boxes, making your choices for: • sleeve style (one-piece/two-piece/short) • shoulder pads/no shoulder pads • pocket style (patch/welt/buttonhole/round flap/rectangular flap/none) Then, depending on the options you have chosen, you will see further dialog boxes for any or all of the following: • pocket direction (straight/slant) • breast pocket style (same as above) • lapel height (bust, mid waist-bust, waist) • single breasted/double breasted Regardless of which garment you have selected, the macro will ask you whether the pattern pieces should be printed with seam allowances or not, and whether you want to use inches or centimeters for your measurements. Use your mouse or arrow keys to select your choices. 2 SuperJacket/Dress Collection After you have made your choices, a dialog box will ask you for the measurements. Fill these in from your measurement chart. Note: the field called “Jacket Length” is referring to the desired length of your garment from the waist. You can enter any number, including “0” if you want a jacket that ends at your waist. Remember to use decimal numbers, so 8-3/4 inches is 8.75 inches and so forth. Be careful to enter the right numbers in the right spaces. When you are ready, click “OK” or press the Enter key. You may have to wait for the macro to run, especially if you do not have a fast computer. You will know the macro is done when the hourglass cursor changes back to an arrow and the word Command: appears on the prompt line. If you cannot see the pattern, or if you only see part of it, press the <END>key on your keyboard. Note: Refer to the PatternMaker User's Manual for instructions on running the program and printing the pattern pieces. SEWING THE JACKETS Sewing instructions for this collection are not available at this time. If you are unfamiliar with the necessary techniques for sewing these jackets, you may wish to refer to additional sewing reference material. 3 PatternMaker Software Measuring for Women's Macros 1. 2. 3. 4. 5. 6. 7. 8. 9. 10. 11. 12. 13. 14. 15. 16. 17. 18. neck circumference bust circumference waist circumference abdomen circumference hip circumference bust span bust height waist height back length back width shoulder waist-abdomen waist-hip biceps wrist circumference overarm outside seam crotch depth Measure bust height (7) and waist height (8) around neck, double, and divide by 2. Following are the instructions on how to measure for PatternMaker women's macros. Don't try to take the measurements yourself. Ask someone else to take them. Stand straight but relaxed when you are being measured. You will receive the best results if the measurements are taken over underwear. Set 1-inch wide elastic bands around your waist and hip. Search carefully for the correct places of these elastic bands. Keep these elastic bands on their places during the whole measuring process. Hip elastic is fastened on the level where hip circumference is maximum. Examine whether it is on your buttocks (7-8 inches/18-20 cm below the waist) or on top of your thighs (10-12 inches/25-30 cm below the waist). Measurements are taken from the bottoms of the bands. Except for pants' cuff circumference and skirt/dress length, all measurements are body measurements. DO NOT ADD ANY EASE to the measurements. The program does it for you. DO NOT TIGHTEN MEASURING TAPE. Please, refer to the picture related to this measuring form. BE ESPECIALLY CAREFUL WHEN TAKING THE MEASUREMENTS WRITTEN IN CAPITAL LETTERS. They are crucial for good fitting patterns. After having taken all the measurements, take these important measurements once again. You can use either centimeters or inches. Give inches in fractions PatternMaker Software Women’s Measuring Chart Name: ___________________________ Date: ___________ 1 Neck Circumference: Measure around lowest part of neck, at the base 2 Bust Circumference: Marked with elastic. Measure around the fullest part of the bust, keeping the tape high at the back 3 Waist Circumference: Measure waist at the elastic tape 4 Abdomen Circumference: Measured on the level where abdomen circumference is maximum 5 Hip Circumference: Measured over the largest part of your bottom/thighs (at elastic) 6 Bust Span: Horizontal distance between bust apexes (also called bust bridge). Measured along bust elastic. 7 Bust Height: Measure from center of back neck over shoulder to apex of one breast 8 WAIST HEIGHT: Measure from center of back neck over shoulder to breast apex and from there vertically to lower edge of waist elastic. To be sure to get right measurements, take this and bust height as a link around neck (=double) and divide the result by 2 (see picture). 9 BACK LENGTH: Measure from center of back neck to lower edge of waist elastic 10 BACK WIDTH: hang your arms relaxed on your sides. The measurement is taken horizontally between shoulder blades (i.e. from sleeve seam to sleeve seam), from and to the point where your arm meets your body (but not to armpit) about 4" (10 cms) from neck downwards. 11 Shoulder length: Measure from neck to shoulder tip. Shoulder tip is found when you raise your arm to horizontal position and feel where there is hollow/pit between shoulder and arm bones. Hold your arm horizontal, if necessary, to find this point. 12 Waist-Abdomen: Measure vertically from lower edge of waist elastic to lower edge of abdomen elastic. Measure at front center. 13 Waist-Hip: Measure vertically from lower edge of waist elastic to lower edge of hip elastic. Measure at the side. 14 Biceps circumference: Measure at widest point of upper arm. 15 Wrist circumference: Measure over wrist bone 16 Overarm: Arm length from shoulder tip (as described above) to wrist. Bend arm slightly and measure over outside of elbow. 17 Outside seam: Measure from waist over the outside curvature of the hip to the desired cuff length. 18 CROTCH DEPTH: Sit on unpadded bench or chair. Measure vertically from waist elastic to chair level on both sides, and use the longer measurement. Measure in a straight line, not along the outside hip curve. (Crotch depth can also be measured from a pair of old, well fitting pants.) Crotch depth is the difference between outside and inside length of pants. Desired cuff circumference, not ankle circumference Desired jacket length from waist elastic to hem Desired skirt /dress length from waist elastic to hem Important things to be taken into consideration when measuring The most important measurements are the ones written in on the measuring chart in BOLD CAPITAL LETTERS: waist height, back length, back width, and pants' crotch depth. If one of these four measurements is wrong, the result may be a distorted pattern and it is difficult to figure what measurement is wrong. If some other measurement is wrong, you get either a too-tight or a too-loose garment and you can easily see what measurement to correct and to what direction. Figure 3: normal sloper Figure 2: back width wrong Figure 1: waist height/back length wrong Normally the pattern for basic sloper is more or less like Figure 1. Front and back shoulders slope downwards to shoulder tip. Armscyes curve inward. Back armscye can be rather straight but should never bulge outward. If the pattern is like in Figure 2 -- i.e. front armscye curves strongly inward (a) and back armscye bulges outward (b), back width has been measured wrong and is too much. Measure back width anew. Please note that this measuring error causes the garment to be too loose at back and too tight at front. Therefore the situation cannot be corrected by only reducing width of back piece. The pattern must be redrawn using the correct back width measurement. If waist height in relation to back length is wrong (refer to Figure 3), the result is either a shoulder that slopes to wrong direction (a) or a shoulder which is too steep (b). If you measure waist height as instructed in PatternMaker measuring instructions i.e. double around back neck and divide the result by 2, there seldom is any error in waist height. Therefore the error usually is in back length. If shoulder slopes in wrong direction (a), back length is too much and if shoulder is too steep (b), back length is too little. Change back length 2-3 cm in the needed direction and see if it is enough to correct the situation. If it looks good, you see to which point at neck back length has to be measured to be OK. If the subject stands in a very upright, military position with bust out and abdomen in, also waist height may be too much. Please make sure that the subject stands in a relaxed position when she is being measured. In some cases a steep shoulder may be due to the subject's body shape. This is the case if the subject has a very prominent bust. And conversely, if a subject has a very flat bust and/or a very round back, the shoulder can be rather straight. Thus, there are cases, where the patterns are all right even if they look "odd". When the patterns are drawn according to a person's own measurements, they should not be compared with patterns drawn according to "normal" or "average" measurements. If you are not sure of the measurements taken, you have a very good and simple way to check them: sew a muslin with the basic bodice patterns. If it fits on the subject, you can be sure that all other garments sewn with PatternMaker macros will fit well. If you get an error message: value out of range in line … coord (32,33,sqrt(op*op-oke*oke),-oke); it means the measuring error is so drastic that the program is unable to draw the patterns at all. Front shoulder does not meet armscye line. Then either back length is too little or waist height too much. It may also be that shoulder length has some influence: shoulder length may be too short. Also, in some other cases there may be reason for checking shoulder length measurement. If shoulder is too short, there will be a corner inward where front and back shoulder meet at shoulder tip and vice versa.