1
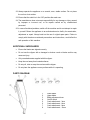
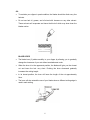
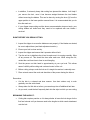
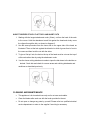
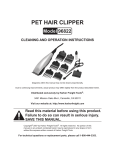
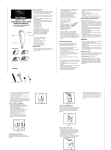
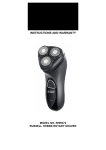
INSTRUCTIONS AND WARRANTY MODEL NO. RHC28 RUSSELL HOBBS HAIR CLIPPER Congratulations on purchasing our Russell Hobbs Hair Clipper. Each unit is manufactured to ensure safety and reliability. Before using this appliance for the first time, please read the instruction manual carefully and keep it for future reference. FEATURES OF THE RUSSELL HOBBS HAIR CLIPPER Corded operation Stainless steel blades Brushed stainless steel finish Comb attachment (cutting lengths): 3, 6, 9 & 12 mm Blade adjustment level Hanging loop Scissors Blade guard Lubricating oil Cleaning brush Barber comb IMPORTANT SAFEGUARDS When using any electrical appliance, basic safety precautions should always be followed including the following: 1. Please read the instructions carefully before using any appliance. 2. Always ensure that the voltage on the rating label corresponds to the mains voltage in your home. 3. Incorrect operation and improper use can damage the appliance and cause injury to the user. 4. The appliance is intended for household use only. Commercial use invalids the warranty and the supplier can not be held responsible for injury or damage caused when using the appliance for any other purpose than that intended. 5. Avoid any contact with moving parts. 6. This appliance is not intended for use by persons (including children) with reduced physical, sensory or mental capabilities, or lack of experience and knowledge, unless they have been given supervision or instruction concerning use of the appliance by a person responsible for their safety. 2 7. Children should be supervised to ensure that they do not play with the appliance. 8. Check the power cord and plug regularly for any damage. If the cord or the plug is damaged, it must be replaced by the manufacturer or a qualified person in order to avoid an electrical hazard. 9. Do not use the appliance if it has been dropped or damaged in any way. In case of damage, take the unit in for examination and/or repair by an authorised service agent 10. To reduce the risk of electric shock, do not immerse or expose the motor assembly, plug or the power cord to water or any other liquid. 11. Never immerse the unit in water or any other liquid for cleaning purposes. 12. Remove the plug from the socket by gripping the plug. Do not pull on the cord to disconnect the appliance from the mains. Always unplug the unit when not in use, before cleaning or when adding or removing parts. 13. The use of accessory attachments that are not recommended or supplied by the manufacturer may result in injuries, fire or electric shock. 14. A short cord is provided to reduce the hazards resulting from becoming entangled in or tripping over a longer cord. 15. Do not let the cord hang over the edge of a table or counter. Ensure that the cord is not in a position where it can be pulled on inadvertently. 16. Do not allow the cord to touch hot surfaces and do not place on or near a hot gas or electric burner or in a heated oven. 17. Do not use the appliance on a gas or electric cooking top or over or near an open flame. 18. Use of an extension cord with this appliance is not recommended. However, if it is necessary to use an extension lead, ensure that the lead is suited to the power consumption of the appliance to avoid overheating of the extension cord, appliance or plug point. Do not place the extension cord in a position where it can be pulled on by children or animals or tripped over. 19. This appliance is not suitable for outdoor use. Do not use this appliance for anything other than its intended use. 20. DO NOT carry the appliance by the power cord. 21. Do not leave this appliance unattended during use. Always unplug the unit when not in use or before cleaning. 3 22. Always operate the appliance on a smooth, even, stable surface. Do not place the unit on a hot surface. 23. Ensure that the switch is in the “Off” position after each use. 24. The manufacturer does not accept responsibility for any damage or injury caused by improper or incorrect use, or for repairs carried out by unauthorised personnel. 25. In case of technical problems, switch off the machine and do not attempt to repair it yourself. Return the appliance to an authorised service facility for examination, adjustment or repair. Always insist on the use of original spare parts. Failure to comply with the above mentioned pre-cautions and instructions, could affect the safe operation of this machine. ADDITIONAL SAFEGUARDS Ensure the blades are aligned correctly. Do not use the clipper with a damaged or broken comb or blades as this may cause an injury. Only use attachments supplied with this clipper. Keep the cord away from heated surfaces. Do not pull, twist or wrap the cord around the clipper. Do not place the appliance on any surface while it is operating, PARTS DIAGRAM 1. 2. 3. 4. 5. 6. 7. 8. Lower blade Upper blade Blade adjustment lever On/Off switch Comb attachment - 3mm Comb attachment - 6mm Comb attachment - 9mm Comb attachment - 12mm 4 Accessories: OPERATING INSTRUCTIONS BLADE ADJUSTMENT When manufactured, the blades on the clipper are aligned and lubricated with oil. After cleaning or replacement it is possible that the blades may need to be re-adjusted. To do so follow the steps below: Set the blade adjustment lever (3) to the upper position; adjust the blades so that the lower blade (1) is set parallel to the upper blade (2) with a 1-2mm ledge against the upper blade (see below image). Then fasten the screws. •If the blade alignment is still incorrect, add a few drops of oil to the blades, turn the clipper on for a few moments, turn it off and unplug. Loosen the screws slightly again and adjust the blades. Ensure that the screws are tightened after the alignment. 5 OIL To maintain your clipper in peak condition, the blades should be oiled every few haircuts. Do not use hair oil, grease, and oil mixed with kerosene or any other solvent. These solvents will evaporate and leave the thick oil which may slow down the blades motion. BLADE LEVER The blade lever (3) adds versatility to your clipper by allowing you to gradually change the closeness of your cut without an attachment comb. When the lever is in the uppermost position, the blades will give you the closest cut and leave the hair very short. Pushing the lever downward gradually increases the cutting length. In its lowest position, the lever will leave the length of the cut approximately 5mm. The lever will also extend the use of your blades since a different cutting edge is used in each setting. 6 In addition, if extremely heavy hair cutting has jammed the blades, it will help if you remove the hair, once it has become wedged between the two blades without removing the blades. This can be done by moving the lever (3) from the upper position to the lower position several times. It is recommended that you do this after each cut. If your clipper stops cutting and the above recommendation does not work, your cutting blades are dulled and they need to be replaced with new blades / serviced. RIGHT BEFORE YOU BEGIN CUTTING: 1. Inspect the clipper to ensure the blades are set properly, if the blades are slanted, be sure to adjust them (see blade adjustment section.) 2. Ensure your hair is clean and dry. 3. Inspect the clipper and ensure that it operates without fault. 4. Turn the unit on to distribute the oil and to make sure it is running smoothly. Wipe off any excess oil. This should be done after each use. While using the unit, untwist the cord from time to time to avoid tangling. 5. Seat the person so their head is approximately at your eye level. This allows ease of visibility while cutting and a relaxed control of the unit. 6. Before cutting, always comb the hair so it is tangle free and as is naturally worn. 7. Place a towel around the neck and shoulders of the person having the haircut. Remember: Cut the hair in a relaxed and slow manner. Use short strokes only to work gradually over the entire head. Always take of a little hair at a time; you can always trim off additional hair later. As you work, comb the hair frequently back into the style to which you are cutting. BEGINNING THE HAIRCUT: Cutting hair requires practice so it is always better to leave the hair longer for the first few haircuts until you become used to the lengths to which comb attachment cuts the hair. 7 Attachment Combs: Attachment Comb #1 (image 5)leaves 3mm hair length Attachment Comb #2 (image 6) leaves 6mm hair length Attachment Comb #3 (image 7)leaves 9mm hair length Attachment Comb #4(image 8) leaves 12mm hair length See each combs size on the surface of the respective comb. To attach a comb, hold it with its teeth upward and slide it onto and along the clipper blade until the front of the comb seats against the clipper blade. To remove the comb, simply pull the comb upward and away from the clipper blade. For an even haircut, slowly and smoothly move the hair clipper along the hair. Do not make any sudden movements. Do not force it through quickly. Cut a small amount of hair at a time, you can always trim off additional hair later. Also, remember to comb the hair frequently to remove trimmed hair and to check for uneven strands. STEP 1- NAPE OF THE NECK 1. Attach the 3mm or 6mm comb attachments. 2. Insert the plug into the socket and turn on the unit with the power switch. 3. Hold the clipper with the cutting edge pointed up and begin the haircut, starting at the centre of the head from the base of the neck (see diagram 1). 4. Hold the clipper comfortably in your hand and hold lightly against the head ensuring the blades are directed upwards. 5. Gradually lift the clipper, working upwards and outwards through the hair, trimming just a little at a time. Start the cut from the beginning of the hair growth in the nape of the neck. 8 6. In the same movement as above cut the hair at the back of the head behind the ears. STEP 2- BACK OF THE HEAD Change to the next longest comb attachment, 9mm or 12mm and continue cutting hair nearer to the top of the head (diagram 2) STEP 3- SIDE OF THE HEAD Change to one of the shorter combs 3mm or 6mm, trim sideburns, i.e. the hair directly in front of the ears. Then change to one of the longer combs, 9mm or 12mm and continue to cut to the top of the head (diagram 3). 9 STEP 4- TOP OF THE HEAD 1. Using comb attachment 9mm or 12mm cut the top of the head from back to front against the direction in which the hair normally grows (diagram 4). In some cases, this may require the reverse, or cutting from front to back. Keep in mind that hair cut against the growth will be shorter than the hair cut along the growth. 2. Comb attachments 3mm or 6mm are used to achieve a short cut. 3. For longer hair on top, use the comb provided and lift the hair on the top of the head. Select your desired length and cut over the comb, with the hair lifted or hold the hair between your fingers to lift it (diagram 5 & 6). You can cut the hair shorter gradually by reducing the space between the comb/fingers and the head. Comb out the trimmed hair to check for uneven strands. STEP 5- THE FINISHING TOUCH 1. Finally, remove the attachment comb from the clipper for close trimming around the base of the neck, the sides of the neck and the ears. 2. Turn the clipper with the blades facing toward the hair and carefully trim the hair around the temples and neck. Do not apply too much pressure as the blades making contact against the skin may cause a wound or cut the skin. 10 SHORT TAPERED STYLES-‘FLAT TOPS’ AND SHORT CUTS 1. Starting with the longest attachment comb (12mm), cut from the back of the neck to the crown. Hold the attachment comb flat against the head and slowly move the clipper through the hair, as shown in diagram 8. 2. Use the same procedure from the lower side to the upper side of the head, as illustrated. Then cut the hair against the direction in which it grows from in front to the crown and then level the cut with the sides. 3. To give a ‘flat top’ look, the hair on the top of the head must be cut over the top of a flat comb rather than by using the attachment comb. 4. Use the closer cutting attachment combs to taper the hair down to the decline as desired. Comb hair and check for uneven areas and outlining sideboards and necklines as described previously. CLEANING AND MAINTENANCE This appliance is for household use only and is not user-serviceable. Clean the blades after each use with the brush provided in the set. Do not open or change any parts by yourself. Please refer to a qualified electrical service department or return to the supplier if servicing is necessary. 11 Always remember to unplug the unit from the electrical outlet when not in use and before cleaning. Ensure that the speed control is set to “0”. It is much easier to clean the accessories directly after they have been used. Wash them in warm, soapy water, rinse and dry well. The body of the appliance and the stand should be cleaned with a damp cloth. Do not let water enter the appliance or the stand. Do not use bleach or other abrasive substance or solvents to clean your appliance as it can be damaging to the finish. Do not immerse the appliance in water or any other liquid, or hold it under a running tap to clean. To remove stubborn spots/marks, wipe the surfaces with a cloth slightly dampened in soapy water or mild non-abrasive cleaner. Rinse and dry a clean, dry, soft cloth. Ensure the blades get lubricated with oil on a regular basis. STORING THE APPLIANCE Unplug the unit from the wall outlet and clean all the parts as instructed above. Ensure that all parts are dry before storing. Store the appliance in its box or in a clean, dry place. Never store the appliance while it is still wet or dirty. Never wrap the power cord around the appliance. SERVICING THE APPLIANCE There are no user serviceable parts in this appliance. If the unit is not operating correctly, please check the following: You have followed the instructions correctly That the unit has been wired correctly and that the wall socket is switched on. That the mains power supply is ON. That the plug is firmly in the mains socket. 12 If the appliance still does not work after checking the above: - Consult the retailer for possible repair or replacement. If the retailer fails to resolve the problem and you need to return the appliance, make sure that: The unit is packed carefully back into its original packaging. Proof of purchase is attached. A reason is provided for why it is being returned. If the supply cord is damaged, it must be replaced by the manufacturer or an authorised service agent, in order to avoid any hazard. If service becomes necessary within the warranty period, the appliance should be returned to an approved Home of Living Brands (Pty) Ltd service centre. Servicing outside the warranty period is still available, but will, however, be chargeable. CHANGING THE PLUG Should the need arise to change the fitted plug, follow the instructions below. This unit is designed to operate on the stated current only. Connecting to other power sources may damage the appliance. Connect a three-pin plug as follows: The wires in this mains lead are coloured in accordance with the following code: Green/Yellow = Earth Blue = Neutral Brown = Live 13 PLEASE AFFIX YOUR PROOF OF PURCHASE/RECEIPT HERE IN THE EVENT OF A CLAIM UNDER WARRANTY THIS RECEIPT MUST BE PRODUCED. WARRANTY 1. Home of Living Brands (Pty) Ltd warrants to the original purchaser of this product (“the customer”) that this product will be free of defects in quality and workmanship which under normal personal, family or household use and purpose may manifest within a period of 1 (one) year from the date of purchase (“warranty period”). 2. Where the customer has purchased a product and it breaks, is defective or does not work properly for the intended purpose, the customer must notify the supplier from whom the customer bought the product (“the supplier”) thereof within the warranty period. Any claim in terms of this warranty must be supported by a proof of purchase. If proof of purchase is not available, then repair, and/or service charges may be payable by the customer to the supplier. 3. The faulty product must be taken to the supplier's service centre to exercise the warranty. 4. The supplier will refund, repair or exchange the product in terms of this warranty subject to legislative requirements. This warranty shall be valid only where the customer has not broken the product himself, or used the product for something that it is not supposed to be used for. The warranty does not include and will not be construed to cover products damaged as a result of disaster, misuse, tamper, abuse or any unauthorised modification or repair of the product. 5. This warranty will extend only to the product provided at the date of the purchase and not to any expendables attached or installed by the customer. 6. If the customer requests that the supplier repairs the product and the product breaks or fails to work properly within 3 (three) months of the repair and not as a result of misuse, tampering or modification by or on behalf of the customer, then the supplier may replace the product or pay a refund to the customer. 7. The customer may be responsible for certain costs where products returned are not in the original packaging, or if the packaging is damaged. This will be deducted from any refund paid to the customer. HOME OF LIVING BRANDS (PTY) LTD (JOHANNESBURG) JOHANNESBURG TEL NO. (011) 490-9600 CAPE TOWN TEL NO. (021) 552-5161 DURBAN TEL NO. (031) 792-6000 www.russellhobbs.co.za 14