1
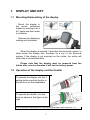
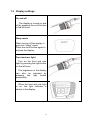
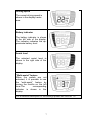
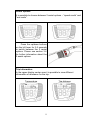
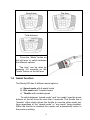
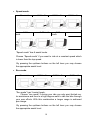
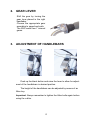
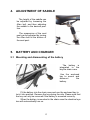
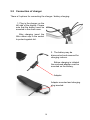
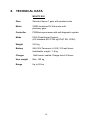
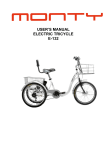
Instruction Manual MONTY E50 Contents INTRODUCTION 3 1. 1.1 1.2 1.3 1.4 1.5 DISPLAY AND KEY 5 Mounting/dismounting of the display .................................. 5 Operation of the display and the throttle ............................ 5 Display settings .................................................................. 6 Assist function .................................................................... 9 Troubleshooting ................................................................ 11 2. GEAR LEVER 12 3. ADJUSTMENT OF HANDLEBARS 12 4. ADJUSTMENT OF SADDLE 13 5. 5.1 5.2 5.3 5.4 5.5 5.6 5.7 BATTERY AND CHARGER 13 Mounting and dismounting of the battery ......................... 13 Connection of charger ...................................................... 14 Use of battery charger ...................................................... 15 Charging ........................................................................... 15 Storage for the winter ....................................................... 16 Warning ............................................................................ 16 Disposal of battery ............................................................ 17 6. DRIVING INSTRUCTIONS 7. EU STANDARDS, DECLARATION OF CONFORMITY 17 8. TECHNICAL DATA 18 9. WARRANTY 19 17 10. CUSTOMER APPLYING FORM 20 11. MONTY OFFICIAL DISTRIBUTORS AND CONTACTS 20 2 INTRODUCTION WELCOME TO THE MONTY FAMILY Firstly, we would like to welcome you and thank you for choosing the Monty brand This “User’s Manual” for your new Monty electric bike contains important information which you will need to keep your bike in good condition. It has been designed so that you can enjoy your E-Bike safely, making the most of your time. Please read this manual carefully before using your electric bike and save this manual for future reference. If you have any doubt or questions, please contact your authorized Monty dealer. The E-50 includes a long-lasting, top-quality engine which is not to require much maintenance from your side. Its innovative design and safe construction is to provide you with km and km of satisfaction. Parents or guardians should explain the contents of this manual to any minors using the E-Bike to ensure that they have understood its contents. The drawings and images may not correspond exactly to your model. They are used solely to facilitate your understanding. We apologize if any part of this manual does not correspond with the precise characteristics of your E-50. At Monty, we always strive to improve our products, as such; we may incorporate other new technical components to its models or change pieces without prior notice. Always give this manual to any future bicycle owner. The Monty family is constantly innovating to offer its clients a top-quality product made from the best materials. Our new EBikes are a clear example. They provide a new means of light and fun transport which is also ecological, silent and does not pollute. For this reason, we want to thank you for choosing us, a decision which will benefit the environment and all of us. Thank you as well for dedicating a few minutes to reading this manual. We hope that we have succeeded in making a product to your liking. For further information about our products, visit the Monty web site: http://www.monty.es 3 IMPORTANT WARNING NON-FULFILLMENT OF THE INSTRUCTIONS DETAILED IN THIS MANUAL MAY LEAD TO MECHANICAL FAILLURES, A LOSS OF CONTROL AND POSSIBLE FALLS, WITH SERIOUS PHYSICAL INJURIES TO THE USER OR OTHERS, INCLUDING EVEN DEATH. INCORRECT USAGE MAY ALSO RISK YOUR PHYSICAL INTEGRITY AND THAT OF OTHERS. SAFETY WARNING DO NOT OPEN OR MANIPULATE THE BATTERY, DOING SO WILL FORFEIT THE WARRANTY ESTABLISHED IN THIS MANUAL. IF YOU OPEN OR MANIPULATE THE BATTERY, CHARGER OR ELECTRICAL CIRCUIT, YOU MAY PROVOKE A SHORT-CIRCUIT AND POSSIBLE INJURIES (SHOCK OR BURNS). IT IS RECOMMENDED TO USE A HELMET WHILE RIDING. WARRANTY WARNING MODIFYING THE TRANSMISSION, FORK OR ANY OTHER COMPONENT IMPLIES THE E-50 NO LONGER IS TO BE CONFORMED TO THE MONTY SPECIFICATIONS AND THEREBY ANNULS THE WARRANTY. MANIPULATING THE ELECTRIC BIKE’S ELECTRICAL COMPONENTS WILL ALSO FREE MONTY OF ANY POSSIBLE LIABILITY. THE E-BIKE IS PROVIDED WITH A FRAME NUMBER WHICH CAN BE FOUND UNDER THE CRANK. CE (European Conform) 4 1. DISPLAY AND KEY 1.1 Mounting/dismounting of the display Mount the display in the center- positioned holder by inserting it at a 45° angle and then rotate it clockwise. Remove the display by rotating anti-clockwise. When the display is inserted, it activates the electrical system. In other words the display also functions as a key to the electrical system. If the display is not mounted on the e-bike, the e-bike will works like a conventional bike. Please note that the display must be removed from the holder after use as otherwise it will tap the battery power. 1.2 Operation of the display and the throttle To operate the display, use the 5 setting buttons and the throttle in the left lever on the handlebars. To operate the throttle, turn the lever as shown in the figure to the right. For a detailed description of the settings please see Section 1.3 5 1.3 Display settings On and off The display is turned on and off by pressing the on/off button in the left lever. Sleep mode When turning off the display, it goes into "sleep" mode. Press the on/off button again to activate the display. Front and rear light Turn on the front and rear light by pressing the light button on the left lever. The brightness of the display can also be adjusted by pressing the light button persistantly. When the front and rear light is on, the light indicator is shown in the display. 6 Driving speed The current driving speed is shown in the display center area. Battery indicator The battery indicator is shown in the left side of the display. The indicator indicates the approximate battery level. Assist level The selected assist level is shown in the right side of the display. ”Walk-assist” feature When the pedals are not activated, it is possible to use the ”walk-assist” feature by turning the throttle on the left lever.The corresponding indicator is shown in the display. For a detailed description of the settings please see Section 1.4 7 Assist options It is possible to choose between 2 assist options – “speed mode” and “eco mode”. Press the up/down buttons on the left lever for 3-5 seconds to switch between the 2 assist options. Please see section 3.4 for further information about the 2 assist options. Trip information In the upper display center area it is possible to view different information of relevance for the trip: Temperature Trip distance 8 Actual time Trip time Total distance Press the “Mode” button on the left lever to switch between the different options. “Trip time” can be reset by pressing 3-5 seconds on the “mode” button on the left lever 1.4 Assist function The Monty E50 has 3 different assist options: a) Speed mode with 6 assist levels b) Eco mode with 3 assists levels c) Throttle with variable speed To switch between “speed mode” and “eco mode” pres the arrow buttons on the left lever for more than 3 seconds. The throttle has a “booster” effect which allows the throttle to overrule other assist settings regardless of the “speed mode” or “eco mode” being enabled. When the throttle is released the system will automatically return to the previous setting. 9 Speed-mode: No assist 0-15 0-8 km/h 0-20 km/h km/h 0-10 km/h 0-12 km/h 0-25 km/h “Speed mode” has 6 assist levels. Choose “Speed mode” if you want to ride at a constant speed which is lower than the top speed. By pressing the up/down buttons on the left lever you may choose the appropriate assist level. Eco-mode: No assist 0-25 km/h 0-25 km/h 0-25 km/h ”Eco mode” has 3 assist levels. Choose “eco mode” if during your ride you only want limited motor assistance and thus to a high degree want to ride the bike through your own efforts. With this combination a longer range is achieved per charge. By pressing the up/down buttons on the left lever you may choose the appropriate assist level. 10 Throttle: When not pedaling, the “walk assist” feature can be activated by turning the throttle. This feature is well suited for pulling the e-bike uphill. When the pedals and the throttle are activated simultaneously it is possible to variably adjust the speed up to max speed level. It is advisable to use the throttle when driving in heavy traffic. This is suitable for brief accelerations in connection with overtaking of slow-moving cyclists and will allow you to react promptly. The motor will disconnect at a speed of 24.6 km/h. 1.5 Troubleshooting The error indicator will appear in the display to show possible system errors. A code and a wrench symbol will show the error type. The error code will appear in the “speed indication” space in the centre of the display. Error code numbers range from 01 to 13 indicating the different error types. Final error diagnosing requires skilled personnel. Contact your dealer for assistance. The error indicator has the following error codes: 01: Error on the hall sensor 02 :Error on the speed sensor 03: Error on the wiring system. Check cables and connectors. 04: Errors in data transmission between the motor and controller 05: Error on the controller. 06: too high voltage (>15A) 09: Error on the sensor at the bottom bracket 10: Error in data transmission between throttle and display 12: Error on display/display communication 13: Voltage error: system switched off due to too high voltage. 11 2. GEAR LEVER Shift the gear by turning the gear lever placed in the right handlebar. Choose the appropriate gear according to speed and wish. The E50 model has 7 internal gears. 3. ADJUSTMENT OF HANDLEBARS Push up the black button and raise the lever to allow for adjustment of the handlebars in desired position. The height of the handlebars can be adjusted by means of an Allen key. Important: Always remember to tighten the Allen bolts again before using the e-bike. 12 4. ADJUSTMENT OF SADDLE The height of the saddle can be adjusted by loosening the Allen bolt, and then adjusting the saddle to the desired position. The suspension of the seat post can be adjusted by turning the Allen bolt at the bottom of the seat post. 5. BATTERY AND CHARGER 5.1 Mounting and dismounting of the battery The battery is integrated in the bicycle chain case. Use the enclosed key to mount and dismount the battery. Fit the battery into the chain case and use the enclosed key to lock it into position. Remove the key during the ride. Please note that the key can only be removed if the battery is mounted correctly. When the battery is mounted in the chain case the electrical system will automatically turn on. 13 5.2 Connection of charger There a 2 options for connecting the charger / battery charging: 1. Plug in the charger on the left side of the display. Please note that the battery must be mounted in the chain case. After charging insert the little rubber cap in the socket to protect against dirt. 2. The battery may be dismount-ed and removed for charging indoors. Before charging is initiated the enclosed adapter must be mounted on the battery. Adapter. Adapter mounted and charging plug inserted. 14 5.3 Use of battery charger 1. Charging must take place indoors or under a pent roof, since the charger is not waterproof. 2. Plug in the charger on the left side of the display or dismount the battery and attached the adapter to the battery. 3. Put the mains plug (230v) into the power socket and switch on the charger. 4. The red diode will be on, as long as charging takes place. 5. When the diode changes from red to green, charging is complete and the e-bike is ready. 6. Turn off the charger but do not remove it from the socket until you are going to use the e-bike again. 5.4 Charging The MONTY Electric e-bike uses maintenance-free Panasonic Li-ION batteries. Please note, that the battery can be dismantled. The charging capacity of the battery is only 40% when delivered from the factory. Before commissioning it is therefore necessary to charge the battery to full capacity using the enclosed battery charger (Green diode is on). In order to achieve maximum battery life and range of the e-bike we recommend that charging takes place in a heated room. By temperatures below 20ºC prolonged charging time must be expected, with the result that charging of the battery to full capacity cannot take place which again leads to reduced driving range. Please note that the capacity of the battery will decrease when temperatures fall below 20ºC. Optimum battery charging conditions are at 20ºC. If the battery is exposed to direct sunlight the battery life deteriorates considerably. When the battery is taken indoors for charging, condensation may occur inside the battery as well as on the outside. Please therefore do not start charging until the condensation has disappeared. The battery contains a printed circuit board that controls each battery cell. If charging takes place while there is still some condensation in the battery this printed circuit board may be damaged. Rechargeable batteries must always be kept in dry conditions and dismantled from any equipment. 15 Memory effect does not occur in Li-ION batteries. It is thus unnecessary to discharge the battery before starting a recharge. Charging of the Li-ION battery at many frequent intervals may prolong the battery life. However, please note that once charging of the battery has been started you should not discontinue the process as this may have a negative influence on the battery life. .Do not pull the wires when dismounting the charger from the battery. Grab hold of the plug and pull it carefully out of the battery. Never leave the battery in the charger when the charger is off. Please note that the capacity of the battery will weaken over time and at lower temperatures. The more you use your e-bike the more the capacity will decrease thereby affecting the range. Over time the reduced battery performance will also be noticeable when driving in a hilly countryside. The battery life will normally allow charging / discharging up to 600 times. Please also note that periods with low temperatures will influence the capacity and thus the performance of the battery negatively. This will change when the temperature increases to approx. 20ºC. Other parameters of major importance for the performance/ range are user weight, driving manners, terrain, surface and tire pressure. The user himself/herself may also influence the performance/range depending on how much pedal power is used. Charging to full capacity should take place once a month (full charge = green diode on charger is on). 5.5 Storage for the winter If you put away your e-bike for a longer period (more than one month), it will be sufficient to charge the battery once a month. Before putting the battery away for storage you should make sure that it is fully charged, as the battery will be damaged by being left totally or partly discharged for a longer period. 5.6 Warning Do not heats, short, puncture or in any other way damage the battery. Do not divide or destroy the battery. Do not throw the battery into open fire. Do not lower the battery into water or any other liquid. When charging the battery only use the enclosed battery charger. Do not charge the battery at temperature below 0ºC or above 45ºC. Do not cover the battery charger. 16 5.7 Disposal of battery According to the European Union's WEEE Directive 2002/96/ EC on Waste of Electronic and Electrical Equipment special rules apply for disposal of batteries. This symbol indicates that when the end-user wishes to discard battery products, it must be sent to separate collection facilities for recovery and recycling. By separating this product from other household-type waste, the volume of waste sent to incinerators or land-fills will be reduced and natural resources will thus be conserved. Please contact your dealer in case you have any questions. 6. DRIVING INSTRUCTIONS The auxiliary motor works as follows: When the pedals are activated a sensor sends a signal to the electronic controller which then starts the motor. The power of the auxiliary motor is adjusted according to the chosen assist level. During the ride you may adjust the assist level according to actual need. If you drive uphill you may apply full power whereas when you go downhill you may disconnect the motor. A cut-off function is integrated in both lever brakes. This means that if you activate the lever brake the motor will instantly turn off automatically. When the lever brake is released, the assist function will automatically connect again. The electronic controller will automatically disconnect the motor when you stop pedaling. Likewise the controller will disconnect the motor when your speed exceeds 24.6 km/h. 7. EU STANDARDS, DECLARATION OF CONFORMITY The MONTY E50 e-bike is built according to the guidelines of the EU standards EN 14764 and EPAC EN 15194. The Monty Electric e-bike E50 is CE-approved. 17 8. TECHNICAL DATA MONTY E50 Gear Shimano Nexus 7 gear with coaster brake Motor 250W brushless DC hub motor with planetary gear Controller PWM/microprocessor with self-diagnostic system Mode PAS (Pedal Assist System) (EU standard EN 15194 og EPAC EN 15194) Weight 23,0 kg Battery 9AH 36V Panasonic Li-ION, 313 watt hours, detachable, weight : 1,8 kg Charger Swift mode, sealed, Charge time 6-8 hours User weight Max. 100 kg Range Up to 50 km 18 9. WARRANTY A warranty is being established through the vendor in accordance with the law 23/2003, dated July 10, on the consumer sales warranties, according to the Directive normative 1999/44CE. Additional conditions: The warranty does not cover the E-50 parts subjected to normal use, such as tires, chain, brakes, cables etc... The battery and charger are being covered by a guaranty as follow: Li-ion (Lithium) battery: I year. Never use any other manufacturer’s components. Never repair the E50 by oneself. Take it to the store where the vehicle was purchased or to an authorized Monty dealer. In case that this stipulation is not respected and in case of any problem or accident, Monty is not to assume any responsibility or to be held liable, and this warranty shall be rescinded. Modifying the frame, fork or any other component implies that the E-50 no longer conforms the Monty specifications, there by annulling this warranty. The number of the frame is under the crank Frame number: Controlled by: Delivery date: 19 10. CUSTOMER APPLYING FORM Dear client, If you want to be kept up-to-date on the latest Monty electric products, even everything related to the World of the Monty E-bikes, send us an e-mail with the following information to: [email protected] : Name: Surname: Address Zip code: Town: Country: Telephone number: e- mail: Purchased model: Sale date: Shop ( Shop or authorized dealer): Or to send this information by standard post to: BICICLETAS MONTY, S.A. DPTO. E-BIKE C/ INDUSTRIA, 30-32 08970 SANT FELIU DE LLOBREGAT BARCELONA – SPAIN 11. MONTY OFFICIAL DISTRIBUTORS AND CONTACTS It is recommended to get in touch with the dealer where you bought the product in case of any problem or doubt. Most information can be found on the Monty web site: www.monty.es or by phone: +34 93.666.71.11 or by e- mail: [email protected] We thank you for having dedicated some time to read this manual in order to improve the use of the new E-50. We thank you, as well, for any point of view from your side to Monty. 20