1
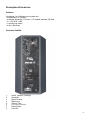
Soundmate 3
ORDERCODE D3212
Congratulations!
You have bought a great, innovative product from DAP Audio.
The DAP Audio Soundmate 3 brings excitement to any venue. Whether you want simple plug-&-play action
or a sophisticated show, this product provides the effect you need.
You can rely on DAP Audio, for more excellent audio products.
We design and manufacture professional audio equipment for the entertainment industry.
New products are being launched regularly. We work hard to keep you, our customer, satisfied.
For more information: [email protected]
You can get some of the best quality, best priced products on the market from DAP Audio.
So next time, turn to DAP Audio for more great audio equipment.
Always get the best -- with DAP Audio !
Thank you!
DAP Audio
DAP Audio Soundmate 3™ Product Guide
Warning..…...................................................................................…………………………………………..
Safety-instructions………………………………………………………………………………………….….
Operating Determinations…………………………………………………………………………………….
2
2
3
Description..…..............................................................................……….…………………………………
Features………………………………………………………………………………….………………….….
Overview…………………………………………………………………………………………………..……
4
4
4
Set Up and Operation.....................................................................……..…………………………………
6
Product Specifications.................................................................……………….…….………………….
7
Set Up Possibilities............................….......................................………..………….…….……………..
10
1
WARNING
CAUTION!
Keep this system away from rain and moisture!
FOR YOUR OWN SAFETY, PLEASE READ THIS USER MANUAL CAREFULLY
BEFORE YOUR INITIAL START-UP!
SAFETY INSTRUCTIONS
Every person involved with the installation, operation and maintenance of this system have to:
be qualified
follow the instructions of this manual
CAUTION! Be careful with your operations.
With a dangerous voltage you can suffer
a dangerous electric shock when touching the wires!
Before you initial start-up, please make sure that there is no damage caused by transportation. Should there
be any, consult your dealer and do not use the system.
To maintain perfect condition and to ensure a safe operation, it is absolutely necessary for the user to follow
the safety instructions and warning notes written in this manual.
Please consider that damages caused by manual modifications to the system are not subject to warranty.
This system contains no user-serviceable parts. Refer servicing to qualified technicians only.
IMPORTANT:
The manufacturer will not accept liability for any resulting damages caused by the non-observance of
this manual or any unauthorized modification to the system.
•
•
•
•
•
•
•
•
•
•
•
•
•
•
Never let the power-cord come into contact with other cables! Handle the power-cord and all
connections with the mains with particular caution!
Never remove warning or informative labels from the unit.
Never use anything to cover the ground contact.
Do not insert objects into air vents.
Do not connect this system to a dimmerpack.
Do not switch the system on and off in short intervals, as this would reduce the system’s life.
Only use system indoor, avoid contact with water or other liquids.
Avoid flames and do not put close to flammable liquids or gases.
Always disconnect power from the mains, when system is not used. Only handle the power-cord by
the plug. Never pull out the plug by tugging the power-cord.
Make sure you don’t use the wrong kind of cables or defective cables.
Make sure that the signals into the mixer are balanced, otherwise hum could be created.
Make sure you use DI boxes to balance unbalanced signals; All incoming signals should be clear
Make sure that there is sufficient room on all sides of the system for air circulation
Make sure that the available voltage is not higher than stated on the rear panel.
2
•
•
•
•
•
•
Make sure that the power-cord is never crimped or damaged. Check the system and the power-cord
from time to time.
Prevent distortion! Make sure that all components connected to the Soundmate have sufficient
power ratings. Otherwise distortion will be generated because the components are operated at their
limits.
Avoid ground loops! Always be sure to connect the power amps from the Soundmate cabinets and
the mixing console to the same electrical circuit to ensure the same phase!
If system is dropped or struck, disconnect mains power supply immediately. Have a qualified
engineer inspect for safety before operating.
If the system has been exposed to drastic temperature fluctuation (e.g. after transportation), do not
switch it on immediately. The arising condensation water might damage your system. Leave the
system switched off until it has reached room temperature.
Repairs, servicing and electric connection must be carried out by a qualified technician.
OPERATING DETERMINATIONS
This system is not designed for permanent operation. Consistent operation breaks will ensure that the
system will serve you for a long time without defects.
If this system is operated in any other way, than the one described in this manual, the product may suffer
damages and the warranty becomes void.
Any other operation may lead to dangers like short-circuit, burns, electric shock, etc.
You endanger your own safety and the safety of others!
Improper installation can cause serious damage to people and property !
3
Description of the device
Features
Soundmate 3 is a fullrange active system with :
• 4 subwoofers 15” 300 watt
• 2 mid/high (fullrange) 2” CD horn + 12” satellite speakers 300 Watt.
• 4 x 1,5 m XLR - cable
• 1 carrying bag cables
• 4 rain / dustcovers
Overview Satellite
1
2
3
4
5
6
7
8
1
2
3
4
5
6
7
8
Switch Satellite / Fullrange
Ground lift
Signal Through
Signal Input
Volume / Gain
IEC power connector
Power Switch
Fuse F6A
4
Overview Subwoofer
9
10
11
12
13
14
15
9
10
11
12
13
14
15
Ground lift
Signal Through
Signal Input
Volume / Gain
IEC power connector
Power Switch
Fuse F6A
5
Set Up and Operation
The DAP SoundMate systems are expanding in a unstopable manner.
In addition to the already existing SoundMate 1 & 2, we present to you the SoundMate 3 !
Every day more users find their way to these amazing active soundsystems, which are powerfull, versatile
and last but not least affordable!
This system is the biggest active set so far and is designed for live acts and bigger playback situations. One
system holds 2 fullrange active “towers” each containing 3 speaker enclosures: 1 fullrange and 2
basscabinets. Both subwoofers and tops are equipped with mounting collars, making it easy, if desired, to
operate the top as a stand-alone system when mounted on a speaker stand.
The amplifier-section is built-in. Each subwoofer consists of 2 separate power-amplifiers, bridged together.
Each top unit consists of 2 separate power-amplifiers, 1 for the midrange speaker and 1 for the HF driver.
Further built-in are the electric Linkwitz Riley crossovers, frequency response correction circuits, breaker
circuitry.
The satellite
The Soundmate 3 satellite is designed to produce a full spectrum of sound. The satellite is equipped with a
12” LF loudspeaker and 2” HF driver with a horn with a dispersion of 60˚x40˚. The built-in amplifiers deliver
300W pure sound. The satellite/full-range switch allows you to select between those 2 modes in order to
use the cabinet as mid/high range cabinet or as a full-range and stand-alone cabinet.
The subwoofer
Feel the bass with this 15” basscabinet. The cabinet is powered through a powerfull 300W amplifier.
The castors makes the unit easy to move and thanks to this feature it is a real roadproof system and is it
even suitable to carry a satellite cabinet.
It’s easy to set up; All you have to do is set up the system components, connect the signal-carrying cables
and power cords and you're ready to roll. The set comes with ALL necessary accessories: cables and even
dust-/raincovers!!!
Linking Satellites / Subwoofers
Connect the cables coming from the mixer to the balanced INPUT socket of any component. Link the units
as shown on page 10. Connect a standard XLR microphone cable from the first unit's THROUGH output
socket to the second unit's INPUT socket. Repeat this process to link subsequent units. Repeat this for each
stack. Make sure that when using multiple tops, they are placed with a proper projection angle.
Do not supply power before all components of the system are set up and connected properly. Make sure
that the Soundmate system is always the last component, which is switched on! When shutting down, the
Soundmate should be the first system, which is switched off.
6
Below you will find a short description of the features from the SoundMate 3 :
Satellite / fullrange switch (1)
This switch allows you to use the Soundmate 3 topcabinet in 2 different modes. Either as a topcabinet for
use in small venues or rehearsel rooms, or in combination with the Soundmate 3 bass cabinets for more
powerfull sound.
If you choose to operate the top without subwoofers, set the SATELLITE / FULLRANGE
switch to "Full-range", so that the entire frequency range including the bass frequencies
will be produced by the satellite.
Set the SATELLITE / FULLRANGE switch to Satellite. The Subwoofer from the
Soundmate system amplifies the low-end frequencies in standard set-up.
All frequencies below 120Hz will be filtered out in the satellite.
Ground Lift (2+9)
When this button is pressed, it separates the signal ground from the chassis ground, enabling you to
eliminate potential ground loops or low-frequency hum.
Through (3+10)
This parallel output allows you to connect more satellites or bass-cabinets together as well to connect other
systems such as monitor power amplifiers, individual components etc.
Input (4+11)
The input equipped with 3 pole XLR chassis connector is electronically balanced to accept the (line) signal
from any mixing console.
Volume / Gain (5+12)
This allows you to adjust the audio level.
Mains Socket (6+13)
Plug one end of the electric mains power cord into the IEC socket on the unit.
Then plug the other end of the cord into a proper electric power supply socket.
Make sure that the available voltage is not higher than stated on the rear panel.
Before plugging the unit in, always make sure that the power supply matches the product specification
voltage. Do not attempt to operate a 120V specification product on 230V power, or vice versa
Mains Switch (7+14)
Do not supply power before the whole system is set up and connected properly.
Fuse (8+15)
An external fuse protects your system for any damage caused by electrical faillures.
7
Specifications
Inputs
Subwoofer
Line IN Connector XLR plug female
Input design electronically balanced & floating
Inp. impedance 47 kΩ
Sensitivity 0 dB
Satellite
Line IN Connector XLR plug female
Input design electronically balanced & floating
Inp. impedance 47 kΩ
Sensitivity 0 dB
Outputs
Subwoofer
Parallel Out Connector: XLR socket male
Satellite
Parallel Out Connector: XLR socket male
Active Crossover
Crossover Subwoofer / Satellite freq. 130 Hz
Roll off 24 dB/ Octave
MONITOR Full range or extra satellite
Subsonic Filter: 20 Hz / 12 dB / Octave
Amplifiers
Power output Subwoofer 300 W / 8 Ω at 1% THD
Power output per Satellite 150 W / 4 Ω at 1% THD
Power output per Monitor 150 W / 4 Ω at 1% THD
Speakers
Subwoofer Specifications
Driver 1x 15"
Nominal impedance 8 Ω
Power handling nom. 300 W RMS
Power handling progr 600 W
Sensitivity 1W/1m axial 98dB (fullspace)
Max. Sound pressure 119dB at 3% harmonic distortion (fullspace/ 1m)
Amplifier power 300W RMS 8 Ω
Dimensions (WXDXH) 450 x 620 (755 incl. wheels) x 660 mm
Weight 48 Kg
Satellites
Titanium Monitor Driver 2" with CD-Horn 60°x40°
1x 12" speaker
Nominal impedance 8 Ω
8
Power handling nom. 200 W RMS
Power handling progr. 400 W
Frequency response 100Hz - 18 kHz, ±3dB
Crossover frequency 3kHz (passive)
Sensitivity 1W/1m axial 98dB (fullspace)
Max. Sound pressure 119dB at 3% harmonic distortion (fullspace/ 1m)
Amplifier power 150W RMS 4 Ω
Dimensions (WXDXH) 390 x 450 x 660 mm
Weight 36,4 Kg
Included
4x 1,5 m Speakon - cable
1 carrying bag for cables
4 rain / dustcovers
9
Soundmate 3 Standard SET UP
2x Soundmate 3 SET UP
SATELLITE
SATELLITE
FULLRANGE
Ground
Lift
On Off
On Off
On Off
Through
Input
MIN
MAX
Volume
MIN
MAX
Ground
Lift
Ground
Lift
Ground
Lift
On Off
On Off
On Off
Through
Through
Input
Input
Input
Volume
Volume
Volume
MAX
MIN
MAX
MIN
MAX
Ground
Lift
Ground
Lift
Ground
Lift
On Off
On Off
On Off
Through
From Mixer
To satellite
Through
Input
MAX
Through
Input
Input
Volume
MIN
Input
Volume
MAX
Through
From Mixer
To satellite
Through
Input
Volume
MIN
FULLRANGE
Ground
Lift
Through
MIN
SATELLITE
FULLRANGE
Ground
Lift
Volume
MIN
MAX
Volume
MIN
MAX
10
Soundmate 3 Standard SET UP
2x Soundmate 3 SET UP