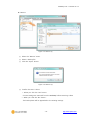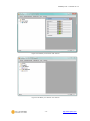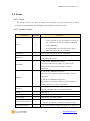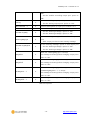
1
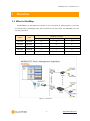
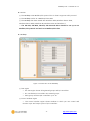
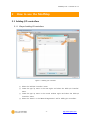
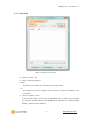
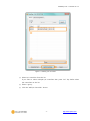
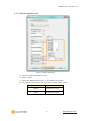
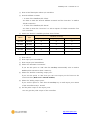
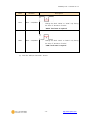
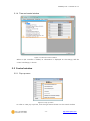
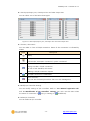
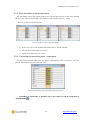
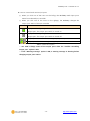
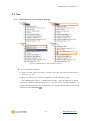
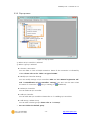
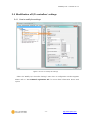
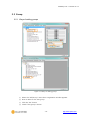
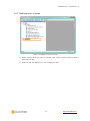
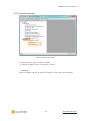
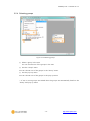
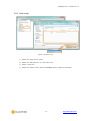
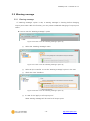
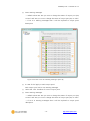
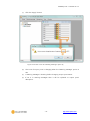
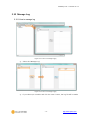
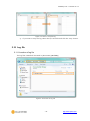
ezTCP Utility ModMap User’s Manual Version 1.5 Sollae Systems Co., Ltd. http://www.ezTCP.com ModMap User’s Manual Ver. 1.5 Contents Contents ............................................................................................................................................- 1 1 Overview ..................................................................................................................................- 3 - 1.1 What is ModMap ............................................................................................................................................... - 3 2 How to use the ModMap .....................................................................................................- 5 - 2.1 Adding I/O controllers..................................................................................................................................... - 5 - 2.1.1 Ways of adding I/O controllers .......................................................................................................... - 5 2.1.2 Search tab .................................................................................................................................................... - 6 2.1.3 Manual registration tab ......................................................................................................................... - 8 2.1.4 Tree and control window ................................................................................................................... - 11 2.2 Control window ............................................................................................................................................... - 11 - 2.2.1 Pop-up menu........................................................................................................................................... - 11 2.2.2 Brief description of input/output ports ...................................................................................... - 13 2.2.3 Controlling and monitoring input / output ports .................................................................. - 13 2.3 Tree ........................................................................................................................................................................ - 15 - 2.3.1 Modification of I/O controllers’ settings .................................................................................... - 15 2.3.2 Pop-up menu........................................................................................................................................... - 16 2.4 Modification of I/O controllers’ settings .............................................................................................. - 17 - 2.4.1 How to modify the settings ............................................................................................................. - 17 2.5 Group .................................................................................................................................................................... - 18 - 2.5.1 Ways of adding groups ...................................................................................................................... - 18 2.5.2 Modifying name of groups ............................................................................................................... - 19 2.5.3 Removal of groups ................................................................................................................................ - 20 2.5.4 Selecting groups .................................................................................................................................... - 21 2.6 Management of I/O controllers ............................................................................................................... - 22 - 2.6.1 How to manage I/O controllers...................................................................................................... - 22 2.7 Backup and restore ........................................................................................................................................ - 25 - 2.7.1 Backup and restore ............................................................................................................................... - 25 2.8 Script ..................................................................................................................................................................... - 28 - 2.8.1 Script............................................................................................................................................................ - 28 2.8.2 Syntax of script ....................................................................................................................................... - 28 2.8.3 Open script ............................................................................................................................................... - 33 2.9 Warning message ........................................................................................................................................... - 34 - 2.9.1 Warning message .................................................................................................................................. - 34 - -1- http://www.ezTCP.com ModMap User’s Manual Ver. 1.5 2.10 Manage Log ...................................................................................................................................................... - 37 - 2.10.1 How to manage log ............................................................................................................................. - 37 2.11 Log file ................................................................................................................................................................. - 38 - 2.11.1 Location of log file ................................................................................................................................ - 38 3 History ................................................................................................................................... - 40 - -2- http://www.ezTCP.com ModMap User’s Manual Ver. 1.5 1 Overview 1.1 What is ModMap The ModMap is a management program for I/O controllers of Sollae Systems. It provides the easiest way of managing many I/O controllers at the same time. The ModMap is for the following products. Name Type CIE-H10 Number of Port(s) Digital Input Digital Output Analog Input External 8 8 0 CIE-M10 Module 8 8 1 CIE-H14 External 4 4 0 CIE-H12 External 2 1 0 EZI-10 External 1 1 0 Table 1-1 I/O Controllers Figure 1-1 Overview -3- http://www.ezTCP.com ModMap User’s Manual Ver. 1.5 Notices ① The ModMap uses Modbus/TCP protocol but it doesn’t supports HTTP protocol. ② The ModMap works as a Modbus/TCP master. ③ The ModMap has been tested with Windows 2000, Windows Server 2003, Windows Server 2008, Windows XP, Windows Vista and Windows 7. ☞ The CIE-H10, CIE-M10, CIE-H12, CIE-H14 and EZI-10 should be set up to use Modbus/TCP protocol and work as a Modbus/TCP slave. ModMap Figure 1-2 Screen shot of the ModMap ① Tree region ☞ The tree region shows all registered groups and I/O controllers. ☞ You can divide I/O controllers into several groups. ☞ Each group can have I/O controllers up to 30. ② Control window region ☞ The control window region shows windows in which you can control and monitor input and output ports of I/O controllers. -4- http://www.ezTCP.com ModMap User’s Manual Ver. 1.5 2 How to use the ModMap 2.1 Adding I/O controllers 2.1.1 Ways of adding I/O controllers Figure 2-1 Adding I/O controllers ① Select the “Add I/O Controller” menu. ② Create the pop-up menu in the tree region and select the “Add I/O Controller” menu. ③ Create the pop-up menu in the control window region and select the “Add I/O Controller” menu. ④ Select the “Search” or the “Manual Registration” tab for adding I/O controllers. -5- http://www.ezTCP.com ModMap User’s Manual Ver. 1.5 2.1.2 Search tab Figure 2-2 Search I/O controllers ① Click the “Search” tab. ② Select a searching method. ☞ MAC This method can search I/O controllers from local network. ☞ IP This method can search a specific I/O controller by using an IP address or the host name. ③ Click the “Search” button. If you click the “Search” button then the ModMap starts to search I/O controllers by using the selected method. The ModMap lists searched I/O controllers’ MAC address, comment and IP address. -6- http://www.ezTCP.com ModMap User’s Manual Ver. 1.5 Figure 2-3 Adding I/O controllers ④ Select I/O controllers from the list. If you want to select multiple I/O controllers then press “Ctrl” key before select I/O controllers on the list. ⑤ Select a group. ⑥ Click the “Add I/O Controller” button. -7- http://www.ezTCP.com ModMap User’s Manual Ver. 1.5 2.1.3 Manual registration tab Figure 2-4 Manual registration ① Click the “Manual Registration” tab. ② Select a group. ③ Select the “Modbus/TCP Server” or the “Modbus/TCP Client”. You can choose it according to I/O controllers’ communication mode. Communication Mode Option Passive Modbus/TCP Client Active Modbus/TCP Server Table 2-1 How to select the option -8- http://www.ezTCP.com ModMap User’s Manual Ver. 1.5 ④ Enter a brief description about I/O controllers. ⑤ Host IP Address or Name ☞ In case of the “Modbus/TCP Client” You have to enter the “Host IP Address or Name” and the “Host Port” to make a TCP/IP connection. ☞ In case of the “Modbus/TCP Server” You have to enter the “Host Port” to wait a request of TCP/IP connection from I/O controllers. ⑥ Select the “Product”. Available products are as follows. Name Type CIE-H10 Number of Port(s) Digital Input Digital Output Analog Input External 8 8 0 CIE-M10 Module 8 8 1 CIE-H14 External 4 4 0 CIE-H12 External 2 1 0 EZI-10 External 1 1 0 Table 2-2 available products ⑦ Enter unit id. ⑧ Enter input port base address. ⑨ Enter output port base address. ⑩ Select the “Automatic Connection” If you set this option to “ON” then the ModMap automatically tries to make a Modbus/TCP connection when it starts up. ⑪ Select the “Prohibit controlling output port” If you set this option to “ON” then you can’t use output port led icons on the control window. (Refer to 2.2 Control window) ⑫ Select the “Polling output ports” If you set this option to “ON” then the ModMap try to read output ports status of I/O controllers every 1 second. ⑬ Set the pulse output to the output ports. You can give the pulse output of the controllers. -9- http://www.ezTCP.com ModMap User’s Manual Ver. 1.5 Level Duration LOW 40ms ~ 10,000ms Description - Change the level “HIGH” to “LOW” only during the time of “Duration of Pulse.” HIGH 40ms ~ 10,000ms - “HIGH” level state is required. - Change the level “LOW” to “HIGH” only during the time of “Duration of Pulse.” - “LOW” level state is required Table 2-3 Pulse Control ⑭ Click the “Add I/O Controller” button. - 10 - http://www.ezTCP.com ModMap User’s Manual Ver. 1.5 2.1.4 Tree and control window Figure 2-5 Tree and control window When an I/O controller is added, its information is displayed on the tree(①) and the control window(②) is shown. 2.2 Control window 2.2.1 Pop-up menu Figure 2-6 Pop-up menu In order to crate pop-up menu, click the right mouse button on the control window. - 11 - http://www.ezTCP.com ModMap User’s Manual Ver. 1.5 View Input/Output port, View Input Port and View Output Port You can select one of the below three types. Figure 2-7 View Input/Output port, View Input Port and View Output Port Connect / Disconnect You can make or close a TCP/IP connection. Status of the connection is indicated by ICONs. ICON Description Ready. Ready. It shows the “Automatic Connection” option is activated. In case of the “Modbus/TCP Client” Trying to make a TCP/IP connection. In case of the “Modbus/TCP Server” Waiting a TCP/IP connection request. A TCP/IP connection is established. Error occurred : You can see the description about the error with message box. Table 2-4 Type of ICONs Modify I/O Controller Settings You can modify settings of I/O controllers. Refer to “2.1.3 Manual registration tab” and “2.4 Modification of I/O controllers’ settings”. You can’t use this menu when the status of connection is (trying or waiting) or (established). Delete I/O Controller You can delete an I/O controller. - 12 - http://www.ezTCP.com ModMap User’s Manual Ver. 1.5 2.2.2 Brief description of input/output ports The edit boxes are on the control window. You can modify the text of each port. Default values of the input boxes are DI0 ~ DI7 and the output boxes are DO0 ~ DO7. How to edit a brief description Figure 2-8 How to edit a brief description ① If you click one of the disabled edit boxes then it will be enabled. ② Edit the brief description of the port. ③ Check if the description is correct.. 2.2.3 Controlling and monitoring input / output ports On the control window LED icons are shown, representing status of the port. You can control and monitor the ports with the icons. Figure 2-9 Controlling and monitoring input/output ports ☞ Controlling or monitoring is possible only if the status of TCP/IP connection is “ESTABLISHED( )” - 13 - http://www.ezTCP.com ModMap User’s Manual Ver. 1.5 How to control and monitor I/O ports ① When you click one of the icons on the left(①) the ModMap reads input ports status from selected I/O controller. ② When you click one of the icons on the right(②) the ModMap changes the output port status of the I/O controller. ICON Description Input port: The digital signal is detected. Output port: The output port switch is turned on. Input port: The digital signal is not detected. Output port: The output port switch is turned off. Output port: The “Prohibit controlling output port” option is ON. Output port: The “2.9 Warning message” option is ON. Table 2-5 Status of I/O ports ☞ You CAN’T change status of the output ports when the “Prohibit controlling output port” option is ON. ☞ If the “Warning message” option is ON, a warning message is showing before changing output ports status. - 14 - http://www.ezTCP.com ModMap User’s Manual Ver. 1.5 2.3 Tree 2.3.1 Modification of I/O controllers’ settings Figure 2-10 Modification of I/O controllers’ settings How to modify the settings ① Select an item which you want to change. Then click the item one more time or press the “F2” key. ② When an edit box or a combo box appears you can change the value. ☞ The “Modbus/TCP Server or Modbus/TCP Client”, “Host IP Address or Name”, “Host Port”, “Number of Input/Output ports”, “Unit ID”, “Input Port Base Address” and “Output Port Base Address” are not allowed to be modified when status of the TCP/IP connection is “ESTABLISHED( )”. - 15 - http://www.ezTCP.com ModMap User’s Manual Ver. 1.5 2.3.2 Pop-up menu Figure 2-11 Pop-up menu ① When an I/O controller is selected. ② When a group is selected. Connect / Disconnect You can make or close a TCP/IP connection. Status of the connection is indicated by ICONs. Please refer to the “Table 2-4 Type of ICONs”. Modify I/O Controller Settings You can modify settings of I/O controllers. Refer to “2.1.3 Manual registration tab” and “2.4 Modification of I/O controllers’ settings”. You can’t use this menu when the status of connection is (trying or waiting) or (established). Delete I/O Controller You can delete an I/O controller. Add I/O Controller You can add new I/O controllers. Please refer to “2.1 Adding I/O controllers" Add Group / Delete Group You can add or delete groups. Please refer to “2.5 Group”. ☞ You can’t delete the default group. - 16 - http://www.ezTCP.com ModMap User’s Manual Ver. 1.5 2.4 Modification of I/O controllers’ settings 2.4.1 How to modify the settings Figure 2-12 How to modify the settings Select the “Modify I/O Controller Settings” menu then a configuration window appears. Please refer to “2.1.3 Manual registration tab” for more detail information about each option. - 17 - http://www.ezTCP.com ModMap User’s Manual Ver. 1.5 2.5 Group 2.5.1 Ways of adding groups Figure 2-13 Ways of adding groups ① Select the “Add Group” menu then a registration window appears. ② Enter a name for the new group. ③ Click the “OK” button. ④ Check if the group is shown. - 18 - http://www.ezTCP.com ModMap User’s Manual Ver. 1.5 2.5.2 Modifying name of groups Figure 2-14 Modifying name of Groups ① Select a group which you want to change. Then click the group one more time or press the “F2” key. ② When an edit box appears you can change the name. - 19 - http://www.ezTCP.com ModMap User’s Manual Ver. 1.5 2.5.3 Removal of groups Figure 2-15 Removal of groups ① Select a group which you want to delete. ② Select the “Delete Group” on the pop-up menu. ☞ WARNING : When you delete a group, all the I/O controllers in the group will be deleted. - 20 - http://www.ezTCP.com ModMap User’s Manual Ver. 1.5 2.5.4 Selecting groups Figure 2-16 Selecting groups ① Select a group in the tree You can choose one of the groups in the tree. ② Use the “Group” menu You can choose one of the groups in the “Group” menu. ③ Use the pop-up menu You can choose one of the groups in the pop-up menu. ☞ If two or more groups are existed then the groups are automatically listed on the “Group” and pop-up menu. - 21 - http://www.ezTCP.com ModMap User’s Manual Ver. 1.5 2.6 Management of I/O controllers 2.6.1 How to manage I/O controllers Figure 2-17 How to manage I/O controllers ① You can move I/O controllers to another group. ② You can delete I/O controllers. - 22 - http://www.ezTCP.com ModMap User’s Manual Ver. 1.5 How to move I/O controllers Figure 2-18 How to move I/O controllers ① Select a group. ② Select I/O controllers you want to move. ③ Click the “Move>>” or “<<Move” button. - 23 - http://www.ezTCP.com ModMap User’s Manual Ver. 1.5 How to delete I/O controllers Figure 2-19 How to delete I/O controllers ① Select a group. ② Select I/O controllers you want to delete. ③ Click the “Delete” button. ☞ If you want to delete all I/O controllers in a group then please skip the step② and click the “Delete All” button. - 24 - http://www.ezTCP.com ModMap User’s Manual Ver. 1.5 2.7 Backup and restore 2.7.1 Backup and restore You can back up the current settings about groups and I/O controllers. Backup Figure 2-20 Back up settings ① Select the “Backup” menu. ② Enter the file name. ③ Click the “Save” button. - 25 - http://www.ezTCP.com ModMap User’s Manual Ver. 1.5 Restore Figure 2-21 Restore (1) ① Select the “Restore” menu. ② Select a backup file. ③ Click the “Open” button. Figure 2-22 Restore (2) ④ Confirm the users’ choice. ☞ When you click the “Yes” button : Current settings are removed from the ModMap before restoring a data. ☞ When you click the “No” button : The backup data will be appended to the existing settings. - 26 - http://www.ezTCP.com ModMap User’s Manual Ver. 1.5 Figure 2-23 When you click the “Yes” button Figure 2-24 When you click the “No” button - 27 - http://www.ezTCP.com ModMap User’s Manual Ver. 1.5 2.8 Script 2.8.1 Script The Script is one of the ways of adding I/O controllers. It must comply with a syntax provided by the ModMap. The ModMap supports INI and CSV file format. 2.8.2 Syntax of script Properties Required Comment Group name of I/O controllers. - Group If this property is not found then the group for I/O controllers will be automatically assigned X by the ModMap. - If the ModMap can’t find the group then it adds new group for I/O controllers. Comment ○ Network ○ Enter a bried descript about I/O controllers. 0 - Modbus/TCP Client 1 - Modbus/TCP Server In case of the “Modbus/TCP Client” : HostAddr ○ You have to enter this property. It is the host IP address or the host name to make a TCP/IP connection. In case of the “Modbus/TCP Client” : This property is the port number to make a TCP/IP HostPort ○ connection. In case of the “Modbus/TCP Server” : This property is the port number to wait a request of TCP/IP connection from I/O controllers. Select a type of products what you have. Product ○ UnitId ○ Enter unit id. InputAddr ○ Enter input port base address. OutputAddr ○ Enter output port base address. AutomaticConnection X OuputPortControl X (CIE-H10, CIE-M10, CIE-H12, CIE-H14, EZI-10) 0 – Set the “Automatic Connection” option to “OFF”. 1 – Set the “Automatic Connection” option to “ON”. 0 – Set the “Prohibit controlling output port” option to - 28 - http://www.ezTCP.com ModMap User’s Manual Ver. 1.5 “OFF”. 1 – Set the “Prohibit controlling output port” option to “ON”. 0 – Set the “Polling output ports” option to “OFF”. Polling X DiComment0 ~ 7 X The brief descriptions for input port number 0 to 7. DoComment0 ~ 7 X The brief descriptions for output port number 0 to 7. UseWarningMSg X 1 – Set the “Polling output ports” option to “ON”. 0 – Set the “Warning message” option to “OFF”. 1 – Set the “Warning message” option to “ON” 0 – Same warning message will be used to all output WarningMsgType X ports. 1 – Each output port has its own warning message. UseWarningMsgDo0 ~7 Set the “Warning message” option to each output port. X 0 – Set the “Warning message” option to “OFF”. 1 – Set the “Warning message” option to “ON” When the “WarningMsgType” is zero(0): MsgAllOn X This message is showing before changing output ports status to “ON”. When the “WarningMsgType” is zero(0): MsgAllOff X This message is showing before changing output ports status to “OFF”. When the “WarningMsgType” is one(1) and the DoMsgOn0 ~ 7 X “UseWarningMsgDo0 ~ 7” is one(1) : This message is showing before changing output ports status to “ON”. DoMsgOff0 ~ 7 X This message is showing before changing output ports status to “OFF”. Table 2-6 Properties - 29 - http://www.ezTCP.com ModMap User’s Manual Ver. 1.5 INI file format ☞ Properties The basic element contained in an INI file. Every property has a name and value, delimited by an equal sign(=). The name appears to the left of the equals sign. ☞ Sections Properties may be grouped into arbitrarily named sections. The section name appears on a line by itself, in square brackets( [ and ] ). The ‘[CONTROLLER]’ is used for a section name. ☞ Properties or sections have to end with <CR><LF>. ☞ You have to use all required properties. - 30 - http://www.ezTCP.com ModMap User’s Manual Ver. 1.5 [CONTROLLER] Group=Group #1 Comment=I/O controller #3 Network=0 HostAddr=10.1.0.1 HostPort=502 Product=CIE-H10 UnitId=1 InputAddr=0 OutputAddr=8 AutomaticConnection=1 OutputPortControl=1 Polling=1 DiComment0=DI0 DiComment1=DI1 DiComment2=DI2 DiComment3=DI3 DiComment4=DI4 DiComment5=DI5 DiComment6=DI6 DiComment7=DI7 DoComment0=DO0 DoComment1=DO1 DoComment2=DO2 DoComment3=DO3 DoComment4=DO4 DoComment5=DO5 DoComment6=DO6 DoComment7=DO7 UseWarningMsg=1 WarningMsgType=1 UseWarningMsgDo0=1 UseWarningMSgDo7=1 DoMsgOn0=Are you sure to change the status of output #0 to ON? DoMsgOff7= Are you sure to change the status of output #7 to OFF? Table 2-7 A example of INI file - 31 - http://www.ezTCP.com ModMap User’s Manual Ver. 1.5 CSV file format ☞ CSV is a delimited data format that has fields separated by the comma character(,) and record separated by newlines(<CR><LF>). ☞ Fields can’t have the comma character(,). ☞ The first record in a csv file contain column names in each of the fields. The column names should be one of the properties names of INI file. Comment,Network,HostAddr,HostPort,Product,UnitId,InputAddr,OutputAddr I/O controller #1,0,10.1.0.1,502,CIE-H10,1,0,8 I/O controller #2,0,10.1.0.2,502,CIE-H10,1,0,8 I/O controller #3,0,10.1.0.3,502,CIE-M10,1,0,8 I/O controller #4,0,10.1.0.4,502,CIE-M10,1,0,8 I/O controller #5,0,10.1.0.5,502,CIE-H12,1,0,8 I/O controller #6,0,10.1.0.6,502,CIE-H12,1,0,8 I/O controller #7,0,10.1.0.7,502,EZI-10,1,0,8 I/O controller #8,0,10.1.0.8,502,EZI-10,1,0,8 I/O controller #9,0,10.1.0.9,502,EZI-10,1,0,8 I/O controller #10,0,10.1.0.10,502,EZI-10,1,0,8 Table 2-8 A example of csv file - 32 - http://www.ezTCP.com ModMap User’s Manual Ver. 1.5 2.8.3 Open script Figure 2-25 Open script ① Select the “Open Script” menu. ② Select the “INI Files(*.ini)” or “CSV Files(*.csv)”. ③ Select a script file. ④ Select the “Open” button then the MadMap start to add I/O controllers . - 33 - http://www.ezTCP.com ModMap User’s Manual Ver. 1.5 2.9 Warning message 2.9.1 Warning message If “Warning message” option is ON, a warning message is showing before changing output ports status. With this function, you can prevent unwanted changing of output ports status. How to set the “Warning message” option Figure 2-26 How to set the "Warning message" option (1) ① Select the “Warning message” menu. Figure 2-27 How to set the "Warning message" option (2) ② Select an I/O controller to use the “Warning message” option in the tree. ③ Check the “Use” checkbox. Figure 2-28 How to set the "Warning message" option (3) ④ In case of the “Apply to all output ports”. Same warning message will be used to all output ports. - 34 - http://www.ezTCP.com ModMap User’s Manual Ver. 1.5 ⑤ Enter warning messages. ☞ Default values are “Are you sure to change the status of output port (%s) to ON?” and “Are you sure to change the status of output port (%s) to OFF?”. ☞ If %s is in warning messages then it will be replaced to output port’s description. Figure 2-29 How to set the "Warning message" option (4) ⑥ In case of the “Apply to each output ports” Each output port has its own warning message. ⑦ Select the “Use” checkbox for one of output ports. ⑧ Enter warning messages. ☞ Default values are “Are you sure to change the status of output port (%s) to ON?” and “Are you sure to change the status of output port (%s) to OFF?”. ☞ If %s is in warning messages then it will be replaced to output port’s description. - 35 - http://www.ezTCP.com ModMap User’s Manual Ver. 1.5 ⑨ Click the “Apply” button. Figure 2-30 How to set the "Warning message" option (5) ⑩ The icons of outpur ports is changing when the “Warning message” option is ON. ⑪ A warning message is showing before changing output ports status. ⑫ If %s is in warning messages then it will be replaced to output port’s description. - 36 - http://www.ezTCP.com ModMap User’s Manual Ver. 1.5 2.10 Manage Log 2.10.1 How to manage log Figure 2-31 How to manage log(1) ① Select the “Manage Log” Figure 2-32 How to manage log(2) ② If you select I/O controller and click the "start" button, the log file will be made. - 37 - http://www.ezTCP.com ModMap User’s Manual Ver. 1.5 Figure 2-33 How to stop the log ③ If you want to stop the log, select the I/O controller and click the "stop" button. 2.11 Log file 2.11.1 Location of log file The log files created will be saved in [Document]-[ModMap] Figure 2-34 location of log file - 38 - http://www.ezTCP.com ModMap User’s Manual Ver. 1.5 Figure 2-35 log file Each log files will be created to data_time. If the I/O controller status or port status are change, it will be updated. - 39 - http://www.ezTCP.com ModMap User’s Manual Ver. 1.5 3 History Date Ver. Comments 2010.10.15 1.0 ○ Created Jack Kim 2010.11.03 1.1 ○ [Script] function has been added. Jack Kim 2010.12.24 1.2 ○ [Warning message] function has been added. Jack Kim 2011.08.17 1.4 2013.07.30 1.5 ○ Contents about the script has been changed ○ Screen shots have been updated ○ [Log] function has been added ○ Screen shots have been updated - 40 - Author Roy LEE Lisa Shin http://www.ezTCP.com