Download here

Transcript
INSTRUCTION MANUAL
E
E
E
The “Quick Reference Guide” is included at the end of this manual.
INSTRUCTION
MANUAL
Introduction
The EOS REBEL T5i/EOS 700D is a digital single-lens reflex camera
featuring a fine-detail CMOS sensor with approx. 18.00 effective
megapixels, DIGIC 5, high-precision and high-speed 9-point AF,
approx. 5 fps continuous shooting, Live View shooting, and Full HighDefinition (Full HD) movie shooting.
Before Starting to Shoot, Be Sure to Read the Following
To avoid botched pictures and accidents, first read the “Safety
Precautions” (p.349-351) and “Handling Precautions” (p.16-17).
Refer to This Manual while Using the Camera to Further
Familiarize Yourself with the Camera
While reading this manual, take a few test shots and see how they
come out. You can then better understand the camera.
Testing the Camera Before Use and Liability
After shooting, play images back and check whether they have been
properly recorded. If the camera or memory card is faulty and the
images cannot be recorded or downloaded to a computer, Canon
cannot be held liable for any loss or inconvenience caused.
Copyrights
Copyright laws in your country may prohibit the use of your recorded
images or copyrighted music and images with music in the memory
card for anything other than private enjoyment. Also be aware that
certain public performances, exhibitions, etc., may prohibit photography
even for private enjoyment.
This camera is compatible with SD memory cards, SDHC memory
cards, and SDXC memory cards. In this manual, “card” refers to all
these cards.
* The camera does not come with a card for recording images/
movies. Please purchase it separately.
2
Item Check List
Before starting, check that all the following items have been included
with your camera. If anything is missing, contact your dealer.
Camera
(with eyecup and body cap)
Battery Pack
LP-E8
Battery Charger
LC-E8/LC-E8E*
(with protective cover)
Wide Strap
EOS DIGITAL Solution Disk
(Software/Software Instruction Manuals)
Interface Cable
Camera
Instruction Manual
(this booklet)
* Battery Charger LC-E8 or LC-E8E is provided. (The LC-E8E comes with a
power cord.)
If you purchased a Lens Kit, check that the lens is included.
Depending on the Lens Kit type, a lens instruction manual may also be
included.
Be careful not to lose any of the above items.
Software Instruction Manuals
The Software Instruction Manuals are included on the EOS DIGITAL
Solution Disk as PDF files. See page 367 for instructions to look up
information in the Software Instruction Manuals.
3
Conventions Used in this Manual
Icons in this Manual
<6>
: Indicates the Main Dial.
<V> <U>
: Indicates the <S> Cross keys.
<0>
: Indicates the Setting button.
0, 9, 7, 8 : Indicates that the corresponding function
remains active for 4 sec., 6 sec., 10 sec., or 16
sec. respectively after you let go of the button.
* In this manual, the icons and markings indicating the camera’s buttons, dials,
and settings correspond to the icons and markings on the camera and on the
LCD monitor.
3 : Indicates a function that can be changed by pressing the
<M> button and changing the setting.
M
: When shown on the upper right of a page, it indicates that the
function is available only in the Creative Zone modes (p.24).
(p.**) : Reference page number for more information.
: Warning to prevent shooting problems.
: Supplemental information.
: Tips or advice for better shooting.
: Problem-solving advice.
Basic Assumptions
All operations explained in this manual assume that the power switch
is already set to <1> (p.34).
It is assumed that all the menu settings and Custom Functions are
set to their defaults.
The illustrations in this manual show the camera attached with the
EF-S18-55mm f/3.5-5.6 IS STM lens as an example.
4
Chapters
For first-time DSLR users, Chapters 1 and 2 explain the camera’s
basic operations and shooting procedures.
Introduction
1
2
3
4
5
6
7
8
9
10
11
12
13
14
15
2
Getting Started
27
Basic Shooting and Image Playback
57
Creative Shooting
85
Advanced Shooting
109
Shooting with the LCD Monitor (Live View Shooting)
145
Shooting Movies
173
Handy Features
203
Wireless Flash Photography
229
Image Playback
241
Post-Processing Images
273
Printing Images
279
Customizing the Camera
295
Reference
305
Downloading Images to a Personal Computer
361
Quick Reference Guide and Index
369
5
Contents at a Glance
Shooting
Shoot automatically
Î p.57 - 75 (Basic Zone modes)
Shoot continuously
Î p.104 (i Continuous shooting)
Take a picture of yourself in a group Î p.106 (j Self-timer)
Freeze the action
Blur the action
Î p.110 (s Shutter-priority AE)
Blur the background
Î p.64 (C Creative Auto)
Keep the background in sharp focus Î p.112 (f Aperture-priority AE)
Adjust the image brightness (exposure) Î p.119 (Exposure compensation)
Shoot in low light
Î p.58, 107 (D Flash photography)
p.92 (ISO speed setting)
Shoot without flash
Î p.63 (7 Flash Off)
p.76 (b Flash Off)
Photograph fireworks at night
Î p.116 (Bulb exposure)
Shoot while viewing the LCD monitor Î p.145 (A Live View shooting)
Using Creative Filters
Î p.152 (Creative filters)
Shoot movies
Î p.173 (k Movie shooting)
Image Quality
Shoot with image effects matching the subject Î p.95 (Picture Style)
6
Make a large-size print of the picture Î p.88 (73, 83, 1)
Take many pictures
Î p.88 (7a, 8a, b, c)
Focusing
Change the point of focus
Î p.100 (S AF point selection)
Shoot a moving subject
Î p.70, 98 (AI Servo AF)
Playback
View the images on the camera
Î p.84 (x Playback)
Search for pictures quickly
Î p.242 (H Index display)
p.243 (I Image browsing)
Rate images
Î p.248 (Ratings)
Prevent important images
from accidental deletion
Î p.266 (K Image protect)
Delete unnecessary images
Î p.268 (L Delete)
Auto play images and movies
Î p.258 (Slide show)
View the images or movies on a TV set Î p.262 (Video OUT)
Adjust the LCD monitor brightness Î p.205 (LCD monitor brightness)
Printing
Print pictures easily
Î p.279 (Direct printing)
7
Index to Features
Power
Battery
• Charging
• Installing/Removing
• Battery check
Power outlet
Auto power off
Image Quality
Î p.28
Î p.30
Î p.35
Î p.306
Î p.34
Card
Installing/Removing
Î p.31
Format
Î p.48
Release shutter without
card
Î p.204
Lens
Attaching/Detaching
Zoom
Image Stabilizer
Î p.39
Î p.40
Î p.41
AF
Î p.42
Î p.38
Î p.36
Î p.204
Drive
Î p.33
Î p.217
Î p.205
Î p.53
Shooting
Basic Settings
Dioptric adjustment
Language
Zone/Date/Time
Beeper
LCD Monitor
Using the LCD Monitor
LCD auto off/on
Brightness adjustment
Touch screen
Recording Images
Creating/Selecting a folder Î p.206
File numbering
Î p.208
8
Image-recording quality Î p.88
Picture Style
Î p.95
White balance
Î p.137
Color space
Î p.141
Image enhancement features
• Auto Lighting Optimizer Î p.125
• Lens peripheral
illumination correction
Î p.129
• Chromatic aberration
correction
Î p.130
• Noise reduction for
long exposures
Î p.127
• Noise reduction for
high ISO speeds
Î p.126
• Highlight tone priority
Î p.299
AF operation
AF point selection
Manual focusing
Drive mode
Continuous shooting
Self-timer
Maximum burst
Shooting mode
ISO speed
Feature guide
Bulb
Mirror lockup
Metering mode
Remote control
Quick Control
Î p.97
Î p.100
Î p.103
Î p.22
Î p.104
Î p.106
Î p.90
Î p.24
Î p.92
Î p.52
Î p.116
Î p.142
Î p.117
Î p.307
Î p.44
Index to Features
Exposure Adjustment
Playback
Exposure compensation Î p.119
AEB
Î p.121
AE lock
Î p.123
Flash
Built-in flash
• Flash exposure
compensation
• FE lock
External flash
Flash control
• Wireless flash
Î p.107
Î p.120
Î p.124
Î p.309
Î p.218
Î p.229
Live View Shooting
Live View shooting
Autofocusing (AF)
methods
Continuous AF
Touch Shutter
Aspect ratio
Grid display
Quick Control
Creative filters
Î p.145
Î p.159
Î p.156
Î p.168
Î p.157
Î p.156
Î p.151
Î p.152
Movie Shooting
Movie shooting
Movie Servo AF
Sound recording
Grid display
Manual exposure
Still photo shooting
Quick Control
Video snapshot
Î p.173
Î p.196
Î p.198
Î p.198
Î p.177
Î p.182
Î p.184
Î p.187
Image review time
Single-image display
Shooting information
display
Index display
Image browsing
(Jump display)
Magnified view
Image rotate
Rating
Movie playback
Editing out movie’s
first/last scene
Slide show
Viewing images on TV
Protect
Erase
Quick Control
Î p.204
Î p.84
Î p.270
Î p.242
Î p.243
Î p.244
Î p.247
Î p.248
Î p.254
Î p.256
Î p.258
Î p.262
Î p.266
Î p.268
Î p.250
Image Editing
Creative filters
Resize
Î p.274
Î p.277
Printing
PictBridge
Print Order (DPOF)
Photobook Set-up
Î p.282
Î p.289
Î p.293
Customization
Custom Functions (C.Fn) Î p.296
My Menu
Î p.303
Software
Downloading images to a
personal computer
Î p.361
Software instruction manualÎ p.367
9
Contents
Introduction
2
Item Check List................................................................................. 3
Conventions Used in this Manual..................................................... 4
Chapters........................................................................................... 5
Contents at a Glance........................................................................ 6
Index to Features ............................................................................. 8
Handling Precautions ..................................................................... 16
Quick Start Guide ........................................................................... 18
Nomenclature ................................................................................. 20
1
Getting Started
27
Charging the Battery ...................................................................... 28
Installing and Removing the Battery............................................... 30
Installing and Removing the Card .................................................. 31
Using the LCD Monitor ................................................................... 33
Turning on the Power ..................................................................... 34
Setting the Time Zone, Date and Time .......................................... 36
Selecting the Interface Language................................................... 38
Attaching and Detaching a Lens .................................................... 39
About the Lens Image Stabilizer .................................................... 41
Basic Operation.............................................................................. 42
Q Quick Control for Shooting Functions ....................................... 44
3 Menu Operations.................................................................. 46
Formatting the Card ....................................................................... 48
Switching the LCD Monitor Display ................................................ 50
Feature Guide ................................................................................ 52
d Touch Screen Operations .......................................................... 53
10
Contents
2
Basic Shooting and Image Playback
57
A Fully Automatic Shooting (Scene Intelligent Auto) ...................58
A Full Auto Techniques (Scene Intelligent Auto) ......................... 61
7 Disabling Flash ......................................................................... 63
C Creative Auto Shooting.............................................................64
2 Shooting Portraits ...................................................................... 67
3 Shooting Landscapes ............................................................... 68
4 Shooting Close-ups ................................................................... 69
5 Shooting Moving Subjects ........................................................ 70
8: Special Scene Mode .............................................................71
6 Shooting Night Portraits (With a Tripod) ....................................72
F Shooting Night Scenes Handheld .............................................. 73
G Shooting Backlit Scenes............................................................ 74
Q Quick Control............................................................................. 76
Shoot by Ambience Selection .........................................................77
Shoot by Lighting or Scene Type.................................................... 81
x Image Playback ........................................................................84
3
Creative Shooting
85
d: Program AE...............................................................................86
Setting the Image-Recording Quality .............................................. 88
i: Changing the ISO Speed ....................................................... 92
A Optimal Image Characteristics for the Subject (Picture Style) ... 95
f: Changing the Autofocus Operation (AF Operation) ................. 97
S Selecting the AF Point ............................................................ 100
Subjects Difficult to Focus............................................................. 103
MF: Manual Focusing................................................................. 103
i Continuous Shooting ...............................................................104
j Using the Self-timer ................................................................. 106
D Using the Built-in Flash ............................................................. 107
11
Contents
4
Advanced Shooting
109
s: Conveying the Subject’s Movement ..................................... 110
f: Changing the Depth of Field ................................................ 112
Depth of Field Preview................................................................114
a: Manual Exposure ................................................................... 115
q Changing the Metering Mode ..................................................117
Setting Exposure Compensation ...................................................119
Auto Exposure Bracketing (AEB) ................................................. 121
A Locking the Exposure (AE Lock)............................................. 123
A Locking the Flash Exposure (FE Lock) ................................... 124
Auto Correction of Brightness and Contrast (Auto Lighting Optimizer) ... 125
Noise Reduction Settings ............................................................. 126
Lens Peripheral Illumination / Chromatic Aberration Correction.... 129
A Customizing Image Characteristics (Picture Style) .............. 132
A Registering Preferred Image Characteristics (Picture Style)..... 135
B: Matching the Light Source (White Balance)......................... 137
u Adjusting the Color Tone for the Light Source ........................ 139
Setting the Color Reproduction Range (Color Space).................. 141
Mirror Lockup to Reduce Camera Shake ..................................... 142
5
Shooting with the LCD Monitor (Live View Shooting) 145
A Shooting with the LCD Monitor .............................................. 146
Shooting Function Settings .......................................................... 151
U Using Creative Filters ............................................................. 152
A Menu Function Settings ......................................................... 156
Changing the Autofocus Method (AF Method) ............................. 159
x Shooting with the Touch Shutter ............................................ 168
MF: Focus Manually ..................................................................... 170
12
Contents
6
Shooting Movies
173
k Shooting Movies .....................................................................174
Autoexposure Shooting ..............................................................174
Manual Exposure Shooting ........................................................177
Shooting Still Photos ..................................................................182
Shooting Function Settings ...........................................................184
Setting the Movie-recording Size .................................................. 185
Shooting Video Snapshots............................................................ 187
Movie Menu Function Settings...................................................... 196
7
Handy Features
203
Handy Features ............................................................................204
Disabling the Beeper ..................................................................204
Card Reminder ........................................................................... 204
Setting the Image Review Time .................................................204
Setting the Auto Power-off Time ................................................205
Adjusting the LCD Monitor Brightness ....................................... 205
Creating and Selecting a Folder.................................................206
File Numbering Methods ............................................................ 208
Setting Copyright Information..................................................... 210
Auto Rotation of Vertical Images ................................................212
Checking Camera Settings ........................................................213
Reverting the Camera to the Default Settings............................ 214
Preventing the LCD Monitor from Turning Off Automatically......217
Changing the Shooting Settings Screen Color...........................217
Setting the Flash ........................................................................... 218
f Automatic Sensor Cleaning....................................................223
Appending Dust Delete Data ........................................................224
Manual Sensor Cleaning...............................................................226
13
Contents
8
Wireless Flash Photography
229
Using Wireless Flash.................................................................... 230
Easy Wireless Flash Shooting...................................................... 231
Custom Wireless Flash Shooting ................................................. 234
Other Settings .............................................................................. 238
9
Image Playback
241
H I Searching for Images Quickly............................................ 242
u/y Magnified View ................................................................... 244
d Playing Back with the Touch Screen........................................ 245
b Rotating the Image .................................................................. 247
Setting Ratings ............................................................................. 248
Q Quick Control During Playback............................................... 250
k Enjoying Movies ..................................................................... 252
k Playing Movies ....................................................................... 254
X Editing a Movie’s First and Last Scenes ................................. 256
Slide Show (Auto Playback) ......................................................... 258
Viewing the Images on TV ........................................................... 262
K Protecting Images................................................................... 266
L Erasing Images........................................................................ 268
B: Shooting Information Display ............................................. 270
10
Post-Processing Images
11
Printing Images
273
U Applying Creative Filters to the Image.................................... 274
S Resizing a JPEG Image ......................................................... 277
279
Preparing to Print ......................................................................... 280
wPrinting .................................................................................... 282
Cropping the Image ................................................................... 287
W Digital Print Order Format (DPOF) ......................................... 289
W Direct Printing with DPOF....................................................... 292
p Specifying Images for a Photobook......................................... 293
14
Contents
12
Customizing the Camera
295
Setting Custom Functions............................................................. 296
Custom Function Settings............................................................. 298
C.Fn I: Exposure ........................................................................ 298
C.Fn II: Image ............................................................................299
C.Fn III: Autofocus/Drive ............................................................ 300
C.Fn IV: Operation/Others.......................................................... 301
Registering My Menu .................................................................... 303
13
Reference
305
Using a Household Power Outlet.................................................. 306
Remote Control Shooting..............................................................307
External Speedlites ....................................................................... 309
Using Eye-Fi Cards....................................................................... 311
Function Availability Table According to Shooting Mode .............. 314
System Map .................................................................................. 316
Menu Settings ............................................................................... 318
Troubleshooting Guide..................................................................324
Error Codes...................................................................................337
Specifications................................................................................338
Handling Precautions: EF-S18-55mm f/3.5-5.6 IS STM,
EF-S18-135mm f/3.5-5.6 IS STM .................................................346
Safety Precautions........................................................................ 349
14
Downloading Images to a Personal Computer
361
Downloading Images to a Personal Computer ............................. 362
About the Software ....................................................................... 364
Installing the Software................................................................... 366
Software Instruction Manual ......................................................... 367
15
Quick Reference Guide and Index
369
Quick Reference Guide................................................................. 370
Index ............................................................................................. 382
15
Handling Precautions
Camera Care
This camera is a precision instrument. Do not drop it or subject it to physical shock.
The camera is not waterproof and cannot be used underwater. If you
accidentally drop the camera into water, promptly consult the nearest Canon
Service Center. Wipe off any water droplets with a dry cloth. If the camera
has been exposed to salty air, wipe it with a well-wrung wet cloth.
Never leave the camera near anything having a strong magnetic field such
as a magnet or electric motor. Also avoid using or leaving the camera near
anything emitting strong radio waves such as a large antenna. Strong
magnetic fields can cause camera misoperation or destroy image data.
Do not leave the camera in excessive heat such as in a car in direct sunlight.
High temperatures can cause the camera to malfunction.
The camera contains precision electronic circuitry. Never attempt to
disassemble the camera yourself.
Do not block the mirror operation with your finger, etc. Doing so may cause a
malfunction.
Use a blower to blow away dust on the lens, viewfinder, reflex mirror, and
focusing screen. Do not use cleaners that contain organic solvents to clean
the camera body or lens. For stubborn dirt, take the camera to the nearest
Canon Service Center.
Do not touch the camera’s electrical contacts with your fingers. This is to
prevent the contacts from corroding. Corroded contacts can cause camera
misoperation.
If the camera is suddenly brought in from the cold into a warm room,
condensation may form on the camera and internal parts. To prevent
condensation, first put the camera in a sealed plastic bag and let it adjust to
the warmer temperature before taking it out of the bag.
If condensation forms on the camera, do not use the camera. This is to avoid
damaging the camera. If there is condensation, remove the lens, card and
battery from the camera, and wait until condensation has evaporated before
using the camera.
If the camera will not be used for an extended period, remove the battery
and store the camera in a cool, dry, well-ventilated location. Even while the
camera is in storage, press the shutter button a few times once in a while to
check that the camera is still working.
Avoid storing the camera where there are chemicals that result in rust and
corrosion such as in a chemical lab.
If the camera has not been used for an extended period, test all its functions
before using it. If you have not used the camera for some time or if there is
an important shoot such as a foreign trip coming up, have the camera
checked by your Canon dealer or check the camera yourself and make sure
it is working properly.
16
Handling Precautions
LCD Monitor
Although the LCD monitor is manufactured with very high precision
technology with over 99.99% effective pixels, there may be a few dead pixels
displaying only black or red, etc., among the remaining 0.01% or less pixels.
Dead pixels are not a malfunction. They do not affect the images recorded.
If the LCD monitor is left on for a prolonged period, screen burn-in may occur
where you see remnants of what was displayed. However, this is only
temporary and will disappear when the camera is left unused for a few days.
The LCD monitor display may seem slow in low temperatures, or look black
in high temperatures. It will return to normal at room temperature.
Cards
To protect the card and its recorded data, note the following:
Do not drop, bend, or wet the card. Do not subject it to excessive force,
physical shock, or vibration.
Do not touch the card’s electronic contacts with your fingers or anything
metallic.
Do not affix any stickers, etc., on the card.
Do not store or use the card near anything having a strong magnetic field
such as a TV set, speakers, or magnet. Also avoid places prone to having
static electricity.
Do not leave the card in direct sunlight or near a heat source.
Store the card in a case.
Do not store the card in hot, dusty, or humid locations.
Lens
After detaching the lens from the camera, put down the
lens with the rear end up and attach the lens caps to
avoid scratching the lens surface and electrical contacts.
Contacts
Cautions Regarding Prolonged Use
If you use continuous shooting, Live View shooting, or
movie shooting for a prolonged period, the camera may
become hot. Although this is not a malfunction, holding
the hot camera for a long period can cause slight skin
burns.
About Smudges Adhering to the Front of the Sensor
Besides dust entering the camera from outside, in rare cases lubricant from the
camera’s internal parts may adhere to the front of the sensor. If visible spots still
remain after the automatic sensor cleaning, having the sensor cleaned by a
Canon Service Center is recommended.
17
Quick Start Guide
Insert the battery (p.30).
1
To charge the battery, see page 28.
Insert a card (p.31).
2
3
With the card’s label facing
toward the back of the
camera, insert it into the card
slot.
White index
Red index
Attach the lens (p.39).
Align the lens’ white or red index
with the camera’s index in the
matching color.
4
Set the lens focus mode switch
to <AF> (p.39).
5
Set the power switch to <1>,
and set the Mode Dial to <A>
(Scene Intelligent Auto) (p.58).
All the necessary camera settings
will be set automatically.
18
Quick Start Guide
6
Flip out the LCD monitor (p.33).
7
Focus the subject (p.43).
8
Take the picture (p.43).
9
Review the picture (p.204).
When the LCD monitor displays the
time zone and date/time setting
screens, see page 36.
Look through the viewfinder and aim
the viewfinder center over the subject.
Press the shutter button halfway, and
the camera will focus the subject.
If necessary, the built-in flash will be
raised automatically.
Press the shutter button completely
to take the picture.
The captured image will be
displayed for 2 sec. on the LCD
monitor.
To display the image again, press
the <x> button (p.84).
To shoot while looking at the LCD monitor, see “Live View
Shooting” (p.145).
To view the images captured so far, see “Image Playback” (p.84).
To delete an image, see “Erasing Images” (p.268).
19
Nomenclature
The names in bold indicate the parts mentioned up until the “Basic
Shooting and Image Playback” section.
Built-in flash/AF-assist beam
(p.107/101)
EF Lens mount index (p.39)
Mode Dial (p.24)
Microphone (p.174)
Power switch (p.34)
Flash-sync contacts
Hot shoe (p.309)
<i> ISO speed
setting button (p.92)
EF-S Lens mount index
(p.39)
<6> Main Dial
<D> Flash button
(p.107)
Shutter button
(p.43)
<V> Focal plane
mark (p.69)
Red-eye
reduction/
Self-timer
lamp
(p.108/106)
Strap mount
(p.27)
Remote control
sensor
(p.142, 307)
Grip
Mirror (p.142, 226)
Terminal cover
Contacts (p.17)
Lens release button
(p.40)
Lens mount
Lens lock pin
Depth-of-field preview
button (p.114)
<q/C>
Audio/video OUT/
Digital terminal (p.265, 280, 362)
<F> Remote control terminal
(p.308)
Body cap (p.39)
<Y> External microphone
IN terminal (p.198)
<D> HDMI mini OUT
terminal (p.262)
20
Nomenclature
Display off sensor (p.50, 217)
Dioptric adjustment knob (p.42)
<A> Live View shooting/
Movie shooting button (p.146/174)
Viewfinder eyepiece
<A/Hy> AE lock/
FE lock button/
Index/Reduce button
(p.123/124/242/244, 287)
Eyecup (p.308)
<B> Info button
(p.50, 84, 148, 179, 213)
<S/u>
AF point selection/
Magnify button
(p.100/244, 287)
<M> Menu
button (p.46)
Speaker
(p.254)
LCD monitor/
Touch screen
(p.33, 46, 205/
53, 245, 255)
Card slot
cover (p.31)
DC cord hole
(p.306)
<O> Aperture/
Exposure compensation
button (p.115/119)
Tripod socket
Access lamp (p.32)
<Q/l> Quick Control button/
Direct print button (p.44/285)
Battery compartment
cover release lever (p.30)
Battery compartment cover
(p.30)
<x> Playback button (p.84)
<0> Setting button (p.46)
<L> Erase button (p.268)
<S> Cross keys (p.46)
<WB>
White balance selection button (p.137)
<XA>
Picture Style selection button (p.95)
<Yi/Q> Drive mode selection button (p.104, 106)
<Zf>
AF operation selection button (p.97)
Card slot (p.31)
21
Nomenclature
Shooting Settings (in Creative Zone modes, p.24)
Shutter speed
Exposure level indicator
Exposure compensation
amount (p.119)
AEB range (p.121)
Aperture
Main Dial pointer
Auto Lighting Optimizer (p.125)
ISO speed (p.92)
Shooting mode
Highlight tone priority
(p.299)
Picture Style (p.95)
AF operation (p.97)
X
One-Shot AF
9
AI Focus AF
Z
AI Servo AF
MF
Manual Focus
y Flash exposure
compensation (p.120)
0 External flash
exposure compensation
Built-in flash settings
(p.220)
Image-recording
quality (p.88)
73 Large/Fine
83 Large/Normal
74 Medium/Fine
84 Medium/Normal
7a Small 1/Fine
8a Small 1/Normal
b Small 2 (Fine)
c Small 3 (Fine)
1+73
RAW+Large/Fine
1 RAW
Quick Control icon (p.44)
Battery check (p.35)
zxcn
White balance (p.137)
Q Auto
W Daylight
E Shade
R Cloudy
Y Tungsten light
U White fluorescent light
I Flash
O Custom
Eye-Fi transmission status (p.311)
Drive mode (p.104, 106)
u Single shooting
i Continuous shooting
Q Self-timer:10 sec/Remote control
l Self-timer:2 sec
q Self-timer:Continuous
GPS connection indicator
Number of possible shots
during WB bracketing
Self-timer countdown
Multi Shot Noise Reduction (p.126)
u White balance correction (p.139)
B White balance bracketing (p.140)
Metering mode (p.117)
q Evaluative metering
w Partial metering
r Spot metering
e Center-weighted average metering
The display will show only the settings currently applied.
22
Nomenclature
Viewfinder Information
Spot metering circle
AF point activation indicator <•>
Focusing screen
AF points
<i>
ISO speed
<u>
White balance
correction
<A> AE lock/
AEB in-progress
<o> Focus
confirmation light
Max. burst
<D> Flash-ready
Improper FE lock warning
<0> Monochrome
shooting
ISO speed
<e> High-speed sync
(FP flash)
<d> FE lock/FEB in-progress
<y> Flash exposure
compensation
<A> Highlight tone priority
Exposure level indicator
Exposure compensation amount
AEB range
Red-eye reduction lamp-on indicator
Aperture
Shutter speed
FE lock (FEL)
Busy (buSY)
Built-in flash recycling (D buSY)
Card full warning (FuLL)
Card error warning (Card)
No card warning (Card)
The display will show only the settings currently applied.
23
Nomenclature
Mode Dial
The Mode Dial includes the Basic Zone modes and Creative Zone
modes.
Creative Zone
These modes give you more control for
shooting various subjects.
d
: Program AE (p.86)
s : Shutter-priority AE (p.110)
f : Aperture-priority AE (p.112)
a
: Manual exposure (p.115)
Basic Zone
All you do is press the shutter button.
The camera sets everything to suit the
subject or scene.
A : Scene Intelligent Auto (p.58)
7 : Flash Off (p.63)
C : Creative Auto (p.64)
Image Zone
2
: Portrait (p.67)
3 : Landscape (p.68)
4
: Close-up (p.69)
5 : Sports (p.70)
8 : Special Scene Mode (p.71)
6: Night Portrait (p.72)
F: Handheld Night Scene (p.73)
G: HDR Backlight Control (p.74)
24
Nomenclature
Lens
Lens without a distance scale
Focusing ring (p.103, 170)
Focus mode switch (p.39)
Hood mount (p.344)
Zoom position index (p.40)
Filter thread
(front of lens) (p.344)
Zoom ring (p.40)
Image Stabilizer switch (p.41)
Contacts (p.17)
Lens mount index (p.39)
Lens with a distance scale
Hood mount (p.344)
Focus mode switch (p.39)
Zoom position index (p.40)
Distance scale
Filter thread
(front of lens) (p.344)
Zoom ring (p.40)
Focusing ring (p.103, 170)
Image Stabilizer switch (p.41)
Contacts (p.17)
Lens mount index (p.39)
25
Nomenclature
Battery Charger LC-E8
Charger for Battery Pack LP-E8 (p.28).
Power plug
Battery pack slot
Charge lamp
Full-charge lamp
IMPORTANT SAFETY INSTRUCTIONS-SAVE THESE INSTRUCTIONS.
DANGER-TO REDUCE THE RISK OF FIRE OR ELECTRIC SHOCK,
CAREFULLY FOLLOW THESE INSTRUCTIONS.
For connection to a supply not in the U.S.A., use an attachment plug adapter
of the proper configuration for the power outlet, if needed.
Battery Charger LC-E8E
Charger for Battery Pack LP-E8 (p.28).
Charge lamp
Full-charge lamp
Battery pack slot
Power cord
Power cord socket
26
1
Getting Started
This chapter explains preparatory steps before you start
shooting and basic camera operations.
Attaching the Strap
Pass the end of the strap through
the camera’s strap mount eyelet
from the bottom. Then pass it
through the strap’s buckle as shown
in the illustration. Pull the strap to
take up any slack and make sure
the strap will not loosen from the
buckle.
The eyepiece cover is also
attached to the strap (p.308).
Eyepiece cover
27
Charging the Battery
1
Remove the protective cover.
Detach the protective cover provided
with the battery.
the battery.
2 Attach
As shown in the illustration, attach the
battery securely to the charger.
To detach the battery, follow the
above procedure in reverse.
LC-E8
the battery.
3 Recharge
For LC-E8
As shown by the arrow, flip out the
battery charger’s prongs and insert
the prongs into a power outlet.
For LC-E8E
LC-E8E
Connect the power cord to the
charger and insert the plug into a
power outlet.
X Recharging starts automatically and
the charge lamp lights up in orange.
X When the battery is fully recharged,
the full-charge lamp will light up in
green.
It takes approx. 2 hours to fully recharge a completely
exhausted battery at 23°C / 73°F. The time required to recharge
the battery will vary greatly depending on the ambient
temperature and the battery’s remaining capacity.
For safety reasons, recharging in low temperatures (6°C - 10°C /
43°F - 50°F) will take longer (up to approx. 4 hours).
28
Charging the Battery
Tips for Using the Battery and Charger
Upon purchase, the battery is not fully charged.
Recharge the battery before using.
Recharge the battery on the day before or on the day it is to be
used.
Even during storage, a charged battery will gradually drain and lose
its capacity.
After recharging the battery, detach it and disconnect the
charger from the power outlet.
When not using the camera, remove the battery.
If the battery is left in the camera for a prolonged period, a small
amount of power current is released, resulting in excess discharge
and shorter battery life. Store the battery with the protective cover
(provided) attached. Storing the battery when it is fully charged may
lower the battery’s performance.
The battery charger can also be used in foreign countries.
The battery charger is compatible with a 100 V AC to 240 V AC 50/
60 Hz power source. If necessary, attach a commercially-available
plug adapter for the respective country or region. Do not attach any
portable voltage transformer to the battery charger. Doing so can
damage the battery charger.
If the battery becomes exhausted quickly even after being fully
charged, the battery has reached the end of its service life.
Purchase a new battery.
After disconnecting the charger’s power plug, do not touch the prongs for
at least 3 sec.
Do not charge any battery other than a Battery Pack LP-E8.
Battery Pack LP-E8 is dedicated to Canon products only. Using it with an
incompatible battery charger or product may result in malfunction or
accidents for which Canon cannot be held liable.
29
Installing and Removing the Battery
Load a fully charged Battery Pack LP-E8 into the camera.
Installing the Battery
1
Open the cover.
Slide the lever as shown by the
arrows and open the cover.
the battery.
2 Insert
Insert the end with the battery
contacts.
Insert the battery until it locks in
place.
the cover.
3 Close
Press the cover until it snaps shut.
Removing the Battery
Open the cover and remove the
battery.
Press the battery release lever as shown
by the arrow and remove the battery.
To prevent short circuiting of the
battery contacts, be sure to attach the
protective cover (provided, p.28) to
the battery.
After opening the battery compartment cover, be careful not to swing it back
further. Otherwise, the hinge may break.
30
Installing and Removing the Card
The card (sold separately) can be an SD, SDHC, or SDXC memory
card. SDHC and SDXC memory cards with UHS-I can also be used.
The captured images are recorded onto the card.
Make sure the card’s write-protect switch is set upward to
enable writing/erasing.
Installing the Card
1
Write-protect switch
Open the cover.
Slide the cover as shown by the
arrows to open it.
the card.
2 Insert
As shown by the illustration, face
the card’s label side toward you
and insert it until it clicks in place.
the cover.
3 Close
Close the cover and slide it in the
direction shown by the arrows until it
snaps shut.
Possible shots
When you set the power switch to
<1>, the number of possible shots
(p.35) will be displayed on the LCD
monitor.
The number of possible shots depends on the remaining capacity of the
card, image-recording quality, ISO speed, etc.
Setting [z1: Release shutter without card] to [Disable] will prevent
you from forgetting to insert a card (p.204).
31
Installing and Removing the Card
Removing the Card
1
Access lamp
Open the cover.
Set the power switch to <2>.
Make sure the access lamp is off,
then open the cover.
If [Recording...] is displayed, close
the cover.
the card.
2 Remove
Gently push in the card, then let go to
eject it.
Pull the card straight out, then close
the cover.
When the access lamp is lit or blinking, it indicates that images are
being written to or read by the card, being erased, or data is being
transferred. Do not open the card slot cover during this time. Also,
never do any of the following while the access lamp is lit or
blinking. Otherwise, it can damage the image data, card, or camera.
• Removing the card.
• Removing the battery.
• Shaking or banging the camera around.
If the card already contains recorded images, the image number may not
start from 0001 (p.208).
If a card-related error message is displayed on the LCD monitor, remove
and reinsert the card. If the error persists, use a different card.
If you can transfer all the images on the card to a computer, transfer all
the images and then format the card with the camera (p.48). The card
may then return to normal.
Do not touch the card’s contacts with your fingers or metal objects.
32
Using the LCD Monitor
After you flip out the LCD monitor, you can set menu functions, use Live
View shooting, shoot movies, and play back images and movies. You
can change the direction and angle of the LCD monitor.
1
Flip out the LCD monitor.
the LCD monitor.
2 Rotate
When the LCD monitor is swung out,
180°
90°
175°
you can rotate it up or down, or face it
forward toward the subject.
The indicated angle is only
approximate.
it toward you.
3 Face
Normally, face the LCD monitor
toward you.
Be careful not to force and break the hinge when rotating the LCD monitor.
When not using the camera, close the LCD monitor with the screen
facing inward. This will protect the screen.
During Live View shooting or movie shooting, facing the LCD monitor
toward the subject will display a mirror image on the screen.
Depending on the angle of the LCD monitor, the display may turn off right
before the LCD monitor is closed.
33
Turning on the Power
If you turn on the power switch and the time zone and date/time
setting screens appear, see page 36 to set the time zone and date/
time.
<k>
: The camera turns on. You can
shoot movies (p.173).
<1> : The camera turns on. You can
shoot still photos.
<2> : The camera is turned off and
does not operate. Set to this
position when not using the
camera.
About the Automatic Self-Cleaning Sensor
Whenever you set the power switch to <1> or <2>, sensor
cleaning will be executed automatically. (A small sound may be
heard.) During the sensor cleaning, the LCD monitor will display
<f>.
You can still shoot during sensor cleaning. Press the shutter button
halfway (p.43) to stop the sensor cleaning and take a picture.
If you repeatedly turn the power switch <1>/<2> at a short
interval, the <f> icon may not be displayed. This is normal and
not a problem.
3 About Auto Power Off
To save battery power, the camera turns off automatically after
approx. 30 seconds of non-operation. To turn on the camera again,
just press the shutter button halfway (p.43).
You can set the auto power off time with [52: Auto power off]
(p.205).
If you set the power switch to <2> while an image is being recorded to
the card, [Recording...] will be displayed and the power will turn off after the
card finishes recording the image.
34
Turning on the Power
z Checking the Battery Level
When the power is turned on, the battery level will be indicated in one of
four levels.
z : Battery level is sufficient.
x : Battery level is low, but the
camera can still be used.
c : Battery will be exhausted soon.
(Blinks)
n : Recharge the battery.
Battery Life
[Approx. number of shots]
Temperature
At 23°C / 73°F
At 0°C / 32°F
No Flash
550
470
50% Flash Use
440
400
The figures above are based on a fully-charged Battery Pack LP-E8, no Live
View shooting, and CIPA (Camera & Imaging Products Association) testing
standards.
Possible shots with Battery Grip BG-E8
• With two LP-E8 batteries: approx. twice as many shots as with the camera alone.
• With size-AA/LR6 alkaline batteries (at 23°C / 73°F): approx. 470 shots with
no flash, approx. 270 shots with 50% flash use.
The number of possible shots will decrease with any of the following
operations:
• Pressing the shutter button halfway for a prolonged period.
• Activating the AF frequently without taking a picture.
• Using the lens Image Stabilizer.
• Using the LCD monitor often.
The number of possible shots may decrease depending on the actual
shooting conditions.
The lens operation is powered by the camera’s battery. Depending on
the lens used, the number of possible shots may be lower.
For the number of possible shots with Live View shooting, see page 147.
35
3 Setting the Time Zone, Date and Time
When you turn on the power for the first time or if the time zone and date/time
have been reset, the Time zone and Date/Time setting screens will appear.
Follow the steps below to set the time zone first. You can also set the time zone
of your current address. Then if you travel to another time zone, you can simply
set your destination’s time zone so that the correct date/time is recorded.
Note that the date/time appended to recorded images will be based
on this date/time setting. Be sure to set the correct date/time.
Set the Time Zone
[London] is set by default.
Press the <M> button.
Under the [52] tab, select [Time
zone], then press <0>.
Press the <U> key to select a time zone.
Press <0> so <a> is displayed.
Press the <V> key to select the time
zone, then press <0>.
The menu setting procedure is explained on pages 46-47.
The time displayed on the lower right is the time difference compared
with Coordinated Universal Time (UTC). If you do not see your time
zone, set the time zone while referring to the difference with UTC.
Set the Date and Time
1
Display the menu screen.
Press the <M> button.
the [52] tab, select [Date/
2 Under
Time].
Press the <U> key to select the
[52] tab.
Press the <V> key to select [Date/
Time], then press <0>.
36
3 Setting the Time Zone, Date and Time
the date and time.
3 SetPress
the <U> key to select the
date or time number.
Press <0> so <a> is displayed.
Press the <V> key to set the
number, then press <0>. (Returns
to <b>.)
saving time.
4 SetSettheit ifdaylight
necessary.
Press the <U> key to select [Y].
Press <0> so <a> is displayed.
Press the <V> key to select [Z],
then press <0>.
When the daylight saving time is set
to [Z], the time set in step 3 will
advance by 1 hour. If [Y] is set, the
daylight saving time will be canceled
and the time will go back by 1 hour.
the setting.
5 ExitPress
the <U> key to select [OK],
then press <0>.
X The date/time and daylight saving
time will be set and the menu will
reappear.
If you store the camera without the battery or if the camera’s battery
becomes exhausted, the time zone and date/time may be reset. If this
happens, set the time zone and date/time again.
The date/time that was set will start from when you press <0> in step 5.
After changing the time zone, check that the correct date/time has been set.
You can also set the daylight saving time with [52: Time zone].
The [52: Time zone] and [52: Date/Time] daylight saving time settings
are linked.
37
3 Selecting the Interface Language
1
Display the menu screen.
Press the <M> button to display
the menu screen.
the [52] tab, select
2 Under
[LanguageK].
Press the <U> key to select the
[52] tab.
Press the <V> key to select
[LanguageK] (the sixth item from
the top), then press <0>.
the desired language.
3 SetPress
the <S> key to select the
language, then press <0>.
X The interface language will change.
38
Attaching and Detaching a Lens
The camera is compatible with all Canon EF lenses and EF-S lenses.
The camera cannot be used with EF-M lenses.
1
Remove the caps.
Remove the rear lens cap and the
body cap by turning them as shown
by the arrows.
the lens.
2 Attach
Align the lens’ red or white index with
White index
the camera’s index matching the
same color. Turn the lens as shown
by the arrow until it clicks in place.
Red index
the lens focus mode switch to
3 Set
<AF>.
<AF> stands for Autofocus.
If it is set to <MF> (manual focus),
autofocus will not operate.
4 Remove the front lens cap.
Minimizing Dust
When changing lenses, do it quickly in a place with minimal dust.
When storing the camera without a lens attached, be sure to attach the
body cap to the camera.
Remove dust on the body cap before attaching it.
39
Attaching and Detaching a Lens
About Zooming
To zoom, turn the zoom ring on the lens
with your fingers.
If you want to zoom, do it before
focusing. Turning the zoom ring after
achieving focus may throw off the
focus.
Detaching the Lens
While pressing the lens release
button, turn the lens as shown by
the arrows.
Turn the lens until it stops, then
detach it.
Attach the rear lens cap to the
detached lens.
Do not look at the sun directly through any lens. Doing so may cause
loss of vision.
When attaching or detaching a lens, set the camera’s power switch to
<2>.
If the front part (focusing ring) of the lens rotates during autofocusing, do
not touch the rotating part.
If you purchased a lens kit with the EF-S18-55mm f/3.5-5.6 IS STM
or EF-S18-135mm f/3.5-5.6 IS STM lens, see “Handling Precautions”
on page 346.
Image Conversion Factor
Since the image sensor size is
smaller than the 35mm film
format, it will look like the lens
focal length is increased by
approx. 1.6x.
40
Image sensor size (Approx.)
(22.3 x 14.9 mm / 0.88 x 0.59 in.)
35mm image size
(36 x 24 mm / 1.42 x 0.94 in.)
About the Lens Image Stabilizer
When you use the IS lens’ built-in Image Stabilizer, camera shake is
corrected to obtain a sharper shot. The procedure explained here is
based on the EF-S18-55mm f/3.5-5.6 IS STM lens as an example.
* IS stands for Image Stabilizer.
1
Set the IS switch to <1>.
Also set the camera’s power switch to
<1>.
the shutter button halfway.
2 Press
X The Image Stabilizer will operate.
the picture.
3 TakeWhen
the picture looks steady in the
viewfinder, press the shutter button
completely to take the picture.
The Image Stabilizer cannot correct “subject blur”, when the subject
moves at the time of exposure.
For bulb exposures, set the IS switch to <2>. If <1> is set, Image
Stabilizer misoperation may occur.
The Image Stabilizer may not be effective for excessive shaking such as
on a rocking boat.
The Image Stabilizer can operate with the lens focus mode switch set to
either <AF> or <MF>.
When using a tripod, you can still shoot with the IS switch set to <1>
with no problem. However, to save battery power, setting the IS switch to
<2> is recommended.
The Image Stabilizer is effective even when the camera is mounted on a
monopod.
Some IS lenses enable you to switch the IS mode manually to suit the
shooting conditions. However, the following lenses switch the IS mode
automatically:
• EF-S18-55mm f/3.5-5.6 IS STM • EF-S18-135mm f/3.5-5.6 IS STM
• EF-S18-55mm f/3.5-5.6 IS II
• EF-S18-200mm f/3.5-5.6 IS
• EF-S15-85mm f/3.5-5.6 IS USM
41
Basic Operation
Adjusting the Viewfinder Clarity
Turn the dioptric adjustment
knob.
Turn the knob left or right until the
nine AF points in the viewfinder look
sharp.
If the camera’s dioptric adjustment still cannot provide a sharp viewfinder
image, using E-series Dioptric Adjustment Lenses (10 types, sold
separately) is recommended.
Holding the Camera
To obtain sharp images, hold the camera still to minimize camera shake.
Horizontal shooting
Vertical shooting
1. Wrap your right hand around the camera grip firmly.
2. Hold the lens bottom with your left hand.
3. Rest your hand’s right index finger lightly on the shutter button.
4. Press your arms and elbows lightly against the front of your body.
5. To maintain a stable stance, place one foot slightly ahead of the other.
6. Press the camera against your face and look through the viewfinder.
To shoot while looking at the LCD monitor, see page 145.
42
Basic Operation
Shutter Button
The shutter button has two steps. You can press the shutter button
halfway. Then you can further press the shutter button completely.
Pressing halfway
This activates autofocusing and the
automatic exposure system that sets the
shutter speed and aperture.
The exposure setting (shutter speed and
aperture) is displayed in the viewfinder
(0).
Pressing completely
This releases the shutter and takes the
picture.
Preventing Camera Shake
Hand-held camera movement during the moment of exposure is called
camera shake. It can cause blurred pictures. To prevent camera shake,
note the following:
• Hold and steady the camera as shown on the preceding page.
• Press the shutter button halfway to autofocus, then slowly press the
shutter button completely.
If you press the shutter button completely without pressing it halfway first
or if you press the shutter button halfway and then press it completely
immediately, the camera will take a moment before it takes the picture.
Even during menu display, image playback, or image recording, you can
instantly go back to shooting-ready by pressing the shutter button
halfway.
43
Q Quick Control for Shooting Functions
You can directly select and set the shooting functions displayed on the
LCD monitor. This is called the Quick Control screen.
1
Press the <Q> button.
X The Quick Control screen will appear
(7).
the desired function.
2 SetPress
the <S> key to select a
function.
X The selected function and Feature
guide (p.52) will appear.
Turn the <6> dial to change the
setting.
Basic Zone modes
Creative Zone modes
the picture.
3 TakePress
the shutter button completely to
take the picture.
X The captured image will be displayed.
For the functions settable in Basic Zone modes and the setting
procedure, see page 76.
In steps 1 and 2, you can also use the LCD monitor’s touch screen (p.53).
44
Q Quick Control for Shooting Functions
Sample Quick Control Screen
White balance correction (p.139)
Shutter speed (p.110)
Aperture (p.112)
Highlight tone priority* (p.299)
Shooting mode* (p.24)
Exposure compensation/
AEB setting (p.119, 121)
Picture Style (p.95)
White balance (p.137)
AF operation (p.97)
Return
Drive mode (p.104, 106)
Metering mode (p.117)
ISO speed (p.92)
Flash exposure
compensation (p.120)
Built-in flash settings
(p.234)
Image-recording quality (p.88)
Auto Lighting Optimizer (p.125)
White balance bracketing (p.140)
* Asterisked functions cannot be set with the Quick Control screen.
Function Setting Screen
Ð <0>
Select the desired function and press
<0>. The function’s setting screen
will appear.
Press the <U> key or turn the
<6> dial to change the setting.
There are also functions that are set
by pressing the <B> button.
Press <0> to finalize the setting and
return to the Quick Control screen.
45
3 Menu Operations
You can set various settings with the menus such as the imagerecording quality, date/time, etc. While looking at the LCD monitor, use
the <M> button, <S> cross keys, and <0> button on the back of
the camera to operate the menus.
<M> button
<0> button
LCD monitor
<S> Cross keys
Menu Screen
The menu tabs and items displayed will differ depending on the
shooting mode.
Basic Zone modes
Movie shooting
Creative Zone modes
3 Playback
A Live View Shooting
z Shooting
5 Set-up
9 My Menu
Tab
Menu settings
Menu items
46
3 Menu Operations
Menu Setting Procedure
1
Display the menu screen.
Press the <M> button to display
the menu screen.
a tab.
2 Select
Press the <U> key to select a
menu tab.
For example, the [z3] tab refers to
the screen displayed when the z
(Shooting) tab’s third dot [
] from
the left is selected.
the desired item.
3 Select
Press the <V> key to select the
item, then press <0>.
the setting.
4 Select
Press the <V> or <U> key to
select the desired setting. (Some
settings require you to press either
the <V> or <U> key to select it.)
The current setting is indicated in blue.
the desired setting.
5 SetPress
<0> to set it.
the setting.
6 ExitPress
the <M> button to return to
the shooting settings display.
In step 2, you can also turn the <6> dial to select a menu tab.
In steps 2 to 5, you can also use the LCD monitor’s touch screen (p.53).
The explanation of menu functions hereinafter assumes that you have
pressed the <M> button to display the menu screen.
To cancel, press the <M> button.
For details about each menu item, see page 318.
47
3 Formatting the Card
If the card is new or was previously formatted by another camera or
computer, format the card with the camera.
When the card is formatted, all images and data in the card will
be erased. Even protected images will be erased, so make
sure there is nothing you need to keep. If necessary, transfer
the images to a computer, etc., before formatting the card.
1
Select [Format card].
Under the [51] tab, select [Format
card], then press <0>.
the card.
2 Format
Select [OK], then press <0>.
X The card will be formatted.
X When the formatting is completed,
the menu will reappear.
For low-level formatting, press the
<L> button to append [Low level
format] with a checkmark <X>, then
select [OK].
48
3 Formatting the Card
Execute [Format card] in the following cases:
The card is new.
The card was formatted by a different camera or a computer.
The card is full with images or data.
A card-related error is displayed (p.337).
About Low-level Formatting
Perform low-level formatting if the card’s recording or reading speed seems
slow or if you want to totally erase all data in the card.
Since low-level formatting will format all recordable sectors in the card, the
formatting will take slightly longer than normal formatting.
You can stop the low-level formatting by selecting [Cancel]. Even in this
case, normal formatting will be completed and you can use the card as
usual.
When the card is formatted or data is erased, only the file management
information is changed. The actual data is not completely erased. Be
aware of this when selling or discarding the card. When discarding the
card, execute low-level formatting or destroy the card physically to
prevent the personal data from being leaked.
Before using a new Eye-Fi card, the software in the card must be
installed in your computer. Then format the card with the camera.
The card capacity displayed on the card format screen may be smaller
than the capacity indicated on the card.
This device incorporates exFAT technology licensed from Microsoft.
49
Switching the LCD Monitor Display
The LCD monitor can display the shooting settings screen, menu
screen, captured images, etc.
Shooting Settings
When you turn on the power, the
shooting settings will be displayed.
When your eye is near the viewfinder
eyepiece, the display off sensor
(p.21, 217) will turn off the LCD
monitor to prevent glare. When your
eye leaves the viewfinder eyepiece,
the LCD monitor will turn on again.
By pressing the <B> button, you
can switch the LCD monitor screen
as follows: Display the shooting
settings screen (p.22), turn off the
LCD monitor screen, or display the
camera settings screen (p.213).
Menu Functions
Appears when you press the
<M> button. Press the
button again to return to the
shooting settings screen.
50
Captured Image
Appears when you press the
<x> button. Press the button
again to return to the shooting
settings screen.
Switching the LCD Monitor Display
With [52: LCD auto off], you can prevent the LCD monitor from turning
off automatically (p.217).
Even when the menu screen or captured image is displayed, pressing
the shutter button will enable you to shoot immediately.
If you wear sunglasses and look through the viewfinder eyepiece, the
LCD monitor may not turn off automatically. If this occurs, press the
<B> button to turn off the LCD monitor.
Nearby fluorescent lighting may cause the LCD monitor to turn off. If this
occurs, take the camera away from the fluorescent lighting.
51
Feature Guide
The Feature guide is a simple description of the respective function or
option. It is displayed when you change the shooting mode or use the
Quick Control screen to set a shooting function, in Live View shooting,
movie shooting, or during playback. When you select a function or
option on the Quick Control screen, the Feature guide description is
displayed. The Feature guide turns off when you tap the description or
proceed with the operation.
Shooting mode (Sample)
Quick Control (Sample)
Shooting functions
Live View shooting
Playback
3 Disabling the Feature Guide
Select [Feature guide].
Under the [53] tab, select [Feature
guide], then press <0>. Select
[Disable], then press <0>.
52
d Touch Screen Operations
The LCD monitor is a touch-sensitive panel that you can operate with
your fingers.
Tap
Quick Control (Sample display)
Use your finger to tap (touch and let
go) the LCD monitor.
By tapping, you can select menus,
icons, etc., displayed on the LCD
monitor.
Icons that you can tap are displayed
in a frame (excluding the menu
screen).
For example, when you tap [Q], the
Quick Control screen appears. By
tapping [2], you can return to the
preceding screen.
Operations possible by tapping the screen
Setting menu functions after pressing the <M> button
Quick Control
Setting functions after pressing the <i>, <S>, <WB>,
<XA>, <Yi/Q>, or <Zf> button
Setting functions during Live View shooting
Setting functions during movie shooting
Playback operations
53
d Touch Screen Operations
Drag
Menu screen (Sample display)
Slide your finger while touching the
LCD monitor.
Scale display (Sample display)
Operations possible by dragging your finger on the screen
Selecting a menu tab or item after pressing the <M> button
Setting a scale control
Setting functions during Live View shooting
Setting functions during movie shooting
Playback operations (swipe)
3 Silencing the Beep during Touch Operations
If [z1: Beep] is set to [Touch to
beep will not sound during touch
operations.
54
], the
d Touch Screen Operations
3 Touch Control Settings
1
Select [Touch control].
Under the [53] tab, select [Touch
control], then press <0>.
the Touch control.
2 SetSelect
[Enable].
Setting it to [Disable] will disable
touch operations.
Cautions for Touch Screen Operations
Since the LCD monitor is not pressure sensitive, do not use any sharp
objects such as your fingernail, ballpoint pens, etc., for touch operations.
Do not use wet fingers for touch screen operations.
If the LCD monitor has any moisture or if your fingers are wet, the touch
screen may not respond or misoperation may occur. In such a case, turn
off the power and wipe the LCD monitor with a cloth.
Do not attach any protective sheet (commercially available) or sticker on
the LCD monitor. It may make the touch operation response slow.
55
2
Basic Shooting and
Image Playback
This chapter explains how to use the Basic Zone modes
on the Mode Dial for best results and how to play back
images.
With Basic Zone modes, all you do is point and shoot while the
camera sets everything automatically (p.76, 314). Also, to
prevent botched pictures due to mistaken operations, the main
shooting settings cannot be changed.
Basic
Zo
ne
If you set the Mode Dial to <8> while the LCD monitor is off,
press the <Q> button to check the shooting mode before shooting
(p.71).
57
A Fully Automatic Shooting (Scene Intelligent Auto)
<A> is a fully automatic mode. The camera analyzes the scene
and sets the optimum settings automatically. It also adjusts focus
automatically by detecting whether the subject is still or moving (p.61).
1
AF point
Set the Mode Dial to <A>.
any AF point over the
2 Aim
subject.
All the AF points will be used to focus,
and generally the closest object will
be focused.
Aiming the center AF point over the
subject will make focusing easier.
the subject.
3 Focus
Press the shutter button halfway, and
the lens focusing ring will rotate to
focus.
X The dot inside the AF point achieving
focus flashes briefly in red. At the
same time, the beeper will sound and
the focus confirmation light <o> in
the viewfinder will light up.
X If necessary, the built-in flash will be
raised automatically.
Focus confirmation light
58
A Fully Automatic Shooting (Scene Intelligent Auto)
the picture.
4 TakePress
the shutter button completely to
take the picture.
X The captured image will be displayed
for 2 sec. on the LCD monitor.
After taking the picture, retract the
built-in flash by pushing it down with
your fingers.
The <A> mode makes the colors look more impressive in nature, outdoor,
and sunset scenes. If the desired color tone is not obtained, use a Creative
Zone mode and select a Picture Style other than <D> and shoot (p.95).
FAQ
The focus confirmation light <o> blinks and focus is not
achieved.
Aim the AF point over an area having good contrast, then press the
shutter button halfway (p.43). If you are too close to the subject,
move away and try again.
Multiple AF points flash simultaneously.
This indicates that focus is achieved at all those AF points. When the
AF point covering the desired subject flashes, take the picture.
The beeper continues to beep softly. (The focus confirmation
light <o> does not light up.)
It indicates that the camera is focusing continuously on a moving
subject. (The focus confirmation light <o> does not light up.) You
can take sharp pictures of a moving subject.
Note that focus lock (p.61) will not work in this case.
Pressing the shutter button halfway does not focus the subject.
If the focus mode switch on the lens is set to <MF> (manual focus),
set it to <AF> (autofocus).
59
A Fully Automatic Shooting (Scene Intelligent Auto)
The flash was raised even though it was daylight.
For a backlit subject, the flash may pop up to help lighten the
subject’s dark areas. If you do not want the flash to fire, set it to
Flash Off (p.63). Except for the flash setting, the settings will be the
same as in <A>.
The flash fired and the picture came out extremely bright.
Move farther from the subject and shoot. When shooting flash
photography, if the subject is too close to the camera, the picture
may come out extremely bright (overexposure).
In low light, the built-in flash fired a series of flashes.
Pressing the shutter button halfway may trigger the built-in flash to
fire a series of flashes to assist autofocusing. This is called AF-assist
beam. Its effective range is approx. 4 meters/13.1 feet.
When flash was used, the bottom part of the picture came out
unnaturally dark.
You were too close to the subject and the lens barrel created a
shadow. Move further away from the subject. If a hood is attached to
the lens, remove it before taking the flash picture.
60
A Full Auto Techniques (Scene Intelligent Auto)
Recomposing the Shot
Depending on the scene, position the subject toward the left or right to
create a balanced background and good perspective.
In the <A> mode, while you press the shutter button halfway to focus
a still subject, the focus will be locked. You can then recompose the
shot and press the shutter button completely to take the picture. This is
called “focus lock”. Focus lock is also possible in other Basic Zone
modes (except <5> ).
Shooting a Moving Subject
In the <A> mode, if the subject moves (distance to camera changes)
while or after you focus, AI Servo AF will take effect to focus the subject
continuously. (The beeper will continue beeping softly.) As long as you
keep aiming the AF point on the subject while pressing the shutter
button halfway, the focusing will be continuous. When you want to take
the picture, press the shutter button completely.
61
A Full Auto Techniques (Scene Intelligent Auto)
A Live View Shooting
You can shoot while viewing the image on the LCD monitor. This is
called “Live View shooting”. For details, see page 145.
1
Display the Live View image on
the LCD monitor.
Press the <A> button.
X The Live View image will appear on
the LCD monitor.
the subject.
2 Focus
Press the shutter button halfway to
focus.
X When focus is achieved, the AF point
will turn green and the beeper will
sound.
the picture.
3 TakePress
the shutter button completely.
X The picture will be taken and the
captured image is displayed on the
LCD monitor.
X After the image review ends, the
camera will return to Live View
shooting automatically.
Press the <A> button to end the
Live View shooting.
You can also rotate the LCD monitor in different directions (p.33).
Normal angle
62
Low angle
High angle
7 Disabling Flash
The camera analyzes the scene and sets the optimum settings
automatically. In places where flash photography is prohibited, use the
<7> (Flash Off) mode. This mode is also effective for capturing the
particular ambience of a scene, such as candlelight scenes.
Shooting Tips
Prevent camera shake if the numeric display in the viewfinder
blinks.
Under low light when camera shake is prone to occur, the
viewfinder’s shutter speed display will blink. Hold the camera steady
or use a tripod. When using a zoom lens, use the wide-angle end to
reduce blur caused by camera shake.
Take portraits without flash.
In low-light conditions, tell the subject to keep still until the picture is
taken. If the person moves during the exposure, he or she may look
blurred in the picture.
63
C Creative Auto Shooting
In the <C> mode, you can easily change the depth of field, drive
mode, and flash firing. You can also choose the ambience you want to
convey in your images. The default settings are the same as the <A>
mode.
* CA stands for Creative Auto.
1
Set the Mode Dial to <C>.
the <Q> button. (7)
2 Press
X The Quick Control screen will appear.
the desired function.
3 SetPress
the <S> key to select the
function to be set.
X The selected function and Feature
guide (p.52) will appear.
For setting procedure and details on
each function, see pages 65-66.
the picture.
4 TakePress
the shutter button completely to
take the picture.
64
C Creative Auto Shooting
Shutter speed
Aperture
ISO speed
(1)
(2)
(3)
Battery check
(4)
Possible shots
Image-recording quality
Pressing the <Q> button enables you to set the following:
(1) Ambience-based shots
You can choose the ambience you want to convey in your images.
Turn the <6> dial to select the desired ambience. You can also
select it from a list by pressing <0>. For details, see page 77.
(2) Blurring/sharpening the background
If you move the index mark toward the left, the background will look
more blurred. If you move it toward the right, the background will
look more in focus. If you want to blur the background, see “Shooting
Portraits” on page 67. Press the <U> key or turn the <6> dial to
select the desired ambience.
Depending on the lens and shooting conditions, the background
may not look so blurred. This function cannot be set (grayed out)
while the built-in flash is raised in the <a> or <D> mode. If flash is
used, this setting will not be applied.
65
C Creative Auto Shooting
(3) Drive mode: Turn the <6> dial to set it as desired. You can also
select it from a list by pressing <0>.
<u> Single shooting:
Shoot one image at a time.
<i> Continuous shooting:
While you hold down the shutter button completely,
shots will be taken continuously. You can shoot up to
approx. 5 shots per sec.
<Q> Self-timer: 10sec./remote:
The picture is taken 10 seconds after you press the
shutter button. A remote controller can also be used.
<l>Self-timer: 2sec.:
The picture is taken 2 seconds after you press the
shutter button.
<q>Self-timer: Continuous:
Press the <V> key to set the number of multiple
shots (2 to 10) to be taken with the self-timer. 10
seconds after you press the shutter button, the set
number of multiple shots will be taken.
(4) Flash firing: Turn the <6> dial to set it as desired. You can also
select it from a list by pressing <0>.
<a> Auto flash : The flash fires automatically when necessary.
<I> Flash on : The flash fires at all times.
<b> Flash off : The flash is disabled.
If you use an external Speedlite, [Flash firing] cannot be set.
When using the self-timer, see the
notes on page 106.
When using <b>, see “Disabling Flash” on page 63.
66
2 Shooting Portraits
The <2> (Portrait) mode blurs the background to make the human
subject stand out. It also makes skin tones and the hair look softer.
Shooting Tips
The further the distance between the subject and background,
the better.
The further the distance between the subject and background, the
more blurred the background will look. The subject will also stand
out better in front of a plain, dark background.
Use a telephoto lens.
If you have a zoom lens, use the telephoto end to fill the frame with
the subject from the waist up. Move in closer if necessary.
Focus the face.
Check that the AF point covering the face flashes in red. For closeups of the face, focus the eyes.
The default setting is <i> (Continuous shooting). If you hold down the
shutter button, you can shoot continuously to obtain different poses and
facial expressions (max. approx. 5 shots/sec.).
If necessary, the built-in flash will fire automatically.
67
3 Shooting Landscapes
Use the <3> (Landscape) mode for wide scenery or to have
everything in focus from near to far. For vivid blues and greens, and
very sharp and crisp images.
Shooting Tips
With a zoom lens, use the wide-angle end.
When using the wide-angle end of a zoom lens, objects near and far
will be in focus better than at the telephoto end. It also adds breadth
to landscapes.
Shooting night scenes.
Since the built-in flash will be disabled, this mode <3> is also good
for night scenes.
When shooting night scenes, use a tripod to prevent camera shake.
The built-in flash will not fire even in backlit or low-light conditions.
68
4 Shooting Close-ups
When you want to photograph flowers or small things up close, use the
<4> (Close-up) mode. To make small things appear much larger, use a
macro lens (sold separately).
Shooting Tips
Use a simple background.
A simple background makes the flower, etc., stand out better.
Move as close as possible to the subject.
Check the lens for its minimum focusing distance. Some lenses
have indications such as <40.25m/0.8ft>. The lens minimum
focusing distance is measured from the <V> (focal plane) mark on
the top of the camera to the subject. If you are too close to the
subject, the focus confirmation light <o> will blink.
Under low light, the built-in flash will fire. If you are too close to the
subject and the bottom of the picture looks dark, move away from
the subject.
With a zoom lens, use the telephoto end.
If you have a zoom lens, using the telephoto end will make the
subject look larger.
69
5 Shooting Moving Subjects
To photograph a moving subject, whether it is a child running or a
moving vehicle, use the <5> (Sports) mode.
Shooting Tips
Use a telephoto lens.
Using a telephoto lens is recommended so you can shoot from afar.
Use the center AF point to focus.
Aim the center AF point over the subject, then press the shutter
button halfway to autofocus. During autofocusing, the beeper will
continue beeping softly. If focus cannot be achieved, the focus
confirmation light <o> will blink.
The default setting is <i> (Continuous shooting). When you want
to take the picture, press the shutter button completely. If you hold
down the shutter button, continuous shooting (max. approx. 5 shots
per sec.) and autofocusing will take effect to capture the movement
of the subject.
Under low light when camera shake is prone to occur, the viewfinder’s
shutter speed display on the bottom left will blink. Hold the camera steady
and shoot.
70
8: Special Scene Mode
Select “Night Portrait”, “Handheld Night Scene”, or “HDR Backlight
Control” shooting mode. The camera sets everything to suit the
selected shooting mode.
1
Set the Mode Dial to <8>.
the <Q> button. (7)
2 Press
X The Quick Control screen will appear.
the shooting mode.
3 Select
Press the <V> or <U> key to
select the shooting mode icon.
Turn the <6> dial to select a
shooting mode.
You can also select the shooting
mode icon and press <0> to display
a selection of shooting modes from
which you can select one.
Available Shooting Modes in the <8> Mode
Shooting Mode
6
Night Portrait
Page
p.72
F
Handheld Night Scene
p.73
G
HDR Backlight Control
p.74
71
6 Shooting Night Portraits (With a Tripod)
To shoot people at night and obtain a natural-looking night scene in the
background, use the <6> (Night Portrait) mode.
Shooting Tips
Use a wide-angle lens and a tripod.
When using a zoom lens, use the wide-angle end to obtain a wide
night view. Also, use a tripod to prevent camera shake.
Check the subject’s brightness.
Under low light, the built-in flash will fire automatically to obtain a
good exposure of the subject. You should then play back the image
to check the image brightness. If the subject looks dark, move
nearer and shoot again.
Also shoot in another shooting mode.
Since camera shake is prone to occur with night shots, shooting also
with <A> and <F> is recommended.
Tell the subject to keep still even after the flash fires.
If you use the self-timer together with flash, the self-timer lamp will light
up briefly after the picture is taken.
See the caution on page 75.
72
F Shooting Night Scenes Handheld
Normally, a tripod is necessary to steady your camera when shooting a
night scene. However, with the <F> (Handheld Night Scene) mode,
you can shoot night scenes while handholding the camera. Four shots
are taken continuously for each picture, and the resulting image with
reduced camera shake is recorded.
Shooting Tips
Hold the camera firmly.
While shooting, hold the camera firmly and steadily. In this mode,
four shots are aligned and merged into a single image. However, if
there is significant misalignment in any of the four shots due to
camera shake, they may not align properly in the final image.
For shots of people, turn on the flash.
If you want to include people in a night scene shot, press the <Q>
button to set <D> (Flash on).
To take a nice portrait, the first shot will use flash. Tell the person not
to move until all four continuous shots are taken.
See the cautions on page 75.
73
G Shooting Backlit Scenes
When shooting a scene having both bright and dark areas, use the
<G> (HDR Backlight Control) mode. When you take one picture in this
mode, three continuous shots are taken at different exposures. This
results in one image, with a wide tonal range, that has minimized the
blocked-up shadows caused by backlighting.
* HDR stands for High Dynamic Range.
Shooting Tips
Hold the camera firmly.
While shooting, hold the camera firmly and steadily. In this mode,
three shots are aligned and merged into a single image. However, if
there is significant misalignment in any of the three shots due to
camera shake, they may not align properly in the final image.
Flash cannot be used. In low light, the AF-assist beam will be emitted
(p.101).
See the cautions on page 75.
74
Caution for <6> (Night Portrait) and <F> (Handheld Night Scene)
During Live View shooting, it may be difficult to focus dots of light such as
in a night scene. In such a case, you should set the AF method to [Quick
mode] and shoot. If it is still difficult to focus, set the lens’ focus mode
switch to [MF] and focus manually.
Cautions for <F> (Handheld Night Scene)
When shooting flash photography, if the subject is too close to the
camera, the picture may come out extremely bright (overexposure).
If you use flash to shoot a night scene with few lights, the shots may not
align correctly. This can result in a blurry photo.
If you use flash and the human subject is close to the background which
is also illuminated by the flash, the shots may not align correctly. This
can result in a blurry photo. Unnatural shadows and unsuitable colors
may also appear.
Shooting with an external Speedlite
• When using a Speedlite with automatic flash coverage setting, the zoom
position will be fixed to the wide end, regardless of the lens’ zoom position.
• When using a Speedlite with manual flash coverage switch, shoot with
the flash head retracted to the wide (normal) position.
Cautions for <G> (HDR Backlight Control)
Note that the image may not be rendered with a smooth gradation and
may look irregular or have significant noise.
HDR Backlight Control may not be effective for excessively backlit
scenes or extremely high-contrast scenes.
Cautions for <F> (Handheld Night Scene) and <G> (HDR Backlight
Control)
Compared with other shooting modes, the shooting area will be smaller.
1+73 or 1 cannot be selected. Even if 1+73 or 1 has been
set for another shooting mode, the picture will be recorded in 73.
If you shoot a moving subject, the subject’s movement may leave
afterimages or the surrounding area of the subject may become dark.
The image alignment may not function properly with repetitive patterns
(lattice, stripes, etc.), flat or single-tone images, or greatly misaligned
shots caused by camera shake.
Compared to normal shooting, recording the image to the card will take
longer. During the processing of the images, “BUSY” will be displayed
and you cannot take another picture until the processing is completed.
If the shooting mode is set to <F> or <G>, direct printing (p.280) is not
possible.
75
Q Quick Control
In Basic Zone modes when the shooting
settings screen is displayed, you can
press the <Q> button to display the
Quick Control screen. The table below
indicates the functions that can be set
with the Quick Control screen in each
Basic Zone mode.
Example: Portrait mode
1 Set the Mode Dial to a Basic Zone mode.
2Press the <Q> button. (7)
X The Quick Control screen will appear.
3 Set the function.
Press the <S> key to select a function. (This step is not
necessary in the <A> and <7> modes.)
X The selected function and Feature guide (p.52) will appear.
Press the <U> key or turn the <6> dial to change the setting.
Settable Functions in Basic Zone Modes
o:
Default setting k: User selectable
Function
u: Single shooting
i: Continuous shooting
Drive
Q
mode Self-timer
l
(p.106)
q
a: Automatic firing
Flash
D: Flash on (Fires at all times)
firing
b: Flash off
Ambience-based shots (p.77)
A 7 C
2
3
4
5
o
k
k
k
k
o
k
o
k
k
k
o
o
k
k
k
k
o
k
k
k
k
o
k
o
k
k
k
o
k
k
k
k
o
o
k
k
k
k
o
k
k
k
Light/scene-based shots (p.81)
Blurring/sharpening the background (p.65)
: Not selectable
k
k
o
k
k
k
k
o
k
k
6
o
k
k
k
k
o
k
8
F
o
k
k
k
k
k
o
k
G
o
k
k
k
k
o
k
* If you change the shooting mode or set the power switch to <2>, it will revert
to the default settings (except the self-timer).
76
Shoot by Ambience Selection
Except in the <A>, <7>, and <G> Basic Zone modes, you can
select the ambience for shooting.
Standard setting
k
k
k
k
k
8
6 F
k k
Vivid
k
k
k
k
k
k
k Low / Standard / Strong
Soft
k
k
k
k
k
k
k Low / Standard / Strong
Warm
k
k
k
k
k
k
k Low / Standard / Strong
Intense
k
k
k
k
k
k
k Low / Standard / Strong
Cool
k
k
k
k
k
k
k Low / Standard / Strong
Brighter
k
k
k
k
k
k
k Low / Medium / High
Darker
k
k
k
k
k
k
k Low / Medium / High
Monochrome
k
k
k
k
k
k
k Blue / B/W / Sepia
1
Set the Mode Dial to any of the
following modes: <C>, <2>,
<3>, <4>, <5>, or <8>.
Ambience
C 2 3 4 5
Ambience Effect
No setting
If the shooting mode is <8>, set
one of the following: <F> or <6>.
the Live View image.
2 Display
Press the <A> button to display the
Live View image.
X You can check the ambience effect
on the screen.
the Quick Control screen,
3 On
select the desired ambience.
Press the <Q> button (7).
Press the <V> key to select [
Standard setting]. [Ambiencebased shots] will appear on the
screen.
77
Shoot by Ambience Selection
Press the <U> key or turn the
<6> dial to select the desired
ambience.
X The LCD monitor will display how the
image will look with the selected
ambience.
the ambience effect.
4 SetPress
the <V> key to select the
effect bar so that [Effect] appears at
the bottom.
Press the <U> key or turn the
<6> dial to select the desired effect.
the picture.
5 TakePress
the shutter button completely to
take the picture.
To shoot through the viewfinder, first
press the <A> button to exit Live
View shooting. Then press the shutter
button completely to take the picture.
If you change the shooting mode or
set the power switch to <2>, the
setting will revert back to
[
Standard setting].
The Live View image shown with the ambience setting applied will not
look exactly the same as the actual photo taken.
Using flash may minimize the ambience effect.
In bright outdoors, the Live View image you see on the screen may not
have exactly the same brightness or ambience as the actual photo. Set
[52: LCD brightness] to 4 and look at the image while the screen is
unaffected by stray light.
If you do not want the Live View image to be displayed when setting
functions, press the <Q> button after step 1. Then you can set [Ambiencebased shots] and [Effect] on the Quick Control screen.
78
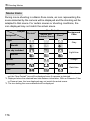
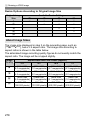
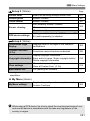
Shoot by Ambience Selection
Ambience Settings
Standard setting
Standard image characteristics for the respective shooting mode.
Note that <2> has image characteristics geared for portraits and
<3> is geared for landscapes. Each ambience is a modification of
the respective shooting mode’s image characteristics.
Vivid
The subject will look sharp and vivid. It makes the photo look more
impressive than with [
Standard setting].
Soft
The subject will look softer and more dainty. Good for portraits, pets,
flowers, etc.
Warm
The subject will look softer with warmer colors. Good for portraits,
pets, and other subjects to which you want to give a warm look.
Intense
While the overall brightness is slightly lowered, the subject is
emphasized for a more intense feeling. Makes the human or living
subject stand out more.
Cool
The overall brightness is slightly lowered with a cooler color cast. A
subject in the shade will look more calm and impressive.
79
Shoot by Ambience Selection
Brighter
The picture will look brighter.
Darker
The picture will look darker.
Monochrome
The picture will be monochrome. You can select the monochrome
color to be black and white, sepia, or blue. When [Monochrome] is
selected, <0> will appear in the viewfinder.
80
Shoot by Lighting or Scene Type
In the <2>, <3>, <4>, and <5> Basic Zone modes, you can shoot
while the settings match the lighting or scene type. Normally,
[
Default setting] is adequate, but if the settings match the lighting
condition or scene, the picture will look more accurate to your eye.
For Live View shooting, if you set both [Light/scene-based shots] and
[Ambience-based shots] (p.77), you should first set [Light/scenebased shots]. This will make it easier to see the resulting effect on the
LCD monitor.
Lighting or Scene 2
3
4 5
Default setting
k
k
k
k
Daylight
k
k
k
k
Shade
k
k
k
k
Cloudy
k
k
k
k
Tungsten light
k
k
k
Fluorescent light
k
k
k
Sunset
k
k
k
k
1
Set the Mode Dial to any of the
following modes: <2>, <3>,
<4> or <5>.
the Live View image.
2 Display
Press the <A> button to display the
Live View image.
X You can check the resulting effect on
the screen.
81
Shoot by Lighting or Scene Type
the Quick Control screen,
3 On
select the lighting or scene type.
Press the <Q> button (7).
Press the <V> key to select [
Default setting]. [Light/scenebased shots] will appear on the
screen.
Press the <U> key or turn the
<6> dial to select the desired
lighting or scene type.
X The resulting image with the selected
lighting or scene type will be
displayed.
the picture.
4 TakePress
the shutter button completely to
take the picture.
To shoot through the viewfinder, first
press the <A> button to exit Live
View shooting. Then press the shutter
button completely to take the picture.
If you change the shooting mode or
set the power switch to <2>, the
setting will revert back to [
Default
setting].
If you use flash, the setting will switch to [
Default setting]. (However,
the shooting information will display the lighting or scene type that was set.)
If you want to set this together with [Ambience-based shots], set the
[Light/scene-based shots] that best matches the ambience you have
set. In the case of [Sunset] for example, warm colors will become
prominent so the ambience you set may not work well.
If you do not want the Live View image to be displayed when setting
functions, press the <Q> button after step 1. Then you can set [Light/
scene-based shots] on the Quick Control screen.
82
Shoot by Lighting or Scene Type
Lighting or Scene Type Settings
Default setting
Default setting suited for most subjects.
Daylight
For subjects under sunlight. Gives more natural-looking blue skies
and greenery, and reproduces light-colored flowers better.
Shade
For subjects in the shade. Suitable for skin tones, which may look
too bluish, and for light-colored flowers.
Cloudy
For subjects under overcast skies. Makes skin tones and
landscapes, which may otherwise look dull on a cloudy day, look
warmer. Also effective for light-colored flowers.
Tungsten light
For subjects lit under tungsten lighting. Reduces the reddish-orange
color cast caused by tungsten lighting.
Fluorescent light
For subjects under fluorescent lighting. Suited for all types of
fluorescent lighting.
Sunset
Suitable when you want to capture the sunset’s impressive colors.
83
x Image Playback
The easiest way to play back images is explained below. For more
details on the playback procedure, see page 241.
1
Play back the image.
Press the <x> button.
X The last captured image or last image
viewed will appear.
an image.
2 Select
To view images starting with the last
image, press the <Y> key. To view
images starting with the first (oldest)
image, press the <Z> key.
Each time you press the <B>
button, the display format will change.
No information
With basic information
Histogram
Shooting information display
the image playback.
3 ExitPress
the <x> button to exit the
image playback and return to the
shooting settings display.
84
3
Creative Shooting
In Basic Zone modes, to prevent spoiled shots,
advanced function settings cannot be changed.
However, in the <d> (Program AE) mode, you can set
various functions and be more creative.
In the <d> mode, the camera sets the shutter speed and
aperture automatically to obtain a standard exposure.
The difference between the Basic Zone modes and <d> is
explained on page 314.
The functions explained in this chapter can also be used in
the <s>, <f>, and <a> modes explained in Chapter
4.
The M mark shown on the right of the page title indicates
that the function is available only in Creative Zone modes
(p.24).
* <d> stands for Program.
* AE stands for Auto Exposure.
85
d: Program AE
The camera automatically sets the shutter speed and aperture to suit
the subject’s brightness. This is called Program AE.
1
Set the Mode Dial to <d>.
the subject.
2 Focus
Look through the viewfinder and aim
the selected AF point over the
subject. Then press the shutter button
halfway.
X The dot inside the AF point achieving
focus lights up briefly in red, and the
focus confirmation light <o> on the
viewfinder’s bottom right lights up (in
One-Shot AF mode).
X The shutter speed and aperture will
be set automatically and displayed in
the viewfinder.
the display.
3 Check
A standard exposure will be obtained
as long as the shutter speed and
aperture display do not blink.
the picture.
4 TakeCompose
the shot and press the
shutter button completely.
86
d: Program AE
Shooting Tips
Change the ISO speed or use the built-in flash.
To match the subject and ambient lighting level, you can change the
ISO speed (p.92) or use the built-in flash (p.107). In the <d> mode,
the built-in flash will not fire automatically. So under low light, press
the <I> (flash) button to raise the built-in flash.
The program can be shifted. (Program shift)
After pressing the shutter button halfway, turn the <6> dial to
change the shutter speed and aperture setting combination
(program). Program shift is canceled automatically after the picture
is taken. Program shift is not possible with flash.
If the “30"” shutter speed and the maximum aperture
blink, it indicates underexposure. Increase the ISO
speed or use flash.
If the “4000” shutter speed and the minimum aperture
blink, it indicates overexposure. Decrease the ISO
speed.
Differences Between <d> and <A> (Scene Intelligent Auto)
In the <A> mode, many functions such as the AF operation and metering
mode are set automatically to prevent spoiled shots. The functions you can
change are limited. Whereas in the <d> mode, only the shutter speed and
aperture are set automatically. You can freely set the AF operation, metering
mode, and other functions (p.314).
87
3 Setting the Image-Recording Quality
You can select the pixel count and the image quality. Ten imagerecording quality settings are provided: 73, 83, 74, 84, 7a,
8a, b, c, 1+73, 1.
1
Pixels recorded (pixel count)
Possible shots
Select [Image quality].
Under the [z1] tab, select [Image
quality], then press <0>.
X [Image quality] will appear.
the image-recording
2 Select
quality.
The respective quality’s pixel count
and number of possible shots will be
displayed to help you select the
desired quality. Then press <0>.
88
3 Setting the Image-Recording Quality
Guide to Image-recording Quality Settings (Approx.)
Pixels Recorded
(megapixels)
File Size
(MB)
High
quality
Approx. 17.9
(18M)
6.4
1140
22 (30)
3.2
2240
2240 (2240)
Medium
quality
Approx. 8.0
(8M)
3.4
2150
410 (2150)
1.7
4200
4200 (4200)
Image Quality
73
83
74
84
7a
JPEG
8a
b
Low
quality
c
1+73
1
High
quality
Possible
Shots
Maximum
Burst
2.2
3350
3350 (3350)
1.1
6360
6360 (6360)
Approx. 2.5
(2.5M)
1.3
5570
5570 (5570)
Approx. 0.35
(0.35M)
0.3
21560
21560 (21560)
23.5+6.4
230
3 (3)
23.5
290
6 (6)
Approx. 4.5
(4.5M)
Approx. 17.9
(18M)
* Figures for the file size, number of possible shots, and maximum burst are based on
Canon’s 8 GB test card and testing standards (3:2 aspect ratio, ISO 100, and Standard
Picture Style). These figures will vary depending on the subject, card brand,
aspect ratio, ISO speed, Picture Style, Custom Functions, and other settings.
* Figures in parentheses apply to an UHS-I compatible 8 GB card based on Canon’s
testing standards.
89
3 Setting the Image-Recording Quality
FAQ
I want to select the image-recording quality matching the paper
size for printing.
Refer to the diagram on the left when
Paper size
choosing the image-recording quality. If
A2 (59.4x42cm/23.4x16.5in.)
you want to crop the image, selecting a
73
higher quality (more pixels) such as 73,
83
A3(42x29.7cm/
83, 1+73, or 1 is recommended.
16.5x11.7in.) 1+73
1
b is suitable for playing the images on a
74
84
7a
digital photo frame. c is suitable for
8a
b
emailing the image or using it on a Web
A4 (29.7x21cm/11.7x8.3in.) site.
12.7x8.9cm/5.0x3.5in.
What’s the difference between 7 (Fine) and 8 (Normal)?
It indicates a different image quality due to a different compression
rate. Even with the same number of pixels, the 7 image has higher
image quality. If 8 is selected, the image quality will be slightly lower,
but more images can be saved to the card. Both b and c have 7
quality.
I was able to take more shots than the number of possible shots
indicated.
Depending on the shooting conditions, you may be able to take
more shots than was indicated. It may also be fewer than indicated.
The number of possible shots displayed is only approximate.
Does the camera display the maximum burst?
The maximum burst is displayed in the viewfinder’s right side. Since
it is only a single-digit indicator 0 - 9, any number higher than 9 will
be displayed only as “9”. Note that this number will also be displayed
even when no card is installed in the camera. Be careful not to shoot
without a card in the camera.
When should I use 1?
1 images require processing with your computer. For details, see
“About 1” and “About 1+73” on the next page.
90
3 Setting the Image-Recording Quality
About 1
1 is the raw image data before it is made into 73 or other images.
Although 1 images require software such as Digital Photo
Professional (provided, p.364) so that they can be displayed on the
computer, they also offer flexibility for image adjustments possible only
with 1. 1 is effective when you want to precisely adjust the image
yourself or shoot an important subject.
About 1+73
1+73 records both a 1 and 73 image with a single shot. The
two images are saved to the card simultaneously. The two images will
be saved in the same folder with the same file numbers (file extension
.JPG for JPEG and .CR2 for RAW). 73 images can be viewed or
printed even with a computer that does not have the software provided
with the camera installed.
1 image
0001 . CR2
73 image
0001 . JPG
File number
File extension
To display 1 images on a computer, using the provided software is
recommended (p.364).
Commercially-available software may not be able to display 1 images
taken with this camera. To see if the 1 images are compatible with
other software, check with the respective software manufacturer.
91
i: Changing the ISO SpeedN
Set the ISO speed (image sensor’s sensitivity to light) to suit the
ambient light level. In Basic Zone modes, the ISO speed is set
automatically (p.93).
1
Press the <i> button. (9)
X [ISO speed] will appear.
the ISO speed.
2 SetPress
the <U> key or turn the
<6> dial to select the desired ISO
speed, then press <0>.
You can also set the ISO speed in the
viewfinder while turning the <6>
dial.
With [AUTO] selected, the ISO speed
will be set automatically (p.93).
ISO Speed Guide
ISO Speed
100 - 400
400 - 1600
1600 - 12800, H
Shooting Situation
(No flash)
Flash Range
Sunny outdoors
The higher the ISO speed,
Overcast skies or evening time the farther the flash range
will extend (p.107).
Dark indoors or night
* High ISO speeds will result in grainier images.
Under [54: Custom Functions (C.Fn)], if [2: ISO expansion] is set to [1:
On], “H” (equivalent to ISO 25600) can also be set (p.298).
Under [54: Custom Functions (C.Fn)], if [3: Highlight tone priority] is
set to [1: Enable], ISO 100 and “H” (equivalent to ISO 25600) cannot be
selected (p.299).
Shooting in high temperatures may result in images that look grainier.
Long exposures can also cause irregular colors in the image.
92
i: Changing the ISO SpeedN
When you shoot at high ISO speeds, noise (such as dots of light and
banding) may become noticeable.
If you use a high ISO speed and flash to shoot a close subject,
overexposure may result.
With ISO 12800 or “H” (equivalent to ISO 25600), the maximum burst for
continuous shooting will greatly decrease.
As “H” (equivalent to ISO 25600) is an expanded ISO speed setting,
noise (such as dots of light and banding) and irregular colors will be more
noticeable, and the resolution will be lower than usual.
As the maximum ISO speed that can be set differs between still photo
shooting and movie shooting (manual exposure), the ISO speed you set
may change when you switch from still photo shooting to movie shooting.
Even if you switch back to still photo shooting, the ISO speed will not
revert to the original setting.
The maximum ISO speed settable varies depending on the setting for [2:
ISO expansion] under [54: Custom Functions (C.Fn)].
• When [0: Off] is set: If you set ISO 12800 during still photo shooting
and then switch to movie shooting, ISO speed will be changed to ISO
6400.
• When [1: On] is set: If you set ISO 12800 or “H” (equivalent to ISO
25600) during still photo shooting and then switch to movie shooting,
the ISO speed will change to “H” (equivalent to ISO 12800).
ISO [AUTO]
If the ISO speed is set to [AUTO], the
actual ISO speed to be set will be
displayed when you press the shutter
button halfway. As indicated on the next
page, the ISO speed will be set
automatically to suit the shooting mode.
93
i: Changing the ISO SpeedN
Shooting Mode
ISO Speed Setting
A / 7 / C / 3/ 4 / 5 / 6 / G
Automatically set within ISO 100 - ISO 6400
2
ISO 100
F
Automatically set within ISO 100 - ISO 12800
d/ s/ f/ a*1
Automatically set within ISO 100 - ISO 6400*2
With flash
ISO 400*3*4*5
*1: Fixed at ISO 400 for bulb exposures.
*2: Depends on the maximum ISO speed limit set.
*3: If fill flash results in overexposure, ISO 100 or a higher ISO speed will be set.
*4: Except in the A, 6, and F modes.
*5: Automatically set within ISO 400 - ISO 1600 (or up to the maximum limit) in the
C, 2, 3, 4, 5 and <d> modes if you use bounce flash with an external
Speedlite.
When [AUTO] is set, the ISO speed is indicated in whole-stop
increments. However, the ISO speed is actually set in finer increments.
Therefore, in the image’s shooting information (p.270), you may find an
ISO speed such as 125 or 640 displayed as the ISO speed.
In the <2> mode, the ISO speed shown in the table is actually used
even if ISO 100 is not displayed.
3 Setting the Maximum ISO Speed for [ISO Auto]N
For ISO Auto, you can set the maximum ISO speed limit within ISO 400
- ISO 6400.
Under the [z3] tab, select [ISO Auto],
then press <0>. Select the ISO speed,
then press <0>.
94
A Optimal Image Characteristics for the SubjectN
By selecting a Picture Style, you can obtain image characteristics
matching your photographic expression or the subject.
In Basic Zone modes, you cannot select the Picture Style.
1
Press the <XA> button.
X [Picture Style] will appear.
a Picture Style.
2 Select
Press the <U> key or turn the
<6> dial to select the desired
Picture Style, then press <0>.
Picture Style Characteristics
D Auto
The color tone will be adjusted to suit the scene. The colors will
look vivid, especially for blue skies, greenery, and sunsets in
nature, outdoor, and sunset scenes.
If the desired color tone is not obtained with [Auto], use another Picture
Style.
P Standard
The image looks vivid, sharp, and crisp. This is a general-purpose
Picture Style suitable for most scenes.
Q Portrait
For nice skin tones. The image looks softer. Suited for close-up
portraits.
By changing the [Color tone] (p.133), you can adjust the skin
tone.
95
A Optimal Image Characteristics for the SubjectN
R Landscape
For vivid blues and greens, and very sharp and crisp images.
Effective for impressive landscapes.
S Neutral
This Picture Style is for users who prefer to process images with
their computer. For natural colors and subdued images.
U Faithful
This Picture Style is for users who prefer to process images with
their computer. When the subject is captured under a color
temperature of 5200K, the color is adjusted colorimetrically to
match the subject’s color. Images will appear dull and subdued.
V Monochrome
Creates black-and-white images.
Black-and-white images shot in formats other than 1 cannot be
reverted to color. If you want to later shoot pictures in color, make sure
the [Monochrome] setting has been canceled. When [Monochrome] is
selected, <0> will appear in the viewfinder.
W User Def. 1-3
You can register a basic style such as [Portrait], [Landscape], a
Picture Style file, etc., and adjust it as desired (p.135). Any User
Defined Picture Style that has not been set will have the same
default settings as the [Auto] Picture Style.
96
f: Changing the Autofocus OperationN
You can select the AF (autofocus) operation characteristics suiting the
shooting conditions or subject. In Basic Zone modes, the optimum AF
operation is set automatically for the respective shooting mode.
1
On the lens, set the focus mode
switch to <AF>.
the <Zf> button.
2 Press
X [AF operation] will appear.
the AF operation.
3 Select
Press the <U> key or turn the
<6> dial to select the desired AF
operation, then press <0>.
the subject.
4 Focus
Aim the AF point over the subject and
press the shutter button halfway. The
camera will then autofocus in the
selected AF operation.
97
f: Changing the Autofocus OperationN
One-Shot AF for Still Subjects
Suited for still subjects. When you press the shutter button
halfway, the camera will focus only once.
When focus is achieved, the dot inside the AF point achieving focus
lights up briefly in red, and the focus confirmation light <o> in the
viewfinder will also light up.
With evaluative metering (p.117), the exposure setting will be set at
the same time focus is achieved.
While you hold down the shutter button halfway, the focus will be
locked. You can then recompose the shot if desired.
If focus cannot be achieved, the focus confirmation light <o> in the
viewfinder will blink. If this occurs, the picture cannot be taken even if the
shutter button is pressed completely. Recompose the picture and try to
focus again. Or see “Subjects Difficult to Focus” (p.103).
If [z1: Beep] is set to [Disable], the beeper will not sound when focus
is achieved.
AI Servo AF for Moving Subjects
This AF operation is suited for moving subjects when the focusing
distance keeps changing. While you hold down the shutter button
halfway, the subject will be focused continuously.
The exposure is set at the moment the picture is taken.
When the AF point selection (p.100) is automatic, the camera first
uses the center AF point to focus. During autofocusing, if the subject
moves away from the center AF point, focus tracking continues as
long as the subject is covered by another AF point.
With AI Servo AF, the beeper will not sound even when focus is achieved.
Also, the focus confirmation light <o> in the viewfinder will not light up.
98
f: Changing the Autofocus OperationN
AI Focus AF for Automatic Switching of AF Operation
AI Focus AF switches the AF operation from One-Shot AF to AI
Servo AF automatically if a still subject starts moving.
After the subject is focused in One-Shot AF operation, if the subject
starts moving, the camera will detect the movement, change the AF
operation automatically to AI Servo AF, and keep tracking the
moving subject.
When focus is achieved with AI Focus AF with the Servo operation active,
the beeper will continue beeping softly. However, the focus confirmation
light <o> in the viewfinder will not light up. Note that focus will not be
locked in this case.
99
S Selecting the AF PointN
In Basic Zone modes, the camera will normally focus the closest subject
automatically. Therefore, it may not always focus your target subject.
In the <d>, <s>, <f>, and <a> modes, you can select the AF
point and use it to focus the target subject.
1
Press the <S> button. (9)
X The selected AF point will be
displayed on the LCD monitor and in
the viewfinder.
the AF point.
2 Select
Use the <S> key to select the AF
point.
While looking at the viewfinder, you
can select the AF point by turning the
<6> dial until the desired AF point
lights up in red.
When all the AF points light up,
automatic AF point selection will be
set. The AF point will be selected
automatically to focus the subject.
Pressing <0> toggles the AF point
selection between the center AF point
and automatic AF point selection.
the subject.
3 Focus
Aim the selected AF point over the
subject and press the shutter button
halfway to focus.
You can also tap the screen to select AF points. During manual AF point
selection, tapping the [
] icon at the bottom left of the screen will switch
to automatic AF point selection.
100
S Selecting the AF PointN
Shooting Tips
When shooting a portrait up close, use One-Shot AF and focus
the eyes.
If you focus the eyes first, you can then recompose and the face will
remain sharp.
If it is difficult to focus, select and use the center AF point.
The center AF point is the most sensitive among the nine AF points.
To make it easier to focus a moving subject, set the camera to
automatic AF point selection and AI Servo AF (p.98).
The center AF point will first be used to focus the subject. During
autofocusing, if the subject moves away from the center AF point,
focus tracking continues as long as the subject is covered by
another AF point.
AF-Assist Beam with the Built-in Flash
Under low-light conditions, when you press the shutter button halfway,
the built-in flash fires a brief burst of flashes. It illuminates the subject to
enable easier autofocusing.
The AF-assist beam will not be fired in the following shooting modes:
<7>, <3>, and <5>.
The AF-assist beam cannot be emitted with AI Servo AF operation.
The effective range of the AF-assist beam emitted by the built-in flash is
approx. 4 meters/13.1 feet.
In Creative Zone modes, when you raise the built-in flash with the <I>
button (p.107), the AF-assist beam will be emitted when necessary. Note
that depending on the setting for [4: AF-assist beam firing] under [54:
Custom Functions (C.Fn)], AF beam will not be emitted (p.300).
101
S Selecting the AF PointN
AF Operation and Maximum Lens Apertures
With maximum apertures up to f/5.6:
Cross-type focusing (vertical and horizontal lines detected
simultaneously) is possible with all AF points. With certain lenses (see
below), the off-center AF points will detect only vertical or horizontal
lines (no cross-type focusing).
With maximum apertures up to f/2.8:
High-precision AF* with vertical and horizontal lines detection is
possible with the center AF point, in addition to the cross-type focusing
(vertical and horizontal lines detected simultaneously).
The remaining eight AF points enable cross-type focusing in the same
way as when using lenses with maximum apertures up to f/5.6.
* Except with the EF28-80mm f/2.8-4L USM and EF50mm f/2.5 Compact Macro.
If you use an Extender (sold separately) and the maximum aperture
becomes smaller than f/5.6, AF shooting will not be possible (except in
[u+Tracking], [FlexiZone - Multi], and [FlexiZone - Single] during Live
View shooting). For details, refer to the Extender’s instruction manual.
Lenses not Enabling Cross-Type Focusing with all AF Points
The following lenses enable only horizontal-line sensitive focusing with
the three AF points on the left and the three AF points on the right and
only vertical-line sensitive focusing with the top and bottom AF points.
Cross-type focusing is possible only with the center AF point.
EF35-80mm f/4-5.6
EF35-80mm f/4-5.6 II
EF35-80mm f/4-5.6 III
EF35-80mm f/4-5.6 USM
EF35-105mm f/4.5-5.6
EF35-105mm f/4.5-5.6 USM
EF80-200mm f/4.5-5.6 II
EF80-200mm f/4.5-5.6 USM
102
Subjects Difficult to Focus
Autofocus can fail to achieve focus (viewfinder’s focus confirmation light
<o> blinks) with certain subjects such as the following:
Very low-contrast subjects
(Example: Blue sky, solid-color walls, etc.)
Subjects in very low light
Extremely backlit or reflective subjects
(Example: Car with a highly reflective body, etc.)
Near and far subjects covered by an AF point
(Example: Animal in a cage, etc.)
Repetitive patterns
(Example: Skyscraper windows, computer keyboards, etc.)
In such cases, do either of the following:
(1) With One-Shot AF, focus an object at the same distance as the
subject and lock the focus before recomposing (p.61).
(2) Set the lens focus mode switch to <MF> and focus manually.
For subjects difficult to focus during Live View shooting with [u+Tracking],
[FlexiZone - Multi], or [FlexiZone - Single], see page 165.
MF: Manual Focusing
the lens focus mode switch to
1 Set
<MF>.
the subject.
2 Focus
Focus by turning the lens focusing
Focusing ring
ring until the subject looks sharp in
the viewfinder.
If you hold down the shutter button halfway during manual focusing, the AF
point achieving focus will light up briefly in red, the beeper will sound, and
the focus confirmation light <o> in the viewfinder will light up.
103
i Continuous Shooting
You can shoot up to approx. 5 shots per second. This is effective for
shooting a child running toward you or capturing different facial
expressions.
1 Press the <YiQ> button.
<i>.
2 Select
Press the <U> key or turn the
<6> dial to select <i> continuous
shooting, then press <0>.
picture.
3 TakeThethecamera
shoots continuously
while you hold down the shutter
button completely.
Shooting Tips
Also set the AF operation (p.97) matching the subject.
• For a moving subject
When AI Servo AF is set, focusing will be continuous during
continuous shooting.
• For still subjects
When One-Shot AF is set, the camera will focus only once during
continuous shooting.
Flash can also be used.
Since the flash will require recycling time, the continuous shooting
speed will be slower.
104
i Continuous Shooting
The maximum continuous shooting speed of approx. 5 shots per second
is achieved* with a shutter speed of 1/500 sec. or faster and at the
maximum aperture (differs depending on the lens). The continuous
shooting speed may decrease due to shutter speed, aperture, subject
conditions, brightness, lens, flash use, etc.
* With the following lenses, 5 shots per second is achieved with OneShot AF and the Image Stabilizer turned off: EF300mm f/4L IS USM,
EF28-135mm f/3.5-5.6 IS USM, EF75-300mm f/4-5.6 IS USM, and
EF100-400mm f/4.5-5.6L IS USM.
In AI Servo AF operation, the continuous shooting speed may become
slightly slower depending on the subject and the lens used.
When the battery level is low, the continuous shooting speed will become
slightly slower.
105
j Using the Self-timer
1 Press the <YiQ> button.
the self-timer.
2 Select
Press the <U> key or turn the
<6> dial to select the self-timer,
then press <0>.
Q: 10-sec. self-timer
The remote controller can also be used (p.307).
l: 2-sec. self-timer (p.142)
q: 10-sec. self-timer plus
continuous shots
Press the <V> key to set the
number of multiple shots (2 to 10)
to be taken with the self-timer.
picture.
3 TakeLookthethrough
the viewfinder, focus the subject,
then press the shutter button completely.
X You can check the self-timer operation with
the self-timer lamp, beeper, and countdown
display (in seconds) on the LCD monitor.
X Two seconds before the picture is
taken, the self-timer lamp will light up
and the beeper will sound faster.
With <q>, the interval between the multiple shots may be prolonged depending
on the shooting functions settings such as the image-recording quality or flash.
If you do not look through the viewfinder when you press the shutter
button, attach the eyepiece cover (p.308). If stray light enters the
viewfinder when the picture is taken, it may throw off the exposure.
The <l> enables you to shoot while not touching the camera mounted on a
tripod. This prevents camera shake while you shoot still lifes or long exposures.
After taking self-timer shots, playing back the image (p.84) to check
focus and exposure is recommended.
When using the self-timer to shoot only yourself, use focus lock (p.61) on
an object at about the same distance as where you will stand.
To cancel the self-timer after it starts, press the <YiQ> button.
106
D Using the Built-in Flash
In indoors, low light, or backlit conditions in daylight, just raise the builtin flash and press the shutter button to take flash pictures. In the <d>
mode, the shutter speed (1/60 sec. - 1/200 sec.) will be set
automatically to prevent camera shake.
1
Press the <D> button.
In Creative Zone modes, you can
press the <D> button anytime to take
flash pictures.
While the flash is recycling, “DbuSY”
is displayed in the viewfinder, and
[BUSYD] is displayed on the LCD
monitor.
the shutter button halfway.
2 Press
In the bottom left of the viewfinder,
check that the <D> icon is lit.
the picture.
3 TakeWhen
focus is achieved and you
press the shutter button completely,
the flash will fire for the picture.
Effective Flash Range
ISO Speed
(p.92)
100
200
400
800
1600
3200
6400
12800
H: 25600
[Approx. in meters/feet]
EF-S18-55mm f/3.5-5.6 IS STM
EF-S18-135mm f/3.5-5.6 IS STM
Wide Angle
Telephoto
1 - 3.7 / 3.3 - 12.1
1 - 2.3 / 3.3 - 7.5
1 - 5.3 / 3.3 - 17.4
1 - 3.3 / 3.3 - 10.8
1 - 7.4 / 3.3 - 24.3
1 - 4.6 / 3.3 - 15.1
1 - 10.5 / 3.3 - 34.4
1 - 6.6 / 3.3 - 21.7
1 - 14.9 / 3.3 - 48.9
1 - 9.3 / 3.3 - 30.5
1 - 21.0 / 3.3 - 68.9
1 - 13.1 / 3.3 - 43.0
1 - 29.7 / 3.3 - 97.4
1 - 18.6 / 3.3 - 61.0
1 - 42.0 / 3.3 - 137.8
1 - 26.3 / 3.3 - 86.3
1 - 59.4 / 3.3 - 194.9
1 - 37.1 / 3.3 - 121.7
107
D Using the Built-in Flash
Shooting Tips
If the subject is far away, increase the ISO speed (p.92).
By increasing the ISO speed, you can extend the flash range.
In bright light, decrease the ISO speed.
If the exposure setting in the viewfinder blinks, decrease the ISO speed.
Detach the lens hood and do not get too close to the subject.
If the lens has a hood attached or you are too close to the subject,
the bottom of the picture may look dark due to the obstructed flash.
For important shots, check the image on the LCD monitor to make
sure the flash exposure looks natural (not dark at the bottom).
3 Red-eye Reduction
Using the red-eye reduction lamp before taking a flash picture can
reduce red eye.
Red-eye reduction will function in any shooting mode except <7>,
<3>, <5>, or <G>.
Under the [z1] tab, select [Red-eye
reduc.], then press <0>. Select
[Enable], then press <0>.
For flash photography, when you press
the shutter button halfway, the red-eye
reduction lamp will light up. Then when
you press the shutter button
completely, the picture will be taken.
The red-eye reduction feature is most effective when the subject looks at
the red-eye reduction lamp, when the room is well lit, or when you are
close to the subject.
When you press the shutter button halfway, the
scale display on the bottom of the viewfinder will
shrink and turn off. For best results, take the picture
after this scale display turns off.
The effectiveness of red-eye reduction varies depending on the subject.
108
4
Advanced Shooting
This chapter builds on Chapter 3 and introduces more
ways to shoot creatively.
The first half of this chapter explains how to use the <s>,
<f>, and <a> modes on the Mode Dial.
All the functions explained in Chapter 3 can also be used in
the <s>, <f>, and <a> modes.
To see which functions can be used in each shooting mode,
see page 314.
The M mark shown on the right of the page title indicates
that the function is available only in Creative Zone modes
(p.24).
c About the Main Dial Pointer
The pointer icon <c> displayed
together with the shutter speed, aperture
setting, or exposure compensation
amount indicates that you can turn the
<6> dial to adjust the respective
setting.
109
s: Conveying the Subject’s Movement
You can either freeze the action or create motion blur with the <s>
(Shutter-priority AE) mode on the Mode Dial.
* <s> stands for Time value.
Blurred motion
(Slow shutter speed: 1/30 sec.)
1
Frozen action
(Fast shutter speed: 1/2000 sec.)
Set the Mode Dial to <s>.
the desired shutter speed.
2 SetSee
“Shooting Tips” for advice on
setting the shutter speed.
Turning the <6> dial to the right
sets a faster shutter speed, and
turning it to the left sets a slower one.
the picture.
3 TakeWhen
you focus and press the
shutter button completely, the picture
will be taken at the selected shutter
speed.
Shutter Speed Display
The LCD monitor displays the shutter speed as a fraction. However, the
viewfinder displays only the denominator. Also, “0"5” indicates 0.5 sec. and
“15"” is 15 sec.
110
s: Conveying the Subject’s Movement
Shooting Tips
To freeze the motion of a fast-moving subject
Use a fast shutter speed such as 1/4000 sec. to 1/500 sec.
To blur a running child or animal and convey an impression of
motion
Use a medium shutter speed such as 1/250 sec. to 1/30 sec. Follow
the moving subject through the viewfinder and press the shutter
button to take the picture. If you use a telephoto lens, hold it steady
to prevent camera shake.
To blur a flowing river or fountain
Use a slow shutter speed of 1/30 sec. or slower. Use a tripod to
prevent hand-held camera shake.
Set the shutter speed so that the aperture display does not blink.
If you press the shutter button halfway and change
the shutter speed while the aperture is displayed,
the aperture display will also change to maintain the
same exposure (amount of light reaching the image
sensor). If you exceed the adjustable aperture
range, the aperture display will blink to indicate that
the standard exposure cannot be obtained.
If the exposure will be too dark, the maximum aperture (smallest
number) will blink. If this happens, turn the <6> dial to the left to
set a slower shutter speed or increase the ISO speed.
If the exposure will be too bright, the minimum aperture (highest
number) will blink. If this happens, turn the <6> dial to the right to
set a faster shutter speed or decrease the ISO speed.
D Using the Built-in Flash
To obtain a correct flash exposure, the flash output will be set
automatically (autoflash exposure) to match the automatically-set
aperture. The shutter speed can be set from 1/200 sec. to 30 sec.
111
f: Changing the Depth of Field
To blur the background or to make everything near and far look sharp,
set the Mode Dial to <f> (Aperture-priority AE) to adjust the depth of
field (range of acceptable focus).
* <f> stands for Aperture value, which is the size of the diaphragm hole inside the lens.
Blurred background
(With a low aperture f/number: f/5.6)
Sharp foreground and background
(With a high aperture f/number: f/32)
1 Set the Mode Dial to <f>.
desired aperture.
2 SetThethehigher
the f/number, the wider
the depth of field where sharper focus
is obtained in both the foreground
and background.
Turning the <6> dial to the right will
set a higher f/number (smaller
aperture opening), and turning it to
the left will set a lower f/number
(larger aperture opening).
the picture.
3 TakeFocus
and press the shutter button
completely. The picture will be taken
with the selected aperture.
Aperture Display
The higher the f/number, the smaller the aperture opening will be. The
apertures displayed will differ depending on the lens. If no lens is attached to
the camera, “00” will be displayed for the aperture.
112
f: Changing the Depth of Field
Shooting Tips
When using an aperture with a high f/number or shooting in low
light scenes, note that camera shake can occur.
A higher aperture f/number will make the shutter speed slower.
Under low light, the shutter speed can be as long as 30 sec. In such
cases, increase the ISO speed and hold the camera steady or use a
tripod.
The depth of field depends not only on the aperture, but also on
the lens and on the subject distance.
Since wide-angle lenses have a wide depth of field (range of
acceptable focus in front of and behind the point of focus), you need
not set a high aperture f/number to obtain a sharp picture from the
foreground to the background. On the other hand, a telephoto lens
has a narrow depth of field.
The closer the subject, the narrower the depth of field. A farther
subject will have a wider depth of field.
Set the aperture so that the shutter speed display does not
blink.
If you press the shutter button halfway and change
the aperture while the shutter speed is displayed,
the shutter speed display will also change to
maintain the same exposure (amount of light
reaching the image sensor). If you exceed the
adjustable shutter speed range, the shutter speed
display will blink to indicate that the standard
exposure cannot be obtained.
If the picture will be too dark, the “30"” (30 sec.) shutter speed
display will blink. If this happens, turn the <6> dial to the left to set
a lower aperture f/number or increase the ISO speed.
If the picture will be too bright, the “4000” (1/4000 sec.) shutter
speed display will blink. If this happens, turn the <6> dial to the
right to set a higher aperture f/number or decrease the ISO speed.
113
f: Changing the Depth of Field
D Using the Built-in Flash
To obtain a correct flash exposure, the flash output will be set
automatically to match the set aperture (autoflash exposure). The
shutter speed will be set automatically between 1/200 sec. - 30 sec. to
suit the scene’s brightness.
In low light, the main subject is exposed with the automatic flash, and
the background is exposed with a slow shutter speed set automatically.
Both the subject and background look properly exposed (automatic
slow-speed flash sync). If you are handholding the camera, keep it
steady to prevent camera shake. Using a tripod is recommended.
To prevent a slow shutter speed, under [z1: Flash control], set
[Flash sync. speed in Av mode] to [1/200-1/60 sec. auto] or [1/200
sec. (fixed)] (p.219).
Depth of Field PreviewN
The aperture opening (diaphragm) changes only at the moment when
the picture is taken. Otherwise, the aperture remains fully open.
Therefore, when you look at the scene through the viewfinder or on the
LCD monitor, the depth of field will look narrow.
Press the depth-of-field preview button
to stop down the lens to the current
aperture setting and check the depth of
field (range of acceptable focus).
While looking at the Live View image (p.146) and holding down the depth-offield preview button, you can change the aperture and see how the depth of
field changes.
114
a: Manual Exposure
You can set both the shutter speed and aperture manually as desired.
While referring to the exposure level indicator in the viewfinder, you can
set the exposure as desired. This method is called manual exposure.
* <a> stands for Manual.
1
Set the Mode Dial to <a>.
2 Set the ISO speed (p.92).
speed and aperture.
3 SetTothesetshutter
the shutter speed, turn the
<6>
<O> + <6>
Standard exposure index
Exposure level mark
<6> dial.
To set the aperture, hold down the
<O> button and turn the <6> dial.
the subject.
4 Focus
Press the shutter button halfway.
X The exposure setting will be
displayed in the viewfinder.
The exposure level mark <h>
indicates how far the current
exposure level is from the standard
exposure level.
the exposure and take the picture.
5 SetCheck
the exposure level and set the desired shutter speed and
aperture.
If the exposure compensation amount exceeds ±2 stops from
the standard exposure, the end of the exposure level indicator
will display <I> or <J> in the viewfinder. (On the LCD monitor, if
the exposure level exceeds ±3 stops, <I> or <J> will be
displayed.)
If ISO Auto is set, the ISO speed setting will change to suit the shutter speed
and aperture to obtain a standard exposure. Therefore, you may not obtain
the desired exposure effect.
115
a: Manual Exposure
In [z2: Auto Lighting Optimizer], if the checkmark <X> for [Disable
during man expo] is removed, it can be set in the <a> mode (p.125).
When ISO Auto is set, you can press the <A> button to lock the ISO speed.
After recomposing the picture, you can see the exposure level difference
on the exposure level indicator (p.22, 23) compared to when you pressed
the <A> button.
I Using the Built-in Flash
To obtain a correct flash exposure, the flash output will be set
automatically (autoflash exposure) to match the manually-set aperture.
The shutter speed can be set from 1/200 sec. to 30 sec. or <BULB>.
BULB: Bulb Exposures
A bulb exposure keeps the shutter open for
as long as you hold down the shutter button.
It can be used to photograph fireworks and
other subjects requiring long exposures.
In step 3 on the preceding page, turn the
<6> dial to the left to set <BULB>.
The elapsed exposure time will be
displayed on the LCD monitor.
Do not point the camera toward an intense light source, such as the sun
on a sunny day or an intense artificial light source. Doing so may
damage the image sensor or the camera’s internal components.
Since bulb exposures produce more noise than usual, the image may
look a little grainy.
When [z3: Long exp. noise reduction] is set to [Auto] or [Enable],
noise generated by the long exposure can be reduced (p.127).
If ISO Auto is set, the ISO speed will be ISO 400 (p.94).
For bulb exposures, using a tripod and Remote Switch (sold separately,
p.308) is recommended.
You can also use a remote controller (sold separately, p.307) for bulb
exposures. When you press the remote controller’s transmit button, the
bulb exposure will start immediately or 2 sec. later. Press the button
again to stop the bulb exposure.
116
q Changing the Metering ModeN
Four methods (metering modes) to measure the subject’s brightness
are provided. Normally, evaluative metering is recommended.
In Basic Zone modes, evaluative metering is set automatically.
1
Select [Metering mode].
Under the [z2] tab, select [Metering
mode], then press <0>.
the metering mode.
2 SetSelect
the metering mode, then press
<0>.
q Evaluative metering
This is a general-purpose metering mode suited
even for backlit subjects. The camera sets the
exposure automatically to suit the scene.
w Partial metering
Effective when the background is much brighter
than the subject due to backlighting, etc. The
gray area in the left figure is where the
brightness is metered to obtain the standard
exposure.
r Spot metering
This is for metering a specific part of the subject
or scene. The gray area in the left figure is
where the brightness is metered to obtain the
standard exposure. This metering mode is for
advanced users.
117
q Changing the Metering ModeN
e Center-weighted average metering
The brightness is metered at the image center
and then averaged for the entire scene. This
metering mode is for advanced users.
Metering Range During Live View Shooting
With q (evaluative metering) and e (center-weighted average
metering), the metering range is almost the same as with viewfinder
shooting.
With w (partial metering) and r (spot metering), the metering
range slightly differs from viewfinder shooting. The approximate
metering ranges are as shown below:
Partial metering
Spot metering
* The figures show when [Grid 2 m] is set. The metering ranges are not
displayed on the LCD monitor.
With q (evaluative metering) during viewfinder shooting, the exposure
setting will be locked when you press the shutter button halfway and focus is
achieved. With w (partial metering), r (spot metering), and e (centerweighted average metering), exposure setting is set at the moment of
exposure. (The exposure setting is not locked when you press the shutter
button halfway.) During Live View shooting, the exposure setting is set at the
moment of exposure, regardless of the metering mode setting.
118
Setting Exposure CompensationN
O Setting Exposure Compensation
Set exposure compensation if the exposure (without flash) does not come out
as desired. This feature can be used in Creative Zone modes (except <a>).
You can set the exposure compensation up to ±5 stops in 1/3-stop increments.
Increased exposure for a brighter image
Decreased exposure for a darker image
Dark exposure
Making it brighter:
Hold down the <O> button and
turn the <6> dial to the right.
(Increased exposure)
Making it darker:
Hold down the <O> button and
turn the <6> dial to the left.
(Decreased exposure)
X As shown in the figure, the exposure
level is displayed on the LCD monitor
and in the viewfinder.
After taking the picture, cancel the
exposure compensation by setting
it back to 0.
Increased exposure for a brighter image
The exposure compensation amount displayed in the viewfinder goes up
to only ±2 stops. If the exposure compensation amount exceeds ±2
stops, the end of the exposure level indicator will display <I> or <J>.
If you want to set exposure compensation exceeding ±2 stops, setting it
with [z2: Expo.comp./AEB] (p.121) or with the Quick Control screen
(p.44) is recommended.
119
Setting Exposure CompensationN
y Flash Exposure Compensation
Set flash exposure compensation if the flash exposure of the subject
does not come out as desired. You can set the exposure compensation
up to ±2 stops in 1/3-stop increments.
1
Press the <Q> button. (7)
X The Quick Control screen will appear
(p.44).
[y].
2 Select
Press the <S> key to select [y*].
X [Flash exposure comp.] will be
displayed at the bottom.
exposure compensation amount.
3 SetTothemake
the flash exposure brighter,
turn the <6> dial to the right
(increased exposure). To make it
darker, turn the <6> dial to the left
(decreased exposure).
X When you press the shutter button
halfway, the <y> icon will appear in
the viewfinder.
After taking the picture, cancel the
flash exposure compensation by
setting it back to 0.
If [z2: Auto Lighting Optimizer] (p.125) is set to any setting other than
[Disable], the image may look bright even if a decreased exposure
compensation or decreased flash exposure compensation is set.
You can also set flash exposure compensation with [Built-in flash settings]
in [z1: Flash control] (p.220).
120
3 Auto Exposure BracketingN
This feature takes exposure compensation a step further by varying the
exposure automatically (up to ±2 stops in 1/3-stop increments) with
three shots as shown below. You can then choose the best exposure.
This is called AEB (Auto Exposure Bracketing).
Standard exposure
Darker exposure
(Decreased exposure)
1
Brighter exposure
(Increased exposure)
Select [Expo.comp./AEB].
Under the [z2] tab, select
[Expo.comp./AEB], then press <0>.
the AEB range.
2 SetTurn
the <6> dial to set the AEB
AEB range
range.
Press the <U> key to set the
exposure compensation amount. If
AEB is combined with exposure
compensation, AEB will be applied
centering on the exposure
compensation amount.
Press <0> to set it.
When you press the <M> button
to exit the menu, the AEB range will
be displayed on the LCD monitor.
the picture.
3 TakeFocus
and press the shutter button
completely. The three bracketed
shots will be taken in this sequence:
standard exposure, decreased
exposure, and increased exposure.
121
3 Auto Exposure BracketingN
Canceling AEB
Follow steps 1 and 2 to turn off the AEB level display.
The AEB setting will also be canceled automatically if the power
switch is set to <2>, flash recycling is completed, etc.
Shooting Tips
Using AEB with continuous shooting
If <i> continuous shooting (p.104) is set and you press the shutter
button completely, the three bracketed shots will be taken
continuously in this sequence: standard exposure, decreased
exposure, and increased exposure.
Using AEB with <u> single shooting
Press the shutter button three times to take the three bracketed
shots. The three bracketed shots will be exposed in the following
sequence: standard exposure, decreased exposure, and increased
exposure.
Using AEB with the self-timer or a remote controller (sold
separately)
With the self-timer or a remote control shooting (<Q> or <l>),
you can take three continuous shots after a 10-sec. or 2-sec. delay.
With <q> (p.106) set, the number of continuous shots will be three
times the number set.
AEB cannot be used with flash, Multi Shot Noise Reduction, Creative
filters, or bulb exposures.
If [z2: Auto Lighting Optimizer] (p.125) is set to any setting other
than [Disable], the AEB’s effect may be minimal.
122
A Locking the ExposureN
You can lock the exposure when the area of focus is to be different from the
exposure metering area or when you want to take multiple shots at the same
exposure setting. Press the <A> button to lock the exposure, then recompose
and take the shot. This is called AE lock. It is effective for backlit subjects.
1
Focus the subject.
Press the shutter button halfway.
X The exposure setting will be
displayed.
the <A> button. (0)
2 Press
X The <A> icon lights up in the
viewfinder to indicate that the
exposure setting is locked (AE lock).
Each time you press the <A> button,
the current autoexposure setting is
locked.
and take the picture.
3 Recompose
If you want to maintain the AE lock
while taking more shots, hold down
the <A> button and press the shutter
button to take another shot.
AE Lock Effects
Metering Mode
(p.117)
q*
wre
AF Point Selection Method (p.100)
Automatic Selection
Manual Selection
AE lock is applied at the AF
AE lock is applied at the
point that achieved focus.
selected AF point.
AE lock is applied at the center AF point.
* When the lens’ focus mode switch is set to <MF>, AE lock is applied at the
center AF point.
123
A Locking the Flash ExposureN
If the subject is on the side of the frame and you use flash, the subject may
turn out to be too bright or dark depending on the background, etc. This is
when you should use FE lock. After setting the proper flash exposure for
the subject, you can recompose (put the subject toward the side) and
shoot. This feature can also be used with a Canon EX-series Speedlite.
* FE stands for Flash Exposure.
1
Spot metering circle
Press the <D> button.
X The built-in flash will rise.
Press the shutter button halfway and
look in the viewfinder to check that
the <D> icon is lit.
2 Focus the subject.
the <A> button. (8)
3 Press
Aim the spot metering circle over the
subject, then press the <A> button.
X The flash will fire a preflash and the
required flash output is calculated
and retained in memory.
X In the viewfinder, “FEL” is displayed
for a moment and <d> will light up.
Each time you press the <A> button, a
preflash is fired and the required flash output
is calculated and retained in memory.
the picture.
4 TakeCompose
the shot and press the
shutter button completely.
X The flash is fired when the picture is
taken.
If the subject is too far away and beyond the effective range of the flash,
the <D> icon will blink. Get closer to the subject and repeat steps 2 to 4.
FE lock cannot be used during Live View shooting.
124
3 Auto Correction of Brightness and ContrastN
If the image comes out dark or the contrast is low, the brightness and
contrast can be corrected automatically. This function is called Auto
Lighting Optimizer. The default setting is [Standard]. With JPEG
images, the correction is done when the image is captured.
In Basic Zone modes, [Standard] is set automatically.
1
Select [Auto Lighting Optimizer].
Under the [z2] tab, select [Auto
Lighting Optimizer], then press
<0>.
the setting.
2 Select
Select the desired setting, then press
<0>.
picture.
3 TakeThetheimage
will be recorded with the
brightness and contrast corrected if
necessary.
Under [54: Custom Functions (C.Fn)], if [3: Highlight tone priority] is
set to [1: Enable], the Auto Lighting Optimizer will be set automatically to
[Disable] and the setting cannot be changed.
If a setting other than [Disable] is set and you use exposure
compensation or flash exposure compensation to darken the exposure,
the image may still come out bright. If you want a darker exposure, set
this function to [Disable].
Depending on the shooting conditions, noise may increase.
In step 2, if you press the <B> button and uncheck <X> the [Disable
during man expo] setting, the Auto Lighting Optimizer can be set in the
<a> mode.
125
3 Noise Reduction SettingsN
High ISO Speed Noise Reduction
This function reduces the noise generated in the image. Although noise
reduction is applied at all ISO speeds, it is particularly effective at high
ISO speeds. At low ISO speeds, the noise in the darker parts of the
image (shadow areas) is further reduced. Change the setting to suit the
noise level.
1
Select [High ISO speed NR].
Under the [z3] tab, select [High ISO
speed NR], then press <0>.
the setting.
2 SetSelect
the desired setting, then press
<0>.
X The setting screen closes and the
menu will reappear.
[M: Multi Shot Noise Reduction]
Noise reduction with higher image quality than when [High] is
applied. For a single photo, four shots are taken continuously and
aligned and merged automatically into a single JPEG image.
picture.
3 TakeThetheimage
will be recorded with noise
reduction applied.
With [High] or [Multi Shot Noise Reduction], the maximum burst for
continuous shooting will greatly decrease.
If you play back a 1+73 or 1 image with the camera or print an image
directly, the effect of the high ISO speed noise reduction may look minimal.
Check the noise reduction effect or print noise-reduced images with Digital
Photo Professional (provided software, p.364).
126
3 Noise Reduction SettingsN
About [Multi Shot Noise Reduction]
The following functions cannot be set: AEB, WB bracketing, [z3: Long
exp. noise reduction], 1+73/1. If any of these has already been
set, [Multi Shot Noise Reduction] cannot be set.
Flash shooting is not possible. The AF-assist beam will be emitted according to
the [54: Custom Functions (C.Fn)]’s [4: AF-assist beam firing] setting.
You cannot set [Multi Shot Noise Reduction] for bulb exposures.
If you turn off the power or change the shooting mode to a Basic Zone
mode, movie shooting, or bulb, the setting will change to [Standard].
If there is significant misalignment in the image due to camera shake, the
noise reduction effect may be minimal.
If you are handholding the camera, keep it steady to prevent camera
shake. Using a tripod is recommended.
If you shoot a moving subject, the subject’s movement may leave
afterimages or the surrounding area of the subject may become dark.
The image alignment may not function properly with repetitive patterns
(lattice, stripes, etc.) or flat, single-tone images.
Recording the image to the card will take longer than with normal
shooting. During the processing of the images, “BUSY” will be displayed
and you cannot take another picture until the processing is completed.
[z3: Dust Delete Data] cannot be set.
If [Multi Shot Noise Reduction] is set, direct printing (p.280) is not
possible.
Long Exposure Noise Reduction
You can reduce noise in long exposures.
1
Select [Long exp. noise
reduction].
Under the [z3] tab, select [Long
exp. noise reduction], then press
<0>.
127
3 Noise Reduction SettingsN
the setting.
2 SetSelect
the desired setting, then press
<0>.
X The setting screen closes and the
menu will reappear.
[Auto]
For 1 sec. or longer exposures, noise reduction is performed
automatically if noise typical of long exposures is detected. This
[Auto] setting is effective in most cases.
[Enable]
Noise reduction is performed for all exposures of 1 sec. or longer.
The [Enable] setting may be able to reduce noise that otherwise
cannot be detected with the [Auto] setting.
picture.
3 TakeThetheimage
will be recorded with noise
reduction applied.
With [Auto] and [Enable], the noise reduction process after the picture is
taken may take the same amount of time as the exposure. You cannot
take another picture until the noise reduction process is completed.
Images taken at ISO 1600 or higher may look grainier with the [Enable]
setting than with the [Disable] or [Auto] setting.
With [Auto] and [Enable], if a long exposure is shot with the Live View
image displayed, “BUSY” will be displayed during the noise reduction
process. The Live View display will not reappear until the noise reduction
is completed. (You cannot take another picture.)
128
3 Lens Peripheral Illumination / Chromatic Aberration Correction
Peripheral light fall-off is a phenomenon that makes the image corners
look darker due to the lens characteristics. Color fringing along subject
outlines is another chromatic aberration. Both lens aberrations can be
corrected. 1 images can be corrected with Digital Photo Professional
(provided software, p.364).
Peripheral Illumination Correction
1
Select [Lens aberration
correction].
Under the [z1] tab, select [Lens
aberration correction], then press
<0>.
the setting.
2 Select
Check that [Correction data
available] is displayed for the
attached lens.
Select [Peripheral illumin.], then
press <0>.
Select [Enable], then press <0>.
If [Correction data not available] is
displayed, see “About the Lens
Correction Data” on page 131.
picture.
3 TakeThetheimage
will be recorded with the
peripheral illumination corrected.
Depending on shooting conditions, noise may appear on the image
periphery.
The correction amount applied will be slightly lower than the maximum
correction amount settable with Digital Photo Professional (provided
software).
The higher the ISO speed, the lower the correction amount will be.
129
3 Lens Peripheral Illumination / Chromatic Aberration Correction
Chromatic Aberration Correction
1
Select the setting.
Check that [Correction data
available] is displayed for the
attached lens.
Select [Chromatic aberration], then
press <0>.
Select [Enable], then press <0>.
If [Correction data not available] is
displayed, see “About the Lens
Correction Data” on the next page.
picture.
2 TakeThetheimage
will be recorded with the
chromatic aberration corrected.
With [Enable], the maximum burst for continuous shooting will greatly
decrease.
If you play back a 1 image shot with the chromatic aberration
corrected, the image will be displayed on the camera without the
chromatic aberration correction applied. Check the chromatic aberration
correction with Digital Photo Professional (provided software, p.364).
130
3 Lens Peripheral Illumination / Chromatic Aberration Correction
About the Lens Correction Data
The camera already contains lens peripheral illumination correction
data and chromatic aberration correction data for approx. 25 lenses. If
you select [Enable], the peripheral illumination correction and
chromatic aberration correction will be applied automatically for any
lens whose correction data is registered in the camera.
With EOS Utility (provided software), you can check which lenses have
their correction data registered in the camera. You can also register the
correction data for unregistered lenses. For details, refer to the EOS
Utility Instruction Manual (p.367).
Notes for Peripheral Illumination Correction and Chromatic Aberration
Correction
Peripheral illumination correction and chromatic aberration correction
cannot be applied to JPEG images already taken.
When using a non-Canon lens, setting the corrections to [Disable] is
recommended, even if [Correction data available] is displayed.
If you use the magnified view during Live View shooting, the peripheral
illumination correction and chromatic aberration correction will not be
reflected in the image shown on the screen.
If the effect of the correction is not visible, magnify the image and check
it.
Corrections can be applied even when an Extender or Life-size
Converter is attached.
If the correction data for the attached lens is not registered to the
camera, the result will be the same as when the correction is set to
[Disable].
If the lens does not have distance information, the correction amount will
be lower.
131
A Customizing Image CharacteristicsN
You can customize a Picture Style by adjusting individual parameters
such as [Sharpness] and [Contrast]. To see the resulting effects, take
test shots. To customize [Monochrome], see page 134.
1 Press the <XA> button.
a Picture Style.
2 Select
Select a Picture Style, then press the
<B> button.
X The Detail setting screen will appear.
a parameter.
3 Select
Select a parameter such as
[Sharpness], then press <0>.
the parameter.
4 SetPress
the <U> key to adjust the
parameter as desired, then press
<0>.
Press the <M> button to save the
adjusted parameters. The Picture
Style selection screen will reappear.
X Any parameter settings different from
the default will be displayed in blue.
By selecting [Default set.] in step 3, you can revert the respective
Picture Style to its default parameter settings.
To shoot with the Picture Style you modified, follow step 2 on page 95 to
select the modified Picture Style and then shoot.
132
A Customizing Image CharacteristicsN
Parameter Settings and Effects
Sharpness
Adjusts the sharpness of the image.
To make it less sharp, set it toward the E end. The closer it is to E,
the softer the image will look.
To make it sharper, set it toward the F end. The closer it is to F, the
sharper the image will look.
Contrast
Adjusts the image contrast and the vividness of colors.
To decrease the contrast, set it toward the minus end. The closer it is
to G, the more muted the image will look.
To increase the contrast, set it toward the plus end. The closer it is to
H, the crisper the image will look.
Saturation
The image’s color saturation can be adjusted.
To decrease the color saturation, set it toward the minus end. The
closer it is to G, the more diluted the colors will look.
To increase the color saturation, set it toward the plus end. The
closer it is to H, the bolder the colors will look.
Color tone
The skin tones can be adjusted.
To make the skin tone redder, set it toward the minus end. The
closer it is to G, the redder the skin tone will look.
To make the skin tone less red, set it toward the plus end. The closer
it is to H, the more yellow the skin tone will look.
133
A Customizing Image CharacteristicsN
V Monochrome Adjustment
For Monochrome, you can also set [Filter effect] and [Toning effect] in
addition to [Sharpness] and [Contrast] explained on the preceding
page.
kFilter Effect
With a filter effect applied to a
monochrome image, you can make
white clouds or green trees stand out
more.
Filter
Sample Effects
N : None
Normal black-and-white image with no filter effects.
Ye: Yellow
The blue sky will look more natural, and the white clouds will look
crisper.
Or : Orange
The blue sky will look slightly darker. The sunset will look more
brilliant.
R : Red
The blue sky will look quite dark. Fall leaves will look crisper and
brighter.
G : Green
Skin tones and lips will appear muted. Tree leaves will look
crisper and brighter.
Increasing the [Contrast] will make the filter effect more pronounced.
lToning Effect
By applying a toning effect, you can
create a monochrome image in that
color. It can make the image look more
impressive.
The following can be selected: [N:None],
[S:Sepia], [B:Blue], [P:Purple] or
[G:Green].
134
A Registering Preferred Image CharacteristicsN
You can select a base Picture Style such as [Portrait] or [Landscape],
adjust its parameters as desired and register it under [User Def. 1],
[User Def. 2], or [User Def. 3].
You can create multiple Picture Styles whose parameter settings such
as sharpness and contrast are different.
You can also adjust the parameters of a Picture Style that has been
registered to the camera with EOS Utility (provided software, p.364).
1 Press the <XA> button.
[User Def.*].
2 Select
Select a [User Def.*] style, then press
<B>.
X The Detail setting screen will appear.
<0>.
3 Press
With [Picture Style] selected, press
<0>.
the base Picture Style.
4 Select
Press the <S> key or turn the <6>
dial to select the base Picture Style,
then press <0>.
To adjust the parameters of a Picture
Style that has been registered to the
camera with EOS Utility (provided
software), select the Picture Style
here.
135
A Registering Preferred Image CharacteristicsN
a parameter.
5 Select
Select a parameter such as
[Sharpness], then press <0>.
the parameter.
6 SetPress
the <U> key to adjust the
parameter as desired, then press
<0>. For details, see “Customizing
Image Characteristics” on pages 132134.
Press the <M> button to register
the modified Picture Style. The
Picture Style selection screen will
then reappear.
X The base Picture Style will be
indicated on the right of [User Def.*].
If a Picture Style has already been registered under [User Def.*],
changing the base Picture Style in step 4 will nullify the parameter
settings of the registered Picture Style.
If you execute [Clear all camera settings] (p.214), all the [User Def.*]
settings will revert to their defaults. Picture Styles registered via EOS
Utility (provided software) will have only their modified parameters
reverted to their default settings.
To shoot with a registered Picture Style, follow step 2 on page 95 to
select [User Def.*], then shoot.
For the procedure to register a Picture Style file to the camera, refer to
the EOS Utility Instructions (p.367).
136
B: Matching the Light SourceN
The function adjusting the color tone so that white objects look white in
the picture is called white balance (WB). Normally, the <Q> (Auto)
setting will obtain the correct white balance. If natural-looking colors
cannot be obtained with <Q>, you can select the white balance that
matches the light source or set it manually by shooting a white object.
the <WB> button.
1 Press
X [White balance] will appear.
the white balance.
2 Select
Press the <U> key or turn the
<6> dial to select the desired white
balance, then press <0>.
The “Approx. ****K” (K: Kelvin)
displayed for the white balance
settings <W>, <E>, <R>, <Y>
or <U> is the respective color
temperature.
O Custom White Balance
Custom white balance enables you to manually set the white balance
for a specific light source for better accuracy. Perform this procedure
under the actual light source to be used.
1
Photograph a white object.
The plain, white object should fill the
spot metering circle.
Focus manually and set the standard
exposure for the white object.
You can set any white balance.
Spot metering circle
137
B: Matching the Light SourceN
[Custom White Balance].
2 Select
Under the [z2] tab, select [Custom
White Balance], then press <0>.
X The custom white balance selection
screen will appear.
the white balance data.
3 Import
Select the image that was captured in
step 1, then press <0>.
X On the dialog screen that appears,
select [OK] and the data will be
imported.
When the menu reappears, press the
<M> button to exit the menu.
the custom white balance.
4 Select
Press the <WB> button.
Select <O>, then press <0>.
If the exposure obtained in step 1 differs greatly from the standard
exposure, a correct white balance may not be obtained.
An image captured while the Picture Style was set to [Monochrome]
(p.96) or an image processed with a Creative filter cannot be selected in
step 3.
Instead of a white object, an 18% gray card (commercially available) can
produce a more accurate white balance.
The personal white balance registered with EOS Utility (provided
software, p.364) will be registered under <O>. If you perform step 3,
the data for the registered personal white balance will be erased.
138
u Adjusting the Color Tone for the Light SourceN
You can correct the white balance that has been set. This adjustment
will have the same effect as using a commercially-available color
temperature conversion filter or color compensating filter. Each color
can be corrected to one of nine levels.
This function is for advanced users who are familiar with using color
temperature conversion or color compensating filters.
White Balance Correction
1
Select [WB Shift/Bkt.].
Under the [z2] tab, select [WB
Shift/Bkt.], then press <0>.
X The WB correction/WB bracketing
screen will appear.
the white balance correction.
2 SetPress
the <S> key to move the “ ”
Sample setting: A2, G1
mark to the desired position.
B is for blue, A for amber, M for
magenta, and G for green. The color
in the respective direction will be
corrected.
On the upper right, “SHIFT” indicates
the direction and correction amount.
Pressing the <L> button will cancel
all the [WB Shift/Bkt.] settings.
Press <0> to exit the setting and
return to the menu.
When the white balance is corrected, <u> will be displayed in the
viewfinder and on the LCD monitor.
One level of the blue/amber correction is equivalent to approx. 5 mireds
of a color temperature conversion filter. (Mired: Measuring unit indicating
the density of a color temperature conversion filter.)
139
u Adjusting the Color Tone for the Light SourceN
White Balance Auto Bracketing
With just one shot, three images having a different color balance can be
recorded simultaneously. Based on the color temperature of the current white
balance setting, the image will be bracketed with a blue/amber bias or
magenta/green bias. This is called white balance bracketing (WB-BKT). White
balance bracketing is possible up to ±3 levels in single-level increments.
Set the white balance bracketing amount.
B/A bias ±3 levels
In step 2 for white balance correction,
when you turn the <6> dial, the “ ”
mark on the screen will change to
“
” (3 points). Turning the dial to the
right sets the B/A bracketing, and turning
it to the left sets the M/G bracketing.
X On the right, “Bracket” indicates the
bracketing direction and correction
amount.
Pressing the <L> button will cancel
all the [WB Shift/Bkt.] settings.
Press <0> to exit the setting and
return to the menu.
Bracketing Sequence
The images will be bracketed in the following sequence: 1. Standard
white balance, 2. Blue (B) bias, and 3. Amber (A) bias, or 1. Standard
white balance, 2. Magenta (M) bias, and 3. Green (G) bias.
During WB bracketing, the maximum burst for continuous shooting will
be lower and the number of possible shots will also decrease to approx.
one-third the normal number.
You can also set white balance correction and AEB together with white
balance bracketing. If you set AEB in combination with white balance
bracketing, a total of nine images will be recorded for a single shot.
Since three images are recorded for one shot, it takes longer to record
the shot to the card.
“Bkt.” stands for bracketing.
140
3 Setting the Color Reproduction RangeN
The range of reproducible colors is called the color space. With this
camera, the color space for captured images can be set to sRGB or
Adobe RGB. For normal shooting, sRGB is recommended.
In Basic Zone modes, sRGB is set automatically.
1
Select [Color space].
Under the [z2] tab, select [Color
space], then press <0>.
the desired color space.
2 SetSelect
[sRGB] or [Adobe RGB], then
press <0>.
About Adobe RGB
This color space is mainly used for commercial printing and other
industrial uses. This setting is not recommended if you do not know
about image processing, Adobe RGB, and Design rule for Camera File
System 2.0 (Exif 2.21 or higher). The image will look very subdued in a
sRGB personal computer environment and with printers not compatible
with Design rule for Camera File System 2.0 (Exif 2.21 or higher). Postprocessing of the image with software will therefore be required.
If the captured still photo was shot in the Adobe RGB color space, the
first character in the file name will be an underscore “_”.
The ICC profile is not appended. Refer to explanations about the ICC
profile in the Digital Photo Professional Instruction Manual (p.367).
141
Mirror Lockup to Reduce Camera ShakeN
The camera’s mechanical shake caused by the reflex mirror action can
blur images taken with a super telephoto lens or close-up (macro) lens.
In such cases, mirror lockup is effective.
Mirror lockup is enabled by setting [5: Mirror lockup] to [1: Enable]
in the [54: Custom Functions (C.Fn)] (p.300).
1
Focus the subject, then press the shutter button
completely.
X The mirror will swing up.
2 Press the shutter button completely again.
X The picture is taken and the mirror goes back down.
After taking the picture, set [5: Mirror lockup] to [0: Disable].
Shooting Tips
Using the self-timer <Q>, <l> with mirror lockup
When you press the shutter button completely, the mirror locks up,
then the picture is taken 10 sec. or 2 sec. later.
Remote control shooting
Since you do not touch the camera when the picture is taken, remote
control shooting together with mirror lockup can further prevent
camera shake (p.307). With Remote Controller RC-6 (sold
separately) set to a 2-sec. delay, press the transmit button and the
mirror will lockup before the picture is taken 2 sec. later.
142
Mirror Lockup to Reduce Camera ShakeN
In very bright light such as at the beach or a ski slope on a sunny day,
take the picture promptly after mirror lockup.
Do not point the camera toward an intense light source, such as the sun
on a sunny day or an intense artificial light source. Doing so may
damage the image sensor or the camera’s internal components.
If you use the self-timer and bulb exposure in combination with a mirror
lockup, keep pressing the shutter button completely (self-timer delay
time + bulb exposure time). If you let go of the shutter button during the
self-timer countdown, there will be a shutter-release sound, but no
picture will be taken.
Even if <i> or <q> is set for drive mode, single shooting will take
effect.
When [z3: High ISO speed NR] is set to [Multi Shot Noise
Reduction], four continuous shots will be taken for the single picture
regardless of the [5: Mirror lockup] setting.
If 30 seconds elapse after the mirror has locked up, it will go back down
automatically. Pressing the shutter button completely again locks up the
mirror again.
143
5
Shooting with the LCD Monitor
(Live View Shooting)
You can shoot while viewing the image on the camera’s
LCD monitor. This is called “Live View shooting”.
If you handhold the camera and shoot while viewing the
LCD monitor, camera shake can cause blurred images.
Using a tripod is recommended.
About Remote Live View Shooting
With EOS Utility (provided software, p.364) installed in your
computer, you can connect the camera to the computer and shoot
remotely while viewing the computer screen. For details, refer to
the EOS Utility Instruction Manual (p.367).
145
A Shooting with the LCD Monitor
1
Display the Live View image.
Press the <A> button.
X The Live View image will appear on
the LCD monitor. In the <A> mode,
the scene icon for the scene detected
by the camera is displayed on the
upper left (p.149).
By default, Continuous AF (p.156) will
take effect.
The Live View image will closely
reflect the brightness level of the
actual image you capture.
the subject.
2 Focus
When you press the shutter button
halfway, the camera will focus with
the current AF method (p.159).
the picture.
3 TakePress
the shutter button completely.
X The picture will be taken and the captured
image is displayed on the LCD monitor.
X After the image review ends, the
camera will return to Live View
shooting automatically.
Press the <A> button to exit Live
View shooting.
The image’s field of view is approx. 99% (when the image-recording
quality is set to JPEG 73).
In Creative Zone modes, you can check the depth of field by pressing the
depth-of-field preview button.
During continuous shooting, the exposure set for the first shot will also
be applied to subsequent shots.
You can also tap the subject on the LCD monitor to focus (p.159-167)
and shoot (p.168).
You can also use a remote controller (sold separately, p.307) for Live View shooting.
146
A Shooting with the LCD Monitor
Enabling Live View Shooting
Set [A: Live View shoot.] to [Enable].
Battery Life with Live View Shooting
Temperature
[Approx. number of shots]
Shooting Conditions
No Flash
50% Flash Use
At 23°C / 73°F
200
180
At 0°C / 32°F
170
150
The figures above are based on a fully-charged Battery Pack LP-E8 and CIPA
(Camera & Imaging Products Association) testing standards.
With a fully-charged Battery Pack LP-E8, continuous Live View shooting is
possible as for approx. 1 hr. 30 min. at 23°C / 73°F.
In the <F> and <G> shooting modes, the picture area will be smaller
than with other shooting modes.
Do not point the camera toward an intense light source, such as the sun
on a sunny day or an intense artificial light source. Doing so may
damage the image sensor or the camera’s internal components.
Cautions for using Live View shooting are on pages 171-172.
When flash is used, there will be two shutter sounds, but only one shot
will be taken. Also, the time it takes to take the picture after you press the
shutter button completely will be slightly longer than with viewfinder
shooting.
If the camera is not operated for a prolonged period, the power will turn
off automatically as set with [52: Auto power off] (p.205). If [52: Auto
power off] is set to [Disable], Live View shooting will end automatically
after approx. 30 min. (camera power remains on).
With the stereo AV cable AVC-DC400ST (sold separately) or HDMI cable
HTC-100 (sold separately), you can display the Live View image on a TV
(p.262, 265).
147
A Shooting with the LCD Monitor
Information Display
Each time you press the <B> button, the information display will
change.
Battery check
AF point (Quick AF)
Histogram
Possible shots
Auto Lighting
Optimizer
AF method
Shooting mode
Quick Control
Drive mode
Metering mode
Image-recording
quality
Built-in flash
settings
Switch to auto
selection (AF point)
Touch shutter
White balance
Picture Style
Creative filters
Eye-Fi card
transmission
status
Exposure
simulation
AE lock
D Flash-ready
b Flash off
Shutter speed
Flash exposure compensation
Aperture
Exposure level indicator/AEB range
Digital compass
Magnified view
AEB/FEB/
Multi Shot Noise
Reduction
ISO speed
Highlight tone priority
GPS connection indicator
When <g> is displayed in white, it indicates that the Live View image
brightness is close to what the captured image will look like.
If <g> is blinking, it indicates that the Live View image is displayed at
a brightness that differs from the actual shooting result because of lowor bright-light conditions. However, the actual image recorded will reflect
the exposure setting. Note that noise may be more noticeable than the
actual image recorded.
If you use the <F> or <G> shooting mode, bulb exposure, or flash, the
<g> icon and histogram will be grayed out (for your reference). The
histogram may not be properly displayed in low- or bright-light conditions.
148
A Shooting with the LCD Monitor
Scene Icons
During Live View shooting in the <A> mode, an icon representing the
scene detected by the camera will be displayed and the shooting will be
adapted to that scene. For certain scenes or shooting conditions, the
icon displayed may not match the actual scene.
Subject
Portrait*1
Background
Movement
Non-Portrait
Nature and
Movement Close*2
Outdoor Scene
Background
Color
Bright
Gray
Backlit
Blue sky
included
Light blue
Backlit
Sunset
*3
*3
Orange
Spotlight
Dark
With tripod
Dark blue
*4*5
*3
*4*5
*3
*1: Displayed only when the AF method is set to [u+Tracking]. If another AF method is
set, the “Non-Portrait” icon will be displayed even if a person is detected.
*2: Displayed when the attached lens has distance information. With an Extension Tube
or Closeup Lens, the icon displayed may not match the actual scene.
*3: The icon suiting the scene detected will be displayed.
*4: Displayed when all the following conditions apply: The shooting scene is dark, it is a
night scene, and the camera is mounted on a tripod.
<→ Continued on next page>
149
A Shooting with the LCD Monitor
*5: Displayed with any of the lenses below:
• EF-S18-55mm f/3.5-5.6 IS II
• EF-S55-250mm f/4-5.6 IS II
• EF300mm f/2.8L IS II USM
• EF400mm f/2.8L IS II USM
• Image Stabilizer lenses marketed in 2012 or later.
*4*5: If the conditions in both *4 and *5 apply, the shutter speed will become slow.
Final Image Simulation
The final image simulation reflects the effects of the Picture Style, white
balance, etc., in the Live View image so you can see how the captured
image will look like.
During shooting, the Live View image will automatically reflect the
function settings listed below.
Final Image Simulation During Live View Shooting
Picture Style
* All settings such as sharpness, contrast, color saturation, and color tone will
be reflected.
White balance
White balance correction
Ambience-based shots
Light/scene-based shots
Creative filters
Metering mode
Exposure
Depth of field (with depth-of-field preview button ON)
Auto Lighting Optimizer
Peripheral illumination correction
Highlight tone priority
Aspect ratio (image area confirmation)
150
Shooting Function Settings
Function settings particular to Live View shooting are explained here.
Q Quick Control
If you press the <Q> button while the image is displayed on the LCD
monitor in a Creative Zone mode, you can set any of the following: AF
method, drive mode, metering mode, image-recording quality, builtin flash settings, white balance, Picture Style, Auto Lighting Optimizer,
and Creative filters.
In Basic Zone modes, you can set the functions in bold and the settings
shown in the table on page 76.
1
Press the <Q> button.
X The settable functions will be
displayed.
a function and set it.
2 Select
Press the <V> key to select a
function.
X The selected function and Feature
guide (p.52) will appear.
Press the <U> key or turn the
<6> dial to change the setting.
To set the drive mode’s <q> setting
or Picture Style parameters, press the
<B> button.
the setting.
3 ExitPress
<0> to finalize the setting and
return to Live View shooting.
You can also select <2> to return to
Live View shooting.
In Creative Zone modes, you can set the ISO speed by pressing the
<i> button.
For details on metering modes, see page 117.
151
U Using Creative Filters
While looking at the Live View screen, you can shoot while applying a
filter effect (Grainy B/W, Soft focus, Fish-eye effect, Art bold effect,
Water painting effect, Toy camera effect, and Miniature effect). These
are called Creative filters.
When you shoot with a Creative filter applied, only images applied with
a Creative filter will be saved. If you also want to save the image without
a Creative filter, shoot the image without the Creative filter and apply
the Creative filter afterward, then save it as a separate image (p.274).
any shooting mode except
1 Set
<F> or <G>.
the <Q> button.
2 Press
X The Quick Control screen will appear.
[ ].
3 Select
Press the <V> key to select [ ]
(Creative filter) on the screen’s right
side.
the Creative filter effect.
4 Select
Press the <U> key to select a
Creative filter (p.154).
X The Creative filter’s effect will appear
on the screen.
152
U Using Creative Filters
the Creative filter’s effect.
5 Adjust
Press the <B> button (except for
the Miniature effect).
Press the <U> key to adjust the
Creative filter’s effect, then press
<0>.
For the Miniature effect, press <0>,
then press the <V> key to move the
white frame to where you want it to
look sharp.
the picture.
6 Take
X The picture will be applied with the
Creative filter.
Even if you set the drive mode to <i> or the self-timer to <q>, single
shooting will take effect.
Creative filters cannot be used if any of the following is set: 1+JPEG
or 1 image quality, AEB, white balance bracketing, or multi shot noise
reduction.
When you shoot with a Creative filter, the histogram will not be displayed.
153
U Using Creative Filters
Creative Filter Characteristics
Grainy B/W
Makes the image grainy and black and white. By adjusting the
contrast, you can change the black-and-white effect.
Soft focus
Gives the image a soft look. By adjusting the blur, you can change
the degree of softness.
Fish-eye effect
Gives the effect of a fish-eye lens. The image will have a barrel-type
distortion.
Depending on the level of this filter effect, the amount trimmed along
the image periphery will change. Also, since this filter effect
magnifies the image center, the apparent resolution at the center
may degrade depending on the number of recorded pixels. Set the
filter effect while checking the resulting image. The AF method will
either be FlexiZone - Single (fixed at center) or Quick mode.
Art bold effect
Makes the photo look like an oil painting and the subject look threedimensional. You can adjust the contrast and saturation. Note that
the sky, white walls, and similar subjects may not be rendered with a
smooth gradation and may look irregular or have significant noise.
Water painting effect
Makes the photo look like a watercolor painting with soft colors. You
can adjust the color density. Note that night scenes or dark scenes
may not be rendered with a smooth gradation and may look irregular
or have significant noise.
154
U Using Creative Filters
Toy camera effect
Gives a color cast typical of toy cameras and darkens the image’s
four corners. By adjusting the color tone, you can change the color
cast.
Miniature effect
Creates a diorama effect. You can change where the image is to
look sharp. In step 5, you can press the <u> button (or tap [ ] on
the screen) to change the white frame’s orientation (horizontal/
vertical) where you want the image to look sharp. The AF method
will be FlexiZone - Single with the camera focusing the center of the
white frame.
With Grainy B/W, the grainy effect displayed on the LCD monitor will not
look the same as the actual photo.
With the Soft focus or Miniature effect, the blur effect displayed on the
LCD monitor may not look the same as the actual photo. You can check
the blur effect for the actual photo by pressing the depth-of-field preview
button (only in Creative Zone modes).
155
A Menu Function Settings
The menu options below are displayed.
The functions settable on this menu
screen only apply during Live View
shooting. These functions do not take
effect during viewfinder shooting.
Live View shooting
You can set Live View shooting to [Enable] or [Disable].
AF method
You can select [u+Tracking] (p.159), [FlexiZone - Multi] (p.161),
[FlexiZone - Single] (p.162), or [Quick mode] (p.166).
Continuous AF
The default setting is [Enable].
Since the focus is constantly close to the subject, when you press
the shutter button, the camera quickly focuses the subject. If
[Enable] is set, the lens will operate frequently and consume more
battery power. This will reduce the number of possible shots (battery
life). Also, if the AF method is set to [Quick mode], Continuous AF
will be automatically set to [Disable]. If you select another AF
method, Continuous AF will revert to the original setting.
During Continuous AF, turn off the power before you set the lens’s
focus mode switch to <MF>.
Touch Shutter
Just by tapping the LCD monitor screen, you can focus and take the
picture automatically. For details, see page 168.
Grid display
With [Grid 1l] or [Grid 2m], you can display grid lines to help
you level the camera vertically or horizontally.
156
A Menu Function Settings
Aspect ratioN
The image’s aspect ratio can be set to [3:2], [4:3], [16:9], or [1:1].
The area surrounding the Live View image is masked in black when
the following aspect ratios are set: [4:3] [16:9] [1:1].
JPEG images will be saved with the set aspect ratio. 1 images
will always be saved with the [3:2] aspect ratio. Since the aspect
ratio information is appended to the 1 image, the image will be
generated in the respective aspect ratio when you process the 1
image with the provided software. In the case of the [4:3], [16:9], and
[1:1] aspect ratios, the aspect-ratio lines will appear during image
playback, but the lines are not actually drawn on the image.
Image
Quality
3
Aspect Ratio and Pixel Count (approx.)
3:2
4:3
16:9
1:1
4608x3456
5184x3456
(17.9 megapixels) (16.0 megapixels)
5184x2912*
3456x3456
(15.1 megapixels) (11.9 megapixels)
4
3456x2304
(8.0 megapixels)
3072x2304
(7.0 megapixels)
3456x1944
2304x2304
(6.7 megapixels) (5.3 megapixels)
a
2592x1728
(4.5 megapixels)
2304x1728
(4.0 megapixels)
2592x1456*
1728x1728
(3.8 megapixels) (3.0 megapixels)
b
1920x1280
(2.5 megapixels)
1696x1280*
(2.2 megapixels)
1920x1080
1280x1280
(2.1 megapixels) (1.6 megapixels)
c
720x480
640x480
(350,000 pixels) (310,000 pixels)
720x400*
480x480
(290,000 pixels) (230,000 pixels)
1
Asterisked image-recording qualities do not exactly match the set aspect
ratio.
The image area displayed for the asterisked aspect ratio is slightly larger
than the recorded area. Check the captured images on the LCD monitor
when shooting.
If you use a different camera to directly print images shot with this
camera in the 1:1 aspect ratio, the images may not be correctly printed.
157
A Menu Function Settings
Metering timerN
You can change how long the exposure setting is displayed (AE lock
time). In Basic Zone modes, metering timer is fixed at 16 sec.
The Live View shooting will stop with any of the following operations. To
resume Live View shooting, press the <A> button again.
• When selecting [z3: Dust Delete Data], [53: Sensor cleaning],
[54: Clear settings], or [54: z firmware ver.]
Even if a low ISO speed is set, noise may be noticeable in the displayed
Live View image under low light. However, when you shoot, the image
recorded will have minimal noise. (The image quality of the Live View
image is different from that of the recorded image.)
158
Changing the Autofocus Method (AF Method)
Selecting the AF Method
You can select the AF method suiting the shooting conditions or subject. The
following AF methods are provided: [u(face)+Tracking], [FlexiZone Multi] (p.161), [FlexiZone - Single] (p.162), and [Quick mode] (p.166).
AF methods other than the [Quick mode] use the image sensor to
autofocus while displaying the Live View image.
Select the AF method.
Under the [A] tab, select [AF method].
Select the desired AF method, then
press <0>.
While the Live View image is
displayed, you can also press the
<Q> button to select the AF method
on the Quick Control screen (p.151).
u(face)+Tracking: c
Human faces are detected and focused. If a face moves, the AF point
<p> also moves to track the face.
1
Display the Live View image.
Press the <A> button.
X The Live View image will appear on
the LCD monitor.
an AF point.
2 Select
When a face is detected, the <p> AF point
will appear over the face to be focused.
If multiple faces are detected, <q>
will be displayed. Press the <U>
key to move the <q> frame over
the desired target face.
You can also tap the LCD monitor screen
to select the face or subject. If the subject
is not a face, < > will be displayed.
159
Changing the Autofocus Method (AF Method)
If no faces are detected or if you tap
the LCD monitor but do not select any
face or subject, the camera will switch
to [FlexiZone - Multi] with automatic
selection (p.161).
the subject.
3 Focus
Press the shutter button halfway to
focus.
X When focus is achieved, the AF point
will turn green and the beeper will
sound.
X If focus is not achieved, the AF point
will turn orange.
the picture.
4 TakeCheck
the focus and exposure, then
press the shutter button completely to
take the picture (p.146).
If the focus is far off, face detection will not be possible. If you set
[Continuous AF] to [Enable], you can prevent the image from becoming
greatly out of focus.
An object other than a human face may be detected as a face.
Face detection will not work if the face is very small or large in the
picture, too bright or too dark, or partially hidden.
The <p> may cover only part of the face.
If you press <0> or the <L> button, the AF point < > will appear at
the center and you can use the <S> keys to move the AF point.
Since AF is not possible with a face detected near the edge of the picture,
the <p> will be grayed out. If you press the shutter button halfway, the
subject will be focused in FlexiZone - Multi method with automatic
selection.
160
Changing the Autofocus Method (AF Method)
When [Continuous AF] (p.156) or [Movie servo AF] (p.196) is set to
[Enable]
When [u+Tracking] or [FlexiZone - Multi] with automatic selection is
set, the AF point will be momentarily displayed in the image center if the
subject is not detected. If you press the shutter button halfway, the
camera will focus in FlexiZone - Multi method with automatic selection. If
you press the shutter button halfway during movie shooting, the center
AF point will be used to focus.
FlexiZone - Multi: o
Up to 31 AF points (automatically selected) covering a wide area can be
used to focus. This wide area can also be divided into 9 zones for
focusing (zone selection).
1
Display the Live View image.
Press the <A> button.
X The Live View image will appear on
the LCD monitor.
Area frame
the AF zone. N
2 Select
Pressing <0> or the <L> button
will toggle between automatic
selection and zone selection. In Basic
Zone modes, automatic selection is
set automatically.
Use the <S> keys to select a zone.
To return to the center zone, press
<0> or the <L> button again.
You can also tap the LCD monitor
screen to select a zone. When a zone
is selected, tap [
] on the screen
to switch to automatic selection.
161
Changing the Autofocus Method (AF Method)
the subject.
3 Focus
Aim the AF point over the subject and
press the shutter button halfway.
X When focus is achieved, the AF point
will turn green and the beeper will
sound.
X If focus is not achieved, the area
frame will turn orange.
the picture.
4 TakeCheck
the focus and exposure, then
press the shutter button completely to
take the picture (p.146).
When the camera does not focus the desired target subject with
automatic AF point selection, switch the AF method to zone selection or
[FlexiZone - Single], and refocus.
Depending on the aspect ratio setting, the number of AF points will differ.
At [3:2], there will be 31 AF points. At [1:1] and [4:3], there will be 25 AF
points. At [16:9], 21 AF points. Also, at [16:9], there will be only three
zones.
For movie shooting, there will be 21 AF points (or 25 AF points if
[640x480] is set) and three zones (or 9 zones if [640x480] is set).
FlexiZone - Single: d
Since only one AF point is used to focus, you can focus the target subject.
1
AF point
162
Display the Live View image.
Press the <A> button.
X The Live View image will appear on
the LCD monitor.
X The AF point < > will appear. During
movie shooting, if [Movie servo AF]
is set to [Enable], the AF point will be
displayed in a larger size.
Changing the Autofocus Method (AF Method)
the AF point.
2 Move
Press the <S> key to move the AF
point to where you want to focus. (It
cannot be moved to the edges of the
picture.) To return the AF point to the
center, press <0> or the <L>
button.
You can also tap the LCD monitor
screen to move the AF point.
the subject.
3 Focus
Aim the AF point over the subject and
press the shutter button halfway.
X When focus is achieved, the AF point
will turn green and the beeper will
sound.
X If focus is not achieved, the AF point
will turn orange.
the picture.
4 TakeCheck
the focus and exposure, then
press the shutter button completely to
take the picture (p.146).
163
Changing the Autofocus Method (AF Method)
Notes About [u+Tracking], [FlexiZone - Multi], and
[FlexiZone - Single]
AF Operation
Focusing will take longer than with [Quick mode].
Even when focus has been achieved, pressing the shutter button
halfway will focus again.
The image brightness may change during and after the AF operation.
If the light source changes while the Live View image is displayed,
the screen may flicker and focusing may be difficult. If this happens,
exit Live View shooting and autofocus under the actual light source.
When [FlexiZone - Multi] is set and you press the <u> button (or
tap < > on the screen), the center of the selected zone (or image
center with automatic selection) will be magnified. If you press the
shutter button halfway, the display will return to normal and the
camera will focus.
When [FlexiZone - Single] is set and you press the <u> button (or
tap < > on the screen), the area covered by the AF point will be
magnified. Press the shutter button halfway to focus while in the
magnified view. This is effective when the camera is attached to a
tripod and you need to attain very precise focus. If focusing is difficult
in the magnified view, return to the normal display and use AF. Note
that the AF speed may differ between the normal and magnified views.
If you magnify the view after focusing with [FlexiZone - Multi] or
[FlexiZone - Single] in the normal view, it may not look focused.
If [u+Tracking] is set, magnified view is not possible.
If you shoot a peripheral subject and it is slightly out of focus, aim the
center AF point or zone over the subject to focus, focus again and then
take the picture.
The AF-assist beam will not be emitted. However, if an EX-series
Speedlite (sold separately) equipped with an LED light is used, the LED
light will turn on for AF-assist when necessary.
In magnified view, the higher the magnification, the more difficult
focusing will be because of camera shake when shooting hand-held (as
well as when the lens focus mode switch is set to <MF>). Using a tripod
is recommended.
164
Changing the Autofocus Method (AF Method)
Shooting conditions that make focusing difficult
Low-contrast subjects such as the blue sky, solid-color flat surfaces
or when highlights or shadow details are lost.
Subjects in low light.
Stripes and other patterns where there is contrast only in the
horizontal direction.
Subjects with repetitive patterns (skyscraper windows, computer
keyboards, etc.).
Fine lines and subject outlines.
Under a light source whose brightness, color, or pattern keeps changing.
Night scenes or points of light.
When the image flickers under fluorescent or LED light sources.
Extremely small subjects.
Subjects at the edge of the picture.
Subjects strongly reflecting light.
The AF point covers both a near and faraway subject (such as an
animal in a cage).
Subjects that keep moving within the AF point and cannot keep still
due to camera shake or subject blur.
A subject approaching or moving away from the camera.
Autofocusing while the subject is very far out of focus.
Soft focus effect is applied with a soft focus lens.
A special effect filter is used.
Noise (spots, banding, etc.) appears on the screen during AF.
If focus is not achieved with the above shooting conditions, set the lens
focus mode switch to <MF> and focus manually.
If you use AF with any of the following lenses, using [Quick mode] is
recommended. If you use the [u+Tracking], [FlexiZone - Multi] or
[FlexiZone - Single] for AF, it may take a longer time to achieve focus or
the camera may not be able to achieve correct focus.
EF50mm f/1.4 USM, EF50mm f/1.8 II, EF50mm f/2.5 Compact Macro,
EF75-300mm f/4-5.6 III, EF75-300mm f/4-5.6 III USM
For information on discontinued lenses, refer to your local Canon Web
site.
165
Changing the Autofocus Method (AF Method)
Quick Mode: f
The dedicated AF sensor is used to focus in One-Shot AF operation
(p.98), using the same AF method as with viewfinder shooting.
Although you can focus the target subject quickly, the Live View image
will be interrupted momentarily during the AF operation.
You can use nine AF points to focus (automatically selected). You can
also select one AF point to focus and focus only the area covered by
that AF point (manually selected). In Basic Zone modes, the AF point
will be selected automatically. You cannot select the AF point.
AF point
1
Display the Live View image.
Press the <A> button.
X The Live View image will appear on
the LCD monitor.
The small boxes are the AF points.
the AF point. N
2 Select
Pressing <0> or the <L> button
will toggle between automatic
selection and manual selection.
Use the <S> keys to select an AF
point. To return the AF point to the
center, press <0> or the <L>
button.
You can also tap the LCD monitor
screen to select the AF point. During
manual selection, tap [
] on the
screen to switch to automatic
selection.
166
Changing the Autofocus Method (AF Method)
the subject.
3 Focus
Aim the AF point over the subject and
press the shutter button halfway.
X The Live View image will turn off, the
reflex mirror will go back down, and
AF will be executed. (No picture is
taken.)
X When focus is achieved, the AF point
that achieved focus will turn green
and the Live View image will
reappear.
X If focus is not achieved, the AF point
will turn orange and blink.
the picture.
4 TakeCheck
the focus and exposure, then
press the shutter button completely to
take the picture (p.146).
When [Quick mode] is set, [Continuous AF] cannot be set (p.156).
The [Quick mode] cannot be set for movie shooting.
You cannot take a picture during autofocusing. Take the picture while the
Live View image is displayed.
167
x Shooting with the Touch Shutter
Just by tapping the LCD monitor screen, you can focus and take the
picture automatically. This works in all shooting modes.
1
Display the Live View image.
Press the <A> button.
X The Live View image will appear on
the LCD monitor.
the touch shutter.
2 Enable
Tap [y] on the screen’s bottom left.
Each time you tap the icon, it will
toggle between [y] and [x].
[x] (Touch Shutter: Enable)
Enables you to focus and shoot by
tapping the screen.
[y] (Touch Shutter: Disable)
You can tap where you want to focus
on the screen. Then press the shutter
button completely to shoot.
to shoot.
3 TapTapthethescreen
face or subject on the screen.
X At the point you tap, the camera will
focus in the AF method that was set
(p.159-167). When [FlexiZone Multi] is set, it will switch to
[FlexiZone - Single].
X When focus is achieved, the AF point
turns green and the picture is taken
automatically.
If focus is not achieved, the AF point
turns orange. Tap the face or subject
on the screen again.
168
x Shooting with the Touch Shutter
Even if <i> (continuous shooting) is set, single shooting will take
effect.
The touch shutter does not work with the magnified view.
When [6: Shutter/AE lock button] is set to [1: AE lock/AF] or [3: AE/
AF, no AE lock] under [54: Custom Functions (C.Fn)], autofocusing
does not take effect.
You can also enable the touch shutter by setting [Touch Shutter:
Enable] in the [A] tab.
To take a bulb exposure, tap the screen twice. The first tap on the screen
will start the bulb exposure. Tapping it again will stop the exposure. Be
careful not to shake the camera when tapping the screen.
169
MF: Focus Manually
You can magnify the image and focus precisely with manual focus.
1
Set the lens focus mode switch to
<MF>.
Turn the lens focusing ring to focus
roughly.
the magnifying frame.
2 Display
Press the <u> button.
X The magnifying frame will appear.
You can also tap [ ] on the screen to
magnify the image.
the magnifying frame.
3 Move
Press the <S> key to move the
Magnifying frame
magnifying frame to the position
where you want to focus.
To return the magnifying frame to the
center, press <0> or the <L> button.
the image.
4 Magnify
Each time you press the <u> button,
the magnification within the frame will
change as follows:
1x → 5x → 10x → Magnification canceled
manually.
5 Focus
While looking at the magnified image,
turn the lens focusing ring to focus.
After achieving focus, press the <u>
button to return to the normal view.
AE lock
Magnified area position
Magnification
170
the picture.
6 TakeCheck
the focus and exposure, then
press the shutter button to take the
picture (p.146).
Live View Shooting Cautions
Image Quality
When you shoot at high ISO speeds, noise (such as dots of light and
banding) may become noticeable.
Shooting in high temperatures may cause noise and irregular colors in
the image.
If Live View shooting is used continuously for a long period, the camera’s
internal temperature may rise, and image quality may deteriorate. Stop
Live View shooting when not shooting images.
If you shoot a long exposure while the camera’s internal temperature is
high, image quality may deteriorate. Stop Live View shooting and wait a
few minutes before shooting again.
White <s> and Red <E> Internal Temperature Warning
If the camera’s internal temperature increases due to prolonged Live
View shooting or under a high ambient temperature, a white icon <s>
will appear. If you continue shooting while this icon is displayed, the
image quality of still photos may deteriorate. It is recommended to
temporarily exit Live View shooting and allow the camera to cool down
before shooting again.
If the camera’s internal temperature further increases while the white
icon <s> is displayed, a red icon <E> will start blinking. This blinking
icon indicates that the Live View shooting will soon stop automatically. If
this happens, you will not be able to shoot again until the camera’s
internal temperature decreases. Turn off the power and let the camera
rest for a while.
Using Live View shooting at a high temperature for a prolonged period
will cause the <s> and <E> icons to appear earlier. When you are not
shooting, turn off the camera.
If the camera’s internal temperature is high, the image quality of high ISO
speed images or long exposures may be degraded even before the white
icon <s> is displayed.
171
Live View Shooting Cautions
Shooting Result
If you take the picture in magnified view, the exposure may not come out
as desired. Return to the normal view before taking the picture. In
magnified view, the shutter speed and aperture will be displayed in
orange. Even if you take the picture in magnified view, the image will be
captured in the normal view.
If [z2: Auto Lighting Optimizer] (p.125) is not set to [Disable], the
image may look bright even if a decreased exposure compensation or
decreased flash exposure compensation is set.
If you use a TS-E lens (other than the TS-E17mm f/4L or TS-E24mm
f/3.5L II) and shift or tilt the lens or use an Extension Tube, the standard
exposure may not be obtained or an irregular exposure may result.
Live View Image
Under low- or bright-light conditions, the Live View image may not reflect
the brightness of the captured image.
If the light source within the image changes, the screen may flicker. If this
happens, exit Live View shooting and resume shooting under the actual
light source.
If you point the camera to a different direction, it may throw off the Live
View image’s correct brightness momentarily. Wait until the brightness
level stabilizes before shooting.
If there is a very bright light source in the picture, the bright area might
appear black on the LCD monitor. However, the actual captured image
will correctly show the bright area.
In low light, if you set the [52: LCD brightness] to a bright setting,
chrominance noise may appear in the Live View image. However, the
chrominance noise will not be recorded in the captured image.
When you magnify the image, the image sharpness may look more
pronounced than in the actual image.
Custom Functions
During Live View shooting, certain Custom Function settings will not take
effect (p.297).
Lens and Flash
The focus preset function is possible for Live View shooting only when
using a (super) telephoto lens equipped with the focus preset mode
marketed since the second half of 2011.
FE lock is not possible when the built-in flash or an external Speedlite is
used. Modeling flash will not work with an external Speedlite.
172
6
Shooting Movies
You can shoot movies by setting
the power switch to <k>. The
movie recording format will be
MOV.
Cards that can record movies
When shooting movies, use a large-capacity SD card rated SD
Speed Class 6 “
” or higher.
If you use a slow-writing card when shooting movies, the movie
may not be recorded properly. Also, if you play back a movie on a
card with a slow reading speed, the movie may not play back
properly.
To check the card’s read/write speed, refer to the card
manufacturer’s Web site.
About Full HD 1080
Full HD 1080 indicates compatibility with HighDefinition featuring 1080 vertical pixels (scanning
lines).
173
k Shooting Movies
Connecting the camera to a TV set is recommended to play back the
movies shot (p.262, 265).
Autoexposure Shooting
When the shooting mode is not set to <a>, autoexposure control will
take effect to suit the scene’s current brightness.
1
Set the power switch to <k>.
X The reflex mirror will make a sound,
then the image will appear on the
LCD monitor.
mode.
2 SetSetthetheshooting
Mode Dial to any shooting
mode except <a>.
3
Focus the subject.
Before shooting a movie, focus with
AF or manual focus (p.159-167, 170).
By default, [Movie Servo AF:
Enable] is set so that the camera will
always focus. To stop Movie Servo
AF, see page 196.
the movie.
4 Shoot
Press the <A> button to start
Recording movie
Microphone
174
shooting a movie. To stop movie
shooting, press <A> again.
X While the movie is being shot, the
“o” mark will be displayed on the
upper right of the screen.
k Shooting Movies
Cautions for movie shooting are on pages 200 and 201.
If necessary, also read the Live View shooting cautions on pages
171 and 172.
In Basic Zone modes, the shooting result will be the same as in the
<A> mode. Also, the scene icon for the scene detected by the camera
is displayed on the upper left (p.176).
In the <f> and <s> shooting modes, the settings will be the same
as in the <d> mode.
Settable menu functions will differ between Basic Zone modes and
Creative Zone modes (p.322).
The ISO speed (ISO 100 - ISO 6400), shutter speed, and aperture are
set automatically.
In Creative Zone modes, you can press the <A> button to lock the
exposure (AE lock, p.123,198). After applying AE lock during movie
shooting, you can cancel it by pressing the <S> button. (AE lock setting
is retained until you press the <S> button.)
In Creative Zone modes, you can hold down the <O> button and turn
the <6> dial to set the exposure compensation.
Pressing the shutter button halfway displays the shutter speed and ISO
speed at the bottom of the screen. This is the exposure setting for taking
a still photo (p.179). The exposure setting for movie shooting is not
displayed. Note that the exposure setting for movie shooting may differ
from that for still photo shooting.
If you shoot a movie with autoexposure, the shutter speed and aperture
will not be recorded in the image information (Exif).
Using an EX-series Speedlite (Sold Separately) Equipped with an LED Light
This camera is compatible with the function turning on the LED light
automatically in low-light conditions during autoexposure shooting. For
details, refer to the Speedlite’s instruction manual.
175
k Shooting Movies
Scene Icons
During movie shooting in a Basic Zone mode, an icon representing the
scene detected by the camera will be displayed and the shooting will be
adapted to that scene. For certain scenes or shooting conditions, the
icon displayed may not match the actual scene.
Subject
Background
Non-Portrait
Portrait*1
Nature and
Outdoor Scene
Close*2
Background
Color
Bright
Gray
Backlit
Blue sky included
Light blue
Backlit
Sunset
*3
*3
Orange
Spotlight
Dark blue
Dark
*1: Displayed only when the AF method is set to [u+Tracking]. If another AF method is
set, the “Non-Portrait” icon will be displayed even if a person is detected.
*2: Displayed when the attached lens has distance information. With an Extension Tube
or Closeup Lens, the icon displayed may not match the actual scene.
*3: The icon suiting the scene detected will be displayed.
176
k Shooting Movies
Manual Exposure Shooting
In the <a> mode, you can freely set the shutter speed, aperture, and
ISO speed for the movie shooting. Using manual exposure to shoot
movies is for advanced users.
1
Set the power switch to <k>.
X The reflex mirror will make a sound,
then the image will appear on the
LCD monitor.
2 Set the Mode Dial to <a>.
<6>
<O> + <6>
the shutter speed and
3 Set
aperture.
To set the shutter speed, turn the
<6> dial. The settable shutter
speeds depend on the frame rate
<9>.
•8 / 7
: 1/4000 sec. - 1/60 sec.
•6 / 5 / 4 : 1/4000 sec. - 1/30 sec.
To set the aperture, hold down the
<O> button and turn the <6>
dial.
4
Set the ISO speed.
Press the <i> button and press
the <U> key or turn the <6> dial
to select the ISO speed.
For details on the ISO speed, see the
next page.
177
k Shooting Movies
and shoot the movie.
5 Focus
The procedure is the same as steps 3
and 4 for “Autoexposure Shooting”
(p.174).
ISO speed during manual-exposure shooting
With [Auto], the ISO speed will be set automatically within ISO 100 ISO 6400.
You can set the ISO speed manually within ISO 100 - ISO 6400 in
whole-stop increments. Under [54: Custom Functions (C.Fn)], if
[2: ISO expansion] is set to [1: On], the manual setting range will
expand so you can also select H (equivalent to ISO 12800).
Under [54: Custom Functions (C.Fn)], if [3: Highlight tone
priority] is set to [1: Enable], the ISO speed will be ISO 200 - ISO
6400.
Since shooting a movie at ISO 12800 may result in much noise, it is
designated as an expanded ISO speed (displayed as “H”).
Under [54: Custom Functions (C.Fn)], if [2: ISO expansion] is set to
[1: On] and you switch from still photo shooting to movie shooting, the
manual setting range’s maximum will be H (equivalent to ISO 12800).
Even if you switch back to still photo shooting, the ISO speed will not
revert to the original setting.
Exposure compensation cannot be set.
Changing the shutter speed or aperture during movie shooting is not
recommended since the changes in the exposure will be recorded.
If you change the shutter speed while shooting under fluorescent or LED
lighting, image flicker may be recorded.
When ISO Auto is set, you can press the <A> button to lock the ISO
speed.
After recomposing the picture, you can see the exposure level difference
on the exposure level indicator (p.179) compared to when you pressed
the <A> button.
By pressing the <B> button, you can display the histogram.
When shooting a movie of a moving subject, a shutter speed of 1/30 sec.
to 1/125 sec. is recommended. The faster the shutter speed, the less
smooth the subject’s movement will look.
178
k Shooting Movies
Information Display
Each time you press the <B> button, the information display will
change.
AF method
• c: u+Tracking
• o : FlexiZone - Multi
• d : FlexiZone - Single
Movie shooting mode
: Autoexposure
(Basic Zone modes)
: Autoexposure
(Creative Zone modes)
: Manual exposure
Possible shots
Movie shooting remaining time/
Elapsed time
Battery check
AF point (FlexiZone - Single)
Drive mode
Quick Control
Image-recording
quality
White balance
Picture Style
Auto Lighting
Optimizer
Movie recording
size
Frame rate
Eye-Fi card
transmission
Video snapshot
Movie Servo AF
AE lock
LED light
Shutter speed
Aperture
GPS connection indicator
Digital compass
Exposure level indicator
Exposure mode
L: Autoexposure
K: Manual exposure
Magnified view
Recording level:
Manual
ISO speed
Attenuator
Highlight tone priority
Wind filter
When movie shooting starts, the movie shooting remaining time will change
to the elapsed time.
179
k Shooting Movies
Notes on Movie Shooting
Do not point the camera toward an intense light source, such as the sun
on a sunny day or an intense artificial light source. Doing so may
damage the image sensor or the camera’s internal components.
If <Q> is set, you should not change the ISO speed or aperture during
movie shooting because it may also change the white balance.
If you shoot a movie under fluorescent or LED lighting, the movie may flicker.
Zooming the lens during movie shooting is not recommended. Zooming
the lens can cause changes in the exposure regardless of whether the
lens’ maximum aperture changes or not. Exposure changes may be
recorded as a result.
You cannot magnify the image during movie shooting.
Be careful not to cover the microphone (p.174) with your finger, etc.
Cautions for movie shooting are on pages 200 and 201.
If necessary, also read the Live View shooting cautions on pages
171 and 172.
Movie-related settings are under the [Z1] and [Z2] tabs (p.196).
A movie file is recorded each time you shoot a movie. If the file size
exceeds 4 GB, a new file will be automatically created.
The movie image’s field of view is approx. 100% (with movie recording
size set to [A]).
The sound will be recorded in stereo by the camera’s built-in microphone
(p.174).
Most commercially-available external stereo microphones with a 3.5 mm
diameter miniplug can be connected to the camera. If an external
microphone has been connected to the camera’s external microphone IN
terminal (p.20), it will be given priority over the built-in microphone.
You can use Remote Controller RC-6 (sold separately, p.307) to start and
stop the movie shooting if the drive mode is <Q>. Set the shooting timing
switch to <2> (2-sec. delay), then press the transmit button. If the switch is
set to <o> (immediate shooting), still photo shooting will take effect.
With a fully-charged Battery Pack LP-E8, the total movie shooting time
will be as follows: approx. 1 hr. 40 min. at room temperature (23°C/73°F),
and approx. 1 hr. 20 min. at low temperature (0°C/32°F).
The focus preset function is possible for movie shooting only when using
a (super) telephoto lens equipped with the focus preset mode marketed
since the second half of 2011.
180
k Shooting Movies
Final Image Simulation
The final image simulation is a function that allows you to see the
effects of the Picture Style, white balance, etc., on the image.
During movie shooting, the image displayed will automatically reflect
the effects of the settings listed below.
Final image simulation for movie shooting
Picture Style
* All settings such as sharpness, contrast, color saturation, and color tone will
be reflected.
White balance
White balance correction
Exposure
Depth of field
Auto Lighting Optimizer
Peripheral illumination correction
Highlight tone priority
181
k Shooting Movies
Shooting Still Photos
While shooting a movie, you can also
take a still photo by pressing the shutter
button completely.
Taking still photos during movie shooting
If you take a still photo during movie shooting, the movie will record
a still moment lasting approx. 1 sec.
The captured still photo will be recorded to the card, and the movie
shooting will resume automatically when the Live View image is
displayed.
The movie and still photo will be recorded as separate files on the card.
Functions particular to still photo shooting are shown below. Other
functions will be the same as for movie shooting.
Function
Settings
ImageRecording
Quality
As set in [z1: Image quality].
When the movie recording size is [1920x1080] or [1280x720], the
aspect ratio will be 16:9. When the size is [640x480], the aspect
ratio will be 4:3.
ISO Speed*
• With autoexposure shooting: Automatically set within ISO 100 ISO 6400.
• With manual exposure shooting: See “ISO speed during
manual-exposure shooting” on page 178.
Exposure
Setting
• Autoexposure shooting: Automatically-set shutter speed and
aperture (displayed when pressing the shutter button halfway).
• Manual exposure shooting: Manually-set shutter speed and
aperture.
AEB
Canceled
Flash
Flash off
* If highlight tone priority is set, the ISO speed range will start from ISO 200.
Regardless of the drive mode setting, single shooting will take effect for still
photo shooting during movie shooting.
182
k Shooting Movies
When you press the shutter button halfway to autofocus during movie
shooting, the following phenomena may occur.
• Focus may become far off momentarily.
• The brightness of the recorded movie may be different from that of the
actual scene.
• The recorded movie may be momentarily still.
• Lens operation noise may be recorded.
• You may not take a still photo when focus is not achieved in cases such as
the subject is moving.
183
Shooting Function Settings
Function settings particular to movie shooting are explained here.
Q Quick Control
If you press the <Q> button while the image is displayed on the LCD
monitor, you can set any of the following: AF method, drive mode,
image-recording quality (still photos), movie-recording size, video snapshots, white balance, Picture Style, and Auto Lighting
Optimizer.
In Basic Zone modes, only the functions in bold can be set.
1
Press the <Q> button. (7)
X The settable functions will be
displayed.
a function and set it.
2 Select
Press the <V> key to select a
function.
X The function and Feature guide (p.52)
will appear.
Press the <U> key or turn the
<6> dial to change the setting.
To set the drive mode’s <q> setting
or Picture Style parameters, press the
<B> button.
the setting.
3 ExitPress
<0> to finalize the setting and
return to movie shooting.
You can also select <2> to return to
movie shooting.
184
3 Setting the Movie-recording Size
The menu option [Z2: Movie rec. size]
enables you to select the movie’s image
size [****x****] and frame rate [9]
(frames recorded per second). The 9
(frame rate) switches automatically
depending on the [52: Video system]
setting.
Image size
A [1920x1080]
B [1280x720]
C [640x480]
: Full High-Definition (Full HD) recording quality.
The aspect ratio will be 16:9.
: High-Definition (HD) recording quality.
The aspect ratio will be 16:9.
: Standard-definition recording quality.
The aspect ratio will be 4:3.
Frame rate (fps: frames per second)
6/8 : For areas where the TV format is NTSC (North America,
Japan, Korea, Mexico, etc.).
5/7 : For areas where the TV format is PAL (Europe, Russia,
China, Australia, etc.).
4
: Mainly for motion pictures.
185
3 Setting the Movie-recording Size
Total Movie Recording Time and File Size Per Minute
Movie-Recording
Size
Total Recording Time (approx.)
4 GB Card
8 GB Card
16 GB Card
File Size
(approx.)
11 min.
22 min.
44 min.
330 MB/min.
11 min.
22 min.
44 min.
330 MB/min.
46 min.
1 hr. 32 min.
3 hr. 4 min.
82.5 MB/min.
6
[1920x1080]
5
4
[1280x720]
[640x480]
8
7
6
5
About Movie Files Exceeding 4 GB
Even if you shoot a movie exceeding 4 GB, you can keep shooting
without interruption.
During movie shooting, approx. 30 sec. before the movie reaches
the 4 GB file size, the elapsed shooting time displayed in the movie
shooting screen will start blinking. If you keep shooting the movie
and the file size exceeds 4 GB, a new movie file will be created
automatically and the elapsed shooting time or time code will stop
blinking.
When you play back the movie, you will have to play each movie file
individually. Movie files cannot play back consecutively automatically.
After the movie playback ends, select the next movie to be played.
Movie Shooting Time Limit
The maximum recording time of one movie clip is 29 min. 59 sec. If
the movie shooting time reaches 29 min. 59 sec., the movie shooting
will stop automatically. You can resume movie shooting by pressing
the <A> button. (A new movie file is recorded.)
An increase of the camera’s internal temperature may cause movie shooting
to stop before the maximum recording time shown in the table above (p.200).
186
3 Shooting Video Snapshots
You can easily create a short movie with the video snapshot function.
A video snapshot is a short movie clip lasting approx. 2 sec., 4 sec., or 8
sec. A collection of video snapshots is called a video snapshot album
and can be saved to the card as a single movie file. By changing the
scene or angle in each video snapshot, you can create dynamic short
movies.
A video snapshot album can also be played together with background
music (p.193, 255).
Video Snapshot Album Concept
Video
snapshot 1
Video
snapshot 2
Video
snapshot x
Video snapshot album
Setting the Video Snapshot Shooting Duration
1
Select [Video snapshot].
Under the [Z2] tab, select [Video
snapshot], then press <0>.
[Enable].
2 Select
Select [Enable], then press <0>.
187
3 Shooting Video Snapshots
[Album settings].
3 Select
Select [Album settings], then press
<0>.
If you want to continue shooting for
an existing album, go to “Adding to an
Existing Album” (p.192).
[Create a new album].
4 Select
Select [Create a new album], then
press <0>.
the Snapshot length.
5 Select
Press <0> and use <V> to select
the snapshot’s length, then press
<0>.
[OK].
6 Select
Select [OK], then press <0>.
Shooting duration
188
Press the <M> button to exit the
menu and return to the movie
shooting screen. A blue bar will
appear to indicate the snapshot
length.
Go to “Creating a Video Snapshot
Album” (p.189).
3 Shooting Video Snapshots
Creating a Video Snapshot Album
the first video snapshot.
7 Shoot
Press the <A> button and shoot.
X The blue bar indicating the shooting
duration will gradually decrease. After
the set shooting duration elapses, the
shooting stops automatically.
X After the LCD monitor turns off and the
access lamp stops blinking, the
confirmation screen will appear (p.190).
as a video snapshot album.
8 Save
Press the <U> key to select
[JSave as album], then press
<0>.
X The movie clip will be saved as the
video snapshot album’s first video
snapshot.
to shoot more video
9 Continue
snapshots.
Repeat step 7 to shoot the next video
snapshot.
Press the <U> key to select
[JAdd to album], then press <0>.
To create another video snapshot
album, select [W Save as a new
album], then select [OK].
189
3 Shooting Video Snapshots
video snapshot shooting.
10 QuitSetthe[Video
snapshot] to [Disable].
To return to normal movie
shooting, be sure to set [Disable].
Press the <M> button to exit the
menu and return to the normal movie
shooting screen.
On-screen Options in Steps 8 and 9
Function
JSave as album
(Step 8)
JAdd to album
(Step 9)
Description
The movie clip will be saved as the video
snapshot album’s first video snapshot.
The video snapshot just recorded will be added
to the album recorded immediately before.
A new video snapshot album is created and the
W Save as a new album
movie clip is saved as the first video snapshot.
(Step 9)
The new album will be a different file from the
previously recorded album.
The video snapshot just recorded will be played.
1 Playback video snapshot
For playback operations, see the table on the
(Steps 8 and 9)
next page.
rDo not save to album
If you want to delete the video snapshot you just
(Step 8)
recorded and not save it to the album, select
rDelete without saving to
[OK].
album (Step 9)
190
3 Shooting Video Snapshots
[Playback video snapshot] Operations
Function
Playback Description
7 Play
By pressing <0>, you can play or pause the just-recorded
video snapshot.
5 First frame
Displays the first scene of the album’s first video snapshot.
Skip backward*
Each time you press <0>, the video snapshot skips back by
a few seconds.
3 Previous frame
Each time you press <0>, the previous frame is displayed.
If you hold down <0>, it will rewind the movie.
6 Next frame
Each time you press <0>, the movie will play frame-byframe. If you hold down <0>, it will fast forward the movie.
Skip forward*
4 Last frame
Each time you press <0>, the video snapshot skips forward
by a few seconds.
Displays the last scene of the album’s last video snapshot.
Playback position
mm’ ss”
Playback time (minutes:seconds)
9 Volume
You can adjust the built-in speaker’s (p.254) volume by
turning the <6> dial.
32
Pressing the <M> button returns to the previous screen.
* With [Skip backward/Skip forward], the skipping duration will correspond to the
number of seconds set under [Video snapshot] (approx. 2 sec., 4 sec., or 8 sec.).
191
3 Shooting Video Snapshots
Adding to Existing Album
1
Select [Add to existing album].
Follow step 4 on page 188 to select
[Add to existing album], then press
<0>.
an existing album.
2 Select
Press the <U> key to select an
album, then press <0>.
Check the text, select [OK], then
press <0>.
X Certain video snapshot settings will
change to match the existing album’s
settings.
Press the <M> button to exit the
menu and return to the movie
shooting screen.
the video snapshot.
3 Shoot
Go to “Creating a Video Snapshot
Album” (p.189).
You cannot select an album shot with another camera.
192
3 Shooting Video Snapshots
Cautions for Shooting Video Snapshots
You can add to an album only video snapshots with the same duration
(approx. 2 sec., 4 sec., or 8 sec. each).
Note that if you do any of the following while shooting video snapshots, a
new album will be created for subsequent video snapshots.
• Changing the [Movie rec. size] (p.185).
• Changing the [Sound rec.] setting from [Auto/Manual] to [Disable] or
from [Disable] to [Auto/Manual] (p.198).
• Updating the firmware.
You cannot take still photos while shooting a video snapshot.
The shooting duration of a video snapshot is only approximate.
Depending on the frame rate, the shooting duration displayed during
playback may not be exact.
Playing an Album
You can play back a completed album in the same way as a normal
movie (p.254).
1
Play back the movie.
Press the <x> button to display
images.
the album.
2 Select
Press the <U> key to select an album.
On the single-image display, the
[
] icon displayed on the upper
left indicates that the image is a video
snapshot.
back the album.
3 PlayPress
<0>.
On the movie playback panel
displayed, select [7] (Play), then
press <0>.
193
3 Shooting Video Snapshots
Background Music
Music recorded on the memory card must be used only for private
enjoyment. Do not violate the rights of the copyright holder.
You can play background music when you play back albums, normal
movies, and slide shows on the camera (p.255, 258). To play background
music, you must first copy the background music to the card using EOS
Utility (provided software). For information on how to copy the background
music, refer to the EOS Utility Instruction Manual (p.367).
Editing an Album
After shooting, you can rearrange, delete, or play back the video
snapshots in the album.
1
On the playback panel, select [X]
(Edit).
X The editing screen will be displayed.
an editing operation.
2 Select
Use the <U> keys to select an
editing operation, then press <0>.
Function
Description
Move snapshot
Press the <U> key to select the video snapshot you
want to move, then press <0>. Press the <U> key to
move the snapshot, then press <0>.
Delete snapshot
Press the <U> key to select the video snapshot you
want to delete, then press <0>. The [L] icon will be
displayed on the selected video snapshot. Pressing <0>
again will cancel the selection and [L] will disappear.
Play snapshot
Press the <U> key to select the video snapshot you
want to play, then press <0>.
194
3 Shooting Video Snapshots
the edited album.
3 Save
Press the <M> button to return to
the Editing panel at the screen’s
bottom.
Press the <U> key to select [W]
(Save), then press <0>.
X The save screen will appear.
To save it as a new movie, select
[New file]. To save it and overwrite
the original movie file, select
[Overwrite], then press <0>.
If the card does not have enough free space, [New file] will not be
available.
When the battery level is low, editing albums is not possible. Use a fullycharged battery.
Provided Software Usable with Albums
EOS Video Snapshot Task: Editing albums is possible. This is an addon function for ImageBrowser EX.
195
3 Movie Menu Function Settings
When you set the power switch to <k>, the [Z1/Z2] tab will show
functions dedicated to movie shooting. The menu options are as
follows.
[Z1] menu
[Z2] menu
AF method
The AF methods are the same as described on pages 159-165. You
can select [u+Tracking], [FlexiZone - Multi], or [FlexiZone Single].
Movie Servo AF
The default setting is [Enable]. You can focus by pressing the
shutter button halfway regardless of the setting.
• When [Enable] is set:
• You can shoot a movie while focusing a moving subject
continuously. Note that the camera may record the lens operation
noise. To reduce the recording of the lens operation noise, use a
commercially-available external microphone. Using EF-S1855mm f/3.5-5.6 IS STM or EF-S18-135mm f/3.5-5.6 IS STM lens
can minimize the focusing noise recorded during movie shooting.
• During Movie Servo AF, turn off the power before you set the
lens’s focus mode switch to <MF>.
196
3 Movie Menu Function Settings
• If you want to hold the focus at a certain point or avoid recording
the lens operation noise before or during movie shooting, you
can temporally stop Movie Servo AF by performing one of the
operations below. When you stop Movie Servo AF, the AF point
will turn gray. When you perform the same operation below
again, Movie Servo AF will resume.
• Tap the [ ] icon on the lower left of the screen.
• Press the <D> button.
• If [6: Shutter/AE lock button] is set to [2: AF/AF lock, no AE
lock] in the [54: Custom Functions (C.Fn)], Movie Servo AF
will stop while you hold down the <A> button. When you let go
of the <A> button, Movie Servo AF will resume.
• While Movie Servo AF is stopped, if you press the <M>
button, <x> button etc. and then return to movie shooting,
Movie Servo AF will resume.
• For cautions when [Movie servo AF] is set to [Enable], see
page 202.
• When [Disable] is set:
• You can focus only when the shutter button is pressed halfway.
AF with shutter button during k (movie recording)
When you press the shutter button while shooting a movie, you can
shoot a still photo. The default setting is [ONE SHOT].
• When [ONE SHOT] is set:
• You can refocus and shoot a still photo by pressing the shutter
button halfway while shooting a movie.
• When shooting a static subject (not moving), you can perform
shooting in precise focus.
• When [Disable] is set:
• You can immediately start shooting a still photo by pressing the
shutter button, even though focus is not achieved. It is effective
when you want give priority to the shutter chance rather than to
focus.
197
3 Movie Menu Function Settings
Grid display
With [Grid 1l] or [Grid 2m], you can display grid lines to help
you level the camera vertically or horizontally.
Metering timerN
You can change how long the exposure setting is displayed (AE lock
time).
Movie recording size
You can set the movie recording size (image size and frame rate).
For details, see pages 185-186.
Sound recordingN
Level meter
Normally, the built-in microphone will
record stereo sound. If a commerciallyavailable microphone equipped with a
mini plug (3.5 mm diameter) is
connected to the camera’s external
microphone IN terminal (p.20), it will be
given priority.
[Sound rec./Rec. level] options
[Auto]
: The sound-recording level is adjusted automatically.
Auto level control will operate automatically in
response to the sound level.
[Manual] : For advanced users. You can adjust the sound
recording level to one of 64 levels. Select [Rec. level]
and look at the level meter while pressing the <U>
key to adjust the sound recording level.
While looking at the peak hold indicator (approx. 3
sec.), adjust so that the level meter sometimes lights
up the “12” (-12 dB) mark on the right for the loudest
sounds. If it exceeds “0”, the sound will be distorted.
[Disable] : Sound will not be recorded.
198
3 Movie Menu Function Settings
[Wind filter]
When set to [Enable], it reduces wind noise when there is wind
outdoors. This feature takes effect only with the built-in
microphone.
Note that [Enable] will also reduce low bass sounds, so set this
function to [Disable] when there is no wind. It will record a more
natural sound than with [Enable].
[Attenuator]
Even if you set [Sound recording] to [Auto] or [Manual] and
shoot, sound distortion may still result if there is a very loud sound.
In such a case, setting it to [Enable] is recommended.
In Basic Zone modes, the settings available for [Sound recording] will
be [On/Off]. If [On] is set, the sound-recording level will be adjusted
automatically (same as with [Auto]). However, the wind filter function will
not take effect.
The sound volume balance between L (left) and R (right) cannot be
adjusted.
Both L and R record audio at a 48 kHz/16-bit sampling rate.
Video snapshot
You can shoot video snapshots. For details, see page 187.
199
Movie Shooting Cautions
White <s> and Red <E> Internal Temperature Warning Icons
If the camera’s internal temperature increases due to prolonged movie
shooting or under a high ambient temperature, a white icon <s> will
appear. Even if you shoot a movie while this icon is displayed, the
movie’s image quality will hardly be affected. However, if you shoot still
photos, the image quality of the still photos may deteriorate. It is
recommended to stop still photo shooting for a while and allow the
camera to cool down.
If the camera’s internal temperature further increases while the white
icon <s> is displayed, a red icon <E> will start blinking. This blinking
icon indicates that movie shooting will soon stop automatically. If this
happens, you will not be able to shoot again until the camera’s internal
temperature decreases. Turn off the power and let the camera rest for a
while.
Shooting a movie at a high temperature for a prolonged period will cause
the <s> and <E> icons to appear earlier. When you are not shooting,
turn off the camera.
Recording
If the attached lens has an Image Stabilizer and you set the Image
Stabilizer (IS) switch to <1>, the Image Stabilizer will operate at all
times even if you do not press the shutter button halfway. The Image
Stabilizer consumes battery power and may shorten the total movie
shooting time or decrease the number of possible shots. If you use a
tripod or if the Image Stabilizer is not necessary, it is recommended to set
the IS switch to <2>.
The camera’s built-in microphone will also pick up camera operation
noise. Using a commercially-available external microphone can prevent
(or reduce) these noises from being recorded.
Do not connect anything other than an external microphone to the
camera’s external microphone IN terminal.
If the brightness changes during autoexposure movie shooting, that part
may look momentarily still when you play back the movie. In such cases,
shoot movies with manual exposure.
200
Movie Shooting Cautions
Recording
If you use a card with a slow writing speed, a five-level
indicator may appear on the right of the screen during movie
shooting. It indicates how much data has not yet been
written to the card (remaining capacity of the internal buffer
memory). The slower the card, the faster the indicator will
climb upward. If the indicator becomes full, movie shooting
will stop automatically.
Indicator
If the card has a fast writing speed, the indicator will either
not appear or the level (if displayed) will hardly go upward.
First, shoot a few test movies to see if the card can write fast enough.
If there is a very bright light source in the picture, the bright area may
appear black on the LCD monitor. In movies, the bright areas will be
recorded in almost the same way you see it on the LCD monitor.
Still Photo Shooting During Movie Shooting
Regarding the image quality of still photos, see “Image Quality” on page
171.
TV Connection
If you connect the camera to a TV set (p.262, 265) and shoot a movie,
the TV will not output any sound during the shooting. However, the
sound will be properly recorded.
201
Cautions when [Movie servo AF] is set to [Enable]
Shooting Conditions that Make Focusing Difficult
A fast-moving subject approaching or moving away from the camera.
A subject moving at a close distance in front of the camera.
Also refer to “Shooting conditions that make focusing difficult” on page
165.
• Since using Movie Servo AF will consume battery power, the number of
possible shots and the possible movie shooting time will be reduced.
• During zooming or image magnification, Movie Servo AF operation will be
stopped momentarily.
• During movie shooting, if a subject approaches / moves away, or if
the camera is moved vertically or horizontally (panning), the
recorded movie image may momentarily expand or contract (change
in image magnification).
202
7
Handy Features
Disabling the Beeper (p.204)
Card Reminder (p.204)
Setting the Image Review Time (p.204)
Setting the Auto Power-off Time (p.205)
Adjusting the LCD Monitor Brightness (p.205)
Creating and Selecting a Folder (p.206)
File Numbering Methods (p.208)
Setting Copyright Information (p.210)
Auto Rotation of Vertical Images (p.212)
Checking Camera Settings (p.213)
Reverting the Camera to the Default Settings (p.214)
Preventing the LCD Monitor from Turning Off Automatically
(p.217)
Changing the Shooting Settings Screen Color (p.217)
Setting the Flash (p.218)
Automatic Sensor Cleaning (p.223)
Appending Dust Delete Data (p.224)
Manual Sensor Cleaning (p.226)
203
Handy Features
3 Disabling the Beeper
You can prevent the beeper from sounding when focus is achieved,
during self-timer operation, and during touch screen operations.
Under the [z1] tab, select [Beep], then
press <0>. Select [Disable], then
press <0>.
To silence the beeper only during touch
screen operations, select [Touch to ].
3 Card Reminder
This setting prevents shooting if there is no card in the camera.
Under the [z1] tab, select [Release
shutter without card], then press
<0>. Select [Disable], then press
<0>.
If there is no card inserted in the camera
and you press the shutter button, “Card”
will be displayed in the viewfinder, and
you cannot release the shutter.
3 Setting the Image Review Time
You can set how long the image is displayed on the LCD monitor
immediately after capture. If [Off] is set, the image will not be displayed
immediately after image capture. If [Hold] is set, the image review will
be displayed up until the [Auto power off] time.
During image review, if you operate any camera controls such as
pressing the shutter button halfway, the image review will end.
Under the [z1] tab, select [Image
review], then press <0>. Select the
desired setting, then press <0>.
204
Handy Features
3 Setting the Auto Power-off Time
To save battery power, the camera turns off automatically after the set
time of idle operation elapses. You can set this auto power-off time.
When the camera has turned off due to auto power off, you can turn it
on again by pressing the shutter button halfway or pressing any of the
following buttons: <M>, <B>, <x>, <A>, etc.
If [Disable] is set, either turn off the camera or press the <B>
button to turn off the LCD monitor to save battery power.
Even when [Disable] is set, if the camera is not used for 30 min.,
the LCD monitor will turn off automatically. To turn on the LCD
monitor again, press the <B> button.
Under the [52] tab, select [Auto power
off], then press <0>. Select the desired
setting, then press <0>.
3 Adjusting the LCD Monitor Brightness
You can adjust the brightness of the LCD monitor to make it easier to read.
Under the [52] tab, select [LCD
brightness], then press <0>. With the
adjustment screen displayed, press the
<U> key to adjust the brightness, then
press <0>.
When checking the exposure of an
image, set the LCD monitor brightness to
4 and prevent the ambient light from
affecting the reviewed image.
205
Handy Features
3 Creating and Selecting a Folder
You can freely create and select the folder where the captured images
are to be saved.
This operation is optional since a folder will be created automatically for
saving captured images.
Creating a Folder
1
Select [Select folder].
Under the [51] tab, select [Select
folder], then press <0>.
[Create folder].
2 Select
Select [Create folder], then press
<0>.
a new folder.
3 Create
Select [OK], then press <0>.
X A new folder with the folder number
increased by one is created.
206
Handy Features
Selecting a Folder
Lowest file number
Number of images
in folder
With the folder selection screen
displayed, select a folder and press
<0>.
X The folder where the captured
images will be saved is selected.
Subsequent captured images will be
recorded into the selected folder.
Folder name
Highest file number
About Folders
As with “100CANON” for example, the folder name starts with three digits
(folder number) followed by five alphanumeric characters. A folder can
contain up to 9999 images (file number 0001 - 9999). When a folder
becomes full, a new folder with the folder number increased by one is
created automatically. Also, if manual reset (p.209) is executed, a new
folder will be created automatically. Folders numbered from 100 to 999 can
be created.
Creating Folders with a Personal Computer
Open the card on the screen, and create a new folder named “DCIM”. Open
the DCIM folder and create as many folders as necessary to save and
organize your images. The folder name must follow the format
“100ABC_D”. The first three digits are the folder number, from 100 to 999.
The next five characters can be any combination of upper- and lower-case
letters from A to Z, numerals, and the underscore “_”. The space cannot be
used. Also note that two folder names cannot share the same three-digit
folder number (for example, “100ABC_D” and “100W_XYZ”), even if the
other five characters in each name are different, since the camera cannot
recognize the folders.
207
Handy Features
3 File Numbering Methods
The image files will be numbered from 0001 to 9999 in the order the
images are taken, then saved in a folder. You can change how the file
number is assigned.
The file number will appear on your computer in this format:
IMG_0001.JPG.
Under the [51] tab, select [File
numbering], then press <0>. The
available settings are described below.
Select the option, then press <0>.
[Continuous]: The file numbering continues in sequence even
after you replace the card or create a folder.
Even after you replace the card or create a new folder, the file
numbering continues in sequence up to 9999. This is convenient
when you want to save images numbered anywhere between 0001
to 9999 in multiple cards or folders into one folder in your personal
computer.
However, if the replacement card or existing folder already contains
images recorded previously, the file numbering of the new images
may continue from the file numbering of the existing images in the
card or folder. If you want to use continuous file numbering, use a
newly formatted card each time.
File numbering after
replacing the card
Card-1
File numbering after
creating a folder
Card-2
Card-1
100
0051
0052
Next sequential file number
208
0051
101
0052
Handy Features
[Auto reset]: The file numbering restarts from 0001 each time
the card is replaced or a new folder is created.
When you replace the card or create a folder, the file numbering
restarts from 0001 for the new images saved. This is convenient if
you want to organize images according to cards or folders.
However, if the replacement card or existing folder already contains
images recorded previously, the file numbering of the new images
may continue from the file numbering of the existing images in the
card or folder. If you want to save images with the file numbering
starting from 0001, use a newly formatted card each time.
File numbering after
replacing the card
Card-1
File numbering after
creating a folder
Card-2
Card-1
100
0051
0001
0051
101
0001
File numbering is reset
[Manual reset]: To reset the file numbering to 0001 manually or
to start from file number 0001 in a new folder.
When you reset the file numbering manually, a new folder is created
automatically and the file numbering of images saved to that folder
starts from 0001.
This is convenient if you want to use different folders for the images
taken yesterday and the ones taken today, for example. After the
manual reset, the file numbering returns to continuous or auto reset.
(There will be no Manual reset confirmation screen.)
If the file number in folder 999 reaches 9999, shooting will not be possible
even if the card still has storage capacity. The LCD monitor will display a
message telling you to replace the card. Replace it with a new card.
For both JPEG and RAW images, the file name will start with “IMG_”. Movie
file names will start with “MVI_”. The extension will be “.JPG” for JPEG
images, “.CR2” for RAW images, and “. MOV” for movies.
209
Handy Features
3 Setting Copyright InformationN
When you set the copyright information, it will be appended to the
image as Exif information.
1
Select [Copyright information].
Under the [54] tab, select [Copyright
information], then press <0>.
the option to be set.
2 Select
Select [Enter author’s name] or
[Enter copyright details], then press
<0>.
X The text entry screen will appear.
Select [Display copyright info.] to
check the copyright information
currently set.
Select [Delete copyright
information] to delete the copyright
information currently set.
text.
3 Enter
Refer to “Text Entry Procedure” on
the next page and enter the copyright
information.
Enter up to 63 alphanumeric
characters and symbols.
the setting.
4 ExitAfter
entering the text, press the
<M> button to exit.
On the confirmation dialog, select
[OK] and press <0>.
210
Handy Features
Text Entry Procedure
Changing the entry area:
Press the <Q> button to toggle
between the top and bottom entry
areas.
Moving the cursor:
Press the <U> key to move the
cursor.
Entering text:
In the bottom area, press the <S> key or turn the <6> dial to
select a character, then press <0> to enter it.
Changing the entry mode:*
Select [
] at the bottom right of the bottom entry area. Each
time you press <0>, the entry mode will change as follows: Lower
case → Numerals / Symbols 1 → Numerals / Symbols 2 → Upper
case.
* When [Touch control: Disable] is set, you can display all the
available characters on one screen.
Deleting a character:
Press the <L> button to delete one character.
Exiting:
Press the <M> button, check the text, select [OK], then press
<0>. The screen in step 2 will reappear.
Canceling the text entry:
Press the <B> button, check the text, select [OK], then press
<0>. The screen in step 2 will reappear.
You can also set or check the copyright information with EOS Utility
(provided software, p.364).
211
Handy Features
3 Auto Rotation of Vertical Images
Vertical images are rotated automatically so they
are displayed vertically on the camera’s LCD
monitor and on the personal computer instead of
horizontally. You can change the setting for this
feature.
Under the [51] tab, select [Auto rotate],
then press <0>. The available settings
are described below. Select the option,
then press <0>.
[OnzD] : The vertical image is automatically rotated during playback
on both the camera’s LCD monitor and on the computer.
[OnD]
[Off]
: The vertical image is automatically rotated only on the
computer.
: The vertical image is not automatically rotated.
FAQ
The vertical image is not rotated during the image review
immediately after it is captured.
Press the <x> button and the image playback will display the
rotated image.
[OnzD] is set, but the image does not rotate during playback.
Auto rotate will not work with vertical images captured while [Auto
rotate] was set to [Off]. If the vertical image is taken while the camera
is pointed up or down, the image may not be rotated automatically for
playback. In such a case, see “Rotating the Image” on page 247.
On the camera’s LCD monitor, I want to rotate an image
captured when [OnD] had been set.
Set [OnzD], then play back the image. It will be rotated.
The vertical image does not rotate on the computer screen.
The software used is not compatible with image rotation. Use the
software provided with the camera instead.
212
Handy Features
B Checking Camera Settings
While the shooting settings (p.50) are displayed, press the <B>
button to display the camera’s major function settings.
Settings display
Card remaining capacity
Color space (p.141)
WB correction (p.139)/
WB bracketing (p.140)
Touch control (p.55)
Red-eye reduction (p.108)
Auto rotate display (p.212)
LCD auto off (p.217)
Date/Time (p.36)
Daylight saving time (p.37)
Beeper (p.204)
Auto power off (p.205)
Sensor cleaning (p.223)
Live View shooting (p.145)
213
Handy Features
3 Reverting the Camera to the Default SettingsN
The camera’s shooting settings and menu settings can be reverted to
their defaults. This option is available in Creative Zone modes.
1
Select [Clear settings].
Under the [54] tab, select [Clear
settings], then press <0>.
[Clear all camera settings].
2 Select
Select [Clear all camera settings],
then press <0>.
[OK].
3 Select
Select [OK], then press <0>.
X Setting [Clear all camera settings]
will reset the camera to the default
settings as shown on the next page.
FAQ
Clearing all camera settings:
After the procedure above, select [Clear all Custom Func. (C.Fn)]
in [54: Clear settings] to clear all the Custom Function settings
(p.296).
214
Handy Features
Shooting Settings
AF operation
AF point selection
Drive mode
Metering mode
ISO speed
ISO Auto
Exposure
compensation/AEB
Built-in flash settings
Flash exposure
compensation
Custom Functions
External flash
function setting
One-Shot AF
Automatic selection
u (Single shooting)
q (Evaluative metering)
AUTO (Auto)
Maximum 6400
Canceled
Normal firing
0 (Zero)
Unchanged
Unchanged
Image-recording Settings
Image quality
Picture Style
Auto Lighting Optimizer
Peripheral illumination
correction
Chromatic aberration
correction
Color space
White balance
Custom White Balance
White balance
correction
White balance
bracketing
Long exposure noise
reduction
High ISO speed noise
reduction
File number
Auto cleaning
Dust Delete Data
73
Auto
Standard
Enable/Correction
data retained
Disable/Correction
data retained
sRGB
Q (Auto)
Canceled
Camera Settings
Auto power off
Beep
Release shutter
without card
Image review
Histogram display
Image jump with 6
Auto rotate
LCD brightness
LCD auto off
Time zone
Date/Time
Language
Video system
Screen color
Feature guide
Touch control
Copyright
information
Control over HDMI
Eye-Fi transmission
My Menu settings
Display from My
Menu
30 sec.
Enable
Enable
2 sec.
Brightness
e (10 images)
OnzD
Enable
Unchanged
Unchanged
Unchanged
Unchanged
1
Enable
Enable
Unchanged
Disable
Disable
Unchanged
Disable
Canceled
Canceled
Disable
Standard
Continuous
Enable
Erased
215
Handy Features
Live View Shooting
Live View shooting
AF method
Continuous AF
Touch Shutter
Grid display
Aspect ratio
Metering timer
216
Enable
u+Tracking
Enable
Disable
Off
3:2
16 sec.
Movie Shooting
AF method
Movie Servo AF
u+Tracking
Enable
AF with shutter
button during k
ONE SHOT
Grid display
Metering timer
Movie recording size
Sound recording
Video snapshot
Off
16 sec.
1920x1080
Auto
Disable
Handy Features
3 Preventing the LCD Monitor from Turning Off Automatically
You can prevent the display-off sensor from turning off the shooting
setting display on the LCD monitor when your eye approaches the
viewfinder.
Under the [52] tab, select [LCD auto
off], then press <0>. Select [Disable],
then press <0>.
3 Changing the Shooting Settings Screen Color
You can change the background color of the shooting settings screen.
Under the [53] tab, select [Screen
color], then press <0>. Select the
desired color, then press <0>.
When you exit the menu, the selected
color will be displayed for the shooting
settings screen.
217
3 Setting the FlashN
The built-in flash and external Speedlite settings can be set with the
camera’s menu. You can use the camera’s menu to set the external
Speedlite function settings only if an EX-series Speedlite compatible
with this function is attached.
The setting procedure is the same as when setting a camera menu
function.
Select [Flash control].
Under the [z1] tab, select [Flash
control], then press <0>.
X The flash control screen will appear.
[Flash firing]
Normally, set this to [Enable].
If [Disable] is set, neither the builtin flash nor the external Speedlite
will fire. This is useful when you only
want to use the flash’s AF-assist
beam.
[E-TTL II meter.]
For normal flash exposures, set this
to [Evaluative].
[Average] is for advanced users. As
with an external Speedlite, the
metering area is averaged. Flash
exposure compensation may be
necessary.
Even if [Flash firing] is set to [Disable], if focus is difficult to achieve in low
light, the flash may still fire a series of flashes (AF-assist beam, p.101).
218
3 Setting the FlashN
[Flash sync. speed in Av mode]
You can set the flash-sync speed for
flash photography in the aperture-priority
AE (f) mode.
: Auto
The flash sync speed is set automatically within a range of 1/200
sec. to 30 sec. to suit the scene’s brightness. High-speed sync is
also possible.
: 1/200-1/60 sec. auto
Prevents a slow shutter speed from being set in low-light conditions.
It is effective for preventing subject blur and camera shake.
However, while the subject will be properly exposed with the flash,
the background may come out dark.
: 1/200 sec. (fixed)
The flash-sync speed is fixed at 1/200 sec. This more effectively
prevents subject blur and camera shake than with [1/200-1/60 sec.
auto]. However, in low light, the subject’s background will come out
darker than with [1/200-1/60 sec. auto].
If [1/200-1/60 sec. auto] or [1/200 sec. (fixed)] is set, high-speed sync is
not possible in the <f> mode.
219
3 Setting the FlashN
[Built-in flash settings] and [External flash func. setting]
You can set the functions in the table below. The functions displayed under
[External flash func. setting] will vary depending on the Speedlite model.
Select [Built-in flash settings] or
[External flash func. setting].
X The flash functions will be displayed.
With [Built-in flash settings], the
highlighted functions can be selected
and set.
Sample screen
Flash mode
[External flash func. setting]
[Built-in flash settings]
Wireless functions
Flash zoom
(Flash coverage)
FEB
Flash exposure
compensation
Shutter
synchronization
[Built-in flash settings] and [External flash func. settings] Functions
Function
Flash mode
Shutter
synchronization
FEB*
Wireless functions
Channel
Flash group
Flash exposure
compensation
Zoom*
[Built-in flash settings]
[External
Easy
Custom flash func.
Wireless Wireless
setting]
(p.231)
(p.234)
k
k
Normal
Firing
221
k
221
k
k
k
k
k
k
k
k
229
232
235
k
k
k
120
k
k
Page
k
* For [FEB] (Flash exposure bracketing) and [Zoom], refer to the instruction
manual of a Speedlite compatible with the functions.
220
3 Setting the FlashN
Shutter synchronization
Normally, set this to [1st curtain] so that the flash fires immediately
after the exposure starts.
If [2nd curtain] is set, the flash will fire right before the shutter
closes. When this is combined with a slow shutter speed, you can
create a trail of light such as from car headlights at night. With E-TTL
II (auto flash exposure), two flashes will be fired: once when you
press the shutter button completely, and once immediately before
the exposure ends. Also, with shutter speeds faster than 1/30 sec.,
1st curtain synchronization will automatically take effect.
If an external Speedlite is attached, you can also select [Hi-speed]
(e). For details, refer to the Speedlite’s instruction manual.
Wireless functions
When performing optical transmission wireless flash shooting using
the master function of the built-in flash, see “Wireless Flash
Photography” on page 229. When performing wireless flash
shooting with radio or optical transmission using the master function
of the external Speedlite, refer to the Speedlite’s instruction manual.
Flash exposure compensation
See “Flash Exposure Compensation” on page 120.
Flash mode
You can select the flash mode to suit your desired flash shooting.
[E-TTL II] is the standard mode of
EX-series Speedlites for automatic
flash shooting.
[Manual flash] is for advanced users
who want to set the [Flash output]
(1/1 to 1/128) themselves.
Regarding other flash modes, refer to
the instruction manual of a Speedlite
compatible with the functions.
221
3 Setting the FlashN
Setting the External Speedlite Custom Functions
The Custom Functions displayed under [External flash C.Fn setting]
will vary depending on the Speedlite model.
1
Display the Custom Function.
With the camera ready to shoot with
an external Speedlite, select
[External flash C.Fn setting], then
press <0>.
the Custom Function.
2 SetPress
the <U> key to select the
function number, then set the
function. The procedure is the same
as setting the camera’s Custom
Functions (p.296).
Clear the Settings
1
Select [Clear settings].
Under the [z1: Flash control] tab,
select [Clear settings], then press
<0>.
the settings to be cleared.
2 Select
Select [Clear built-in flash set.],
[Clear external flash set.], or [Clear
ext. flash C.Fn set.], then press
<0>.
When you select [OK], the respective
flash settings will be cleared.
222
f Automatic Sensor Cleaning
Whenever you set the power switch to <1> or <2>, the Self
Cleaning Sensor Unit operates to automatically shake off the dust on
the front of the sensor. Normally, you need not pay attention to this
operation. However, you can choose to perform sensor cleaning at any
time, or disable it.
Cleaning the Sensor Now
1
Select [Sensor cleaning].
Under the [53] tab, select [Sensor
cleaning], then press <0>.
[Clean nowf].
2 Select
Select [Clean nowf], then press
<0>.
Select [OK] on the dialog screen,
then press <0>.
X The screen will indicate that the
sensor is being cleaned. (A small
sound may be heard.) Although there
will be a shutter sound during the
cleaning, a picture is not taken.
For best results, perform the sensor cleaning with the camera placed
upright and stable on a table or other flat surface.
Even if you repeat the sensor cleaning, the result will not improve much.
Immediately after the sensor cleaning is finished, the [Clean nowf]
option will remain disabled temporarily.
Disabling Automatic Sensor Cleaning
In step 2, select [Auto cleaningf] and set it to [Disable].
X The sensor cleaning will no longer be executed when you set the
power switch to <1> or <2>.
223
3 Appending Dust Delete DataN
Normally, the Self Cleaning Sensor Unit will eliminate most of the dust
that may be visible on captured images. However, in case visible dust
still remains, you can append the Dust Delete Data to the image for
erasing the dust spots later. The Dust Delete Data is used by Digital
Photo Professional (provided software, p.364) to erase the dust spots
automatically.
Preparation
Prepare a solid white object such as a sheet of paper.
Set the lens focal length to 50 mm or longer.
Set the lens focus mode switch to <MF> and set the focus to infinity
(∞). If the lens has no distance scale, look at the front of the lens and
turn the focusing ring clockwise all the way.
Obtain the Dust Delete Data
1
Select [Dust Delete Data].
Under the [z3] tab, select [Dust
Delete Data], then press <0>.
[OK].
2 Select
Select [OK] and press <0>. After
the automatic self-cleaning of the
sensor is performed, a message will
appear. Although there will be a
shutter sound during the cleaning, a
picture is not taken.
224
3 Appending Dust Delete DataN
a solid-white object.
3 Photograph
At a distance of 20 cm - 30 cm (0.7 ft.
- 1.0 ft.), fill the viewfinder with a
patternless, solid-white object and
take a picture.
X The picture will be taken in aperturepriority AE mode at an aperture of f/22.
Since the image will not be saved, the
data can still be obtained even if there
is no card in the camera.
X When the picture is taken, the camera
will start collecting the Dust Delete
Data. When the Dust Delete Data is
obtained, a message will appear. Select
[OK], and the menu will reappear.
If the data was not obtained
successfully, an error message will
appear. Follow the “Preparation”
procedure on the preceding page, then
select [OK]. Take the picture again.
About the Dust Delete Data
After the Dust Delete Data is obtained, it is appended to all the JPEG
and 1 images captured thereafter. Before an important shoot, it is
recommended to update the Dust Delete Data by obtaining it again.
For details about using Digital Photo Professional (provided software,
p.364) to erase dust spots, refer to the Digital Photo Professional
Instruction Manual (p.367).
The Dust Delete Data appended to the image is so small that it hardly
affects the image file size.
Be sure to use a solid-white object such as a new sheet of white paper. If the
paper has any pattern or design, it may be recognized as dust data and
affect the accuracy of the dust deletion with the software.
225
3 Manual Sensor CleaningN
Dust that could not be removed by the automatic sensor cleaning can
be removed manually with a blower, etc. Before cleaning the sensor,
detach the lens from the camera.
The surface of the image sensor is extremely delicate. If the
sensor needs to be cleaned directly, having it done by a Canon
Service Center is recommended.
1
Select [Sensor cleaning].
Under the [53] tab, select [Sensor
cleaning], then press <0>.
[Clean manually].
2 Select
Select [Clean manually], then press
<0>.
[OK].
3 Select
Select [OK], then press <0>.
X In a moment, the reflex mirror will
lockup and the shutter will open.
4 Clean the sensor.
5 EndSetthethecleaning.
power switch to <2>.
If you use a battery, make sure it is fully charged. If the battery grip with sizeAA/LR6 batteries is attached, manual sensor cleaning will not be possible.
For the power source, using AC Adapter Kit ACK-E8 (sold separately) is
recommended.
226
3 Manual Sensor CleaningN
While cleaning the sensor, never do any of the following. If the
power is cut off, the shutter will close and the shutter curtains and
image sensor may get damaged.
• Setting the power switch to <2>.
• Opening the battery compartment cover.
• Opening the card slot cover.
The surface of the image sensor is extremely delicate. Clean the sensor
with care.
Use a plain blower without any brush attached. A brush can scratch the
sensor.
Do not insert the blower tip inside the camera beyond the lens mount. If
the power is turned off, the shutter will close and the shutter curtains or
reflex mirror may get damaged.
Never use canned air or gas to clean the sensor. The blowing force can
damage the sensor or the spray gas can freeze on the sensor.
If the battery level becomes low while you clean the sensor, the beeper
will sound as a warning. Stop cleaning the sensor.
If a smudge that cannot be removed with a blower remains, having the
sensor cleaned by a Canon Service Center is recommended.
227
8
Wireless Flash
Photography
You can use the built-in flash
for wireless flash shooting.
The camera’s built-in flash can work as a master unit
with Canon Speedlites with a wireless slave feature and
wirelessly trigger the Speedlite(s) to fire.
Canceling the slave unit’s auto power off
To cancel the slave unit’s auto power off, press the
camera’s <A> button. If you are using manual flash
firing, press the slave unit’s test firing (PILOT) button to
cancel the auto power off.
Be sure to also read the information about wireless flash
photography in the Speedlite’s instruction manual.
229
Using Wireless FlashN
Slave Unit Settings and Position
Regarding your Speedlite (slave unit), refer to its instruction manual and
set it as follows. The settings other than the ones below for the slave
unit’s control are all set with the camera. Different types of Canon
Speedlite slave units can be used and controlled together.
(1) Set the Speedlite as a slave unit.
(2) Set the Speedlite’s transmission channel to the same channel
as set on the camera.*1
(3) If you want to set the flash ratio (p.236), set the slave unit ID.
(4) Position the camera and slave unit(s) within the range shown below.
(5) Face the slave unit’s wireless sensor toward the camera.*2
Example of Wireless Flash Set-up
Indoors
Approx.
10 m
(32.8 ft.)
Outdoors
Approx.
7m
Approx. (23.0 ft.)
80°
Approx. 5 m Approx. 7 m
(16.4 ft.)
(23.0 ft.)
*1: If the Speedlite does not have a transmission channel setting function, the camera
can work with any channel.
*2: In small rooms, the slave unit may work even if its wireless sensor does not face the
camera. The camera’s wireless signals can bounce off the walls and be received by
the slave unit. When using an EX-series Speedlite with fixed flash head and wireless
sensor, take pictures to make sure it can fire.
The camera’s master unit function cannot be used for wireless flash
shooting with radio transmission.
230
Easy Wireless Flash Shooting
The basics of easy, fully automatic wireless flash shooting are explained
below.
Fully Automatic Shooting with One External Speedlite
Steps 1 to 4 and 6 apply to all
wireless flash shooting. Therefore,
these steps are omitted in the other
wireless flash setups explained on
the pages hereafter.
1
Press the <I> button to raise the
built-in flash.
For wireless flash shooting, be sure
to raise the built-in flash.
[Flash control].
2 Select
Under the [z1] tab, select [Flash
control], then press <0>.
[Evaluative].
3 Select
For [E-TTL II meter.], select
[Evaluative], then press <0>.
231
Easy Wireless Flash Shooting
[Built-in flash settings].
4 Select
Select [Built-in flash settings], then
press <0>.
[EasyWireless].
5 Select
Under [Built-in flash], select
[EasyWireless], then press <0>.
6 SetSet[Channel].
the transmission channel (1-4) to
the same one as the slave unit.
picture.
7 TakeSetthe
the camera and take picture in
the same way as with normal
shooting.
wireless flash shooting.
8 ExitForthe[Built-in
flash], select
[NormalFiring].
Setting [E-TTL II meter.] to [Evaluative] is recommended.
Even though the firing of the built-in flash is disabled when
[EasyWireless] is set, it will still fire a small flash to control the slave unit.
Depending on shooting conditions, the flash fired to control the slave unit
may appear in the picture.
Firing a test flash is not possible with the slave unit.
232
Easy Wireless Flash Shooting
Fully Automatic Shooting with Multiple External Speedlites
You can have multiple slave units fire as if they were a single Speedlite.
This is convenient when you need a large flash output.
Basic settings:
Flash mode
E-TTL II meter.
Built-in flash
Channel
: E-TTL II
: Evaluative
: EasyWireless
: (Same as slave units)
All the slave units will fire at the same
output and be controlled to obtain a
standard exposure.
No matter what the slave ID is (A, B, or
C), all the slave units will fire as one
group.
Flash Exposure Compensation
If the flash exposure looks too dark or too bright, you can set flash
exposure compensation to adjust the slave units’ flash output.
Select [1exp. comp.], then press
<0>.
If the flash exposure is too dark, press the
<Z> key to increase the flash exposure
and make it brighter. If the flash exposure is
too bright, press the <Y> key to decrease
the flash exposure and make it darker.
233
Custom Wireless Flash Shooting
Fully Automatic Shooting with One External Speedlite
and Built-in Flash
This section describes fully automatic
wireless flash shooting with one external
Speedlite and the built-in flash.
You can change the flash ratio between
the external Speedlite and built-in flash
to adjust how the shadows look on the
subject.
On the menu screens, the <0> and
<1> icons refer to the external
Speedlite, and the <3> and <2>
icons refer to the built-in flash.
1
Select [CustWireless].
Follow step 5 on page 232 to select
[CustWireless], then press <0>.
[Wireless func.].
2 Select
Under [Wireless func.], select
[0:3], then press <0>.
the desired flash ratio and
3 Set
take the picture.
Select [1:2] and set the flash ratio
within 8:1 to 1:1. Setting a flash ratio
to the right of 1:1 is not possible.
If the built-in flash output is not enough,
set a higher ISO speed (p.92).
The 8:1 to 1:1 flash ratio is equivalent to 3:1 to 1:1 stops (1/2-stop increments).
234
Custom Wireless Flash Shooting
Fully Automatic Shooting with Multiple External Speedlites
Multiple Speedlite slave units can be treated as one flash unit or
separated into slave groups whose flash ratio can be set.
The basic settings are shown below. By changing the [Firing group]
setting, you can shoot with various wireless flash setups with multiple
Speedlites.
Basic settings:
Flash mode
E-TTL II meter.
Wireless func.
Channel
: E-TTL II
: Evaluative
:0
: (Same as slave units)
[1All] Using multiple slave Speedlites as one flash unit
This is convenient when you need a
large flash output. All the slave units will
fire at the same output and be controlled
to obtain a standard exposure.
No matter what the slave ID is (A, B, or
C), all the slave units will fire as one
group.
Set [Firing group] to [1All], then
take the picture.
235
Custom Wireless Flash Shooting
[1 (A:B)] Multiple slave units in multiple groups
Divide the slave units into groups A and
B and change the flash ratio to obtain
the desired lighting effect.
Refer to your Speedlite’s instruction
manual to set one slave unit’s slave ID
to A (Group A) and the other slave unit’s
A
B
ID to B (Group B), and position them as
shown in the illustration.
1
Select [Wireless func.].
Follow step 2 on page 234 to select
[0], then press <0>.
2 Set [Firing group] to [1 (A:B)].
the desired flash ratio and
3 Set
take the picture.
Select [A:B fire ratio] and set the
flash ratio.
If [Firing group] is set to [1 (A:B)], group C will not fire.
The 8:1 to 1:1 to 1:8 flash ratio is equivalent to 3:1 to 1:1 to 1:3 stops (1/2stop increments).
236
Custom Wireless Flash Shooting
Fully Automatic Shooting with the Built-in Flash and
Multiple External Speedlites
The built-in flash can also be added to wireless flash shooting explained
on pages 235-236.
The basic settings are shown below. By changing the [Firing group]
setting, you can shoot with various wireless flash setups of multiple
Speedlites complemented with the built-in flash.
1
Basic settings:
Flash mode
E-TTL II meter.
Wireless func.
Channel
: E-TTL II
: Evaluative
: [0+3]
: (Same as slave units)
[Firing group].
2 Select
Select the firing group, then set the
flash ratio, flash exposure
compensation, and other necessary
settings before shooting.
A
[1All and 2]
B
[1 (A:B) 2]
237
Other Settings
Flash Exposure Compensation
When [Flash mode] is set to [E-TTL II], flash exposure compensation
can be set. The flash exposure compensation settings (see below)
which can be set will differ depending on the [Wireless func.] and
[Firing group] settings.
[Flash exp. comp.]
The flash exposure compensation is
applied to the built-in flash and all
external Speedlites.
[2 exp. comp.]
The flash exposure compensation is
applied to the built-in flash.
[1 exp. comp.]
The flash exposure compensation is
applied to all external Speedlites.
FE Lock
If [Flash mode] is set to [E-TTL II], you can press the <A> button to
perform FE lock.
238
Other Settings
Setting the Flash Output Manually for
Wireless Flash Shooting
When [Flash mode] is set to [Manual flash], flash exposure can be set
manually. The flash output settings ([1 flash output], [Group A
output], etc.) that can be set will differ depending on the [Wireless
func.] setting (see below).
[Wireless func.0]
[Firing group: 1All]: The manual
flash output setting will be applied to
all the external Speedlites.
[Firing group: 1 (A:B)]: You can set
the flash output separately for slave
groups A and B.
[Wireless func.0+3]
[Firing group: 1All and 2]: The
flash output can be set separately for
the external Speedlite(s) and built-in
flash.
[Firing group: 1 (A:B)2]: You can
set the flash output separately for
slave groups A and B. You can also
set the flash output for the built-in
flash.
239
240
9
Image Playback
This chapter explains functions related to viewing
photos and movies, with more detail than in Chapter 2
“Basic Shooting and Image Playback”. Here you will
find explanations of how to play back and erase photos
and movies with the camera and view them on a TV set.
About images shot and saved with another device
The camera may not be able to properly display images captured
with a different camera, edited with a computer, or had their file
names changed.
241
x Searching for Images Quickly
H Display Multiple Images on One Screen (Index Display)
Search for images quickly with the index display showing four or nine
images on one screen.
1
Play back the image.
When you press the <x> button, the
last image captured will be displayed.
to the index display.
2 Switch
Press the <Hy> button.
X The 4-image index display will
appear. The currently-selected image
will be highlighted in a blue frame.
Press the <Hy> button again to
switch to the 9-image index display.
Pressing the <u> button will switch
the display from 9 images to 4 images
and then to 1 image.
B
B
an image.
3 Select
Press the <S> key to move the blue
frame to select an image.
Turning the <6> dial will display the
next screen or previous image.
Press <0> and the selected image
will be displayed as a single image.
242
x Searching for Images Quickly
I
Jump through Images (Jump Display)
With the single-image display, you can turn the <6> dial to jump through
the images forward or backward according to the jump method set.
1
Select [Image jump w/6].
Under the [x2] tab, select [Image
jump w/6], then press <0>.
the jump method.
2 Select
Press the <S> key to select the
jump method, then press <0>.
d:
e:
f:
g:
h:
i:
j:
k:
Display images one by one
Jump 10 images
Jump 100 images
Display by date
Display by folder
Display movies only
Display stills only
Display by image rating (p.248)
Turn the <6> dial to select.
by jumping.
3 Browse
Press the <x> button to play back
Jump method
Playback position
images.
On the single-image display, turn the
<6> dial.
To search images according to the shooting date, select [Date].
To search images according to folder, select [Folder].
If the card contains both movies and still photos, select [Movies] or
[Stills] to display only either ones.
If no images match the selected [Rating], you cannot browse through the
images with the <6> dial.
243
u/y Magnified View
You can magnify a captured image by approx. 1.5x to 10x on the LCD
monitor.
1
Magnify the image.
Press the <u> button during image
playback.
X The image will be magnified.
If you hold down the <u> button, the
image will be magnified until it
reaches the maximum magnification.
Press the <Hy> button to reduce
the magnification. If you hold down
the button, the magnification will be
reduced to the single-image display.
Magnified area position
around the image.
2 Scroll
Use the <S> key to scroll around the
magnified image.
To exit the magnified display, press
the <x> button and the singleimage display will return.
In magnified view, you can turn the <6> dial to view another image at
the same magnification.
The image cannot be magnified during the image review immediately
after shooting.
A movie cannot be magnified.
244
d Playing Back with the Touch Screen
The LCD monitor is a touch-sensitive panel that you can touch with your
fingers for playback operations. Press the <x> button to play back
images.
Browsing Images
Swipe with one finger.
With the single-image display, use
one finger to swipe the image to the
left or right to see another image.
Swipe to the left to see the next
(newer) image or swipe to the right to
see the previous (older) image.
With the index display, use one
finger to scroll up or down the screen
to display another screen of index
images. Swipe your finger up to see
newer images or swipe your finger
down to see the older images. When
you select an image and tap it, it will
be displayed as a single image.
Jump through Images (Jump Display)
Swipe with two fingers.
When you use two fingers to swipe left
or right on the screen, you can jump
through images with the method set in
[Image jump w/6] under the [x2]
tab.
245
d Playing Back with the Touch Screen
Reduce Image (Index Display)
Pinch two fingers.
Touch the screen with two fingers spread
apart, and pinch your fingers together on
the screen.
Each time you pinch your fingers, the
screen changes from a single-image
display to a 4-image index display
and 9-image index display. Spreading
two fingers on the screen will reverse
this operation.
The selected image is highlighted in a
blue frame. When you tap the
selected image, it will be displayed as
a single image.
Magnify Image
Spread two fingers apart.
Touch the screen with two fingers
together, then spread your fingers apart
on the screen.
As you spread your fingers, the
image will be magnified.
The image can be magnified up to 10x.
You can scroll around the image by
swiping your finger.
To reduce the image, pinch your
fingers together on the screen.
Tapping the [2] icon will return to the
single-image display.
Touch screen operations explained on pages 245 - 246 are also possible
while viewing images on a TV set connected to your camera (p.262, 265).
246
b Rotating the Image
You can rotate the displayed image to the desired orientation.
1
Select [Rotate image].
Under the [x1] tab, select [Rotate
image], then press <0>.
an image.
2 Select
Press the <U> key to select the
image to be rotated.
You can also select an image on the
index display (p.242).
the image.
3 Rotate
Each time you press <0>, the
image will rotate clockwise as follows:
90° → 270° → 0°.
To rotate another image, repeat steps
2 and 3.
To exit and return to the menu, press
the <M> button.
If you have set [51: Auto rotate] to [OnzD] (p.212) before taking
vertical shots, you need not rotate the image as described above.
If the rotated image is not displayed in the rotated orientation during
image playback, set [51: Auto rotate] to [OnzD].
A movie cannot be rotated.
247
3 Setting Ratings
You can rate images and movies with one of five rating marks: l/m/
n/o/p. This function is called rating.
1
Select [Rating].
Under the [x2] tab, select [Rating],
then press <0>.
an image or movie.
2 Select
Press the <U> key to select an
image or movie to be rated.
You can display three images by
pressing the <Hy> button. To
return to the single-image display,
press the <u> button.
the image or movie.
3 RatePress
the <V> key to select a
rating.
X The total number of images and
movies rated will be counted for each
rating.
To rate another image or movie,
repeat steps 2 and 3.
Press the <M> button to return to
the menu.
248
3 Setting Ratings
The total number of images with a given rating that can be displayed is 999.
If there are more than 999 images with a given rating, [###] will be displayed
for that rating.
Taking Advantage of Ratings
With [x2: Image jump w/6], you can display only images and
movies with a specific rating.
With [x2: Slide show], you can play back only images and movies with
a specific rating.
With Digital Photo Professional (provided software, p.364), you can
select only images and movies with a specific rating (still photos only).
With Windows 8.1, Windows 8, or Windows 7, etc., you can see each
file’s rating as part of the file information display or in the provided image
viewer (still photos only).
249
Q Quick Control During Playback
During playback, you can press the <Q> button to set any of the
following: [ : Protect images], [b: Rotate image], [9: Rating], [U:
Creative filters], [S: Resize (JPEG images only)], and [e: Image
jump w/6].
For movies, only the functions in bold above can be set.
1
Press the <Q> button.
During image playback, press the
<Q> button.
X The Quick Control screen will appear.
a function and set it.
2 Select
Press the <V> key to select a
function.
X The name and current setting of the
selected function are displayed at the
bottom of the screen.
Set it by pressing the <U> key.
For Creative filters and Resize, press
<0> and set the function. For
details, see page 274 for Creative
filters and page 277 for Resize. To
cancel, press the <M> button.
the setting.
3 ExitPress
the <Q> button to exit the
Quick Control screen.
250
Q Quick Control During Playback
To rotate an image, set [51: Auto rotate] to [OnzD]. If [51: Auto rotate]
is set to [OnD] or [Off], the [b Rotate image] setting will be recorded to
the image, but the camera will not rotate the image for display.
Pressing the <Q> button during the index display will switch to the
single-image display and the Quick Control screen will appear. Pressing
the <Q> button again will return to the index display.
For images taken with another camera, the functions you can select may
be limited.
251
k Enjoying Movies
You can play back movies in the following three ways:
Playback on a TV set
(p.262, 265)
Use the stereo AV cable AVC-DC400ST
(sold separately) or HDMI cable HTC100 (sold separately) to connect the
camera to a TV set. Then you can play
back captured movies and still photos on
the TV.
If you have a High-Definition TV set and
connect your camera with an HDMI
cable, you can watch Full High-Definition
(Full HD: 1920x1080) and HighDefinition (HD: 1280x720) movies with
higher image quality.
Since hard disk recorders do not have an HDMI IN terminal, the camera
cannot be connected to a hard disk recorder with an HDMI cable.
Even if you connect the camera to a hard disk recorder with a cable, you
cannot play or save movies and images.
If the playback device is not compatible with MOV files, the movie cannot
be played.
Playback on the Camera’s LCD Monitor
(p.254-261)
You can play back movies on the
camera’s LCD monitor. You can also edit
out the movie’s first and last scenes, and
play back the still photos and movies on
the card in an automatic slide show.
A movie edited with a personal computer cannot be rewritten to the card and
played back with the camera. However, video snapshot albums edited with
EOS Video Snapshot Task (p.195) can be played on the camera.
252
k Enjoying Movies
Playback and Editing with a Personal Computer
(p.365)
The movie files recorded on the card can
be transferred to a personal computer
and played with ImageBrowser EX
(provided software).
To have the movie play back smoothly on a personal computer, use a
high-performance personal computer. Regarding the computer hardware
requirements for ImageBrowser EX, refer to the PDF file ImageBrowser
EX User Guide.
If you want to use commercially-available software to play back or edit
the movies, make sure it is compatible with MOV files. For details on
commercially-available software, contact the software manufacturer.
253
k Playing Movies
1
Play back the image.
Press the <x> button to display
images.
a movie.
2 Select
Press the <U> key to select a movie.
On the single-image display, the
<s1> icon displayed on the
upper left indicates a movie. If the
movie is a video snapshot, <
>
will be displayed.
You can press the <B> button to
switch to the shooting information
display (p.271).
In the index display, perforations at the
left edge of a thumbnail indicate a
movie. As movies cannot be played
on the index display, press <0> to
switch to the single-image display.
the single-image display, press
3 In<0>.
X The movie playback panel will appear
at the bottom of the screen.
back the movie.
4 PlaySelect
[7] (Play), then press <0>.
Speaker
X The movie will start playing.
You can pause the movie playback by
pressing <0>.
During movie playback, you can turn
the <6> dial to adjust the built-in
speaker’s sound volume.
For more details on the playback
procedure, see the next page.
The camera might not be able to play movies shot by another camera.
254
k Playing Movies
Movie Playback Panel
Operation
Playback Description
7 Play
Pressing <0> toggles between play and stop.
8 Slow motion
Adjust the slow motion speed by pressing the <U> key. The
slow-motion speed is indicated at the upper right of the screen.
5 First frame
3 Previous
frame
Displays the movie’s first frame.
Each time you press <0>, the previous frame is displayed.
If you hold down <0>, it will rewind the movie.
6 Next frame
Each time you press <0>, the movie will play frame-byframe. If you hold down <0>, it will fast forward the movie.
4 Last frame
Displays the movie’s last frame.
Background
music*
Play back a movie with the selected background music
(p.261).
X Edit
Displays the editing screen (p.256).
Play back position
mm’ ss”
Playback time (minutes:seconds)
9 Volume
You can adjust the built-in speaker’s (p.254) volume by
turning the <6> dial.
32
Pressing the <M> button returns to the single-image display.
* When background music is set, the movie’s sound will not be played.
Playback with the Touch Screen
Tap [7] at the center of the screen.
X The movie will start playing.
To display the movie playback panel,
tap <s1> on the upper left of the
screen.
To pause the movie while it is playing,
tap the screen. The movie playback
panel will also appear.
With a fully-charged Battery Pack LP-E8, the continuous playback time
at 23°C/73°F will be as follows: approx. 2 hr. 30 min.
If you took a still photo while you shot the movie, the still photo will be
displayed for approx. 1 sec. during the movie playback.
255
X Editing a Movie’s First and Last Scenes
You can edit out the first and last scenes of a movie (except video
snapshots) in 1-sec. increments.
1
On the movie playback screen,
select [X].
X The editing screen will be displayed.
the part to be edited out.
2 Specify
Select either [U] (Cut beginning) or
[V] (Cut end), then press <0>.
Press the <U> key to see the
previous or next frames. Holding it
down will fast forward the frames.
After deciding which part to edit out,
press <0>. The portion highlighted
in blue on the top of the screen is
what will remain.
the edited movie.
3 Check
Select [7] and press <0> to play
back the portion highlighted in blue.
To change the editing, go back to step
2.
To cancel the editing, press the
<M> button, select [OK] on the
confirmation screen, then press
<0>.
256
X Editing a Movie’s First and Last Scenes
the edited movie.
4 Save
Select [W], then press <0>.
X The save screen will appear.
To save it as a new movie, select
[New file]. To save it and overwrite
the original movie file, select
[Overwrite]. Then press <0>.
On the confirmation screen, select
[OK], then press <0> to save the
edited movie and return to the movie
playback screen.
Since the editing is performed in approx. 1-sec. increments (position
indicated by [ ]), the exact position where the movie is edited may differ
slightly from the position you specified.
If the card does not have enough free space, [New file] will not be
available.
When the battery level is low, editing the movie is not possible. Use a
fully-charged battery.
257
3 Slide Show (Auto Playback)
You can play back the images on the card as an automatic slide show.
1
Number of images to be played
Select [Slide show].
Under the [x2] tab, select [Slide
show], then press <0>.
the images to be played.
2 Select
Press the <V> key to select the
desired option, then press <0>.
[All images/Movies/Stills]
Press the <V> key to select one of
the following: [jAll images/
kMovies/zStills]. Then press
<0>.
[Date/Folder/Rating]
Press the <V> key to select one of
the following: [iDate/nFolder/
9Rating].
When <zH> is highlighted,
press the <B> button.
Press the <V> key to select the
desired option, then press <0>.
[Date]
258
[Folder]
[Rating]
3 Slide Show (Auto Playback)
Item
Playback Description
jAll images All the still photos and movies on the card will be played back.
iDate
Still photos and movies taken on the selected shooting date will
be played back.
nFolder
Still photos and movies in the selected folder will be played
back.
kMovies
Only the movies on the card will be played back.
zStills
Only the still photos on the card will be played back.
9Rating
Only the still photos and movies with the selected rating will be
played back.
[Set up] as desired.
3 SetPress
the <V> key to select [Set
up], then press <0>.
Set the [Display time], [Repeat],
[Transition effect], and
[Background music] for the still
photos.
The background music selection
procedure is explained on page 261.
After selecting the settings, press the
<M> button.
[Display time]
[Repeat]
259
3 Slide Show (Auto Playback)
[Transition effect]
[Background music]
the slide show.
4 StartPress
the <V> key to select [Start],
then press <0>.
X After [Loading image...] is displayed,
the slide show will start.
slide show.
5 QuitTo the
quit the slide show and return to
the setting screen, press the <M>
button.
To pause the slide show, press <0>. During pause, [G] will be
displayed on the upper left of the image. Press <0> again to resume
the slide show. You can also pause the slide show by tapping the screen.
During auto playback, you can press the <B> button to change the
still photo display format (p.84).
During movie playback, you can adjust the sound volume by turning the
<6> dial.
During auto playback or pause, you can press the <U> key to view
another image.
During auto playback, auto power off will not work.
The display time may vary depending on the image.
To view the slide show on a TV set, see page 262.
260
3 Slide Show (Auto Playback)
Selecting the Background Music
1
Select [Background music].
Set [Background music] to [On],
then press <0>.
the background music.
2 Select
Press the <V> key to select the
desired background music, then
press <0>. You can also select
multiple background music tracks.
background music.
3 PlayTo the
listen to a sample of the
background music, press the <B>
button.
Press the <V> key to play another
background music track. To stop
listening to the background music,
press the <B> button again.
Adjust the sound volume by turning
the <6> dial.
To delete a background music track,
press the <V> key and select the
track, then press the <L> button.
At the time of purchase, you cannot select background music with the
camera. You must first use EOS Utility (provided software) to copy the
background music to the card. For details, refer to the EOS Utility Instruction
Manual (p.367).
261
Viewing the Images on TV
You can view the still photos and movies on a TV set.
Viewing on High-Definition (HD) TV Sets (Connected with HDMI)
HDMI Cable HTC-100 (sold separately) is required.
1
Connect the HDMI cable to the
camera.
With the plug’s <dHDMI MINI> logo
facing the front of the camera, insert it
into the <D> terminal.
the HDMI cable to the TV
2 Connect
set.
Connect the HDMI cable to the TV’s
HDMI IN port.
on the TV and switch the
3 Turn
TV’s video input to select the
connected port.
the camera’s power switch to
4 Set
<1>.
Adjust the movie’s sound volume with the TV set. The sound volume
cannot be adjusted with the camera.
Before connecting or disconnecting the cable between the camera and
television, turn off the camera and TV set.
Depending on the TV set, part of the image displayed may be cut off.
262
Viewing the Images on TV
the <x> button.
5 Press
X The image will appear on the TV
screen. (Nothing will be displayed on
the camera’s LCD monitor.)
The images will automatically be
displayed at the TV’s optimum
resolution.
By pressing the <B> button, you
can change the display format.
To play back movies, see page 254.
The images cannot be output at the same time from both the <D>
and <q> terminals.
Do not connect any other device’s output to the camera’s <D>
terminal. Doing so may cause a malfunction.
Certain TVs may not be able to play back the captured images. In such a
case, use the stereo AV cable AVC-DC400ST (sold separately) to
connect to the TV.
Using HDMI CEC TV Sets
If the TV set connected to the camera with an HDMI cable is compatible
with HDMI CEC*, you can use the TV set’s remote control for playback
operations.
* An HDMI-standard function enabling HDMI devices to control each other so that
you can control them with one remote control unit.
1
Set [Ctrl over HDMI] to [Enable].
Under the [x2] tab, select [Ctrl over
HDMI], then press <0>.
Select [Enable], then press <0>.
263
Viewing the Images on TV
the camera to a TV set.
2 Connect
Use an HDMI cable to connect the
camera to the TV.
X The TV’s input will switch
automatically to the HDMI port
connected to the camera.
the camera’s <x> button.
3 Press
X An image will appear on the TV
screen and you can use the TV’s
remote control to play back images.
an image.
4 Select
Point the remote control toward the
TV set and press the / button to
select an image.
Still photo playback menu
Movie playback menu
: Return
: 9-image index
: Play movie
: Slide show
: Disp. shooting info
: Rotate
the remote control’s Enter button.
5 Press
X The menu appears and you can
perform the playback operations
shown on the left.
Press the / button to select the
desired option, then press the Enter
button. For a slide show, press the
remote control’s / button to select
an option, then press the Enter button.
If you select [Return] and press the
Enter button, the menu will disappear
and you can use the / button to
select an image.
Some TV sets require you to first enable the HDMI CEC connection. For
details, refer to the TV set’s instruction manual.
Certain TV sets, even those compatible with HDMI CEC, may not
operate properly. In such a case, disconnect the HDMI cable, set [x2:
Ctrl over HDMI] to [Disable], and use the camera to control the
playback operation.
264
Viewing the Images on TV
Viewing on Non-HD TV Sets (Connected with AV Cable)
Stereo AV Cable AVC-DC400ST (sold separately) is required.
1
Connect the AV cable to the
camera.
With the plug’s <Canon> logo facing
the back of the camera, insert it into
the <q > terminal.
the AV cable to the TV
2 Connect
set.
(Red)
(White)
AUDIO
(Yellow)
VIDEO
Connect the AV cable to the TV’s
video IN terminal and audio IN
terminal.
on the TV and switch the
3 Turn
TV’s video input to select the
connected port.
the camera’s power switch to
4 Set
<1>.
the <x> button.
5 Press
X The image will appear on the TV
screen. (Nothing will be displayed on
the camera’s LCD monitor.)
To play back movies, see page 254.
Do not use any AV cable other than the Stereo AV cable AVC-DC400ST
(sold separately). Images may not be displayed if you use a different
cable.
If the video system format does not match the TV’s, the images will not
be displayed properly. If this happens, switch to the proper video system
format with [52: Video system].
265
K Protecting Images
Protecting an image prevents it from being erased accidentally.
3 Protecting a Single Image
1
Select [Protect images].
Under the [x1] tab, select [Protect
images], then press <0>.
X The protect setting screen will
appear.
[Select images].
2 Select
Select [Select images], then press
<0>.
X The images will be displayed.
Image protect icon
the image.
3 Protect
Press the <U> key to select the
image to be protected, then press
<0>.
X When an image is protected, the
<K> icon will appear on the top of
the screen.
To cancel the image protection, press
<0> again. The <K> icon will
disappear.
To protect another image, repeat step
3.
Press the <M> button to return to
the menu.
266
K Protecting Images
3 Protecting All Images in a Folder or on a Card
You can protect all the images in a folder or on a card at one time.
When you select [All images in folder]
or [All images on card] in [x1: Protect
images], all the images in the folder or
on the card will be protected.
To cancel the image protection, select
[Unprotect all images in folder] or
[Unprotect all images on card].
If you format the card (p.48), the protected images will also be erased.
Movies can also be protected.
Once an image is protected, it cannot be erased by the camera’s erase
function. To erase a protected image, you must first cancel the
protection.
If you erase all the images (p.269), only the protected images will
remain. This is convenient when you want to erase unnecessary images
all at once.
267
L Erasing Images
You can either select and erase images one by one or erase them in
one batch. Protected images (p.266) will not be erased.
Once an image is erased, it cannot be recovered. Make sure
you no longer need the image before erasing it. To prevent
important images from being erased accidentally, protect
them. Erasing a 1+73 image will erase both the RAW and
JPEG images.
Erasing a Single Image
1 Play back the image to be erased.
the <L> button.
2 Press
X The Erase menu will appear at the
bottom of the screen.
3
Erase the image.
Select [Erase], then press <0>. The
image displayed will be erased.
3 Checkmarking <X> Images to be Erased in a Batch
By appending checkmarks <X> to the images to be erased, you can
erase multiple images at one time.
1
268
Select [Erase images].
Under the [x1] tab, select [Erase
images], then press <0>.
L Erasing Images
[Select and erase images].
2 Select
Select [Select and erase images],
then press <0>.
X The images will be displayed.
To display the three-image display,
press the <Hy> button. To return to
the single-image display, press the
<u> button.
the images to be erased.
3 Select
Press the <U> key to select the
image to be erased, then press
<0>.
X A checkmark <X> will be displayed
on the upper left of the screen.
To select other images to be erased,
repeat step 3.
the image.
4 Erase
Press the <L> button.
Select [OK], then press <0>.
X The selected images will be erased.
3 Erasing All Images in a Folder or on a Card
You can erase all the images in a folder or on a card at one time. When
[x1: Erase images] is set to [All images in folder] or [All images on
card], all the images in the folder or on the card will be erased.
To also erase protected images, format the card (p.48).
269
B: Shooting Information Display
Sample Image Taken in a Creative Zone Mode
Protect images
Exposure compensation amount
Flash exposure compensation
amount
Aperture
Rating
Folder number - File number
Histogram
(Brightness/RGB)
Shutter speed
Picture Style/Settings
Metering mode
Shooting mode
ISO speed
Highlight tone priority
White balance
Color space
Shooting date and time
Image-recording
quality
Playback
number/
Total images
recorded
White balance correction
File size
Eye-Fi transfer
* With 1+73 images, the 1 file size is displayed.
* For still photos taken during movie shooting, <G> will be displayed.
* If a Creative filter or Resize has been applied to the image, the <u> icon will be
displayed.
* Photos taken with flash without any flash exposure compensation are marked
with the < > icon. Photos taken with flash exposure compensation are marked
with the <y> icon.
270
B: Shooting Information Display
Sample Image Taken in a Basic Zone Mode
Ambience
Shooting mode
Ambience effect
Lighting or scene
* With images taken in a Basic Zone mode, the information displayed will differ
depending on the shooting mode.
* Photos taken in the <C> mode will show [Background blur].
Sample Movie
Shooting time
Playback
Shutter speed
Aperture
Shooting mode
Movie recording
size
Movie file size
Frame rate
* If manual exposure was used, the shutter speed, aperture, and ISO speed
(when set manually) will be displayed.
* The < > icon will be displayed for video snapshots.
271
B: Shooting Information Display
About the Highlight Alert
When the shooting information is displayed, any overexposed areas of the
image will blink. To obtain more image detail in the overexposed areas, set
the exposure compensation to a negative amount and shoot again.
About the Histogram
The brightness histogram shows the exposure level distribution and overall
brightness. The RGB histogram is for checking the color saturation and
gradation. The display can be switched with [x2: Histogram disp].
[Brightness] Display
Sample Histograms
This histogram is a graph showing the distribution of
the image’s brightness level. The horizontal axis
indicates the brightness level (darker on the left and
Dark image
brighter on the right), while the vertical axis indicates
how many pixels exist for each brightness level. The
more pixels there are toward the left, the darker the
image. The more pixels there are toward the right, the
Normal brightness
brighter the image. If there are too many pixels on the
left, the shadow detail will be lost. If there are too many
pixels on the right, the highlight detail will be lost. The
Bright image
gradation in-between will be reproduced. By checking
the image and its brightness histogram, you can see
the exposure level inclination and the overall gradation.
[RGB] Display
This histogram is a graph showing the distribution of each primary
color’s brightness level in the image (RGB or red, green, and blue).
The horizontal axis indicates the color’s brightness level (darker on
the left and brighter on the right), while the vertical axis indicates how
many pixels exist for each color brightness level. The more pixels
there are toward the left, the darker and less prominent the color. The
more pixels there are toward the right, the brighter and denser the
color. If there are too many pixels on the left, the respective color
information will be lacking. If there are too many pixels on the right,
the color will be too saturated with no gradation. By checking the
image’s RGB histogram, you can see the color’s saturation and
gradation condition, as well as white balance inclination.
272
10
Post-Processing
Images
After shooting, you can apply Creative filters or resize
the images (downsize the pixel count).
The camera may not be able to process images taken with
another camera.
Post-processing images as described in this chapter cannot be
performed while the camera is connected to a personal
computer via the <C> terminal.
273
U Applying Creative Filters to the Image
You can apply the following Creative filters to an image and save it as a
new image: Grainy B/W, Soft focus, Fish-eye effect, Art bold effect,
Water painting effect, Toy camera effect, and Miniature effect.
1
Select [Creative filters].
Under the [x1] tab, select [Creative
filters], then press <0>.
X The images will be displayed.
an image.
2 Select
Select the image you want to apply a
filter to.
By pressing the <Hy> button, you
can switch to the index display and
select an image.
a filter.
3 Select
When you press <0>, the types of
Creative filters will be displayed.
For details on Creative filter
characteristics, see pages 275, 276.
Press the <U> key to select a filter,
then press <0>.
X The image will be displayed with the
corresponding filter applied.
the filter effect.
4 Adjust
Press the <U> key to adjust the
filter effect, then press <0>.
For the Miniature effect, press the
<V> key and select the image area
(within the white frame) where you
want the image to look sharp. Then
press <0>.
274
U Applying Creative Filters to the Image
the image.
5 Save
Select [OK] to save the image.
Check the destination folder and
image file number, then select [OK].
To apply a filter to another image,
repeat steps 2 to 5.
Press the <M> button to return to
the menu.
When shooting 1+73 or 1 images, the Creative filter will be applied to
the 1 image and the image will be saved as a JPEG image. If an aspect
ratio is set for Live View shooting and a Creative filter is applied to the 1
image, the image will be saved in the aspect ratio that was set.
Creative Filter Characteristics
Grainy B/W
Makes the image grainy and black and white. By adjusting the
contrast, you can change the black-and-white effect.
Soft focus
Gives the image a soft look. By adjusting the blur, you can change
the degree of softness.
275
U Applying Creative Filters to the Image
Fish-eye effect
Gives the effect of a fish-eye lens. The image will have a barrel-type
distortion.
Depending on the level of this filter effect, the area trimmed along
the periphery of the image changes. Also, since this filter effect will
magnify the image center, the apparent resolution at the center may
degrade depending on the number of recorded pixels. Set the filter
effect in step 4 while checking the resulting image.
Art bold effect
Makes the photo look like an oil painting and the subject look threedimensional. You can adjust the contrast and saturation. Note that
the sky, white walls, and similar subjects may not be rendered with a
smooth gradation and may look irregular or have significant noise.
Water painting effect
Makes the photo look like a watercolor painting with soft colors. You
can adjust the color density. Note that night scenes or dark scenes
may not be rendered with a smooth gradation and may look irregular
or have significant noise.
Toy camera effect
Gives a color cast typical of toy cameras and darkens the image’s
four corners. By adjusting the color tone, you can change the color
cast.
Miniature effect
Creates a diorama effect. You can change where the image looks
sharp. In step 4, you can press the <B> button (or tap [ ] on the
screen) to change the white frame’s orientation (horizontal/vertical)
where you want the image to look sharp.
276
S Resizing a JPEG Image
You can resize an image to make the pixel count lower and save it as a
new image. Resizing an image is possible only with JPEG 3/4/a/b
images. JPEG c and 1 images cannot be resized.
1
Select [Resize].
Under the [x1] tab, select [Resize],
then press <0>.
X The images will be displayed.
an image.
2 Select
Select the image you want to resize.
By pressing the <Hy> button, you
can switch to the index display and
select an image.
the desired image size.
3 Select
Press <0> to display the image
sizes.
Press the <U> key to select the
desired image size, then press <0>.
Target sizes
the image.
4 Save
Select [OK] to save the resized
image.
Check the destination folder and
image file number, then select [OK].
To resize another image, repeat steps
2 to 4.
Press the <M> button to return to
the menu.
277
S Resizing a JPEG Image
Resize Options According to Original Image Size
Available Resize Settings
Original Image
Size
4
a
b
c
3
k
k
k
k
k
k
k
k
k
4
a
k
b
c
About Image Sizes
The image size displayed in step 3 on the preceding page, such as
[***M ****x****], has a 3:2 aspect ratio. The image size according to
aspect ratios is shown in the table below.
The asterisked image-recording quality figures do not exactly match the
aspect ratio. The image will be cropped slightly.
Image
Quality
Aspect Ratio and Pixel Count (Approx.)
3:2
4:3
16:9
1:1
4
3456x2304
3072x2304
3456x1944
2304x2304
(8.0 megapixels) (7.0 megapixels) (6.7 megapixels) (5.3 megapixels)
a
2592x1728
2304x1728
2592x1456*
1728x1728
(4.5 megapixels) (4.0 megapixels) (3.8 megapixels) (3.0 megapixels)
b
1920x1280
1696x1280*
1920x1080
1280x1280
(2.5 megapixels) (2.2 megapixels) (2.1 megapixels) (1.6 megapixels)
c
720x480
640x480
720x400*
480x480
(350,000 pixels) (310,000 pixels) (290,000 pixels) (230,000 pixels)
278
11
Printing Images
Printing (p.280)
You can connect the camera directly to a printer and print
out the images on the card. The camera is compatible with
“wPictBridge” which is the standard for direct printing.
Digital Print Order Format (DPOF) (p.289)
DPOF (Digital Print Order Format) enables you to print
images recorded on the card according to your printing
instructions such as the image selection, quantity to print,
etc. You can print multiple images in one batch or give the
print order to a photofinisher.
Specifying Images for a Photobook (p.293)
You can specify images in the card for printing in a
photobook.
279
Preparing to Print
The direct printing procedure can be performed entirely with the
camera while you look at the LCD monitor.
Connecting the Camera to a Printer
1
Set the camera’s power switch to
<2>.
the printer.
2 SetForupdetails,
see the printer’s
instruction manual.
the camera to the
3 Connect
printer.
Use the interface cable provided with
the camera.
Connect the cable to the camera’s
<C> terminal with the cable
plug’s <D> icon facing the front of
the camera.
To connect to the printer, refer to the
printer’s instruction manual.
4 Turn on the printer.
the camera’s power switch to
5 Set
<1>.
X Some printers may make a beeping
sound.
280
Preparing to Print
wPictBridge
back the image.
6 PlayPress
the <x> button.
X The image will appear, and the <w>
icon will appear on the upper left to
indicate that the camera is connected
to a printer.
Before using the printer, make sure it has a PictBridge connection port.
Movies cannot be printed.
The camera cannot be used with printers compatible only with CP Direct
or Bubble Jet Direct.
Do not use any interface cable other than the one provided.
If there is a long beeping sound in step 5, it indicates a problem with the
printer. Resolve the problem displayed in the error message (p.288).
Printing is not possible if the <F> or <G> shooting mode or Multi Shot
Noise Reduction has been set.
You can also print 1 images taken with this camera.
If you use a battery pack to power the camera, make sure it is fully
charged. With a fully-charged battery, printing up to approx. 3 hr. 30 min
is possible.
Before disconnecting the cable, first turn off the camera and printer. Hold
the plug (not the cord) to pull out the cable.
For direct printing, using AC Adapter Kit ACK-E8 (sold separately) to
power the camera is recommended.
281
wPrinting
The screen display and setting options will differ depending on the
printer. Some settings may not be available. For details, refer to the
printer’s instruction manual.
Printer-connected icon
1
Select the image to be printed.
Check that the <w> icon is
displayed on the upper left of the LCD
monitor.
Press the <U> key to select the
image to be printed.
<0>.
2 Press
X The print setting screen will appear.
Print setting screen
Sets the printing effects (p.284).
Sets the date or file number imprinting to on
or off.
Sets the quantity to be printed.
Sets the cropping (trimming) (p.287).
Sets the paper size, type, and layout.
Returns to the screen in step 1.
Starts the printing.
The paper size, type, and layout you have set are displayed.
* Depending on the printer, certain settings such as the date and file
number imprinting and cropping may not be selectable.
[Paper settings].
3 Select
Select [Paper settings], then press
<0>.
X The paper settings screen will
appear.
282
wPrinting
Q Setting the Paper Size
Select the size of the paper loaded in
the printer, then press <0>.
X The paper type screen will appear.
Y Setting the Paper Type
Select the type of the paper loaded in
the printer, then press <0>.
X The page layout screen will appear.
U Setting the Page Layout
Select the page layout, then press
<0>.
X The print settings screen will
reappear.
Bordered
The print will have white borders along the edges.
Borderless
The print will have no borders. If your printer cannot print
borderless prints, the print will have borders.
Borderedc
The shooting information*1 will be imprinted on the border on
9x13 cm and larger prints.
xx-up
Option to print 2, 4, 8, 9, 16, or 20 images on one sheet.
20-upc
35-upp
20 or 35 images will be printed as thumbnails on A4 or Letter size
paper*2.
• [20-upc] will have the shooting information*1 imprinted.
Default
The page layout will vary depending on the printer model or its settings.
*1: From the Exif data, the camera name, lens name, shooting mode, shutter speed, aperture,
exposure compensation amount, ISO speed, white balance, etc., will be imprinted.
*2: After ordering the prints with “Digital Print Order Format (DPOF)” (p.289), it is
recommended that you print by following “Direct Printing with DPOF” (p.292).
If the image’s aspect ratio is different from the printing paper’s aspect ratio, the
image may be cropped significantly if you print it as a borderless print. If the image is
cropped, it may look more grainy on the paper due to the fewer number of pixels.
283
wPrinting
the printing effects (image
4 Set
optimization).
Set them if necessary. If you do not
need to set any printing effects, go to
step 5.
What is displayed on the screen
differs depending on the printer.
Select the option, then press <0>.
Select the desired printing effect, then
press <0>.
If the <e> icon is displayed brightly
next to <z>, you can also adjust
the printing effect (p.286).
Printing Effect
Description
EOn
The image will be printed using the printer’s standard colors.
The image’s Exif data is used to make automatic corrections.
EOff
No automatic correction will be applied.
EVivid
The image will be printed with higher saturation to produce
more vivid blues and greens.
ENR
Image noise is reduced before printing.
0 B/W
Prints in black-and-white with true blacks.
0 Cool tone
Prints in black-and-white with cool, bluish blacks.
0 Warm tone Prints in black-and-white with warm, yellowish blacks.
Prints the image in the actual colors and contrast. No
zNatural
automatic color adjustments are applied.
zNatural M
The printing characteristics are the same as the “Natural”
setting. However, this setting enables finer printing
adjustments than with “Natural.”
EDefault
The printing will differ depending on the printer. For details,
refer to the printer’s instruction manual.
* When you change the printing effects, changes are reflected in the image
displayed on the upper left. Note that the printed image may look slightly
different from the displayed image, which is only an approximation. This also
applies to [Brightness] and [Adjust levels] on page 286.
284
wPrinting
the date and file number
5 Set
imprinting.
Set them if necessary.
Select <I>, then press <0>.
Set as desired, then press <0>.
of copies.
6 SetSettheit ifnumber
necessary.
Select <R>, then press <0>.
Set the number of copies, then press
<0>.
printing.
7 StartSelect
[Print], then press <0>.
With Easy printing, you can print another image using the same settings.
Just select the image and press the <l> button. With Easy printing, the
number of copies will always be 1. (You cannot set the number of
copies.) Also, any cropping (p.287) will not be applied.
The [Default] setting for printing effects and other options are the
printer’s own default settings as set by the printer’s manufacturer. Refer
to the printer’s instruction manual to find out what the [Default] settings
are.
Depending on the image’s file size and image-recording quality, it may
take some time for the printing to start after you select [Print].
If image tilt correction (p.287) is applied, it may take longer to print the
image.
To stop the printing, press <0> while [Stop] is displayed, then select
[OK].
If you execute [Clear all camera settings] (p.214), all the settings will
revert to their defaults.
285
wPrinting
e Adjustment of Printing Effects
In step 4 on page 284, select the printing
effect. When the <e> icon is displayed
brightly next to <z>, you can press
the <B> button. You can then adjust
the printing effect. What can be adjusted
or what is displayed will depend on the
selection made in step 4.
Brightness
The image brightness can be adjusted.
Adjust levels
When you select [Manual], you can change
the histogram’s distribution and adjust the
image’s brightness and contrast.
With the Adjust levels screen displayed, press
the <B> button to change the position of
the <h>. Press the <U> key to freely adjust
the shadow level (0-127) or highlight level (128-255).
kBrightener
Effective in backlit conditions that can make the subject’s face look
dark. When [On] is set, the face will be brightened for printing.
Red-eye corr.
Effective in flash images where the subject has red eye. When [On]
is set, the red eye will be corrected for printing.
The [kBrightener] and [Red-eye corr.] effects will not be reflected on
the screen.
When you select [Detail set.], you can adjust the [Contrast], [Saturation],
[Color tone], and [Color balance]. To adjust the [Color balance], use the
<S> keys. B is for blue, A for amber, M for magenta, and G for green.
The image’s color balance will be corrected towards the selected color.
If you select [Clear all], all the printing effect settings will be reverted to
their defaults.
286
wPrinting
Cropping the Image
Tilt correction
You can crop the image and print only
the cropped portion as if the image was
recomposed.
Set the cropping right before printing.
If you set the cropping and then set the
print settings, you may have to set the
cropping again before printing.
1 On the print settings screen, select [Cropping].
2 Set the cropping frame size, position, and aspect ratio.
The image area within the cropping frame will be printed. The
cropping frame’s aspect ratio can be changed with [Paper settings].
Changing the cropping frame size
When you press the <u> or <Hy> button, the size of the
cropping frame will change. The smaller the cropping frame, the
larger the image magnification will be for printing.
Moving the cropping frame
Press the <S> key to move the frame over the image vertically or
horizontally. Move the cropping frame until it covers the desired image area.
Rotating the frame
Pressing the <B> button will toggle the cropping frame
between the vertical and horizontal orientations. This enables you
to create a vertically oriented print from a horizontal image.
Image tilt correction
By turning the <6> dial, you can adjust the image tilt angle up to
±10 degrees in 0.5-degree increments. When you adjust the
image tilt, the <O> icon on the screen will turn blue.
3 Press <0> to exit the cropping.
X The print settings screen will reappear.
You can check the cropped image area on the upper left of the
print settings screen.
287
wPrinting
Depending on the printer, the cropped image area may not be printed as
you specified.
The smaller you make the cropping frame, the grainier the picture will
look in the print.
While cropping the image, look at the camera’s LCD monitor. If you look
at the image on a TV screen, the cropping frame may not be displayed
accurately.
Handling Printer Errors
If you resolve a printer error (no ink, no paper, etc.) and select [Continue] to
resume printing but it does not resume, operate the buttons on the printer to
resume printing. For details on resuming the printing, refer to the printer’s
instruction manual.
Error Messages
If a problem occurs during printing, an error message will appear on the
camera’s LCD monitor. Press <0> to stop printing. After fixing the
problem, resume printing. For details on how to fix a printing problem, refer
to the printer’s instruction manual.
Paper Error
Check whether the paper is properly loaded in the printer.
Ink Error
Check the printer’s ink level, and check the waste ink tank.
Hardware Error
Check for any printer problems other than paper and ink problems.
File Error
The selected image cannot be printed via PictBridge. Images taken with a
different camera or images edited with a computer may not be printable.
288
W Digital Print Order Format (DPOF)
You can set the print type, date imprinting, and file number imprinting.
The print settings will be applied to all print-ordered images. (They
cannot be set individually for each image.)
Setting the Printing Options
1
Select [Print order].
Under the [x1] tab, select [Print
order], then press <0>.
[Set up].
2 Select
Select [Set up], then press <0>.
as desired.
3 SetSetthetheoptions
[Print type], [Date], and [File
No.].
Select the option to be set, then press
<0>. Select the desired setting,
then press <0>.
[Print type]
[Date]
[File No.]
289
W Digital Print Order Format (DPOF)
Print type
Date
File number
K
L
K
L
Standard
Prints one image on one sheet.
Index
Multiple thumbnail images are printed on one sheet.
Both
Prints both the standard and index prints.
On
Off
On
Off
[On] imprints the recorded date on the print.
[On] imprints the file number on the print.
the setting.
4 ExitPress
the <7> button.
X The print order screen will reappear.
Next, select [Sel.Image], [Byn], or
[All image] to order the images to be
printed.
Even if [Date] and [File No.] are set to [On], the date or file number may
not be imprinted depending on the print type setting and printer model.
With [Index] prints, the [Date] and [File No.] cannot both be set to [On]
at the same time.
When printing with DPOF, you must use the card whose print order
specifications have been set. It will not work if you just extract images
from the card and try to print them.
Certain DPOF-compatible printers and photofinishers may not be able to
print the images as you specified. Refer to the printer’s instruction
manual before printing. Or check with your photofinisher about
compatibility when ordering prints.
Do not insert into the camera a card whose print order was set by a
different camera and then try to specify a print order. The print order may
be overwritten. Also, depending on the image type, the print order may
not be possible.
1 images and movies cannot be print ordered. You can print 1 images
through direct printing (p.292).
290
W Digital Print Order Format (DPOF)
Print Ordering
Sel.Image
Select and order images one by one.
To display the three-image display, press
the <Hy> button. To return to the
single-image display, press the <u>
button.
Press the <M> button to save the
print order to the card.
Quantity
Total images selected
Checkmark
Index icon
[Standard] [Both]
Press the <V> key to set the number of
copies to be printed for the displayed
image.
[Index]
Press <0> to add a checkmark to the
box <X>. The image will be included in
the index print.
Byn
Select [Mark all in folder] and select the folder. A print order for one
copy of all the images in the folder will be placed. If you select [Clear
all in folder] and select the folder, the print order for that folder will
all be canceled.
All image
If you select [Mark all on card], one copy of all the images on the
card will be set for printing. If you select [Clear all on card], the print
order will be cleared for all the images on the card.
Note that 1 images and movies will not be included in the print order
even if you set “Byn” or “All image”.
When using a PictBridge printer, print no more than 400 images for one
print order. If you specify more than this, all the images may not be
printed.
291
W Direct Printing with DPOF
With a PictBridge printer, you can easily
print images with DPOF.
1
Prepare to print.
See page 280. Follow the “Connecting the Camera to a Printer”
procedure up to step 5.
2 Under the [x1] tab, select [Print order].
3 Select [Print].
[Print] will be displayed only if the camera is connected to a
printer and printing is possible.
4 Set the [Paper settings] (p.282).
Set the printing effects (p.284) if necessary.
5 Select [OK].
Before printing, be sure to set the paper size.
Certain printers cannot imprint the file number.
If [Bordered] is set, certain printers may imprint the date on the border.
Depending on the printer, the date may appear faint if it is imprinted on a
bright background or on the border.
Under [Adjust levels], [Manual] cannot be selected.
If you stopped the printing and want to resume printing the remaining
images, select [Resume]. Note that printing will not resume if you stop
the printing and any of the following occurs:
• Before resuming the printing, you changed the print order or deleted
print-ordered images.
• When you set the index, you changed the paper setting before
resuming the printing.
• When you paused the printing, the card’s remaining capacity was low.
If a problem occurs during printing, see page 288.
292
p Specifying Images for a Photobook
When you select images (up to 998 images) to be used for a photobook
and transfer them from the camera to a computer using EOS Utility
(provided software), the images will be copied to a dedicated folder.
This function is convenient when you order a photobook from the
Internet.
Specify One Image at a Time
1
Select [Photobook Set-up].
Under the [x1] tab, select
[Photobook Set-up], then press
<0>.
[Select images].
2 Select
Select [Select images], then press
<0>.
X The images will be displayed.
To display the three-image display,
press the <Hy> button. To return to
the single-image display, press the
<u> button.
the image to be specified.
3 Select
Press the <U> key to select the
image to be specified, then press
<0>.
Repeat this step to select another
image. The number of images which
have been specified will be displayed
on the screen’s upper left.
To cancel the specified image, press
<0> again.
To return to the menu, press the
<M> button.
293
p Specifying Images for a Photobook
Specifying All Images in a Folder or on a Card
You can specify all the images in a folder or card at one time.
When [x1: Photobook Set-up] is set
to [All images in folder] or [All images
on card], all the images in the folder or
on the card will be specified.
To cancel the image specification, select
[Clear all in folder] or [Clear all on
card].
Do not specify images already specified for a photobook in another camera
for another photobook with this camera. The photobook settings may be
overwritten.
1 images and movies cannot be specified.
294
12
Customizing the
Camera
Cre
ati
v
You can customize various camera functions to suit
your picture-taking preferences with Custom Functions.
Custom Functions can be set and used only in Creative
Zone modes.
e
ne
Zo
295
3 Setting Custom FunctionsN
1
Custom Function number
Select [Custom Functions (C.Fn)].
Under the [54] tab, select [Custom
Functions (C.Fn)], then press <0>.
the Custom Function
2 Select
number.
Press the <U> key to select the
Custom Function number, then press
<0>.
the setting as desired.
3 Change
Press the <V> key to select the
setting (number), then press <0>.
Repeat steps 2 and 3 if you want to
set another Custom Functions.
At the bottom of the screen, the
current Custom Function settings are
indicated below the respective
function numbers.
the setting.
4 ExitPress
the <M> button.
X The screen for step 1 will reappear.
Clearing All Custom Functions
Under [54: Clear settings], select [Clear all Custom Func. (C.Fn)] to
clear all the Custom Function settings currently set (p.214).
296
3 Setting Custom FunctionsN
Custom Functions
A LV
Shooting
C.Fn I: Exposure
1
Exposure level increments
2
ISO expansion
kMovie
Shooting
k
k
k
In a
p.299
k
k
p.300
k (With
f*)
p.298
C.Fn II: Image
3
Highlight tone priority
C.Fn III: Autofocus/Drive
4
AF-assist beam firing
5
Mirror lockup
* If you use an EX-series Speedlite (sold separately) equipped with an LED light,
the LED light will turn on for AF-assist even in the c, o, and d modes.
C.Fn IV: Operation/Others
6
Shutter/AE lock button
p.301
k
k
7
Assign SET button
p.302
k
(Except 3)
k
(Except
2, 3)*
8
LCD display when power ON
p.302
* [5: ISO speed] is settable only for manual exposure shooting.
The shaded Custom Functions do not function during Live View (LV
shooting) or movie shooting. (Settings are disabled.)
297
3 Custom Function SettingsN
Custom Functions are organized into four groups based on the function
type: C.Fn I: Exposure, C.Fn II: Image, C.Fn III: Autofocus/Drive, C.Fn
IV: Operation/Others.
C.Fn I: Exposure
C.Fn-1
Exposure level increments
0: 1/3-stop
1: 1/2-stop
Sets 1/2-stop increments for the shutter speed, aperture, exposure
compensation, AEB, flash exposure compensation, etc. This is effective
when you prefer to control the exposure in less fine increments than 1/3stop increments.
With setting 1, the exposure level will be displayed in the viewfinder and on
the LCD monitor as shown below.
C.Fn-2
ISO expansion
0: Off
1: On
When you set the ISO speed, you will be able to set “H” (equivalent to
ISO 25600) for still photos and “H” (equivalent to ISO 12800) for movies.
Note that if [C.Fn-3: Highlight tone priority] is set to [1: Enable], “H”
cannot be set.
298
3 Custom Function SettingsN
C.Fn II: Image
C.Fn-3
Highlight tone priority
0: Disable
1: Enable
Improves the highlight detail. The dynamic range is expanded from the
standard 18% gray to bright highlights. The gradation between the grays
and highlights becomes smoother.
With setting 1, the Auto Lighting Optimizer (p.125) is automatically set to
[Disable] and the setting cannot be changed.
With setting 1, noise (grainy image, banding, etc.) may become slightly
more pronounced than with setting 0.
With setting 1, the settable range will be ISO 200 - ISO 12800 (up to ISO
6400 for movies).
Also, the <A> icon will be displayed on the LCD monitor and in the
viewfinder when highlight tone priority is enabled.
299
3 Custom Function SettingsN
C.Fn III: Autofocus/Drive
C.Fn-4
AF-assist beam firing
The settings to specify whether or not the AF-assist beam is emitted by the
camera’s built-in flash or by an external, EOS-dedicated Speedlite can be
set.
0: Enable
If necessary, the AF-assist beam will be emitted by the built-in flash or
external Speedlite.
1: Disable
The AF-assist beam is not emitted.
2: Enable external flash only
If an external Speedlite is attached, it will emit the AF-assist beam when
necessary. The camera’s built-in flash will not fire the AF-assist beam.
3: IR AF assist beam only
Among external Speedlites, only those which have an infrared AF-assist
beam will be able to emit the beam. This prevents any Speedlite which
uses a series of intermittent flashes (like the built-in flash) from firing the
AF-assist beam.
With an EX-series Speedlite equipped with an LED light, the LED light
will not automatically turn on for AF-assist.
If the external Speedlite’s [AF-assist beam firing] Custom Function is set
to [Disabled], the Speedlite will not emit the AF-assist beam even if the
camera’s C.Fn-4 is set to 0, 2, or 3.
C.Fn-5
Mirror lockup
0: Disable
1: Enable
Prevents mechanical vibrations in the camera caused by the reflex
mirror action (mirror shock), which can disturb shooting with super
telephoto lenses or close-up (macro) shooting. See page 142 for the
mirror lockup procedure.
300
3 Custom Function SettingsN
C.Fn IV: Operation/Others
C.Fn-6
Shutter/AE lock button
0: AF/AE lock
1: AE lock/AF
This is convenient when you want to focus and meter separately. Press
the <A> button to autofocus, and press the shutter button halfway to
apply AE lock.
2: AF/AF lock, no AE lock
In the AI Servo AF operation, you can press the <A> button to stop the
AF operation momentarily. This prevents the AF from being thrown off by
any obstacle passing between the camera and subject. The exposure is
set at the moment the picture is taken.
3: AE/AF, no AE lock
This is useful for subjects which keep moving and stopping repeatedly.
During AI Servo AF, you can press the <A> button to start or stop the AI
Servo AF operation. The exposure is set at the moment the picture is
taken. Thus, the optimum focusing and exposure will always be
achieved as you wait for the decisive moment.
During Live View shooting or movie shooting
• With setting 1 or 3, press the <A> button for One-Shot AF. Also, using
the touch shutter will take a picture without autofocusing.
• With setting 2, press the shutter button halfway for One-Shot AF.
301
3 Custom Function SettingsN
C.Fn-7
Assign SET button
You can assign a frequently-used function to <0>. Press <0> when the
camera is ready to shoot.
0: Normal (disabled)
1: Image quality
Press <0> to display the image-recording quality setting screen on the
LCD monitor. Select the desired image-recording quality, then press
<0>.
2: Flash exposure compensation
When you press <0>, the flash exposure compensation setting screen
will appear. Set the flash exposure compensation, then press <0>.
3: LCD monitor On/Off
Press <0> to turn on or off the LCD monitor.
4: Menu display
Press <0> to display the menu screen.
5: ISO speed
The ISO speed setting screen will appear. Press the <U> key or turn
the <6> dial to change the ISO speed. You can also refer to the
viewfinder to set the ISO speed.
C.Fn-8
LCD display when power ON
0: Display on
When the power switch is turned on, the shooting settings will be
displayed (p.50).
1: Previous display status
If you pressed the <B> button and turned off the camera while the
LCD monitor was off, the shooting settings will not be displayed when
you turn on the camera again. This helps to save battery power. The
menu screens and image playback will still be displayed when used.
If you pressed the <B> button to display the shooting settings and
then turn off the camera, the shooting settings will be displayed when
you turn on the camera again.
302
3 Registering My MenuN
Under the My Menu tab, you can register up to six menu options and
Custom Functions whose settings you change frequently.
1
Select [My Menu settings].
Under the [9] tab, select [My Menu
settings], then press <0>.
[Register to My Menu].
2 Select
Select [Register to My Menu], then
press <0>.
the desired items.
3 Register
Select an item to register, then press
<0>.
On the confirmation dialog, select
[OK] and press <0> to register the
item.
You can register up to six items.
To return to the screen in step 2,
press the <M> button.
About My Menu Settings
Sort
You can change the order of the registered items in My Menu. Select
[Sort] and select the item whose order you want to change. Then
press <0>. With [z] displayed, press the <V> key to change the
order, then press <0>.
Delete item/items and Delete all items
You can delete any of the registered items. [Delete item/items]
deletes one item at a time, and [Delete all items] deletes all
registered items.
Display from My Menu
When [Enable] is set, the [9] tab will be displayed first when you
display the menu screen.
303
13
Reference
This chapter provides reference information for camera
features, system accessories, etc.
Certification Logo
If you select [54: Certification Logo Display] and press <0>,
some of the logos of the camera’s certifications will appear. Other
certification logos can be found in this Instruction Manual, on the
camera body, or on the camera’s package.
305
Using a Household Power Outlet
With AC Adapter Kit ACK-E8 (sold separately), you can connect the
camera to a household power outlet and not worry about the remaining
battery level.
1
Connect the power cord.
Connect the power cord as shown in
the illustration.
After using the camera, unplug the
power plug from the power outlet.
the DC Coupler.
2 Connect
Connect the DC cord’s plug to the DC
Coupler.
the DC Coupler.
3 Insert
Open the cover and insert the DC
Coupler until it locks in place.
in the DC cord.
4 Push
Open the DC cord hole cover and
install the cord as shown.
Close the cover.
Do not connect or disconnect the power cord while the camera’s power
switch is set to <1>.
306
Remote Control Shooting
Remote Controller RC-6 (Sold Separately)
This remote controller enables you to take pictures wirelessly up to
approx. 5 meters/16.4 feet from the camera. You can either shoot
immediately or use a 2-sec. delay.
Remote control sensor
Set the self-timer to <Q> (p.106).
Point the remote controller toward the camera’s remote control
sensor and press the transmit button.
X The camera will autofocus.
X When focus is achieved, the self-timer lamp will light up and the
picture will be taken.
Fluorescent or LED lighting may cause camera misoperation by
triggering the shutter inadvertently. Try to keep the camera away from
such light sources.
If you point a remote controller for a TV set toward the camera and
operate it, it may cause camera misoperation by triggering the shutter
inadvertently.
Remote Controller RC-1/RC-5 (sold separately) can also be used.
Remote control shooting is also possible with an EX-series Speedlite
equipped with a remote-release function.
The Remote Controller can also be used during movie shooting (p.173).
Note that still photo shooting in the movie shooting mode is not possible
with the Remote Controller RC-5.
307
Remote Control Shooting
F Remote Switch RS-60E3 (Sold Separately)
Remote Switch RS-60E3 (sold separately) comes with an approx.
60 cm/2.0 ft cord. When connected to the camera’s remote control
terminal, it can be pressed halfway and completely, just like the shutter
button.
Using the Eyepiece Cover
When you use the self-timer, bulb, or Remote Switch and do not look
through the viewfinder, stray light entering the viewfinder can cause the
image to look dark. To prevent this, use the eyepiece cover (p.27)
attached to the camera strap.
During Live View shooting and movie shooting, attaching the eyepiece
cover is unnecessary.
1
Remove the eyecup.
Push the bottom of the eyecup to
remove.
the eyepiece cover.
2 Attach
Slide the eyepiece cover down into
the eyepiece groove to attach it.
After taking the picture, detach the
eyepiece cover and attach the
eyecup by sliding it down the
eyepiece groove.
308
External Speedlites
EOS-dedicated, EX-series Speedlites
Basically operates like a built-in flash for easy operation.
When an EX-series Speedlite (sold separately) is attached to the
camera, almost all the autoflash control is done by the camera. In other
words, it is like a high-output flash attached externally in place of the
built-in flash.
For detailed instructions, refer to the EX-series Speedlite’s
instruction manual. This camera is a Type-A camera that can use all
the features of EX-series Speedlites.
Shoe-mount Speedlites
Macro Lites
With an EX-series Speedlite not compatible with flash function settings
(p.220), only [Flash exposure compensation] can be set for [External
flash func. setting]. (With certain EX-series Speedlites, [Shutter
synchronization] is also settable.)
If flash exposure compensation is set with the external Speedlite, the
flash exposure compensation icon displayed on the camera’s LCD
monitor will change from y to 0.
If the Speedlite’s Custom Function has the flash metering mode set to
TTL autoflash, the flash will fire at full output only.
309
External Speedlites
Canon Speedlites Other Than the EX-series
With an EZ/E/EG/ML/TL-series Speedlite set in TTL or A-TTL
autoflash mode, the flash can be fired at full output only.
Set the camera’s shooting mode to <a> (manual exposure) or
<f> (aperture-priority AE) and adjust the aperture setting before
shooting.
When using a Speedlite that has manual flash mode, shoot in the
manual flash mode.
Using Non-Canon Flash Units
Sync Speed
The camera can synchronize with compact, non-Canon flash units at
1/200 sec. or slower shutter speeds. Use a sync speed slower than
1/200 sec.
Be sure to test the flash unit beforehand to make sure it synchronizes
properly with the camera.
Cautions for Live View shooting
A non-Canon flash will not fire during Live View shooting.
If the camera is used with a flash unit or flash accessory dedicated to
another camera brand, the camera may not operate properly and
malfunction may result.
Do not attach a high-voltage flash unit on the camera’s hot shoe. It may
not fire.
310
Using Eye-Fi Cards
With a commercially-available Eye-Fi card already set up, you can
automatically transfer captured images to a personal computer or
upload them to an online service via a wireless LAN.
The image transfer is a function of the Eye-Fi card. For instructions on
how to set up and use the Eye-Fi card or to troubleshoot any image
transfer problems, refer to the Eye-Fi card’s instruction manual or
contact the card’s manufacturer.
The camera is not guaranteed to support Eye-Fi card functions
(including wireless transfer). In case of an issue with an Eye-Fi
card, please check with the card manufacturer. Also note that
approval is required to use Eye-Fi cards in many countries or
regions. Without approval, use of the card is not permitted. If it
is unclear whether the card has been approved for use in your
area, please check with the card manufacturer.
1 Insert an Eye-Fi card (p.31).
[Eye-Fi settings].
2 Select
Under the [51] tab, select [Eye-Fi
settings], then press <0>.
This menu is displayed only when an
Eye-Fi card is inserted into the
camera.
Eye-Fi transmission.
3 Enable
Press <0>, set [Eye-Fi trans.] to
[Enable], then press <0>.
If you set [Disable], automatic
transmission will not occur even with
the Eye-Fi card inserted
(transmission status icon I).
the connection
4 Display
information.
Select [Connection info.], then press
<0>.
311
Using Eye-Fi Cards
the [Access point SSID:].
5 Check
Check that an access point is
displayed for [Access point SSID:].
You can also check the Eye-Fi card’s
MAC address and firmware version.
Press the <M> button three times
to exit the menu.
the picture.
6 Take
X The picture is transferred and the
Transmission status icon
H(Gray) Not connected :
H(Blinking) Connecting :
H(Displayed) Connected :
H( ) Transferring
:
312
<H> icon switches from gray (not
connected) to one of the icons below.
For transferred images, O is
displayed in the shooting information
display (p.270).
No connection with access point.
Connection with access point.
Connection to access point established.
Image transfer to access point in progress.
Using Eye-Fi Cards
Cautions for Using Eye-Fi Cards
If “J” is displayed, an error occurred while retrieving the card
information. Turn the camera’s power switch off and on again.
Even if [Eye-Fi trans.] is set to [Disable], it may still transmit a signal. In
hospitals, airports, and other places where wireless transmissions are
prohibited, remove the Eye-Fi card from the camera.
If the image transfer does not function, check the Eye-Fi card and
personal computer settings. For details, refer to the card’s instruction
manual.
Depending on the wireless LAN’s connection conditions, the image
transfer may take longer or it may be interrupted.
Because of the transmission function, the Eye-Fi card may become hot.
The battery power will be consumed faster.
During the image transfer, auto power off will not take effect.
313
Function Availability Table According to Shooting Mode
o: Set automatically k: User selectable
: Not selectable/Disabled
Basic Zone
Function
All image quality
settings selectable
ISO
speed
A7C 2 3 4 5
Creative Zone Movie
8
6 F G
k k k k k k k k k *2 k *2 k k k k
Automatically set/Auto ISO o o o o o o o o
o
o k k k k
Manual
k k k k
Maximum for Auto
k k k k
Picture Automatic Selection/Auto o o o o o o o o
Style
Manual selection
o o o o o o o o o
White Preset
balance Custom
Auto Lighting Optimizer o o o o o o o o
Peripheral
Lens
illumination correction k k k k k k k k
aberration
correction Chromatic
aberration correction k k k k k k k k
Long exposure noise reduction
High ISO speed noise reduction o o o o o o o o
k *4
k k k k
k *5
o k k k k
k *4
k k k k
k *5
k k k k
k *5
o
k
k k k k k
k
k k k k k
o
o k k k k
k k k k
o o o o o o o o o
Adobe RGB
o o o
One-Shot AF
o o
o
AI Servo AF
o o o
AF point selection o o o o o o o o
AF-assist beam o
o
o o *8 o *8 o o
k *5
o k k k k o k*5
k k k k
k*5
o k k k k c
k k k k o
d
k k k k f*7
o k k k k f*7
o k k k k
*1: The z icon indicates still photo shooting in the movie shooting mode.
*2: 1+73 or 1 cannot be selected.
*3: Settable only for manual exposures.
*4: Set automatically in Basic Zone modes.
*5: Settable only in Creative Zone modes.
314
k
k k k k
Highlight tone priority
Focusing AI Focus AF
o k k k k
k k k k *6 k*5
o k k k k k *5
Correction/Bracketing
sRGB
k *3
k k k k
Light/scene-based shots
Auto
o
k
k
k k k k k k k
Ambience-based shots
Color
space
d s f a k z*1
Function Availability Table According to Shooting Mode
Basic Zone
Function
A7C 2 3 4 5
Creative Zone
Movie
8
d s f a k z*1
6 F G
Metering Evaluative metering o o o o o o o o o o k k k k
mode
Metering mode selection
k k k k
Exposure
Program shift
k
Exposure
compensation
k k k
AEB
AE lock
Depth-of-field preview
Single shooting k k k k k k k k k k
Continuous shooting k k k k k k k k k k
Drive
Q (10 sec.)
k k k k k k k k k k
k k k k k k k k k k
q (Continuous) k k k k k k k k k k
Automatic firing o
k o
o
o
l (2 sec.)
k
Manual firing
o k
Flash off
Built-in Red-eye reduction k
flash
FE lock
k k
k
o
o
k
k
k
k
k
k
k
k
k
k
k
k
k
k
k
k
k
k
k
k
k
k
k
k
k
k *5
Other than a
k
*9
k
k
k
k
k
k
k k k k
k k k k
Wireless control
k k k k
Function settings
k k k k
Live View shooting
o
k k k k
Flash exposure
compensation
External
Custom Function
flash
settings
k
k*10
k*10
k*10
k*10
k k k k
k o k k k k
k k
k *5
k k k k
k k k k k k k k k k k k k k
Aspect ratio*7
k k k k
Quick Control
k k k k k k k k k k k k k k
k
Feature guide
k k k k k k k k k k k k k k
k
*6: White balance correction can be set.
*7: Settable only for Live View shooting.
*8: If the AF method is <f> during Live View shooting, the external
Speedlite will emit the AF-assist beam when necessary.
*9: With Auto ISO, you can set a fixed ISO speed.
*10: Works only before the start of movie shooting.
315
System Map
ST-E2 ST-E3-RT 270EX II
90EX
320EX
430EX II 600EX-RT/ Macro Ring Lite Macro Twin Lite
600EX
MR-14EX II
MT-24EX
Bundled
Accessories
Eyecup Ef
Eyepiece Extender
EP-EX15ll
Rubber Frame Ef
Wide Strap
E-series Dioptric
Adjustment Lenses
Angle Finder C
AC Adapter Kit
ACK-E8
Battery Pack
LP-E8
Battery Charger
LC-E8 or LC-E8E
Hand Strap E2
DC Coupler
DR-E8
Battery Grip
BG-E8
316
Battery Magazine
BGM-E8L for two
LP-E8 battery packs
Battery Magazine
BGM-E8A for
size-AA/LR6 batteries
Compact Power
Adapter
CA-PS700
System Map
GPS Receiver
GP-E2
Remote
Controller
RC-6
Remote Switch
RS-60E3
EF lenses
EF-S lenses
External microphone
HDMI Cable
HTC-100 (2.9 m/9.5 ft.)
TV/Video
Stereo AV Cable AVC-DC400ST
(1.3 m/4.3 ft.)
EOS DIGITAL
Solution Disk
PictBridge-compatible printer
Interface Cable
(1.3 m/4.3 ft.)
Interface Cable IFC-200U/500U
(1.9 m/6.2 ft.) / (4.7 m/15.4 ft.)
USB port
SD/SDHC/SDXC
memory card
Card reader
Card slot
Computer
* All cable lengths given are approximate figures.
Semi Hard Case
EH22-L/EH24-L
317
3 Menu Settings
For Viewfinder Shooting and Live View Shooting
Shooting 1 (Red)
Page
Image quality
73 / 83 / 74 / 84 / 7a / 8a / b / c /
1+73* / 1*
88
Beep
Enable / Touch to
204
Release shutter
without card
Enable / Disable
204
Image review
Off / 2 sec. / 4 sec. / 8 sec. / Hold
204
Lens aberration
correction
Peripheral illumination: Enable / Disable
Chromatic aberration: Enable / Disable
129
Red-eye reduction
Disable / Enable
108
Flash control
Flash firing / E-TTL II metering / Flash sync.
speed in Av mode / Built-in flash settings /
External flash function settings / External flash
C.Fn settings / Clear settings
218
/ Disable
* Not selectable if the <F> or <G> shooting mode, Multi Shot Noise Reduction,
or a Creative filter is set.
Shooting 2 (Red)
Exposure
compensation/AEB
1/3-stop or 1/2-stop increments, ±5 stops (AEB:
±2 stops)
Auto Lighting
Optimizer
Disable / Low / Standard / High
Disable during manual exposure
Custom White Balance Manual setting of white balance
121
125
137
White balance shift/
bracketing
WB correction: White balance correction
BKT setting: White balance bracketing
139
140
Color space
sRGB / Adobe RGB
141
Picture Style
DAuto / PStandard / QPortrait /
RLandscape / SNeutral / UFaithful /
VMonochrome / WUser Def. 1-3
95
132
135
Metering mode
q Evaluative metering / w Partial metering /
r Spot metering /
e Center-weighted average metering
117
Shaded menu options are not displayed in Basic Zone modes.
318
3 Menu Settings
Shooting 3 (Red)
Page
Dust Delete Data
Obtains data to be used to erase dust spots
224
ISO Auto
Max.: 400 / Max.: 800 / Max.: 1600 /
Max.: 3200 / Max.: 6400
94
Long exposure noise
reduction
Disable / Auto / Enable
127
High ISO speed noise
reduction
Disable / Low / Standard / High /
Multi Shot Noise Reduction
126
A Live View Shooting (Red)
Live View shooting
Enable / Disable
147
AF method
u+Tracking / FlexiZone - Multi /
FlexiZone - Single / Quick mode
159
Continuous AF
Enable / Disable
156
Touch Shutter
Disable / Enable
168
Grid display
Off / Grid 1l / Grid 2m
156
Aspect ratio
3:2 / 4:3 / 16:9 / 1:1
157
Metering timer
4 sec. / 16 sec. / 30 sec. / 1 min. / 10 min. /
30 min.
158
Protect images
Select images / All images in folder / Unprotect
all images in folder / All images on card /
Unprotect all images on card
266
Rotate image
Rotate vertical images
247
Erase images
Select and erase images / All images in folder /
All images on card
268
Print order
Specify images to be printed (DPOF)
289
Photobook Set-up
Select images / All images in folder / Clear all in
folder / All images on card / Clear all on card
293
Creative filters
Grainy B/W / Soft focus / Fish-eye effect /
Art bold effect / Water painting effect /
Toy camera effect / Miniature effect
274
Resize
Downsize the image’s pixel count
277
Playback 1 (Blue)
319
3 Menu Settings
Playback 2 (Blue)
Page
Histogram display
Brightness / RGB
272
Image jump w/6
1 image / 10 images / 100 images / Date /
Folder / Movies / Stills / Rating
243
Slide show
Playback description / Display time / Repeat /
Transition effect / Background music
258
Rating
[OFF] / l / m / n / o / p
248
Control over HDMI
Disable / Enable
263
Select folder
Create and select a folder
206
File numbering
Continuous / Auto reset / Manual reset
208
Auto rotate
OnzD / OnD / Off
212
Format card
Initialize and erase data on the card
48
Eye-Fi settings*
Eye-Fi transmission: Disable / Enable
Connection information
311
Set-up 1 (Yellow)
* Displayed only when an Eye-Fi card is used.
Set-up 2 (Yellow)
Auto power off
30 sec. / 1 min. / 2 min. / 4 min. / 8 min. /
15 min. / Disable
205
LCD brightness
Seven brightness levels provided
205
LCD auto off
Enable / Disable
217
Time zone
Daylight saving time* / Time zone
36
Date/Time
Date (year, month, day) / Time (hour, min.,
sec.) / Daylight saving time*
36
LanguageK
Select the interface language
38
Video system
NTSC / PAL
265
* The daylight saving time setting is linked to [Time zone] and [Date/time].
320
3 Menu Settings
Set-up 3 (Yellow)
Page
Screen color
Select the shooting settings screen color
217
Feature guide
Enable / Disable
52
Touch control
Enable / Disable
55
Auto cleaning: Enable / Disable
Sensor cleaning
Clean now
Clean manually
GPS device settings
Settings available when the GPS Receiver GPE2 (sold separately) is attached
223
226
–
Set-up 4 (Yellow)
Certification Logo
Display
Displays some of the logos of the camera’s
certifications
305
Custom Functions
(C.Fn)
Customize camera functions as desired
296
Display copyright information /
Copyright information Enter author’s name / Enter copyright details /
Delete copyright information
Clear settings
Clear all camera settings /
Clear all Custom Func. (C.Fn)
zFirmware Ver.*
For updating the firmware
210
214
–
* During firmware updates, the touch screen will be disabled to prevent accidental
operations.
9 My Menu (Green)
My Menu settings
Register frequently-used menu options and
Custom Functions
303
When using a GPS device, be sure to check the countries and areas of use,
and use the device in accordance with the laws and regulations of the
country or region.
321
3 Menu Settings
k For Movie Shooting
Shooting 1 (Red)
Page
Image quality
73 / 83 / 74 / 84 / 7a / 8a / b / c /
1+73 / 1
88
Beep
Enable / Touch to
204
Release shutter
without card
Enable / Disable
204
Image review
Off / 2 sec. / 4 sec. / 8 sec. / Hold
204
Lens aberration
correction
Peripheral illumination: Enable / Disable
129
1/3-stop or 1/2-stop increments, ±5 stops
121
/ Disable
Shooting 2 (Red)
Exposure
compensation
Auto Lighting
Optimizer
Disable / Low / Standard / High
Disable during manual exposure
125
Custom White
Balance
Manual setting of white balance
137
White balance shift/
bracketing
WB correction: White balance correction
BKT setting: White balance bracketing
139
140
Color space
sRGB / Adobe RGB
141
Picture Style
DAuto / PStandard / QPortrait /
RLandscape / SNeutral / UFaithful /
VMonochrome / WUser Def. 1-3
95
132
135
Obtains data to be used to erase dust spots
224
Shooting 3 (Red)
Dust Delete Data
Shaded menu options are not displayed in Basic Zone modes.
The menu tabs and options displayed will differ between viewfinder
shooting/Live View shooting and movie shooting. Note that the menu
tabs and options displayed in [x1] Playback 1, [x2] Playback 2, [51]
Set-up 1 to [54] Set-up 4 and [9] My Menu are the same as those
displayed in viewfinder shooting/Live View shooting (p.319 - 321).
The [Z1] and [Z2] Menu tabs will appear only for movie shooting.
322
3 Menu Settings
Movie 1 (Red)
Page
AF method
u+Tracking / FlexiZone - Multi /
FlexiZone - Single
196
Movie Servo AF
Enable / Disable
196
AF with shutter button
ONE SHOT / Disable
during k
197
Grid display
Off / Grid 1l / Grid 2m
198
Metering timer
4 sec. / 16 sec. / 30 sec. / 1 min. / 10 min. /
30 min.
198
1920x1080 (6/5/4) / 1280x720 (8/7) /
640x480 (6/5)
185
Movie 2 (Red)
Movie recording size
Sound recording: Auto / Manual / Disable
Sound recording*
Recording level
198
Wind filter/Attenuator: Disable / Enable
Video snapshot: Enable / Disable
Video snapshot
Album settings: Create a new album / Add to
existing album
187
* In Basic Zone modes, [Sound recording] will be set to [On/Off].
323
Troubleshooting Guide
If a problem occurs with the camera, first refer to this Troubleshooting
Guide. If this Troubleshooting Guide does not resolve the problem,
contact your dealer or nearest Canon Service Center.
Power-Related Problems
The battery pack does not recharge.
Do not recharge any battery pack other than a genuine Canon Battery
Pack LP-E8.
The battery charger’s lamp blinks.
If there is a problem with the battery charger, the protective circuit will
stop the charging operation and the charge lamp will blink in orange. If
this happens, disconnect the charger’s power plug from the power
outlet and remove the battery pack. Attach the battery pack to the
charger again and wait a while before connecting the charger to a
power outlet again.
The camera does not operate even when the power switch
is set to <1>.
Make sure the battery is properly installed in the camera (p.30).
Make sure the battery compartment cover is closed (p.30).
Make sure the card slot cover is closed (p.31).
Recharge the battery (p.28).
Press the <B> button (p.50).
The access lamp still blinks even when the power switch is
set to <2>.
If the power is turned off while an image is being recorded to the card,
the access lamp will remain on/continue to blink for a few seconds.
When the image recording is completed, the power will turn off
automatically.
324
Troubleshooting Guide
The battery becomes exhausted quickly.
Use a fully-charged battery pack (p.28).
The rechargeable battery pack performance will degrade over
repeated use. Purchase a new one.
The number of possible shots will decrease with any of the following
operations:
• Pressing the shutter button halfway for a prolonged period.
• Often activating only the AF without taking a picture.
• Using the lens Image Stabilizer.
• Using the LCD monitor often.
• Continuing Live View shooting or movie shooting for a prolonged
period.
The camera turns off by itself.
Auto power off is in effect. If you do not want auto power off to take
effect, set [52: Auto power off] to [Disable] (p.205).
Even if [52: Auto power off] is set to [Disable], the LCD monitor will
still turn off after the camera is left idle for 30 min. (The camera’s
power does not turn off.) Press the <B> button to turn on the LCD
monitor.
325
Troubleshooting Guide
Shooting-Related Problems
No images can be shot or recorded.
Make sure the card is properly inserted (p.31).
Slide the card’s write-protect switch to the Write/Erase position (p.31).
If the card is full, replace the card or delete unnecessary images
to make room (p.31, 268).
If you try to focus in the One-Shot AF operation while the focus
confirmation light <o> in the viewfinder blinks, a picture cannot be
taken. Press the shutter button halfway again to refocus automatically,
or focus manually (p.43, 103).
The card cannot be used.
If a card error message is displayed, see page 32 or 337.
The image is out of focus.
Set the lens focus mode switch to <AF> (p.39).
To prevent camera shake, press the shutter button gently (p.42, 43).
If the lens has an Image Stabilizer, set the IS switch to <1>.
In low light, the shutter speed may become slow. Use a faster shutter
speed (p.110), set a higher ISO speed (p.92), use flash (p.107), or use
a tripod.
326
Troubleshooting Guide
I cannot lock the focus and recompose the shot.
Set the AF operation to One-Shot AF. Focus lock is not possible in the
AI Servo AF and AI Focus AF operations (p.98).
With FlexiZone - Multi, it takes longer to autofocus.
Depending on the shooting conditions, it may take longer to focus the
subject. Use FlexiZone - Single instead or focus manually.
The continuous shooting speed is slow.
Depending on the lens type, shutter speed, aperture, subject
conditions, brightness, etc., the continuous shooting speed may
become slower.
The maximum burst during continuous shooting is lower.
With ISO 12800 or “H” (equivalent to ISO 25600), the maximum burst
for continuous shooting will greatly decrease (p.93).
Set [z3: High ISO speed NR] to [Standard/Low/Disable]. If it is set
to [High] or [Multi Shot Noise Reduction], the maximum burst during
continuous shooting will greatly decrease (p.126).
With [Chromatic aberration: Enable], the maximum burst for
continuous shooting will greatly decrease (p.130).
During WB bracketing, the maximum burst for continuous shooting will
decrease (p.140).
If you shoot something that has fine detail (such as a field of grass),
the file size will be larger and the actual maximum burst may be lower
than the number mentioned on page 89.
327
Troubleshooting Guide
ISO 100 cannot be set.
Under [54: Custom Functions (C.Fn)], if [3: Highlight tone priority]
is set to [1: Enable], ISO 100 cannot be set. If [0: Disable] is set, ISO
100 can be set (p.299). This also applies to movie shooting (p.178).
ISO speed [H] (ISO 25600) cannot be set.
Under [54: Custom Functions (C.Fn)], if [3: Highlight tone priority]
is set to [1: Enable], the [H] ISO speed (25600) cannot be selected
even when [2: ISO expansion] is set to [1: On]. If [0: Disable] is set
for [3: Highlight tone priority], [H] can be set (p.298).
The Auto Lighting Optimizer cannot be set.
Under [54: Custom Functions (C.Fn)], if [3: Highlight tone priority]
is set to [1: Enable], the Auto Lighting Optimizer cannot be set. If [0:
Disable] is set, the Auto Lighting Optimizer can be set (p.299).
Even though I set a decreased exposure compensation,
the image comes out bright.
Set [z2: Auto Lighting Optimizer] to [Disable]. When [Standard/
Low/High] is set, even if you set a decreased exposure compensation
or flash exposure compensation, the image may come out bright
(p.125).
When I use the <f> mode with flash, the shutter speed
becomes slow.
If you shoot at night when the background is dark, the shutter speed
becomes slow automatically (slow-sync shooting) so that both the
subject and background are properly exposed. To prevent a slow
shutter speed, under [z1: Flash control], set [Flash sync. speed in
Av mode] to [1/200-1/60 sec. auto] or [1/200 sec. (fixed)] (p.219).
328
Troubleshooting Guide
The built-in flash is raised by itself.
In the A, C, 2, 4, 6, and G modes, the built-in flash will be
raised automatically when flash is necessary.
The built-in flash does not fire.
If you shoot continuously with the built-in flash at short intervals, the
flash may stop operating to protect the flash unit.
The flash always fires at full output.
If you use a flash unit other than an EX-series Speedlite, the flash will
always be fired at full output (p.310).
Under [z1: Flash control] and [External flash C.Fn setting], if
[Flash metering mode] is set to [TTL], the flash will always fire at full
output (p.220).
I cannot set flash exposure compensation with external
flash function setting.
If flash exposure compensation has been set on an external Speedlite,
[Flash exposure compensation] (p.221) cannot be set in the
[External flash func. setting] screen. Also, if you set flash exposure
compensation with the camera and then set flash exposure
compensation with the external Speedlite, the Speedlite’s flash
exposure compensation setting will be given priority. When the
Speedlite’s flash exposure compensation is canceled (set to 0), [Flash
exposure compensation] can be set with the camera.
329
Troubleshooting Guide
High-speed sync cannot be set in the <f> mode.
Under [z1: Flash control], set [Flash sync. speed in Av mode] to
[Auto] (p.219).
The camera makes a noise when it is shaken.
The built-in flash’s pop-up mechanism moves slightly. This is normal.
The shutter makes two shooting sounds during Live View
shooting.
If you use flash, the shutter will make two sounds each time you shoot
(p.147).
During Live View and movie shooting, a white <s> or
red <E> icon is displayed.
It indicates that the camera’s internal temperature is high. If the white
<s> icon is displayed, the still photo’s image quality may deteriorate.
If the red <E> icon is displayed, it indicates that the Live View or
movie shooting will soon stop automatically (p.171, 200).
Movie shooting stops by itself.
If the card’s writing speed is slow, movie shooting may stop
automatically. Use an SD Speed Class 6 “
” or faster card. To
find out the card’s read/write speed, refer to the card manufacturer’s
Web site, etc.
If the movie shooting time reaches 29 min. 59 sec., the movie shooting
will stop automatically.
330
Troubleshooting Guide
The ISO speed cannot be set for movie shooting.
In shooting modes other than <a>, the ISO speed is set
automatically. In the <a> mode, you can freely set the ISO speed
(p.178).
The exposure changes during movie shooting.
If you change the shutter speed or aperture during movie shooting, the
changes in the exposure may be recorded.
Zooming the lens during movie shooting can cause changes in the
exposure regardless of whether the lens’ maximum aperture changes
or not. Changes in the exposure may be recorded as a result.
The subject looks distorted during movie shooting.
If you move the camera to the left or right quickly (high-speed panning)
or shoot a moving subject, the image may look distorted.
The image flickers or horizontal stripes appear during movie
shooting.
Flickering, horizontal stripes (noise), or irregular exposures can be
caused by fluorescent light, LED bulbs, or other light sources during
movie shooting. Also, changes in the exposure (brightness) or color
tone may also be recorded. In the <a> mode, a slow shutter speed
may solve the problem.
331
Troubleshooting Guide
Operation Problems
During touch screen operations, the beeper suddenly
sounds softer.
Check if your finger is covering the speaker (p.21).
Touch screen operation is not possible.
Check if [Enable] is set with [53: Touch control] (p.55).
Display Problems
The menu screen shows few tabs and options.
In Basic Zone modes and in movie shooting mode, certain tabs and
menu options are not displayed. Set the shooting mode to a Creative
Zone mode (p.46).
The file name’s first character is an underscore (“_”).
Set the color space to sRGB. If Adobe RGB is set, the first character
will be an underscore (p.141).
The file name starts with “MVI_”.
It is a movie file (p.209).
The file numbering does not start from 0001.
If the card already contains recorded images, the image number may
not start from 0001 (p.208).
332
Troubleshooting Guide
The shooting date and time displayed is incorrect.
Make sure the correct date and time has been set (p.36).
Check the time zone and daylight savings time (p.36).
The date and time is not in the picture.
The shooting date and time does not appear in the picture. The date
and time is instead recorded in the image data as shooting
information. When printing, you can imprint the date and time in the
picture by using the date and time recorded in the shooting information
(p.285).
[###] is displayed.
If the card has recorded a number of images greater than the camera
can display, [###] will be displayed (p.249).
The LCD monitor does not display a clear image.
If the LCD monitor is dirty, use a soft cloth to clean it.
In low or high temperatures, the LCD monitor display may seem slow
or may look black. It will return to normal at room temperature.
[Eye-Fi settings] does not appear.
[Eye-Fi settings] will appear only when an Eye-Fi card is inserted in
the camera. If the Eye-Fi card has a write-protect switch set to the
LOCK position, you will not be able to check the card’s connection
status or disable Eye-Fi card transmission (p.311).
333
Troubleshooting Guide
Playback Problems
Part of the image blinks in black.
It is the highlight alert (p.272). Overexposed highlight areas with a loss
of highlight detail will blink.
The image cannot be erased.
If the image is protected, it cannot be erased (p.266).
The movie cannot be played back.
Movies edited with a personal computer using the provided
ImageBrowser EX (p.365) or other software cannot be played back
with the camera. However, video snapshot albums edited with EOS
Video Snapshot Task (p.195) can be played back on the camera.
When the movie is played back, camera operation noise
can be heard.
If you operate the camera’s dials or lens during movie shooting, the
operation noise will also be recorded. Using an external microphone
(commercially available) is recommended (p.198).
The movie has still moments.
During autoexposure movie shooting, if there is a drastic change in the
exposure level, the recording will stop momentarily until the brightness
stabilizes. If this happens, shoot with <a> shooting mode (p.177).
No image appears on the TV screen.
Make sure the stereo AV cable or HDMI cable’s plug is inserted all the
way in (p.262, 265).
Set the video OUT system (NTSC/PAL) to the same video system as
the TV set (p.265).
334
Troubleshooting Guide
There are multiple movie files for a single movie shoot.
If the movie file size reaches 4 GB, another movie file will be created
automatically (p.186).
My card reader does not recognize the card.
Depending on the card reader and computer OS used, SDXC cards
may not be correctly recognized. If this occurs, connect your camera
to the computer with the provided interface cable, then transfer the
images to your computer using EOS Utility (provided software, p.364).
I cannot resize the image.
JPEG c and 1 images cannot be resized (p.277).
335
Troubleshooting Guide
Sensor Cleaning Problems
The shutter makes a noise during sensor cleaning.
If you selected [Clean nowf], the shutter will make a noise, but no
picture is taken (p.223).
Automatic sensor cleaning does not work.
If you repeatedly turn the power switch <1>/<2> at a short
interval, the <f> icon may not be displayed (p.34).
Printing-Related Problems
There are fewer printing effects than listed in this instruction
manual.
What is displayed on the screen differs depending on the printer. This
instruction manual lists all the printing effects available (p.284).
Computer Connection Problems
I cannot download images to a computer.
Install the provided software (EOS DIGITAL Solution Disk CD-ROM)
on the computer (p.366).
336
Error Codes
Error number
If there is a problem with the camera, an
error message will appear. Follow the onscreen instructions.
Countermeasures
Number
01
02
Error Message and Solution
Communications between the camera and lens is faulty. Clean the
lens contacts.
Î Clean the electrical contacts on the camera and lens or use a
Canon lens (p.17, 20).
Card cannot be accessed. Reinsert/change card or format card
with camera.
Î Remove and insert the card again, replace the card, or format the
card (p.31, 48).
Cannot save images because card is full. Replace card.
04
05
Î Replace the card, erase unnecessary images, or format the card
(p.31, 268, 48).
The built-in flash could not be raised. Turn the camera off and on
again.
Î Operate the power switch (p.34).
06
Sensor cleaning is not possible. Turn the camera off and on
again.
Î Operate the power switch (p.34).
10, 20, Shooting is not possible due to an error. Turn the camera off and
30, 40, on again or re-install the battery.
50, 60,
70, 80, Î Operate the power switch, remove and install the battery pack
again, or use a Canon lens (p.34, 30).
99
* If the error still persists, write down the error number and contact your
nearest Canon Service Center.
337
Specifications
• Type
Type:
Recording media:
Image sensor size:
Compatible lenses:
Lens mount:
Digital, single-lens reflex, AF/AE camera with built-in flash
SD memory card, SDHC memory card, SDXC memory card
* Compatible with UHS-I
Approx. 22.3 x 14.9 mm
Canon EF lenses (including EF-S lenses)
* Excluding EF-M lenses
(35 mm-equivalent focal length is approx. 1.6 times the
lens focal length)
Canon EF mount
• Image Sensor
Type:
Effective pixels:
Aspect ratio:
Dust delete feature:
CMOS sensor
Approx. 18.00 megapixels
3:2
Auto, Manual, Dust Delete Data appending
• Recording System
Recording format:
Image type:
Recorded pixels:
Design rule for Camera File System (DCF) 2.0
JPEG, RAW (14-bit Canon original)
RAW+JPEG Large simultaneous recording possible
L (Large)
: Approx. 17.90 megapixels (5184 x 3456)
M (Medium) : Approx. 8.00 megapixels (3456 x 2304)
S1 (Small 1) : Approx. 4.50 megapixels (2592 x 1728)
S2 (Small 2) : Approx. 2.50 megapixels (1920 x 1280)
S3 (Small 3) : Approx. 350,000 pixels (720 x 480)
RAW
: Approx. 17.90 megapixels (5184 x 3456)
• Image Processing During Shooting
Picture Style:
Basic+:
White balance:
Auto, Standard, Portrait, Landscape, Neutral, Faithful,
Monochrome, User Def. 1 - 3
Ambience-based shots, Light/scene-based shots
Auto, Preset (Daylight, Shade, Cloudy, Tungsten light,
White fluorescent light, Flash), Custom
White balance correction and white balance bracketing
features provided
* Flash color temperature information transmission enabled
Applicable to long exposures and high ISO speed shots
Noise reduction:
Automatic image
brightness correction: Auto Lighting Optimizer
Highlight tone priority: Provided
Lens aberration correction: Peripheral illumination correction, Chromatic aberration correction
338
Specifications
• Viewfinder
Type:
Coverage:
Magnification:
Eye point:
Built-in dioptric adjustment:
Focusing screen:
Mirror:
Depth-of-field preview:
Eye-level pentamirror
Vertical/Horizontal approx. 95% (with Eye point approx. 19 mm)
Approx. 0.85x (-1 m-1 with 50mm lens at infinity)
Approx. 19 mm (from eyepiece lens center at -1 m-1)
Approx. -3.0 - +1.0 m-1 (dpt)
Fixed, Precision Matte
Quick-return type
Provided
• Autofocus
Type:
AF points:
TTL secondary image-registration, phase detection
Nine cross-type AF points (Cross-type AF sensitive to
f/2.8 with center AF point)
Focusing brightness range:EV -0.5 - 18 (center AF point, at 23°C/73°F, ISO 100)
AF operation:
One-Shot AF, AI Servo AF, AI Focus AF
AF-assist beam:
Small series of flashes fired by built-in flash
• Exposure Control
Metering modes:
63-zone TTL full-aperture metering
• Evaluative metering (linked to all AF points)
• Partial metering (approx. 9% of viewfinder at center)
• Spot metering (approx. 4% of viewfinder at center)
• Center-weighted average metering
Metering brightness range: EV 1 - 20 (at 23°C/73°F, ISO 100)
Exposure control:
Program AE (Scene Intelligent Auto, Flash Off, Creative
Auto, Portrait, Landscape, Close-up, Sports, Special
scene (Night Portrait, Handheld Night Scene, HDR
Backlight Control), Program), Shutter-priority AE,
Aperture-priority AE, Manual exposure
ISO speed:
Basic Zone modes*: ISO 100 - ISO 6400 set automatically
(Recommended
* Portrait: ISO 100, Handheld Night Scene:
exposure index)
ISO 100 - ISO 12800 set automatically
Creative Zone modes: ISO 100 - ISO 12800 set manually
(whole-stop increments), ISO 100 - ISO 6400 set
automatically, maximum ISO speed settable for ISO
Auto, or ISO expansion to “H” (equivalent to ISO 25600)
Exposure compensation: Manual: ±5 stops in 1/3- or 1/2-stop increments
AEB:
±2 stops in 1/3- or 1/2-stop increments (Can be
combined with manual exposure compensation)
339
Specifications
AE lock:
Auto:
Applied in One-Shot AF with evaluative
metering when focus is achieved
Manual: With AE lock button
• Shutter
Type:
Shutter speeds:
Electronically-controlled, focal-plane shutter
1/4000 sec. to 30 sec. (Total shutter speed range.
Available range varies by shooting mode.), Bulb, X-sync
at 1/200 sec.
• Flash
Built-in flash:
Retractable, auto pop-up flash
Guide No.: Approx. 13/43 (ISO 100, in meters/feet)
Flash coverage: Approx. 17mm lens angle of view
Recycling time approx. 3 sec.
Wireless master function provided
External flash:
EX-series Speedlite (Flash functions settable with the camera)
Flash metering:
E-TTL II autoflash
Flash exposure compensation: ±2 stops in 1/3- or 1/2-stop increments
FE lock:
Provided
PC terminal:
None
• Drive System
Drive mode:
Single shooting, continuous shooting, self-timer with 10-sec.
or 2-sec. delay and 10-sec. delay with continuous shooting
Continuous shooting speed: Max. approx. 5 shots/sec.
Max. burst (Approx.):
JPEG Large/Fine: 22 (30) shots
RAW: 6 (6) shots
RAW+JPEG Large/Fine: 3 (3) shots
* Figures in parentheses apply to an UHS-I compatible
8 GB card based on Canon’s testing standards.
* Figures are based on Canon’s testing standards (ISO
100 and “Standard” Picture Style) using an 8 GB card.
• Live View Shooting
Aspect ratio settings:
Focusing:
340
3:2, 4:3, 16:9, 1:1
Hybrid CMOS AF System* (Face+Tracking, FlexiZoneMulti, FlexiZone-Single), Phase-difference detection
(Quick mode)
Manual focusing (approx. 5x / 10x magnification possible)
* Focusing brightness range: EV 1 - 18 (at 23°C/73°F,
ISO 100)
Specifications
Continuous AF:
Touch shutter:
Metering modes:
Provided
Provided
Real-time metering with image sensor
Evaluative metering (315 zones), Partial metering
(approx. 8.8% of Live View screen), Spot metering
(approx. 2.8% of Live View screen), Center-weighted
average metering
Metering brightness range: EV 0 - 20 (at 23°C/73°F, ISO 100)
Creative filters:
Grainy B/W, Soft focus, Fish-eye effect, Art bold effect,
Water painting effect, Toy camera effect, Miniature effect
Grid display:
Two types
• Movie Shooting
Recording format:
Movie:
Audio:
Recording size
and frame rate:
MOV
MPEG-4 AVC / H.264
Variable (average) bit rate
Linear PCM
1920x1080 (Full HD) : 30p/25p/24p
1280x720 (HD)
: 60p/50p
640x480 (SD)
: 30p/25p
* 30p: 29.97 fps, 25p: 25.00 fps, 24p: 23.98 fps,
60p: 59.94 fps, 50p: 50.00 fps
File size:
1920x1080 (30p/25p/24p): Approx. 330 MB/min.
1280x720 (60p/50p)
: Approx. 330 MB/min.
640x480 (30p/25p)
: Approx. 82.5 MB/min.
Focusing:
Hybrid CMOS AF System* (Face+Tracking, FlexiZoneMulti, FlexiZone-Single)
Manual focusing (approx. 5x / 10x magnification possible)
* Focusing brightness range: EV 1 - 18 (at 23°C/73°F,
ISO 100)
Metering modes:
Center-weighted average and evaluative metering with
the image sensor
* Automatically set by the focusing mode
Servo AF:
Provided
Metering brightness range: EV 0 - 20 (at 23°C/73°F, ISO 100)
Exposure control:
Program AE for movies and manual exposure
Exposure compensation: ±3 stops in 1/3-stop increments (Still photos: ±5 stops)
341
Specifications
ISO speed:
(Recommended
exposure index)
Video snapshots:
Sound recording:
Grid display:
With autoexposure shooting: ISO 100 - ISO 6400 set
automatically
With manual exposure: ISO 100 - ISO 6400 set automatically/
manually, expandable to H (equivalent to ISO 12800)
Settable to 2 sec./4 sec./8 sec.
Built-in stereo microphone
External stereo microphone terminal provided
Sound recording level adjustable, wind filter provided,
attenuator provided
Two types
• LCD Monitor
Type:
Monitor size and dots:
Angle adjustment:
Brightness adjustment:
Interface languages:
Touch screen technology:
Feature guide:
TFT color liquid-crystal monitor
Wide, 7.7 cm (3.0-in.) (3:2) with approx. 1.04 million dots
Possible
Manual (7 levels)
25
Capacitive sensing
Displayable
• Playback
Image display formats: Single-image display, Single-image + Info display (Basic
info, shooting info, histogram), 4-image index, 9-image
index
Zoom magnification:
Approx. 1.5x - 10x
Highlight alert:
Overexposed highlights blink
Image browsing methods: Single image, jump by 10 or 100 images, by shooting
date, by folder, by movies, by stills, by rating
Image rotate:
Possible
Ratings:
Provided
Movie playback:
Enabled (LCD monitor, video/audio OUT, HDMI OUT)
Built-in speaker
Image protect:
Possible
Slide show:
All images, by date, by folder, by movies, by stills, by rating
Five transition effects selectable
Background music:
Selectable for slide shows and movie playback
• Post-Processing of Images
Creative filters:
Resize:
342
Grainy B/W, Soft focus, Fish-eye effect, Art bold effect,
Water painting effect, Toy camera effect, Miniature effect
Possible
Specifications
• Direct Printing
Compatible printers:
Printable images:
Print ordering:
PictBridge-compatible printers
JPEG and RAW images
DPOF Version 1.1 compatible
• Custom Functions
Custom Functions:
My Menu registration:
Copyright information:
8
Possible
Entry and inclusion possible
• Interface
Audio/video OUT/
Digital terminal:
Analog video (compatible with NTSC/PAL)/stereo audio output
Personal computer communication and direct printing
(Hi-Speed USB equivalent), GPS Receiver GP-E2
connection
HDMI mini OUT terminal: Type C (auto switching of resolution), CEC-compatible
External microphone
IN terminal:
3.5 mm diameter stereo mini-jack
Remote control terminal: For Remote Switch RS-60E3
Wireless remote control: Remote Controller RC-6
Eye-Fi card:
Compatible
• Power
Battery:
Possible shots:
(Based on CIPA
testing standards)
Movie shooting time:
Battery Pack LP-E8 (Quantity 1)
* AC power can be supplied via AC Adapter Kit ACK-E8
* With Battery Grip BG-E8 attached, size-AA/LR6
batteries can be used
With viewfinder shooting:
Approx. 440 shots at 23°C/73°F, approx. 400 shots at 0°C/32°F
With Live View shooting:
Approx. 180 shots at 23°C/73°F, approx. 150 shots at 0°C/32°F
Approx. 1 hr. 40 min. at 23°C/73°F
Approx. 1 hr. 20 min. at 0°C/32°F
(with a fully-charged Battery Pack LP-E8)
• Dimensions and Weight
Dimensions (W x H x D): Approx. 133.1 x 99.8 x 78.8 mm / 5.2 x 3.9 x 3.1 in.
Weight:
Approx. 580 g / 20.5 oz. (CIPA Guidelines),
Approx. 525 g / 18.5 oz. (Body only)
343
Specifications
• Operation Environment
Working temperature range: 0°C - 40°C / 32°F - 104°F
Working humidity:
85% or less
• Battery Pack LP-E8
Type:
Rated voltage:
Battery capacity:
Working temperature range:
Rechargeable lithium-ion battery
7.2 V DC
1120 mAh
During charging: 6°C - 40°C / 43°F - 104°F
During shooting: 0°C - 40°C / 32°F - 104°F
Working humidity:
85% or less
Dimensions (W x H x D): Approx. 37.1 x 15.4 x 55.2 mm / 1.5 x 0.6 x 2.2 in.
Weight:
Approx. 52 g / 1.8 oz.
• Battery Charger LC-E8
Compatible battery:
Recharging time:
Rated input:
Rated output:
Working temperature range:
Working humidity:
Dimensions (W x H x D):
Weight:
Battery Pack LP-E8
Approx. 2 hours (at 23°C/73°F)
100 - 240 V AC (50/60 Hz)
8.4 V DC / 720 mA
6°C - 40°C / 43°F - 104°F
85% or less
Approx. 69 x 28 x 87.5 mm / 2.7 x 1.1 x 3.4 in.
Approx. 82 g / 2.9 oz.
• Battery Charger LC-E8E
Compatible battery:
Recharging time:
Rated input:
Rated output:
Working temperature range:
Working humidity:
Dimensions (W x H x D):
Weight:
Battery Pack LP-E8
Approx. 2 hours (at 23°C/73°F)
100 - 240 V AC (50/60 Hz)
8.4 V DC / 720 mA
6°C - 40°C / 43°F - 104°F
85% or less
Approx. 69 x 28 x 87.5 mm / 2.7 x 1.1 x 3.4 in.
Approx. 82 g / 2.9 oz. (excluding power cord)
• EF-S18-55mm f/3.5-5.6 IS STM
Angle of view:
Diagonal extent: 74°20’ - 27°50’
Horizontal extent: 64°30’ - 23°20’
Vertical extent: 45°30’ - 15°40’
Lens construction:
13 elements in 11 groups
Minimum aperture:
f/22 - 36
Closest focusing distance: 0.25 m / 0.82 ft. (from image sensor plane)
344
Specifications
Max. magnification:
Field of view:
0.36x (at 55 mm)
199 x 129 - 63 x 42 mm / 7.83 x 5.08 - 2.48 x 1.65 in. (at
0.25 m / 0.82 ft.)
Image Stabilizer:
Lens shift type
Filter size:
58 mm
Lens cap:
E-58 II
Max. diameter x length: Approx. 69.0 x 75.2 mm / 2.72 x 2.96 in.
Weight:
Approx. 205 g / 7.2 oz.
Hood:
EW-63C (sold separately)
Case:
LP1016 (sold separately)
• EF-S18-135mm f/3.5-5.6 IS STM
Angle of view:
Diagonal extent: 74°20’ - 11°30’
Horizontal extent: 64°30’ - 9°30’
Vertical extent: 45°30’ - 6°20’
Lens construction:
16 elements in 12 groups
Minimum aperture:
f/22 - 36
Closest focusing distance*: At 18 mm focal length: 0.39 m / 1.28 ft.
(Approx. 372 x 248 mm / 14.6 x 9.8 in. field of view)
At 135 mm focal length: 0.39 m / 1.28 ft.
(Approx. 80 x 53 mm / 3.1 x 2.1 in. field of view)
* Distance from image sensor plane
Max. magnification:
0.28x (at 135 mm)
Image Stabilizer:
Lens shift type
Filter size:
67 mm
Lens cap:
E-67 II
Max. diameter x length: Approx. 76.6 x 96.0 mm / 3.0 x 3.8 in.
Weight:
Approx. 480 g / 16.9 oz.
Hood:
EW-73B (sold separately)
Case:
LP1116 (sold separately)
All the data above is based on Canon’s testing standards and CIPA (Camera &
Imaging Products Association) testing standards and guidelines.
Dimensions, maximum diameter, length and weight listed above are based on
CIPA Guidelines (except weight for camera body only).
Product specifications and the exterior are subject to change without notice.
If a problem occurs with a non-Canon lens attached to the camera, consult the
respective lens maker.
345
Handling Precautions: EF-S18-55mm f/3.5-5.6 IS STM,
EF-S18-135mm f/3.5-5.6 IS STM
The kit lenses use a stepping motor that drives the focus lens. The
motor controls the focus lens even during zooming.
1. When the camera is OFF
The motor does not operate while the camera is OFF or when the
camera is OFF due to the auto power off function. Therefore, users
must be aware of the following points.
Manual focusing is not possible.
During zooming, inaccurate focusing may occur.
2. When the lens is in sleep mode
If not operated for a certain period of time, this lens will enter sleep
mode in order to save power, apart from the camera’s auto power off.
To exit sleep mode, press the shutter button halfway.
In sleep mode, the motor will not operate even if the camera is ON.
Therefore, users must be aware of the following points.
Manual focusing is not possible.
During zooming, inaccurate focusing may occur.
3. During initial reset
When the camera is turned ON or when the camera is turned ON by
pressing the shutter button halfway when the camera is OFF due to
the auto power off function*1, the lens performs an initial reset of the
focus lens.
Although the image in the viewfinder will appear out of focus
during the initial reset, this is not a malfunction.
Although the shutter can be released during the initial reset, users
must wait approx. 1 second*2 after the initial reset has completed
before shooting.
*1: Applicable to the following EF-S lens compatible digital SLR cameras:
EOS 7D Mark II, EOS 7D, EOS 70D, EOS 60D, EOS 60Da, EOS 50D, EOS
40D, EOS 30D, EOS 20D, EOS 20Da, EOS REBEL T3i/600D, EOS REBEL
T2i/550D, EOS REBEL T1i/500D, EOS REBEL XSi/450D, EOS REBEL T5/
1200D, EOS REBEL T3/1100D, EOS REBEL XS/1000D, EOS DIGITAL
REBEL XTi/400D DIGITAL, EOS DIGITAL REBEL XT/350D DIGITAL, EOS
DIGITAL REBEL/300D DIGITAL
*2: The initial reset time varies depending on the camera used.
346
Trademarks
Adobe is a trademark of Adobe Systems Incorporated.
Microsoft and Windows are trademarks or registered trademarks of Microsoft
Corporation in the United States and/or other countries.
Macintosh and Mac OS are trademarks of Apple Inc., registered in the U.S. and
other countries.
SDXC logo is a trademark of SD-3C, LLC.
HDMI, HDMI logo, and High-Definition Multimedia Interface are trademarks or
registered trademarks of HDMI Licensing LLC.
All other trademarks are the property of their respective owners.
About MPEG-4 Licensing
“This product is licensed under AT&T patents for the MPEG-4 standard and may be
used for encoding MPEG-4 compliant video and/or decoding MPEG-4 compliant video
that was encoded only (1) for a personal and non-commercial purpose or (2) by a
video provider licensed under the AT&T patents to provide MPEG-4 compliant video.
No license is granted or implied for any other use for MPEG-4 standard.”
* Notice displayed in English as required.
347
Use of genuine Canon accessories is recommended
This product is designed to achieve excellent performance when used with
genuine Canon accessories. Canon shall not be liable for any damage to this
product and/or accidents such as fire, etc., caused by the malfunction of nongenuine Canon accessories (e.g., a leakage and/or explosion of a battery
pack). Please note that this warranty does not apply to repairs arising out of the
malfunction of non-genuine Canon accessories, although you may request
such repairs on a chargeable basis.
348
Safety Precautions
The following precautions are provided to prevent harm or injury to
yourself and others. Make sure to thoroughly understand and follow
these precautions before using the product.
If you experience any malfunctions, problems, or damage to the
product, contact the nearest Canon Service Center or the dealer
from whom you purchased the product.
Warnings:
Follow the warnings below. Otherwise, death or
serious injuries may result.
To prevent fire, excessive heat, chemical leakage, explosions, and electrical shock,
follow the safeguards below:
• Do not use any batteries, power sources, or accessories not specified in the
Instruction Manual. Do not use any home-made or modified batteries.
• Do not short-circuit, disassemble, or modify the battery. Do not apply heat or
solder to the battery. Do not expose the battery to fire or water. Do not subject the
battery to strong physical shock.
• Do not insert the battery’s plus and minus ends incorrectly.
• Do not recharge the battery in temperatures outside the allowable ambient
temperature range. Also, do not exceed the recharging time indicated in the
Instruction Manual.
• Do not insert any foreign metallic objects into the electrical contacts of the camera,
accessories, connecting cables, etc.
When disposing of a battery, insulate the electrical contacts with tape to prevent
contact with other metallic objects or batteries. This is to prevent a fire or an explosion.
If excessive heat, smoke, or fumes are emitted when recharging the battery,
immediately unplug the battery charger from the power outlet to stop recharging.
Otherwise, it may cause a fire, heat damage or electrical shock.
If the battery leaks, changes color, deforms, or emits smoke or fumes, remove it
immediately. Be careful not to get burned in the process. It may cause a fire,
electrical shock or skin burn if you keep using it.
Prevent any battery leakage from contacting your eyes, skin, and clothing. It can
cause blindness or skin problems. If the battery leakage contacts your eyes, skin, or
clothing, flush the affected area with lots of clean water without rubbing it. See a
physician immediately.
Do not leave any cords near a heat source. It can deform the cord or melt the
insulation and cause a fire or electrical shock.
Do not hold the camera in the same position for long periods of time. Even if the
camera does not feel too hot, prolonged contact with the same body part may cause
skin redness, blistering or low-temperature contact burns. Using a tripod is
recommended for people with circulation problems or very sensitive skin, or when
using the camera in very hot places.
Do not fire the flash at anyone driving a car or other vehicle. It may cause an accident.
Do not fire the flash near a person’s eyes. It may impair the person’s vision. When
using flash to photograph an infant, keep at least 1 meter/3.3 feet away.
349
Safety Precautions
When the camera or accessories are not in use, make sure to remove the battery
and disconnect the power plug from the equipment before storing. This is to prevent
electrical shock, excessive heat, fire, or corrosion.
Do not use the equipment where there is flammable gas. This is to prevent an
explosion or a fire.
If you drop the equipment and the casing breaks open to expose the internal parts,
do not touch the internal parts. There is a possibility of an electrical shock.
Do not disassemble or modify the equipment. High-voltage internal parts can cause
electrical shock.
Do not look at the sun or an extremely bright light source through the camera or
lens. Doing so may damage your vision.
Keep equipment out of the reach of children and infants, including when in use. Straps
or cords may accidentally cause choking, electrical shock, or injury. Choking or injury
may also occur if a child or infant accidentally swallows a camera part or accessory. If
a child or infant swallows a part or accessory, consult a physician immediately.
Do not store the equipment in dusty or humid places. Likewise, store the battery with
its protective cover attached to prevent short-circuit. This is to prevent a fire,
excessive heat, electrical shock, or burn.
Before using the camera inside an airplane or hospital, check if it is allowed.
Electromagnetic waves emitted by the camera may interfere with the plane’s
instruments or the hospital’s medical equipment.
To prevent a fire and electrical shock, follow the safeguards below:
• Always insert the power plug all the way in.
• Do not handle a power plug with wet hands.
• When unplugging a power plug, grasp and pull the plug instead of the cord.
• Do not scratch, cut, or excessively bend the cord or put a heavy object on the
cord. Also do not twist or tie the cords.
• Do not connect too many power plugs to the same power outlet.
Do not use a cord whose wire is broken or insulation is damaged.
Unplug the power plug periodically and clean off the dust around the power outlet
with a dry cloth. If the surrounding is dusty, humid, or oily, the dust on the power
outlet may become moist and short-circuit the outlet, causing a fire.
Do not connect the battery directly to an electrical outlet or a car’s cigarette lighter
outlet. The battery may leak, generate excessive heat or explode, causing a fire,
burns or injuries.
A thorough explanation of how to use the product by an adult is required when the
product is used by children. Supervise children while they are using the product.
Incorrect usage may result in electrical shock or injury.
Do not leave a lens or lens-attached camera in the sun without the lens cap
attached. Otherwise, the lens may concentrate the sun’s rays and cause a fire.
Do not cover or wrap the product with a cloth. Doing so may trap heat within and
cause the casing to deform or catch fire.
Be careful not to get the camera wet. If you drop the product in the water or if water
or metal get inside the product, promptly remove the battery. This is to prevent a fire
and an electrical shock.
Do not use paint thinner, benzene, or other organic solvents to clean the product.
Doing so may cause fire or a health hazard.
350
Safety Precautions
Cautions:
Follow the cautions below. Otherwise physical injury
or property damage may result.
Do not use or store the product inside a car under the hot sun or near a heat source.
The product may become hot and cause skin burns. Doing so may also cause
battery leakage or explosion, which will degrade the performance or shorten the life
of the product.
Do not carry the camera around when it is attached to a tripod. Doing so may cause
injury. Also make sure the tripod is sturdy enough to support the camera and lens.
Do not leave the product in a low-temperature environment for an extended period of
time. The product will become cold and may cause injury when touched.
Never play the provided CD-ROM in a drive that is not compatible with the CD-ROM.
If you use it in a music CD player, you may damage the speakers and other
components. When using headphones, there is also a risk of injury to your ears from
excessively loud volume.
351
Digital Camera Model DS126431 Systems
This device complies with Part 15 of the FCC Rules. Operation is subject to the
following two conditions: (1) This device may not cause harmful interference,
and (2) this device must accept any interference received, including
interference that may cause undesired operation.
Note: This equipment has been tested and found to comply with the limits for
class B digital devices, pursuant to Part 15 of the FCC Rules. These
limits are designed to provide reasonable protection against harmful
interference in a residential installation. This equipment generates, uses
and can radiate radio frequency energy and, if not installed and used in
accordance with the instructions, may cause harmful interference to
radio communications. However, there is no guarantee that interference
will not occur in a particular installation. If this equipment does cause
harmful interference to radio or television reception, which can be
determined by turning the equipment off and on, the user is encouraged
to try to correct the interference by one or more of the following
measures:
— Reorient or relocate the receiving antenna.
— Increase the separation between the equipment and receiver.
— Connect the equipment into an outlet on a circuit different from
that to which the receiver is connected.
— Consult the dealer or an experienced radio/TV technician for help.
The cable with the ferrite core provided with the digital camera must be used
with this equipment in order to comply with Class B limits in Subpart B of Part
15 of the FCC rules.
Do not make any changes or modifications to the equipment unless otherwise
specified in the manual. If such changes or modifications should be made, you
could be required to stop operation of the equipment.
Canon U.S.A. Inc.
One Canon Park, Melville, NY 11747, U.S.A.
Tel No. 1-800-OK-CANON (1-800-652-2666)
CAN ICES-3 (B) / NMB-3 (B)
When connecting to and using a household power outlet, use only AC
Adapter Kit ACK-E8 (rated input: 100-240 V AC 50/60 Hz, rated output:
7.4 V DC). Using anything else can cause fire, overheating, or
electrical shock.
352
USA and Canada only:
The Lithium ion/polymer battery that powers the product is
recyclable. Please call 1-800-8-BATTERY for information on
how to recycle this battery.
For CA, USA only
Included lithium battery contains Perchlorate Material – special handling may
apply. See www.dtsc.ca.gov/hazardouswaste/perchlorate/ for details.
CAUTION
RISK OF EXPLOSION IF BATTERY IS REPLACED BY AN INCORRECT TYPE.
DISPOSE OF USED BATTERIES ACCORDING TO LOCAL REGULATION.
353
MEMO
354
MEMO
355
MEMO
356
MEMO
357
MEMO
358
MEMO
359
MEMO
360
14
Downloading Images to a
Personal Computer
This chapter explains how to download images from the
camera to your personal computer, gives an overview of
the software in the EOS DIGITAL Solution Disk (CDROM) provided with the camera, and explains how to
install the software on your personal computer. It also
explains how to view the Software Instruction Manuals.
EOS DIGITAL Solution Disk
(Software/Software Instruction Manuals)
361
Downloading Images to a Personal Computer
You can use the provided software to download the images in the
camera to your personal computer. There are two ways to do this.
Download by Connecting the Camera to the Personal Computer
1
Install the software (p.366).
the provided interface cable
2 Use
to connect the camera to your
personal computer.
Use the interface cable provided with
the camera.
Connect the cable to the camera’s
<C> terminal with the cable
plug’s <D> icon facing the front of
the camera.
Connect the cord’s plug to the
personal computer’s USB terminal.
EOS Utility to download the
3 Use
images/movies.
For details, refer to the EOS Utility
Instruction Manual (p.367).
362
Downloading Images to a Personal Computer
Downloading Images with a Card Reader
If you have a commercially-available card reader, you can use it to
download images to your personal computer.
Install the software (p.366).
1
the card into the card
2 Insert
reader.
Canon software to download
3 Use
the images/movies.
X Use Digital Photo Professional.
X Use ImageBrowser EX.
For details, refer to the Software
Instruction Manuals (p.367).
.
When downloading images from the camera to your personal computer, if
you do not use Canon software and instead use a card reader, copy the
DCIM folder on the card to your personal computer.
363
About the Software
EOS DIGITAL Solution Disk
Various software for EOS DIGITAL cameras are contained
on the EOS DIGITAL Solution Disk.
EOS Utility
With the camera connected to a personal computer, EOS Utility enables
you to transfer still photos and movies shot with the camera to the
computer. You can also use this software to set various camera settings
and shoot remotely with the computer connected to the camera. Also,
you can copy background music tracks, such as EOS Sample Music*,
to the card.
* Can be used as background music during playback of video snapshot albums,
movies, or slide shows on the camera.
Digital Photo Professional
This software is recommended for users who mainly shoot 1 images.
You can view, edit, process, and print 1 images at high speed. You
can also edit JPEG images while retaining the original images.
Picture Style Editor
You can edit Picture Styles and create and save original Picture Style
files. This software is aimed at advanced users who are experienced in
processing images.
364
About the Software
ImageBrowser EX
Connect to the Internet to download and install the software*.
This software is recommended for users who mainly shoot JPEG images.
You can easily view and play back still photos, MOV movies, and video
snapshot albums and also print JPEG images.
* EOS DIGITAL Solution Disk is necessary for downloading and installing
ImageBrowser EX.
Note that the software ZoomBrowser EX/ImageBrowser provided with
previous cameras does not support still photos and MOV movie files shot
with this camera (it is not compatible). Use ImageBrowser EX.
365
Installing the Software
Do not connect the camera to your computer before you install the
software. The software will not be installed correctly.
When downloading and installing ImageBrowser EX, follow the steps
below as with other EOS software included on the EOS DIGITAL
Solution Disk. Note that Internet connection is necessary. Downloading
or installing software is not possible in environments with no Internet
connection.
Even if your computer already has ImageBrowser EX installed, follow the
steps below to reinstall ImageBrowser EX. It will be updated to the latest
version with features optimized for your camera. Also, the latest
functions may be added with the auto update feature.
For software other than ImageBrowser EX, if a previous version is
installed, follow the steps below to reinstall the software. (The newer
version will overwrite the previous version.)
1
Insert the EOS DIGITAL Solution Disk into your computer.
For Macintosh, double-click to open the CD-ROM icon displayed
on the desktop, then double-click on [setup].
2 Click [Easy Installation] and follow the on-screen
instructions to install.
If the install screen for “Microsoft Silverlight” is displayed during
installation, install “Microsoft Silverlight”.
3 Click [Restart] and remove the CD-ROM after the
computer restarts.
When the computer has restarted, the installation is complete.
366
Software Instruction Manual
Software Instruction Manuals are contained on the EOS
DIGITAL Solution Disk. Instructions for copying and
viewing the Software Instruction Manual PDFs are as
follows.
1
Insert the EOS DIGITAL Solution Disk into your
computer.
2 Close the install screen.
When the EOS DIGITAL Solution Disk install screen appears,
close the install screen.
3 Open the CD-ROM.
4 Open the [Manual] folder.
5 Copy the [English] folder to your computer.
Instruction Manual PDFs with the names below are copied.
Windows
Macintosh
EUx.xW_E_xx
EUx.xM_E_xx
Digital Photo Professional
DPPx.xW_E_xx
DPPx.xM_E_xx
Picture Style Editor
PSEx.xW_E_xx
PSEx.xM_E_xx
EOS Utility
Instruction manual for ImageBrowser EX (ImageBrowser EX
User Guide) is included in the software.
6 Double-click the copied PDF file.
Adobe Reader (most recent version recommended) must be
installed on your computer.
Adobe Reader can be downloaded free from the Internet.
367
MEMO
368
15
Quick Reference Guide
and Index
Menu Operations - - - - - - - - - - - - - - - - - - - - Image-recording Quality - - - - - - - - - - - - - - - A Picture Style- - - - - - - - - - - - - - - - - - - - Q Quick Control - - - - - - - - - - - - - - - - - - - - Nomenclature - - - - - - - - - - - - - - - - - - - - - - Basic Zone Modes - - - - - - - - - - - - - - - - - - - D Using the Built-in Flash - - - - - - - - - - - - - - Creative Zone Modes - - - - - - - - - - - - - - - - - d: Program AE - - - - - - - - - - - - - - - - - - s: Shutter-priority AE - - - - - - - - - - - - - f: Aperture-priority AE- - - - - - - - - - - - f: AF Operation - - - - - - - - - - - - - - - - - - - S AF Point - - - - - - - - - - - - - - - - - - - - - - - i: ISO Speed - - - - - - - - - - - - - - - - - - - - i Drive Mode - - - - - - - - - - - - - - - - - - - - - A Live View Shooting- - - - - - - - - - - - - - - - k Shooting Movies - - - - - - - - - - - - - - - - - Image Playback - - - - - - - - - - - - - - - - - - - - - -
p.370
p.371
p.371
p.372
p.373
p.375
p.375
p.376
p.376
p.376
p.376
p.377
p.377
p.378
p.378
p.379
p.380
p.381
369
Quick Reference Guide
Menu Operations
<M>
button
<0> button
LCD
monitor/
Touch
screen
<S>
Cross keys
1. Press the <M> button to display the menu.
2. Press the <U> key to select a tab, then press the <V>
key to select the desired item.
3. Press <0> to display the setting.
4. After setting the item, press <0>.
Basic Zone Modes
Movie Shooting
Creative Zone
Modes
Tabs
Menu items
370
Menu settings
Quick Reference Guide
Image-Recording Quality
Select [z1: Image quality], then press <0>.
Press the <U> key to select the quality, then press <0>.
Image-recording quality
Recorded pixels
Possible shots
A Picture StyleN
Press the <XA> button.
Press the <U> key to select the
Picture Style, then press <0>.
Style
Description
D Auto
P Standard
Q Portrait
R Landscape
V Monochrome
Color tones optimized for the particular scene.
Vivid colors and sharp images.
Nice skin tones and slightly sharp images.
Vivid blue skies and greenery and very sharp images.
Black-and-white images.
For <S> (Neutral) and <U> (Faithful), see page 96.
371
Quick Reference Guide
Q Quick Control
Press the <Q> button.
The Quick Control screen will
appear.
Basic Zone Modes
Shutter speed
Shooting mode
Exposure
compensation/
AEB setting
Picture Style
AF operation
White
balance
Return
Drive mode
White balance correction
Creative Zone Modes
Aperture
Highlight tone priority
ISO speed
Flash exposure
compensation
Auto Lighting
Optimizer
Built-in flash settings
Image-recording
quality
White balance bracketing
Metering mode
In Basic Zone modes, the settable functions differ depending
on the shooting mode.
Press the <S> key to select a function, then turn the <6>
dial to set it.
372
Quick Reference Guide
Nomenclature
Power switch
<i> ISO speed
setting button
Mode Dial
<D> Flash
button
<6>
Main Dial
Shutter
button
Focus mode switch
<A> Live View shooting/
Movie shooting button
<Q> Quick Control button
<A> AE lock button
<S> AF point
selection button
<S>
Cross keys
Access lamp
<O> Aperture/Exposure
compensation button
<0> Setting button
373
Quick Reference Guide
Shooting Settings
Shutter speed
Shooting mode
Aperture
ISO speed
Exposure level
indicator
Auto Lighting
Optimizer
White balance
Picture Style
Built-in flash
settings
AF operation
Image-recording
quality
Quick Control icon
Battery check
zxcn
OK
Not good
Viewfinder Information
Possible shots
Metering mode
Drive mode
AF point activation indicator <•>
Spot metering
circle
AF points
AE lock
Flash-ready
Flash exposure
compensation
Shutter speed
Aperture
374
Focus
confirmation light
Max. burst
Monochrome shooting
ISO speed
Exposure level indicator
Quick Reference Guide
Basic Zone Modes
All the settings necessary for
shooting are set automatically.
You just press the shutter button,
and the camera does the rest.
Basi Zone
c
A Scene Intelligent Auto 5 Sports
7 Flash Off
8 Special scene
C Creative Auto
6 Night Portrait
2 Portrait
F Handheld Night Scene
3 Landscape
G HDR Backlight Control
4 Close-up
At the 8 position, press the <Q> button, select the shooting
mode icon with <S> key, and turn the <6> dial to set the
shooting mode.
D Using the Built-in Flash
Basic Zone Modes
If necessary, the built-in flash will be raised and fire automatically
in low-light or backlit conditions (except in the <7> <3> <5>
<F> <G> modes).
Creative Zone Modes
Press the <D> button to raise the
built-in flash, then shoot.
375
Quick Reference Guide
Crea
tiv
Creative Zone Modes
e
Zo
ne
You can change the camera
settings as desired to shoot in
various ways.
d: Program AE
The camera automatically sets the shutter speed and
aperture in the same way as the <A> mode.
Set the Mode Dial to <d>.
s: Shutter-priority AE
Set the Mode Dial to <s>.
Turn the <6> dial to set the desired
shutter speed, then focus the subject.
The aperture will be set automatically.
If the aperture display blinks, turn the
<6> dial until it stops blinking.
f: Aperture-priority AE
Set the Mode Dial to <f>.
Turn the <6> dial to set the desired
aperture, then focus the subject.
The shutter speed will be set
automatically.
If the shutter speed display blinks, turn
the <6> dial until it stops blinking.
376
Quick Reference Guide
f: AF OperationN
Set the lens focus mode switch
to <f>.
Press the <Zf> button.
Press the <U> key or turn the
<6> dial to select the AF
operation, then press <0>.
S AF PointN
X(One-Shot AF):
For still subjects
9(AI Focus AF):
Switches the AF operation
automatically
Z(AI Servo AF):
For moving subjects
Press the <S> button.
Press the <S> key to select the
AF point.
While looking through the
viewfinder, you can select the AF
point by turning the <6> dial
until the desired AF point flashes
in red.
Pressing <0> toggles the AF
point selection between the
center AF point and automatic
AF point selection.
377
Quick Reference Guide
i: ISO SpeedN
Press the <i> button.
Press the <U> key or turn the
<6> dial to select the ISO
speed, then press <0>.
When [AUTO] is selected, the
ISO speed is set automatically.
When you press the shutter
button halfway, the ISO speed
setting is displayed.
i Drive Mode
378
Press the <YiQ> button.
Press the <U> key or turn the
<6> dial to select the drive
mode, then press <0>.
u : Single shooting
i : Continuous shooting
Q : Self-timer:10 sec./Remote
control
l : Self-timer:2 sec.
q : Self-timer:Continuous
Quick Reference Guide
A Live View Shooting
Press the <A> button to display
the Live View image.
Press the shutter button halfway to
focus.
Press the shutter button
completely to take the picture.
Battery Life with Live View Shooting
Temperature
No Flash
UseFlash Use
Temperature
No Flash 50% Flash
50%
AtAt23°C
200 shots
Approx. 180
shots180 shots
23°C/ /73°F
73°FApprox.
Approx.
200 shots
Approx.
379
Quick Reference Guide
k Shooting Movies
Set the power switch to <k>.
Set the Mode Dial to any
shooting mode except <a>.
Press the <A> button to start
shooting a movie.
To stop movie shooting, press
the <A> button again.
Recording movie
Microphone
380
Quick Reference Guide
Image Playback
y
u
Index
y
u
Magnify
S
Select image
x
Playback
B Shooting information
L Erase
381
Index
Numerics
10-sec. or 2-sec. delay .................106
1280x720 ......................................185
1920x1080 ....................................185
4- or 9-image index display...........242
640x480 ........................................185
9-point AF auto selection ..............100
A
A (Scene Intelligent Auto)........... 58
AC Adapter Kit ............................. 306
Access lamp .................................. 32
Accessories .....................................3
Adobe RGB.................................. 141
AE lock .........................................123
AEB.......................................121, 298
AF → Focusing
AF point ....................................... 100
AI FOCUS (AI Focus AF)............... 99
AI SERVO (AI Servo AF) ............... 98
AI Servo AF ............................. 61, 98
Ambience-based shots .................. 77
Aperture-priority AE ..................... 112
Art bold effect....................... 154, 276
Aspect ratio ..................................157
Audio/video OUT ..................252, 265
Auto Lighting Optimizer ...............125
Auto playback ..............................258
Auto power off........................ 34, 205
Auto reset .................................... 209
Auto rotate of vertical images ...... 212
Autofocus............................... 97, 100
Automatic selection of AF point ....100
Av (Aperture-priority AE).............. 112
A/V OUT .............................. 252, 265
382
B
B/W (Monochrome) ............... 96, 134
Background music........................ 261
Basic Zone modes ........................ 24
Battery ............................... 28, 30, 35
Battery check ................................ 35
Battery Grip ........................... 35, 316
Beeper......................................... 204
Black-and-white image.... 77, 96, 134
Bracketing ........................... 121, 140
Brightness (exposure) ..................119
Auto exposure bracketing
(AEB) .............................. 121, 298
Autoexposure lock (AE lock)... 123
Exposure compensation ..........119
Measurement method
(Metering mode) .......................117
Built-in flash.................................. 107
BULB (Bulb exposure) ................. 116
Bulb exposures .............................116
C
C (Creative Auto)........................ 64
Cable....... 3, 262, 265, 280, 316, 362
Camera
Camera shake ........................ 142
Clear camera settings............. 214
Holding the camera................... 42
Settings display....................... 213
Camera shake......................... 41, 42
Card .................................. 17, 31, 48
Card reminder......................... 204
Format ...................................... 48
Low-level format ....................... 49
Problem .............................. 32, 49
SD speed class....................... 173
Write-protect .............................. 31
Center-weighted average
metering .......................................118
Charger ................................... 26, 28
Chromatic aberration correction.. 130
Index
Cleaning (Image sensor) ......223, 226
Clear camera settings .................. 214
Close-ups....................................... 69
Color space (color reproduction
range)........................................... 141
Color temperature ........................ 137
Color tone .................................... 133
Continuous................................... 208
Continuous shooting .................... 104
Contrast ....................................... 133
Copyright information ...................210
Creative Auto ................................. 64
Creative filters ...................... 152, 274
M icon..............................................4
Creative Zone modes..................... 24
Cropping (printing) ........................287
Custom Functions ........................ 296
Custom WB.................................. 137
D
Date/Time ...................................... 36
Daylight saving time....................... 37
DC coupler ................................... 306
Depth-of-field preview .................. 114
Dial .........................................20, 109
Digital terminal ..................... 280, 362
Dioptric adjustment ........................ 42
Direct printing............................... 292
DPOF ........................................... 289
Dragging ........................................ 54
Drive mode............... 22, 66, 104, 106
Dust Delete Data.......................... 224
E
Erase (image) .............................. 268
Error codes .................................. 337
Evaluative metering ..................... 117
Exposure compensation .............. 119
Exposure level increments........... 298
Extension ......................................209
External Speedlite ....................... 309
Eyecup ........................................ 308
Eye-Fi card .................................. 311
Eyepiece cover...................... 27, 308
F
Faithful............................................ 96
FE lock ........................................ 124
Feature guide ................................ 52
FEB ............................................. 220
File name..................................... 208
File size ......................... 89, 186, 270
Filter effect........................... 134, 274
Final image simulation.......... 150, 181
Fine (Image-recording quality) ....... 22
Firmware Ver. .............................. 321
First-curtain synchronization ....... 221
Fish-eye effect..................... 154, 276
Flash
Built-in flash ............................ 107
Custom Functions ................... 222
Effective range ........................ 107
External Speedlite ................... 309
FE lock .................................... 124
Flash control ........................... 218
Flash exposure
compensation........................... 120
Flash off ........................ 63, 66, 76
Flash-sync speed.................... 310
Manual flash.................... 221, 239
Red-eye reduction................... 108
Shutter synchronization
(1st/2nd curtain) ...................... 221
Wireless .................................. 229
Flash exposure compensation .... 120
Flash mode.......................... 220, 221
Flash-sync contacts....................... 20
Focus confirmation light ................ 58
Focus lock ..................................... 61
Focus mode switch......... 39, 103, 170
383
Index
Focusing
AF method .......................159, 196
AF operation.............................. 97
AF point selection.................... 100
AF-assist beam ............... 101, 300
Beeper .....................................204
Difficult-to-focus
subjects ...................103, 165, 202
Manual focusing ..............103, 170
Out of focus ..........41, 42, 103, 165
Recompose ...............................61
Folder Create/Select.................... 206
Format (card initialization) ............. 48
Frame rate ...................................185
Full Auto
(Scene Intelligent Auto) ................. 58
Full High-Definition
(Full HD) ..............................185, 252
G
Grainy B/W .......................... 154, 275
Grid display.......................... 156, 198
H
Handheld Night Scene ...................73
HDMI.................................... 252, 262
HDMI CEC ...................................263
HDR Backlight Control................... 74
High ISO speed noise reduction .. 126
High-Definition (HD) .............185, 252
Highlight alert............................... 272
Highlight detail loss...................... 272
Highlight tone priority ...................299
Histogram (Brightness/RGB) .......272
Hot shoe ......................................309
Household power......................... 306
I
ICC profile.................................... 141
384
Image
Auto playback ......................... 258
Auto rotate .............................. 212
Erase ...................................... 268
Highlight alert.......................... 272
Histogram ............................... 272
Image characteristics
(Picture Style) .......... 95, 132, 135
Index ....................................... 242
Jump display
(Image browsing) .................... 243
Magnified view ........................ 244
Manual rotate .......................... 247
No. .......................................... 208
Playback ........................... 84, 241
Protect .................................... 266
Rating ..................................... 248
Review time ............................ 204
Shooting information............... 270
Slide show .............................. 258
Transfer.................................... 311
View on TV ..................... 252, 262
Image conversion factor................. 40
Image dust prevention. 223, 224, 226
Image review ............................... 204
Image Stabilizer (lens)................... 41
Image Zone ................................... 24
Image-recording quality................. 88
Index display ............................... 242
ISO speed ..................................... 92
Automatic setting (Auto) ........... 93
ISO expansion ........................ 298
Maximum ISO speed with
ISO Auto .................................... 94
J
JPEG............................................. 89
Jump display ............................... 243
L
Landscape............................... 68, 96
Language selection ....................... 38
Large (Image-recording quality) ..... 22
Index
LCD monitor................................... 17
Brightness adjustment ............. 205
Image playback ................. 84, 241
Menu screen...................... 46, 318
Screen color ............................ 217
Shooting settings display..... 22, 50
Vari-Angle ............................ 33, 62
Lens ......................................... 25, 39
Chromatic aberration
correction................................. 130
Image stabilizer ......................... 41
Lock release .............................. 40
Peripheral illumination
correction................................. 129
Light/scene-based shots ................81
Live View shooting .................62, 145
Aspect ratio ..............................157
Continuous AF .........................156
Creative filters ..........................152
Face+Tracking......................... 159
FlexiZone - Multi ...................... 161
FlexiZone - Single.................... 162
Grid display ..............................156
Information display .................. 148
Manual focusing .............. 103, 170
Metering timer.......................... 158
Possible shots ......................... 147
Quick Control ...........................151
Quick mode ............................. 166
Long exposure noise reduction.... 127
Long exposures ........................... 116
M
M (Manual exposure) ................... 115
Macro photography ........................ 69
Magnified view ..................... 170, 244
Malfunction ...................................324
Manual exposure ................. 115, 177
Manual focus (MF) ............... 103, 170
Manual reset ................................ 209
Manual selection (AF) .................. 100
Maximum burst........................ 89, 90
Medium (Image-recording
quality).................................... 22, 278
Memory card → Card
Menu ............................................. 46
My Menu ................................. 303
Setting procedure...................... 47
Settings ................................... 318
3 icon........................................ 4
Metering mode ............................ 117
Metering timer ..................... 158, 198
MF (Manual focusing).......... 103, 170
Microphone................................... 174
Miniature effect.................... 155, 276
Mirror lockup........................ 142, 300
Mode Dial ...................................... 24
Monochrome ................... 77, 96, 134
Movie........................................... 173
AF method ...................... 184, 196
Attenuator ............................... 199
Autoexposure.......................... 174
Edit.......................................... 256
Editing out first and
last scenes .............................. 256
Enjoying .................................. 252
File size................................... 186
Frame rate .............................. 185
Grid display ............................. 198
Information display.................. 179
Manual exposure .................... 177
Manual focusing...................... 174
Metering timer ......................... 198
Movie recording size ............... 185
Movie Servo AF ...................... 196
Playback ................................. 254
Quick Control .......................... 184
Recording time........................ 186
Sound recording............... 187, 198
Still photo shooting.................. 182
Video snapshot ....................... 187
Video snapshot album ............ 187
View on TV...................... 252, 262
Wind filter ................................ 199
385
Index
Multi Shot Noise Reduction ..........126
My Menu ...................................... 303
N
Neutral ...........................................96
Night Portrait.................................. 72
Night scene ..............................72, 73
Noise reduction
High ISO speed ....................... 126
Long exposures .......................127
Nomenclature ................................ 20
Non-Canon flash units ................. 310
Normal (Image-recording quality) ...22
NTSC ................................... 185, 320
O
ONE SHOT (One-Shot AF) ............98
One-Shot AF ..................................98
P
P (Program AE) ............................. 86
PAL ...................................... 185, 320
Paper settings (printing)............... 282
Partial metering............................ 117
Peripheral illumination
correction ..................................... 129
Personal white balance................ 138
Photobook Set-up ........................293
PictBridge .................................... 279
Picture Style ...................95, 132, 135
Pixels ............................................. 88
Playback ................................ 84, 241
Portrait ..................................... 67, 95
Possible shots.................. 35, 88, 147
Power
Auto power off ......................... 205
Battery check..............................35
Household power .................... 306
Possible shots .............35, 88, 147
Recharge................................... 28
Predictive (AI Servo)...................... 98
386
Pressing completely ...................... 43
Pressing halfway ........................... 43
Printing ........................................ 279
Cropping .................................. 287
Layout ..................................... 283
Paper settings......................... 282
Photobook Set-up .................... 293
Print Order (DPOF)................. 289
Printing effects ........................ 284
Tilt correction .......................... 287
Program AE................................... 86
Program shift ................................. 87
Protect
(image erase-protection) ............. 266
Q
Q (Quick
Control) ........... 44, 76, 151, 184, 250
Quick Control ................................ 76
Quick mode ................................. 166
R
Rating mark ................................. 248
RAW ......................................... 22, 91
RAW+JPEG ............................. 22, 91
Recharge....................................... 28
Red-eye reduction....................... 108
Release shutter without card....... 204
Remote control shooting ............. 307
Remote switch ............................. 308
Resize ......................................... 277
Revert to default settings ............ 214
Rotate (image) ............ 212, 247, 287
S
Safety precautions ....................... 349
Saturation .................................... 133
Scene icon ........................... 149, 176
SD, SDHC, SDXC card → Card
Second-curtain synchronization .. 221
Self-timer ..................................... 106
Sensor cleaning .................. 223, 226
Index
Sepia (Monochrome) ............. 77, 134
Sharpness ....................................133
Shooting information display........ 270
Shooting mode............................... 24
Av (Aperture-priority AE) ......... 112
M (Manual exposure)............... 115
P (Program AE) ......................... 86
Tv (Shutter-priority AE)............ 110
A (Scene Intelligent Auto) ...... 58
7 (Flash Off)............................ 63
C (Creative Auto) .................... 64
2 (Portrait) ............................... 67
3 (Landscape) ........................ 68
4 (Close-up)............................. 69
5(Sports)................................. 70
SCN (Special scene) ................. 71
6 (Night Portrait).................. 72
F (Handheld Night Scene) ...73
G (HDR Backlight Control) .. 74
Shooting mode’s settable
functions....................................... 314
Shooting settings display ......... 22, 50
Shutter button ................................43
Shutter synchronization ............... 221
Shutter-priority AE........................ 110
Single shooting ...................... 66, 315
Single-image display ......................84
Single-point AF ............................100
Slide show.................................... 258
Small (Image-recording
quality) ....................................22, 278
Soft focus ............................. 154, 275
Software................................... 3, 364
Speaker........................................ 254
Special scene mode....................... 71
Sports............................................. 70
Spot metering............................... 117
sRGB ........................................... 141
Stopped-down aperture ............... 114
Strap .............................................. 27
System map .................................316
T
Tap (Touch).................................... 53
Temperature warning........... 171, 200
Time zone...................................... 36
Tone priority................................. 299
Toning effect (Monochrome)........ 134
Touch beeping ............................... 54
Touch screen ........... 21, 53, 245, 255
Touch shutter............................... 168
Toy camera effect ................ 155, 276
Tripod socket ................................. 21
Tv (Shutter-priority AE)................ 110
U
USB (Digital) terminal.......... 280, 362
V
Vari-Angle LCD monitor ........... 33, 62
Video snapshot............................ 187
Video snapshot album ................. 187
Video system ............... 185, 265, 320
View on TV .......................... 252, 262
Viewfinder...................................... 23
Dioptric adjustment ................... 42
Volume (Movie playback) ............ 255
W
Water painting effect ............ 154, 276
WB (White balance) .................... 137
White balance.............................. 137
Bracketing ............................... 140
Correction ............................... 139
Custom.................................... 137
Personal .................................. 138
Wind filter .................................... 199
Wireless flash shooting ............... 229
Custom wireless shooting ....... 234
Easy wireless shooting ........... 231
387
The descriptions in this Instruction Manual are current as of October 2014. For
information on the compatibility with any products introduced after this date,
contact any Canon Service Center. For the latest version Instruction Manual,
refer to the Canon Web site.
CPH-E063-003
© CANON INC. 2014