1
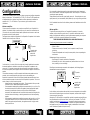
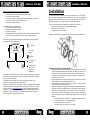
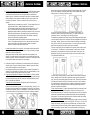
Specifications (Per Pair) TL-1651 TL-1051 TL-1041 Power Handling (Peak) Power Continuous (RMS) Frequency Response Sensitivity Impedance Woofer section: Resonant Frequency (Fs) Total Equivalent Factor (Qts) Vol of Acoustic Susp. (Vas) Linear Excursion (Xmax) Displacement Volume (Vd) 400 watts 120 watts 60 Hz – 22 kHz 90 dB 4 ohms 350 watts 100 watts 75 Hz – 22 kHz 91 dB 4 ohms 300 watts 90 watts 80 Hz – 22 kHz 91 dB 4 ohms 72 Hz 0.65 16.72 lit 4 mm 0.005 cutf 88 Hz 0.71 5.83 lit 4 mm 0.0035 cuft 90 Hz 0.72 2.86 lit 4 mm 0.002 cuft Tweeter Crossover 1” Titanium dome 6 dB / slope 1” Titanium dome 6 dB / slope 1” Titanium dome 6 dB / slope * Features & specification due to change without notice due to continued improvement and development. 2-WAY LOUDSPEAKERS CO-AXIAL/COMPONENT OPERATION REMOVABLE DOME TWEETERS OWNER’S MANUAL All content © Copyright TheLoudest.com 2005 All content © Copyright TheLoudest.com 2004 SAFETY GUIDELINES | TECHNICAL SPECIFICATIONS FEATURES | INSTALLATION AND OPERATION INSTRUCTIONS OWNER’S MANUAL Contents Page Introduction .................................................................. 2 Configuration ................................................................ 3 Installation ................................................................... 6 Calibration of speakers with power source ......................... 9 Safety .......................................................................... 10 Troubleshooting ............................................................. 10 Specifications .............................................................. Back OWNER’S MANUAL Introduction Congratulations on your purchase of the Competition Pro TL-1041, TL-1051 or TL-1651 2-way co-axial/component speakers. After much detailed research, design, development and testing, TheLoudest.com are able to present a revolutionary range of premium car audio products. These Competition Pro speakers have a durable, precision-engineered, robust heavy-duty build that delivers a stunningly high degree of fidelity and realism throughout the entire audible frequency range. This is demonstrated in the frequency response graphs below. Frequency response graphs are normally only specified by manufacturers of music studio equipment; the Competition Pro speakers deliver magnificent “studio-like” audio reproduction which allows the Frequency response graphs listener to hear crisp, clear audio, and subtleties in music that can not be heard using other car speakers. Not only do they deliver fantastic audio reproduction, but can maintain such clear signal reproduction at uncompromisingly high power levels. A unique feature of the Competition Pro TL-1041, TL-1051 and TL-1651 speakers is the fact that the tweeters can be tilted, enabling the user or installer to change the angle of the tweeters in relation to the listener, which is extremely important for sound imaging. The revolutionary feature of these speakers is the fact the tweeter can be completely removed from the loudspeaker and mounted elsewhere in the vehicle with the use of the included crossovers. This enables bi-amplification and enormous power handling. We strongly advise you to read The frequency response graph of a loudspeaker illustrates through this manual before operating the range of frequencies that it reproduces (lowest on the the speakers. This will ensure correct left, through to highest on the right), and the power (or gain) of the output signal at these frequencies. configuration and operation. Competition Pro speakers give a linearised frequency While this manual gives general advice on how to install the speakers, response normally found in studio equipment. if you do not have sufficient experience or tools it is best to have them professionally installed. These speakers function best with a good quality source unit. Connecting them to a poor quality source unit (such as a standard, factory fitted one) may not give good results. Keep this manual in a safe place so it is accessible for future reference. OWNER’S MANUAL Configuration It is important to establish exactly how you are going to connect and configure the speakers before you install them. The Competition Pro TL-1041, TL-1051 and TL-1651 speakers are all designed and built so that they can be fitted as a direct replacement to standard car speakers of a 4”, 5” or 6.5” diameter. They are however, just as suited to custom installations. Without an amplifier… If you are unsure as to whether or not you require an amplifier for your Competition Pro speakers, it is advisable initially to connect them up to your source unit and test them out. It is common for users to require fantastic audio reproduction and not want or need to use the speakers to their full power potential. The diagram below shows the configuration of the Competition Pro speakers in this situation. Installed in the front and/or rear of the car: SOURCE UNIT FRONT = TL speaker = speaker cable, consisting of a positive and negative wire REAR In this situation, it is normally fine for the wiring that is already installed and connected to the standard speakers to be used to connect the new Competition Pro speakers to the source unit. It is important to ensure that the positive cable is connected to the positive terminal of the speaker, and the negative cable is connected to the negative terminal of the speaker. It is sometimes necessary to modify the materials behind where the speakers are to be mounted, as the mounting depth may be slightly more than the standard ones. Sometimes the connectors on the end of the already installed cable are different to those which are needed to connect to the terminals of the Competition Pro speakers. There are a number of ways in which this can be resolved: - Adaptor leads can be purchased from a retailer. The type needed is from your make and model of car to “standard spade speaker connectors”. - Cut the standard installed cable just before the connector and strip 1 cm of wire. Cut the cable that comes with Competition Pro speakers (already equipped with spade connectors) just before the connectors, and join the short cable with spade connectors to the installed cables via a connection block, manually twisting the wires round each other and insulating, or attaching connectors to each cable and pushing together. - Cut the standard installed cable just before the connector and then strip 1 cm of wire. Crimp spade connectors to the wire. Make sure that correct spade connectors are used for the negative and positive leads; the negative connector is slightly smaller than the positive one. OWNER’S MANUAL It is not possible to detach the tweeter from the speaker unit and mount it elsewhere in the car in this situation. Please see configuration notes “With an amplifier…” for details of mounting the tweeter separately. These speakers function best with a good quality source unit. Connecting them to a poor quality source unit (such as a standard, factory fitted one) may not give such good results. For full installation instructions for this situation, please see the Installation section of this manual. With an amplifier… To get the full power potential from your Competition Pro speakers, it is normally necessary to use an amplifier to power them. It is possible to achieve better sound staging, and highest power handling by mounting the tweeters separately (as component speakers), but it is down to personal preference and convenience. * THESE SPEAKERS ARE DESIGNED FOR 4 OHM OPERATION ONLY * Co-axial setup (Leaving tweeter mounted to loudspeaker) Advantages of using co-axial setup: - Simpler to install - Tweeter can be turned (or “swivelled”) while in operation to easily fine-tune positioning - Tweeter and loudspeaker are in exactly the same position, thus not separating the sound source Disadvantages of using a co-axial setup: - Sound imaging is limited to the location of the speakers - Unfortunately on a lot of vehicles, speakers are positioned down low in the car doors, resulting in a low sound stage If deciding to leave the tweeters mounted to the loudspeaker, the following diagram demonstrates the correct configuration: SOURCE UNIT TL-1092 AMPLIFIER = TL speaker = pre-out from source unit = speaker cable, consisting of a positive and negative wire In this situation, use the speaker cables provided, to connect the speakers to the amplifier. Use the end with spade connectors to connect to the speaker, and the end with stripped wires to connect to the amplifier. Although the TL-1092 amplifier is not specifically required, the speakers and amplifier have been manufactured to compliment each other, and are very well matched. The TL-1092 amplifier (available from www.theloudest.com) is capable of producing enough power to overpower (i.e. “blow”) the TL speakers, so it is important to configure the amplifier with the speakers correctly, to ensure this doesn’t happen (as detailed later in this manual under “Calibration of speakers with power source”). OWNER’S MANUAL Component setup (Removing tweeter and mounting separately) Advantages of using component setup: - Tweeters are free to be mounted wherever the listener wants - Total control over stereo imaging - Tweeters that are close to the loudspeakers but positioned higher up, enable the sound stage to be lifted closer to the listener’s ears - Higher power handling capabilities Disadvantages of using component setup: - More work, and more difficult to install - Need to install the external crossovers - An amplifier is required - Mounting tweeters to the car doors/dash almost certainly will permanently disfigure the vehicle’s trim (this is OK if the tweeters are to be installed permanently OWNER’S MANUAL Installation The proper installation of the speakers is critical to them functioning well. Poor or shoddy work could result in damage to the speakers and reduce their level of optimum performance. While this manual gives general advice on how to install the speakers, if you do not have sufficient experience or tools, it is best to have them professionally installed. There - are a few installation options available that are described in this section: Fitting them as a straight swap for existing standard speakers Modifying the rear “parcel shelf” Constructing your own “parcel shelf” Please see exploded installation diagram below for how the speakers should be installed: If deciding to mount the tweeters separately to the loudspeaker, the following diagram demonstrates the correct configuration: SOURCE UNIT TL-1092 AMPLIFIER = TL speaker = removed tweeter = crossover = pre-out from source unit = speaker cable, consisting of a positive and negative wire In this situation, use the speaker cables provided, to connect the speakers to the amplifier. Use the end with spade connectors to connect to the speaker, and the end with stripped wires to connect to the amplifier. The tweeters are to be powered from the source unit’s speaker outputs, via the crossovers. They can be amplified separately if desired. Although the TL-1092 amplifier is not specifically required, the speakers and amplifier have been manufactured to complement each other, and are very well matched. The TL-1092 amplifier (available from www.theloudest.com) is capable of producing enough power to overpower (i.e. “blow”) the TL speakers, so it is important to configure the amplifier with the speakers correctly, to ensure this doesn’t happen (as detailed later in this manual under “Calibration of speakers with power source”). If fitting as a straight swap for existing speakers: 1. Depending on where the speakers are situated, it may be necessary to remove parts of the trim to replace the speakers (like door cards, trim panels, rear-panels, etc.). If you are unsure, it is best to consult your vehicle’s manual, speak to the vehicle’s manufacturers, or post a message on the vehicle “owner’s club” message board for information on how to do this. 2. With any appropriate door panels/trim cards removed, use a screwdriver to unscrew the screws/bolts that hold the standard speakers in place. 3. Remove the speaker (it may be stuck down hard on older cars). Pull the connectors on the leads out from the speaker terminals. 4. Remove the Competition Pro speakers from their packaging and place them into the vacant hole to check that the depth of the hole is large enough for the Competition Pro speakers. If the speaker depth is too large for the hole, it will be necessary to remove some of the materials behind the hole to allow for the larger speaker depth. If this is not possible, measure the additional depth required, and carry out one of the following: - Use multiple washers (for example 4 or 5) in-between the mounting point on the car and the speaker, to bring it forward slightly Purchase a “spacing ring” from a retailer Construct a spacing ring yourself from mdf or similar OWNER’S MANUAL 5. If powering the speakers straight from the source unit, connect the existing speaker cable to the Competition Pro speakers. Take care to ensure that positive lead is connected to the positive terminal and the negative lead is connected to the negative terminal. Sometimes the connectors on the end of the already installed cable are different to those which are needed to connect to the terminals of the Competition Pro speakers. There are a number of ways in which this can be resolved: - Adaptor leads can be purchased from a retailer. The type needed is from your make and model of car to “standard spade speaker connectors”. - Cut the standard installed cable just before the connector and strip 1 cm of wire. Cut the cable that comes with Competition Pro speakers (already equipped with spade connectors) just before the connectors, and join the short cable with spade connectors to the installed cables via a connection block, manually twisting the wires round each other and insulating, or attaching connectors to each cable and pushing together. - Cut the standard installed cable just before the connector and then strip 1 cm of wire. Crimp spade connectors to the wire. Make sure that correct spade connectors are used for the negative and positive leads; the negative connector is slightly smaller than the positive one. If powering the speakers from an amplifier, run the leads provided to the amplifier to check that they are long enough. If they are not, it will be necessary to extend these leads, or purchase longer ones. When length has been verified, install the audio lead from the speaker to the amplifier. It may be necessary to remove panels or trim to enable the leads to be installed out of sight. When crossing sections such as doors, it is advisable to cabletie the leads to existing cable to ensure it is not caught up. 6. Check that the holes in the Competition Pro surround match up with those at the mounting points. If they do not match up at all, an adapter ring may be needed. These can be purchased from a car audio retailer. 7. Use the screws that held your old speakers in place to install the Competition Pro speakers (it may be necessary to use longer ones if you have used spacers, or use the screws provided), ensuring they are held firmly in place. 8. If installing the Competition Pro speakers as coaxial speakers, it is best to proceed to “Configuration of speakers with power source” and experimenting with the angle of the swivel-tweeters to give the best “sweet spot” before proceeding to points 9 and 10 to complete the installation. If installing them as component sets, the tweeters need to be removed and installed/mounted separately. Grasp the side of the tweeter (1) and twist it round, slowly lifting, removing it. Lift the tweeter a few centimetres from the loudspeaker (2) and look for the connector that attaches the tweeter’s cable to the loudspeaker. Grab the cable as close to the connector as possible (3) and pull outwards to disconnect the tweeter completely. 1. 2. 3. OWNER’S MANUAL Remove the cap from the mounting pod supplied, as illustrated below (left). Place this cap onto the loudspeaker; where the tweeter used to be as illustrated below (right). Push and twist it on, ensuring it is securely in place. It is now time to choose the best position for the tweeters to be mounted. It is important to choose a location that is both practical (i.e. it doesn’t obstruct any instruments in the car), and suitable for your listening placement. The tweeters may produce the best stereo imaging if placed facing towards each other on the door panels, perhaps a few inches higher than the loudspeakers to help raise the sound stage. However, there are no set rules, and the best resulting sound changes from vehicle to vehicle, and from person to person. It is best to experiment and find positions that are practical and in which you feel most comfortable. There are two methods in which the tweeters can be mounted; either “surface-mount” or “flush-mount”. The difference is: when the tweeter is surface mount, the whole tweeter pod is on the outside of the surface, when the tweeter is flush mount, the tweeter pod is the other side of the surface and only the top of the tweeter is seen. This is demonstrated below (left). For either tweeter mounting method, the audio leads must be attached to the tweeter, then run through the hole in the back of the tweeter mounting pod (as shown above right), all the way to the speaker outputs of the source unit. Please refer to the source unit’s instruction manual to clarify which of the leads coming from it are for speakers. It is important that the negative terminal on the tweeter is connected to the negative lead, which connects to the negative of the corresponding speaker output from the source unit; likewise for the positives. To flush mount the tweeters, it is best to have access to both the front and back of the mounting surface. Use the supplied template to mark the size of the hole on the surface that needs to be cut. Cut the hole using a sharp knife or similar, then push the tweeter into the pod after feeding the speaker cable through the hole and attaching it to the tweeter. Push the pod through the hole from the back and install the mounting ring from the front, bushing both together tightly. To surface mount the tweeters, use the mounting pod as a guide to mark the mounting holes and hole for speaker cable on the mounting surface. Drill small (1 or 2 mm) pilot holes for the mounting, and a larger one for the speaker cable. Use the two screws provided to attach the pod to the surface, feed the speaker cable through the hole and attach to the tweeter. Push the tweeter into the pod and attach the mounting ring. OWNER’S MANUAL OWNER’S MANUAL 9. Replace any door cards/trim parts that were removed in order to install the speakers. 10.Installation is now complete, please see “Configuration of speakers with power source” to configure your speakers, and prepare them for use. If constructing a rear “parcel shelf” or modifying your existing one… If modifying your existing parcel shelf, only follow steps 2, 3, 6 and 7. 1. - Use your existing shelf as a template and draw round it using a pen or pencil onto a sheet of 18 mm mdf. - Cut round the marked area (using a jigsaw or similar) to give a basic outline of the old parcel shelf. - Place the new shelf into the rear of the car; you may need to make modifications to it such as cutting a small square from the corners and inserting screws to allow the shelf to “click in” to the vehicle’s parcel shelf hinge. Try to attach the old elastic cord to the new shelf to allow it to lift up when the boot is opened. 2. Decide where best to mount the speakers and use the template provided (or grille surround) to mark out the holes that need to be cut for the speakers. 3. Cut out the holes using a jigsaw. Never go outside of the lines you have marked. 4. Cover the shelf with acoustic carpet material; staple it neatly along one side underneath the shelf and stretch it over the front of the shelf to the other side and staple it down underneath. Keep stretching the material when stapling to allow it to lay flat. Use spray-on glue to help the carpet stick to the shelf. If wanting to mount the speakers underneath the shelf and not present them visibly on the shelf, it is a good idea to staple extra blocks of material over the holes before carpeting so that the material does not “sag down” over them. 5. If wanting to present your Competition Pro speakers visibly on the shelf, cut away the carpet over the holes neatly, place your speakers into the holes (easier to do when shelf is installed in vehicle), and mark onto the material where the four mounting screws or bolts will go. Remove the speakers and either drill a pilot hole if mounting with screws, or drill a hole large enough for the bolts if mounting this way. If wanting to mount your speakers underneath the shelf, (so they are not visible from the top), turn the shelf over and place the speakers where they are to be mounted. 6. Attach the speakers to the shelf with either self tapping screws or bolts provided. 7. Proceed to point 5 of the “Installation Instructions” (page 7). Safety Health Warning The Competition Pro range of car audio is built for very high power handling. Listening to music at such high powers is potentially capable of causing physical side effects such as nausea or even permanent side effects such as hearing loss. It is therefore absolutely essential that conservatism and a high sense of judgement is observed when in operation. TheLoudest.com accepts no liability for hearing disorders, nausea or other side effects caused by this equipment. General Safety Playing loud music in a vehicle can hinder your sense of what is going on around you on the road, including your ability to hear your own, and other vehicles. We recommend listening at low or moderate levels while driving. TheLoudest.com accepts no liability for injury, property damage or otherwise resulting from the use or misuse of this equipment. Do not use any chemicals when cleaning this equipment. Please use a clean dry cloth. Do not install this unit outside the car, or anywhere where it could become damp or humid, or where it can become exposed to the sun. It should be installed in a dry and ventilated area inside the car. Never connect or disconnect speakers when the amplifier is on; this can permanently damage the speakers. Always do this when it is off. None of the parts are serviceable by the user. In the case of the unit needing repair or maintenance, please take it to a qualified professional. Troubleshooting Problem Distorted output Calibration of speakers with power source 1. Turn the gain knob on the amplifier and/or source unit all the way down 2. Play a CD or similar of music or audio that will be typically played 3. If using an amplifier, turn the gain control on the source unit to around 70 – 80% of it’s maximum. If only using a source unit, increase the gain until just before distortion is heard. Never increase the gain above this level. 4. Slowly increase the gain knob on the amplifier until you can hear distortion 5. Turn the gain knob on the amplifier to just before this distortion occurs 6. Test the system and make any equalisation changes on the source unit or the amplifier according to taste 7. If any equalisation changes are made, repeat stages 1 to 7 until satisfied 8. Never exceed the source unit gain that you used to calibrate the system Remember: It is possible for the amplifier’s gain knob to be at only a quarter of its maximum, but the amplifier is actually outputting to its full potential. This could be because the source unit is supplying slightly more power than normally expected. Bass is weak Possible Cause(s) Source unit/amplifier gain set too high Solution Re-calibrate speakers Source unit is not capable of good audio reproduction Replace/upgrade source unit Speaker(s) blown Disconnect speakers one at a time to pinpoint defective speaker Speakers being run from 2 ohm amplifier Speakers wired out of phase Don’t bridge channels/seek advice. Speakers need to be run at 4 ohms. Check the + and – connections all match Eq settings are reducing bass power Return all eq settings on amplifier and source unit to default If your speakers are still not functioning correctly after checking through the “troubleshooting” section, please contact our support team at: [email protected]