1
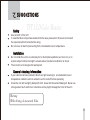
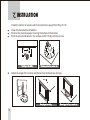
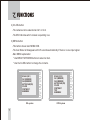
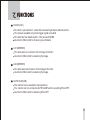
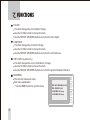
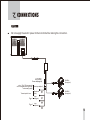
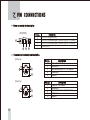
INSTALLATION & USER-MANUAL
PLEASE READ CAREFULLY BEFORE USING AND KEEP WELL.
5" TFT LCD Color Rear Vision Monitor
for Automobile
MXN
MODEL:
ECL-500
* Design and Specifications are subject to change without notice.
CONTENTS
CHARACTERS
--------------------------------------------------------------- 3
SUGGESTIONS
--------------------------------------------------------------- 4
INSTALLATION
--------------------------------------------------------------- 5
FUNCTIONS
--------------------------------------------------------------- 6
CONNECTIONS
--------------------------------------------------------------- 12
PIN CONNECTIONS
--------------------------------------------------------------- 13
SPECIFICATIONS
--------------------------------------------------------------- 14
2
CHARACTERS
This monitor has been specially designed for Automobile Rear Vision System.
It can be used on the power source from 12V to 32V DC.
It has two external triggers and the triggers have an off- time- delay for 2 seconds.
It is automatically turned on when a gear is set on the R position.
Two cameras can be connected up into the monitor.
This monitor has a speaker and users can hear what is happening behind the vehicle.
(when used with a camera with integral microphone).
This monitor has back-lights for buttons and this back-lights are turned on automatically at night.
3
SUGGESTIONS
Safety
TFT LCD Color Monitor
Use only DC 12V to 32V.
In case that dust or liquid was soaked into the case, please turn off power and consult
the experienced technician before using.
Do not cover air duct for preventing from considerable rise in temperature.
Installation
Do not install the unit in an extremely hot or humid place (radiator, air duct, etc.) or in
a place subject to direct sunlight, excessive dust, mechanical vibration or shock.
The monitor is not designed for waterproof.
General cleaning information
If your vehicle has been parked in direct sun light resulting in a considerable rise in
temperature inside the vehicle, allow the unit to cool off before operating.
Clean the unit with a slightly damp soft cloth. Use a mild household detergent. Never use
strong solvent such as thinner or benzine as they might damage the finish of the unit.
Warning
While driving, do not watch Video
4
INSTALLATION
Install the monitor on a place which can stand more weight than 5Kg (10.1b).
Clean the place before installation.
Remove the protective paper covering the bottom of the bracket.
Stick the provided bracket on the surface and fix it firmly with the screws.
Mounting on the ceiling
Mounting on the floor, console, etc.
Adjust the angle of the monitor and fasten the handle screws strongly.
Mounting on the ceiling
5
Mounting on the floor, console, etc.
FUNCTIONS
When power lamp of the monitor is on, the monitor is in stand-by mode. The monitor is
not turned off until the ignition key is on the off position.
FUNCTION
1) POWER ON Button and Stand-by Lamp
- When the RED lamp is turned on, the monitor indicates power on and stand-by mode.
- When the POWER ON button is pushed, the lamp color changes to GREEN and
the monitor goes into RUN mode.
6
FUNCTIONS
2) CA.SEL button
- The cameras can be selected as CA 1 or CA 2.
- The OSD indicates which camera is operating now.
3) MENU button
- This button shows main MENU OSD.
- The main Menu list disappears within 5 seconds automatically if there is no new input signal.
- Main MENU explanation
* Use BRIGHT UP/DOWN buttons to select an item.
* Use the CA.SEL button to change the contents.
7
SCALE (CA1)
CA1 (MIRROR)
CA2 (MIRROR)
AUTO SCAN (ON)
COLOR
CONTRAST
SUB MENU
SCALE (CA1)
CA1 (MIRROR)
CA2 (MIRROR)
AUTO SCAN (ON)
COLOR
CONTRAST
TINT
SUB MENU
PAL system
NTSC system
FUNCTIONS
SCALE (CA1)
This item is just electronic scale that is measuring distance behind vehicle.
This scale is available only when trigger signal is inputted.
This item has four details as CA1, CA2, ALL and NONE.
Use the CA.SEL button for choosing one of details.
CA1 (MIRROR)
This item selects a normal or mirror image of the CA1.
Use the CA.SEL button for selecting the image.
CA2 (MIRROR)
This item selects a normal or mirror image of the CA2.
Use the CA.SEL button for selecting the image.
AUTO SCAN (ON)
The monitor has an automatic scan operation.
The monitor can run or stop the AUTO SCAN function as setting ON or OFF.
Use the CA.SEL button for selecting ON or OFF.
8
FUNCTIONS
COLOR
This item changes the color depth of image.
Use the CA.SEL button to choose this item.
Use the BRIGHT UP/DOWN buttons to control the color depth .
CONTRAST
This item changes the contrast of image.
Use the CA.SEL button to choose this item.
Use the BRIGHT UP/DOWN buttons to control the contrast level.
TINT (NTSC system only)
This item changes the color coordination of image.
Use the CA.SEL button to choose this item.
Use the BRIGHT UP/DOWN buttons to control the position between R and G.
SUB MENU
This function has a sub-menu
Sub menu explanation
* Use the MENU button to quit this menu.
TRIG. OFF TIME DELAY (CA1)
TRIG. PRIORITY (CA1)
SCAN TIME CA1 (0 sec)
SCAN TIME CA2 (0 sec)
9
FUNCTIONS
TRIG. OFF TIME DELAY (CA1)
This item has four sub details as CA1, CA2, ALL and NONE
This function is useful for triggering connection to the direction signal lamp.
(Delay time 2.5 seconds)
Use the CA.SEL button for choosing one of the details.
TRIG. PRIORITY (CA1)
User can select camera priority.
When two triggers are inputted at the same time, the image of selected camera is shown
on the screen.
Use the CA.SEL button to select the camera priority, CA1 or CA2.
SCAN TIME CA1 (0 sec ), SCAN TIME CA2 (0 sec )
This scan time is maximum 10 seconds.
Use the VOL UP/DOWN buttons to select the time.
When the AUTO SCAN function which is in main MENU is ON, the monitor shows each image
during the scan time.
10
FUNCTIONS
4) VOL buttons
- This buttons control sound level of built in speaker.
5) BRIGHT buttons
- This buttons control brightness level on the screen.
6) BRIGHTNESS SENSOR (Automatic Brightness Control)
- The brightness of the monitor will be adjusted automatically according to the circumstances.
- The light-sensor automatically turns on back-light for buttons at night.
7) BRACKET RAIL
- Mounting bracket is adjustable.
8) INPUT CABLE
- Cameras, Power and trigger wires are connected to the end of this cable assembly.
11
CONNECTIONS
CAUTION
Do not supply the electric power to the monitor before making the connection.
to POWER
Power cable(supplied)
to the 12V or 32V power terminal
which is energized with the ignition key
in the accessory position
Power input lead(red)
Ground wire
(black)
+
Trigger 1
input
lead(green)
-
Trigger 2
input
lead(white)
To a metal point of the car
CAMERA 1.
(Not supplied)
CAMERA 2
(Not supplied)
+
+
12
PIN CONNECTIONS
Power connector pin description
( ECL500 )
Pin No.
4
3
2
1
1
2
3
4
Description
12V/24V DC via Ignition (RED)
12V/24V DC via Reverse gear or Direction Light for CA1 (GREEN)
12V/24V DC via Reverse gear or Direction Light for CA2 (WHITE)
Ground (BLACK)
Camera input connector pin description.
(Camera)
2
Pin No.
3
4
1
5
(Camera)
2
1
3
4
5
13
1
2
3
4
5
Description
Power (DC 12V Output)
Audio Input
Heater Function (DC 9V~ 12V Output)
Video Input
Ground
Pin No.
Description
1
2
3
4
5
Power (DC 12V Output)
Audio Input
Shutter Control Power (DC 9V Output)
Video Input
Ground
SPECIFICATIONS
Model No : ECL-500
Power input
Power consumption
Video signal
Sync. System
LCD panel size
Angle of view
Screen size
Screen resolution
Dimmer
Color configuration
OSD control
Power connector
Camera connection
Speaker
Finish
Operating Temperature
Storage Temperature
Ambient condition
Vibration
Dimension
Weight
Supplied Acc'y
: DC 12 ~ 32 V
: Ma x 10 Watt
: NT SC, PAL stand ard system
: Internal
: 5 i nch diagonal
: Top: 35°, Bott om: 15°, L eft: 55°, Ri ght: 55°
: 106(W) ×78(H)mm
: 225, 000 Pix e ls ( 960 (W) ×234(H))
: Automatic
: R , G , B Stripe
: Volu me, Brightne ss, Sc ale on /off, Im age se lect (Mirror/Normal)
A uto s can on /o ff, 2 A uto trigge , Color, Contrast, Tint(NTSC Only)
: 4 Pin wire
: 2 mini-DIN
: 8 o hm, 0.2 w att max
: L ight Bl ack (A BS)
:-25° C ~ + 75° C ( -13°F~+167°F)
: -30° C~ +80 °C (-22°F~+185°F)
: Ind oor use only
: 5G
: 170(W)x115(H)x28 (D) mm
: App rox. 1. 0kg gross
: Mounting Bracket (1)
Screw kits
(1)
Power Cord
(1)
Sun Visor
(1)
* Design and specifications are subject to change without notice.
14
Printed in Korea