1
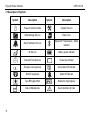
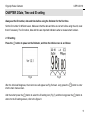
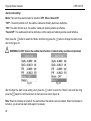
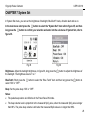
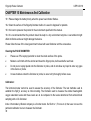
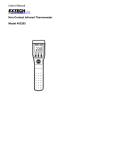
Pluse Oximeter Instruction Manual VER2.0C318 Pulse Three Fingertip Pulse Oximeter VER1.0C318 Copyright Our company owns all rights to this unpublished work and intends to maintain this work as confidential. Our company may also seek to maintain this work as an unpublished copyright. This publication is to be used solely for the purpose of reference, operation, maintenance or repair of our equipment. No part of this can be disseminated for other purposes. In the event of inadvertent or deliberate publication, our company intends to enforce its right to this work under copyright laws as a published work. Those having access to this manual may not copy, disseminate or disclose the information in this work unless expressly authorized by our company. All information contained in this manual is believed to be correct. Our company shall not be liable for errors contained herein nor for incidental or consequential damages in connection with the furnishing, performance, or use of this material. This publication may refer to information and protected by copyrights or patents and does not convey any license under the patent rights of our company, nor the rights of others. Our company does not assume any liability arising out of any infringements of patents or other rights of third parties. Our Company reserves the right to make changes in specifications and features shown herein, or discontinue the product described at any time without notice or obligation. Also, content of the manual is subject to change without prior notice. ALL RIGHTS RESERVED Bluetooth® and the Bluetooth® Logo are registered trademarks of Bluetooth SIG, Inc. 2 Fingertip Pulse Oximeter VER1.0C318 Safety Information Please read this manual thoroughly before using the pulse Oximeter! Keep it in hand for future reference. Warnings alert the user to potential serious outcomes, such as injury or adverse events to the patient or user. Cautions alert the user to exercise care when necessary for the safe and effective use of the pulse Oximeter. Notes contain important information that may be overlooked or missed. Warnings! ● DO NOT strike or needle the battery. ● Keep away from source of fire and/or heat. ● DO NOT disassemble the Oximeter or its accessories. ● DO NOT use the pulse Oximeter in an MRI or a CT environment ● DO NOT use the pulse Oximeter in the presence of flammable anesthetics. ● Explosion hazard: DO NOT use the pulse Oximeter in an explosive atmosphere. ● Chemicals from a broken OLED panel are toxic when ingested. Use caution when the Oximeter has a broken display screen. ● The pulse Oximeter is intended only as an adjunct in patient assessment. It must be used in conjunction with other methods of assessing clinical signs and symptoms. ● Check the pulse Oximeter application site frequently to determine the positioning of the measurement and circulation and skin sensitivity of the patient. ● Although the pulse Oximeter has alarms, it is not suggested for long time continuous monitoring. 3 Fingertip Pulse Oximeter VER1.0C318 Prolonged use or the patient’s condition may require changing the measurement site periodically. ● Change measurement site and check skin integrity, circulatory status, and correct alignment at least every 4 hours. ● Follow local ordinances and recycling instructions regarding disposal or recycling of the device and device components, including batteries. ● Only the authorized service personnel can replace the battery or repair this device. This device uses a fixed lithium-ion battery inside. Do not try to replace the battery by yourself at any time. For longer battery life, only charge the battery when the battery power is empty. ● This device complies with Part 15 of the FCC Rules. Operation is subject to the following two conditions: (1) this device may not cause harmful interference, and (2) this device must accept any interference received, including interference that may cause undesired operation. Cautions! ¾ Inaccurate measurements may be caused by autoclaving, ethylene oxide sterilizing, or immersing the sensors in liquid may cause inaccurate readings. ¾ Significant levels of dysfunctional hemoglobins (such as carbonyl- hemoglobin or methemoglobin) may cause inaccurate readings. ¾ Intravascular dyes such as indocyanine green or methylene blue may cause inaccurate readings. ¾ SpO2 measurements may be adversely affected in the presence of upper ambient light. Shield the sensor area (with a surgical tower, or direct sunlight, for example) if necessary. ¾ Excessive patient movement may cause inaccurate readings. ¾ Upper-frequency electrosurgical interference may cause inaccurate readings. 4 Fingertip Pulse Oximeter ¾ Venous pulsations may cause inaccurate readings. VER1.0C318 ¾ Placement of a sensor on an extremity with a blood pressure cuff, arterial catheter, or intravascular line may cause inaccurate readings. ¾ The patient has hypotension, severe vasoconstriction, severe anemia, or hypothermia may cause inaccurate readings. ¾ Operation of the pulse Oximeter may be affected by the use of an electrosurgical unit (ESU). ¾ The pulse Oximeter must be able to measure the pulse properly to obtain an accurate SpO2 measurement. Verify that nothing is hindering the pulse measurement before replying on the SpO2 measurement. ¾ The patient is in cardiac arrest or is in shock may cause inaccurate readings. ¾ Fingernail polish or false fingernails may cause inaccurate SpO2 readings. ¾ Federal Law (U.S.A) restricts this device to sale by or on the order of a physician. ¾ All Choice devices are designed to be compliant with rules and regulations in locations they are sold and will be labelled as required. ¾ Any changes or modifications to choice equipment, not expressly approved by choice, could void the user’s authority to operate the equipment. 5 Fingertip Pulse Oximeter VER1.0C318 Contents CHAPTER 1 General Information...................................................................................................................................................... 7 1.1 Measuring principle................................................................................................................................................................. 7 1.2 Product Features .................................................................................................................................................................... 8 1.3 Intended Use .......................................................................................................................................................................... 8 1.4 Appearance Introduction ......................................................................................................................................................... 9 1.5 Description of Symbols ......................................................................................................................................................... 10 CHAPTER 2 Date, Time and ID setting ........................................................................................................................................... 11 2.1 ID setting.............................................................................................................................................................................. 11 2.2 Date and Time setting .......................................................................................................................................................... 12 CHAPTER 3 Take a measurement .................................................................................................................................................. 14 CHAPTER 4 Battery Charge............................................................................................................................................................ 17 4.1 Power Supply........................................................................................................................................................................ 17 4.2 Battery charge ...................................................................................................................................................................... 17 CHAPTER 5 Data Manage ............................................................................................................................................................... 19 CHAPTER 6 Alarm set ..................................................................................................................................................................... 21 CHAPTER 7 System Set .................................................................................................................................................................. 25 CHAPTER 8 Data transmission (optional)...................................................................................................................................... 27 CHAPTER 9 Specifications ............................................................................................................................................................. 28 CHAPTER 10 Maintenance And Calibration................................................................................................................................... 30 CHAPTER 11 Troubleshooting........................................................................................................................................................ 31 CHAPTER 12 Declaration................................................................................................................................................................ 32 6 Fingertip Pulse Oximeter VER1.0C318 CHAPTER 1 General Information The pulse Oximeter is integrated with Bluetooth® technology allowing the user to transfer measurement data any time and anywhere. The Oximeter is designed with the measurement, storage, review, audible and visible alarms, vibration alert and data transmission (optional). Note: The illustrations used in this manual may differ slightly from the appearance of the actual product. 1.1 Measuring principle Principle of the Oximeter is as follows: An experience formula of data process is established taking use of Lambert Beer Law according to Spectrum Absorption Characteristics of Reductive hemoglobin(HbR) and Oxyhemoglobin (HbO2) in red light and near-infrared light zones. The photoelectric oxyhemoglobin inspection technology is adopted in accordance with capacity pulse scanning and recording technology, so that two beams of different wavelength of lights (660nm red light and 940nm near infrared light) can be focused onto human nail tip through perspective clamp finger-type sensor. Then measured signal can be obtained by a photosensitive element, information acquired through which will be shown on two groups of LEDs through process in electronic circuits and microprocessor. Diagram of Operation Principle: 1. Red and Infrared light emission diodes 2. Red and Infrared photodiode Fig.1 7 Fingertip Pulse Oximeter VER1.0C318 1.2 Product Features ¾ Compact and light weight ¾ Four display modes ¾ Low power consumption ¾ Battery low indicator ¾ Rechargeable lithium-ion battery ¾ Visible, audible and vibration alarms. ¾ Automatically power off after finger out for 8 seconds. ¾ Bluetooth® and USB modes for data transmission. 1.3 Intended Use The Fingertip Pulse Oximeter is indicated for spot check monitoring of functional arterial oxygen saturation (SpO2) and pulse rate of adult and pediatric patients in hospital, hospital type facilities, transport and mobile environments as well as in home care environment. The Oximeter is not indicated for long time continuous monitoring although it has alarm functions. The Oximeter requires no calibration or special maintenance other than charge the battery. 8 Fingertip Pulse Oximeter VER1.0C318 1.4 Appearance Introduction Fig.2 Fig.3 Description: 1: Display screen: OLED display 2: Power switch & function button Short press: press this button for about 0.5 second to power on or change the select item. Long press: Press this button for about 1.5 seconds to confirm your selection and enter into the submenu. 3: USB cable port: It is used to connect the USB cable with the pulse Oximeter. NOTE: The pulse Oximeter will return to the measuring screen, when no operation lasts for 8 seconds. 9 Fingertip Pulse Oximeter VER1.0C318 1.5 Description of Symbols Symbol Description Power or function button Data Manage Set icon Alarm Set/Alarm On icon 10 Symbol Description System Set icon Return icon Bluetooth® Transmission Mode indicator ID Set icon Battery power indicator Date and Time Set icon Power low indicator Europen union approval Sound alarm off indicator Non AP equipment Alarm Off indicator Type BF Applied Part Resitant to liquid ingress Date of Manufacture See Instructions for Use Fingertip Pulse Oximeter VER1.0C318 CHAPTER 2 Date, Time and ID setting Always set the ID number, date and time before using the Oximeter for the first time. Set the ID number for different users. Make sure that the date and time are correct before using the unit, reset them if necessary. The ID number, date and time are important indicators when a measurement is taken. 2.1 ID setting Press the button to power on the Oximeter, and then the initial screen is as follows: Fig.4 Fig.5 After the initial self-diagnose, the main menu will appear as Fig.5 shown. Long press the into the main menu screen. button to enter And then short press the button to select the ID setting icon (Fig.7), and then long press the enter into the ID setting screen, refer to the figure 8. button to 11 Fingertip Pulse Oximeter In figure 7 long press the press the VER1.0C318 button to set the ID number, the range is 01 to 99. After finishing setting, short button to select the “Return” item and long press the Fig.7 button to return to the previous menu. Fig.8 2.2 Date and Time setting button to select the Date and Time icon, refer to Fig.9, and then long In the main menu short press the press the button to enter into the “Date and time” setting screen, refer to Fig.10. Fig.9 Fig.10 In figure 10, short press the button to select the item you want to set, and then long press the adjust the date and time value. 12 button to Fingertip Pulse Oximeter VER1.0C318 The displaying mode: Date: Year-Month-Day Time: Hour: Minute: Second The setting range: Year: 2008~2028 Hour: 0~23 Month: 1~12 Minute: 0~59 Day: 1~31 Second: 0~59 CAUTION: In the Date and Time setting screen, BE SURE TO select the “Return” item and long press the button to return to the previous menu. Otherwise, the settings will not be saved. 13 Fingertip Pulse Oximeter VER1.0C318 CHAPTER 3 Take a measurement After the ID, date and time setting. Return to the main menu and then short press the button to select the “Return” item and long press the button to confirm your selection to return to the measuring screen. Open the clamp and insert a finger into the Oximeter as illustrated in the figure 11 before releasing the clamp. Caution: When your finger is plugged into the Oximeter, your nail surface must be upward. Fig.11 The figure 12 is shown the recommended measuring fingers: Note: Keep your tested hand still and do not move during the measurement. Fig.12 14 Fingertip Pulse Oximeter VER1.0C318 The measurement screen refers to figure 13: Fig.13 Description of figure 13: 1—Time display: The current time is 22:10. 2—SpO2% area of display 3—Measured SpO2% 4—The SpO2% Plethysmograph 5—Measured pulse rate. 6—Pulse amplitude indicator. 7—Pulse rate unit. 8—Battery power indicator: When battery power is low the icon will be empty and turn to red. 9—Data transmission mode area of display the current transmission mode is Bluetooth®. 10—Alarm status area of display: The current alarm status is alarm on. 15 Fingertip Pulse Oximeter VER1.0C318 During the measuring, each time you press the button the Oximeter will switch to another display mode, there are 4 display modes shown as follows: Fig.14 Fig.15 Fig.16 Fig.17 NOTE: Please use the medical alcohol to clean the rubber, touching the finger inside of Oximeter with a soft cloth dampened with 70% isopropyl alcohol, and clean the test finger using alcohol before and after each measurement. Do not pour or spray liquids onto the Oximeter, and do not allow any liquid to enter any openings in the device. Allow the Oximeter to dry thoroughly before reusing. 16 Fingertip Pulse Oximeter VER1.0C318 CHAPTER 4 Battery Charge 4.1 Power Supply Battery Model: SP080 Battery Type: One 3.7V Lithium Ion Rechargeable Battery 4.2 Battery charge 4.2.1 Connect the Oximeter with attached the USB cable, as shown in Fig.18. 4.2.1 Connect the other end of the USB cable with the attached charger or a computer’s USB port. Fig.18 Fig.19 Charging temperature: 0℃~40℃ Charging Voltage: 110Vac~240 Vac, 50Hz~60Hz. It will take about 4 hours to complete charging no more than 5 hours. Note: The battery indicator icon is active until the charge process is completely. 17 Fingertip Pulse Oximeter VER1.0C318 Warning! Keep away from source of fire and/or heat. Avoiding the strongly impacting to the Oximeter. Avoid the Oximeter exposure straightly to the strongly sunlight. DO not leave the Oximeter in the sealed car. DO NOT open or disassemble the device, opening and disassembly may cause damage to the Oximeter. ONLY USE the attached battery charger, DO NOT USE other chargers. If not that may cause damage even danger to the Oximeter or person. DO NOT charge the battery for more than 5 hours, otherwise that may cause damage to it. DO NOT charge or preserve the battery in too hot or cold environment, the proper temperature is 0~30℃ for charging, The details refer to the section “CHAPTER 9 Specifications”. Please charge the Oximeter in time, when the power low indicator appears. Otherwise, there maybe cause influence to the specification of the Pulse Oximeter. Avoiding water ingress, keep the Oximeter in the specified environment. The rechargeable lithium-ion battery will be exposure when the water ingress the Oximeter or in the high temperature environment. If the snow, rain, sweat and so on ingress the Oximeter. Please stop using the Oximeter, or else the Oximeter may cause flaming. Please contact with the local service center for help. Not recommended that using the Oximeter during charging. NOTE: It is suggested that charge or discharge the battery once every three months, if the Oximeter will be not used for a long time. Due to influences of ambient humidity and non-absolute insulation environment, batteries have a phenomenon of self - consumption. So it is quite normal that the capacity of the battery declines along with use. 18 Fingertip Pulse Oximeter VER1.0C318 CHAPTER 5 Data Manage In the main menu (shown as Fig.20), select the “Data Manage” icon and long press the Fig.21 to review, clear the data and look over the used space for data storage. button to enter into Fig.20 Fig.21 Fig.22 Fig.23 Data review: In figure 20, long press the button reviews the stored data, refers to the figure 21. Short press the button turns page up or down. If there is no stored data the screen will be the figure 22. Long press the button you will exit from the Data Review and return to the previous menu refers to figure 20. Look over storage space: Used Space: 10% — Percent of occupied storage space is 10%, refer to figure 24. Fig.24 19 Fingertip Pulse Oximeter VER1.0C318 Clear Data: Short press the button to select the “Clear Data” item and then long press the selection, and then the screen as shown in Fig.26 will be appear. Short press the “No” and then long press the button to confirm your selection. Fig.25 After finishing “Data Manage”, short press the button to confirm the selection. Fig.26 button to select the “Return” item and then long press the Fig.27 20 button to conform your button to select “Yes” or Fingertip Pulse Oximeter VER1.0C318 CHAPTER 6 Alarm set The Alarm limits display allows you to adjust the upper and lower saturation and pulse rate limits. When the measured values exceed the setting limits, the visible, audible or vibratory alarms will occur according to the alarm setting. In the main menu short press the button to select the “Alarm Set” icon, and long press the confirm your selection and enter into the Alarm Set screen, refer to figure 29. Fig.28 button to Fig.29 SpO2% alarms setting: Upper alarm limit setting: The SpO2 %upper alarm limit range is 71% to 99%. The lower value of the SpO2% upper alarm limit is limited to the SpO2% low alarm limit. The SpO2% upper alarm limit cannot be set equal to or lower than the SpO2 %low alarm limit. SpO2 ALMHI (Upper alarm limit): Short press the button to select the “SpO2 ALMHI” and then long press button to increase the upper alarm limit. If you long press the button, the number will be cycled the displaying. Note: The default SpO2% upper alarm is 99%. 21 Fingertip Pulse Oximeter VER1.0C318 Lower alarm limit setting: Fig.30 The SpO2% low alarm limit range is 70% to 98%. The upper value of the SpO2% low alarm limit is limited to the SpO2% upper alarm limit. The SpO2% low alarm limit cannot be set equal to or higher than the SpO2% upper alarm limit. button to select the “SpO2 ALMLO” and then long press SpO2 ALMLO (lower alarm limit): Short press the the button to decrease the low alarm limit. If you long press the button, the number will be cycled displaying. Note: The default SpO2% low alarm is 90%. PR alarms setting: Upper alarm limit setting: The pulse rate upper alarm limit range is 31 to 235. The low value of the pulse rate upper alarm limit is limited to one number above the pulse rate low alarm limit. The pulse rate upper alarm limit cannot be set equal to or lower than the pulse rate low alarm limit. Refer to Fig.31. Note: The default PR upper alarm is 100. 22 Fingertip Pulse Oximeter VER1.0C318 Fig.31 button to select the “PR ALMHI” and then long press the PR ALMHI (Upper alarm limit): Short press the button, the number will be cycled displaying. button to increase the upper alarm limit. If you long press the Lower alarm limit setting: The pulse rate low alarm limit range is 30 to 234. The upper value of the pulse rate low alarm limit is limited to one number lower than the pulse rate low alarm limit. The pulse rate low alarm limit cannot be set equal to or higher than the pulse rate upper alarm limit. Fig.32 button to select the “PR ALMLO” and then long press the PR ALMLO (Low alarm limit): Short press the button to increase the low alarm limit. If you long press the button, the number will be cycled displaying. Note: The default PR low alarm is 60. 23 Fingertip Pulse Oximeter VER1.0C318 Alarm mode setting: Mode: There are three alarm modes for selection: OFF, ON and Sound Off. “OFF”: The alarm function is off, the audible, visible and vibratory alarms are ineffective. “ON”: The alarm function is on, the audible, visible and vibratory alarms are effective. “Sound Off”: The audible alarm will be ineffective, but the visible and vibratory alarms are still effective. button to select the “Mode” and then long press the Short press the refer to the figure 33. button to change the alarm mode, WARNING: Do NOT silence the audible alarm function, if patient safety could be compromised. Fig.33 Fig.34 After finishing the alarm mode setting, short press the button to select the “Return” item and then long button to confirm and return to the main menu refer to figure 34. press the Note: When the Oximeter is turned off, the alarm limits of the last time set are restored. When the Oximeter is turned on, you should set alarm limits again if necessary. 24 Fingertip Pulse Oximeter VER1.0C318 CHAPTER 7 System Set In System Set menu, you can set the brightness of backlight, BlueTooth® mode, vibration alert and so on. In the main menu short press the button to select the “System Set” item refer to figure 35, and then long press the button to confirm your selection and enter into the sub menu of System Set, refer to figure 36. Fig.35 Brightness: Adjust the backlight brightness, in figure 36, long press the the backlight. The brightness level is 1 to 7. BlueTooth: Short press the select “ON” or “OFF”. Fig.36 button to adjust the brightness of button to select the “Blue Tooth” item and then long press the button to Beep: Set the pulse beep “ON” or “OFF”. Notes: ¾ The pulse beep volume is ineffective in the Power Save ON mode. ¾ The beep volume level is proportion to the measured SpO2 value, when the measured SpO2 value is larger than 80%. The pulse beep volume is still when the measured SpO2 value is no larger than 80%. 25 Fingertip Pulse Oximeter VER1.0C318 Power Save: “ON” or “OFF” setting. When setting “Power save: ON”, the “BlueTooth” will be set “OFF” automatically and the beep is ineffective. button return to NOTE:If the “Power Save” is on, the display screen turns black. Long press the the displaying screen, short press the button the following screen will appear showing the Oximeter is in process of measuring. Fig.37 Vibration: “ON” or “OFF” Short press the button selects the “Vibration” item, and then long press the button sets the vibration alert “ON” or “OFF”. If vibration is on, the Oximeter will vibrate along with the alarms. NOTE: Under the “Power Save: ON” mode, If the vibration is set to “ON”, the audible alarm is ineffective when the finger is out. Contrarily the vibration mode is set to “OFF”, the audible alarm is effective when the finger is out. 26 Fingertip Pulse Oximeter VER1.0C318 CHAPTER 8 Data transmission (optional) Please be sure to register the pulse Oximeter before transmission. Contact our company for registration. The measurement results saved in the pulse Oximeter can be uploaded to a computer for review or management. The modes of Data transmission are Bluetooth® transmission and USB calbe transmission. Please refer to the “software user manual” for the details of data transmission. The data transimission screen is shown in Fig.38. USB cable transmission: Connect the USB cable to a computer. Power on the Pulse Oximeter. Bluetooth transmission: Power on the Pulse Oximeter. Set the Pulse Oximeter to “Bluetooth: ON” in the System Set menu. Fig.38 CAUTION: The Bluetooth® transmission may be influenced in different environments, such as: walls, metallic doors, steel wire netting and an MRI or a CT environment and so on. 27 Fingertip Pulse Oximeter CHAPTER 9 Specifications Display: Display type: OLED display SpO2 display range: 0~99% PR display range: 30~235 BPM PR display mode: Amplitude Bar Data update period: <15 s Resolution: SpO2: ±1% Pulse rate: ±1BPM Measurement Accuracy: SpO2: 70%--99% ±3%; ≤69% unspecified. PR: 30~99 bpm ±2 bpm; 100~235 bpm ±2%. Antenna Information: Antenna Type/Patten: Internal Frequency Range: 2402 to 2480 MHz LED Wavelengths and Out put Power: Red: approximately 660nm @0.8mW maximum average Infrared: approximately 940nm @0.8mW maximum average Wireless transmission distance: 0~10m 28 VER1.0C318 Fingertip Pulse Oximeter VER1.0C318 Physical Characteristics: Dimensions: 56mm x 38mm x 40mm (2.2”x 1.5”x 1.6”) Weight: 51g (0.11 lbs.)(including the lithium-ion battery) Battery life: Typical lithium ion battery: 300 cycles. Charge temperature: 0℃~40℃(32℉H to 113℉H) Environment Conditions: Operating Temperature: 5℃~40℃ (41℉H to 104℉H) Storage Temperature: -20℃~30℃ (-4℉H to 86℉H) for 1 year; -20℃~45℃ (-4℉H to113℉H) for 3 months. Humidity: 20%-85% in operation, non condensing <85% in storage, non condensing. EMC of this product comply with IEC60601-1-2 standard. Accessories: USB Cable…………………………………………………………………………………………………1 piece AC/DC Adapter…………………………………………………………………………………………….1 piece Instruction Manual…………………………………………………………………………………………1 piece Lanyard……………………………………………………………………………………………………..1 piece MedView Software CD (Optional)…………………………………………………………………...…...1 piece USB Dongle (Optional)…………………………………………………………………………………….1 piece 29 Fingertip Pulse Oximeter VER1.0C318 CHAPTER 10 Maintenance And Calibration 10.1 Please charge the battery timely when the power low indicator flashes. 10.2 Clean the surface of the fingertip Oximeter before it is used in diagnosis for patients. 10.3 It is best to preserve the product in the environment specified in this manual. 10.4 It is recommended that the product should be kept in a dry environment anytime. A wet ambient might affect its lifetime and even might damage the device. Please follow the law of the local government to deal with used Oximeter and the accessories. Cleaning the PULSE OXIMETER: ¾ Please use 70% isopropyl alcohol to clean the inside surface of the probe. ¾ Moisten a soft cloth with the alcohol and clean the finger probe, before and after each test. ¾ Do not pour or spray liquids onto the Oximeter or probe, and do not allow any liquid to enter any gaps in the device or probe. ¾ In case moisture enters the Oximeter or probe, be sure to dry thoroughly before reuse. Calibration: The functional tester cannot be used to assess the accuracy of the Oximeter. The test methods used to establish the SpO2% accuracy is clinical testing. The Oximeter used to measure the arterial haemoglobin oxygen saturation levels and these levels are to be compared to the levels determined from arterial blood sampling with a CO- Oximeter. Index 2 that made by Bioteck company is a function tester. Set Tech to 1, R curve to 2, then user can use this particular calibration curve to measure the Oximeter. 30 Fingertip Pulse Oximeter VER1.0C318 CHAPTER 11 Troubleshooting Problem Cause Solution SpO2% or pulse rate does not display. 1. Finger is not plugged correctly. 2. Patient’s SpO2 value is too low to be measured. 1.Retry by plugging the finger. 2.There is excessive illumination. 3.Measure other patients to make sure that no problem exists in the product. Go to a hospital in a timely manner for an exact diagnosis. SpO2% or PR is shown unstably. 1.Finger might not be plugged deep enough into the clamp probe. 2. Excessive patient movement. 1. No battery or low power of battery. 2. Battery might be installed incorrectly. 3. The Monitor might be damaged. 1. The Oximeter is automatically powered off when no signal is detected longer than 8 seconds. 2. The batteries power is too low to work. The Oximeter can not be powered on. Display suddenly turns off. 1. Retry by inserting the finger to the end. 2. Stop moving the finger, hand or body. 1. Please replace battery. 2. Please reinstall the battery. 3. Please contact with local customer service centre. 1. Relocate the probe on another finger or restart the Oximeter and be sure the signal strength is strong enough for stable display. 2. Replace the battery. Error 1 ROM error Please contact with local customer service centre. Error 2 RAM error Please contact with local customer service centre. Error10 EEPROM damaged or dry joint Please contact with local customer service centre. 31 Fingertip Pulse Oximeter VER1.0C318 CHAPTER 12 Declaration FCC-ID: WWIMD300C318 This equipment has been tested and found to comply with the limits for a Class B digital device, pursuant to Part 15 of the FCC Rules. There limits are designed to provide reasonable protection against harmful interference in a residential installation. This equipment generates, uses and can radiate radio frequency energy and, if not installed and used in accordance with the instructions, may cause harmful interference to radio communications. However, there is no guarantee that interference will not occur in a particular installation. If this equipment does cause harmful interference to radio or television reception, which can be determined by turning the equipment off and on, the user is encouraged to try to correct the interference by one or more of the following measures: --Reorient of relocate the receiving antenna. --Increase the separation between the equipment and receiver. --Connect the equipment into an outlet on a circuit different from that to which the receiver is connected. --Consult the dealer or an experienced radio/TV technician for help. 32 Fingertip Pulse Oximeter VER1.0C318 EMC of this product comply with IEC60601-1-2 standard. 33 Fingertip Pulse Oximeter 34 VER1.0C318 Fingertip Pulse Oximeter VER1.0C318 35 Fingertip Pulse Oximeter 36 VER1.0C318 Fingertip Pulse Oximeter VER1.0C318 37 Fingertip Pulse Oximeter VER1.0C318 Distributor: EVO Medical Solutions 26378 289th Place Adel, IA 50003 TEL:515.993.5001 FAX:515.993.4172 Toll free :800.759.3038 Web: http://www.evomedical.com Manufacturer: Beijing Choice Electronic Technology Co., Ltd. 38