1
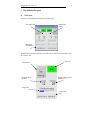
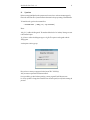
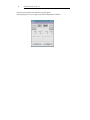
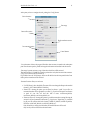
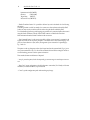
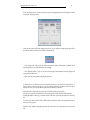
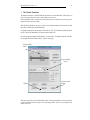
EUROPEAN SOUTHERN OBSERVATORY
Organisation Européenne pour des Recherches Astronomiques dans l’Hémisphère Austral
Europäische Organisation für astronomische Forschung in der südlichen Hemisphäre
VERY LARGE TELESCOPE
dataSubscriber
User Guide
Doc.No.VLT-MAN-ESO-19300-2367
Issue 1.0
Date 31/10/00
Fabio Sogni
Prepared.....................................................................................................
Name
Michele Peron
Approved...................................................................................................
Name
Peter Quinn
Released .....................................................................................................
Name
VLT PROGRAMME * TELEPHONE: +49 89 32006-0 * FAX: +49 89 320 2362
4
dataSubscriber User’s Guide - 1.0
Change Record1
Issue/Revision
Date
Section/Page affected
Reason/Remarks
1.0
October 30, 2000
All
First release
dataSubscriber User’s Guide - 1.0
5
Table of Contents
Introduction
1.1
1.2
1.3
Purpose and Scope
Reference Documents
Abbreviations And Acronyms
2 The dataSubscriber panel
2.1
2.2
Panel Layout
Operations
3 The Header Translator
5
5
5
5
7
7
9
15
6
dataSubscriber User’s Guide - 1.0
dataSubscriber User’s Guide - 1.0
1
1.1
7
Introduction
Purpose and Scope
The purpose of dataSubscriber is to simplify the subscription to the Olas Data Server.
It allows the user to define header translation tables, rename the incoming files and apply user defined commands. The GUI checks all the input from the user, minimizing possible mistakes.
From dataSubscriber is possible to monitor the file transfer, start and stop cleanly the related processes (avoiding conflicts or pending processes), and create transaltion tables, useful to add keywords to the incoming fits files.
1.2
Reference Documents
The following documents are referenced in this document
[1] Archive Storage Subsystem (ASTO) architectural design.
[2] ASTO User Manual
[3] ASTO Command Interface Specifications
[4] VLT-MAN-ESO-19000-2050 “FTU - FITS Translation Utility - User Manual”
1.3
Abbreviations And Acronyms
The following abbreviations and acronyms are used in this document:
ARCSYS
Archive System
ASM
Astronomical Site Monitor
ASTO
Archive Storage Subsystem
CCS
(VCS) Central Control System
DICB
Data Interface Control Board
DFS
Data Flow System
DHS
Data Handling Server
DMD
Data Management Division
FITS
Flexible Image Transport System
FWHM
Full width at Half Maximum
GUI
Graphical User Interface (Toolkit)
HOS
High Level Operating Software
ICD
Interface Control Document
ICS
Instrument Control Software
IDD
Instrument Description Database
IMP
Interprocess Message Passing
INS
Instrumentation Software
LAN
Local Area Network
LCU
Local Control Unit
8
dataSubscriber User’s Guide - 1.0
N/A
Not Applicable
OLAC
On-Line Archive Client
OLAF
On-Line Archive Facility
OLAS
On-Line Archive Subsystem
OS
Observation Software
OSS
Observation Support Software
PAF
VLT Parameter File
SW
Software
TBC
To be Confirmed
TBD
To be Defined
TCS
Telescope Control Software
VCS
VLT Control Software
VOLAC
VCS OLAC Client
WS
Workstation
dataSubscriber User’s Guide - 1.0
2
9
The dataSubscriber panel
2.1
Panel Layout
An overview of the dataSubscriber panel is shown in the figure:
Raw data section.
Reduced data
section.
Main panel
control buttons.
The dataSubscriber panel is divided into two sections each one controlling the acquisition of “raw”
and “reduced” data:
Control Buttons
Number of files in
the queue
Status Icon
Number of files processed
and delivered
Progress bar
Selected dates
10
dataSubscriber User’s Guide - 1.0
Where the main components are:
- Control Buttons: allow the user to start the dhs process, stop it or show the process log.
- Status Icon: It is grey when the dhs process is not running, green when is running and it becomes
red when an error occurs.
- Queued: Number of files received from the server and waiting (on disk) to be processed.
- Delivered: Number of files received from the server, processed and store on disk.
- Progress bar: Shows the percentage of files delivered. The header of the status bar shows which
type of files we are receiving and from which host.
- Selected dates: Incoming data are covered by this range of dates.
In the main panel there are 2 more buttons:
- “Quit”: Close the panel leaving the processes running in background.
- “Config”: Pops up a configuration panel. It is highlighted only when the related dhs process is
NOT running.
dataSubscriber User’s Guide - 1.0
2.2
11
Operations
Before executing dataSubscriber the operator must be sure to have set the environment properly.
Please refer to the Data Flow System installation document for the proper setting of dataSubscriber.
To launch the tool, type from the command line:
% dataSubscriber [ -debug [1-2] -log <filename> ]
Where:
-debug [1-3] : enables the debug mode. The numbers define the level of verbosity. Messages are sent
to the standard output.
-log <filename>: redirect the debug messages to a log file. This option is used together with the
-debug option.
A subscription window pops up:
Here you have to insert your program id in the format: PPP.C-NNNN(X).
And your name as specified in the observation block.
It is not possible to go ahead without specifying a correct program ID and Observer name.
It is always possible to change this information from the main panel, but only before starting the
processes.
12
dataSubscriber User’s Guide - 1.0
Once the correct information are inserted the main panel appears.
At the beginning the two icons are grey and the Start and Stop buttons are disabled:
dataSubscriber User’s Guide - 1.0
13
At this point you have to configure the tool, pushing the “Config” button:
User information
Date range
Rename files section
Header translation section
Post command section
Control buttons
- User information: It shows the program ID and the observer name as inserted in the subscription
panel. From the main panel is possible to change this information as described in the last section.
- Date range: It permits to insert a range of dates from which data will be retrieved.
The format must be: YYYY-MM-DD. A check is performed to verify date format and date consistency (E.g. From cannot be more recent than To).
It is possible to leave the To field empty. In this case all the files from the date specified in the From
field up to the current date will be retrieved.
- Rename file section: Here you can choose:
• “Use DFS Names”: this is the default. The name of files is not changed and kept in the standard
format (E.g. ONTT.1999-02-20T00:27:17.960.fits )
• “Rename To”: choosing this option you are allowed to choose a “prefix” for you files. An
incremental number will be appended to your files. E.g. If you choose the prefix isaacNewton
as prefix all your files will have this kind of name: isaacNewton_0001.fits,
isaacNewton_0002.fits, isaacNewton_0003.fits, ecc.
• “Rename to keyword”: choosing this option it is possible to rename the incoming file using the
content of a keyword contained in the header. E.g. if you choose “Target Name” as a standard
key all your files will have this kind of names: LAMPFLAT_0001.fits, LAMPFLAT_0002.fits,
U0525.fits, css-0637-4857_0001.fits, css-0637-4857_0002.fits, etc..
If the selected key is missing from the header, the standard file name will be used.
Only four keys can be selected from the menu button:
14
dataSubscriber User’s Guide - 1.0
Instrument mode (INS.MODE)
OB name
(OBS.NAME)
Target Name
(OBJECT)
Name on INS ws (ORIGFILE)
- “Header Translation Section”: It is possible to add new keyword to the header of a fits file using
this section.
Translating a header is useful, for example if we want to use a data reduction software like IRAF.
In this case some new keys must be created in order to keep the fits file readable by IRAF.
Two default tables (Spectroscopy and Imaging) are provided, and a customized table can be created
using the Header Translator. Push the “Define Table” button to call the Header Translator.
More information about the Header Translator in the next section.
- “Post Command Section”: in this section is possible to define a post-command, a command to be
applied to each file as last step of the procedure. A command can be a unix command (gzip, compress) or a data reduction sw (iraf, midas). The argument of post-command is %s (percentage s)
E.g. : midas %s
This option can be very dangerous and no check is performed on the command itself. E.g. if you insert a post-command like "rm -f %s" this will be considered valid and all the coming files will be removed after being processed. Use this option with caution!
There are three buttons on the bottom of the panel:
- “Accept”: parse the options, checks the input and give error messages in case the input is not correct.
- “Reset Conf.”: resets configuration to the default options: current date (To is blank), no file name
translation, no header translation, no post command.
- “Cancel”: quit the configuration panel without making any change.
dataSubscriber User’s Guide - 1.0
15
If the inserted option are correct, pushing Accept the configuration panel will disappear and the
main panel will pop up again:
From the main pane and before starting the process, you can decide to change the program ID or
the observer name. Select the “File” option in the menu bar:
- “New Program ID”: will pop up the initial subscription window. This option is enabled only if
both the processes (raw and reduced) are not running.
- “View filename table”: it pops up an xterm showing the correspondence between original file
names and translated ones.
- “Quit”: quit the panel without stopping the processes.
At this point you can decide to start one or both the processes. If you decide to start only the “reduced” process a window will pop up: it’s just a warning reminding you that raw files won’t be retrieved. Of course you can start the raw files retrieval whenever you want.
DataSubscriber will start the process(es) and will check that they start properly.
If there are no problems the related icon will become green and the counters will be updated.
Pushing the button “Show Log” an xterm window will come up showing the latest rows of the log
file.
In case of errors the icon (RAW and/or RED) will turn red. Have a look to the log and then click on
the icon to turn it green.
Push the “Stop” button to stop the process(es): this is the safest way to stop the processes, don’t use
kill.
16
dataSubscriber User’s Guide - 1.0
dataSubscriber User’s Guide - 1.0
3
17
The Header Translator
The Header Translator is a tool that facilitates the creation of a translation table, a table where you
copy a keyword giving a new name or create (add) a new keyword.
It is not possible to “move” or delete a keyword. What you can do is add new keywords, copy existing keywords, but not remove them.
With the Header Translator (ht) you can create a set of translation tables and store them on disk:
they will be available from the dataSubscriber.
A translation table will be used as input for FTU. Refer to “FTU - FITS Translation Utility User Manual (VLT-MAN-ESO-19000-2050)” for more information about FTU.
From the configuration panel of dataSubscriber, if you select the “Translation Template” checkbutton and push the “Define Table” button, a window will pop up:
Translation table
section
Keyword editing
section
Help bar
Common control
buttons
There are two sections, the “Translation table section” showing the translation you have created (or
you have loaded from the disk) and a “Keyword editing section” where you can actually add or
modify a keyword.
18
dataSubscriber User’s Guide - 1.0
In the “Translation table section” you have the following components:
Where:
-”Translation Table”: the default is your Observer Name, you can provide a different name choosing the “Save as” option in the option “File” of the menu bar. This name will appear in the menu
button of the Config panel of dataSubscriber.
-”Table listbox”: this listbox shows your translation table. On the right you see the old keyword on
the left the new, copied, keywords. If an “Old Header” entry is missing means that a new keyword
has been created, not copied.
-”Test Table”: the test table button is used to test your translation table. Pushing the button your
translation table will be applied to a fits file (provided by Eso) and the new header will pop up.
You can have a look to your header to see if your translation table is correct.
-”Delete Entry”: select an entry from the “Table listbox” and push this button to delete it.
You can make multiple choices:
<Left mouse button> = Select a line
<Control + Left mouse button> = Multiple selection
<Shift + Left mouse button> = Select line between the former and current selected line.
Under the menu button “Edit” in the upper part of the GUI there is an option called “Undo Deletion”: it “undo”s the last deletion you performed.
-”Predefined Translation tables”: this is a list of already defined translation tables (prepared by
USG). You can select one of them as a starting point to add or modify keywords. E.g. you can select
the table named “Imaging” and add the keyword EXPTIME or remove the keyword AIRMASS.
Note: you don’t modify the Imaging table, this is not writable, you will create a new table.
In the “Translation table section” you have the following components:
dataSubscriber User’s Guide - 1.0
19
Where:
-”Keyword to translate”: is an entry where you insert the Eso key you want to modify.
This part is a keyword browser. If you are not sure about the keyword you want to modify, just
type few letters and then press Return: a list of keyword matching your entry will appear in the
“Keyword listbox”. Click on the keyword to select it. A description of the selected key will appear
in the “Keyword listbox”.
-“Categories”: is an option button containing the main keyword categories. Select one of the main
categories and all the keywords related to that category will appear in the “Keyword listbox”.
-”New Keyword”: insert here the new name you want to assign to the key specified in “Keyword to
translate”. If the field ”Keyword to translate” is empty you will create a new keyword.
-”Type”: a keyword can assume one of these values: string, double, integer.
This menu button (like the entries Precision and ConstValue) are enabled only if you are creating a
new keyword. If you are copying an Eso keyword (“Keyword to translate” is not empty), these value will be the same of the original keyword and you’ll only add a new comment.
-”ConstValue”: a constant value assigned to your keyword. E.g. New Keyword = PI, ConstValue =
3.141
-”Comment”: a comment explaining the new keyword.
-”Clear” button: it’s used to clear all the entries. It’s useful if you want to create a new keyword instead copying a standard one.
-”Apply/Edit” button: it permits to add a new keyword or to modify an existing one.
To add a new keyword:
a) Push the “Clear” button to clean the entries
b) Fill in ALL the entries, leaving the “Keyword to translate” empty.
c) Push the “Apply/Edit” button. The new key will appear in the top listbox.
20
dataSubscriber User’s Guide - 1.0
To edit an existing keyword:
d) Select the keyword in the top listbox
e) Modify the entries
f) Push the “Apply/Edit” button. The modified key will replace the old entry in the top
listbox
There are three buttons on the bottom of the panel:
-”Ok”: accepts the new/modified table. It will pop up a window asking if you want to save the table if you haven’t do it.
“Save/Save as”: if you created a new table this button has the “Save as” value: you can define a
new name for your table. If you have already saved the table specifying a name, this button will assume the value “Save”. You can always change the file name using the menu bar option “File” and
choose the option “Save as”
-”Cancel”: it quits the panel discarding all the changes.
From the menu bar option “File” you can:
-”New”: create a new table. I cleans all the entry in the top list box and change the default file name
to <undefined>.
-”Load”: loads a new table. It pops up a file browser where you can select an header translation table. Header Translator performs a check to verify that what you are loading is a proper, not corrupted translation table.
-”Save”: save a translation table with an already defined filename. If the filename is <undefined>
this option is disabled.
-”Save as”: save a translation table specifying a filename.
NOTE: no extension will be appended to the filename. It’s is recommended to manually specify and
extension like .ht in order to keep visible the translation tables.
-”Quit”: It’s always disabled. This option is used to fix a bug in this tcl/tk version. Please use the
“OK” or “Cancel” button to quit the panel.