1
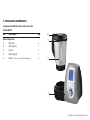
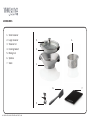
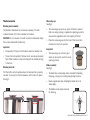
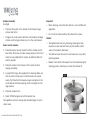
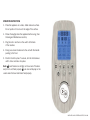
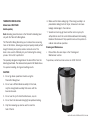
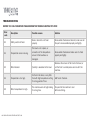
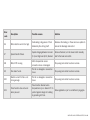
MULTI-FUNCTIONAL
KITCHEN APPLIANCE
INSTALLATION & OPERATION
INSTRUCTIONS
PRO-TP
WWW.PROAPPLIANCES.COM.AU
Congratulations on your purchase
of a ThermoPro Multi-Functional Kitchen Appliance
Note: Please read through the instructions carefully before using or installing the product and ensure that the
manual is kept in a safe place for future reference.
The system must be properly installed and located in accordance with the installation instructions before it is used.
CUSTOMER CARE: 1300 764 325
Aquaport Corporation Pty Ltd
70 Hardys Road
Torrensville SA 5031
Telephone: 08 8354 0711
www.proappliances.com.au
/proappliances
@proappliancesau
Electrical Requirements:
Australia / New Zealand 220V / 240V 50/60Hz
Due to manufacturing alterations product may
vary slightly from that pictured.
OPERATION CONDITIONS & SAFETY PRECAUTIONS
•
All components need to be installed in accordance with the
user manual instructions for correct performance of unit.
•
This appliance is not intended for use by persons (including
children) with reduced physical, sensory or mental capabilities,
or lack of experience and knowledge, unless they have been
given supervision or instruction concerning use of the appliance
by a person responsible for their safety.
•
Position the appliance at a minimum distance of 20cm away
from walls, curtains and other appliances and provide adequate
space above and on all sides for air circulation.
•
Do not operate or place any part of the appliance on or near
any hot surfaces (such as hot has or electric burner, or in a
heated oven).
•
Do not use this appliance for anything other than its intended
use. This product is intended for household use only.
•
Children should be supervised to ensure they do not play
with the appliance.
•
Switch unit off and unplug from wall outlet when not in use and
before cleaning.
•
Do not operate any appliance with a damaged cord or plug or after
the appliance malfunctions, or has been damaged in any manner.
•
Do not attempt to repair, disassemble or modify the appliance.
There are no user-serviceable parts.
•
If the supply cord is damaged, it must be replaced by the
manufacturer, its service agent or similarly qualified persons in
order to avoid a hazard.
•
Place the unit on an even and stable surface and ensure that
there is sufficient distance from the edge.
•
During the cutting or kneading process the unit may move due
to vibration, therefore do not leave the appliance unattended
while it is operating as it might fall from the work surface.
•
To protect against risk of electric shock and personal injury, do
not immerse cord, plugs, or appliance in water or other liquids.
•
Fully unwind the power cord before use. Connect only to
220V/240V power outlet.
•
Do not touch the blades when removing food from the bowl or
when removing the blades for cleaning as they are very sharp.
•
This appliance should be used in conjunction with a safety switch.
•
•
If an extension cord is used with this unit, the extension cord
must have a rating equal to the rating of this appliance.
•
Do not use attachments not recommended or sold by the
manufacturer as it may lead to fire, electric shock or injury.
CAUTION: Keep hands and utensils away from cutting blade
while chopping food to reduce the risk of injury to persons or
damage to the unit. A plastic or wooden scraper may be used
but only when the unit is not in operation.
INSTALLATION AND OPERATING INSTRUCTIONS 3
•
The appliance becomes very hot during steaming and may
cause burns when touched. Touch only the handles at both
sides of the steamer attachment.
Ensure that the blade sealing ring is in place and the blade
assembly is tightly fixed by the fixing bracket on the bottom.
Incorrect installation of this will cause food leakage and
damage to the unit.
•
Beware of hot steam that escapes from the steamer during the
steaming process and when you remove the steamer lid.
•
When steaming, ensure that the steamer is not over filled
with ingredients.
•
Pay attention to the capacity mark on the bowl. The food should
not exceed the maximum capacity of 2 Litres.
•
Do not use the steamer without the steamer lid in place.
•
CAUTION: should be taken when handling this appliance as
some surfaces may become hot during and immediately after
boiling. Severe burn may result from misuse.
System
Specifications
Rating
220-240V~, 50/60Hz, 1500W
•
Exercise extreme caution with moving any appliance containing
hot liquids or foods. Wait until the appliance has switched off
automatically, or switch it off manually before moving it.
Motor
Power 500W
Speed setting (rpm): 60-6500 rpm
Heating element
•
CAUTION: This appliance generates heat and escaping steam
during operation. Proper precautions must be taken to prevent
the risk of burns, fire and other damage to persons or property.
Power 1000W
Temperature setting (°C): 37-120°C
•
Use only the measuring cup to close the opening in the bowl lid.
•
If the blades get stuck, unplug the appliance before you remove
the ingredients blocking the blades.
•
4 INSTALLATION AND OPERATING INSTRUCTIONS
Weight
PRO-TP
N.W.: 7.16 kg
G.W.: 10 kg
A. INSTALLATION INSTRUCTIONS
Component identification and content check list:
Model PRO-TP
Ref
Description
Qty
Main Components
A
B
C
D
E
Main body
Blending bowl
Bowl lid
Measuring cup
Blade (not shown - located inside Blending bowl)
1
1
1
1
1
D
C
B
A
INSTALLATION AND OPERATING INSTRUCTIONS 5
ACCESSORIES
1. Small steamer
2. Large steamer
3.
4.
3. Steamer lid
4. Cooking basket
2.
5. Mixing tool
6. Spatula
7. Scale
1.
6.
5.
6 INSTALLATION AND OPERATING INSTRUCTIONS
7.
The Accessories
Blending bowl assembly:
The Stainless Steel bowl has a maximum capacity of 2L with
marked intervals of 0.5 litres indicated on the bowl.
CAUTION: Do not immerse it in water or place in dishwasher. Keep
the surface underneath the bowl dry.
Important:
•
The quantity of food put into the bowl should not exceed 2.0L.
•
The unit will not operate if the bowl is not securely and properly
fixed. Place the bowl on the main body with the handle pointing
to the front.
Blending bowl Lid:
The ThermoPro will not operate unless the bowl and lid is properly
secured. To secure, turn the lid clockwise until it clicks into place.
See Fig 1.
Fig 1
Measuring cup:
See Fig 2.
•
The measuring cup serves as a part of the lid to prevent
heat loss during cooking or ingredients splashing up and to
measure the ingredients with a full capacity of 100ml.
•
Place the measuring cup into the hole of the lid and turn
clockwise to lock it into position.
Fig 2
Important:
•
The measuring cup is the only part
which can be used to cover the round
opening in the lid.
Blade assembly:
See Fig 3.
•
The blade has a sharp edge and is intended for blending,
chopping, mincing, ice crushing and grinding functions.
•
Exercise great care when handling the blade due to its
sharp edges.
•
The blades can be easily removed
for cleaning.
Fig 3
INSTALLATION AND OPERATING INSTRUCTIONS 7
How to remove the blade:
See Fig 4.
•
Turn the bowl upside down and place a tea towel
inside the bowl.
•
Turn the fixing bracket anticlockwise, allowing the blade to drop
down onto the tea towel.
•
Important: Do not lose the black sealing ring between the
blade assembly and the bowl bottom.
Fig 4
•
To re-insert the blade ensure that the black sealing ring is in
place. Put the blade back into the bowl by pushing it through
the opening of the bowl. Hold the blade in place with one hand
while the other hand places the fixing bracket in place. Turn the
fixing bracket clockwise to lock the blade.
8 INSTALLATION AND OPERATING INSTRUCTIONS
Important:
•
The blade is very sharp. Please wrap the blade with a cloth
when assembling or removing the blade base.
•
Please make sure that the fixing bracket and the sealing ring
are in place and locked tightly with blade assembly. If the
sealing ring isn’t positioned correctly, the food inside the bowl
may leak out and cause damage to the appliance.
•
Do not use this blade in the Thermopro Mixing Bowl.
Spatula:
See Fig 5.
•
The spatula included is the only tool that is to be used to
scrape, mix or stir the food in the bowl (when the blades are
stationary).
•
Do not use other tools such as cooking spoons.
•
There is a small groove on the handle of the spatula, use it to
hold the cooking basket. (Fig 5)
•
Do not use it to mix in the bowl when the blade is operating.
•
Do not use the spatula if butterfly is attached.
Fig 5
Cooking basket:
See Fig 6.
Mixing Tool:
See Fig 7.
The cooking basket serves many functions:
•
As a sieve: Filter fruit and vegetable juice. After grinding or
making fruit puree with the appliance, put the basket into the
bowl to help pour out the juice.
The Mixing tool is ideal for whipping cream or beating egg
whites. It is also ideal for the preparation of creamy mixtures.
•
For stewing: Delicate food such as meatballs or fishballs that
are not suitable for preparation in the bowl should be placed
into the cooking basket. Here they can be stewed.
When installed on the blade, the mixing tool can help to mix the
food while preventing cutting from the blades, prevents the food
from sticking and allows for constant movement of ingredients.
•
Fix the mixing tool on the blade assembly by the hole, and
press it with enough force for a good connection and turn the
butterfly bar counterclockwise to hook it onto the blade.
To remove simply, turn clockwise to unhook from the blade
and pull the mixing tool off.
•
•
•
Cooking side dishes, such as rice, potatoes etc.
•
Use the small groove on the handle of the spatula to put in or
take out the cooking basket.
•
•
If you want to decrease the amount of liquid (e.g. reduce
a sauce) remove the measuring cup and place the cooking
basket upside down as a cover onto the lid. The cooking
basket as cover onto the lid instead of the measuring cup.
Important:
Caution: Beware of hot steam and splashing liquids that escapes
from the hole of the lid. Also exercise caution when removing the
cooking basket as it may be hot.
Fig 6
Fig 7
•
Do not start the appliance until the
mixing tool is fully fixed in place.
•
Do not use above speed 4 when
using the mixing tool.
•
Do not use spatula when using the
mixing tool.
•
Do not add ingredients into the bowl
when the appliance is working with the
mixing tool installed, otherwise the
mixing tool may be damaged or blocked.
•
Do not use the mixing tool to knead dough.
INSTALLATION AND OPERATING INSTRUCTIONS 9
Steamer Assembly:
See Fig 8.
•
There are three parts to the steamer: Small steamer, large
steamer and the lid.
•
The glass lid can be used on both the small steamer and large
steamer, and the large steamer can sit on the small steamer.
How to use the steamer:
1. Place the bowl on the unit and add 0.5 litres of water into the
bowl. Note: 30 minutes of steam cooking requires a 0.5 litre of
water, for every additional 15 minutes an additional 250ml of
water is required.
2. Place the steamer onto the bowl so that it seals the bowl
opening completely.
3. Loosely fill the tray(s) with ingredients for steaming. Make sure
that some slots remain open so that the steam can spread
evenly. Tip: Place food that requires longer cooking time in the
small steamer and foods requiring shorter cooking time in the
large steamer.
4. Place the steamer lid on.
5. Select ‘STEAM’ program and set the desired time.
The ingredients will start cooking when the water begins to boil in
steam mode.
10 INSTALLATION AND OPERATING INSTRUCTIONS
Important:
•
When steaming, ensure that the steamer is not over filled with
ingredients.
•
Do not use the steamer without the steamer lid in place.
Caution:
•
The appliance becomes very hot during steaming and may
cause burns when touched. Touch only the handles at both
sides of the steamer attachment.
•
The steamer cannot be used in a microwave oven or any other
electric appliance.
•
Beware of hot steam that escapes from the steamer during the
steaming process and when you remove the steamer lid.
Fig 8
OPERATION INSTRUCTIONS
1. Place the appliance on a clean, stable and even surface.
Do not position it too close to the edge of the surface.
2. Please thoroughly clean the appliance before using ( See
Cleaning and Maintenance section).
3. Plug the unit in and turn on the switch at the back
of the machine.
4. Firmly press down the bowl onto the unit with the handle
pointing to the front.
5. Position the lid in place. To secure, turn the lid clockwise
until it clicks and locks into place.
Note:
Lock failure icon will flash on the screen if the bowl
and/or lid is not fixed properly.
Lock Icon will display on the
screen when the bowl and lid are fixed properly.
INSTALLATION AND OPERATING INSTRUCTIONS 11
STOP/ CANCEL
•
When this button is pressed, the LCD back light will illuminate
and the lights around the knob will flash and goes into standby
mode. From here you can select the desired functions.
•
Press this button during the setting process and all settings
will be cleared and will return to standby mode.
•
Press this button during operation, and the appliance will stop
operation immediately and return to standby mode.
•
•
START/ PAUSE/ KNOB
•
After desired setting or program has been selected, press this
button to start operation.
•
Press this button during the operating process and the
machine will pause operation and go into standby. The LCD will
display
. During the pause, you can open the lid, take
away the bowl, etc. But it must be properly positioned before
re-starting. Press the button again and operation will continue.
Press this button during DIY recording process, and the
appliance will stop and cancel the recording.
•
The machine will turn off automatically if left idle for 10
minutes during PAUSE mode.
The machine will turn off automatically if left idle for 30
seconds during standby mode.
•
Turn this knob for selecting and setting the timer, speed,
temperature, heat power- increasing the value when turned
clockwise, and decreasing when turned anti-clockwise, or
choosing among the 15 auto programs.
12 INSTALLATION AND OPERATING INSTRUCTIONS
TIMER
SPEED
, indicating hour:
•
The LCD screen displays
minute: second.
•
To set the time, press the timer button and the minutes
and timer icon on LCD will flash; Turn the knob to adjust the
minutes. Press the timer button again, and the seconds will
flash- turn the knob to adjust the seconds. Press the timer
button again and the hours with flash- turn the knob to adjust
the hours from 1-12h.
•
Press the timer during the operating process, and the machine
starts to count down directly.
•
If no time is set, the unit will operate for 1 hour before
automatically stopping, however for some auto programs the
maximum working time is up to 12 hours.
•
If the motor is working or selected to work, the maximum
working time is 1 hour, with the exception with some auto
programs where maximum working time is up to 12 hours.
•
To adjust the speed, press this button during stand-by mode or
during the operating process (Note: some auto programs the
speed is fixed and cannot be adjusted).
The
signal on the LCD will flash, indicating that the speed
can be adjusted. Turn the knob to select desired speed.
•
Speed range from level 1-10.
•
The speed can be adjusted during the blending & heating
process, however if the temperature setting or the actual
temperature is over 60°C, the speed can only be adjusted from
speed 1 to 4. If it was working at high speed, it will drop to
speed 4 automatically.
•
Do not use above speed 4 when using the mixing tool.
•
The ThermoPro has 2 gears, so it is normal to hear a brief
noise before the motor starts working, or transferring the
speed between level 5 and level 6.
•
For crushing or chopping hard food or large volumes of food, it
is suggested to select speed 5 first and then turn to speed 10,
to avoid vibration.
INSTALLATION AND OPERATING INSTRUCTIONS 13
HEAT POWER
TEMPERATURE
•
To adjust the temperature, press this button during stand-by
mode or during heating process (Note: some auto programs
the temperature is fixed and cannot be adjusted).
•
While adjusting the temperature, the heat power setting will
automatically change to the default heating power for the
temperature level.
•
To change the heat power, press this button during stand-by
mode or during heating process (Note: some auto programs
the temperature is fixed and cannot be adjusted).
The
icon on the LCD will flash, indicating that the
temperature can be adjusted. Turn the knob to select desired
temperature.
•
The
signal on LCD will flash, indicating that the heat power
can be adjusted. Turn the knob to select desired heat power.
Temperature range: 37-120°C.
14 INSTALLATION AND OPERATING INSTRUCTIONS
•
Heat power range from level 1-10.
•
For some sticky foods, it is recommended that low heat
power is selected to reduce the risk of burning at the base
of the bowl.
•
If food volume is small and requires precise temperature,
selecting low heat power is recommended.
•
Low power will allow you to have precise control; High power
will heat quicker.
•
The unit will not operate if only heat power with no temperature
setting selected. It is suggested to follow the default heat
power setting when selecting different temperature levels.
•
During working of DIY program, all settings can be adjusted
freely, but it will not revise the recording.
•
Press STOP/CANCEL during recording, and the machine will
stop recording and abandon the records.
DIY
•
There are three DIY programs, for recording custom
settings for future use.
•
Press this button, and the icon
button again to select between
•
Recording: When the DIY icon flashes, press and hold DIY
button for 5 seconds, until the screen shows STEP:01
. Set desired speed, temperature, heat power, timer and press
DIY button again, it comes to STEP:02
; repeat until
finish setting, up to maximum STEP:20. When finished, hold
DIY button again for 5 seconds to save and record.
•
•
•
on LCD will flash. Press
To operate: Press DIY and select the desired DIY function, and
press START to start working as recorded.
Revise settings: During DIY setting, if the previous setting
needs revising, press DIY button, it goes from STEP:01 until
STEP:20 and returns back to STEP:01. You can revise the
setting of any step. After DIY recorded, repeat recording
process until the desired step to revise, and hold DIY for 5
seconds to keep the updated setting in memory.
PULSE
•
The Pulse function is for chopping and mixing ingredients at
maximum speed.
•
Press and hold this button for the required time (usually 3-4
seconds).
•
When the temperature in the bowl is over 60°C, PULSE cannot
be used.
•
Do not use mixing tool with this function.
•
Caution: When using this function, ingredients may splash and
might result in burns if the necessary caution is not taken. It
is therefore recommended to turn the measuring cup to lock
position when using Pulse.
•
When crushing ice or grinding hard food, press the button in
short bursts until the desired result is achieved.
During working of DIY program, the machine will stop for 10
seconds at the end of the step and will beep to allow you to
PAUSE the machine and add ingredients if needed. If left
idle during these 10 seconds, the machine goes to next step
according to the setting.
INSTALLATION AND OPERATING INSTRUCTIONS 15
MENU
•
Press the MENU button to access 15 auto programs.
•
Turn the knob to select the desired program.
•
For the programs QUICK SOUP, THICK SOUP, STIR, STEW,
REHEAT, BOIL, RICE, PORRIDGE, after completion, it will
show “End” on the screen. If left idle for 5 minutes,
it will enter WARM mode automatically for 12 hours
until manually stopped.
•
Some settings in certain auto programs are fixed and cannot
be adjusted.
16 INSTALLATION AND OPERATING INSTRUCTIONS
Programme
Description
Programme
Description
SMOOTHIE
All settings non-adjustable
STEW
Time adjustable from 1-12 hours
QUICK SOUP
Time adjustable from 15-60 minutes
WARM
Time adjustable from 1-12 hours
THICK SOUP
Time adjustable from 15-60 minutes
REHEAT
Time adjustable from 30-60 minutes
CHOP
Time adjustable from 1-10 minutes
BOIL
All settings non-adjustable
SAUTE
Time adjustable from 1-30 minutes
YOGURT
Time adjustable from 3-12 hours
STIR
Time adjustable from 5-60 minutes;
Speed adjustable from level 0-3;
Temperature adjustable from 90-120°C
RICE
All settings non-adjustable
KNEAD
Time adjustable from 5-20 minutes;
Speed adjustable from level 2-3;
Temperature adjustable at 0 or 37°C
PORRIDGE
All settings non-adjustable
STEAM
Time adjustable from 15-60 minutes
INSTALLATION AND OPERATING INSTRUCTIONS 17
CLEANING AND MAINTENANCE:
•
Clean the body of the machine with a damp cloth only.
Caution: Turn off and disconnect the machine from the power
supply before cleaning. Never immerse the main body in water or
other liquids.
•
Do not use harsh abrasives or chemicals to clean the machine.
•
Dry the machine before storing in a well-ventilated and
dry place.
CAUTION: Do not immerse the blending bowl in water or put in the
dishwasher. Keep the bottom of the bowl dry.
•
Ensure that the 6 contact pins at the bottom of the bowl are
always clean and dry.
•
Before using the Thermopro for the first time and after each
use, clean the machine, its components and accessories
thoroughly.
•
To clean the blending bowl, dismantle the blending bowl and
blade (refer to page 7-8).
•
Clean the inside and outside of the bowl (without the mixing
knife with cleansing agent and a soft sponge/cloth. The mixing
knife, spatula, mixing tool, steamer, measuring cup, bowl lid
and cooking basket can be cleaned in the same way.
Note: Remove the black seal ring prior to washing blade
assembly and ensure that both parts are dried before fitting
back together.
18 INSTALLATION AND OPERATING INSTRUCTIONS
THERMOPRO MIXING BOWL
Model Code: PRO-TP-MB
Sold Separately
Note: Kneading cannot be done in the ThermoPro blending bowl
only with the ThermoPro Mixing Bowl.
The ThermoPro Mixing Bowl helps you to reduce time consuming
tasks in the kitchen, allowing you easily and quickly create perfect
dough for bread, pizza, pasta, cookies and much more. This
bowl is also used to effectively stir your food during the cooking
process. Stir risotto to perfection!
The specially designed mixing blade in this bowl differs from the
blending bowl blade. The advanced and powerful flat blade allows
for superior kneading, stirring and sautéing results.
6. Make sure the black sealing ring of the mixing assembly is in
place before adding food into the jar, otherwise it will cause
leakage and damage to the machine.
7. Sometimes food may get stuck and the motor may stop for
self-protection due to the small distance between the kneading
blade and the bowl wall. Stop operation and use the spatula to
unblock and continue operation.
Cleaning and Maintenance
•
Please follow the same steps in the ‘Cleaning and
Maintenance’ section.
To purchase, contact customer service on 1300 764 325
CAUTION:
1. Do not go above speed level 4 when using the
ThermoPro Mixing Bowl.
2. Do not use a different blade assembly for this bowl,
only the mixing blade assembly that comes with this
bowl can be used.
3. Do not use this jar for hard food like bones, ice, etc.
4. Do not touch the bowl wall during high temperature heating.
5. Only the measuring cup can be used to cover the
hole of the lid.
INSTALLATION AND OPERATING INSTRUCTIONS 19
TROUBLE SHOOTING
BEFORE YOU CALL FOR SERVICE PLEASE REVIEW THE TROUBLE SHOOTING TIPS FIRST.
Error
code
Description
Possible reasons
Solution
E1
Safety switch not fixed.
Bowl or bowl lid is not fixed
properly.
Re-assemble the bowl and bowl lid, make sure all
the parts are assembled properly and tightly.
E2
Temperature sensor missing.
The bowl is not in place, or
connection of the temperature
sensor at the bowl base is
damaged.
Re-assemble the bowl and make sure it is fixed
properly and tightly.
E3
Motor blocked.
Quantity is exceeded in the bowl.
Decrease the volume of the food in the bowl, or
cut the food to smaller pieces and re-start the
machine.
E4
Temperature is too high.
No food in the bowl, or very little
food with high temperature setting
for a long period of time.
Add food in the bowl.
E5
Motor temperature too high.
The machine works at high loading
for a long time.
Stop and let the machine to cool
before restarting.
20 INSTALLATION AND OPERATING INSTRUCTIONS
Error
code
Description
Possible reasons
Solution
E6
Motor electric current too high.
Overloading or big pieces of food
blocked by the stirring shaft.
Decrease the loading, or Pause and use spatula to
remove the blockage and restart.
E7
Speed transfer failure.
Speed changing between low level
(1-5) and high level (6-10) blocked.
Remove the bowl, turn the lower clutch manually
and fix the bowl and restart.
E8
Motor NTC missing.
Motor temperature sensor
connection loose or damaged.
Stop using and contact customer service.
E9
Fan doesn't work.
The fan is damaged or connection
loose.
Stop using and contact customer service.
E10
Electric current for Fan is not
strong enough.
The fan is damaged or connection
loose.
Stop using and contact customer service.
E11
Pulse function does not work
when pressed
Pulse function blocked when
temperature in jar is above 60°C to
protect against danger of scalding
by splashing hot food.
Allow ingredients in jar to cool before trying again.
INSTALLATION AND OPERATING INSTRUCTIONS 21
Your Aquaport 24 Month
Repair or Replacement Warranty
Aquaport offers a 24 month repair or replacement warranty on
this product.
Conditions of this warranty:
1. This product has been fully installed in accordance with the
user manual installation instructions.
Aquaport warrants this appliance to the first purchaser and
subject to the stated conditions:
2. The warranty extends only to repairing or replacing any
component that proves to be defective in material or
workmanship.
Warranty covers any defects in material or workmanship in the
manufactured product within the first 24 months from date
of purchase.
3. The warranty does not cover defects occasioned by misuse,
alterations, and accidents or used for other than the intended
purpose.
To make a warranty claim you must call Aquaport on toll free
number 1300 764 325 for instructions.
4. The warranty does not cover damage to the product caused by
accident, fire or floods.
Product will be repaired or replaced at our discretion. Repair or
replacement costs will be covered under warranty by Aquaport.
5. Proof of purchase is required for warranty claims.
Goods presented for repair may be replaced by refurbished goods
of the same type rather then being repaired. Refurbished parts
may be used for the repair of goods.
Our goods come with guarantees that cannot be excluded under
the Australian Consumer Law. You are entitled to a replacement
or refund for a major failure and compensation for any other
reasonably foreseeable loss or damage. You are also entitled to
have the goods repaired or replaced if goods fail to acceptable
quality and the failure does not amount to a major failure.
22 INSTALLATION AND OPERATING INSTRUCTIONS
6. This unit is for household use only and warranty is not
extended to units used for commercial purposes
Please keep purchase receipt in a safe place
Customer Care 1300 764 325
Aquaport Corporation
70 Hardys Road, Torrensville SA 5031
Phone (08) 8354 0711
INSTALLATION AND OPERATING INSTRUCTIONS 23
MULTI-FUNCTIONAL
KITCHEN FOOD PROCESSOR
CUSTOMER HOTLINE: 1300 764 325
Aquaport Corporation Pty Ltd
70 Hardys Road, Torrensville SA 5031
Phone: 08 8354 0711
Facsimile: 08 8354 0722
Email: [email protected]
www.proappliances.com.au
/proappliances
@proappliancesau