1
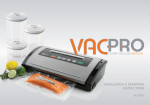
INSTALLATION & OPERATING
INSTRUCTIONS
ALI-VAC1
Congratulations on your purchase
of a VACPRO Home Vacuum Sealer.
Note: Please read through the instructions carefully before using or installing the product and ensure that the
manual is kept in a safe place for future reference.
The system must be properly installed and located in accordance with the installation instructions before it is used.
During the set up of this product if you have any questions/ comments/ issues
DO NOT RETURN TO STORE FOR SERVICE AND TECHNICAL ADVICE ON THIS PRODUCT FREE CALL 1300 764 325
CUSTOMER CARE: 1300 764 325
Alibaba Imports Pty Ltd
5 John St, Flinders Park
SA 5025 Australia
Phone: (08) 8354 0711
www.proappliances.com.au
/proappliances
@proappliancesau
Electrical Requirements:
Australia / New Zealand 240V / 230V 50Hz
Due to manufacturing alterations product may
vary slightly from that pictured.
INSTALLATION AND OPERATING INSTRUCTIONS 1
OPERATION CONDITIONS & SAFETY PRECAUTIONS
• All components need to be installed in accordance with the
user manual instructions for correct performance of unit.
• To protect against risk electric shock and personal injury, do
not immerse cord, plugs, or appliance in water or other liquids.
READ ALL INSTRUCTIONS CAREFULLY BEFORE OPERATION OF THE UNIT
• Fully unwind the power cord before use. Connect only to
230V/240V power outlet.
• This appliance is not intended for use by persons (including
children) with reduced physical, sensory or mental capabilities,
or lack of experience and knowledge, unless they have
been given supervision or instruction concerning use of the
appliance by a person responsible for their safety.
• This appliance should be used in conjunction with a
safety switch.
• Children should be supervised to ensure they do not play with
the appliance.
• Position the appliance at a minimum distance of 20cm
away from walls, curtains and other heat or steam sensitive
materials and provide adequate space above and on all sides
for air circulation.
• Remove and safely discard any packaging material and
promotional labels before using the VACPRO for the first time.
• Switch unit off and unplug from wall outlet when not in use and
before cleaning.
• Do not operate any appliance with a damaged cord or plug or
after the appliance malfunctions, or has been damaged in any
manner.
• Do not use attachments not recommended or sold by the
manufacturer as it may lead to fire, electric shock or injury.
• If the supply cord is damaged, it must be replaced by the
manufacturer, its service agent or similarly qualified persons in
order to avoid a hazard.
• Do not pull or carry the VACPRO by the cord.
2 INSTALLATION AND OPERATING INSTRUCTIONS
• Operate unit on a stable level flat surface, keep away from
moving parts. Ensure surface is clean and free from water, etc.
• Do not place the unit near the edge of a bench or table
during operation.
• Do not place the unit near an oven, heater, direct sunlight or
any other heat source.
• When disconnecting cord, to avoid injury, unplug by grasping
the plug and not the cord and ensure your hands are dry.
• Before cleaning, always turn the appliance OFF, switch off at
the power outlet, unplug at the power outlet and remove the
power cord, if detachable, from the appliance and allow all
parts to cool.
• Appliance does not require or use any lubricants, such as
lubricating oils or water.
• After use of the Food Vacuum, leave machine cover open for
unit to cool down before closing cover.
• Do not use outdoors or on wet surfaces.
Important: Do not store or leave appliance for extended periods
with the cover closed and locked into position. It may cause the
gaskets and seal profile to become compressed and compromise
the sealing ability of the unit. Always store the unit with the cover
closed but in the UNLOCKED position.
• If an extension cord is used with this unit, the extension cord
must have a rating equal to the rating of this appliance.
• Do not use appliance for other than intended purpose.
• Clean the VACPRO Lower and Upper Gaskets, Removable
Vacuum Chamber regularly. Also ensure these parts are
cleaned immediately after handling raw meat, poultry or fish.
• Do not reuse the VACPRO bags after using with raw meat,
fish or poultry or after the bag has been heated, ie. microwave
or simmer.
WARNING: BURN HAZARD. Sealing stripe will be hot after use, allow
strip to cool before touching.
• Do not wash canister cover. Wipe the unit with a soft
damp cloth.
• Keep the VACPRO bags away from babies and children to
eliminate a choking and suffocation hazard.
• Do leave the VACPRO unattended when in use.
• Keep the appliance clean. Follow the cleaning instructions
provided in this Instruction book.
INSTALLATION AND OPERATING INSTRUCTIONS 3
1
6
3
INSTALLATION & OPERATING INSTRUCTIONS
A. Vacuum Sealer Parts Identification
RefDescription
Main Components
14
7
1
Roll storage compartment
1
2
Cancel Button 1
3
Seal Button 1
4
Vacuum & Seal Button
1
5
Canister Button
1
6
Vacuum Seal Hose Port
1
7
Cover Release Buttons (located on each side of unit)
2
8
Double Sealing Stripe
1
9
Upper Gasket
1
10
Roll Cutter
1
11
Lower Gasket
1
12
Removable Vacuum Chamber
1
13
Sealing Profile
1
14
Roll Cutter Release Buttons (located on each side of unit) 2
15
Power Cord (located underneath unit)
4 INSTALLATION AND OPERATING INSTRUCTIONS
5
Qty
1
2
4
5
8
9
10
12
13
11
B. Preserving Food in Vacuum Bags
Note: Operate unit on a stable level flat surface, keep away from
moving parts. Ensure surface is clean and free from water. Do not
place the unit near the edge of a bench or table during operation.
6. Release Roll Cutter from underneath the cover by pressing the
left and right Roll Cutter Release Buttons simultaneously
(see Fig 2).
Note: If unit has been in storage with cover locked in place, before
operation of the unit allow the lower gasket (which would have
been compressed over time while in storage) to decompress back
into shape.
7. Slide Roll Cutter incision button from one side to the other to
cut the bag to length (see Fig 3).
1. Fully unwind the power cord and connect to a 230V/240V
power outlet.
8. To seal 1 end of the bag place an end over the Sealing Profile
and close cover so that two clicks can be heard to ensure
cover is fully closed.
2. Place preferred bag roll size into the Roll Storage Compartment
and secure the Roll Storage Compartment to the back of the
Vacuum Seal Unit.
Fig 3
3. Open the cover of unit by pressing the left and right Cover
Release Buttons simultaneously.
4. Thread bag from Roll Storage
Compartment through bottom
opening of cover (see Fig 1).
incision button
Fig 1
Fig 2
5. Pull out bag to desired length.
Note: You will require at least 3
inches of bag material more than
the item as this extra part will
form the seal.
INSTALLATION AND OPERATING INSTRUCTIONS 5
9. Push Seal Button and wait for seal indicator light to switch OFF
before opening cover. When indicator light switches OFF sealing
is complete. Remove bag (see Fig 4).
Note: Seal Button seals bag without vacuum operation.
WARNING: BURN HAZARD. Sealing profile may be hot after
action, allow to cool.
10. Place items for storage into the sealed bag.
Note: Do not put overload the Bag. Always allow enough space
at the open end of the bag to be properly placed into the
Removable Vacuum Chamber.
Note: Do not vacuum pack objects with sharp edges like fish
bones and hard shells. Sharp pointed objects may pierce and
tear the bag.
Fig 4
6 INSTALLATION AND OPERATING INSTRUCTIONS
Fig 5
Fig 6
11. Insert open end of filled bag into the Removable Vacuum
Chamber and over the Sealing Profile (see Fig 5).
Note: Ensure no items or food is covering the Sealing profile
and make sure bag has no wrinkles or ripples that will inhibit
the seal.
Note: The Removable Vacuum Chamber draws air out of the bag
and catches any liquid overflow. Lower Gasket and Removable
Vacuum Chamber should be cleaned regularly.
Always ensure these parts are cleaned immediately after
handling raw meat, poultry or fish. Removable Vacuum
Chamber is dishwasher safe.
12.Close cover so that two clicks can be heard to ensure cover is
fully closed (see Fig 6).
13. Push Vacuum & Seal Button and wait for seal indicator light to
switch OFF before opening cover.
Note: The Vacuum & Seal Button draws out air from bag and
automatically seals the bag after vacuum is complete.
The Upper and Lower Gasket keep air away by forming a
vacuum environment when closed together. Ensure upper and
lower gaskets are not crimped or out of shape or bags will not
seal properly.
Note: Vacuuming and Sealing Action can be cancelled at any
time by pressing the Cancel Button.
Note: If the item is becoming crushed by the vacuum pressure
push the Seal Only button during operation, it will start to seal
the bag and prevent more air being drawn out.
Note: If bag is not vacumable and sealable for some unknown
reason, the vacuum system will shut off automatically after
30 seconds.
16. Before repeating above steps 3-15 with a new bag and food
item, it is recommended that the appliance is allowed to cool
down for 1 minute for best sealing effect. Always wipe any
excess liquid or food residue after each bag package.
Important: Do not store or leave appliance for extended periods
with the cover closed and locked into position. It may cause the
gaskets and seal profile to become compressed and compromise
the sealing ability of the unit. Always store the unit with the cover
closed but in the UNLOCKED position.
14. Press the left and right Cover Release Buttons
simultaneously to open cover and remove bag (see Fig 7).
15. Refrigerate or freeze sealed food bag if needed.
Fig 7
INSTALLATION AND OPERATING INSTRUCTIONS 7
C. Preserving Food in Canisters
1. Ensure canisters are clean and dry.
Note: Do not immerse canister
lids in water, wipe with a damp
cloth only.
Fig 8
Note: If canister is not vacumable and sealable for some
unknown reason, the vacuum system will shut down
automatically after 2 minutes.
8. Remove Vacuum Seal Hose connection to the canister.
2. Remove Vacuum Seal Hose from
Roll Storage Compartment lid (see
Fig 8) and ensure Vacuum Seal
Cover is closed but not locked
on unit.
9. Repeat steps 2-6 for other canister to be sealed.
3. Fill canister with the item to be preserved and secure lid onto
the canister.
Note: Leave at least one inch from canister cover rim, and
make sure upper lid is already locked before vacuuming.
Note: Canister lids are not to be used in microwaves or in freezers.
4. Turn canister lid dial arrow to SEAL.
5. Connect one end of the Vacuum Seal Hose to the Vacuum Seal
Hose Port, ensure connection is pushed in tightly (see Fig 9).
6. Connect the other end of the Vacuum Seal Hose to the Vacuum
Seal Canister Lid ensure connection is pushed in tightly
(see Fig 9).
7. Press the Canister Button to draw out air from Canister through
hose attachment. Vacuum action will stop automatically when
all air has been drawn out from canister.
8 INSTALLATION AND OPERATING INSTRUCTIONS
10. When all canisters have been sealed remove Vacuum
Seal Hose Port and store back inside the Roll Storage
Compartment lid.
11.To open Canister after vacuum
packaging, turn the canister
lid dial arrow to OPEN. Wait
several seconds for the lid to be
released before removing.
Fig 9
D. Preserving Wine
Fig 10
1. Ensure Vacuum Seal Cover is closed but not locked and
remove Vacuum Seal Hose from Roll Storage Compartment
(see Fig 10).
2. Securely insert one Wine Stopper into the top of the opened
wine bottle (see Fig 11).
Note: Do not use on Sparkling Wine.
3. Connect one end of the Vacuum Seal Hose to the Vacuum Seal
Hose Port and the other end to the Wine Stopper in the wine
bottle; ensure connections are pushed in tightly (see Fig 12).
Fig 11
4. Press the Canister Button to draw out air from the wine
bottle through hose attachment. Vacuum action will stop
automatically when all air has been drawn out.
5. Remove Vacuum Seal Hose connection from Wine Stopper.
6. Repeat steps 2 -5 for other Wine bottles.
7. When all wine bottles have been sealed remove Vacuum Seal
Hose from Vacuum Seal Hose Port.
8. Store the Vacuum Seal Hose back inside the Roll Storage
Compartment lid.
Fig 12
INSTALLATION AND OPERATING INSTRUCTIONS 9
HINTS FOR BEST VACUMMING PERFORMANCE
1. Do not overload the bag; leave enough space at the open
end of the bag so that the bag can be easily placed over the
Sealing Profile and in the Removable Vacuum Chamber.
7. When using canister, remember to leave one inch from canister
cover rim, and make sure upper lid is already locked before
vacuuming.
2. To avoid overfilling, always leave at least 3 inches of bag
material between bag contents and top of bag. Then leave at
least one additional inch of bag material for each time you plan
to reuse bag.
Important: Do not reuse the VACPRO bags after using with raw
meat, fish or poultry or after the bag has been heated, ie.
microwave or simmer.
3. Clean and straighten the open end of the bag before sealing.
Make sure nothing is left on the open area of the bag and bag
has no wrinkle or creased lines. Foreign objects or creased bag
may cause difficulty in sealing the bag tightly.
4. Do not vacuum package objects with sharp points like fish
bones and hard shells! Sharp points may penetrate and tear
the bag! You may want to use a canister instead of a bag.
5. Allow appliance to cool down for one minute between each
sealing operation.
6. Clean the removable Vacuum Chamber and Gaskets after each
vacuuming operation.
10 INSTALLATION AND OPERATING INSTRUCTIONS
INSTALLATION AND OPERATING INSTRUCTIONS 11
FOOD STORAGE/PRESERVATION GUIDELINES
The VACPRO Home Vacuum Sealer will change the way you purchase
and store food. The VACPRO Home Vacuum Sealer removes air from the
specially designed VACPRO bags and canisters to create a commercial
quality vacuum.
The ease and convenience of preserving and extending the
freshness of your food with the Vacuum Sealer will become an
indispensable part of your food preparation.
The VACPRO removes air from specially designed bags and
canisters to extend food freshness up to 5 times longer than
conventional storage methods.
Oxygen and moisture in air causes food to degrade over time, by
removing the air before sealing items airtight the VACPRO extends
the life of food naturally.
Vacuum Sealing is not intended to replace the refrigeration or
freezing of foods, food should still be refrigerated or frozen if
normally required.
Important: It is best to Vacuum Seal fresh food, Vacuum Sealing
will not restore or revive food past its prime. Do not consume food
that has gone bad.
12 INSTALLATION AND OPERATING INSTRUCTIONS
FOOD PRESERVATION CHART
Note: Storage preservation chart are estimates only and should be
used as a guide only. The storage life will depend on the original
quality of the foods and the integrity of the packages seal.
Fridge
Conventional
Storage
VACPRO Home
Vacuum Sealer
Semi Hard Cheeses (Swiss,
Cheddar)
1-2 weeks
4-8 months
Hard Cheeses (Parmesan)
1-2 weeks
4-8 months
Lettuce, Spinach
3-6 days
2 weeks
Avocado (cut)
1-2 days
5-6 days
Blueberries
3-6 days
2 weeks
Other berries (black berries,
strawberries, Raspberries)
1-3 days
1 week
Freezer
Conventional
Storage
VACPRO Home
Vacuum Sealer
Beef, Pork or Lamb
6 months
2-3 years
Minced Meat
4 months
1 year
Poultry
6 months
2-3 years
Fish
6 months
2 years
Soups, Stews, Sauces
3-6 months
1-2 years
Vegetables
8 months
2-3 years
Berries
1-2 months
6-8 months
Pantry
Conventional
Storage
VACPRO Home
Vacuum Sealer
Nuts
6 months
2 years
Coffee Beans
6 months
1 year
Rice
6 months
2 years
Flour
6 months
1-2 years
Sugar
6 months
1-2 years
Chips
1-2 weeks
3-6 weeks
Cookies, Crackers
1-2 weeks
3-6 weeks
INSTALLATION AND OPERATING INSTRUCTIONS 13
HINTS & TIPS
• Before Vacuum Sealing, it is necessary to clean your hands,
and all utensils and surfaces to be used for cutting and
Vacuum Sealing foods.
• VACPRO Vacuum Bags and rolls are SIMMER/BOIL safe. Place
bag into pot of boiling water with the top of the bag above the
water for easy removal.
• Refrigerate or freeze perishable foods immediately, if they
have been vacuum sealed do not leave them sitting at room
temperature.
Note: Bags or rolls are not reusable if they have been microwaved
or simmered/boiled.
Note: It may be harmful if you consume foods which have been left
out at room temperature.
• Store dry foods such as nuts, biscuits or cereals, in a cool,
dark dry place.
• Vacuum Sealed bags prevent freezer burn. Foods that thaw
easily should be placed at the back of the freezer where it the
temperature is more constant. When thawing foods it is best
to thaw foods in the refrigerator. Never thaw meats, poultry,
fish or dairy at room temperature or in hot water. If thawing
food by microwave, foods should be cooked immediately after
processing to prevent bacteria growth.
• VACPRO Vacuum Bags and rolls are MICROWAVE safe, to
microwave cut off one corner of the bag so that steam can
escape and place in microwave.
14 INSTALLATION AND OPERATING INSTRUCTIONS
• To Freeze SOUPS and SAUCES pour liquid into a bag, allowing
at least 3 inches of space at the top of the bag (this allows
space for expansion of liquid when frozen and sealing space
for the bag). Do not seal at this point. Place the filled liquid bag
upright into a freezer, when liquid is frozen, remove bag from
freezer and Vacuum Seal.
• Vacuum Sealing FRUITS, for best results pre-freeze cut soft
fruit prior to vacuum sealing. This helps prevent the fruit from
being crushed during the vacuum process.
• VEGETABLES, for best results blanch vegetables in hot water
otherwise they may turn black. Blanch so that vegetables are
still crunchy, then transfer immediately into icy cold water to
cool. Drain and separate into convenient portions then vacuum
seal in bags.
HINTS & TIPS
• Vacuum Sealing POULTRY and whole FISH, for best results
wash poultry and pat dry with a paper towel. Then place foods
between two paper towels inside bag before Vacuum Sealing.
The paper towels helps to absorb excess moisture and juices.
• The canisters are a great solution for marinating meats in
minutes, not hours, as Vacuum Sealing opens the pores in
foods such as meat, poultry and seafood’s allowing foods to
absorb marinades at a fraction of the time.
• Vacuum Sealing red MEATS and fish fillets, for best results pat
dry with a paper towel. Then place foods between two paper
towels inside bag before Vacuum Sealing. The paper towels
helps to absorb excess moisture and juices.
• For the busy family, on-the-go meals can be prepared ahead
and Vacuum Sealed in individual servings, and ready to
heat anytime.
Note: Vacuum Sealing may cause meat to darken. This is due to
the removal of oxygen and does not indicate spoilage.
• The Vacpro Home Vacuum Sealer can also protect NON-FOOD
ITEMS from oxidation, corrosion and moisture. Simply store
and seal items in a VACPRO Vacuum Bag and follow the
“Preserving Food in a Vacuum Bag” instructions.
• Vacuum Seal items to help keep them dry, and take up
less room for storage. e.g. camping, batteries, important
documents, travelling and emergency equipment.
• Vacuum seal wet paint brushes between paint jobs without
cleaning, it keeps them moist and saves on clean up time.
• Prepare foods in advance for picnics and camping trips
or barbecues.
• To make an ICE PACK, pour water into a bag, allowing at least
3 inches of space at the top of the bag (this allows space for
expansion of liquid when frozen and sealing space for the bag).
Do not seal at this point. Place the filled liquid bag upright into a
freezer, when liquid is frozen, remove bag from freezer and Vacuum
Seal. Use for ice in the cooler, or ice packs for sports injuries.
• Primarily the VACPRO is used for vacuum sealing, however you
are able to reseal foil based bags such as chip and biscuit
bags using the Seal Only function.
• Use the canisters to store DELICATE ITEMS such as berries,
biscuits and salad leaves or use to store sauces or soups.
INSTALLATION AND OPERATING INSTRUCTIONS 15
CLEANING AND MAINTENANCE
It is important to ensure that all parts of your VACPRO sealing
system is cleaned on a regular basis.
Follow the care and cleaning guidelines below:
1. Always unplug the unit before cleaning.
2. Do not immerse appliance in water or any other liquid.
3. Do not use abrasive cleaners to clean the unit.
4. Wipe the outside of the unit with a damp cloth, sponge or mild
dish soap.
5. Wipe away food residue and water inside or around component
with a paper towel.
6. Dry thoroughly before use.
16 INSTALLATION AND OPERATING INSTRUCTIONS
Cleaning Removable Vacuum Chamber, and Lower Gasket:
Remove the Removable Vacuum Chamber from unit and clean with
warm soapy water and then rinse thoroughly. Alternatively place
Removable Vacuum Chamber in a dishwasher. Ensure Removable
Vacuum Chamber is completely dry before installing and using
in appliance.
Remove Lower Gasket from its indentation location and wash with
warm soapy water then rinse thoroughly. Ensure Lower Gasket is
completely dry before installing back into indentation location.
IT IS IMPORTANT that the lower gasket is not out of shape or
damaged in any manner otherwise air tight seal will not be formed
with Upper Gasket when cover is closed.
STORING YOUR VACUUM PRESERVATION SYSTEM
Cleaning Vacuum Bags:
Keep the unit in a flat and safe place, out of the reach of children.
Note: Do not reuse the VACPRO bags after using with raw meat,
fish or poultry or after the bag has been heated, ie microwave or
simmer.
Important: Do not store or leave appliance for extended periods
with the cover closed and locked into position. It may cause the
gaskets and seal profile to become compressed and compromise
the sealing ability of the unit. Always store the unit with the cover
closed but in the UNLOCKED position.
1. Wash bag material in warm water with a mild
dishwashing soap.
2. Alternatively, Bags can be washed on the top rack in your
dishwasher by turning the bag inside out. Stand bags up so
that the washing water can rinse the entire surface.
Cleaning Accessories:
(Including canister base, wine stoppers and hose accessories.)
1. Wash all vacuum accessories in warm water with a mild
dishwashing soap (except canister lids)
2. Canister bases (not lids) are top rack dishwasher safe.
Canister lids should be wiped down with a damp cloth and
must not be immersed in water.
3. Ensure all accessories are thoroughly dried before use.
Note: Canister lids are not to be used in microwaves or in freezers.
INSTALLATION AND OPERATING INSTRUCTIONS 17
TROUBLE SHOOTING
BEFORE YOU CALL FOR SERVICE PLEASE REVIEW THE TROUBLE SHOOTING TIPS FIRST.
Problem
Possible Cause
Solution
Nothing happens when I
press the vacuum sealer
1. Power cord not plugged in.
1. Make sure the power cord is correctly plugged into the electrical
outlet, and in the “on” position.
2. Power cord is damaged.
1. The bag has not been
placed correctly inside
the Removable Vacuum
Chamber.
Air is not removed from the
bag completely
18 INSTALLATION AND OPERATING INSTRUCTIONS
2. Debris covering sealing strip
or gasket. Sealing strip or
gaskets may be out of place.
2. Check power cord and plug, and make sure they are not damaged
in any way. If damaged, do not use the vacuum sealer.
1. To seal properly, open end of bag should be resting entirely inside
the Removable Vacuum Chamber.
2. Check sealing strip and gasket beneath the lid for debris and wipe
clean and smooth them back into place.
3. Bag may have a hole.
3. To test, seal the bag with some air in it, submerge in water, and
apply pressure. If there are bubbles present, it does indicate a leak
and a new bag should be used.
4. Unit cover has not been
closed properly.
4. Open cover and reclose cover ensuring two clicks are heard to
ensure cover is closed completely.
Problem
Possible Cause
Solution
1. Wrinkles, crumbs, grease or liquids may cause leaks along the
seal. Reopen bag, wipe the top inside of the bag and smooth it out
along the sealing strip before resealing.
1. Bag not sealed properly.
Vacuum sealer bag loses
vacuum after being sealed.
2. Moisture or juices from
foods.
3. Bag has a hole.
2. Check if there is moisture or juices from the food present within the
bag, if yes, you may need to cut open the bag and reseal it, or use
an entirely new bag. Foods with excess liquids should be frozen
before vacuum sealing.
3. If items with sharp edges, they may have punctured the bag, and
released the vacuum. Cushion sharp edges in the contents of the
bag with paper towels.
Vacuum sealer not sealing
bag properly
1. Sealing strip is too hot.
2. Seal Only function still active
or needs to reset.
1. Lower & Upper gaskets are
not forming an air tight seal.
The canister will not vacuum
2. Canister lid dial not in SEAL
position.
3. Accessory hose not correctly
attached to Vacuum Seal
Hose Port or canister lid.
1. If sealing strip over heat and melted the bag, it’s necessary to lift
the lid and allow sealing strip to cool for a few minutes.
2. Before re-pressing the “seal only” key, allow the unit to resume for
15 seconds.
1. Ensure that rubber gasket ring on is free from food content.
2. Gently turn the canister lid dial arrow to SEAL position.
3. Make sure accessory hose is securely into Vacuum Seal Hose Port
on appliance and canister lid.
INSTALLATION AND OPERATING INSTRUCTIONS 19
Your Alibaba Imports 12 Month Repair or Replacement Warranty
Conditions Of This Warranty:
libaba Imports warrants this appliance to the first purchaser and
A
subject to the stated conditions:
1. This product has been fully installed in accordance with the user manual installation instructions.
Warranty covers any defects in material or workmanship in the
manufactured product within the first twelve months from the date of
purchase.
2. The warranty extends only to repairing or replacing any component that proves to be defective in material
or workmanship.
To make a warranty claim you must call Alibaba Imports on toll free
number 1300 764 325 for instructions.
3. The warranty does not cover defects occasioned by misuse,
alterations, accidents, or used for other than the intended
purpose.
If a product is found to be faulty there is a 90 day return policy
from the date of purchase. Product returned to store MUST be
accompanied by a valid proof of purchase and Customer Reference
number received from Alibaba Imports. Call 1300 764 325.
4. The warranty does not cover damage to the product caused by
accident, fire, or floods.
5. Proof of purchase is required for warranty claims.
For warranty claims outside of 90 days from date of purchase, product
will be repaired or replaced at our discretion. Repair or replacement
costs of the product will be covered under warranty by Alibaba
Imports.
Please keep purchase receipt in a safe place.
Goods presented for repair may be replaced by refurbished goods of
the same type rather than being repaired. Refurbished parts may be
used to repair the goods.
Alibaba Imports Pty Ltd
5 John St, Flinders Park
SA 5025 Australia
Phone: (08) 8354 0711
Our goods come with guarantees that cannot be excluded under
the Australian Consumer Law. You are entitled to a replacement or
refund for a major failure and compensation for any other reasonably
foreseeable loss or damage. You are also entitled to have the goods
repaired or replaced if goods fail to be of acceptable quality and the
failure does not amount to a major failure.
20 INSTALLATION AND OPERATING INSTRUCTIONS
Customer Care 1300 764 325
INSTALLATION AND OPERATING INSTRUCTIONS 21
CUSTOMER HOTLINE: 1300 764 325
Alibaba Imports Pty Ltd
5 John St, Flinders Park
SA 5025 Australia
Phone: (08) 8354 0711
/proappliances
@proappliancesau
www.proappliances.com.au