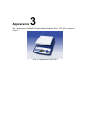
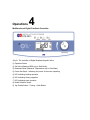
1
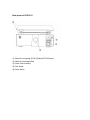
HARMONY
Digital Hotplate Stirrer
Written for HTS-2013
User’s Manual
LMS Co., Ltd.
Introduction
1
Thank you for purchase of HARMONY Digital Hotplate Magnetic Stirrer.
lHARMONY Digital Hotplate Stirrer is high performance digital controlled
hotplate and/or magnetic stirrer. HARMONY Digital Hotplate Stirrer has many
superior features as follows;
Digital feedback control for accurate/constant RPM.
Feedback control for the temperature of the hotplate
Feedback control for the temperature of the liquid sample in the vessel
(optional PT100 sensor required).
Precise and accurate temperature control : Max 400℃, ±2℃
Digital timer function : Max 199 hours 59 minutes.
Slow start function to prevent overflow of the liquid sample in the vessel.
Digital LCD to monitoring the status of instrument.
Multiple-functional Jog Shuttle switch adopted.
Storage function for the set-value of rpm, temperature and timer.
Safe-mode for stable experiment - invalidating the input of Jog Shuttle switch
Free voltage power supplier by adopting SMPS.
Package Contents
2
HTS-2003, Digital Hotplate Magnetic Stirrer .…..…………………..……….………………
1
SS 100, Direct contact Temperature Sensor (PT100) .………..……….………………
□
RD 100, Stand Rod ………………………………………………………..……….………………
□
CL 220, Holder + Clamp for the use of SS 100 Temp. Sensor ………………………
□
Power Code ……………………………………………………………………..…………………….. 1 ea
User’s Manual ……………………………………………………………………………………1 ea
Appearance
3
The appearance of HARMONY Digital Hotplate Magnetic Stirrer, HTS-2013 is shown in
<Fig 1>.
<Fig. 1> Appearance of HTS-2013
Operations
4
Multifunctional Digital Feedback Controller
<Fig.2> The controller of Digital Hotplate Magnetic Stirrer
① Operation Status
② Set Value (Measured RPM only in Safe Mode)
③ Measured Value (Measured Temperature only in Safe Mode)
④ Power Bar-Graph : indicating the power of the motor operating
⑤ LED indicating Heating operation
⑥ LED indicating Stirring operation
⑦ LED indicating timer operation
⑧ Model Selection Switch
⑧ Jog Shuttle Switch : Turning + Push Button
Back plane of HTS-2013
⑨ Socket for connecting SS 100 (Optional PT100 Sensor)
⑩ Holder for the Support Rod
⑪ Power Code connector
⑫ Fuse Socket
⑬ Power Switch
⑨
⑩
⑪
⑫
⑬
Operation Guide
1. Power-On : Turn on the power switch, and then the HTS-2003(H/S) get into its
default mode.
2. Mode Selection: HTS-2003 series could have 4 different Modes including Default
Mode. You can change the mode by click MODE switch ⑦.
HTS-2013 (Hotplate / Magnetic Stirrer) : 4 Modes are available
⑴RPM Mode, ⑵Temp. Mode, ⑶Timer Mode, and ⑷Locking Mode.
Default mode is the ⑴RPM Mode.
RPM Mode.
HTS-203 and HTP-2002 have 2 different kind of temperature control functions
depending on the use of SS 100 (optional PT100 sensor).
A. If you use SS 100 to measure the temperature of liquid sample in the
vessel, embedded digital feedback controller considers its control goal as
the temperature of liquid sample. And the measured value displayed on
the LCD is the temperature of the liquid sample.
B. If you don’t use SS 100, the controller considers its control goal as the
temperature of the hotplate itself. HTS-2003 (HTP-2002) automatically detects the
existence of SS 100.
In <fig. 2>, ②Set Value and ③Measured Value have different meaning for each
operation mode. It is shown in the following <Table 1>.
Setting mode
Set Value
Measured Value
Control Target
RPM Mode
Set(Saved) Speed
(rpm)
Set(Saved)
Temperature
Set(Saved) Time
Current Temperature
Current Speed
(rpm)
Current
Temperature
Time remained
Current Speed
Stirring Speed (rpm)
Temp. Mode
Timer Mode
Locking Mode
<Table 1> the meaning of digit by mode
Temperature of
Hotplate or Sample
Operation time
Display only
3. RPM Mode / Temp. Mode
A. After you turn on the power and select one of the RPM mode or Temp
Mode, you can see the Set Value is zero or non-zero on LCD panel.
i. If the setting value is non-zero, it means someone has saved a value
previously. You can use the saved value or you can modify the value
by turning the jog-shuttle. Simply by clicking jog-shuttle, the unit
begins to revolve at the set rpm or to heat to the set temperature.
ii. If the setting value is 0, it means there is not stored value. You can
adjust the set rpm or temperature by turning jog-shuttle. In this case,
the unit immediately begins to revolve at the set rpm or to heat to the
set temperature without clicking the jog-shuttle.
B. RPM (Temperature) adjustment : When you turn the jog-shuttle for
adjustment of rpm or temperature, the set value is changed first, and then
the measuring value goes after the set value. It shows that WiseStirTM
Hotplate Magnetic Stirrer series is feedback controlled by digital controller.
(Control resolution: 1 rpm for speed, 0.5℃ for temperature)
C. Pause and Restart Function: If you click the jog-shuttle during stirring
operation in RPM mode, the unit stop stirring (Pause Status). If you click
again in this pause status, the unit restart to operate.
D. Saving current set value: You could save current rpm (temperature) in
your operation by clicking the jog-shuttle for one second. Hotplate
magnetic stirrer stores the set value while it is turned off, so you could
reuse it.
4. Timer Mode
A. You can use internal digital timer to preserve your current operation status
during the set time. After the set time, the controller makes each
operation stop. So you have to set up the operation modes (rpm and
temperature that you want) before you set up timer.
B. Setting Timer : To set up the timer, you have to enter the Timer Mode by
clicking the mode select button, and then turning the jog-shuttle to adjust
timer. Click (push and then release immediately) the jog-shuttle after
turning to set required value. When you enter the Timer Mode, you could
see a time set before. You are able to use that value itself, or to modify by
turning the jog-shuttle.
C. Start and pause timer: To start the timer, click the jog-shuttle. During the
operation of timer, the remained time is shown. Click again to pause the
timer.
D. Restart overall operations: After end of the set time, the timer makes all
operation pause. Therefore you must release the pause of each operation
mode by click the jog-shuttle, if you want to restart overall timer
operations
5. Locking Mode
After you complete to set up rpm, temperature and timer, you can make the unit
enter the Safe Mode by click mode select button. In safe mode, it is shown
current measuring temperature in setting value digit, and current measuring rpm
in measuring value digit. And all inputs are disabled from jog. If you want to
release monitoring mode, click the mode select button.
6. Power off
After you complete to use the unit, you must turn off the power switch for your
safety.
Safety Instructions
5
Please confirm that the proper power is supplied (AC 100-230V ,
50/60Hz , Single phase)
The machine must be standing on a stable, even surface that is as
sleep-free as possible.
Avoid allowing objects to push or strike the hotplate or stirring plate of
the machine.
You have to use Hotplate magnetic stirrer at indoor environment, to
preserve temperature between 5℃ and 40℃.
The hotplate is made of ceramic-coated aluminum. Although the
ceramic coating prevent the plate from erode by acid chemical, pay
attention not to be stained with acid or basic material.
If you may touch the hotplate with hands, Confirm the current
measuring temperature is below 70℃ from LCD display.
Please be careful that liquid should not penetrate into the part of control
panel or back plane.
Flammable materials or Chemicals must not be used in order to avoid
an explosion or a fire.
Please use the machine in clean environment for use with long lifetime.
Specifications
6
WARRANTY STATEMENT
The full warranty for the device is 12 month from the date of sale.
During this period of time the device will be repaired or exchanged without charge.
Warranty is not applied to device with the damaged manufacture’s number,
damaged seal, or due to incorrect exploitation, storage or transport of device.
If you have any questions concerning the exploitation and repairmen of the Hotplate
Stirrer, please contact Sale representative, or the Manufacturer.
CERTIFICATED OF SALE OF EQUIPMENT
Name of company
Address
Model Number
Description
Serial Number
Date of Sale