1
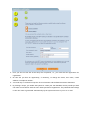
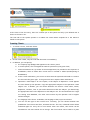
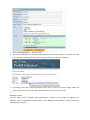
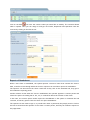
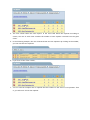
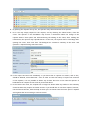
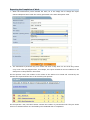
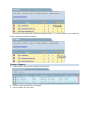
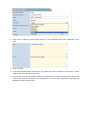
ProFM Helpdesk Manual Brief User’s Manual Contents Review ................................................................................................................... 2 Registration ............................................................................................................. 2 Sending the application for registration ....................................................................... 2 Confirming the application for registration ................................................................... 3 Signing-in ............................................................................................................ 5 Operator Interface .................................................................................................... 5 Creating Clients ........................................................................................................ 6 Creating Users .......................................................................................................... 9 Reports of Breakdowns .............................................................................................. 11 Handling Requests .................................................................................................... 13 Distribution of Work .................................................................................................. 16 Commencement of Work ............................................................................................ 18 Reporting the Completion of Work ................................................................................ 20 Closing of Reports .................................................................................................... 21 Properties of the Project ............................................................................................ 23 Language Setting ..................................................................................................... 24 Review By means of the ProFM Helpdesk program, you can manage your clients’ reports of breakdowns and distribute your maintenance crew’s work. The program differentiates between three different types of users: Operator, who is fully authorized to handle the requests. He or she admits each client as well as other users with right of operation and right of maintenance, Repairman, who carry out the work in relation to the individual requests, and Requester, who can report the individual breakdowns on the client’s portal. Registration The user can create his or her own operating portal during registration. This includes a complete dedicated database and, initially, one user with complete right of operation. Sending the application for registration 1. First, go to http://www.cmmsservice.com. 2. Then click on the “Take a try - ProFM Helpdesk” icon. 3. Fill in the required information, then click Send. 4. The window that appears within a few minutes shows that the application for registration has been recorded by the system and that the letter necessary for the confirmation of the application has been sent to the e-mail address given. 5. Next, by clicking on the link given in the letter, confirm the application for registration. Confirming the application for registration 1. By clicking on the link given on the sign-in page, you again enter the web site. 2. Here you can see that the second step was completed; i.e., you confirmed the application for registration. 3. On this site you have an opportunity, if necessary, to change the name, user name, e-mail address or telephone number. 4. You need only to read and accept the Service Contract and the Data Protection Statement. 5. By clicking I Accept, you enable the system to create your own database and to provide you with full-scale access thereto with the user name specified at registration. The password that belongs to the user name is generated automatically by the system and sent to you in an e-mail. Signing-in 1. The data required for signing-in (user name, password) is sent to you by the system in an e-mail. 2. The e-mail includes a link to the sign-in page in case you signed out from the program. If you stayed on the registration page, you can get to the sign-in page by clicking Sign In. 3. Keep the e-mail sent by the system at hand and copy the data into the fields on the sign-in page. 4. Click Sign In. Operator Interface After signing in, you get to the operator interface since the automatically-generated user is given full-scale authority, i.e., he or she has a right of operation. The operator interface helps your everyday work by providing information about the status of each request. At the time of the first entry, there are no data yet in the system and only a pre-defined user is shown in the users’ list. The first task of the system operator is to admit the clients whose requests he or she wants to handle in the system. Creating Clients 1. To create a client, click New Client. 2. Of the client’s data, only the code and the name are mandatory. 3. In addition, you can specify: a. the company logo (badge) that appears on the client’s portal b. a contact person, who is assigned the tasks of operation by the given client, c. useful information can, by means of the message board, be provided to the reporters of breakdowns, which is shown when a new event is created or edited (see Reporting of Breakdowns) d. at the e-mail notification, you can set in what cases the system should send an e-mail to the user with the given right – if the given user later requires those notifications. e. Operators e-mail subject. At new request, in the subject of Operator’s e-mail appears the text chosen by the Operator. Copy the appropriate subject to the Operators e-mail subject row. In default, you can choose between five choices: Client name, Status, Requester, Location, Text. If you would choose more than one subject, you should copy the appropriate texts to the Operators e-mail subject row. The text between the % signs are coming from Database, the other texts written by the Operator will be appear without changes. f. the language of the Client. As default, the language of the project is selected. g. You can set the type of the License here. Currently, you can choose between two possibilities: Free license and Free, unlimited license. The free, unlimited license allows unlimited rights for every roll for one month. After one month, this license can be extended for one more month free of charge. The Free license can be used for 3 years and allows one right for every roll (Operator, Repairman, Requester). After the expiration date, both of the free licenses can be extended by paying conversation. For more information, click the License information button. 4. If the required data are completed, click Save. 5. The operator will receive an e-mail about the creation of the client in any case. 6. The e-mail will include a link where the reporters that belong to the client can send their request. 7. If you select Send Notification about the Creation of the Client, the contact person will also get a notification about the creation of the client, which will also include the above-mentioned link. 8. If the system allows for requests by people other than the contact person, the link can be forwarded to the reporters that belong to the client. 9. After the creation of the client, you will return to the operator’s page, where you can immediately see your newly admitted client. 10. The numbers next to the clients pertain to the various status of the request belonging to the given client. For a detailed description please see the chapter entitled Handling of Requests. 11. The clients’ data can be edited by clicking on the small pencil icon shown next to the client. 12. The link through which the client’s reporters can send their reports of breakdowns can also be reached on the editing page. Creating Users The system supports several kinds of work processes. If the operator does not have a maintenance co-worker, he or she can operate the system on his or her own without the need to add other users to the system. If, however, you would like the system to track which task is assigned to which maintenance person and also the status of the tasks, it is recommended that the maintenance crew be entered as users. 1. To add new users, click New Person on the right hand side. 2. Among the users’ information, provide the first and last names, user name, contact addresses and what rights you wish to assign to the given user. You can provide several e-mail addresses, in which case you have to separate them by semi-colons or commas (supported only in Premium Edition). This option is most advantageous if, for example, the cell phone service provider offers mobile e-mail service. In this case, the system will send any notification about new requests and required modifications to both the cell phone and the e-mail address. 3. In this case, select Maintenance right. 4. Select Send Notification..., and click Send. 5. The newly established user receives a notification that the system operator created a user with his or her name and the user also receives the data that are required for signing in. 6. By clicking on the sign-in point specified in the e-mail, you get to the sign-in page, where you have to provide your user name and password that you received in the e-mail. 7. Managing licenses You can assign Clients, Operators and Repairmen to contracts in the project, by signed in as Operator. Click on the Manage licenses button. In the Manage licenses window, you can see former and available contracts. Click on the Edit icon near the contract what you would like to modify. The Licenses details table is opened. Here you can assign to and get out Clients, Repairmen and Operators from the contract by clicking on the blue arrow. Reports of Breakdowns When a new client is established, the system operator receives a letter that contains the client’s data, as well as a link through which the client’s reporters can send their reports of breakdowns. The operator can then inform the client’s staff that if they click on the attached link, they get to the breakdown reporting portal. Another solution is that when the client is established, the operator appoints a contact person and selects the option of sending him or her, too, a notification about the creation of the client. In this case, the contact person either reports the breakdowns to the system or forwards the link received, so that any person from the client can report breakdowns. The reporters do not need to sign in, or provide user name or password; they simply need to click on the link received from the operator or the client’s contact person, and they can make the reports on the page shown. 1. To make a report, click on the link received in the e-mail to get to the client’s reporting site. IMPORTANT! If you try out the program functions from the same computer, i.e., if you sign in as an operator at one time and you use the system simply as a reporter of breakdowns another time, you always have to sign out at every change-over by clicking Sign Out in the top right hand corner of the page. (This button is shown only if you are signed in into the system either as an operator or a maintenance person with your user name and password.) 2. To make a new breakdown report, select New Request. 3. After providing the details, click Send. Please note. The system stores in ”cookies” the reporter’s name, e-mail address and whether he or she requests notification. When making a new report, these data are automatically filled in, but can be modified. 4. You can see your newly sent report in the request list. Please note. The reporters belonging to a client will be able to see one another’s reports since the reporters of breakdowns are not identified individually. 5. You can set different filters in the top row of the request list as Status, Date and time and Requester name. 6. Click on the underlined Headers of the list and the events will be placed in alphabetical order, click again to reverse order. 7. The colors of the lines containing certain events are related to the statuses of them, highlighting the solution levels of the events. 8. Choose or click on the identification number of the event to recall the details of the event. 9. Click on the 10. Click on button to print out the details to printer or pdf. button in the header and the filtered list will be printed. Handling Requests 1. The operator can follow on the summary screen which requests require action. 2. There are two summary charts: one that shows the requests according to clients, and one that shows the requests according to users. 3. Both charts comprise five columns with certain numbers in their rows. Icons mean the status of the request, as the following: New requests Due jobs Drawn jobs Overdue jobs Complete requests 4. The first column shows the new reports. In the chart that shows the requests according to clients, the row of each client contains the number of new requests received from the given client. 5. In the following example, the row of Sunset shows two new requests. By clicking on the number, you can view the two requests. 6. If you click on the client’s name, 7. You can view the complete list of requests that the numbers in the client’s row represent. That is, you will see 2+2+0+0+2=6 requests. 8. By opening the requests one by one, the operator may choose between three options: 9. He or she may simply respond to the request, and by choosing the Closed status, close the event. The reporter of the breakdown may receive a notification about the change of the request status if that option was selected during the editing of the client; after reading the notification, the reporter may respond thereto. In this case, the reporter has to click Reply after opening the event, then click Save. The dialogue box contains a summary of the users’ and operators’ responses along with their times. 10. If the report has been sent mistakenly or you know that it requires no actions, and in fact, should be deleted, select Returned. Since in order to track the history of reports we retain all of the requests, it is not possible to delete any of them. But even in this case the reporter of breakdowns can respond to the event as per Point 9 above. 11. In the former two cases, the request will no longer be shown under any number in the summary charts because they require no further actions. If you would like to view that request, however, use the Search function, with the help of which you can choose from the entire pool of requests and organize the list according to various criteria. Distribution of Work 1. If the reporter of breakdowns sees that a breakdown request requires action and a maintenance person is needed for the repair of the breakdown, he or she may set the status of the request to Requested. 2. He or she then selects which maintenance person has to carry out the work and when the work is planned to be commenced and completed; also he or she has to provide a brief description of the work to be done. Please note. The operator may choose himself or herself as the maintenance personnel because the system supports system operation even by one operator. 3. The operator sees whether the reporter of breakdown requested a notification about the change of the breakdown request data. He or she may change or approve the notification request by selecting Notifying the Reporter of Breakdown. 4. If you click Save, the system will store the request with its new status. Please note. If the selected person is not the operator himself or herself, the system will send an e-mail to the person about the work he or she is assigned. 5. Depending on the setting, the reporter of breakdown receives a notification about the change of the breakdown request data. 6. Then, by returning to the operator’s site, you can see that the previous two new requests were reduced to one and three jobs appear in the Due Jobs column . 7. That is because the second column contains the due work or work in progress. Commencement of Work 1. If you wish to sign in as a maintenance person, keep at hand the e-mail received from the system about the creation of the new user with a right of maintenance. 2. Click on the link provided in the sign-in point in the e-mail. 3. The maintenance personnel can view the current works assigned to them on their own interface. 4. The works assigned for the present day include the above-mentioned work scheduled by the operator. To commence the work, set the status of the request and print the work order. 1. Click on the pencil icon at the beginning of the row to edit the request. 2. Change the status of the request to In progress , then click Save. 3. The request status changes and the color code also show that you are taking care of the request. 4. You can print the work order by clicking on the work order icon at the end of the row. Reporting the Completion of Work 1. When the maintenance person finishes the work, he or she simply has to change the report status to Reported and record the activity performed in the work description field. 2. The maintenance personnel may even return the work if they know for sure that they cannot carry it out. This may happen when, for example, the report includes an incorrect address or the description of the problem is inaccurate. On the operator’s site, the number in the column of the works to be closed will increase by one because the reported works have to be closed by the operator. On the operator’s site, the third column contains the number of protracted works. They are works that were commenced but not concluded by the scheduled date of completion. The fourth column shows the number of postponed works, i.e., works that were not commenced by the scheduled commencement date. Closing of Reports 1. As an operator, enter the list of reports to be closed. 2. Find the report mentioned in the example. 3. Select Closed in the edit menu. 4. Then write a response to the original reporter of the breakdown about the completion of the work. 5. Then click Save. 6. If you selected Notification of Reporter, the system will send a message to the reporter’s e-mail address about the closing of the report. 7. The reporter receives a notification about the response to the report. By opening the event, the reporter can view the response in the dialogue box. He or she may respond by completing the Response field and clicking Save. Properties of the Project You can view and modify the properties of the project on the operator’s main site. This page shows the data of the user that created the project (first and last names, user name, email address and telephone number), the name of his or her company, and the language of the project. Apart from the user name and the company name, all of the data can be modified. Language Setting The textual components of the user interface can be displayed in any one of three languages: English, Hungarian, and German. The sites contain three buttons for the selection of the language. Depending on which site you change the language, it is considered user, client, or project setting, and is saved as that. The current language of the interface also depends on that setting. If a site requires user identification, it is displayed in the language set for the given user. If there is no such setting, the project setting will be used. If there is no project setting either, the language set as favorite in the browser will be used. If that language does not belong to the supported languages (English, Hungarian, German), the page is displayed in English. If you are on the client’s page, you will use the language set for him or her; on the sign-in page, the project’s language is prevailing.