1
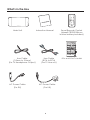
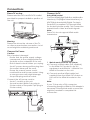
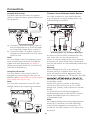
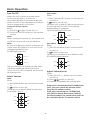
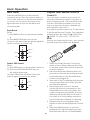
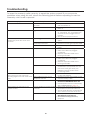
Contents What’s in the Box......................................................................................................... 2 Important Safety Instructions..................................................................................... 3 Identifying the Parts.................................................................................................... 6 Main Unit: Top View .............................................................................................................. 6 Rear View............................................................................................................................... 6 Smart Remote Control.......................................................................................................... 6 Getting Started............................................................................................................ 7 Prepare the Smart Remote Control..................................................................................... 7 Precautions Concerning Batteries....................................................................................... 7 Connections................................................................................................................ 8 Place TV on top..................................................................................................................... 8 Connect to Power................................................................................................................. 8 Connect to TV........................................................................................................................ 8 Connect to an External Audio Device.............................................................................. 10 Basic Operations....................................................................................................... 11 Turn On/Off........................................................................................................................... 11 Select Sources...................................................................................................................... 11 Adjust Volume Level............................................................................................................ 11 Mute Sound.......................................................................................................................... 12 Bass Boost............................................................................................................................. 12 Select SRS Sound.................................................................................................................. 12 Program Smart Remote Control to Control TV................................................................. 12 Troubleshooting......................................................................................................... 13 Specifications............................................................................................................ 14 1 What’s in the Box Main Unit Instruction Manual Smart Remote Control (Maxell CR2025 lithium button battery included) 50kg 53cm Line Cable (3.5mm to 3.5mm) (For TV Headphone Output) AC Power Cable (For EU) Line Cable (RCA to RCA) (For TV Line out) AC Power Cable (For UK) 2 DOs and DON’Ts Leaflet Important Safety Instructions WARNING RISK OF ELECTRIC SHOCK DO NOT OPEN Indicates that ‘there is a possibility of causing death or serious physical injury if this Product is erroneously handled’. Caution! Indicates that ‘there is a possibility of causing physical injury*1 or occurrence of physical damage*2 if this Product is erroneously handled’. CAUTION: TO REDUCE THE RISK OF ELECTRIC SHOCK, DO NOT REMOVE COVER (OR BACK). NO USER-SERVICEABLE PARTS INSIDE. REFER SERVICING TO QUALIFIED SERVICE PERSONNEL. The lightning flash with arrowhead symbol, within an equilateral triangle, is intended to alert the user to the presence of uninsulated “dangerous voltage” within the product’s enclosure that may be of sufficient magnitude as to constitute a risk of electric shock to persons. *1: Serious physical injury implies injuries such as loss of eyesight or injury, burns, electric shock, bone fracture or poisoning that have subsequent complications and which require hospitalization or long term hospital visit for medical treatment. *2: Physical injury implies injury, burns and electric shock which do not require hospitalization or long-term hospital visit for medical treatment. Examples of symbols used in this manual The exclamation point within an equilateral triangle is intended to alert the user to the presence of important operating and maintenance (servicing) instructions in the literature accompanying the apparatus. Reading the user’s manual • • • • • • Warning! The contents of this user’s manual may be modified without any prior notification. The appearance and specifications may be partially modified without any prior notification. The Company shall not be responsible for any injury caused by fire, earthquake or a third party, as well as any injury that occur due to intentional or accidental mishandling or improper use by the customer. Company shall not be held responsible for any damages that may occur due to employment of a usage method not designated in the user’s manual. Company shall not be held responsible for any damages that may occur due to malfunctioning of the Product resulting from the use of this Product together with other devices. This Product is not intended for use in facilities and equipment which may affect human lives, including medical equipment, nuclear devices, aerospace equipment and transport equipment, as well in facilities and equipment which require a high degree of reliability. Company shall not be held responsible for any accident resulting in personal injury or death or any fire accident that may occur due to failure of this Product when this Product is used in the control systems of those facilities and equipment. This symbol shows that the user needs to exercise caution while handling this Product to prevent fire, explosion and heating. The specific caution to be taken is written inside the symbol. This symbol implies restriction of an action while handling this Product. The specific restriction is written inside or near the symbol. This symbol implies compulsion of an action based on the instructions. The specific compulsion is written inside or near the symbol. Warning To reduce the risk of electric shock, do not expose this apparatus to moisture. Warning The battery (battery or batteries or battery pack) must not be exposed to excessive heat such as sunshine, fire or the like. 3 Important Safety Instructions Warning! Caution! Do not repair, modify or disassemble. It may cause fire, electric shock or injury. The Don’t Company shall not be responsible for any physical damage caused by repairing, modification or disassembly. Also, any repairing of a fault caused by repairing, modification or disassembly by the user will be charged, even if it happens during the warranty period. Keep the Product (Remote Control) out of reach of children. Don’t They may accidentally swallow the battery and cause choking and damage the stomach. The cord may entangle around the child’s body and cause suffocation. If any accident occurs by any chance, please consult a doctor immediately. Do not use in a rainy or snowy place, by the waterside or in the bathroom. Don’t It may cause fire or electric shock. Do not use if it is thundering. It may cause fire or electric shock. Do not keep a flower vase, flowerpot, cup, or any container containing medicine, cosmetics or water, near the Product. They may break and get into the Product and cause fire or electric shock. Do not insert any kind of metal or easily combustible object through the aperture. It may cause fire or electric shock. Do not block any ventilation openings. It may get heated and cause fire. Install in accordance with the manufacturer’s instructions. Do not put more than 50kg on top of this apparatus. It may damage the apparatus. Do not use a wrong power plug out of the 2 power cords provided for this apparatus. It may damage the power plug and/or the power socket. It may cause fire or electric shock. Do not keep in a shaky place. The Product may fall and get damaged. Do not keep in a place where lampblack or steam falls. It may cause fire or accident. Do not keep in a place which is directly hit by cold air, or a place which is extremely cold. Dew may fall and cause short circuit or burnout. Do not listen in high volume continuously for a long time. Do not listen in high volume, which causes ringing in the ears, continuously for a long time. It may damage hearing. Do not raise the volume excessively from the beginning. Sudden high volume may damage hearing. Minimize the volume before playing. Do not keep in an excessively hot place. sush as radiators, heaters, stoves, or other apparatus (including amplifiers) that produce heat. The surface of the device or parts may get damaged, and may also cause fire. Do not keep especially in a closed car in summer, and in a place where sunlight directly falls or near a stove. This may cause leakage of battery fluid. Do not use in sandy beaches and sandy soil where sand can easily enter, or in dusty locations. It may cause burnout, fire or accident. Do not cover or wrap with a cloth or futon. Heat may get generated and deform the Product, or Product may catch fire. Don’t Don’t Don’t Don’t Do not keep a cathode-ray tube near it. Spots may appear because of it. Ensure to refer the user’s manual to connect to an external device. Connect to an external device after carefully reading this user’s manual and the user’s manual of the external device, as well as after turning off the power. Do not plug or unplug the power plug with wet hands. It may cause electric shock. Insert the power plug completely and firmly into the outlet socket. If the power plug is not inserted properly, fire may occur due to electric shock or dust deposition. Turn off power when repairing or if not going to be used for a long time, and remove the power plug. Hot adhering to this may cause electric shock or physical damage. Don’t Don’t 4 Don’t Don’t Don’t Don’t Don’t Don’t Don’t Don’t Don’t Don’t Don’t Don’t Disconnect the power supply Important Safety Instructions Safety 1 2 3 4 5 6 7 8 9 13 This apparatus is not intended for use by persons (including children) with reduced physical, sensory or mental capabilities, or lack of experience and knowledge, unless they have been given supervision or instruction concerning use of the apparatus by a person responsible for their safety. Children should be supervised to ensure that they do not play with the apparatus. - Never use the device unsupervised! Switch off the device whenever you are not using it, even if this only for a short while. - The apparatus is not intended to be operated by means of an external timer or separate remote-control system. - If the supply cord is damaged, it must be replaced by the manufacturer, its service agent or similarly qualified persons in order to avoid a hazard. - Do not immerse this product in liquid. Read these instructions. Keep these instructions. Heed all warnings. Follow all instructions. Only use this product indoor. Clean only with a dry cloth. Protect the power cord from being walked on or pinched particularly at plugs, convenience receptacles and the point where it exit from the apparatus. Only use attachments/accessories specified by the manufacturer. Use only with a cart, stand, tripod, bracket or table specified by the manufacturer, or sold with the apparatus. When a cart is used, use caution when moving the cart/ apparatus combination to avoid injury from tip-over. 10 Refer all servicing to qualified service personnel. Servicing is required when the apparatus has been damaged in any way, such as power-supply cord or plug is damaged, liquid has been spilled or objects have fallen into the apparatus, the apparatus has been exposed to rain or moisture, does not operate normally, or has been dropped. 11 This is CLASS II apparatus with double insulation and no protective earth provided. 12 The mains plug is used as the disconnect device, the disconnect device must remain readily operable. 5 Identifying the Parts Main Unit: Top View Smart Remote Control 1 - Turn on this unit or switch to Power standby mode. 2 - Select a source. 3BASS/SRS - Either select Bass boost level 1,2 or no Bass boost effect; or - Switch on or off the SRS WOW HD effect 4 - Increase sound volume level. 5 - Decrease sound volume level. 6 Light indicators 1ON/OFF - Turn on or turn off the unit. 2HDMI - Select an HDMI audio input source from HDMI 1, 2 and 3. 3 VOL+/- (Volume) - Adjust sound volume level 4Optical/ARC - Select OPTICAL source or activate Audio Return Channel (ARC) function. 5 RCA/LINE IN Select RCA or LINE IN Source input. 6 TV Learning Zone - Store some TV Remote Control functions onto the Smart Remote Control. (see P.12 for detail) 7 LEARNING INDICATION LIGHT. - On: Learning mode activated - Off:Learning mode inactivated (see P.12 for detail) 8LEARN - Activate learning mode to setup commands from the TV remote control, to control some TV functions. 9MUTE - Mute or resume sound from the unit. 10BASS - Select Bass boost level 1,2 or no Bass boost effect. 11SRS - Switch on or turn off SRS WOW HD effect. Rear View 1 HDMI IN Socket - Total 3 HDMI connectors compatible with HDMI version 1.4 or below. 2 HDMI OUT Socket - 1 HDMI connector compatible with HDMI version 1.4 or below. 3 OPTICAL Terminals - 1 Optical input jack. 4 RCA Terminals - Standard RCA audio input jack. 5 LINE IN Terminals - Standard 3.5mm audio input jack. 6 AC~ Power Plug - Connect a power cord. 6 Getting Started Prepare the Smart Remote Control Precautions Concerning Batteries The Smart Remote Control provided allows the unit to be operated from a distance. Even if the Smart Remote Control is operated within the effective range (6m), remote control operation may be impossible if there are any obstacles between the unit and the remote control. If the Smart Remote Control is operated near other products which generate infrared rays, or if other remote control devices using infrared rays are used near the unit, it may operate incorrectly. Conversely, the other products may operate incorrectly. When the Smart Remote Control is not to be used for a long time (more than a month), remove the battery from the Smart Remote Control to prevent it from leaking. If the batteries leak, wipe away the leakage inside the battery compartment and replace the batteries with new ones. Do not use any batteries other than those specified. Do not heat or disassemble batteries. Never throw them in fire or water. Do not carry or store batteries with other metallic objects. Doing so could cause batteries to short circuit, leak or explode. Never recharge a battery unless it is confirmed to be a rechargeable type. For First-time use: The unit has a preinstalled lithium CR2025 battery. Remove the protective tab to activate the remote control battery. To Replace the Smart Remote Control Battery: (A): Press down the flip on the left. (B): Pull out the battery tray and remove the old battery. (C): Place a new CR2025 battery into the battery tray with correct polarity (+/-) as indicated. (D): Insert the tray back into the slot. 7 Connections Connect to TV Place TV on top Using HDMI socket Connect HDMI(High Definition Multimedia Interface), DVI(Digital Visual Interface), or HDCP(High-bandwidth Digital Contents Protection)-compliant TVs through HDMI for the best picture quality. This connection transmits both video and audio signals. Note: Some TVs do not support HDMI audio transmission. Please read the DOs and DON’Ts Leaflet provided for proper installation position of the unit. 30cm (Cable not supplied) 53cm Warning: Please turn down the volume of the TV, or other sources before connection. Loud sound might be suddenly produced. AV equipment e.g. Blu-ray Player HDMI OUT Connect to Power HDMI OUT Caution: Risk of product damage! - Ensure that the power supply voltage corresponds to the voltage printed on the back or the underside of the unit. - Risk of electric shock! When you unplug the AC power, always pull the plug from the socket. Never pull the cord. - Ensure the correct power cord is matched the main power socket. Using a wrong power cord might damage the power plug and the socket. HDMI IN (Cable not supplied) 1 Watch movie from blu-ray player a)Connect a HDMI cable (not supplied) to the HDMI OUT socket on the AV equipment and HDMI IN 1, HDMI IN 2 or HDMI IN 3 socket on the unit. b)Connect another HDMI cable( not supplied) from the HDMI OUT socket on the unit to the HDMI IN socket on the TV. Note: If your TV has only a DVI connector, connecting through a HDMI-to-DVI adapter is necessary. Extra optical audio connection might be needed to complete this connection. Connect the AC power cord to: - the AC~ socket on this unit. - the wall socket. (British 3 pin plug to 3-hole socket or European 2 pin plug to 2-hole socket) EU or UK 8 Connections 2 Watching broadcasting TV program using TV supporting ARC a) If you want to watch a TV program and listen to the sound with this unit and a TV that supports HDMI Audio Return Channel (ARC) function you do not need any extra connection. b) Use HDMI version 1.4 cable for connection. c) Connect to the HDMI(ARC) socket on TV. HDMI (ARC) HDMI IN Customer Electronics Control(CEC) function Please check the setting of your TV HDMI function to see whether CEC function is available. If your TV has CEC function in HDMI. - Switch off the TV, the unit will also switch off immediately. - Play your Blu-ray player, the unit and TV will switch on immediately. Note: If it is not functioned, please select the correct HDMI input source manually with the Smart Remote Control or on the unit. Or check the compatibility of CEC function on your TV. Using Optical IN socket If your TV does not have HDMI sockets, please follow the set up below. 3 Watching broadcasting TV program using TV that does not support ARC If you want to watch TV programme and listen the sound with this unit, but your TV does not support ARC function, you will need an additional audio cable (HDMI/Optical/RCA/Line-in cable) to connect from the audio output of the TV to the audio input of the unit. or Composite video (Cable not supplied) AV equipment e.g. Blu-ray Player (Cable not supplied) Component video (Cable not supplied) LINE OUT A B C a) Connect Optical output source into the unit. b) Connect Video output of the AV equipment into the Video input of TV via either, 1) Component connection (Green, Blue, Red)(not supplied); or 2) Composite connection (Yellow)(not supplied). Note: You can listen to the TV program sound from connecting to the unit via LINEIN cable (see HDMI connection point 3.a) connection (C) and (D) in P.9 for reference) HDMI OUT D (Cable not supplied) (Cable not supplied) a. Connect either: (A) HDMI output (TV) to HDMI input (! /@ /# ) (unit) via an HDMI cable (not supplied); or (B) Optical output (TV) to Optical input (unit) via an Optical cable (not supplied); or (C) RCA output (TV) to RCA input(unit) via RCA-to-RCA cable; or (D) LINE-OUT/Headphone(TV) to LINEIN(unit) via LINE-IN cable. 9 Connections Connect to an External Audio Device Using RCA IN socket For audio devices that do not support HDMI or Optical output, please follow the set up below. You can connect to your audio devices, e.g. CD player, to enjoy purely music, via the following conections. (Cable not supplied) (Cable not supplied) AV equipment e.g. DVD recorder (Cable not supplied) a) Connect Composite Video output of the AV equipment e.g. DVD recorder to Composite Video input on the TV. b) Connect Audio L-R output of the AV equipment to the LINE IN or RCA input onto the unit. Note: You can listen to the TV program sound from connecting to the unit via LINE-IN cable as shown previously on page 9, HDMI connection point 3.a, Connect (C) and (D) for reference ) HDMI OUT Audio Equipment, e.g. CD player, MP3 player An auto-on/off function is featured on this unit. Auto-off is to shut down the unit when no sound is playing for a few minutes And Auto-on, when there are sounds input, the unit will switch on automatically after a few seconds. Warning: If the volume of the TV or an external device via RCA or LINE IN is too low, the auto-off function will be triggered. When this situation happens for 2.5 minutes, the LED Using Line-IN socket You can listen to the sound of the TV program by connecting to the unit via LINE-IN cable. (see HDMI connection point 3a) connection (D) on P.9) Note: You can also connect to your PC with LINE-IN cable in the setup shown below. the next 30 seconds and the unit will switch to standby mode. Please turn up the volume of the input source (not the unit, but, e.g. TV or MP3 player, etc.) slowly, until it returns to normal mode. To avoid the auto-off being triggered unintentionally, pre-set the source volume higher and adjust the unit volume to a comfortable level. Note: You might hear the sound over-lapping from both the TV and the unit while following some of the suggestion connections. To avoid this, turn the volume of TV down to 0 or mute it. VGA IN VGA OUT HEADPHONE (Cable not supplied) 10 Basic Operation Turn On/Off Optical/ARC Either, 1) Press Optical/ARC button on the remote control; or 2) button on the unit, will allow you to select Optical source input or activate ARC function for watching broadcasting TV program. OPTICAL/ARC light indicator: When the unit is given an audio signal to any source input, it will turn on automatically after 5 seconds. Make sure audio sound is in an intermediate loudness level to trigger auto-on function. Turning the System ON/OFF Either, 1) Press the button on the unit; or 2) Press the ON/OFF button on the remote control. Note: When turning the system on, the system will continue in the mode was set last time. Note: Be sure to unplug the power cord from the outlet when the system is not in use for an extended period of time. POWER light indicator: OPTICAL/ARC White Either, 1) Press RCA/LINE IN button on the remote control; or 2) button on the unit, will allow you to select RCA or LINE IN source. RCA/LINE IN light indicator: Standby Source Amber RCA/LINE IN RCA Source White Amber LINE IN Source White The unit will switch to standby mode when the audio cables are disconnected or when you turn off TV/external device after several minutes. Either, 1) Press HDMI button on the remote control; or 2) button on the unit, will allow you to select HDMI source input from HDMI 1,2 or 3. If the unit is connected to the TV headphone jack, you can control the Volume Level using the TV remote control. If the unit is connected to TV HDMI jack with CEC(Customer Electronics Control) function enabled. The sound of the unit can be controlled by the TV remote control. HDMI IN White HDMI 2 Red HDMI 3 LINE IN Either, 1) Press the VOL +/- button on the remote control; or 2)Press / button on the unit, to increase or decrease the volume level. HDMI HDMI 1 RCA Adjust Volume Level Select Sources Amber ARC(Audio Return Channel) RCA/LINE IN POWER/SOURCE RED OPTICAL Amber 11 Basic Operation Mute Sound Program Smart Remote Control to Control TV Press the MUTE button on the remote control to mute. Press this button again or VOL+/VOL- buttons on the remote control or on the unit to resume the sound. The light indicator on the unit will blink until sound resumes. You can store a total of up to seven of your most frequently used TV functions in the TV learning zone of the Smart Remote Control. This feature enables you to use only one remote control to operate the unit together with your TV. The remote control codes of a TV are stored in the Smart Remote Control. The available preset buttons are ON/OFF , FUNCTION , ENTER, TV VOL+/VOL-, TV CH+/CH-. NOTE: During the learning process, the normal remote control functions are disabled. Bass Boost Either, 1) Press BASS button on the remote control; or 2) Press BASS/SRS button on the unit, to turn on the bass. Press this button again to switch to level 2 or to turn it off. BASS Bass off Amber Bass 1 White Bass 2 Select SRS Sound Either, 1) Press SRS button on the remote control; or 2) Press and HOLD BASS/SRS button on the unit for 3 seconds, to select SRS WOW HD effect. Press this button again to cancel the effect. SRS OFF Amber OPEN 12 1 Place the Smart Remote Control (A) within a 5mm-50mm distance from the TV remote control (B), pointer to pointer as shown above. 2 Press and hold the LEARN button for 2 seconds to activate the learning mode. A red indicator on the Smart Remote Control (A) will light up. 3 Press one of the TV learning zone buttons on the Smart Remote Control (A), the red indicator flashes. 4 Press the button on the TV remote control (B) that is to be stored on the Smart Remote Control (A). When the code is received successfully, the red indicator will quickly flash for 3 times, If the code is not successfully received, the red indicator will keep on flashing. 5 Repeat steps 3-4 to program more functions onto the Smart Remote Control (A). 6 Press the LEARN button to save the setting and to exit the learning mode. Red indicator will turn off immediately. Troubleshooting To keep the warranty valid, never try to repair the system yourself. If you encounter problems when using this unit, check the following points before requesting for service. Warranty void if case is opened. Symptom Likely Cause What to do No sound Speaker not connected to active • Verify that speaker is connected and AC power that the circuit is on. Power not switched on • Switch on power and verify that power LED is on. Suddenly No sound Triggered auto-off function • Turn the volume up of the source, e.g TV, mp3 player, etc, and readjust the sound of the unit to trigger auto-on function. • See No Sound symptom above. No sound, speaker is connected to Cannot trigger auto-on function • Increase the volume of the source input working AC power but sound won’t signal. come on Speaker power cable is faulty or • Re-seat the power cable at both ends. improperly connected • Substitute a known-good power cable. Blown fuse • Contact with your manufacturer for repair. No sound. Speaker comes on Faulty cables and connections • Disconnect and re-seat signal cables. • Make sure cables are plugged completely. • Replace suspected cable with a known-good cable. Noise or hiss heard at output Faulty Cables and connections • Disconnect and re-seat signal cables. • Make sure cables are plugged completely. • Replace suspected cable with a known-good cable. Noisy source device • Disconnect the devices that are connected to your speaker one at a time. If the noise goes away, the problem is with the source or the connecting cable. • Disconnect or mute the other channels Hum or Buzz that increases or decreases Interference internally when more than one source are to solve the problem. inputting single to the unit at the same Faulty cable between source • Substitute a known-good cable for the time equipment and unit suspected faulty cable. Smart Remote control does not work No/Low battery power • bottom of Smart Remote control. • Insert/Replace remote control battery with a CR2025 battery. (see P.7) The Unit does not responds to the No/Low signal from remote control • Reduce the distance between the remote control to the unit Smart Remote control and the unit. • Aim the Smart Remote control directly at the sensor on the front of the unit. The unit responds but no sound • Before you press any function button, • See Troubleshooting [No Sound] Symptom. 13 Specifications General Power Requirements............................................................................... AC 220-240V~50/60Hz Output Power: Front Speakers............................................................................................................. 10W x 4 Woofer...............................................................................................................................30W Total Harmonic Distortion...................................................................................... 1%(1kHz, 1W) Audio Input Sensitivity/Impedance LINE: ............................................................ 600mV/47kΩ Frequency Response................................................................................ 40Hz - 20kHz(+/- 3dB) Unit Dimensions (W x H x D)............................................................................ 720 x 54 x 340mm NET Weight............................................................................................................................3.4kg Speaker Front Impedance.............................................................................................................................. 3 Ω Rated Power...........................................................................................................................10W Woofer Impedance.............................................................................................................................. 6 Ω Rated Power...........................................................................................................................30W Remote Distance....................................................................................................................................6m Angle........................................................................................................................................ 30O Digital signal input/output information Digital Sampling frequency............................................................................................... 48kHz HDMI signal format................................................................................................................PCM Warranty: 1 year Design and specifications are subject to change without notice. 14