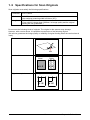
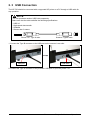
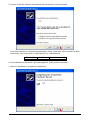
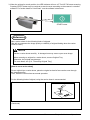
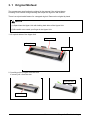
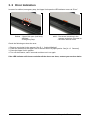
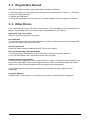
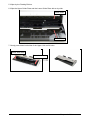
1
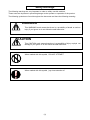
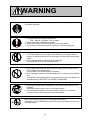
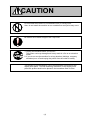
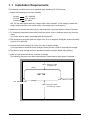
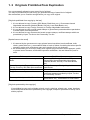
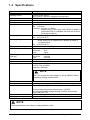
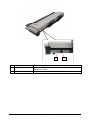
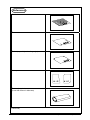
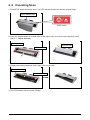
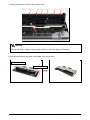
KIP 720 User Manual
Ver. A.1
Thank you for purchasing KIP 720.
This USER'S GUIDE contains functional and operational explanations for KIP 720.
Please read this USER'S GUIDE carefully before using KIP 720.
Please keep this USER'S GUIDE for future reference.
Installed in USA
This device complies with part 15 of the FCC Rules. Operation is subject to the following two
conditions: (1) This device may not cause harmful interference, and (2) This device must accept
any interference received, including interference that may cause undesired operation.
Installed in Europe
This equipment complies with the requirements in Pub.22 of CISPR Rules for a Class A
computing device.
Operation of this equipment in a residential area may cause unacceptable interference to radio
and TV reception requiring the operator to take whatever steps are necessary to correct the
interference.
Warning
This is a class A product. In a domestic environment this product may cause radio interference in which
case the user may be required to take adequate measures.
Do not install the Machine around other electric equipment or precision instruments.
This may be affected by electrical noise or vibration during operation.
If the Machine is installed near other electric equipment, such as TV or radio, interference to
said equipment, such as noise or flickering may occur.
Use a separate power line and install the Machine as far as possible from said equipment.
As an ENERGY STAR ® Partner, Katsuragawa Electric Co., Ltd. has determined
that this product meets the ENERGY STAR ® guidelines for energy efficiency.
The International ENERGY STAR ® Office Equipment Program is an international program that
promotes energy saving through the penetration of energy efficient computers and other office
equipment. The program backs the development and dissemination of products with functions that
effectively reduce energy consumption. It is an open system in which business proprietors can
participate voluntarily. The targeted products are office equipment such as computers, monitors,
printers, facsimiles, copiers, scanners, and multifunction devices. Their standards and logos are
uniform among participating nations.
The symbol shown indicates that this product conforms to Directive
2002/96/EC of the European Parliament and the council of 27
January 2003 on waste electrical and electronic equipment (WEEE)
and does not apply to countries outside of EU.
The symbol shown indicates that this product conforms to
SJ/T11364-2006 of People’s Republic of China Electronic
Industry Standard and does not apply to countries outside of
People’s Republic of China.
The symbol shown indicates that this product conforms to GB
18455-2001 11364-2006 of National Standard of the People’s
Republic of China and does not apply to countries outside of
People’s Republic of China.
NOTE
KIP 720 should be connected with a supported KIP printer or a PC with KIP software installed
through a USB cable for any operation. KIP 720 does not operate as a single unit.
(1)
Safety Warnings
The following warnings are very important in order to safely use this machine.
These notes are important in preventing danger to the operator or operation of the product.
The following symbols are found throughout the document and have the following meaning:
WARNING
This WARNING mark means that th ere is a po ssibility of death or serious
injury if you ignore or do not follow the said instruction.
CAUTION
This CAUTION mark means that th ere is a possibility of injury or physi cal
damage if you ignore or do not follow the said instruction.
When marked with this symbol, “DO NOT ATTEMPT”
When marked with this symbol, “pay close attention to”
(2)
WARNING
Ground the machine with a correct ground source or you may be
electrically shocked.
1. The power source should be as follows:
100 - 240VAC, 50/60Hz, 0.5A or higher
2. Use a circuit with a dedicated breaker.
3. Install the machine as close to the wall outlet as possible.
4. If you want to move the machine, contact your service personnel.
1. Do not remove the screw and do not open the cover if not said to do so
in this User’s Manual. If you ignore this warning, you may be burnt or
receive an electrical shock due to a hot part or electrically charged part
inside.
2. Do not disassemble or tamper with the machine.
It may result in a fire or an electrical shock.
1. Do not plug in the machine into a multi-wire connector in which some
other equipment is plugged into.
It may cause a fire due to outlet overheating.
2. Do not damage the power cord by stepping on or placing heavy objects
on it.
If the power cord is damaged, it may cause a fire or you may receive an
electrical shock. REPLACE THE CORD IF DAMAGED!
1. Do not put a flower vase, a flowerpot or any water-filled objects on the
machine.
Spilt water could cause a fire or an electrical shock.
2. If the machine generates an unusual smell or noise, turn it off and
unplug it from the wall electrical outlet immediately.
Be sure to catch the plug when you unplug the machine.
Otherwise, you may damage the power cord and may result in a fire or an
electrical shock.
(3)
CAUTION
Do not install the machine in a humidified room or a dusty room.
Also, do not install the machine on an unstable floor as injuries may occur.
Be careful not to catch a finger in the Top Cover.
1. Unplug the machine before you move it.
The power cord may damage and it may result in a fire or an electrical
shock.
2. If you do not use the machine for a long duration (holidays, company
shutdown) turn off and unplug the printer from the outlet for safety.
This product is not intended for use in the immediate visual field on the
display work place. To avoid disturbing reflections on the display work
place this product shall not be placed in the immediate field of vision.
(4)
POWER CORD INSTRUCTION
The Power Cord is necessary for with rating 125VAC or 250VAC more than 3A and use the thing
which was equal to the standard of the specifications country.
The installation of (or exchange to) a power plug which fits in the wall outlet of the installation
location shall be conducted in accordance with the following:
WARNING
Select a power plug which meets the following criteria;
- The plug has a voltage and current rating appropriate for the product’s rating marked on
its name plate.
- The plug meets regulatory requirements for the area.
- The plug is provided with a grounding pin or terminal.
If the appropriate plug does not fit the wall outlet in the installation, the customer shall install an
appropriate outlet.
Connector Type:
Configuration
Standard
IEC60320:C13
Rating
10A 250V (IEC)
15A 125V (UL)
Usually found in
Standard
CEE7/7
Rating
16A 250V
Usually found in
European countries
KS C 8305
16A 250V
Korea
AS/NZS 3112
10A 250V
Australia
New Zealand
GB1002
GB2099.1
10A 250V
China
IRAM 2073
10A 250V
Argentina
BS 1363
13A 250V
United Kingdom
SASO 2203
13A 250V
Saudi Arabia
BS 546A
IS-1293
SABS-1293
16A 250V
India
South Africa
Rating
15A 250V
Usually found in
United States
Canada
Plug Type: Model Rating 220-240V
Configuration
Plug Type: Model Rating 120V
Configuration
Standard
NEMA5-15
*cord set: less than
4.5m and UL-Listed
(5)
Chapter 1
Before Use
1. 1 Installation Requirements
page
1- 2
1. 2 Originals Prohibited from Duplication
1- 3
1. 3 Features
1- 4
1. 4 Specifications
1- 5
1. 5 Appearance
1- 7
1. 6 Specifications for Scan Original
1-10
1-1
Chapter 1 Before Use
1. 1 Installation Requirements
The following conditions have to be satisfied when installing KIP 720 Scanner.
1. Satisfy the following input power condition.
Voltage
Current
Frequency
100 - 240VAC
0.5A or higher
50 / 60Hz.
KIP 720 can be supplied with any voltage within 100 to 240VAC. If the voltage is within this
range, please connect to the outlet simply. (No setting has to be changed.)
2. Make sure to connect the power plug to the outlet that is provided with the Ground Terminal.
3. To completely disconnect the machine from the power source, draw the power plug from the
outlet.
The outlet must be easily accessible near the equipment.
4. The temperature must be within the range from 10 to 32 degrees centigrade, and the humidity
must be 15 to 85% RH.
5. Prevent the machine away from water, fire, dust or direct sunlight.
If it is impossible to avoid the direct sunlight, please pull the curtain to intercept the sunlight.
6. The floor must be enough strong to withstand machine’s weight (About 25kg (55lbs)).
7. Keep enough space around the machine as follows.
(The following values are the least requirements. Please keep a wider space if possible.)
12.0” (300mm) or wider
w/ Original Tray
[Rear]
KIP 720
2.0” (50mm) or wider
12.0” (300mm) or wider
[Front]
24.0” (600mm) or wider
for inserting an original
1-2
Chapter 1 Before Use
1. 2 Originals Prohibited from Duplication
It is not necessarily allowed to copy every kind of original.
You may be punished by the law if only you possess the copy of some kind of original.
We recommend you to consider enough before you copy such original.
[Originals prohibited from copying by the law]
1. It is not allowed to copy Currency (Bill, Money, Bank Note, etc.); Government issued
Negotiable Instruments (National Bonds, Security, Local Debt Bonds, etc.).
2. It is not allowed to copy Foreign Currency or Foreign Negotiable Instruments.
3. It is not allowed to copy unused postal stamps or government postcards without permission
to make replica from Government,
4. It is not allowed to copy Government issued revenue stamps, certificate stamps which are
prescribed by Liquor Tax Act or the Commodity Tax Act.
[Special items to be cared]
1. It is warned by the government to copy private issued securities (stock certificate, draft,
check, goods ticket, etc.), commutation ticket or book of tickets, excluding that some specific
company copies such originals as many as it requires for its own business.
2. We recommend you not to copy freely such originals as government issued passport, public
or private issued licenses, automobile inspection certification, Ids and tickets like pass or
meal.
Reference Law
Regulations to control fake currency and
Bond.
Control Law against Forged & faked
Foreign Currency, Bill, Bank Note and Bond
Forged postal stamps control law
Forged revenue stamps control law
Currency similarity securities Control Law
Prohibited items to copy
Currency (Bill, Money, Bank Note, etc.),
Government issued Negotiable Instruments
(National Bonds, Security, Local Debt Bonds,
etc.)
Foreign Currency or Foreign Negotiable
Instruments
Unused postal stamps or government postcards
Government issued revenue stamps, and
certificate stamps prescribed by Liquor Tax Act
or Commodity Tax Act
Private issued securities (stock, draft, check,
goods ticket, etc.), commutation or book tickets
[Originals protected by the copyright]
It is prohibited to copy such originals as book, music, paintings, printed copy, maps, drawings,
movie and pictures which are protected by the copyright, except for personnel or family use or
similar purpose.
1-3
Chapter 1 Before Use
1. 3 Features
The KIP 720 has the following features.
Wide format image scanner
KIP 720 is available for various sized originals.
210 - 914.4 mm (8.5 - 36”) in width
210mm (8.5”) - 6,000mm in length.
High speed scanning
KIP 720 provides quick scan operation (65mm/s in monochrome / grayscale, 22mm/s in color on
600 dpi).
High resolution scanner head
KIP 720’s 600dpi CIS enables clear and high quality color / monochrome images.
Space-saving
KIP 720 is a small footprint component to fit on most of your preferred space.
Energy-saving
KIP 720 has Auto Power OFF feature for reduced power consumption.
1-4
Chapter 1 Before Use
1. 4 Specifications
Model
Scanning method
Reading sensor
Light source
Setting
Starting point of scan
Original size
Scanning Width
Scanning Length
Start point of reading
Color mode
Scanning speed
(600 dpi)
Resolution
Interface
Input power
KIP 720
Sheet through type
Contact Image Sensor
(for A4 size x 5 pieces in staggered arrangement)
LED (R/G/B)
Face up
Center
Max. : 970.0mm
Min. : 150.0mm
Thickness : 0.05mm to 1.60mm
(Image quality for an original with 0.25mm or thicker is
guaranteed only in a standard size even the scanner
physically accepts it.)
Max. : 914.0mm (36”)
Min. : 210.0mm (8.5”)
Max. : 25m
(Image quality for an original over 6,000mm in length is
not guaranteed)
Min. : 210.0mm (8.5”)
within 0.5mm at Leading Edge
Monochrome : Binary
Grayscale
: 8 bit
Color
: 24 bit
Monochrome : 65mm/s
Grayscale
: 65mm/s
Color
: 22mm/s
600dpi
USB 2.0 (Maximum: 5VDC)
Voltage: 100-240VAC
Current: 0.5A (at 100V)
Frequency: 50/60Hz
NOTE
KIP 720 accepts the inlet voltages of 100 to 240VAC without
additional voltage transformation.
Power consumption
Environmental conditions
Acoustic noise
50W maximum
10-32 degrees centigrade, 15-85%RH (Non condensing)
60 db or less (during 65mm/s scan operation)
Outer dimension
Weight
Maschinenlärminformations-Verordnung 3. GPSGV:
Der höchste Schalldruckpegel beträgt 70 dB(A) oder weniger
gemäß EN ISO 7779
1,140mm (Width) x 362mm (Depth) x 162mm (Height)
Approximately 25kg
NOTE
These specifications are subject to change without notice.
1-5
Chapter 1 Before Use
1. 5 Appearance
3
2
1
7
6
4
8
4
5
No.
1
Part Name
Upper Unit
2
3
4
5
6
Original Tray
Original Table
Original Guide
Main Power Switch
Start Button
7
Stop Button
8
LED Indicator
Function
Reads original images.
To be opened for cleaning / removing original jam.
Receives an ejected original.
Used to place an original.
Guides an original to the scanner straight.
Turns on / off KIP 720.
Starts scanning if the controlling software requires user
intervention.
While scanning: emergency stop
At Standby position: eject
green: Ready
green to-and-fro: Scanning
red: Error
red flashing: Cover Open, Jam
1-6
Chapter 1 Before Use
9
No.
9
Part Name
USB Terminal
10
AC Inlet
10
Function
Connect a USB cable from the controller PC or a KIP Printer.
(Maximum: 5VDC)
Connect a power cord.
1-7
Chapter 1 Before Use
1. 6 Specifications for Scan Originals
Scan originals must satisfy the following specifications.
Thickness
0.05-1.60mm
Width
210-970mm
(the maximum scanning width is 914mm (36”))
210mm-25,000mm
(If an original is longer than 6,000mm, its image quality and the original
feeding are not guaranteed.)
Length
Do not scan the following kinds of originals. The original or the scanner may damage.
However, with a carrier sheet, it is possible to scan some of the following original.
(We will not guarantee the image quality or reliability of original feeding when the carrier sheet is
used.)
Wet
Wet
Metal or fabric material
Metal
Fabric
KIP
Clipped or stapled
KIP
Clipped
Stapled
KIP
KIP
1-8
Chapter 1 Before Use
Pasted
With a carrier sheet, it is
possible to scan.
Paste
Patched
With a carrier sheet, it is
possible to scan.
Torn
With a carrier sheet, it is
possible to scan.
Folded
(especially at leading edge)
With a carrier sheet, it is
possible to scan.
Not square
With a carrier sheet, it is
possible to scan.
KIP
KIP
Excessively curled
(a diameter of 80 mm or
less)
With a carrier sheet, it is
possible to scan.
1-9
Chapter 1 Before Use
Rough surface
(Carbon paper for example)
Rough surface
Punched
With a carrier sheet, it is
possible to scan.
With a carrier sheet, it is
possible to scan.
Extremely creased
Extremely thin and soft
With a carrier sheet, it is
possible to scan.
Transparent
With a carrier sheet, it is
possible to scan.
1-10
Chapter 1 Before Use
Chapter 2
Hardware Operation
2. 1 Turning on KIP 720
page
2- 2
2. 2 Turning off KIP 720
2- 3
2. 3 USB Connection
2- 4
2. 4 Installing USB Driver Software to your PC
2- 5
2. 5 Scanning Original
2- 8
2. 6 Canceling Scan
2-12
2. 7 Auto Power OFF
2-13
2. 8 Removing/Reinstalling Original Guide
2-14
2-1
Chapter 2 Hardware Operation
2. 1 Turning on KIP 720
1. Plug the power cord to a dedicated outlet.
WARNING
(1) Do not handle the power plug with a wet hand. It may result in receiving an electrical
shock.
(2) Be sure to ground the machine.
(3) Use a dedicated outlet for KIP 720. Many loads on a single outlet may cause overheating
and result in a fire.
(4) The outlet must satisfy the following conditions;
100-240VAC, 50/60Hz, 0.5A or higher
2. Press “I” side of the Power Switch on the right side.
Press “|” side.
3. The LED Indicator in the front will turn green “Ready”.
LED: GREEN
2-2
Chapter 2 Hardware Operation
2. 2 Turning off KIP 720
1. Press “
” side of the Power Switch on the right side.
Press “
” side.
NOTE
Wait at least 5 seconds for turning on the scanner again.
2-3
Chapter 2 Hardware Operation
2. 3 USB Connection
The KIP 720 should be connected with a supported KIP printer or a PC through a USB cable for
any operation.
NOTE
You can purchase another USB Cable separately.
Make sure that the cable satisfies the following specifications.
- USB 2.0
- High-speed data transfer
- Shielded
- Shorter than 3 meters
Printer / PC: Type A male
Scanner: Type B male
1. Connect the Type B connector to the USB port on the scanner’s rear side.
USB port
USB cable
2. Connect the Type A connector to any available USB port on your KIP printer / PC.
2-4
Chapter 2 Hardware Operation
2. 4 Installing USB Driver Software to your PC
When the KIP 720 is connected to a PC, the PC should have the driver software installed.
NOTE
(1) When the KIP 720 is connected to a supported KIP printer, the installation of the driver
software is not required. Turn on the printer, connect the USB cable and then turn on the
scanner.
(2) The driver software supports Windows 2000 and both 64/32 bit editions of Windows 7,
Vista, XP.
(3) After completion of installation, installation may be required if you connect the USB cable
to another USB port. In this case, choose “Install the software automatically
(Recommended)”.
1. Turn on the PC. Connect the scanner to the PC through the USB cable.
2. Turn on the scanner.
3. Found New Hardware Wizard starts. Choose “No, not this time.”
4. Insert the Software and Operation Guide DVD to the DVD drive, or put your USB removable
storage (with the necessary files in it) to the PC.
2-5
Chapter 2 Hardware Operation
5. Choose “Install the software automatically (Recommended)” and press [Next].
If the driver software is not detected automatically, select “Install from a list or specific location
(Advanced)”, and locate either of “stiK129x64.inf” or “stiK129x86.inf”.
Folder “x64”
Folder “x86”
stiK129x64.inf
stiK129x86.inf
for 64 bit edition OS
for 32 bit edition OS
6. If the notification for Windows Logo testing appears, press [Continue Anyway].
7. When the installation is completed, press[Finish].
2-6
Chapter 2 Hardware Operation
8. Open “Device Manager” (Control Panel Æ System, for example) and confirm that “K129” has
been added under Imaging devices.
2-7
Chapter 2 Hardware Operation
2. 5 Scanning Original
1. Slide Original Guides to align them to the original’s width.
Original Guide
2. Place an original on Original Table in face-up.
Insert the leading edge to the scanner along with Original Guides.
NOTE
(1) Align an original to Original Guides to avoid skewing.
(2) Position an original in the center of Original Table. Not doing so may result in skewing.
(3) Do not place any objects except originals on Original Table. The scanner may catch such
objects and result in damage.
(4) When scanning originals as follows, removing Original Trays is recommended. Original
Trays may damage such object. See [2.8 Removing Original Tray].
- Original in a carrier sheet
- Tough original (cannot be transported along with Original Tray)
(5) If the scanner does not carry an original,
- Wipe the Sensors and remove dust on them. See [4. 1. 2 Sensor].
- Check the USB connection.
2-8
Chapter 2 Hardware Operation
3. When the original is at wait position, the LED Indicator will turn off. The KIP 720 starts scanning.
Pressing START button may be required to start the scan according to the scanner’s controller
software. For further details of “Auto Start”, see the software’s document.
START button
Reference
Use a carrier sheet for the following kinds of originals.
(We will not guarantee the image quality or reliability of original feeding when the carrier
sheet is used.)
NOTE
Handle a carrier sheet carefully. A damaged one may cause a poor scan image.
When scanning an original in a carrier sheet, remove Original Tray.
Otherwise, the original may damage.
For more detail, see [2. 8 Removing Original Tray].
[How to use a carrier sheet]
Put an original into a carrier sheet, place the original so that its face can be seen through
the transparent film.
Then, insert the carrier sheet as normal operation.
For the following kinds of original, using the carrier sheet is recommended.
Pasted
(Continued)
2-9
Chapter 2 Hardware Operation
Reference
Patched
Torn
Folded (especially at leading edge)
Not square
KIP
KIP
Extremely curled
(Less than 80mm in diameter)
(Continued)
2-10
Chapter 2 Hardware Operation
Reference
Rough surface
Creased
Extremely thin and soft
Transparent
2-11
Chapter 2 Hardware Operation
2. 6 Canceling Scan
1. Press STOP button during the scan. The LED Indicator flashes red and the original stops.
LED: flashes RED
STOP button
2. When the original stops, lift up both sides of the Upper Unit, and remove the original by hand.
See [3.1 Original Misfeed].
Lift up here.
from the rear
Lift up here.
3. Gently press down both sides of the Upper Unit until it locks.
Press down here.
Press down here.
4. The LED Indicator will turn green “Ready”.
2-12
Chapter 2 Hardware Operation
2. 7 Auto Power OFF
The KIP 720 has Auto Power OFF feature for energy saving purpose. After a certain period of
inactivity passes, the Power Switch will turn off.
The period can be configured (0-60 minutes).
After Auto Power OFF function ran, please press “ | ” side of the Power Switch to turn on the
scanner again.
NOTE
(1) In combination use with a supported KIP Printer, Auto Power OFF runs after the KIP
printer goes Cold Sleep. It does not while the KIP printer is in ready (standby).
Cold Sleep is a power save feature for the KIP printers to shut down the power supply to
almost all of its components in order to reduce power consumption.
(2) Consult your sales/service dealer for the amount of time to run Auto Power OFF.
2-13
Chapter 2 Hardware Operation
2. 8 Removing Original Tray
NOTE
When scanning originals as follows, removing Original Tray is recommended.
Original Trays may damage such object.
- Original in a carrier sheet
- Tough original (cannot be transported along with Original Tray)
Remove Original Trays from the scanner’s rear.
Original Guides
To reinstall Original Trays, attach its notches
on the rear.
2-14
Chapter 2 Hardware Operation
Chapter 3
Troubleshooting
3. 1 Original Misfeed
page
3- 2
3. 2 Error Indication
3- 4
3. 3 Original Not Carried
3- 4
3. 4 Other errors
3- 5
3-1
Chapter 3 Troubleshooting
3. 1 Original Misfeed
The scanner may stop feeding the original in the scanner if the original skews.
Pressing STOP button during scanning also stops the original in the scanner.
There is no eject/rewind feature for a stopped original. Remove the original by hand.
NOTE
(1) Open/close the Upper Unit with holding both sides of the Upper Unit.
(2) Be careful not to catch your finger in the Upper Unit.
1. Lift up both sides of the Upper Unit.
Upper Unit
Lift up here.
Lift up here.
2. Carefully pull the original from the front.
If cannot, pull it from the rear.
from the rear
to the front
3-2
Chapter 3 Troubleshooting
3. Gently press down both sides of the Upper Unit until it locks.
Press down here.
Press down here.
3-3
Chapter 3 Troubleshooting
3. 2 Error Indication
In case of a misfeed, emergency stop, the Upper Unit open the LED Indicator turns red “Error”.
flashes: - Upper Unit open (half-shut),
- Misfeed,
- Emergency Stop
solid: - Document remaining in the
scanner at the time of power on,
- the other internal errors
Check the followings to clear the error.
1. Remove an original in the scanner. See [3.1 Original Misfeed].
2. Clean the sensors on the Upper Unit to remove dust or a paper portion. See [4.1.2 Sensors].
3. Close the Upper Unit in position.
4. Turn off the scanner, wait 5 seconds and then turn it on again.
If the LED Indicator still shows read after all the above are done, contact your service dealer.
3-4
Chapter 3 Troubleshooting
3. 3 Original Not Carried
If the KIP 720 does not start carrying an original, check the followings.
1. Clean the sensors on the Upper Unit to remove dust or a paper portion. See [4.1.2 Sensors].
2. Check the USB connection.
3. Replace the USB cable.
4. Check the configurations on the scanner’s controller software. See your system’s document.
3. 4 Other Errors
Your monitor device (of your KIP printer’s touchscreen / PC) may display a kind of information as
follows. The contents said in your screen may vary depending on your system.
Upper Unit (Top Cover) Open:
Close the scanner’s Upper Unit in position.
Not Calibrated:
Your system does not finish the color calibration, in order to reproduce your scanned image with
your KIP / third party color printer correctly.
Scanner Not Found:
Check the USB connection between the KIP 720 and your system.
Part of scanned image filled black/white:
1. Check the system configuration of your KIP printer / scanner’s controller software.
2. Turn off the scanner, wait 5 seconds and then turn it on again.
Unexpected color reproduction:
A scanned image displayed on your monitor device or a copy of a scanned image printed by your
color printer may slightly vary from the original image in colors. Color Management may help to
reduce such. (Some devices/software does not support color management)
If your system has the color adjustment feature (for scanning, copying), adjust the color
accordingly.
Copy with Banners:
No malfunction for the scanner. Your system may not have a required license registered.
3-5
Chapter 3 Troubleshooting
Chapter 4
Maintenance
4. 1 Cleaning
4. 1. 1 Scan Glass, Feed Roller, Guide Plate
4. 1. 2 Sensor
4-
4-1
page
4- 2
4- 2
5
Chapter 4 Maintenance
4. 1 Cleaning
4. 1. 1 Scan Glass, Feed Roller and Guide Plate
If Scan Glasses, Feed Rollers or Guide Plates get dusty, it may result in a poor scan image.
Perform cleaning as needed.
NOTE
(1) Open/close the Upper Unit with holding both sides of the Upper Unit.
(2) Be careful not to catch your finger in the Upper Unit.
(3) Never use organic solvent, glass cleaner or antistatic spray for cleaning.
(4) For ease of visual check, this document shows the Upper Unit fully open (not actual wide).
1. Press “
” side of the Power Switch on the right side.
Press “
” side.
2. Lift up both sides of the Upper Unit.
Upper Unit
Lift up here.
Lift up here.
4-2
Chapter 4 Maintenance
3. Gently wipe the Scan Glass and Feed Rollers (white) with a soft cloth.
Equal mixture of water and neutral detergent can be used.
Scan Glass
Feed Rollers (white)
NOTE
Do not use organic solvent, glass cleaner or antistatic spray for cleaning.
4. Wipe the Feed Rollers (rubber) with a dry cloth.
Feed Rollers (rubber)
Feed Rollers (rubber)
4-3
Chapter 4 Maintenance
5. Wipe dry the Feeding Rollers.
6. Wipe the Upper Guide Plate and the Lower Guide Plate with a dry cloth.
Guide Plate
Guide Plate
7. Gently press down both sides of the Upper Unit until it locks.
Press down here.
Press down here.
4-4
Chapter 4 Maintenance
4. 1. 2 Sensor
If Sensors are dirty, the original may be detected incorrectly.
Perform cleaning or as needed.
NOTE
(1) Open/close the Upper Unit with holding both sides of the Upper Unit.
(2) Be careful not to catch your finger in the Upper Unit.
(3) Never use water, organic solvent, glass cleaner or antistatic spray for cleaning.
(4) For ease of visual check, this document shows the Upper Unit fully open (not actual wide).
1. Press “
” side of the Power Switch on the right side.
Press “
” side.
2. Lift up both sides of the Upper Unit.
Upper Unit
Lift up here.
Lift up here.
4-5
Chapter 4 Maintenance
3. Gently wipe Sensors (4) with a dry cotton bud.
NOTE
Do not use water, organic solvent, glass cleaner or antistatic spray for cleaning.
4. Gently press down both sides of the Upper Unit until it locks.
Press down here.
Press down here.
4-6
Chapter 4 Maintenance
Wide Format Color Document Scanner
KIP 720 Hardware Operation Guide
Version A.1 (Issued on April 12, 2012)
Published by Katsuragawa Electric Co., Ltd.
21-1 Shimomaruko 4-Chome,
Ohta-ku, Tokyo 146-8585, Japan
Please note that some articles, illustrations and photographs might be partially different from the
actual machine because of the modification of machine and so on.
© 2012 Katsuragawa Electric Co., Ltd.
No part of this publication may be copied, reproduced or distributed in any form without express
written permission from KIP.