1
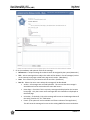
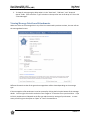
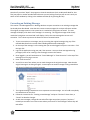
City of Chicago OEMC / PSIT Administrative Message Center (AMC) User Manual Version 1.0 Overview This document is the user manual for the Administrative Message Center (AMC) intranet application. The AMC replaces the existing AMFN (Administrative Message Fax Network) process with an intranet‐ based tool. The AMFN has been a cumbersome manual process of creating paper memos in a variety of formats and faxing them to a distribution hub. The new AMC provides these advantages: One step process for drafting and sending administrative messages Allows priority messages to be displayed on the intranet home page Allows messages to be routed through the existing Unit Message In‐Boxes in CLEAR. Provides full text search for finding messages Allows file attachments to be downloaded. Adds a measure of security. Audience This manual serves two different groups of users: Message Readers – Anybody with access to the police intranet can search for and read administrative messages. Message Authors – Any user with sufficient role privileges can create and distribute new administrative messages or issue corrections or cancellations for existing administrative messages. Accessing the Application All users access the application with a web browser by starting on the intranet home page: http://clear.chicagopolice.local/ There, the user will see recent priority messages and will also see a button called “More Administrative Messages” below the list of priority messages that takes them to the AMC Main Page. No login is required to browse, search, and read administrative messages. Message Authors will be asked to log in with their CLEAR Id’s at the time they create a new administrative message or post a correction/cancellation to an existing one. City of Chicago OEMC / PSIT Administrative Message Center (AMC) User Manual Page 2 of 10 Creating a New Message This section is for Message Authors. Currently, only users with the equivalent rank of Lieutenant or above can create messages. Authority can be delegated to other personnel by submitting request form to the security group. 1. Go to the intranet home page http://clear.chicagopolice.local/ 2. Click the “More Administrative Messages” below the list of priority messages on the intranet home page to get to the AMC Main page. 3. At the top right of the Administrative Message Screen, click “New Message” 4. If not already logged into the AMC, the Message Author will now see the login screen. The normal CLEAR user ID (PC#) and password will grant access but only if the user has sufficient authorization 5. After successful login, the user will be prompted to ”Select a Message Type” and then click the “Create” button. 6. The user will then see the message edit form. This form will have different fields depending on the selected message type. Below is the general message form. Version 1.0 City of Chicago OEMC / PSIT Administrative Message Center (AMC) User Manual Page 3 of 10 7. Fill in the mandatory and optional fields of the message: Reference # ‐ A unique message ID number that will be assigned by the system (Automatic) Title – A short message title or subject line which will be shown in lists of messages (such as on the intranet home page or AMC main page search results. (Mandatory) Date: This is filled in for you based on the current date. (Automatic) Post To: Selects the one or more whays this message will be distributed. Archive – All messages are archived by default. This ensures that the message is searchable and can be retrieved on the main AMC screen. Home Page – Check this if this is a priority message to be displayed on the intranet home page. Only the X most recent messages with this checkbox are displayed on the home page. Unit Inbox – If checked, a link to this message will be sent to the Message Inboxes of the Unit(s) listed in the “TO:” field below. Faxed – (This option will not be available until future releases of the application) This will cause the message to be sent to the existing AMFN fax stream mechanism. Version 1.0 City of Chicago OEMC / PSIT User Manual Administrative Message Center (AMC) Page 4 of 10 Email ‐ (This option will not be available until future releases of the application) This will allow the selection of individual emails or distribution groups to receive copies of the message via email. To: Select All units or a Single unit as the recipient of the message. The ability to select multiple units or groups of units will be added in a future release. (Mandatory) From: This is filled in for you based on your login ID. (Automatic) On Behalf of: If you were delegated to create a message on behalf of your commanding officer or another person in your unit, then enter that person’s name, title, unit, and telephone number here. (Optional) Message: This is the full text of the message. (Optional) There are no rich formatting features or spell check capabilities. These may be added in a future release. Attachments: To add a file attachment (such as a .pdf or .doc file) click the browse button which opens the “Choose File” window, find your file on your local PC and click the “Open” button. When back on the AMC message form, click the “Upload” button. You can only have one attachment per administrative message (as of the current software release). If you selected the wrong file, you can press the delete button to remove the selected attachment and then select a different file to upload. 8. Then press the “Continue” button at the upper left of the message edit form. 9. You will then see the review page for the message you just created (This looks just like the message detail screen except it has different commands available in the upper left) 10. At this time the message has not yet been saved in the system and has not yet been distributed to unit in boxes, emailed, or posted on the intranet home page. 11. Review the message for errors. 12. If you want to make changes to the message contents or to the distribution options, press the “Edit” button at the top left and you will go back to the message edit form. Make your changes and press “Continue” on that form. 13. If you want to abandon your message and never send it, just navigate away from the current review page (for example, click the [Log Out] link in the upper right of the screen) 14. If the message is correct, click the “Save Changes” command in the upper left of the form. At this time your message will be saved to the system and will be distributed according to the “Post To” options you selected. 15. You will be redirected to the AMC Main Page where you will see your new message at the top of the list. Reading Administrative Messages There are four ways to access administrative messages: Select recent high priority messages listed on the intranet home page. Browse and search for messages on the AMC main page. – Access this page by clicking “More Administrative Messages” below the list of priority messages on the intranet home page. Version 1.0 City of Chicago OEMC / PSIT User Manual Administrative Message Center (AMC) Page 5 of 10 Links to certain messages will be sent as Unit Message Box items within the CLEAR system Each message has its own unique browser link to the message details screen for that message. This link can be pasted into other documents and emails for people who want to reference an administrative message. Additional ways of accessing messages will be added in future releases of the application. Searching for Administrative Messages 1. Click the “More Administrative Messages” below the list of priority messages on the intranet home page to get to the AMC Main page. 2. At first, all messages are displayed by default. Only 20 messages are displayed at a time. There are paging controls at the bottom of the screen to show page 2 (messages 21‐40) page 3 (messages 41‐60), and so forth. Version 1.0 City of Chicago OEMC / PSIT Administrative Message Center (AMC) User Manual Page 6 of 10 3. On the top of this page is a “Keyword Search” field and other controls to filter messages. 4. To search for a message, enter a search word or phrase under “Keyword Search” and then click “Filter Messages.” 5. All messages that contain the search terms in their titles or in their full message text will show up in the list below. 6. Notice that the list of matching messages will only display 20 messages at a time. When more than 20 messages match, there are page number links at the bottom of the list. More on Filtering Messages: 1. One can change the sort order of messages in the list by clicking on the column headers. 2. To show all messages of a certain type, leave the Keyword Search field blank and select the desired message type from the “Type” drop list. 3. To show only messages created within a certain date range, click the calendar controls under “Start Date” and “End Date” and select a date range. 4. Notice that Filter controls are always combined. Thus if you select a message type AND enter a date range AND enter a keyword search, then only messages of the selected type that were created in the selected date range and that match the search term are shown. This can easily cause zero messages to be displayed. Version 1.0 City of Chicago OEMC / PSIT User Manual Administrative Message Center (AMC) Page 7 of 10 5. To show all messages again, delete what is in the “Start Date”, “End Date”, and “Keyword Search” fields. Then switch the “Type” selection to the top most item in the drop list. Then click “Filter Messages”. Viewing Message Details and Attachments When one clicks on the message title in any of the lists mentioned in previous sections, the user will see the message detail screen. Different formats than that of the general message above will be shown depending on the message type. If the message has a file attachment it can be accessed by clicking the link at the bottom of the message details. You can right click the link and select “Save Target As” to save the file to your hard drive. If you left click, the behavior will depend on the file type and the security settings of your browser. In some cases you will be given the option to “Open” or “Save” the attachment. Version 1.0 City of Chicago OEMC / PSIT User Manual Administrative Message Center (AMC) Page 8 of 10 Note that if you select “Open” the program to view the attachment (such as Microsoft Word for .doc files) may open in another window behind the one you are looking at and you will not see it until you switch to that window by clicking in the windows task bar (Or by pressing Alt‐Tab). Correcting an Existing Message This section is for Message Authors. Message Authors can post corrections to an existing message that has already been distributed. Note that this creates a new message with a unique reference number. The original message remains in the system but it is marked as having been corrected. The new message will display a link back to the message it is correcting. The original message will be clearly marked as having been corrected and it will display a link to the new message that serves as it’s correction. This is done to preserve the historical chain of communication. 1. To post a correction to a message, start by accessing the original message using any of the methods described in the section titled “Reading Administrative Messages” 2. On the top of the message is a line stating that you must be logged in to post a correction. Click the login link. 3. Log into the application using your pc# / clear account. You must have message authoring privileges (same as for creating a new message) to access this feature. 4. Once logged in, you will see buttons to “Cancel Message” or “Post Correction” at the top of the message you are trying to correct. 5. Press “Post Correction” 6. You will then see a form where you can make changes to the original message. Note that the original message is not being changed. A new unique correction message is being created that will show a link back to the original message. 7. The original message’s attachment is not copied to the new message. You can add a completely new attachment on this form. 8. Follow the instructions for “Creating a new Message” and press “Continue” when done, or “Cancel” to abandon changes. 9. As with new messages, changes do not take effect right away when you press “continue.” Instead you are taken to a review screen where you must click “Save Changes” before they will take effect. Version 1.0 City of Chicago OEMC / PSIT Administrative Message Center (AMC) User Manual Page 9 of 10 Cancelling an Existing Message This section is for Message Authors. Message Authors can post cancellations of an existing message that has already been distributed. Note that this creates a cancellation announcement in the form of a new message with a unique reference number. The original message remains in the system but it is marked as having been cancelled. The cancellation announcement will display a link back to the original message. The original message will be clearly marked as having been cancelled and it will display a link to it’s cancellation announcement. Note there is no mechanism in this system to completely delete a message. This is done to preserve the historical chain of communication. 1. To post a cancellation, start by accessing the original message using any of the methods described in the section titled “Reading Administrative Messages” 2. On the top of the message is a line stating that you must be logged in to post a correction. Click the login link. 3. Log into the application using your pc# / clear account. You must have message authoring privileges (same as for creating a new message) to access this feature. 4. Once logged in, you will see buttons to “Cancel Message” or “Post Correction” at the top of the message you are trying to correct. 5. Press “Cancel Message” 6. You will then see a confirmation screen 7. Press “Save Changes.” To post the cancellation. (End of User Manual) Version 1.0 City of Chicago OEMC / PSIT Administrative Message Center (AMC) This document was prepared by: Scott Hilkert Clarity Partners, LLC 22 W Washington, STE 1490 Chicago, IL 60602 Contributors David Puplava Clarity Partners, LLC 22 W Washington, STE 1490 Chicago, IL 60602 User Manual Page 10 of 10 P.O. Shantella Jenkins OEMC/PSIT 3510 S Michigan Ave Chicago, IL 60653 Version 1.0