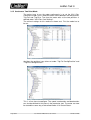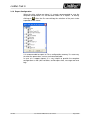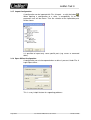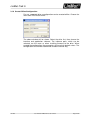
1
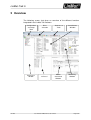
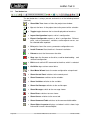
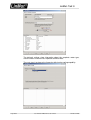
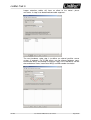
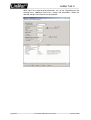
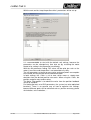
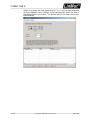
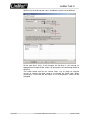
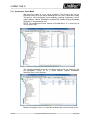
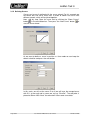
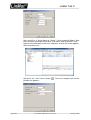
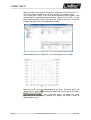
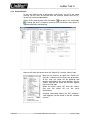
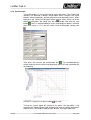
Documentation of
LinMot-Talk 5
Configuration Software
LinMot-Talk 5
User Manual
LinMot-Talk 5
© 2012 NTI AG
This work is protected by copyright.
Under the copyright laws, this publication may not be reproduced or transmitted in any form, electronic or mechanical, including
photocopying, recording, microfilm, storing in an information retrieval system, not even for didactical use, or translating, in whole
or in part, without the prior written consent of NTI AG.
LinMot® is a registered trademark of NTI AG.
Note
The information in this documentation reflects the stage of development at the time of press and is therefore without obligation.
NTI AG reserves itself the right to make changes at any time and without notice to reflect further technical advance or product
improvement.
Document version 5.1/ October 2012
Page 2/43
User manual LinMot-Talk 5 / 05.10.2012
NTI AG / LinMot
LinMot-Talk 5
Table of Content
1 INTRODUCTION..................................................................................................................4
1.1 SYSTEM GENERATIONS (SG)................................................................................................4
2 OVERVIEW..........................................................................................................................5
2.1 TOOL BUTTON BAR...............................................................................................................6
2.2 CONTROL PANEL................................................................................................................7
2.3 MESSAGES........................................................................................................................8
2.4 ERRORS...........................................................................................................................8
2.5 OSCILLOSCOPE...................................................................................................................9
2.6 CURVES.........................................................................................................................10
2.7 PARAMETERS...................................................................................................................11
2.8 VARIABLES......................................................................................................................11
2.9 COMMAND TABLE..............................................................................................................13
2.10 ACCESS CODES.............................................................................................................14
3 QUICK START GUIDE......................................................................................................15
3.1 CABLING E1100..............................................................................................................15
3.2 CABLING E1200..............................................................................................................16
3.3 CABLING E1400..............................................................................................................17
3.4 CABLING B1100..............................................................................................................18
3.5 CABLING B8050-ML........................................................................................................19
3.6 FIRMWARE DOWNLOAD.......................................................................................................20
3.7 LOGIN............................................................................................................................20
3.8 SCANNING CAN BUS........................................................................................................21
3.9 SCANNING ETHERNET ........................................................................................................22
3.10 MOTOR WIZARD.............................................................................................................23
3.11 CONTINUOUS CURVE MODE..............................................................................................31
3.12 DEFINING CURVES..........................................................................................................32
3.13 CONTROL STATUS...........................................................................................................36
3.14 OSCILLOSCOPE...............................................................................................................37
3.15 CONTINUOUS TWO POINT MODE........................................................................................38
3.16 EXPORT CONFIGURATION..................................................................................................39
3.17 IMPORT CONFIGURATION...................................................................................................40
3.18 OPEN OFFLINE CONFIGURATION.........................................................................................40
3.19 CREATE OFFLINE CONFIGURATION......................................................................................41
4 TROUBLE SHOOTING.....................................................................................................42
4.1 SETTING ALL PARAMETERS TO DEFAULT VALUES......................................................................42
4.2 INTERFACE DOES NOT RUN...................................................................................................42
4.3 STOPPING FIRMWARE.........................................................................................................42
5 CONTACT ADDRESSES..................................................................................................43
NTI AG
User manual LinMot-Talk 5 / 05.10.2012
Page 3/43
LinMot-Talk 5
1 Introduction
The LinMot-Talk 5 software is a PC based tool, which helps the user in a
comfortable way installing firmware on the drive, setting up the drive’s
configuration, defining and programming motion profiles, emulating the
PLC, watching variables and reading messages and errors. The LinMotTalk 5 works with the drive series B1100, E1100, E1200, E1400 and
B8050. It replaces the LinMot-Talk1100 software. For the rest of this
document and all other documents, the more general term “LinMot-Talk”
will be used for the Linmot- PC configuration software.
1.1
System Generations (SG)
The LinMot drive families are based on different hardware platforms, which
are called system generations. The abbreviation is “SG”. Whereas
differences of hardware of software functionality exist between the system
generations, the documentation is marked with the “SG” term. The following
table gives an overview of which drive family belongs to which SG:
SG
SG1
SG2
SG3
SG4
SG5
Page 4/43
Drives
Families E400, E4000 V1
Families E400, E4000 V2
Family E1100 (GP, CO, DN, DP) (LC/HC/XC)
Family B1100 (VF, PP, GP, ML) (LC/HC/XC)
Family E1200 (GP, PL, EC, IP, DP, PN, SC)
Family E1400 (GP, PL, EC, IP, DP, PN, SC)
Family B8050-ML (PL, EC, IP, PN, SC)
User manual LinMot-Talk 5 / 05.10.2012
NTI AG / LinMot
LinMot-Talk 5
2 Overview
The following screen shot gives an overview of the different functions
integrated in the LinMot-Talk software.
Configuration
and Setup
Tools
Project tree
window
NTI AG
Drive
Selection
Shortcuts to
Tools
IO Panel
Motion
Command
Window
User manual LinMot-Talk 5 / 05.10.2012
Control/Status
Window
Monitoring
Window
Page 5/43
LinMot-Talk 5
2.1
Tool button bar
The tool button bar is always present and consists of the following buttons
(from left):
➢ Show/Hide Tree shows or hides the project tree window.
➢ Up sets the focus in the project tree to the parent of the selection.
➢ Toggle toggles between the last two displayed tree branches.
➢ Import Configuration imports a drive’s configuration.
➢ Export Configuration exports a drive’s configuration. Different
parts, such as parameters, variables, oscilloscope or curves, can
be selected to be exported.
➢ Print prints items like curves, parameter configurations etc.
➢ Install Firmware Start the drive’s firmware installation.
➢ Reboot restarts the firmware on the drive.
➢ Stop stops the firmware on the drive, used for downloading
software configuration.
and
➢ Blink sends a blink LED command to the drive, which is selected.
➢ Go Offline logs out from actual drive.
➢ Start Motor Wizard starts the motor configuration setup wizard.
➢ Show Control Panel switches to the control panel.
➢ Show Parameters switches to the variables.
➢ Show Variables switches to the variables.
➢ Show Oscilloscope switches to the oscilloscope.
➢ Show Messages switch to the message viewer.
➢ Show Errors switches to error viewer.
➢ Show Curves switches to the curve tool.
➢ Show Command Table switches to the command table editor.
➢ Show Object Inspector displays a window in which shows help
information to each selected object.
Page 6/43
User manual LinMot-Talk 5 / 05.10.2012
NTI AG / LinMot
LinMot-Talk 5
2.2
Control Panel
The Control Panel helps the user to access directly to the control and
status word of the MC Software. The drive can be commanded from the
PC, thus no PLC is necessary to be used for the first commissioning.
Control Word
IO Panel
➢
➢
➢
➢
➢
NTI AG
General
Monitoring
Status Word
Motion Command
Interface
Control Word The MC software’s control word can be directly written
from the PC. For taking over the PC control the left check box (Enable
Manual Override) must be selected. The state of each flag can be set
with the right check box (Override Value). If other flags have to be
altered, the override mask must be configured in the parameter tree
under \Parameters\Motion Control SW\State Machine Setup\Control
Word\Ctrl Word Parameter Force Mask.
Status Word The status word shows the actual state of the drive’s
MC software status word. It is updated
automatically.
General Monitoring This window displays actual motor and drive
information
IO Panel For commissioning. The user can take control of the
X4
IOs on E1100 or X14 IOs on B1100 drives.
Motion Command Interface The MC software’s motion command
Interface can be directly accessed over this window. When enabled
(Enable Manual Override switch must be set), MC commands can be
selected, parametrized and sent to the drive. Because the motion
command interface is, independent of the interface running on the
drive, the same, the commands can be exactly tested before
programming them in the PLC.
User manual LinMot-Talk 5 / 05.10.2012
Page 7/43
LinMot-Talk 5
2.3
Messages
This panel reads out and shows all messages, which are logged on the
drive, and displays them in chronological order. If logged in a B1100 series
drive, this window does not appear, because those drives do not support
message logging.
2.4
Errors
This panel reads out and shows all errors, which are logged on the drive
and displays them in chronological order.
Page 8/43
User manual LinMot-Talk 5 / 05.10.2012
NTI AG / LinMot
LinMot-Talk 5
2.5
Oscilloscope
The drive’s built in oscilloscope, which can record up to four channels in
real time, is controlled with the oscilloscope tool.
During login the oscilloscope reads out the settings and data from the drive.
If an oscilloscope shot is running or ready to read out data, an item called
“Read out” will be displayed. Otherwise a default item will be generated.
The oscilloscope is controlled with the buttons
The functions are (from left):
➢ Start/Abort Start or abort an oscilloscope shot.
➢ Fit View Displays the recorded channels such as they fit best in
the scope window.
➢ Save Display stores the settings for zoom, scaling and offset.
➢ Recall Display restores the settings for zoom, scaling and offset,
which are previously stored with Save Display.
➢ Export Data: Export data and setups of the last recorded
oscilloscope shot in a csv file.
➢ Oscilloscope Settings Switch to setup mask for channels,
triggers, times and modes.
➢ Display Settings is used to set scale, offset and color for the
oscilloscope channels.
➢ Show/Hide: Show and hide the oscilloscope channels.
➢ Show/Hide Cursor: Two time cursors can be be displayed for
measuring the signals.
NTI AG
User manual LinMot-Talk 5 / 05.10.2012
Page 9/43
LinMot-Talk 5
2.6
Curves
With the curve tool, motor motion profiles can be easily created, joined,
uploaded, downloaded and saved. NOTE: On B1100 the curve feature
must be enabled with an access key.
The curve tool is divided into the edit and the download window.
The edit window is used to generate, merge and modify curves with the
following buttons:
➢ New Curve Starts the curve wizard, which guides through the
curve generation.
➢ Edit Properties The properties of a selected curve, like name,
time or stroke, can be modified.
➢ Edit Curve Values The curve points can be manually edited.
➢ Join Curves All selected curves are joined. A wizard will be
started for defining the curve properties of the joined curve.
The download window is used to manage the curves, which are stored on
the drive or have to be downloaded. Modifications in this window will show
up the message “Curves have changed! Please download.” After pressing
the download into Drive button the window and the drive will be
synchronized.
➢ Upload Curves from Drive All curves stored on the drive will be
uploaded and displayed.
➢ Download Curves to Drive The drive’s curve sector will be
synchronized with the download window.
➢ Auto Numerate Curves The curve ID, which must be unique, will
be set automatically.
The maximum number of curves and number of sample points is defined as
follows:
Series E1100, E1200, E1400:
#Curves * 70Bytes + #SamplePoints1 * 4Bytes <= 65280Bytes
Series B1100:
#Curves * 70Bytes + #SamplePoints * 4Bytes <= 2016Bytes
1 #SamplePoints: total of sample points in all curves.
Page 10/43
User manual LinMot-Talk 5 / 05.10.2012
NTI AG / LinMot
LinMot-Talk 5
2.7
Parameters
The drive’s parameters are displayed in a tree view.
Parameters, which are marked as live ( ), can be altered while the drive’s
firmware is running; other parameters can only be changed when the
software is stopped.
2.8
Variables
The drive’s variables, which can be watched, are arranged in different
functional groups. The MC SW overview group contains the most used
variables.
NTI AG
User manual LinMot-Talk 5 / 05.10.2012
Page 11/43
LinMot-Talk 5
The variable service is controlled with the following buttons:
➢ Show/Hide Details Additional information for each parameter,
such as unique parameter ID (UPID), scaling, min/max value, can
be displayed on demand.
➢ Read Variable: Reads the selected variable from the drive
once.
➢ Write Variable: Writes the selected variable to the drive.
➢ Read All Variables: Reads from the drive all variables of the
section once.
➢ Read All Variables Cyclically: Reads from the drive all
variables of the section cyclically.
➢ Remove (Del): Removes the selected variable from the list.
The following buttons are only used in special cases.
➢ Edit Properties The parameter properties can be displayed and
changed.
➢ New … Variable In a new generated variable section a new
variable can be defined. This is a drop down menu, which supports
different variable types.
➢ New Bit Variable In a new generated variable section a variable
of the type bit can be defined.
➢ New String Variable In a new generated variable section a
variable of the type string can be defined.
➢ New Float32 In a new generated variable section a variable of
the type float32 can be defined.
➢ New With UPID In a new generated variable section a variable
can be added by using the UPID from the appropriate parameter.
Under “User Defined” any variables or parameters can be arranged
together. Typically the variables are selected via UPID. It is also possible to
drag and drop them from the parameter or variable section.
Page 12/43
User manual LinMot-Talk 5 / 05.10.2012
NTI AG / LinMot
LinMot-Talk 5
2.9
Command Table
The drive supports the command table (CT) functionality, which means a
set of up to 255 motion commands (31 commands for B1100GP and
B1100VF series drives, on B1100PP CT is not supported) can be stored in
this table.
An example of is shown in the following picture:
A big variety of commands can be set in this tables, such as motion
commands, conditions, sequence directives, parameter access, …
This makes the CT to very powerful functional unit. The CT entries can be
accessed (executed) via digital inputs (on X6) or via interface software.
The CT tool has the following editing elements:
Entry ID indicates the CT entry, which is being edited.
Entry Name is a descriptive string of max. 16 characters
Motion Command Category the available commands are fitted into
groups for keeping a better overview
➢ Motion Command Type specifies the command to be
executed in
this entry.
➢ Auto execute new command on next cycle when selected, on the
next cycle the entry specified under “ID of Sequenced Entry” will be
executed. This gives the possibility of defining cycles, simple logical
sequences.
➢ ID of Sequenced Entry defines the CT entry executed on the
next
cycle when “Auto execute new command on next cycle”
is
activated.
➢ Apply writes the edited values into the entry.
➢ Upload from Drive reads and displays the entire command
table from the drive.
➢ Download to Drive writes the edited table (from the PC) to
the
drive.
➢
➢
➢
An application example of the CT can be found in the motion control
software user manual (Usermanual_MotionCtrlSW_E1100.pdf).
NTI AG
User manual LinMot-Talk 5 / 05.10.2012
Page 13/43
LinMot-Talk 5
2.10 Access Codes
On the drive special features or customer specific applications can be
protected by a software key. This means, a key must be activated by an
access code, which is drive specific (pinned to the serial number). Under
Drive\Set Access Code\ the following window will open:
A maximum of four keys can be set on the drive. Under Active Keys all
valid installed keys are listed (key value and access code).
A new key can be set by selecting the key name and defining the value and
access code. With the write button, the key and access code are written to
the drive. As soon as the drive has rebooted (click the Activate button) the
new key will be active, if the access code fits.
Please note: Access codes are drive specific. They cannot be copied from
one drive to another.
Page 14/43
User manual LinMot-Talk 5 / 05.10.2012
NTI AG / LinMot
LinMot-Talk 5
3 Quick Start Guide
This chapter helps step by step to set up a system using servo drive and
the LinMot-Talk configuration software.
3.1
Cabling E1100
The following picture shows the connectors on the drive used for a first
commissioning (with PC only).
Motor Power Supply (X1)
Motor Phases (X2) (if
present, otherwise on X3)
Motor Signals (X3)
Signal Supply (X4)
Pin1: GND
Pin2: +24VDC
Pin12: SVE (if present)
RS232 to PC (X5)
Pin2: RS232TX
Pin3: RS232RX
Pin5: GND
Use a 1:1 cable to the PC
➢
➢
➢
➢
➢
NTI AG
X1 Motor Supply, use 48..72 VDC (between PWR+ and PGND).
X2 Motor Phases: if this connector is not present, connect the motor
on X3 only.
X3 Motor signals: if motor has a DSUB-9 connector, connect it directly,
otherwise use an adapter to DSUB-9 or wire the phase lines to X2.
X4 For a commissioning with the PC it is necessary to wire only the
Pin1 (GND), Pin2 (+24VDC) and, if present, Pin12 save voltage enable
(SVE, +24VDC).
X5 RS232: The cable between the LinMot drive and PC must be
DSUB-9 F/F, 1:1 (X modem). If the PC has no COM port available, use
the USB to RS232 converter (LinMot article number 0150-3110).
User manual LinMot-Talk 5 / 05.10.2012
Page 15/43
LinMot-Talk 5
3.2
Cabling E1200
The following picture shows the connectors on the drive used for a first
commissioning (with PC only).
Motor Power Supply (X1)
Motor Phases (X2) (if
present, otherwise on X3)
Motor Signals (X3)
(DSUB 9f)
Signal Supply (X4)
Pin1: GND
Pin2: +24VDC
Pin12: SVE (if present)
Configuration Ethernet
(X15/X16)
RS232 to PC (X19)
Pin3: RS232RX
Pin5: GND
Pin6: RS232TX
➢ X1 Motor Supply, use 48..72 VDC (between PWR+ and PGND).
➢ X2 Motor Phases.
➢ X3 Motor Signals. (Note: the motor phases are not present on this
connector. Thus wire the motor phases in any case to X2).
➢ X4 For a commissioning with the PC it is necessary to wire only the
Pin1 (GND), Pin2 (+24VDC) and, if present, Pin12 save voltage enable
(SVE, +24VDC).
➢ X15/X16 Ethernet: Use a standard RJ45 patch cable to wire to the
LAN.
➢ X19 RS232: Use Adapter cable AC01-RJ45/Df-2.5-RS1 (LinMot article
number 0150-2143) to connect your PC via RS232. If the PC has no COM
port available, use the USB to RS232 converter (LinMot article number
0150-3110).
Page 16/43
User manual LinMot-Talk 5 / 05.10.2012
NTI AG / LinMot
LinMot-Talk 5
3.3
Cabling E1400
The following picture shows the connectors on the drive used for a first
commissioning (with PC only).
Motor Phases (X2)
Motor Encoder
Signals(X3), (DSUB 15f)
RS232 to PC (X19)
Pin3: RS232RX
Pin5: GND
Pin6: RS232TX
Safety Relays (X33)
(only present on -1S
drives)
Signal Supply (X4)
Pin1: GND
Pin2: +24VDC
Configuration Ethernet
(X15/X16)
Motor Power Supply,
3phase (X30)
➢
➢
➢
➢
➢
➢
➢
NTI AG
X2 Motor Phases.
X3 Motor Encoder Signals.
X4 For a commissioning with the PC it is necessary to wire only the
Pin1 (GND) and Pin2 (+24VDC).
X15/X16 Ethernet: Use a standard RJ45 patch cable to wire to the
LAN.
X19 RS232: Use Adapter cable AC01-RJ45/Df-2.5-RS1 (LinMot article
number 0150-2143) to connect your PC via RS232. If the PC has no
COM port available, use the USB to RS232 converter (LinMot article
number 0150-3110).
X30 Motor Supply, use 3x400 / 3x480VAC 50/60 Hz
X33 Safety Relays: For the safety relays use a separate +24VDC
supply. For a commissioning it is necessary to wire both Ksr+ (X33.4
and X33.8) to +24 VDC and both Ksr- (X33.3 and X33.7) to GND.
User manual LinMot-Talk 5 / 05.10.2012
Page 17/43
LinMot-Talk 5
3.4
Cabling B1100
The following picture shows the connectors on the drive used for a first
commissioning (with PC only).
Motor Power Supply (X1)
Motor Phases (X2)
Motor Signals (X3)
RS232 to PC (X5)
Pin2: RS232TX
Pin3: RS232RX
Pin5: GND
Use a 1:1 cable to the PC
Signal Supply (X14)
Pin13: DGND
Pin25: +24VDC
➢
➢
➢
➢
➢
Page 18/43
X1 Motor Supply, use 48..72 VDC between (PWR+ and PGND).
X2 Motor Phases
X3 Motor signals: if motor has a DSUB-9 connector, connect it directly,
otherwise use an adapter to DSUB-9 or wire the phase lines to X2.
X5 RS232: The cable between the LinMot drive and PC must be
DSUB-9 F/F, 1:1 (X modem). If the PC has no COM port available, use
the USB to RS232 converter (LinMot article number 0150-3110).
X14 For a commissioning with the PC it is necessary to wire only the
Pin13 (DGND) and Pin25 (+24VDC).
User manual LinMot-Talk 5 / 05.10.2012
NTI AG / LinMot
LinMot-Talk 5
3.5
Cabling B8050-ML
The following picture shows the connectors on the drive used for a first
commissioning (with PC only).
RT ETH Out (X18)
RT ETH In (X17)
RT Bus LED
RT Bus ID (S1, S2)
State LED
RS232 Config to PC (X23)
Pin2: RS232TX
Pin3: RS232RX
Pin5: GND
Use a 1:1 cable to the PC
Supply +24VDC (X24)
MC Link 1 (X25)
MC Link 2 (X26)
MC Link 3 (X27)
MC Link 4 (X28)
➢
➢
NTI AG
X23 RS232: The cable between the LinMot drive and PC must be
DSUB-9 F/F, 1:1 (X modem). If the PC has no COM port available, use
the USB to RS232 converter (LinMot article number 0150-3110).
X24 Use a 24V switched power supply.
User manual LinMot-Talk 5 / 05.10.2012
Page 19/43
LinMot-Talk 5
3.6
Firmware Download
As the cabling is done correctly now, turn on the drive’s power and start up
the LinMot-Talk software. Before using the drive the first time, the firmware
has to be downloaded. Therefore press install firmware button
to start
the wizard. Choose the file “Firmware_Build20101126.sct” (or similar) and
press “Open”. Then the wizard will start and guide through the installation.
In case of installing the firmware over ETHERNET, the service password is
required. This is for safety reasons. Especially if there are a lot of drives
accessible in the network, it can easily happen to confound them. Thus it is
strongly recommended to set a password. By default no password is set. If
the password is unknown, the parameters can be set to default by hex
switches, see 4.1”Setting all Parameters to Default Values”.
According to the drive type, different interface and application software can
be selected.
3.7
Login
When successfully finished downloading the firmware, login with
\File\Login…, then select the appropriate port and press ok. A login info
window will appear showing the login progress.
When logged in you will find the following window:
The Object Inspector window can be dragged away or closed. It can be
reopened with F1.
Page 20/43
User manual LinMot-Talk 5 / 05.10.2012
NTI AG / LinMot
LinMot-Talk 5
3.8
Scanning CAN Bus
When one or several drives are linked with CAN bus for configuring, it can
be very helpful to scan the CAN bus for linked drives automatically. Thus, it
is not necessary to know all node IDs. Under \File\Scanning (with CANusb)
a list of the present drives will be displayed:
With just one click the LinMot-Talk software will log in to all drives.
NTI AG
User manual LinMot-Talk 5 / 05.10.2012
Page 21/43
LinMot-Talk 5
3.9
Scanning Ethernet
When one or several drives are linked with Ethernet for configuring, it is
helpful to scan the automatically for linked drives. Thus, it is not necessary
to know all node IP addresses. Under \File\Scanning (via Ethernet) first the
interface has to be selected (network link)
With the radio button Group Number could be activated a scan for a special
drive group. The list will only display the drives with the group number, like
the number in the text field. In the drives this number is saved in the
parameter with the name Net Group and the UPID 0078h.
A list of the present drives will be displayed:
With just one click the LinMot-Talk software will log in to all drives. The
colored markings have the following meaning:
Green: The drive is ready to log in.
Grey: You are already logged into this drive.
Red: Another instance is logged into this drive (other user or
other interface).
The default mode for acquiring an IP address is via DHCP. If no servers on
the connected network respond, the drive switches to the Ipv4 Link-Local
addressing scheme (also known as APIPA on Windows systems). This way
the drive automatically assigns itself an address within the range of
169.254.0.1 through 169.254.255.254 (Subnet Mask 255.255.0.0).
Please note that this process can take up to a minute until a valid address
is assigned to the drive this way.
Page 22/43
User manual LinMot-Talk 5 / 05.10.2012
NTI AG / LinMot
LinMot-Talk 5
3.10 Motor Wizard
As no motor is defined, the next step is to start the motor setup wizard.
and the following window will appear:
Press the button
As we want to configure a LinMot Motor we choose “LinMot Linear Motors”
and press Open.
Select the actuator type you have wired to the drive, then press Open.
The following steps will show forms including drawings and descriptive
texts.
The first step is to define the stator and slider.
NTI AG
User manual LinMot-Talk 5 / 05.10.2012
Page 23/43
LinMot-Talk 5
The derived settings show information about the complete motor type,
article numbers and the most important technical data.
The next step is to choose the flange for defining the cooling capability.
Page 24/43
User manual LinMot-Talk 5 / 05.10.2012
NTI AG / LinMot
LinMot-Talk 5
Longer extension cables will have an effect to the motor’s phase
resistance. In step 3 can be defined two cable segments.
The next hardware setup step is to define an external position sensor
system (if present). For E1100 drives can be chosen between none,
incremental AB(Z) and analog sine/cosine 1Vpp. For B1100 drives can be
chosen between none, incremental AB(Z) and AB encoder simulation.
NTI AG
User manual LinMot-Talk 5 / 05.10.2012
Page 25/43
LinMot-Talk 5
With step 5 the feed forward parameters are set up. Depending on the
moving mass, additional load mass, friction and orientation. Under the
derived settings the influence can be watched.
Page 26/43
User manual LinMot-Talk 5 / 05.10.2012
NTI AG / LinMot
LinMot-Talk 5
With the next and last step the position drive’s parameters will be set up:
It is recommendable to start with the default soft settings, because the
parameters can be changed any time later on (by restarting the motor
wizard or by setting in the parameter tree directly).
With the soft parameter setting, PID values will be quite low such as the
motor is low noise and the position is not controlled very stiffly.
The stiff parameter set tends to more noise and more power consumption
of the motor, but the position will be controlled harder.
In both settings, the I Gain is set to zero, which means a steady-state
deviation from the desired position can occur. When using the I Gain, the
position controller may tend to swing.
The Noise Filter option is to reduce the noise from the position feedback
sensor at standstill.
For finding the best set of PID parameters, the system has to be optimized
iteratively. There is no general way of how to optimize the settings,
because different goals can be achieved such as position accuracy, power
minimization, noise reduction, …
NTI AG
User manual LinMot-Talk 5 / 05.10.2012
Page 27/43
LinMot-Talk 5
The next step is to define the homing procedure.
The most frequently used homing mode is “Mechanical Stop Negative
Search”. In this case the slider will move with the notch towards the stator’s
front end (where no cable is).
Other modes support homing on home switches, limit switches, indexer
inputs or some combinations of those.
Page 28/43
User manual LinMot-Talk 5 / 05.10.2012
NTI AG / LinMot
LinMot-Talk 5
Step 8 is to define the slider home position. This is for the motor and drive
the most important value. It defines at the home position, where the slider is
positioned relative to the stator. This defines how far the motor can move in
each direction.
NTI AG
User manual LinMot-Talk 5 / 05.10.2012
Page 29/43
LinMot-Talk 5
With the last wizard step the user’s coordinate system can be defined.
At the end, press finish. If the firmware on the drive is still running, an
appropriate message will be shown. All parameters will now being written to
the drive.
The motor wizard can be run several times, e.g. to setup an external
sensor, to change the load setup or to change the motor type. When
rerunning it, at the end will be shown a list of parameters, which will be
changed.
Page 30/43
User manual LinMot-Talk 5 / 05.10.2012
NTI AG / LinMot
LinMot-Talk 5
3.11 Continuous Curve Mode
We want the motor to run a curve cyclically. (The easiest, but not so
informative way to run the motor would be the VAI 2 Pos Continuous mode)
The drive is set to continuous curve mode by selecting “Continuous Curve”
under \Motion Control SW\Motion Interface\Run Mode Settings\RunMode
Selection\ in the parameter tree.
NOTE: For enabling the curve feature on B1100 drives, it is necessary to
set an access key.
The second parameter to be set is to define which curve has to be run. Set
the parameter “Curve ID” to 1 under \Motion Control SW\Motion
Interface\Time Curve Settings\.
Before running the curve, it is advisable to define the curve we want to run.
NTI AG
User manual LinMot-Talk 5 / 05.10.2012
Page 31/43
LinMot-Talk 5
3.12 Defining Curves
Curves can be easily defined with the curve wizard. For this example we
will define two sine curve forms over a stroke of 50mm out and in with
different speeds, which will be joined together.
Now, step by step: Open the curve tool by clicking the “Show Curves”
in the tool button bar. Then press the “New Curve” button
to
button
start the curve wizard.
As we want to define a curve in position vs. time mode we can keep the
default selection and press the next button.
In this mask, we will set the curve ID to 2 (we will have the merged curve
with ID 1 at the end) and as name we set e.g. “SineOut”. The end point is
placed at 50mm. With “Next” the wizard will show some curve data:
Page 32/43
User manual LinMot-Talk 5 / 05.10.2012
NTI AG / LinMot
LinMot-Talk 5
The next and last mask proposes a number curve setpoints. It is advisable
to accept this proposal.
With “Finish” the first curve is defined. The curve will be displayed as
follows:
We will now define curve going back. So we start the curve wizard again
and define under curve settings the following:
NTI AG
User manual LinMot-Talk 5 / 05.10.2012
Page 33/43
LinMot-Talk 5
Set curve ID to 3, Curve Name to “SineIn”, Curve Length to 500ms, Start
Point to 50mm and End Point to 0mm. Click twice “Next” and then “Finish”.
Now we have defined the two curve segments and will join them together.
Select the two curves
then press the “Join Curves” button
joined curve appears:
Page 34/43
. The curve settings mask for the
User manual LinMot-Talk 5 / 05.10.2012
NTI AG / LinMot
LinMot-Talk 5
We will set the curve name to “SineOutIn” and make sure the curve ID is 1.
The curve length is proposes as the sum of the curve segment times.
Press “Next” and “Finish”. The curve for the continuous curve mode is now
defined and has, according to the parameter settings, the curve ID 1. As we
want to download the curves to the drive we select all the curves in the edit
window and move them to the download window.
When double click the “SineOutIn” Curve the joined curve is shown:
Now the curves must be downloaded to the drive. Therefore press the
“Show Curves” button
and then the “Download Curves into Drive” button
. Then a warning comes up which has to be
confirmed and the progress window will display the actions taken to
download the curves.
NTI AG
User manual LinMot-Talk 5 / 05.10.2012
Page 35/43
LinMot-Talk 5
3.13 Control Status
As we have defined now all parameters and curves, we will let the motor
running. For this time, we will take over the interface control from the PC.
So we are interface-independent.
Switch to the control panel with the button
, then press the start button
(starting the drive’s firmware) and wait until the control status panel is
updated and looks the following:
Now we will fetch the control over the “Switch On” and the “Home” flags.
Now turn off and turn on again the “Switch On”
flag, this is because of the auto start prevention.
At this time, the motor will be powered and
position controlled at the actual position. Set the
“Home” flag and the motor will initialize against
the inner hard stop.
When the motor stands still, clear the “Home”
flag and the motor will run the curve
continuously.
Detailed information about the MC software’s
state diagram can be found in the MC software
manual.
Page 36/43
User manual LinMot-Talk 5 / 05.10.2012
NTI AG / LinMot
LinMot-Talk 5
3.14 Oscilloscope
The oscilloscope is a very useful tool for tuning the motor. The LinMot-Talk
software has defined a default oscilloscope, which samples the actual
position, demand position, position difference and demand current. When
clicking on the “Show Oscilloscope” button
, the focus will be set to the
default oscilloscope. We could start the oscilloscope now with the start
button
, but it is recommended to set the recording time about 2 seconds
(one curve cycle is 1.5 s). We will switch to the oscilloscope settings with
Then press Ok and start the oscilloscope with
. The recorded data on
will be read out from the drive and displayed, which will look somehow like
the following.
Possibly it is necessary to press button
(fit view).
Tuning the system would be started at this point. One possibility is by
restarting the Motor Wizard and changing the load or control parameter,
another one is to change the parameters directly in the parameter tree.
NTI AG
User manual LinMot-Talk 5 / 05.10.2012
Page 37/43
LinMot-Talk 5
3.15 Continuous Two Point Mode
The easiest way to run the motor continuously is to set the VAI 2 Pos
Continuous mode. In this mode the motor moves between the two positions
Trig Fall and Trig Rise. The time the motor waits at the two positions is
defined under “VAI 2 Pos Cont Settings”.
The minimal settings for this mode are shown next. First the mode has to
be set:
And then the positions have to be set under “Trig Fall Config\Position” and
“Trig Rise Config\Position”:
This is all we have to configure. The speed, acceleration and deceleration
can also be defined at this place in the parameter tree. The motor can now
be started the same way as described under 3.13 Control Status.
Page 38/43
User manual LinMot-Talk 5 / 05.10.2012
NTI AG / LinMot
LinMot-Talk 5
3.16 Export Configuration
When the drive settings are done it is strongly recommended to save the
complete configuration. This can be done under File
Export… or with by
clicking on
. After the file name dialog the selection of the parts to be
exported will be shown:
It is recommended to export all. For a configuration recovery it is necessary
to select the parameters, curves and command table.
In case of a support request it is very helpful to provide the complete
configuration as well (with variables, oscilloscope shots, message and error
log).
NTI AG
User manual LinMot-Talk 5 / 05.10.2012
Page 39/43
LinMot-Talk 5
3.17 Import Configuration
A configuration can be imported with File
Import… or with the button
.
When opening a configuration to a drive, a compatibility list of the
parameter trees will be shown. Then the selection of the importable parts
will be shown:
It is possible to import only some specific parts (e.g. curves or command
table).
3.18 Open Offline Configuration
A configuration can also be opened when no drive is present. Under File
Login/Open offline…
This is a very helpful feature for supporting problems.
Page 40/43
User manual LinMot-Talk 5 / 05.10.2012
NTI AG / LinMot
LinMot-Talk 5
3.19 Create Offline Configuration
For any supported drive a configuration can be created offline. Choose the
menu item File\Create Offline…
The above window will be shown. Select the drive first, then choose the
interface and application software. The software parts, which can be
selected, are the same as when installing firmware to the drive. When
created the configuration, the parameters will have their default values. The
configuration can then be altered and saved the normal way.
NTI AG
User manual LinMot-Talk 5 / 05.10.2012
Page 41/43
LinMot-Talk 5
4 Trouble shooting
4.1
Setting all Parameters to Default Values
E1100, E1200, E1400 and B8050
All parameters of the SG3 and SG5 drives can be set to their default values
without the use of the LinMot-Talk. This can be done according these
steps:
1. Power off the drive
2. Set the two ID switches to 0xFF
3. Power on the drive, the ERROR and WARN LEDs will blink
alternately.
4. Set the two ID switches to 0x00
5. Wait until the WARN and EN LEDs will flash together.
6. Power off and on again.
B1100
On SG4 drives an image of the default parameters will be stored during the
software installation. This image can be reloaded to the operating
parameters. The procedure is the following:
1. Set the parameter with UPID 0x6085 to 0x0001.
2. Power off the drive.
3. Power on the drive.
The value of the parameter with UPID 0x6085 will be automatically cleared
to 0x0000.
4.2
Interface does not run
If the interface software (DeviceNet, CANopen, Profibus, LinRS) does not
communicate there may be several reasons:
➢ Specific Interface Software not installed
➢ Switch S3.4 “Interface” on drive’s bottom side must be set to “On”. (In
case of LinRS, this switch must be set to off when configuring over
RS232, and set to on when running the LinRS interface).
➢ Parameter with UPID 2008h set to disable.
➢ Baud Rate and Node ID selection not correctly set (Parameters and/or
ID switches on drive’s front).
4.3
Stopping Firmware
When the same link is used for configuration purposes and from the
interface (e.g. RS232 link and LinRS interface) it may not be possible to
login with the LinMot-Talk software. In some cases, it should be possible to
log in, e.g. to download new firmware.
On E1100 drives, the interface switch S3.4 can be set to off and after a
power up the interface software should be deactivated and the
configuration link should be free. If this does not help, or you are working
with a B1100 drive, there is a script under File -> Open ->
StopFirmware.sct, which keeps trying to stop the drives firmware while it is
powered on. After a power up, within the first 2 seconds the interface can
be prevented from starting.
Page 42/43
User manual LinMot-Talk 5 / 05.10.2012
NTI AG / LinMot
LinMot-Talk 5
5 Contact Addresses
----------------------------------------------------------------------------------------------------------------------------SWITZERLAND
NTI AG
Haerdlistr. 15
CH-8957 Spreitenbach
Sales and Administration:
+41-(0)56-419 91 91
[email protected]
Tech. Support:
+41-(0)56-544 71 00
[email protected]
Tech. Support (Skype) :
skype:support.linmot
Fax:
Web:
+41-(0)56-419 91 92
http://www.linmot.com/
----------------------------------------------------------------------------------------------------------------------------USA
LinMot, Inc.
5750 Townline Road
Elkhorn, WI 53121
Sales and Administration:
877-546-3270
262-743-2555
Tech. Support:
877-804-0718
262-743-1284
Fax:
800-463-8708
262-723-6688
E-Mail:
Web:
[email protected]
http://www.linmot-usa.com/
----------------------------------------------------------------------------------------------------------------------------Please visit http://www.linmot.com/ to find the distribution near you.
NTI AG
User manual LinMot-Talk 5 / 05.10.2012
Page 43/43