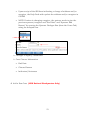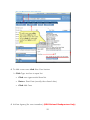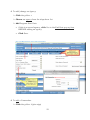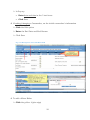
1
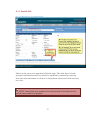
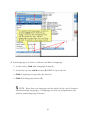
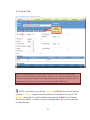
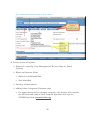
CSCMS V.2.4.3 LIRS Local User Manual November 2015 Table of Contents These titles are live links to Chapters, Paragraph Headings, and Figures. Place the cursor on a title and control click the title. Table of Contents ........................................................... 2 1. IT Requirements for CSCMS .................................... 5 1.1 Browser Compatibility .............................................. 5 1.2 Settings and Best Practices for using CSCMS ............................... 5 Fig. Clear Internet Cache Pg. 1 ............................................................... 5 Fig. Clear Internet Cache Pg. 2 ............................................................... 6 2. Working with Confidential Information ...................... 8 3. Getting Started ......................................................... 9 3.1 How Things Work ......................................................................... 9 Fig. Login Screen .................................................................................... 9 Fig. Dashboard Logout ......................................................................... 10 3.2 How Computer Commands Look ................................................. 10 3.3 Other Helpful Tools .................................................................... 10 4. Dashboard .............................................................. 12 Fig. Dashboard with FR Reminders ...................................................... 12 Fig. Dashboard Ribbon ......................................................................... 12 4.1 Dashboard.................................................................................. 12 5. Case Management ................................................... 13 Fig. Case Management Tab Page ........................................................... 13 5.1 Updating CSCMS in Case Management ....................................... 13 5.2 Minor Search .............................................................................. 13 Fig. To Enter the Case Management Section ......................................... 14 2 5.3 Open a Minor’s Case Record ....................................................... 14 5.4 Add a Minor (LIRS National Headquarters Only) ......................... 15 Fig. Add New Minor .............................................................................. 15 Fig. Case Management Section Tabs Ribbon ......................................... 16 5.1.1 Details Tab.............................................................................. 17 Fig. Case Management Cases Default Page ........................................... 17 Fig. Case Management Details Add Language ....................................... 18 5.1.2 Cases Tab ................................................................................ 19 Fig. Case Management FR Cases Page .................................................. 19 Fig. Case Management FR Cases Page w/ Phase Options ...................... 20 Fig. Case Management Cases Add Case ................................................ 22 Fig. Case Management Cases Add Caseworker ...................................... 23 Fig. Case Management Cases Add Minor Risk ....................................... 24 Fig. Case Management Cases Add Sponsor Risk ............................. 25 Fig. Change in Caregiver ................................................................. 26 Fig. Case Management Cases Add Other Caregiver Risk ........................ 26 Fig. Case Management Cases Intensity of Intervention Part 1 ............... 27 Fig. Case Management Cases Intensity of Intervention Part 2 .......... 28 Fig. Case Management Cases Add Last ORR Placement (Shelter) .......... 29 Fig. Case Management Cases Add LIRS Staff ........................................ 30 5.1.3 Notes ....................................................................................... 31 Fig. Case Management Notes ................................................................ 31 Fig. Case Management Notes Add Note ................................................. 32 Fig. Case Management Case Notes Search/Reports .............................. 34 5.1.5 Reminders ............................................................................... 35 Fig. Fig. Fig. Fig. Case Case Case Case Management Management Management Management Cases Cases Cases Cases Reminders Page ...................................... 35 Reminder from Template ......................... 36 Add New Reminder ................................. 37 Edit a Reminder ...................................... 38 5.1.6 Documents .............................................................................. 39 Fig. Fig. Fig. Fig. Case Case Case Case Management Management Management Management Cases Cases Cases Cases Documents ............................................. 39 Add New Documents ............................... 40 Documents Search Document ................. 41 Documents Edit Document ..................... 42 3 5.1.7 Indicator ................................................................................. 43 Fig. Case Management Cases Indicator ................................................. 43 4 1. IT Requirements for CSCMS 1.1 Browser Compatibility The Children’s Services Case Management System (CSCMS) database is made for Internet Explorer 11 (IE 11) and Google Chrome. OTHER BROWSERS (like Firefox, Google, others) MAY NOT WORK FOR CSCMS and cause errors. 1.2 Settings and Best Practices for using CSCMS The following guidelines will help to ensure that your computer system is set for optimum use of the database. Shut Down your computer before you leave each workday. DO NOT hibernate and restart in the morning; this will NOT clear the internet browser. Getting in the habit of shutting down and starting back up will restore resources and ensure upgrades are received. Configuring the internet browser to clear the cache is explained below for Internet Explorer. Fig. Clear Internet Cache Pg. 1 5 Fig. Clear Internet Cache Pg. 2 Configure the IE Browser to auto-clear the cache Open IE, Click Tools Click Internet Options, (Fig. Clear Internet Cache Pg. 1) Check Delete browsing history on exit* check box, (Fig. Clear Internet Cache Pg. 2) Click Delete Button to enter set-up page (Fig. Clear Internet Cache Pg. 2) Check Temporary Internet files and Cookies check boxes (check or uncheck other boxes if needed) Click Delete button to set and exit page NOTE: The Delete browsing history on exit check box in the General Tab page sets this function to execute automatically every time the computer restarts (a complete shutdown). The Delete browsing history in the IE Tools bar works once each time it is clicked and cannot be set to work automatically. 6 Configuring the internet browser to clear the cache is explained below for Google Chrome: o Open Settings o Click “Show Advanced Settings” o Scroll to Privacy and click “Clear Browsing Data…” o Select the Browsing Data you would like to delete and click “Clear Browsing Data” 7 2. Working with Confidential Information The CSCMS Database information is bound by the Health Insurance Portability and Accountability Act (HIPAA) and other personally identifiable information (PII) which must be protected. The NASW Code of Ethics includes: Social workers should protect the confidentiality of clients’ written and electronic records and other sensitive information. Social workers should take reasonable steps to ensure that clients’ records are stored in a secure location and that clients’ records are not available to others who are not authorized to have access. (Ethical Standards, 1.07 Privacy and Confidentiality) It is critical to remember that you are working with confidential information at all times. The loss and misuse of this information can lead to Identity Theft or other negative consequences, and could harm the very people we are trying to help. Please be careful. In order to protect sensitive, confidential data, always log out of CSCMS, or lock your computer if you walk away. Do not share your password with anyone. Do not send documents to shared printers, scanners, flash/thumb drives, etc. And only access CSCMS over secure web connections. This is the data identity thieves work tirelessly to steal. Please, be careful! People depend on us for their safety. 8 3. Getting Started 3.1 How Things Work The goal of the LIRS Training Manual is to present the CSCMS database in a manner that is to the point and easy to use. These tools are explained below: NOTE: CSCMS times-out when inactive. It may appear to be working but the functions will be incorrect until the user logs back in. To prevent this and protetct sensitive data, CSCMS users should LOG-OUT of CSCMS when leaving their computer even for a short time. Locking the computer—vs.logging out—will protect the data but, a time-out can still occur and shut down the functions (Fig. Dashboard Logout). Fig. Login Screen 9 Fig. Dashboard Logout 3.2 How Computer Commands Look Computer commands are words and actions that users use constantly. In this manual, action words are bolded and things acted on are italicized. Examples: Click the Stop Button, Enter Data, Insert Table, Delete Record. NOTE: Capitalizing first letters is used here only as examples and for clarity. In the manual words in mid-sentence will be in lowercase letters. 3.3 Other Helpful Tools: Control Click on the Table of Contents’ titles if you would like to be taken to chapter, subchapter, paragraph and figure levels. Screen shots use pointer arrows and ‘balloon’ text boxes to show what a task usually looks like and what to look for and/or do. For easy screens, instructions will be in the ‘balloon’ text box. TIPS / NOTES icon: Tips are short cuts, ideas, and helpful information to help make things easier. Notes are the how, the why, and the warning messages to explain why it is done that way and how you fix it if something goes wrong. 10 11 4. Dashboard Fig. Dashboard with FR Reminders Fig. Dashboard Ribbon 4.1 Dashboard The Dashboard Fig. Dashboard is the default site of the Children’s Services Case Management System database (CSCMS) Fig. Dashboard Ribbon. Here users can: Enter the database by clicking one of the titles in the Dashboard Ribbon (e.g. Case Management). Not all titles shown are available to all users. View their reminders by checking the Show All Reminders check box located in the lower left corner See recently viewed cases by clicking on the Recently Viewed link in the upper right corner Logout by clicking the Logout link in the upper right corner 12 5. Case Management Fig. Case Management Tab Page 5.1 Updating CSCMS in Case Management Case Management (Fig. Case Management), is where the majority of CSCMS case records are created, accessed and updated. 5.2 Minor Search Enter the Case Management Section to initiate a Minor Case Search to: Retrieve a specific case or multiple cases by entering one or more of the case details listed below in their appropriate text box: Alien Number—retrieves a single person Person’s Name—retrieves that person or persons with that name Program Agency—retrieves cases from the local agency Case Type(s)—retrieves one or multiple cases from the search parameters entered To limit the Minor Search, check one of these boxes 13 Open Cases Only—retrieves only the open cases from the search parameters entered My Cases Only—retrieves only the user’s cases Click Search Fig. To Enter the Case Management Section TIP: Typing part of a name or number in the text box retrieves data only in the alphabetical or numerical range typed. The more data entered the shorter the retrieved list will be to manually search. For example, type in ‘B’ and the search retrieves only names starting with ‘B’; type in ‘Mi’ and the search retrieves only names starting with ‘Mi’. For numbers, Type in ‘1’ and the search retrieves only numbers starting with ‘1’; type in ‘327’ and the search retrieves only numbers starting with ‘327’. 5.3 Open a Minor’s Case Record To open a Minor’s Case Record to view and/or update a file: 14 In the Full Name column click the person’s blue hyperlinked name. This will open the Details tab for that minor, or In the Case column, click the person’s blue hyperlinked case type. This will open the Cases tab for that minor Once you click into the minor’s case record, access their case information by clicking on the appropriate tab across the top. Tab options include: Details, Cases, Notes, People, Reminders and Documents (see screen shot below, Fig. Case Management Section Default Page) 5.4 Add a Minor (LIRS National Headquarters Only) Fig. Add New Minor Click Add Minor button to open the New Minor window Enter the minor’s data into the text boxes Click the Save button when finished 15 5.1 Case Management Section The Case Management Section (Fig. Case Management Section Tabs Ribbon) is where users access and update the majority of CSCMS case records using the Section tabs—Details, Cases, Notes, People, Reminders, and Documents. Fig. Case Management Section Tabs Ribbon NOTE: Once a case is opened in the Case Management Section no other case can be opened in any tab until the first case is finished/closed. There is no ‘exit’ button in this section; to exit this section, click Case Management in the Dashboard ribbon. A new case can then be opened or another title clicked as needed. 16 5.1.1 Details Tab Fig. Case Management Cases Default Page Above is the open auto populated Details page. The data here is basic personal information and can easily be updated by manually entering data into the text boxes or click on a drop-down arrow and click an entry on a list. NOTE: These fields auto-populate from data entered at the National level and will rarely need to be updated. 17 Fig. Case Management Details Add Language Add Language to a Case to indicate the Minor’s language: In this order, click Add Language button (1) In the Pop-up box, click text box (2) FIRST to open the list Click a language to populate the text box Click Add Language button (3) NOTE: More than one language can be added to the case if a minor speaks multiple languages. A language can also be designated as the minor’s native language if known. 18 5.1.2 Cases Tab Fig. Case Management FR Cases Page The Case Management Cases page is where case data is documented. This includes important dates in the life of a case, and also personal and clinical assessment information regarding clients. Much of this section is populated by referral data entered at the National LIRS level. NOTE: In this section you will see Yellow + and Red X icons on the left side of a row. A Yellow + signals new information can be added to this record. The Yellow + will vanish if no further additions are allowed. A Red X is the 'Delete This Record' button. If clicked, a pop-up message asks if you are sure you want to delete the item. 19 Fig. Case Management FR Cases Page w/ Phase Options Partner users will update: Phases of a case Fig. Case Management FR Cases Page w/ Phase Options) Minor and Sponsor Risks Referral or Additional Risk Date Identified Intensity of Intervention Adding Other Caregivers if Sponsor ends If a minor moves and/or changes caregivers, the Partner will complete the SIR form and email to their Program Specialist and copy the CSCMS Help Desk ([email protected]). 20 Upon receipt of the SIR form indicating a change of address and/or caregiver, the Help Desk with update the address and/or caregiver in CSCMS NOTE: If minor is changing caregiver, the partner needs to give the previous sponsor/caregiver and “End Date” and “Sponsor End Reason” by opening the Sponsor Dialogue Box (from the Cases Tab) using the notepad icon. Changes in Agency Caseworker Case Closure Information End Date Closure Reason Indicators/Outcomes Add a New Case (LIRS National Headquarters Only) 21 Fig. Case Management Cases Add Case To Add a new case click New Case button: Click Type text box to open list Click case type needed from list Enter a Start Date (usually the referral date) Click Add Case Add an Agency (for case transfers) (LIRS National Headquarters Only) 22 To add/change an Agency: Click the yellow + Choose an agency from the drop-down list Add Program Start Date if this is a second agency, click Yes in the End Date pop-up box, BEFORE adding an agency Click Save. Fig. Case Management Cases Add Caseworker To add a Caseworker Click the yellow + (plus sign) 23 In Pop-up Enter data and date in the 5 text boxes Click Save If ending/changing a Caseworker, on the initial caseworker’s information Click the Edit option Enter the End Date and End Reason Click Save Fig. Case Management Cases Add Minor Risk To add a Minor Risks: Click the yellow + (plus sign) 24 In Pop-up Choose Risk Type (Referral or Additional) and Risk from drop-down lists Enter date in text boxes (Referral risks automatically populate date) Click Save Repeat as necessary for initial referral risk entry, and throughout life of case for additional risks identified Fig. Case Management Cases Add Sponsor Risk To add Sponsor Risk: Click yellow + In Pop-up 25 Choose Risk Type (Referral or Additional) and Risk from drop-down lists Enter date in text boxes (Referral risks automatically populate date) Click Save Repeat as necessary for initial referral risk entry, and throughout life of case for additional risks identified Fig. Change in Caregiver Fig. Case Management Cases Add Other Caregiver Risk To add Other Caregiver Risk: Click yellow + 26 In Pop-up Enter data and date in the 4 text boxes Click Save Repeat as necessary for risk entry throughout life of case for additional risks identified Fig. Case Management Cases Intensity of Intervention Part 1 To add an Intensity of Intervention: Click the Yellow + In the Pop-up 27 Enter the level and Start Date (*required items) Click Save Fig. Case Management Cases Intensity of Intervention Part 2 To change an Intensity of Intervention level: First edit the most recent level by Clicking the Edit icon Enter the End Date and End reason Click Save Then add the new level by Clicking the Yellow + In the Pop-up Enter the level and Start Date (*required items) 28 Click Save Fig. Case Management Cases Add Last ORR Placement (Shelter) To add/change Add Shelter History: (LIRS National Headquarters Only) Click the Yellow + in the Pop-up enter as much data as you have regarding the previous ORR Placement in the 6 text boxes (ORR Placement is a required field) Click OK 29 Fig. Case Management Cases Add LIRS Staff To add/change LIRS Staff: (LIRS National Headquarters Only) Click the Yellow + in the Pop-up click data in the LIRS Staff drop-down list Check Active box Enter data in the Start Date text box Enter data in other text boxes if known Click Save 30 5.1.3 Notes The Notes tab is where messages and case notes are created and stored. Notes can be sorted by: Service Date, Author, Note Type, and Entry Date by clicking on the column title. Fig. Case Management Notes 31 Fig. Case Management Notes Add Note 32 To Add a New Case Note: Click Add New Case Note button Enter data in Service Date if needed. CSCMS automatically populates current date, if entering older notes, please backdate to the accurate service date. Choose Note Type Type new note in Note: text box Click Save, Save Draft, or Delete button Save will permanently save the Note in CSCMS. No further edits are allowed Save Draft will save the Note so the user can return later to update or edit the information. Spellcheck will occur automatically, or CSCMS will require the user to use Spellcheck prior to saving To return to page 1 of Notes, click Cancel button 33 Fig. Case Management Case Notes Search/Reports To Search for a specific note/report: Click Case Search Notes/Report button On next page, Enter note/report parameters in text boxes Click Display button To return to page 1 of Notes, click Clear button 34 5.1.5 Reminders Fig. Case Management Cases Reminders Page The work performed by case mangers is detailed, specific and time critical for each minor regarding their legal and physical well-being. For example, a minor’s 18th birthday changes their legal status from minor to adult…a critical date for them and one that case workers must be prepared for. To assist you, Reminders are pop-up case notes that are automatically entered, or you can set to indicate important case activities or event items that should be completed by and/or on specific dates (e.g. a minor's 18th birthday, upcoming visits and reports). 35 Fig. Case Management Cases Reminder from Template Adding Case Reminders from a Template will populate a predefined series of Reminders based on the release date of the minor and child’s birthdate. If not automatically populated on a new case, it should be added when the user first receives the case in CSCMS. To add new Reminders from Template Click the Add Case Reminders from Template button The Reminders will automatically populate on the screen. Upcoming Reminders will also appear on the user’s Dashboard. 36 Fig. Case Management Cases Add New Reminder If desired, the user can add a custom Reminder to a case so a specific future action will appear on the Dashboard and Reminder screen. To add a new reminder Click the Add New button In the Pop-up, enter data in the necessary text boxes. The Reminder Name, Due Date, and Reminder Date (date appears on Dashboard) are required items. Click Save To return to Reminders page, click Close button 37 Fig. Case Management Cases Edit a Reminder To Edit a reminder: Click an Edit link in the far right column As needed, enter data in the Pop-up screen's 6 text boxes Decide if you want to check "Dismiss Reminder..." Click Save Button NOTE Delete will delete without a warning Pop-up To return to page 1 of Reminders, click Close button 38 5.1.6 Documents The Document section is used to add or find case document and upload them into the CSCMS data base. Fig. Case Management Cases Documents 39 Fig. Case Management Cases Add New Documents To Add New Document: Click the Add New Document button In the Pop-up Select Document Type in the text boxes Enter an optional Document Note for reference Click Browse to search for the intended document from your computer drive Select the document from your computer drive, the document will then appear in the Document file box Click Save Button, the document will now appear in the CSCMS data base To return to page 1 of Documents, click Cancel button 40 Fig. Case Management Cases Documents Search Document To find a document Click Search Document button In the Pop-up enter as much data as possible in the text boxes Click Search button 41 Fig. Case Management Cases Documents Edit Document To Edit a Document: Click its blue link In the Pop-up Choose a Document Type Click the Browse button to open the computer's files Choose a file to upload to CSCMS Click Save 42 5.1.7 Indicators Must be completed at the time of case closure. Fig. Case Management Cases Indicator Must be completed at the time of case closure. To update an Indicator, select the Indicator Tab on the case. Click on the blue Notepad Icon within each Indicator Question, three drop downs will appear: 43 Select from the drop down menus for “Answer,” “Utilization,” and “Reason for Non-Utilization” depending on the case information at the time of closure. Click “Update” 44