1
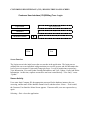
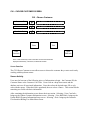
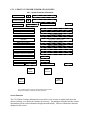
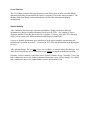
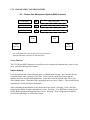
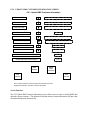
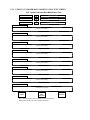
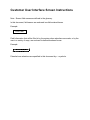
Customer User Interface Screen Instructions
Note: Screen field names are defined in the glossary.
In this document, field names are enclosed in solid-bordered boxes.
Example:
Colo Code
Field information that will be filled in by the system when selections are made, or by the
user in a variety of ways, are enclosed in dashed-bordered boxes.
Example:
colo code displayed
Potential user selections are specified in this document by < > symbols.
CUSTOMER USER INTERFACE (CUI) / BILLING TREE LOGIN SCREEN
Customer User Interface (CUI)/Billing Tree - Login
Login Name
login name goes here
Password
password goes here
Database Instance
database instance goes here
Enter
Exit
Screen Function
The Login screen is the initial screen the user reaches in the application. The login process
validates the user as an individual with permission to access the system, and also determines the
level of access in terms of Create and Change privileges. Levels of permissions expected are
View Information, View and Update Existing Information, and View, Update, Create And Delete
Information. At this time, separate screens have not been created that say “View Only” versus
“Update.”
Screen Activity
Users enter their Company ID, the appropriate password for the database instance they are
accessing, and the name of the database instance itself, and then select <Enter>. If successful,
the Customer User Interface Menu Screen appears. If unsuccessful, users are requested to try
again.
Selecting < Exit> closes the application.
CUSTOMER USER INTERFACE/BILLING TREE – MAIN MENU SCREEN
Custmer User Interface/Billing Tree - Main Menu
Customer Activity
RMS Activity
Bill Tree Activity
Exit
Screen Function
The Customer User Interface/Billing Tree Main Menu screen allows users to directly access the
part of the application they want to work in.
Screen Activity
By clicking on the desired application button, users are brought to the appropriate section of the
application. If successful, the Menu Screen appears.
Selecting < Exit> closes the application.
CUI – CHOOSE CUSTOMER SCREEN
CUI - Choose Customer
Customer ID
number to be selected
Customer Name
name to be selected
Cust Colo Code
name to be selected
Enter
Exit
View
Cust Info
View
RMS Info
Note: Fields that already contain information will have that information
displayed automatically. Otherwise, the fields will be blank.
Screen Function
The CUI Choose Customer screen allows users to choose the customer they want to work on by
working with drop-down menus.
Screen Activity
Users need at least one of the following pieces of information to begin – the Customer ID, the
Customer Name or the Customer Colo Code. Users click on a drop-down arrow and the
database retrieves all associated information. Users then select the desired name, ID or colo
code with the mouse. When the field is populated, the user selects <Enter>. This action fills the
remaining two fields with basic information.
After examining the information, users choose their next action. Selecting <View Cust Info>
brings up the Update Customer Information screen. Selecting <View RMS Info> brings up the
Update RMS Customer Information Setup screen. Selecting < Exit> brings up the Customer
User Interface/Billing Tree Main Menu screen.
CUI – UPDATE CUSTOMER INFORMATION SCREEN
CUI - Update Customer Information
Customer ID
number displayed
Customer Name
name displayed
Cust Colo Code
colo code displayed
Delete Customer
Y/N
Customer Contact Name
customer contact name goes here
Billing Street Address
billing street address goes here
Billing City Name
billing city name goes here
Billing Province, State, etc., if
applicable
billing province or state goes here
Billing Country Name
billing country name goes here
Billing Zip or Country Code
billing zip or country code goes here
Customer Contact Phone Number
Customer Contact Phone Number goes here
Customer Contact Fax Number
Customer Contact Fax Number goes here
Default Billing Minimum (Seconds)
Default Billing Increments (Seconds)
Billing Tree ID
ID number displayed
Save
Update
DBM in secs
DBI in secs
Billing Tree Root
Y/N displayed
Select
Customer
View
Site Info
View
RMS Info
Note: Fields that already contain information will have that information
displayed automatically. Otherwise, the fields will be blank.
Screen Function
The CUI Update Customer Information screen allows users to enter or modify data about the
chosen customer, or to delete the customer if necessary. The database fields that already contain
information will have that information displayed automatically. Bill tree information cannot be
changed on this screen.
Screen Activity
Create/Update Information
After confirming that the proper customer information is displayed, the user adds new
information or changes existing information. After entering the desired information, the user
must select <Save Update> to store the data in the database. All other choices transfer the user
to a different screen without saving the modified information.
Delete Customer
Deleting a customer does not remove customer information from the database. Instead, it
removes the customer from the list of active customers. When this occurs, the Company will no
longer accept customer traffic.
After confirming that the proper customer information is displayed, the user places a “Y” in the
Delete Customer field. The user must select <Save Update> to delete the customer. As above,
all other choices transfer the user to a different screen without deleting the customer.
Selecting <Select Customer> returns the user to Choose Customer screen. Selecting <View Site
Info> transfers the user to the Update Customer Site Specifications screen, while selecting
<View RMS Info> transfers the user to the Update RMS Customer Information screen.
CUI – UPDATE CUSTOMER SITE SPECIFICATIONS SCREEN
CUI - Update Customer Site Specifications
Customer ID
number displayed
Customer Name
name displayed
Cust Colo Code
colo code displayed
Site
ID
Site
Name
Billing
Minimum
(Seconds)
Billing
Increments
(Seconds)
1
New York
secs
secs
2
Los Angeles
secs
secs
3
Hong Kong
secs
secs
22
London
secs
secs
42
Frankfurt
secs
secs
43
Amsterdam
secs
secs
44
Miami
secs
secs
64
Tokyo
secs
secs
84
Singapore
secs
secs
104
Paris
secs
secs
184
IP Site Code
secs
secs
185
NGN
secs
secs
204
Unknown
secs
secs
Save
Update
Select
Customer
View
Cust Info
Note: Fields that already contain information will have that information
displayed automatically. Otherwise, the fields will be blank.
View
RMS Info
Screen Function
The CUI Update Customer Site Specifications screen allows users to enter or modify billing
minimum and billing increment data for specific Company ICOs for the chosen customer. The
database fields that already contain information will have that information displayed
automatically.
Screen Activity
After confirming that the proper customer information is displayed, the user adds new
information or changes existing information for the specific ICOs. All Company ICOs are
displayed whether or not they pass traffic for a customer. However, only those ICOs that pass
traffic will have data in the billing minimum and billing increment fields.
For new or updated information, users should type in the whole numbers, remembering that
information is specified in seconds. To remove an ICO, delete the information in the appropriate
ICO row.
After making changes, the user must select <Save Update> to store the data in the database. All
other choices transfer the user to a different screen without saving the modified information.
Selecting <Select Customer> returns the user to Choose Customer screen. Selecting <View Cust
Info> transfers the user to the Update Customer Information screen, while selecting <View RMS
Info> transfers the user to the Update RMS Customer Information screen.
CUI - CHOOSE RMS CUSTOMER SCREEN
CUI - Choose Rate Management System (RMS) Customer
Customer ID
number to be selected
Customer Name
number to be selected
Cust Colo Code
name to be selected
Enter
View
Cust Info
Exit
View
RMS Info
Note: Fields that already contain information will have that information
displayed automatically. Otherwise, the fields will be blank.
Screen Function
The CUI Choose RMS Customer screen allows users to choose the customer they want to work
on by working with drop-down menus.
Screen Activity
Users need at least one of the following pieces of information to begin – the Customer ID, the
Customer Name or the Customer Colo Code. Users click on a drop-down arrow and the
database retrieves all associated information. Users then select the desired name, ID or colo
code with the mouse. When the field is populated, the user selects <Enter>. This action fills the
remaining two fields with basic information.
After examining the information, users choose their next action. Selecting <View Cust Info>
brings up the Update Customer Information screen. Selecting <View RMS Info> brings up the
Update RMS Customer Information Setup screen. Selecting < Exit> brings up the Customer
User Interface/Billing Tree Main Menu screen.
CUI – UPDATE RMS CUSTOMER INFORMATION SCREEN
CUI - Update RMS Customer Information
Customer ID
number filled in
Customer Name
name filled in
Cust Colo Code
name to be selected
Customer in RMS
Y/N
Product
product to be selected
Customer Type
customer type to be selected
International Type
Y/N
Backdate Allowed
Y/N
Default Increase Interval (days)
in days
Default Decrease Interval (days)
in days
Save
Update
Select
RMS
Customer
View
Cust Info
View
Text Info
Note: Fields that already contain information will have that information
displayed automatically. Otherwise, the fields will be blank.
Screen Function
The CUI Update RMS Customer Information screen allows users to enter or modify RMS data
about the chosen customer. The database fields that already contain information will have that
information displayed automatically.
Screen Activity
After confirming that the proper RMS customer information is displayed, the user adds new
information or changes existing information. As much of the information can be modified by the
Sales organization, drop down arrows are available to ensure that the most up-to-date choices are
available. For default rate increase and decrease intervals, users should type in whole numbers,
remembering that information is specified in days. After entering the desired information, the
user must select <Save Update> to store the data in the database. All other choices transfer the
user to a different screen without saving the modified information.
Selecting <Select RMS Customer> returns the user to Choose RMS Customer screen. Selecting
<View Cust Info> transfers the user to the Update Customer Information screen, while selecting
<View Text Info> transfers the user to the Update RMS Rate Modification Text screen.
CUI – UPDATE CUSTOMER RATE MODIFICATION TEXT SCREEN
CUI - Update Customer Rate Modification Text
Customer ID
number filled in
Customer Name
name filled in
Cust Colo Code
name to be selected
Customer Text Field 1
customer text to be filled in
Customer Text Field 2
customer text to be filled in
Customer Text Field 3
customer text to be filled in
Customer Text Field 4
customer text to be filled in
Customer Text Field 5
customer text to be filled in
Customer Text Field 6
customer text to be filled in
Customer Text Field 7
customer text to be filled in
Customer Text Field 8
customer text to be filled in
Save
Update
Select
RMS
Customer
Note: Fields that already contain information will have that information
displayed automatically. Otherwise, the fields will be blank.
View
RMS Info
Screen Function
The Update Customer Rate Modification Text screen allows users to enter or modify the text that
is placed on rate modifications. In general, Customer Text Fields 1 and 2 contain default
information that is displayed on all Company rate modifications. The text fields that already
contain information will have that information displayed automatically
Screen Activity
After confirming that the proper RMS customer information is displayed, the user adds, modifies
or deletes the text in each text box as desired. After entering the text, the user must select <Save
Update> to store the data in the database. All other choices transfer the user to a different screen
without saving the modified information.
Selecting <Select RMS Customer> returns the user to Choose RMS Customer screen. Selecting
<View RMS Info> transfers the user to the Update RMS Customer Information screen.
BILLING TREE – MAIN MENU SCREEN
Billing Tree - Main Menu
Please select one activity by clicking on the appropriate box:
Create/Update New Billing Tree
Delete Existing Billing Tree
Exit
Screen Function
The Billing Tree Main Menu screen allows users to directly access the part of the Billing Tree
application they want to work in.
Screen Activity
By clicking on the desired application button, users are brought to the appropriate section of the
Billing Tree application.
Selecting < Exit> brings up the Customer User Interface/Billing Tree Main Menu screen.
BILLING TREE – ADD NEW BILLING TREE SCREEN
Billing Tree - Choose Customer/Vendor Billing Tree
Cust / Vendor ID
number to be selected
Cust / Vendor Name
name to be selected
Billing Tree ID
billing tree to be selected
Cust / Vendor Colo Code
Update
Billing
Tree Info
colo code displayed
Enter
Exit
Note: Fields that already contain information will have that information
displayed automatically. Otherwise, the fields will be blank.
Screen Function
The Billing Tree Choose Customer-Vendor/Billing Tree screen allows users to create a new
billing tree or to choose the billing tree they want to work on by working with drop-down menus.
Screen Activity
To create a billing tree with no customers, users just select <Enter>. This transfers the users to a
blank Billing Tree - Update Customer/Vendor Billing Tree Information screen
To add a billing tree for an existing customer, or to update existing billing tree information, users
need at least one of the following pieces of information to begin – the Customer or Vendor ID,
the Customer or Vendor Name, the Billing Tree ID or the Customer or Vendor Colo Code.
Users click on a drop-down arrow and the database retrieves all associated information. Users
then select the desired customer or vendor ID, customer or vendor name, billing tree ID or
customer or vendor colo code with the mouse. When the field is populated, the user selects
<Enter>. This action fills the remaining fields with basic information if it exists.
After examining the information, users choose their next action. Selecting <Update Billing Tree
Info> brings up the Update Customer/Vendor Billing Tree Information screen. Selecting < Exit>
brings up the Billing Tree Main Menu screen.